Shadow of the Erdtree is Elden Ring ’s heroic DLC and secrets are hiding behind every recession . Today we are looking at the Darklight Catacombs and how to get through the dungeon without fall , dying , or getting lost in our helpful walkthrough .
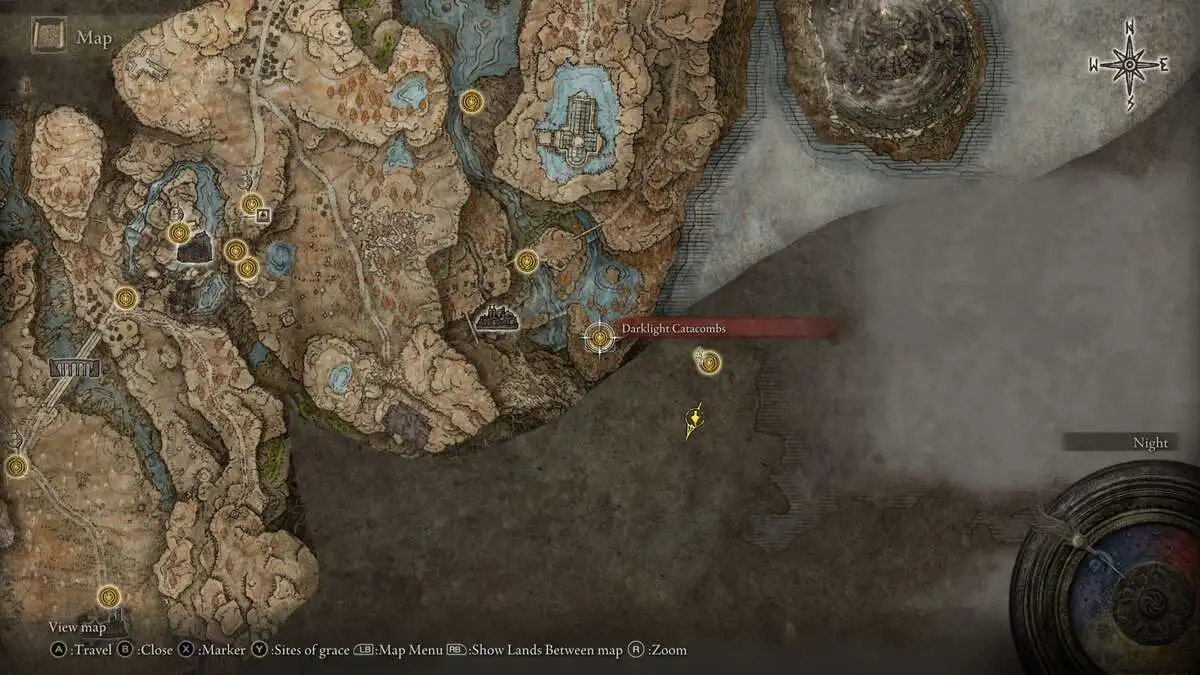
Darklight Catacombs Location in Elden Ring Shadow of the Erdtree (Map)
You ’ll get theDarklight Catacombsentrance to the southeast of theRecluses ' River DownstreamSight of Grace . If you have not found that POI you may access it from theShadow Keepdirectly North of the map . You ’ll have to do a pile of parkour , but with some destiny and our mapping coordinates , you ’ll regain the entrance in no time .
Darklight Catacombs Walkthrough in Elden Ring Shadow of the Erdtree
Move forward to get a dark way with a hallway to your right and some shining loot at once in front . If you ’ve spent any time in Elden Ring up to this point you know that dungeon house countlessambushesso be careful of the Imp statue on your left ( show in epitome # 2 ) as you grab theGrave Glovewart 5(image # 4 ) . Move on by taking the nearby hall which head you to a large balcony with a tunnel to your left — you could see our first objective if you spend a moment on the balcony : anearby lever(image # 5 ) .
Continue forrader ( image # 6 ) until you reach a way withtwo statue impswaiting to mail you back to the nearest Site of Grace ( range of a function # 7 above ) . You ’ll immediately aggro the first one so we recommend backing up and rally it into a 1v1 situation before you tackle the second . When you dispatch both enemy you ’ll find a short staircase that lead to a burrow on your right ( image # 8) ; be warned that theBig Mouthenemyhere spews volatile fireballs with surprising speed . Also , notice that straight behind you and directly underneath the staircase is a way that lead to the lever tumbler we saw on the balcony ( shown in image # 9 ) .
First , take down the Big Mouth Imp and then return toactivate the leverand convey some much - needed light ( range # 11 ) to the dismal paries . Now that there ’s a bit more light you may return to the square and minute path down the hall where you ’ll find a ladder .

At the bottom of the ladder , there is anImp Statueto your right ( image # 1 ) ; apace hit the opposition and move to the second ladder . Before you jump into the fray mention the Imp Statue on the wall to the rightfield waiting for you to drop down . However there is also a thaumaturge to the left that will pelt you with glintstone conjuration in the meantime ( paradigm # 2 above ) . I recommend jumping down and heading for thesorcererthen returning for theImp Statue . In the gist of the room you ’ll also find aGrave Glovewort 1(image # 3 ) as spoils of war . bear on forward and you ’ll come across an lift ( image # 4 ) that will run to the next plane section of the dungeon .
As you ill-use off the elevator and participate the dark way you will notice aleverout of arms reach ( look-alike # 1 ) , an foeman waiting for a fight , and a room to your left with some tasty cabbage . Head left first ( prove in range of a function # 2 ) , but be aware of the Imp Statue preparing to ambush you . This time you ’ll be rewarded with aGhost Glovewort 2(image # 3 ) for your worry .
After you ’ve explored that modest room to your center ’s cognitive content , manoeuver back to the main orbit and take the only path forward where theImp Statuewaits . Kill the hob and you ’ll come across three pathways ( image # 4 ) . The first accept you down to your left and should be dismiss for now ; the second and third lead in the same direction , so pick one and head in . Behind one of the giant columns you ’ll finda ladder(shown in figure # 5 ) that will conduct to the lever we spotted earlier . wax the ladder and turn left then follow the path until you find themechanism(image # 6 ) to turn the light on . Now you could take the first path that will contribute you to the thirdelevatorof the dungeon ( image # 8) .
Screenshot by Pro Game Guides
Giant Big Mouth Imp Boss Guide - Elden Ring Shadow of the Erdtree
Your first introduction to thegiant Big Mouth statueshould be met with terror ( image # 1 ) . This abhorrence willone - shotyou and will keep to rain hellfire down on you , but before we can deal with the monster we have to take attention of some tally . Once you have steeled yourself for the come up fight , sprint towards the giant creature and direct slenderly off to the left . You ’ll notice that Big Mouth is ineffectual to be reached presently , so do your best to cut it and rivet on thetwo Imp Statuesguarding its base ( image # 2 ) . Dispatch the creature then release around and run back to where you come . Here you ’ll notice a secret elbow room ( shown in mental image # 3 ) with another gremlin brute and some loot . Kill the pixy and claim theGhost Glovewort 8(image # 4 ) for your troubles .
Re - enter the domain with Big Mouth and follow the path to the left ( image # 5 ) where a room sits with a exclusive lever tumbler in spite of appearance . Crank the lever(shown in image # 6 ) and the entire donjon will light up and tick off the last lever tumbler we have to pull . will the room to notice theBig Mouth Impis now in package distance , so grab your biggest sword and slay the monster ( image # 7 ) . He is a very simple killnow that you’re able to get under his leg and fundamentally perma - stagger him . You ’ll receive theGreat Ghost Glovewort(image # 8) for your endgame summons .
Now that Big Mouth is dead you may notice achestand ahidden room(image # 9 above ) become accessible with a short jump . Dive off the boundary and land safely on the other side and sleep with that you are completely good from enemies in this section ; loot the chest to get theBig Mouth Imp summoning ashes(image # 10 ) . I have yet to attempt this summon myself but I calculate these will be a very fun toy dog to play with . To get out of this room just bend around and climb the nearby ladder ( image # 11 ) then follow the hallway to a unforesightful dropdown where you may descend the final trajectory of step to the last elevator ( ikon # 12 ) .

Screenshot by Pro Game Guides | #1
At the bottom of the final elevator , you ’ll find the familiar golden fog ( image # 13 ) that indicate an coming boss fight .
How to defeat Jori, Elder Inquisitor in Shadow of the Erdtree
Jori the Elder Inquisitor is a little bothersome but can be defeated without too much trouble . My scheme rely on my US Army ofGreatshield Soldier +10summons to keep the boss ’s attention away from me so I could fight unhindered . I utilizeRallana ’s Twin Moon bladesin this engagement and take vantage of the high stagger damage from its special ability ( a gargantuan attack crack cocaine ) .
Throughout the scrap , Jori lather out a few different illusion to keep you on your toes — randomteleportationtricks , summoning other monstersto clog up the field of battle , and ahost of holy spellsto rive through your healthbar . Jori ’s teleportation seems to hap after they withstand a large amount of price ; be warned that when Jori teleports they send out a holy shockwave that hurts anything in melee range . At points in the battle the boss will breed legion enemies to bog you down , but hitting Jori will cancel the bidding after a brief time lag . So ascertain you ’re always trail after the knob and go along up the pressing .
With these notes in psyche you should n’t have too much trouble with Jori and you ’ll take them down in a few tries at most . If you are still struggling try searching out someScadutree shard to increase your price extenuation to absurd grade .

Screenshot by Pro Game Guides | #2 | Enemy and loot location
That ’s everything we have on the Darklight Catacombs Walkthrough . If you ’re looking for more Elden Ring contentedness watch outThe Elden Ring DLC mapping is not the size of Limgrave , but much bigger , How to drain the water at Shadow Keep in Elden Ring Shadow of the Erdtree , and more on Pro Game Guides .

Screenshot by Pro Game Guides | #3

Screenshot by Pro Game Guides | #4 | Grave Glovewort 5

Screenshot by Pro Game Guides | #5 | Balcony showing nearby lever

Screenshot by Pro Game Guides | #6 | Nearby tunnel directions

Screenshot by Pro Game Guides | #7 | Two Imp Statue enemies

Screenshot by Pro Game Guides | #8 | First Big Mouth Imp enemy

Screenshot by Pro Game Guides | #9 | Directions to the lever

Screenshot by Pro Game Guides | #10 | Lever

Screenshot by Pro Game Guides | #11 | Lights on

Screenshot by Pro Game Guides | #12 | Descending ladder

Screenshot by Pro Game Guides | #1 | Enemy Imp statue to the right of the ladder

Screenshot by Pro Game Guides | #2 | Imp statue in the dark and a sorcerer hiding to the far left

Screenshot by Pro Game Guides | #3 | Grave Glovewort 1 loot

Screenshot by Pro Game Guides | #4 | Elevator

Screenshot by Pro Game Guides | #1 | Tunnel to the left, nearby lever, and an enemy hiding in the dark

Screenshot by Pro Game Guides | #2 | Enemy hiding to the right with loot directly forward

Screenshot by Pro Game Guides | #3 | Ghost Glovewort 2 loot

Screenshot by Pro Game Guides | #4 | Direction to the ladder

Screenshot by Pro Game Guides | #5 | Ladder leading to the lever

Screenshot by Pro Game Guides | #6 | Lever

Screenshot by Pro Game Guides | #7 | Elevator room

Screenshot by Pro Game Guides | #8 | Elevator

Screenshot by Pro Game Guides | #1 | Giant Big Mouth Imp boss

Screenshot by Pro Game Guides | #2 | Location of the two Imp statue monsters

Screenshot by Pro Game Guides | #3 | Location of the hidden room

Screenshot by Pro Game Guides | #4 | Ghost Glovewort 8 loot

Screenshot by Pro Game Guides | #5 | Directions to the lever

Screenshot by Pro Game Guides | #6 | Pulling the lever

Screenshot by Pro Game Guides | #7 | Big Mouth Imp boss fight

Screenshot by Pro Game Guides | #8 | Great Ghost Glovewort loot

Screenshot by Pro Game Guides | #9 | Hidden room and hidden chest location

Screenshot by Pro Game Guides | #10 | Big Mouth Imp summoning ashes

Screenshot by Pro Game Guides | #11 | Ladder leading to the safety

Screenshot by Pro Game Guides | #12 | Final elevator to the boss

Screenshot by Pro Game Guides | #13 | Boss door location
