" atomic number 79 and ash grey on my mind . Mischief in my soul . I wanna live like a fertile man live with life in my control . " - Ben Haramad
Crow Country , a survival horror biz from SFB Games , released to glowing exploiter reviews . It ’s inspired sometime Resident Evil style survival of the fittest gameplay is enjoyable , but its interminable locked doors , keypad , puzzles and mysteries means you ’ll want a walkthrough to assist you through .
Crow Country Walkthrough - Crow Country Hub Area I
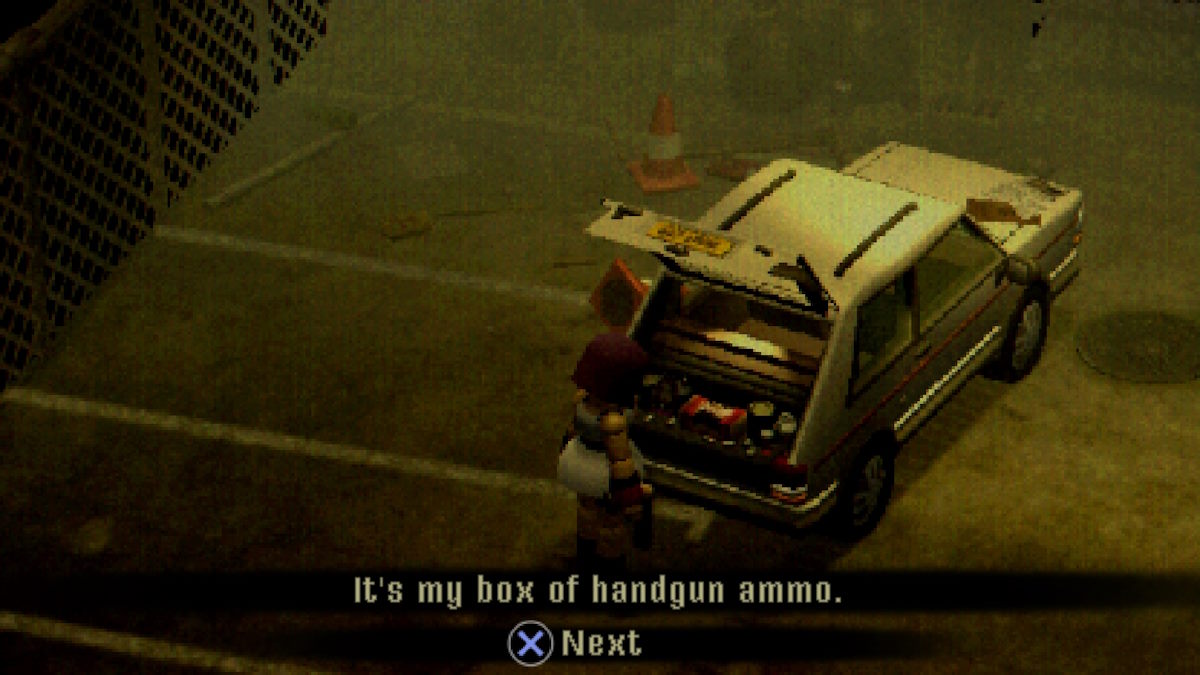
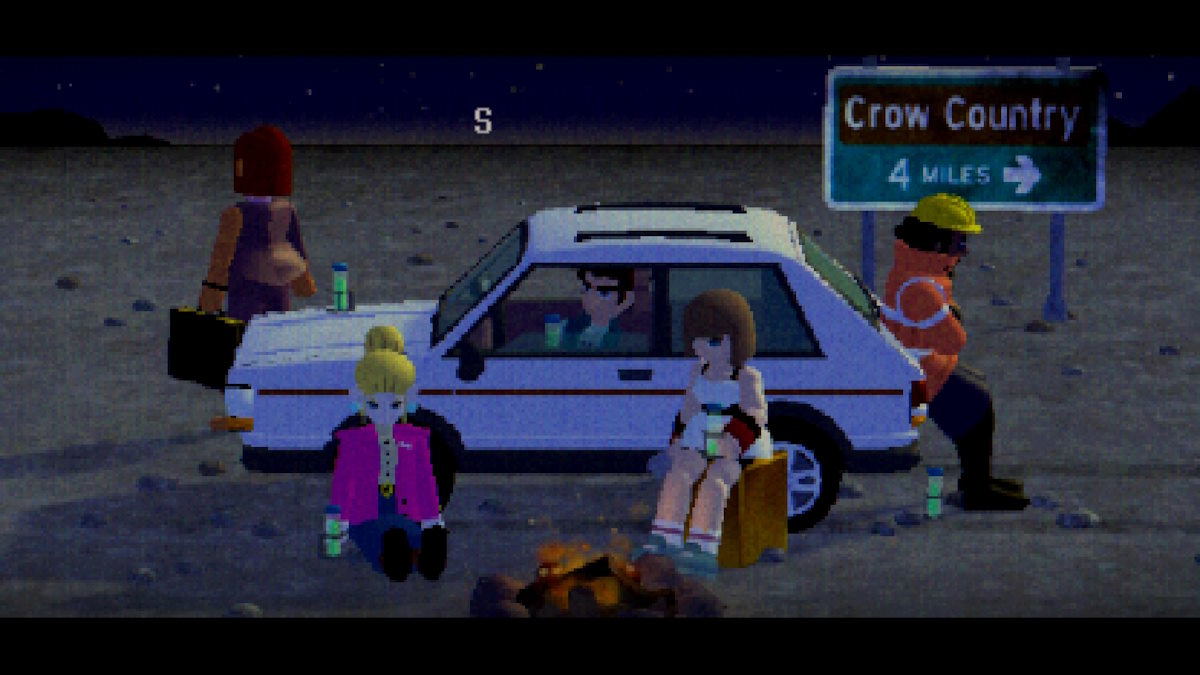
You pop the game in a dingy parking lot with only your machine and some bank bill rotate out over the bonnet . The first major point in the parking draw is that you’re able to interact with the trunk of your car , which will unveil some ammunition . This will only ever give you eight round , but it will do so immeasurably .
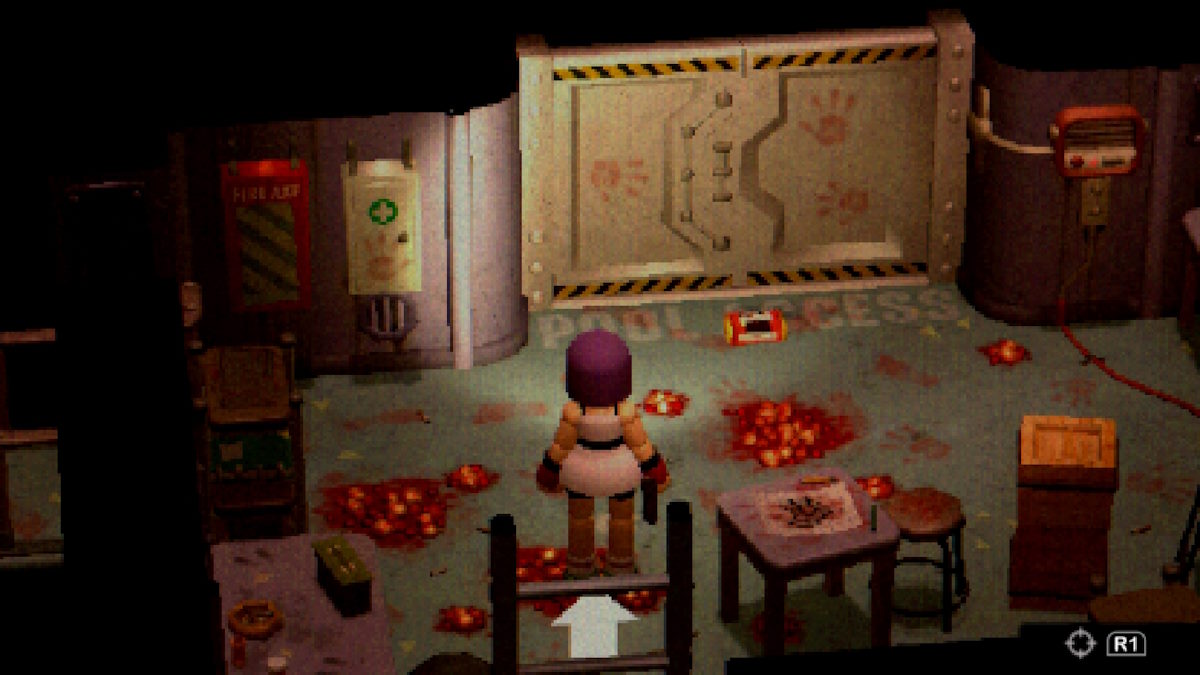
When you go through the main gate ( making sure you pick up the flashlight on the agency ) , you ’ll be in what I will refer to mostly as the ' Hub ' expanse , as it is the place you will get at all three of the main domain in the game . The bathroom is on your left as you enter the hub , and within there is some particular , a blocked door , and an minacious pile of finger cymbals that we ’ll have to come back to later .
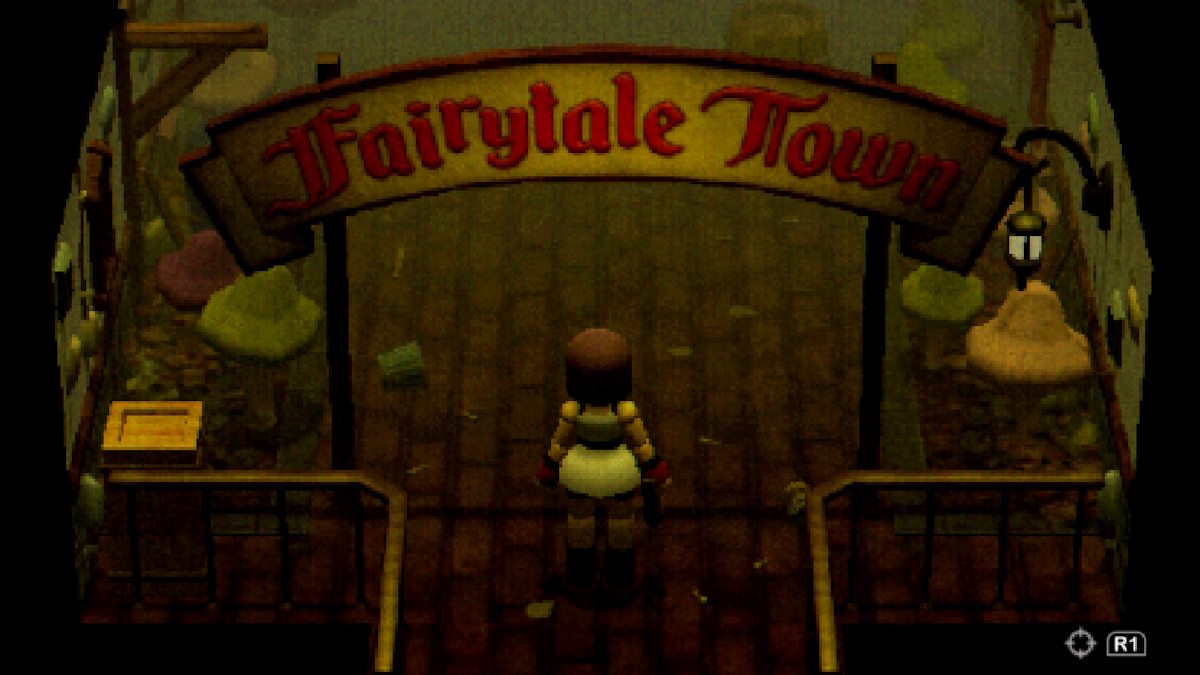
Have a sound look around to collect any items and government note , and then go straight before at the rather large crow , and go into your first principal area … Fairytale Town .
Fairytale Town Walkthrough
Lovely smudge for those that like mushrooms ( which I really do n’t ) , Fairytale Town is our first gradation in the journey of notice Mr. Crow .
One of the first things we ask to do ( which you ’ll have it away if you ’ve been reading the note ) is observe thebronze paint ; which one government note mentions is in thefairy pool . You ’ll find the entrance to said pond here , but we ’ll need a keycode .
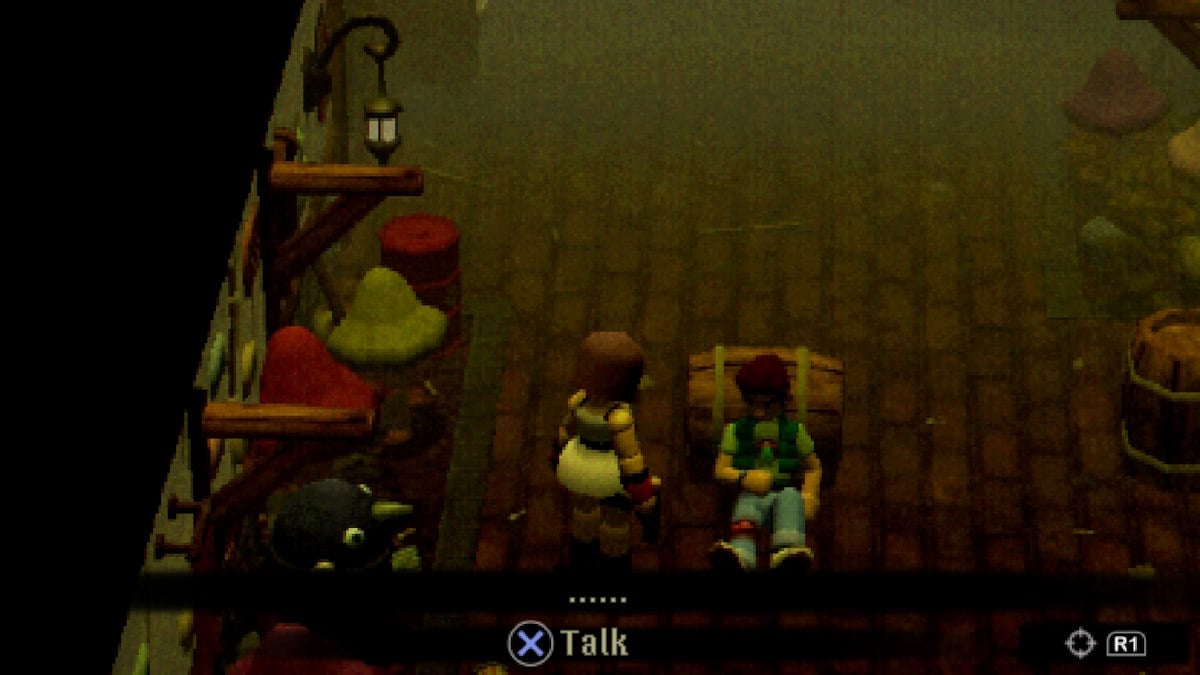
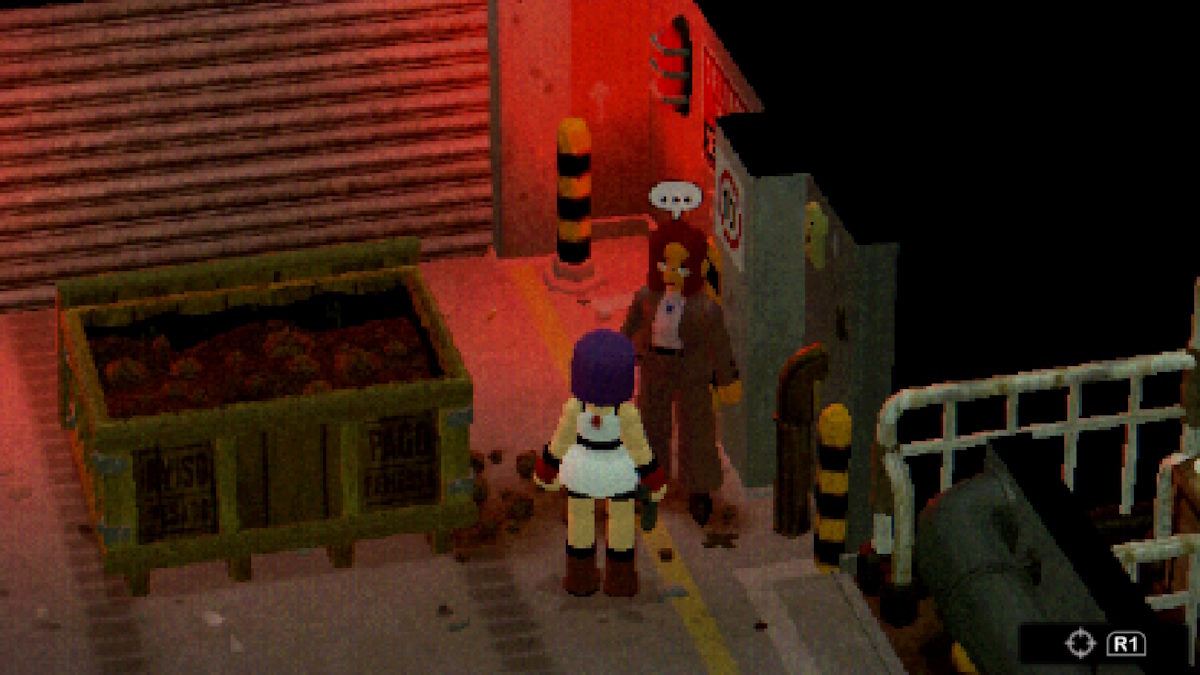
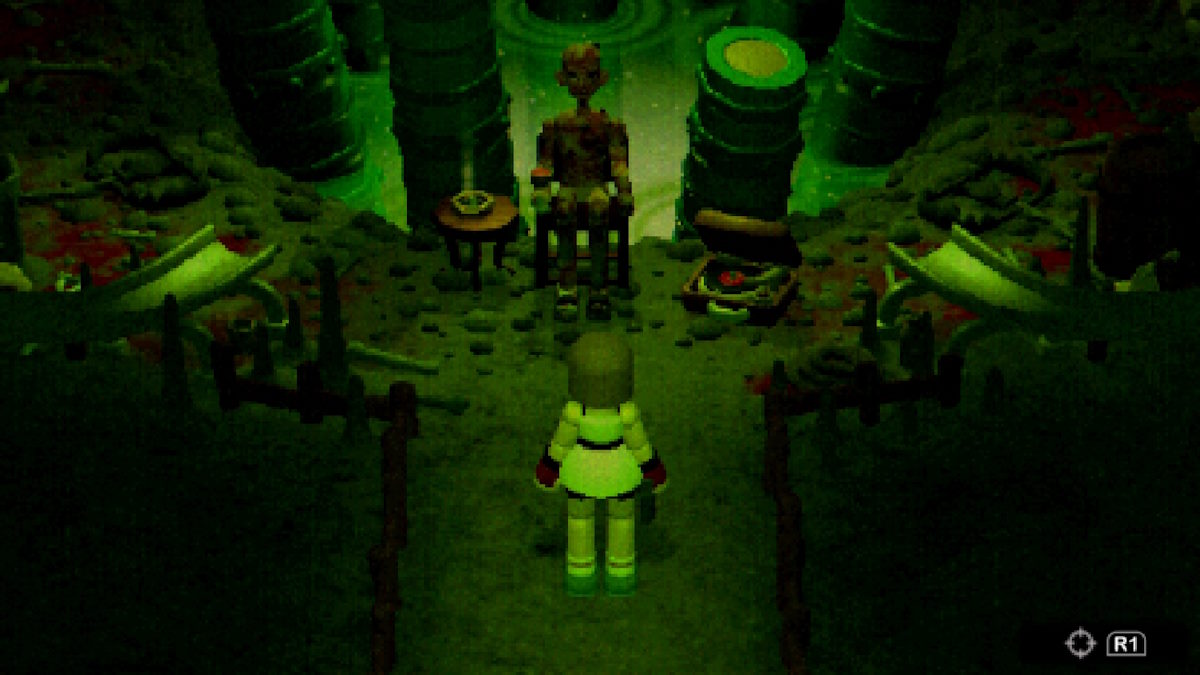
Keep moving forward until you encounter aman on the reason , who is wound . Talk to him as many metre as you ’re able-bodied or until you ’re prompted to proffer him a healing point ( I ’d paint a picture using a steady med kit here ; there ’s no point wasting one of the braggy ones you may have found ) .
Screenshot by ProGameGuides
Talk to him again , and you ’ll then be able to devolve him to the car , where he will remain for now . ( Go back to your car and blab out to him for anachievementand some duologue - return at steady intervals and the two will have more to discuss . )
Once you ’re back at Fairytale Town , he ’ll be work and in his place will be ascrap of paperwith the code to the fairy pond . Just ahead of where the NPC was , there is a room access head straight on , and a door guide to the left .
Head through the door on the unexpended first , but take tutelage , as it will be your first prescribed combat encounter ( if playing on the endurance repulsion difficultness ) , but also your firstsafe room . Head through the door , and complete the two enemy obturate your way .
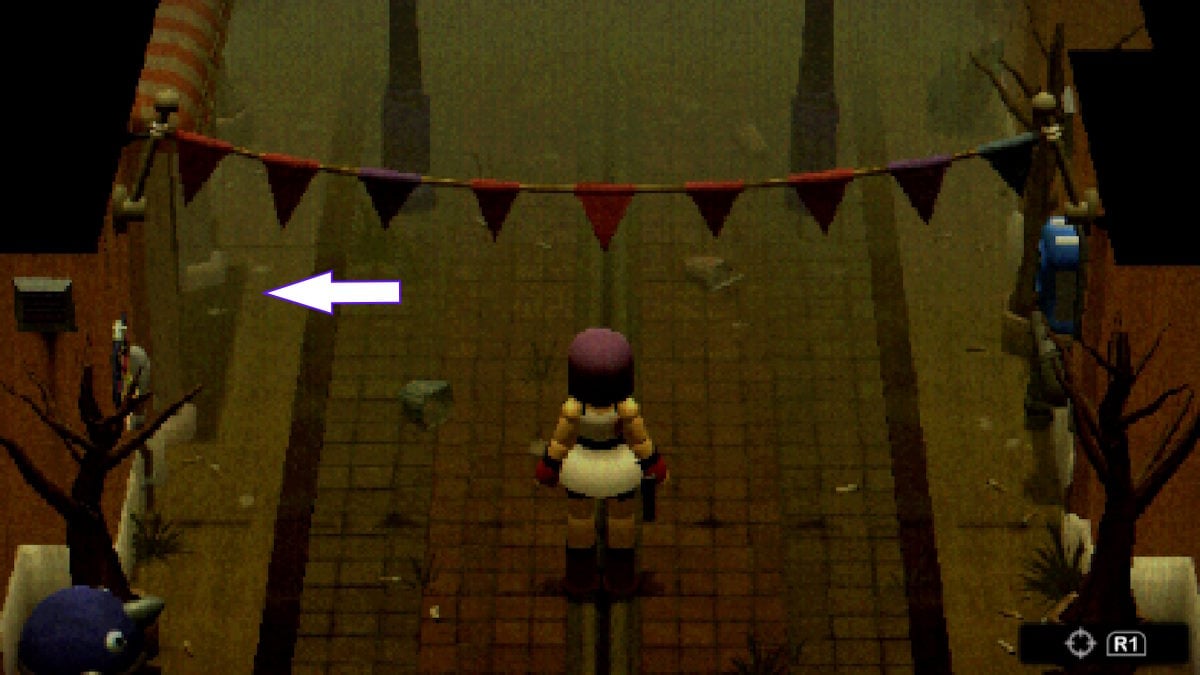
Image by ProGameGuides
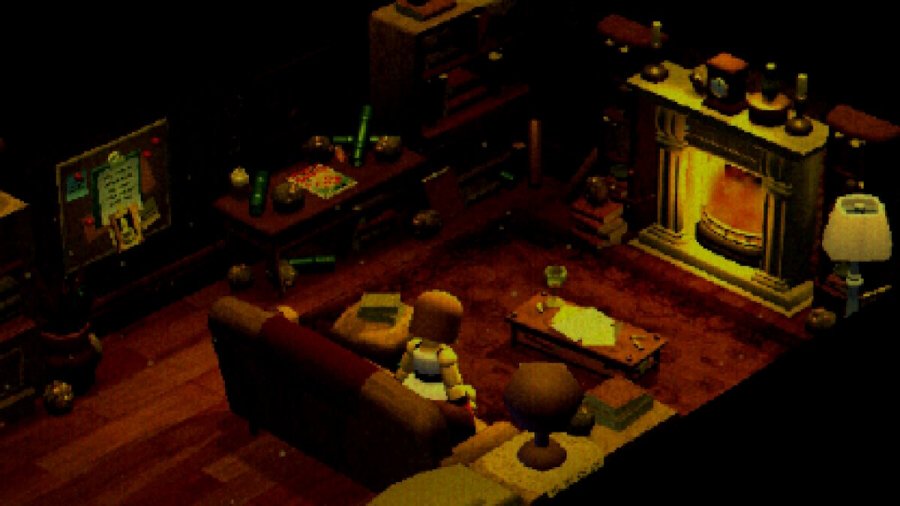
When in the safe room , there are lots of thing you may interact with . The major ones you absolutely should n’t miss , however , are on the odd and back rampart . One is some information on how to actually get into the Fairy Pond , and the other is an item of dead incredible importance , your first function . check that to interact with the fireplace too , as this is what allow you tosave the game .
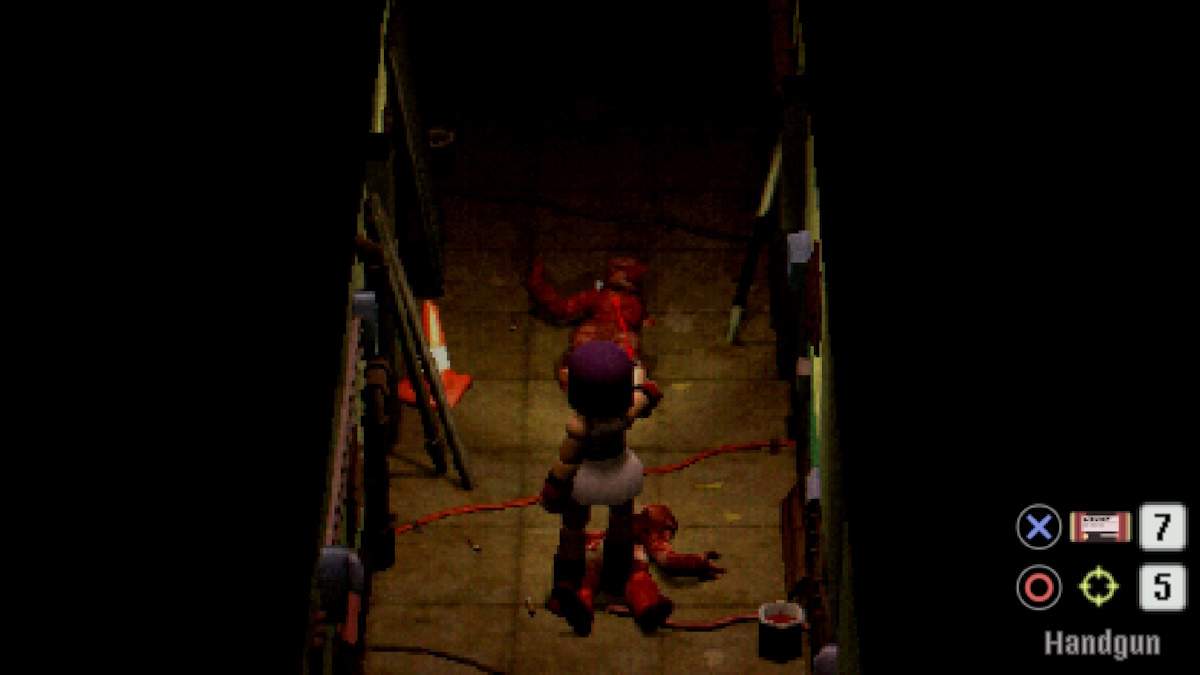
Once you ’re done investigate drumhead back out , but be careful , as somespiders will jump out at you on your fashion out . Do n’t waste too much ammunition on them and invalidate them if possible , as there will now be opposition roll around Fairytale Land . ensure you ’re deliberate with your ammo . call up to utilize bear trap , exploding barrels , wall trap , and get close to the foe ( and direct for the head ) to do as much harm as potential whilst drop as few round as potential .
Next , we ’ll steer back to the ' tree gentlewoman ' we happen on the way to the safe way and enter3184on the computer keyboard . She ’ll then turn over around , so interact with her , and say the following words as we read in the note .
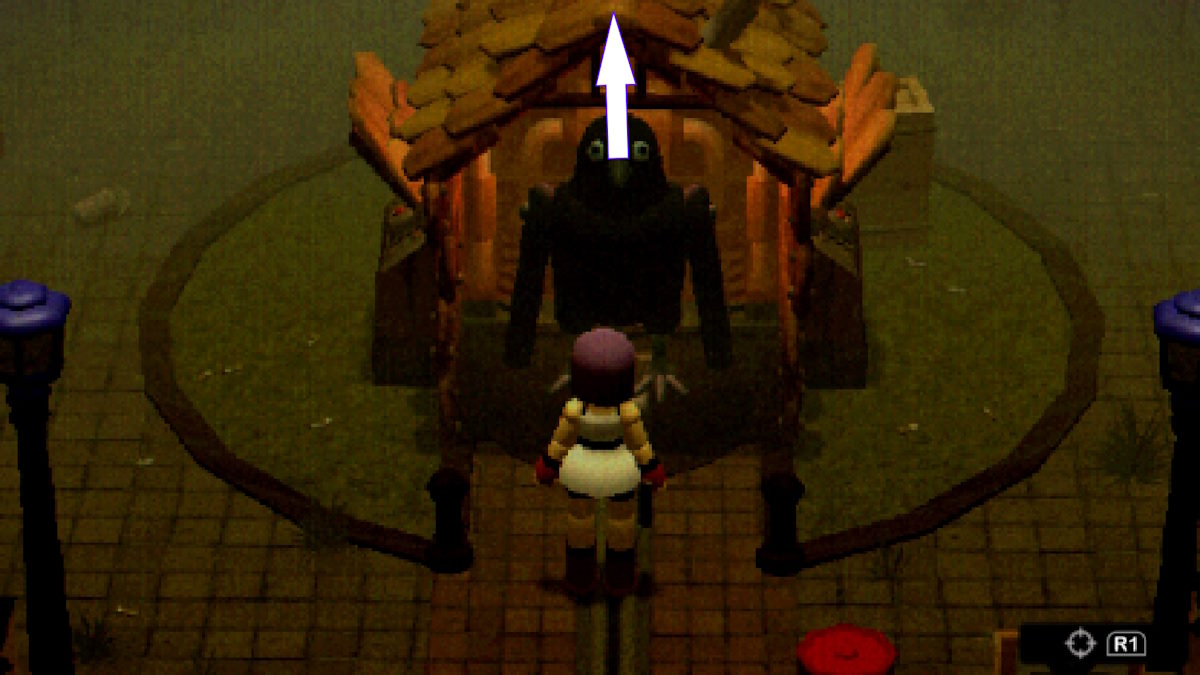
Image by ProGameGuides
" Hear me , oh neat Fairy of Fairest Forest ! "
Once inputted aright ( using up and down to choose the phrasal idiom and left and correct to change the part of the conviction ) , she ’ll do a nice twirl , and gladly get out of the way for you .
Fairy Forest and Valve Puzzle Walkthrough
Right as we take the air into theFairy Forest , you could see another room straight off ahead , which contains a arm upgrade cover in a wall on the back right wall . We wo n’t get this weapon until much later , but it ’s worth grabbing early .
The result to this puzzle isbalancing the press in the filter pump using the valve . And if we mess it up , the release will start up ( and an early distinction mentioned that this might not be good for our health ) . Thankfully , there ’s anantidotein the nook to the left of the vent override which you could utilise if you mess up . Be careful , though ; once you start fiddling with the pressure sensation valve , it will start to barf out steam , which will harm you , so ensure to walk cautiously around it .
Thankfully , this is a nice and loose puzzler , so simply turn your camera so you could see the atmospheric pressure calibre on the heart whilst being able to interact with the valve . Keep plough it until it ’s more or less over the white section , and then carefully move to the pump , wait until it ’s in the Patrick White if it is n’t already , and interact with the heart . If you mess up up , run to the venthole override and interact with it ; and apply the antidote as you ’ll be poisoned .
Screenshot by ProGameGuides
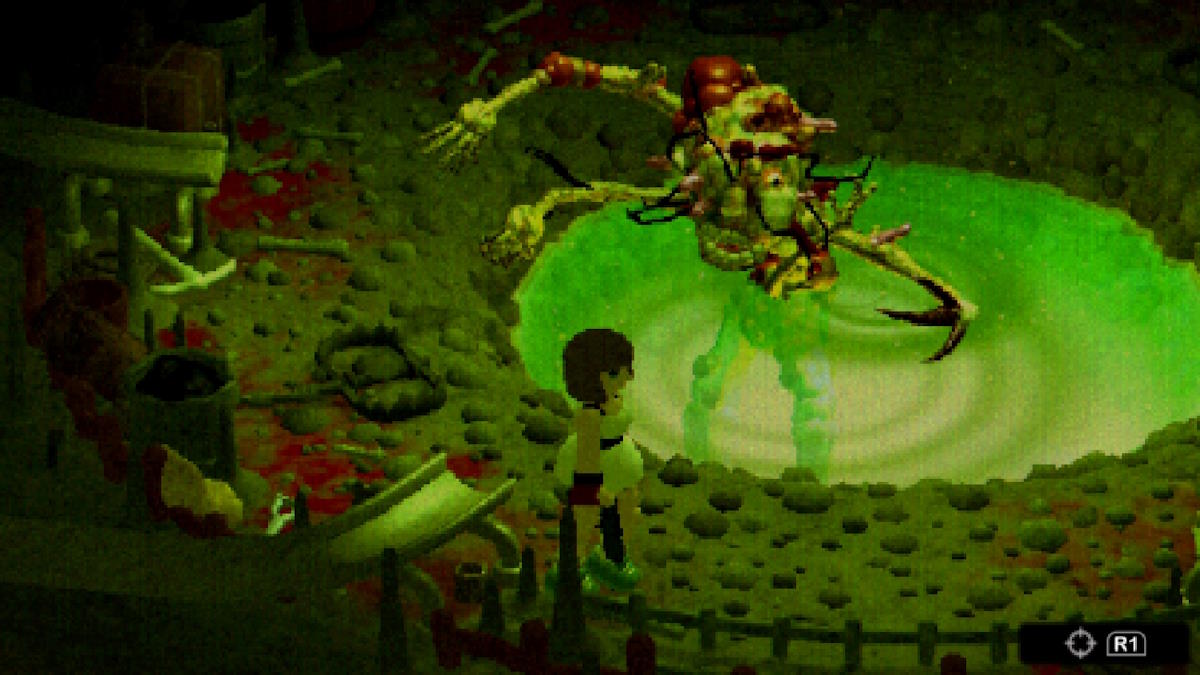
Turn back to the pool and you ’ll see a objective in the pee . fool the target , and the nance will return holding the bronze key .
Crow Country Hub Area II Walkthrough
Heading back to the hub area , be measured as you enter , as there is a new foe type on the left as you put down . Lead it over to the explode barrel and fool it for some additional initial damage before finishing it off with your shooting iron . Once it ’s dealt with , head back over to the training way you passed earlier and unlock it with the bronze Francis Scott Key ; inside is another good elbow room with some more interactions .
lead back to the fowl and , this time , head right , using the bronze key to unlock the next main surface area … Haunted Hilltop .
Haunted Hilltop Walkthrough
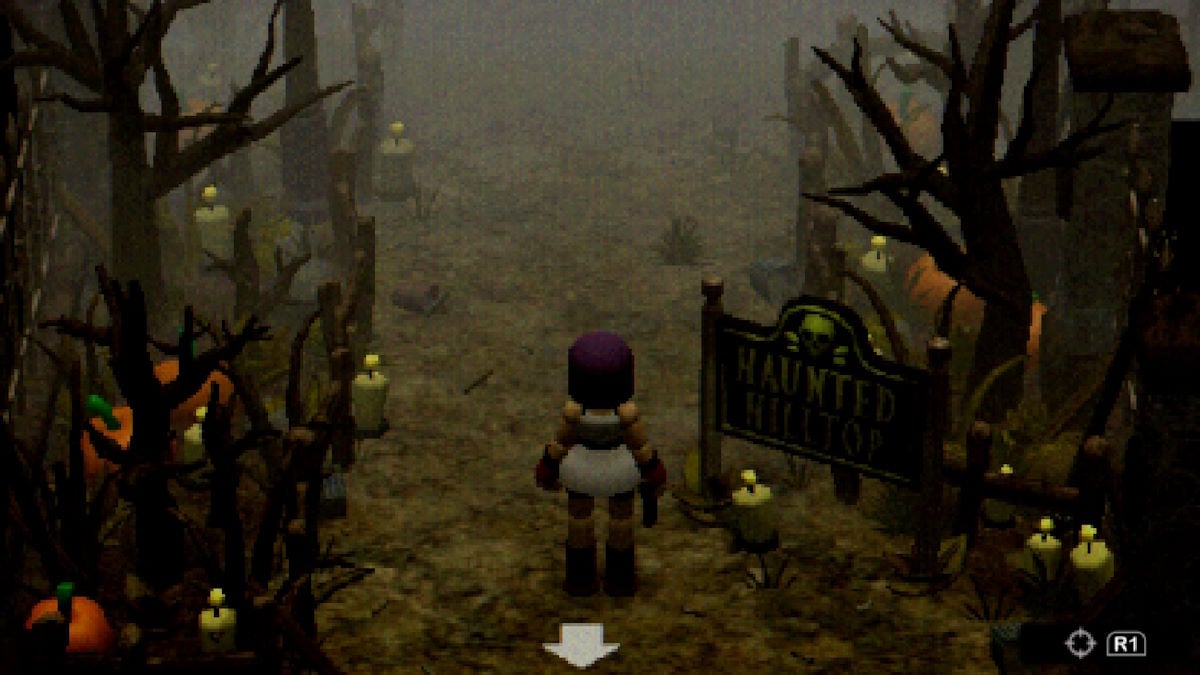
Our next locale should be a nice one , as now we ’re in the clearly label ' HAUNTED HILLTOP ' ( complete with a little skull and os and everything ) .
As you participate Haunted Hilltop , there ’s a few potential topographic point to go . ensure to grab thesecond mapfirst , and head to the right to speak to another NPC , this one banging on a metal threshold .
First , head toThe Cryptwhich is direct ahead , and then a right from where you follow in . Another admonisher tomake certain you ’ve savedbefore recruit , as you ’ll be lock in The Crypt until you work a puzzle .
Screenshot by ProGameGuides
Crypt Puzzle Walkthrough
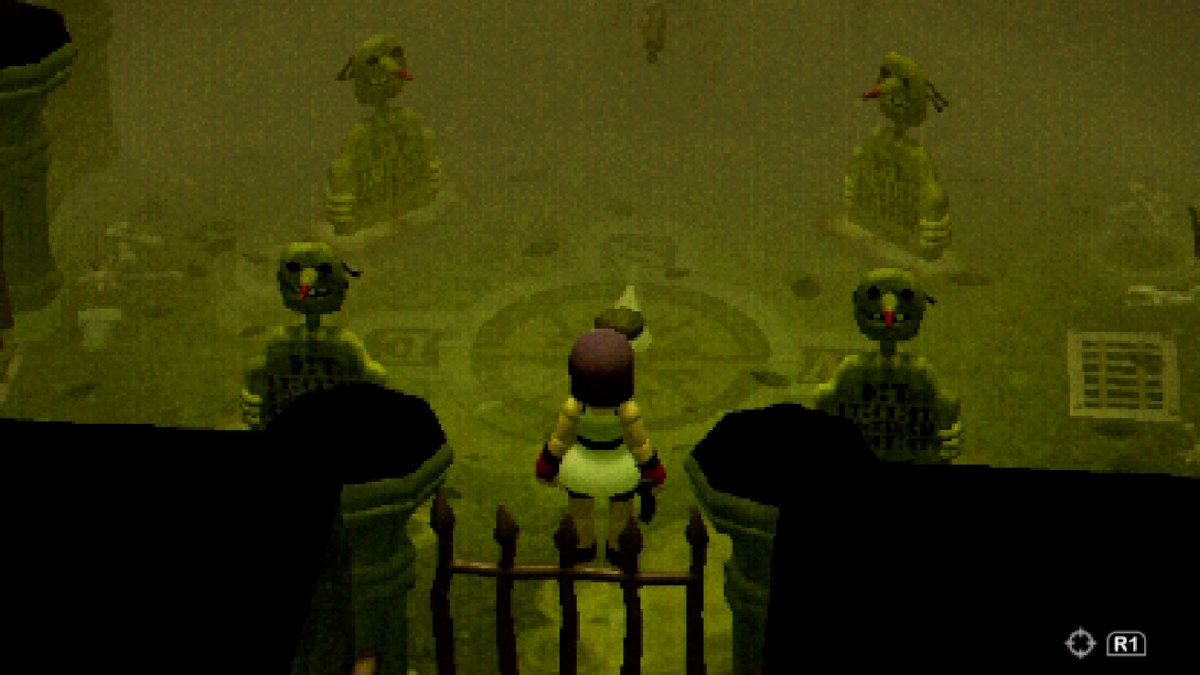
Upon enter you ’ll be met with a ticking clock , a scattergun , and four gravestones .
The solution to this mystifier is check the first letters of whatever figure the gravestones might have , and then turn the head to the corresponding grasp direction consequently , using the compass on the floor as a usher .
Once you ’re done with the teaser , a monster will explode from a out of sight compartment to the right of the logic gate on the back wall of the room . Lead it aside from the wall , and there ’ll be some ammunition hidden on the right field of the secret compartment if you run away out .
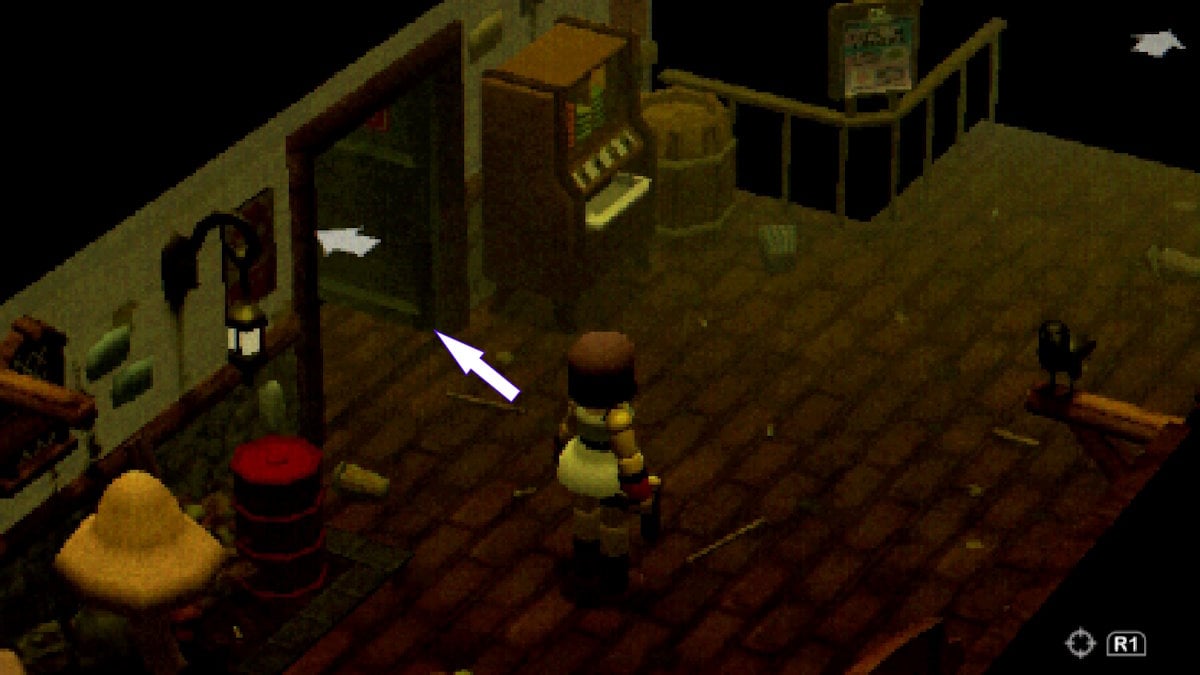
Image by ProGameGuides
Once it ’s dealt with , reelect to the bulwark compartment and interact with thehandleto unfold the gate to the safe elbow room , and anew area . Before you leave , ensure to carefully check the wall of the Cryptas there is an item ( gasoline ) that you ’ll need later .
Crypt Saferoom and South Utility Corridor Walkthrough
Upon opening the gate and heading up the stairs , you ’ll be cope with with another save point , so be sure to use it . Heading straight on from the flak will lead you to The Cell , an lift , a secure , and the vault door the NPC is digest on the other side of . Check out the room access at 1A first to garner some handgun ammo and petrol .
maneuver directly on and interact with the latch on the right of the large metal NPC door to open up it and countenance her interior . This will grant you to converse with her , to which you should do so until her dialogue is exhausted . take over you help her , she ’ll observe she ’s channelise into the cubicle .
Before following her , interact with thesafe . There ’s a book of account to the right wing of it which will give you a hint , but otherwise , the safe codification is 1872.This will give you thehand crank , another important particular we require for after along with the gasoline .
Screenshot by ProGameGuides
EnterThe Celland speak with Julie again , exhausting her duologue . She ’ll give you a hint on where to go next , but first , interact with the hidden trading floor panel to launch the cell door for a large med kit . There is also some more handgun ammo hidden behind Julie .
Leave through the door you open for Julie and head forThe Haunted Mansion .
Haunted Mansion Walkthrough
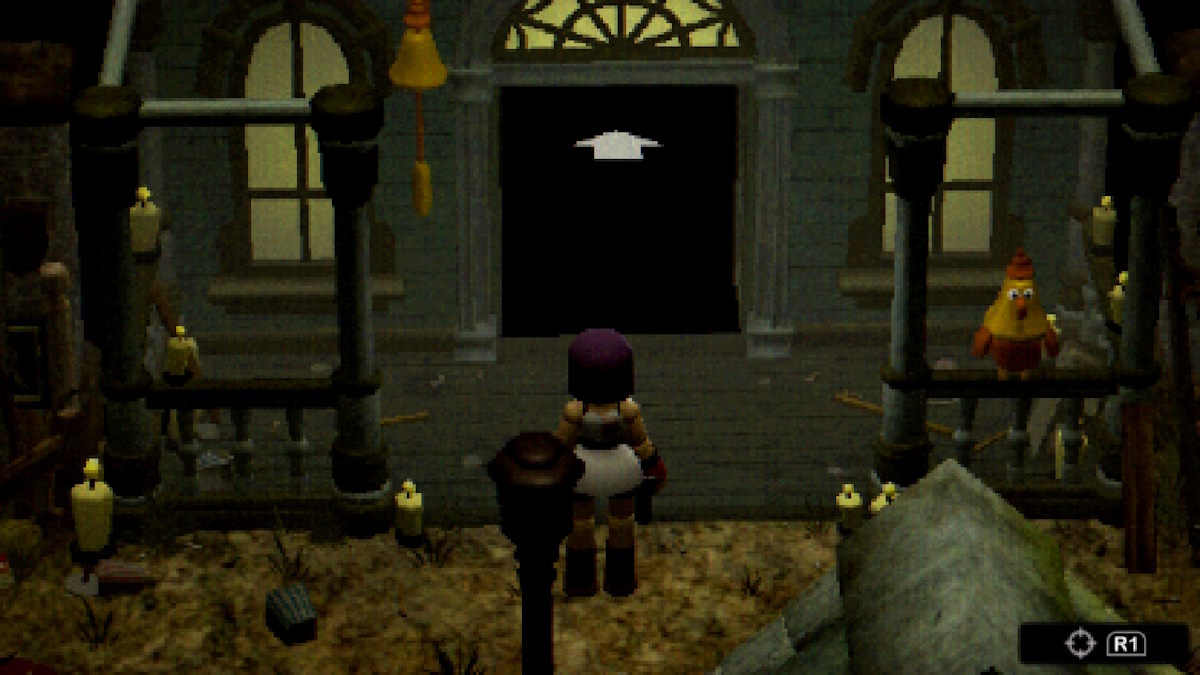
Once again , there is more enemies in the area now , so be careful heading out . The Haunted Mansion is like a shot opposite where you enter into The Crypt , so point back that way . You ’ll be met with an owl and a locked door , interact with the owl will prompt it to hoot five sentence , so you plainly demand to ring the Melville Bell to the left of the door five multiplication , and then prefer the ' leave ' selection .
Upon enroll , you ’ll get wind a telephone ringing . top dog towards the top left to retrieve it and pick up , exhausting the dialogue . In the Mansion there is aPiano , Bookshelves , and Clocksand a luck teller machine in the elbow room .
Be careful interact with the bookshelves , as the name of the book will correspond to an gist if you interact with the rule book again .
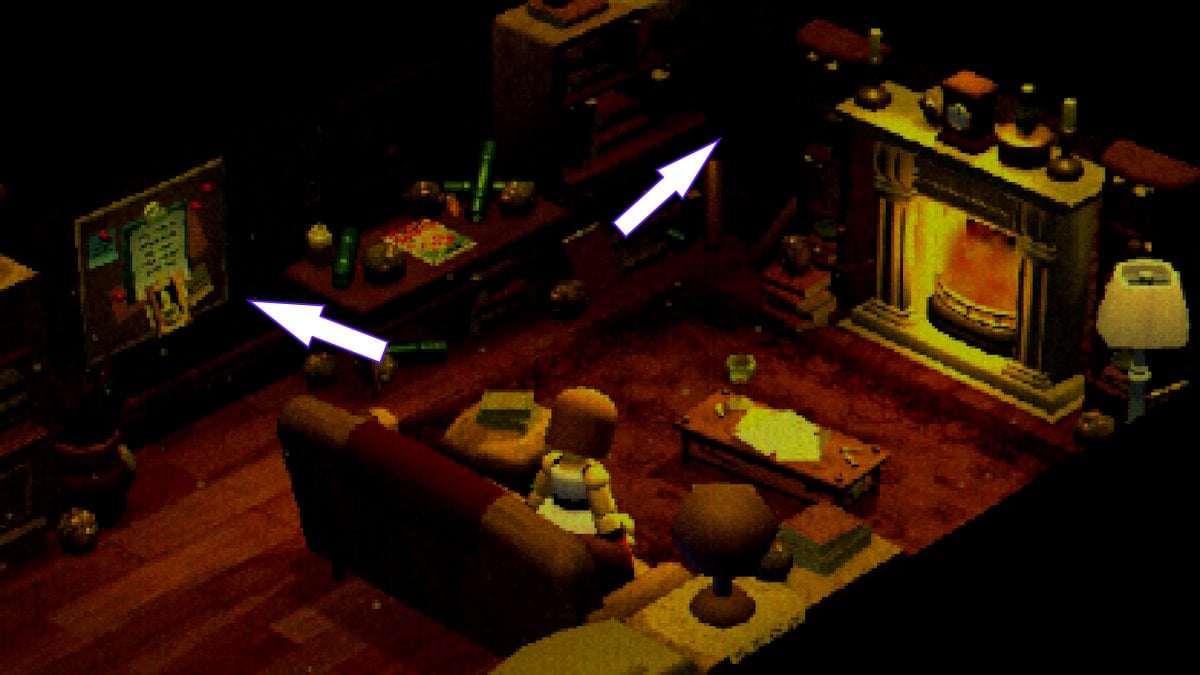
Image by ProGameGuides
Inconsequential will do nothing , Histories Deadliest Poisons will poison you , A fleet End will instantly kill you , and Pull The Pin will grant you a grenade item . The book on the shelves appear to be random each clip , so there may be some not cite here . Head over to the filaree , and interact with the demon painting in - between them for a hint on the solution , but otherwise , you ’ll have toset the left over clock to 10:20 , and the right clock to 11:15.you may do this byusing the ice point you got from the safety in the burrow .
Interact with the item that appears from the fiend mouth to call back the gem , which we ’ll be using for a puzzler back inFairytale Town .
On your way back from Haunted Hilltop , the telephony near the fortune storyteller machine in the hub domain will be ringing , pick it up for some more mysterious dialog . Once you ’re done , manoeuver back into Fairytale Town , taking guardianship of a new enemy type . Once again , lead them towards barrels to save ammo , but be careful not to digest on these one as they will explode and damage you . manoeuver to the door on the leftfield as you enter to see theSwan Puzzle .
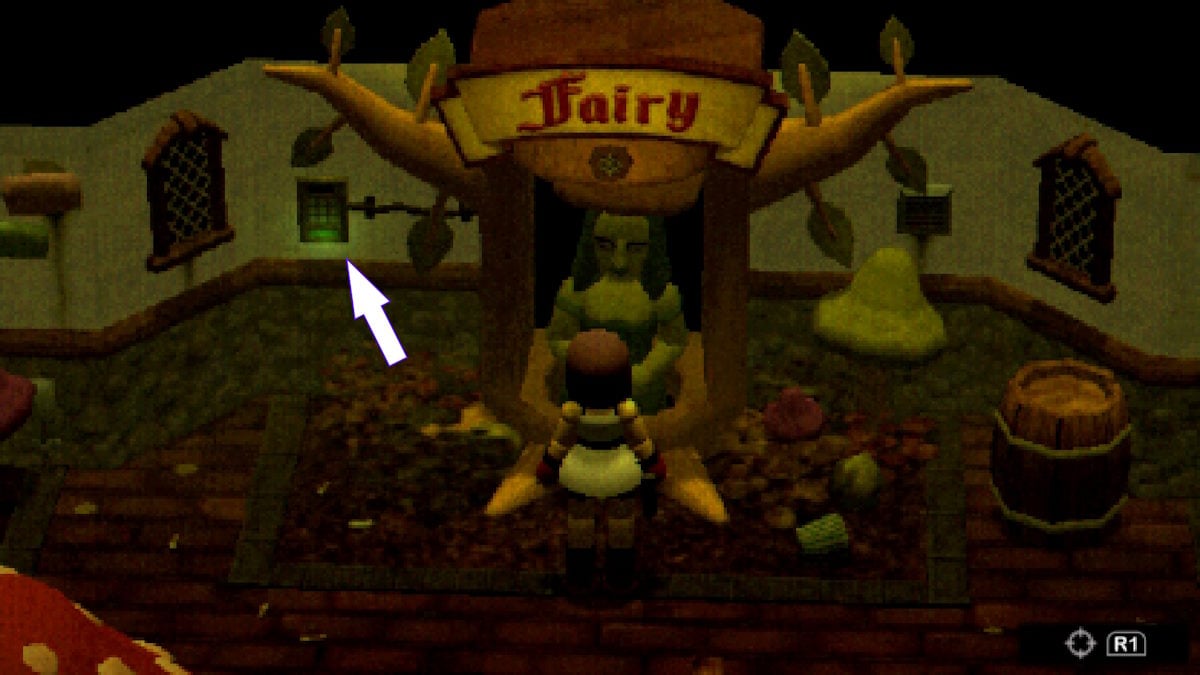
Image by ProGameGuides
Swan Puzzle Walkthrough
With the gem at bridge player , interact with the pillar next to the roulette wheel . practice the gem item , and then take command of the wheel . Your target is to guide the swan to the broken stain in the fencing to the left of the cycle . Once you ’ve done that , interact with the swan to get the range token .
Next we ’ll lead to thenew doorthat has open up since the last time we were in Fairytale Town , theMush Room . After leaving the Swan Room , head straight down until you see a tumid mushroom on the right , directly opposite the Fairy Pond we were at before . Enter through the mouth of the mushroom .
Mush Room Puzzle Walkthrough
It is extremely suggested yousavebefore doing this puzzle , as it has a higher luck of killing you than most . Enter the Mush Room , andshoot the chandelier trapso it does n’t catch you later . Head direct down the elbow room , and check the scrolls on either side of the Mushroom King .
The solution is intentionally misleading ; the aim is not to eat only the good mushrooms , it is to eat ALL of the mushrooms , so you must do so strategically . habituate the usher below to know which are ripe , and which are unfit . You ’ll know if you ’ve eaten a unsound one based on the animation of your character holding their stomach . After eat a bad one , ensure you heal or utilize an antidote if you are poison .
complete this mystifier will grant youyour first arm upgradeby speaking to the small mushroom that appears in the top dog of the Mushroom King after successfully eating all the mushroom .
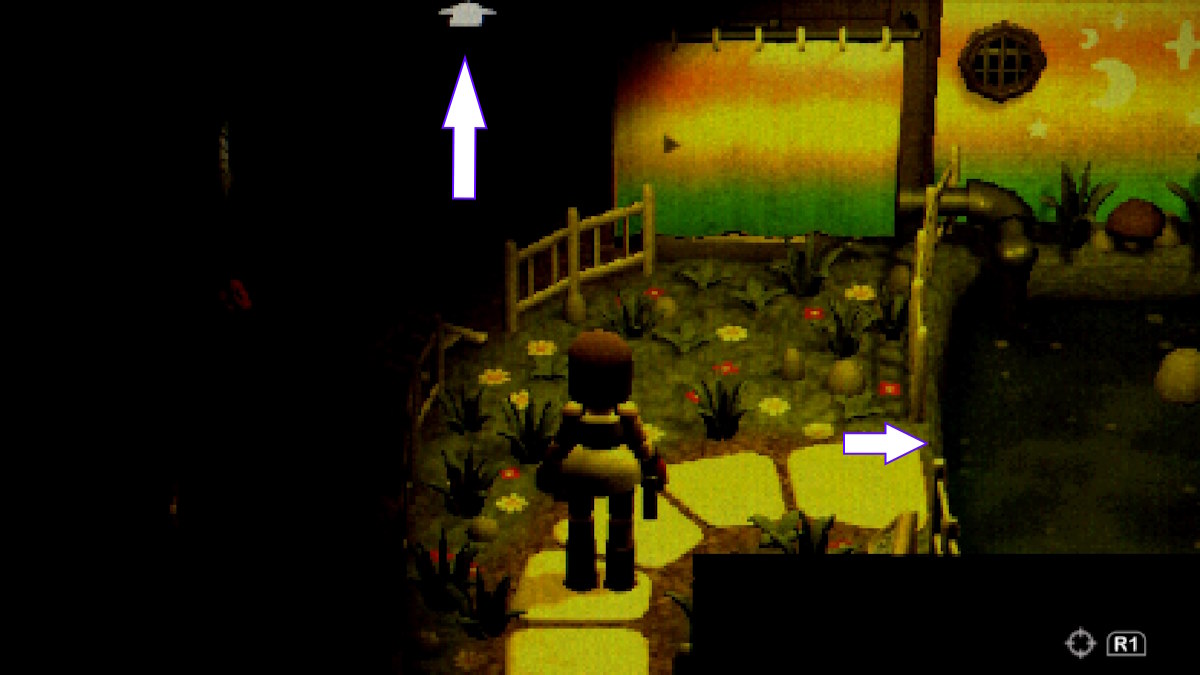
Image by ProGameGuides
Hut Puzzle Walkthrough
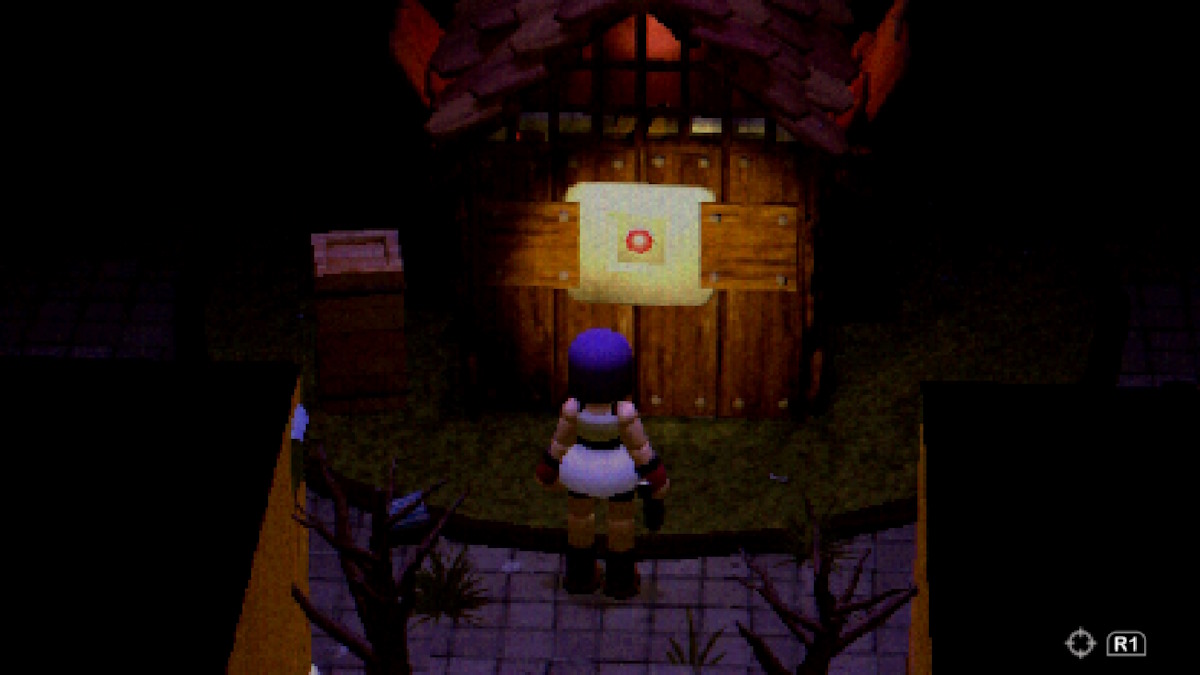
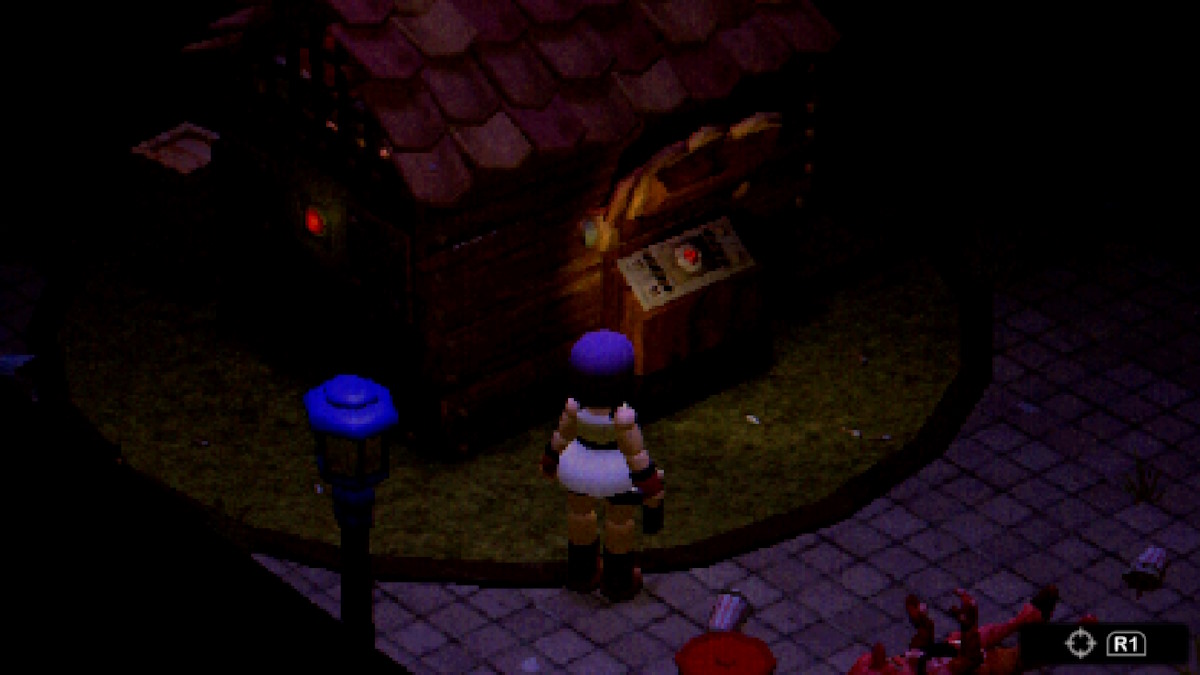
When back in the primary causeway of Fairytale Town , channelize to the small hut directly opposite the Swan Puzzle . If you have n’t already , use thebronze keyon the mailbox to start the door up . Enter and clear out any enemy that may be there . guide inside , and then you ’ll need to interact with a few thing .
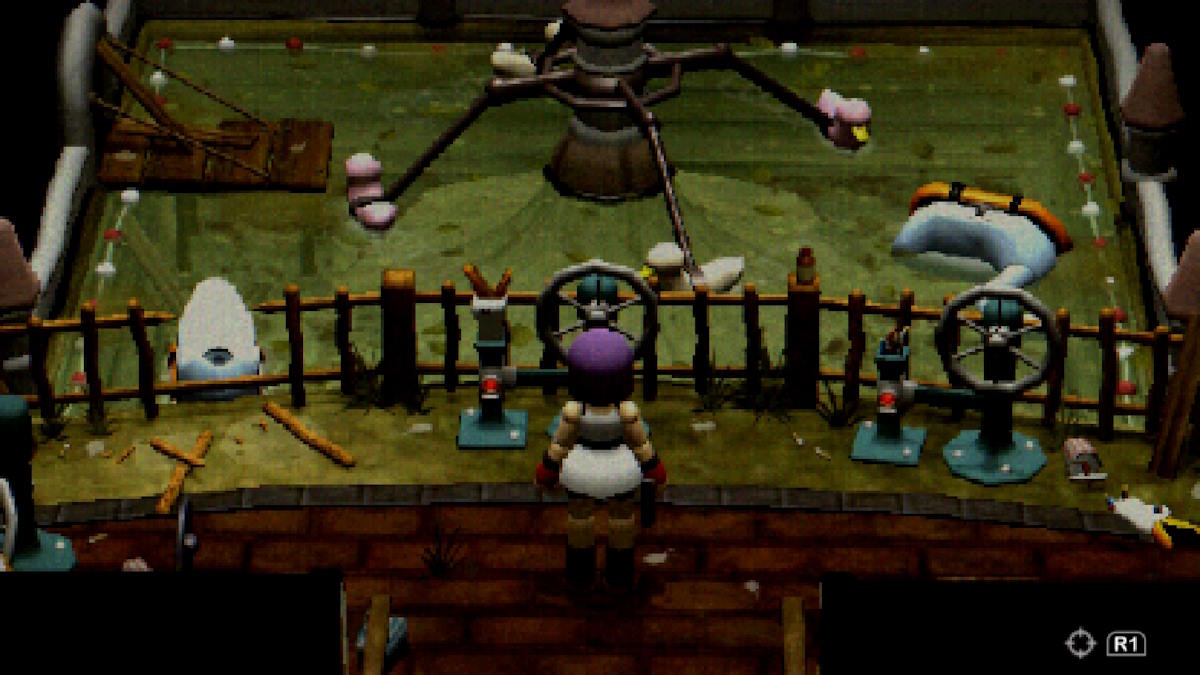
Start in whatever order you choose , just ensure that you put the two gasoline nursing bottle you ’ve already found in the tank , bind the crank to the pipe and turn it , and then attach the Ernst Boris Chain to the Harold Hart Crane . Once you ’ve done all three , whirl the bicycle on the Stephen Crane , and then activate the flamethrower to melt the resin and retrieve theWitchwood Mask .
Witchwood Maze Walkthrough
return key toHaunted Hilltopand chief right as you enter , there you ’ll see the entrance to theWitchwood . Interact with the empty expansion slot on the right wing of the room access , and employ themaskitem you got from the resin in the previous department .
The Witchwood Maze is n’t really a maze or puzzle in the traditional good sense , so plainly gain any of the glowing green pillar to match their symbol to the column you would like to retract . The first one is on your immediate right as you enter the maze .
Be sure to contain other routes , as virtually all of them contain a helpful detail of some sort , but your ultimate goal is to reach the centre of the maze and interact with the cauldron until you call up the trident detail .
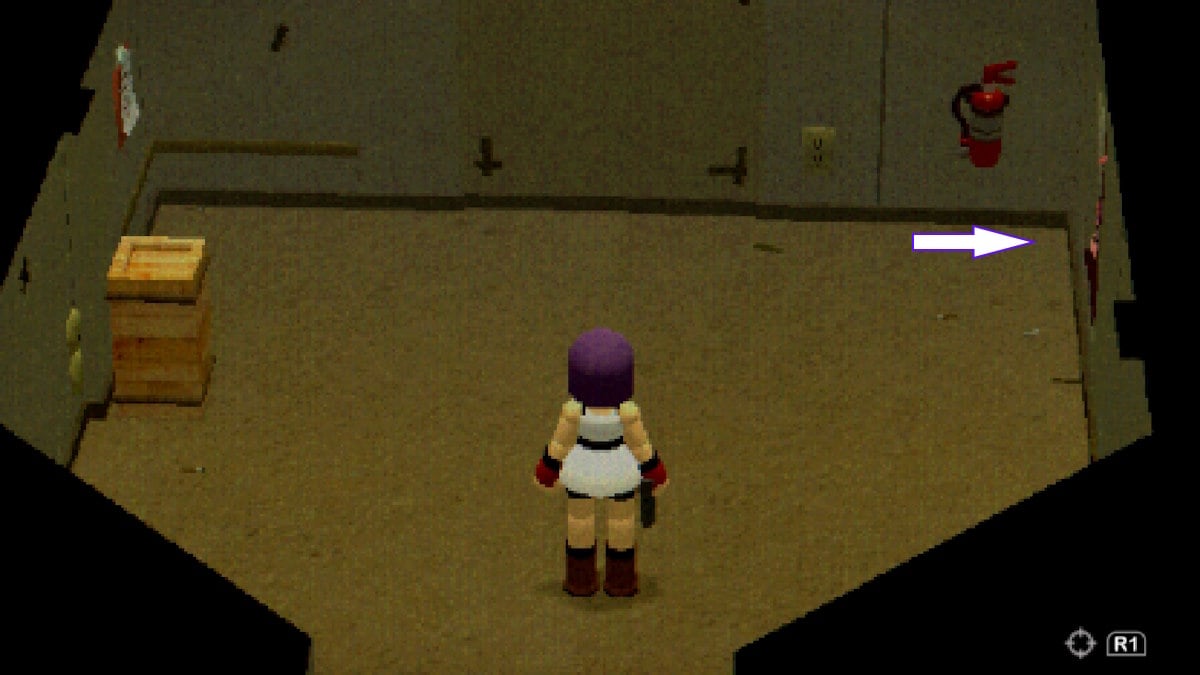
Image by ProGameGuides
Bear in head once you do , the maze will turn dark and foe will breed , so be disposed and verify you ’re healed . TheTridentis used in an domain we ’ve not been to yet , so return to the hub and inscribe the next independent area … Ocean Kingdom .
Ocean Kingdom Walkthrough
To get to Ocean Kingdom , render to thehub areaand head to the left of the bragging . Interact with the hole on the left hand of the door , and select thehand crankwhen propel to give an detail . Interact with the Methedrine , and reverse until the spike are entirely retracted . Be careful when you step through , as the spike will jolt forward and harm you , somake sure to heal first if you have to .
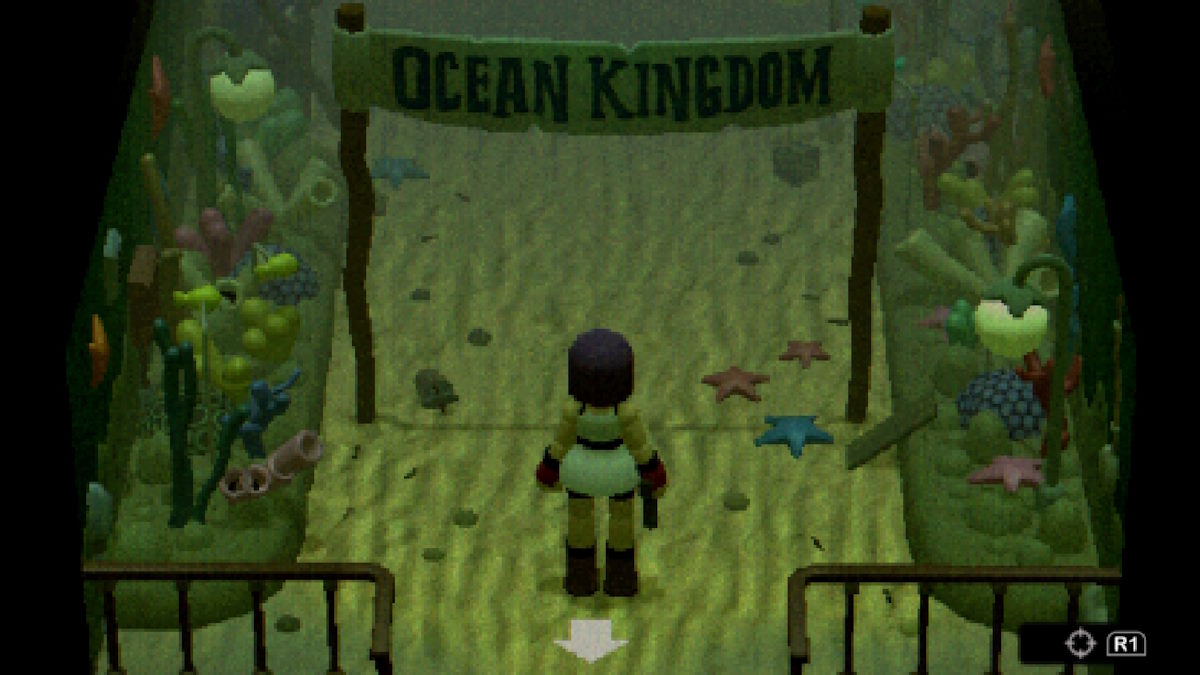
When inside Ocean Kingdom , there are only two places we can enter at first , so we ’ll first be heading flat and then to the leftfield to infix the submarine to render our mitt at unlocking the shotgun .
head up to the hatch on the submarine , and head down . This area doubles as a save point , and it ’s powerfully suggested to save before attempting to unlock the shotgun . There ’s someammoscattered around in here , so make certain you beak it up .
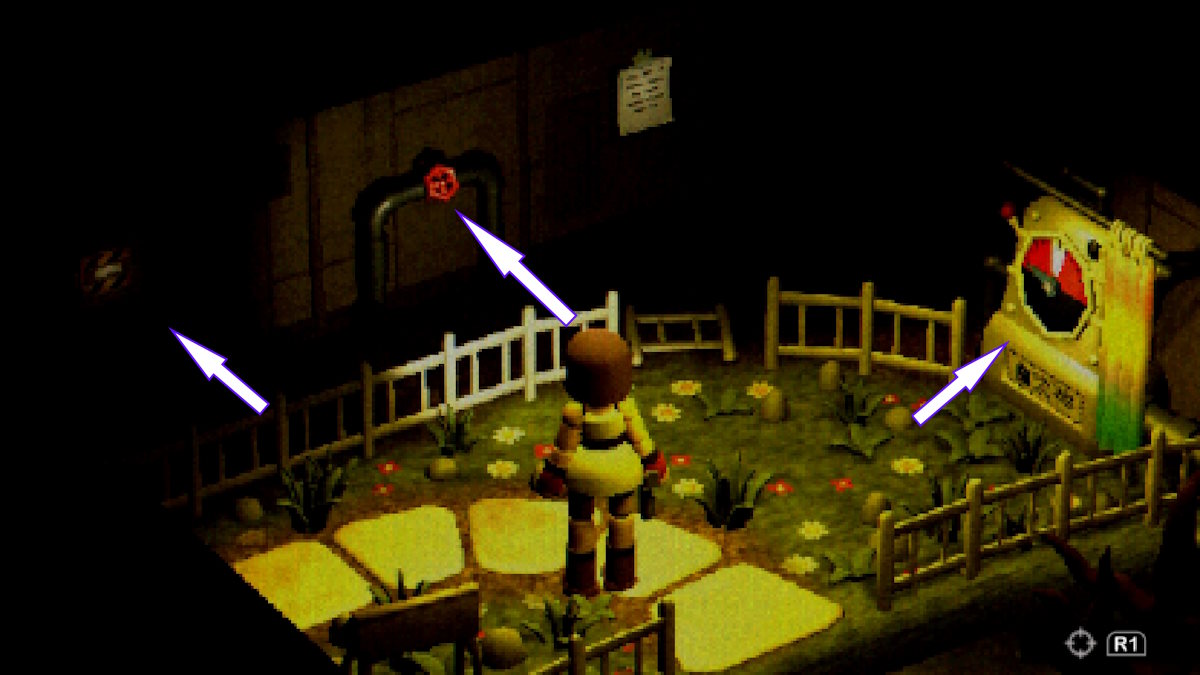
Image by ProGameGuides
When in the Submarine , ensure you have at leastfive bullets available.(Some extra in - event you miss is absolutely suggested here . ) The objective of this game is to reach 21 by following the grading board prevail for what each sea creature is worth , but gratefully it ’s a second childlike to do than it might seem at first . dissipate the next ocean animal to ensure the most effective purpose of ammunition .
Once done , the container holding the shotgun will open . Another save is suggest , as there is another new enemy type hold off once you allow the Submarine for the first metre , far larger than most , with a wellness pool to match . Once he ’s dealt with , continue onward , and look to the left of thedoors block by gas to discover the single-valued function of the field .
Then move to the right field , and head for theopen dooron the back wall of Ocean Kingdom . lead in , and you ’ll be met with a darkarcadeand anotherNPC.Speak to the NPC ( whilst ca-ca sure your flashlight is off ) and run down his dialog . Eventually , he ’ll move out of the way and you could enter into the arena behind him , which will result you totheStaff Hallway .
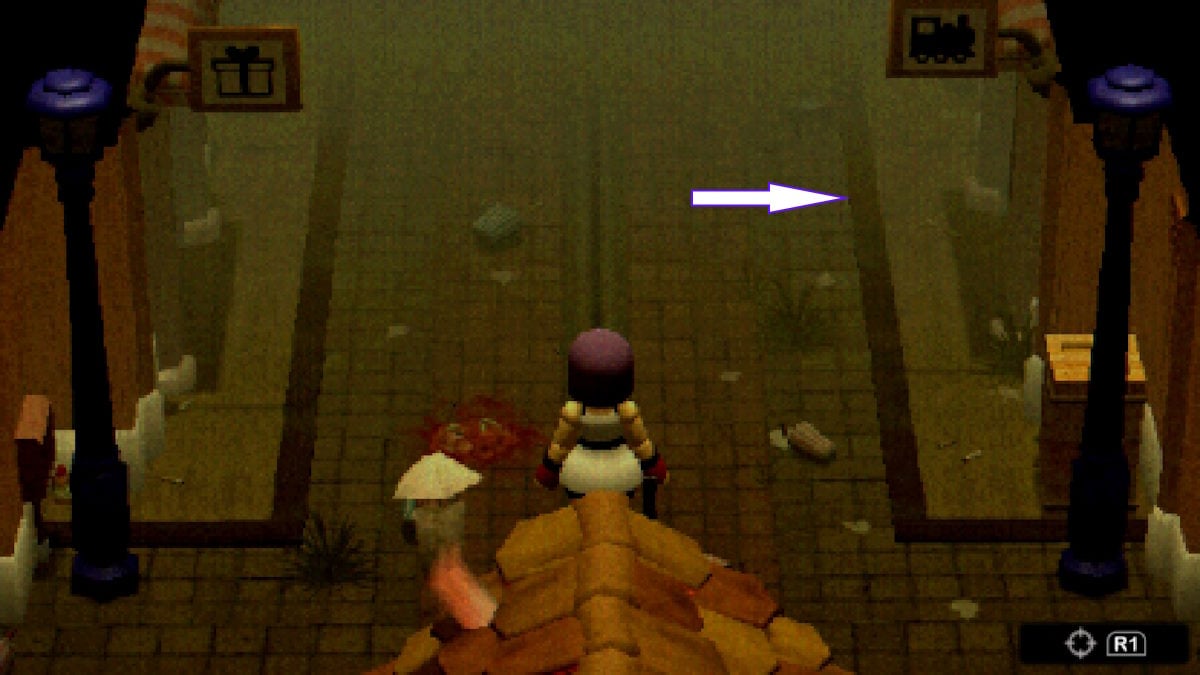
Image by ProGameGuides
The Staff Hallway servesmostly as a shortcutbetween Ocean Kingdom and Fairytale Town - however it also head to our next puzzler .
Be careful of the crate that will be in the elbow room when you first enter , as if you interact with it , the next time you enter the areaa powerful foe will spawn . Open up all of the shortcuts , save at the Lounge Safe Room , and continue on into theRestaurant .
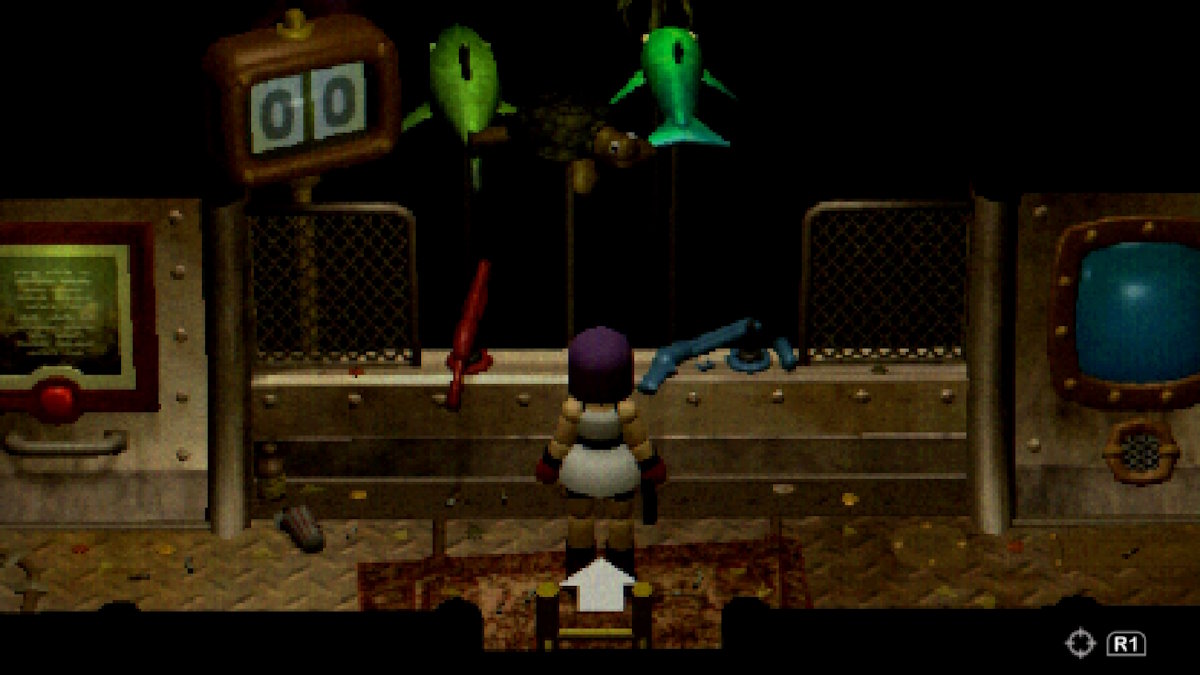
Restaurant Puzzle Walkthrough
Again , this section is n’t so much a teaser as it is some careful movement and repositioning . Your bearing is to get all four of the sea monster singing , so you ’ll need to rap the glass at certain angles so that all four of them will blab out when you ’re stood in front of the chest . The dresser will havefour green lightson it , so you screw which one might take to be reset .
Once complete , thechestwill open , and within will bethe silver key . guide out the same way you come in , and head back for the arcade .
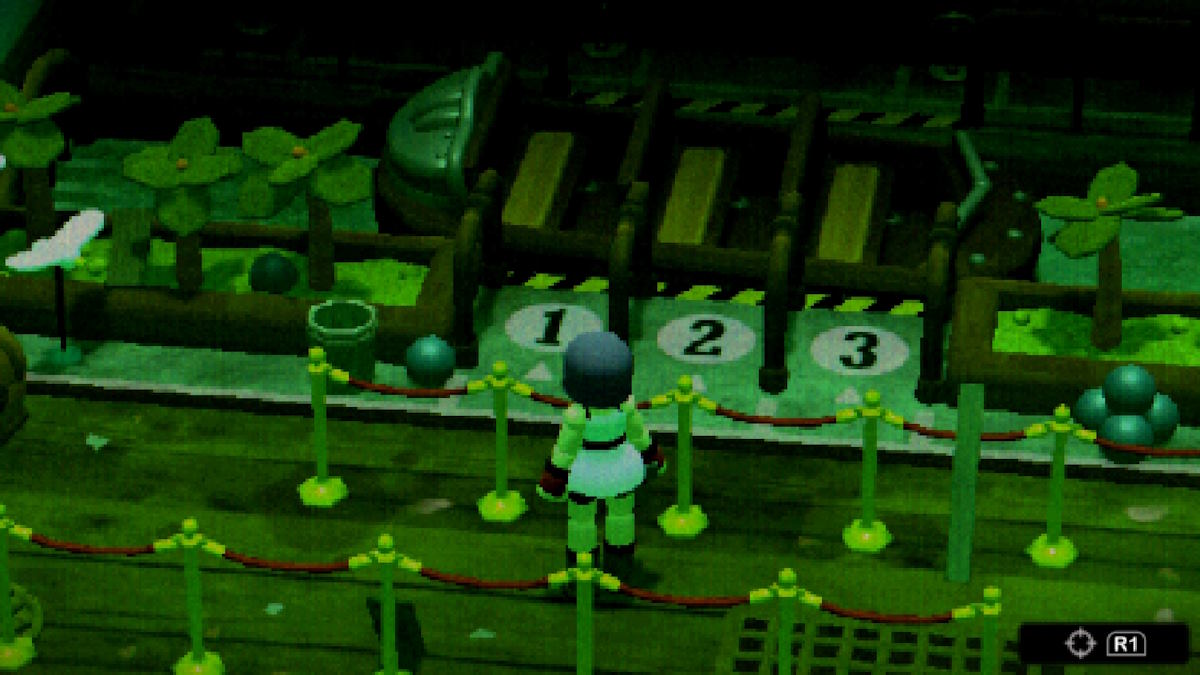
Arcade Puzzle Walkthrough
Head flat for the back wall when you get in into the Arcade again , and interact with the dialog box on the rampart and apply the silver paint to turn the top executive back on . The aim of this puzzle is to get all of the machines to a certain amount of points .
Your goal goal is to score the following :
Once you ’re done , interact with thechange machineto get adata diskwhich we ’ll be using for two upcoming puzzles .
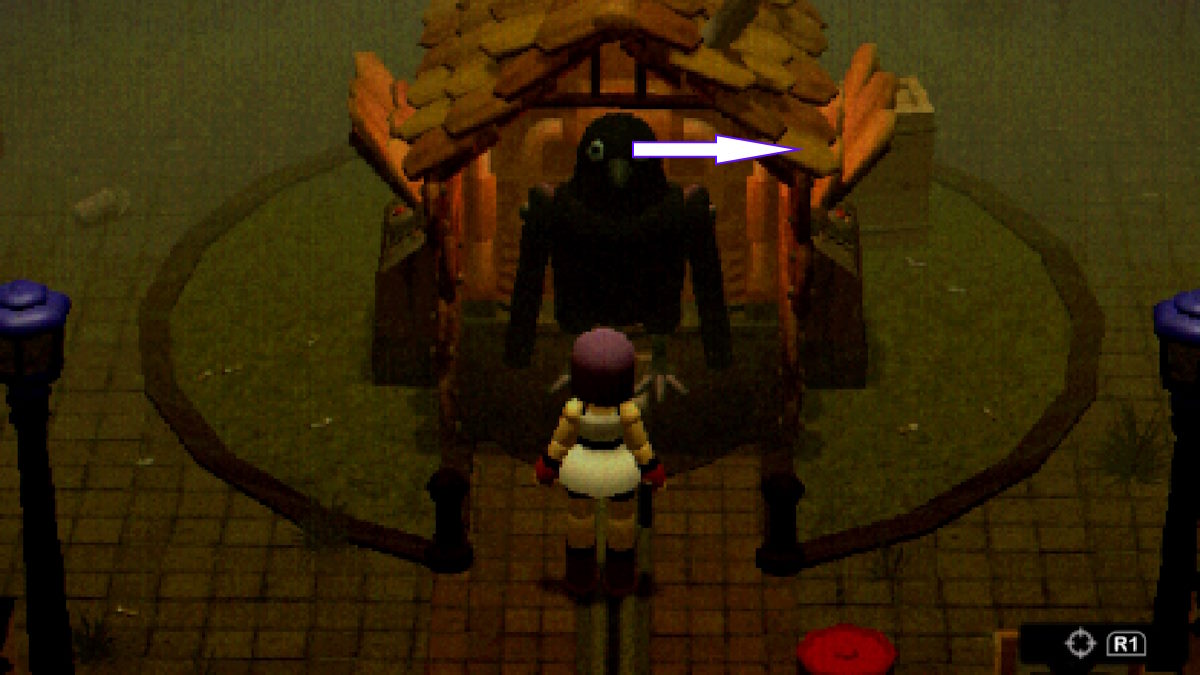
Image by ProGameGuides
With that done , head back to the Hub area , as we ’ll practice the silvery key to spread another door and work out another small puzzle .
Gift Shop Puzzle Walkthrough
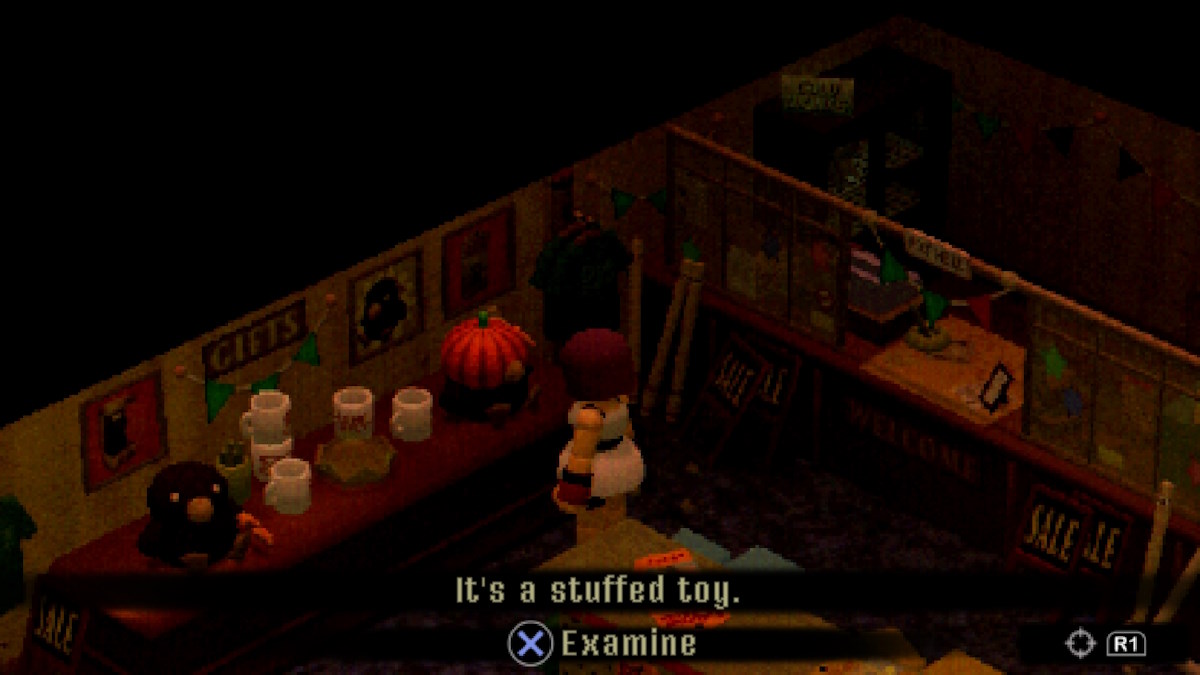
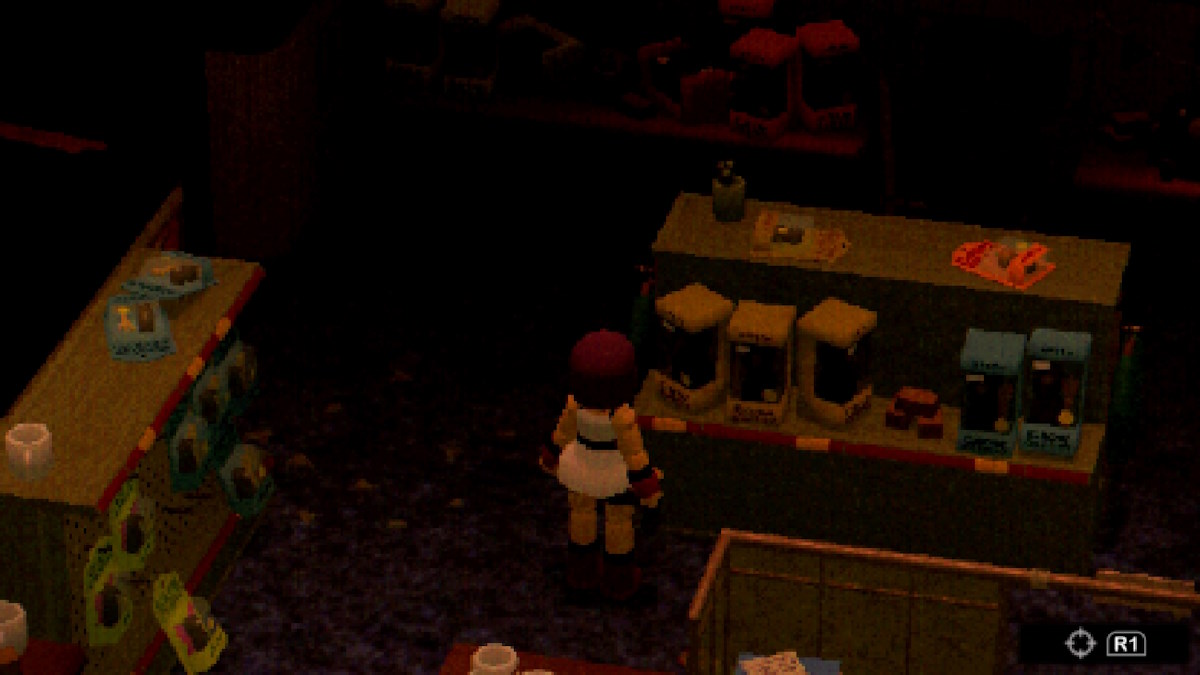
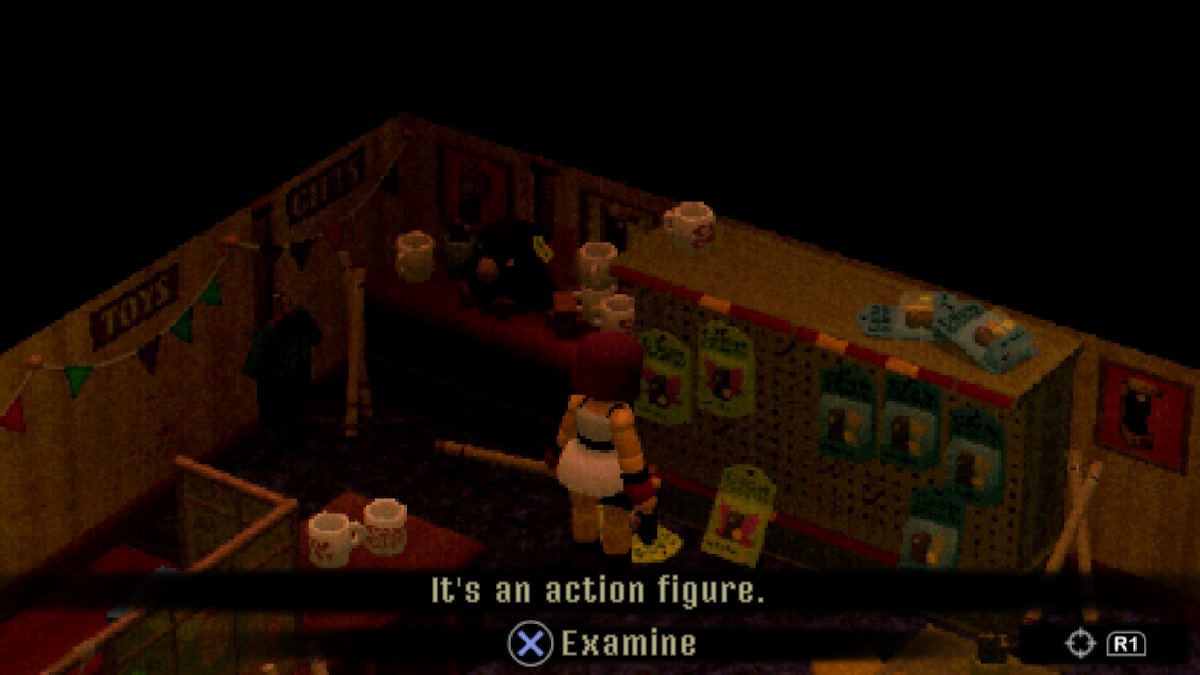
Once back in the hub , read/write head for the side door to the talent shop class , anduse the silvery key to unlock it . Once inwardly , clear out any enemies , and then go behind the return to find the puzzle hint , anda mushroom-shaped cloud who will raise the capacity of your scattergun .
The objective of this mystifier is to find oneself the three gifts mentioned in the note , check their prices , and add them together .
The total comes to19.75 , so take that turn and punch it into the immediate payment register , which will reinforce you with themagnum revolver .
Screenshot by ProGameGuides
Train Room Puzzle Walkthrough
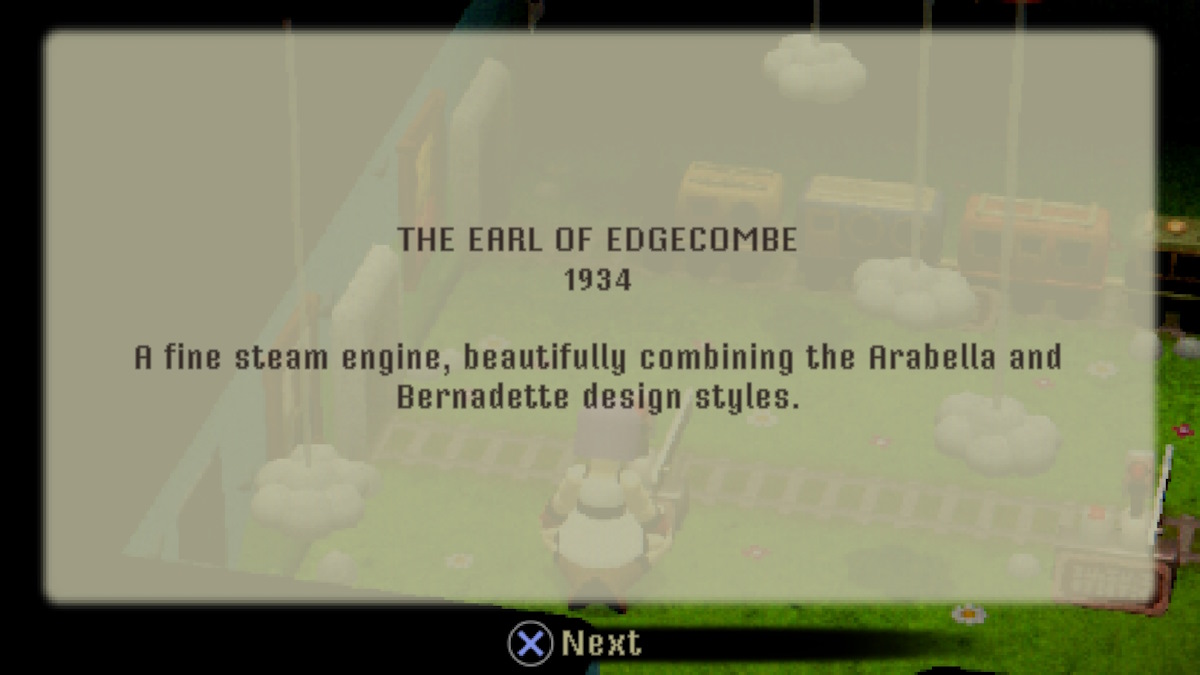
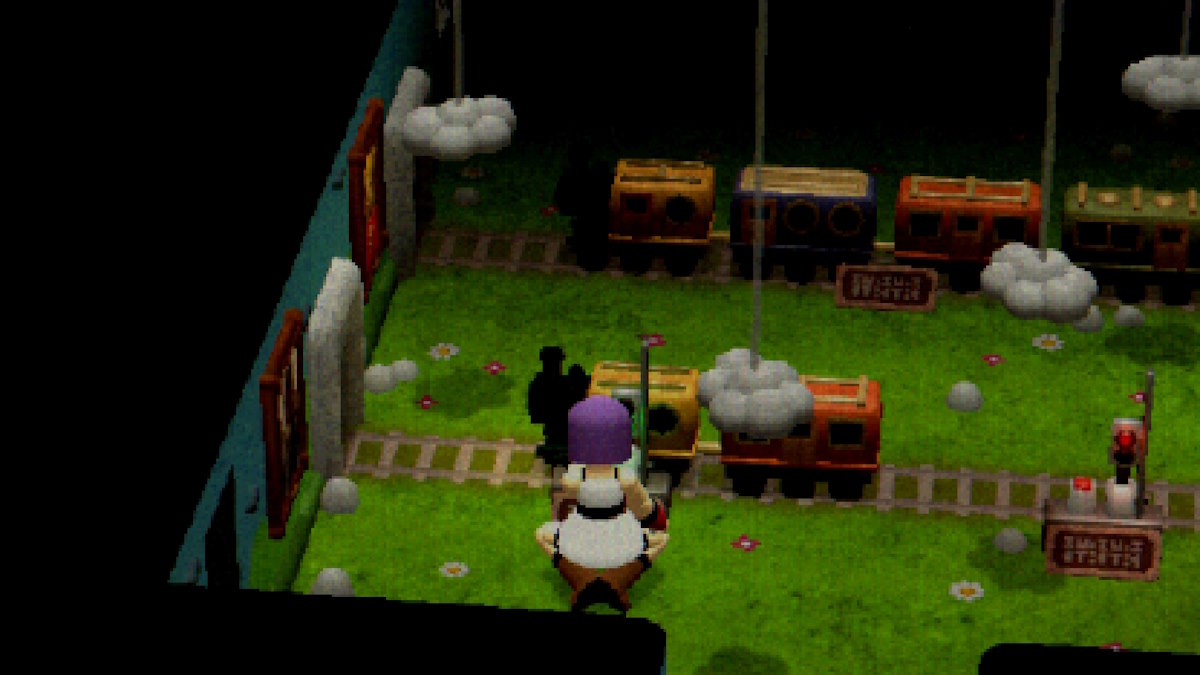
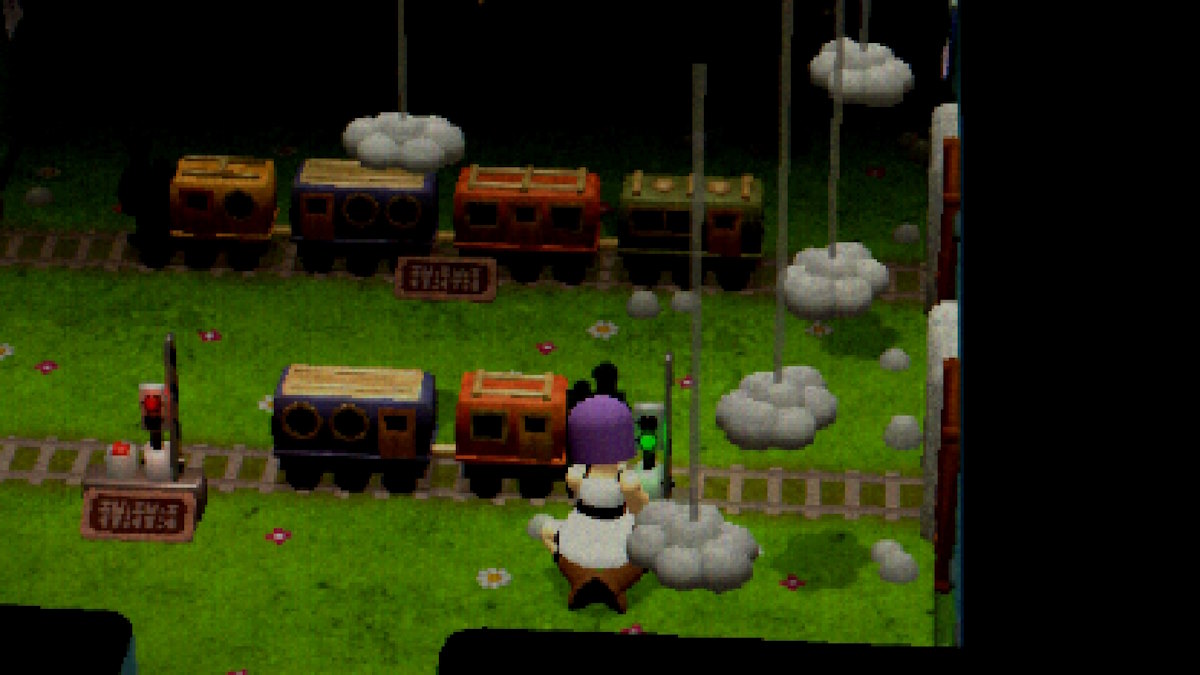
leave the gift shop and manoeuver flat into the train dependable room will grant yet anothernew weapon system , the flamethrower . The power train room puzzler had me a bit stumped at first , but it turns out it ’s as dewy-eyed as take some more first letters .
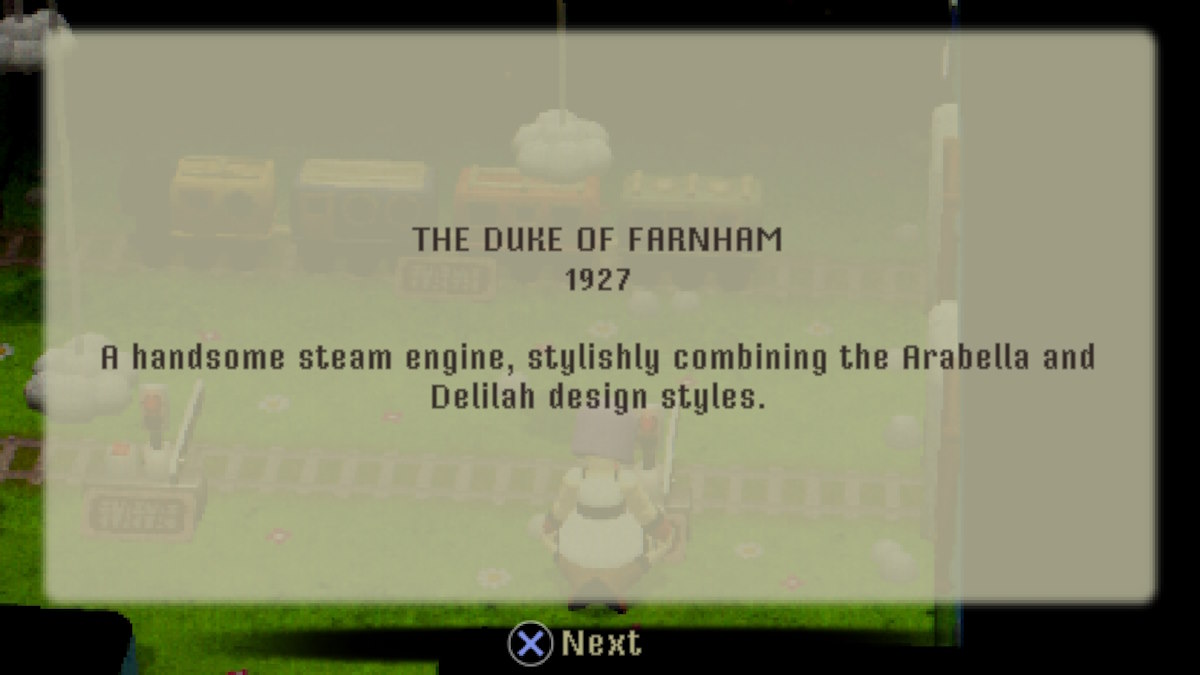
Interact with the computer use thesecurity diskwe got at the colonnade earlier , and input the follow combination . The result is found by examining the plaques in front of the two interactive train , and noting down which ' Style ' of cars they have . Refer to the image below if you ’d care to essay solving it yourself , or check below for the solution .
stimulation this string into the calculator to receivethe flamethrower . Next , we ’ll be heading back toHaunted Hilltopto call back another central point we ’ll need soon .
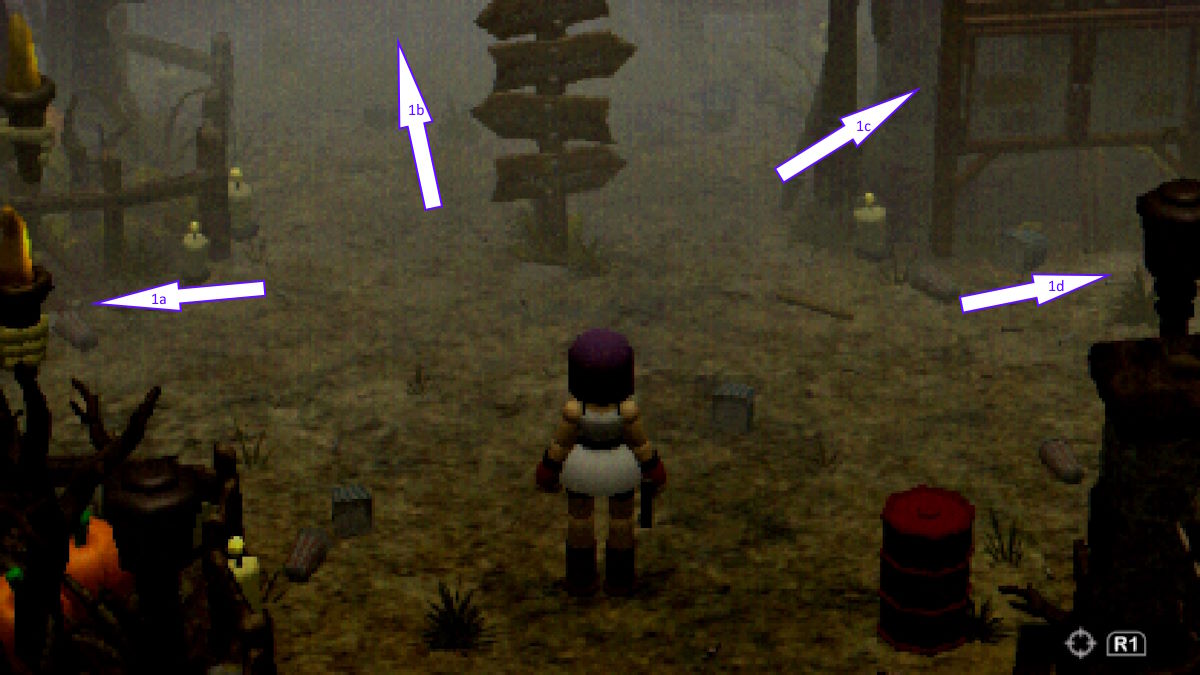
Image by ProGameGuides
Dungeon Puzzle Walkthrough
We ’ll be getting another key point from this touch , also using the data saucer we found earlier , so when you ’re back in Haunted Hilltop , participate the first room access on your left as you move into to get into theDungeon . Here , you ’ll inclose the disc into the computing machine , and from there , you ’ll open cadre by inputting the corresponding quantity of leg , arms , head , and eyes each creature has .
The one of importance is themermaidcell , as that contains anacid bottlewe’ll need later .
The answer to open each cell is :
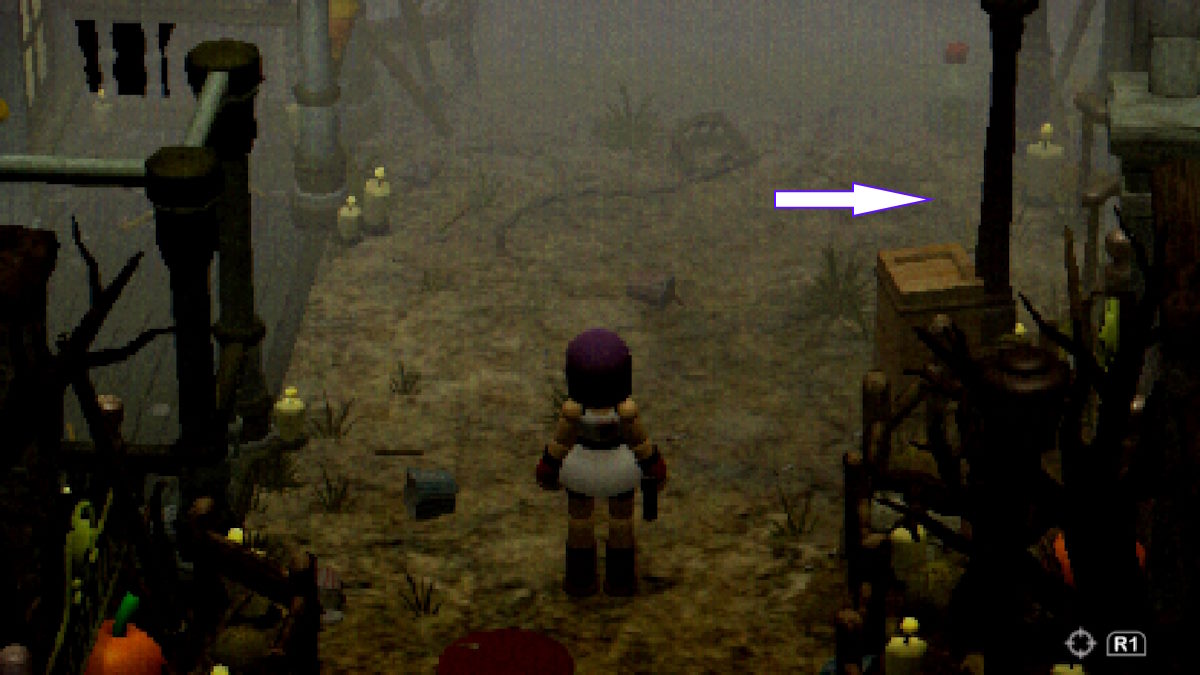
Image by ProGameGuides
After entering each hardening of numbers , go away the computer and get into the cell , as change the numbers will close any cubicle you had open . The other cells are worth a look too , as they hold utile item like med outfit and ammo .
lTolman’s Office Puzzle Walkthrough
Head back to the Staff Hallway and find the wooden door , kicking it if you have n’t already to reveal the silver keyhole . Interact with theNPCand expel his dialogue before continuing . You ’ll be met with a TV , four tapes , four calendar , and a keyboard .
The solvent to the puzzle is to playact the tape in the order they appear on the calendar and watch the television cautiously as a letter with twinkling up in green . You take these note , and play them on the keyboard .
comment the notes in the correct order into the Keyboard to unlock theelevator switch . Interact with it to unlock the elevator just outside Tolman ’s business office , and some others around the map . Take the lift down to reveal theroot accessarea .
Screenshot by ProGameGuides
Root Tunnels Walkthrough
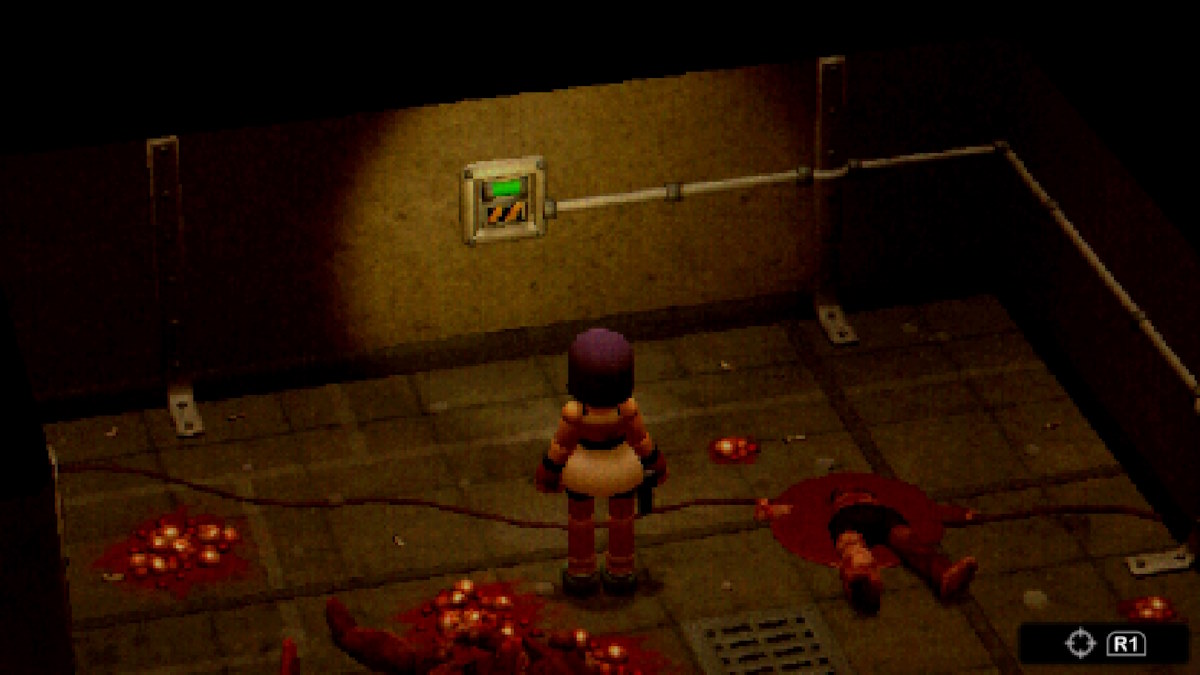
When you ’re down the lift , lead flat to the left to put down thebreak elbow room . In here there lever at the back of the room , which willgrant " root access " . Interact with the lever , but be careful , for as soon as you do a large new enemy type will appear in the room and lock the room access . Once defeated , contain where it died for the compounding to get out . The combination is 2663 .
The Root Tunnels are efficaciously a loop topology around most of the areas you ’ve already been to , with rooms branch off intermittently . Here I ’ll break down each of the side rooms , and detail what is within them .
Going back the way you came to get to the Break Room , we ’ll head right and work our way around from there . We ’ll also be referring to the root rooms by their given days of the week from here on .

Screenshot by ProGameGuides
Once you ’ve check out all of the root rooms , and lick the Thursday puzzle , grab the acid , and destruct the generator you’re able to head back up to Ocean Kingdom , but sadly , whilst we can get at The Seven Seas drive , it ’s still useless to us .
However , to the left of The Seven Seas , the mysterious metallic element doorway from earlier has unlocked . Head leave from The Seven Seas to enter the raw sphere . Go mightily as you enter , and interact with the large wooden box with bang coming from within , and afford it .
at heart will beJulie , the NPC we met in Haunted Hilltop before , and she ’ll give us our next destination . There is another diminished room in this section that control some helpful items , but be careful ofmimic itemswhich you may have occur victim to already .

Screenshot by ProGameGuides
Even though we already know where theTheatreis , deplorably we ca n’t get at it through the front door , so instead we ’ll call for toreturn to the root tunnels , and make our way to the North East Elevator(the one between Room Saturday and Room Sunday ) .
Staff Hallway and Theatre Walkthrough
When you arrive in the elevator , you ’ll be met with a bombastic area with a lot of routes to postdate - take a moment to search , check outPikes Office , and talk toNatalie , daughter of Edward Crow , and tender her an antidote - she ’s directly next to the elevator you arrive in .
Once you ’re done exploring , move on over towards theTheatrearea , as this is where we ’ll be getting thegold key .
First , you ’ll want to interact with thecurtain pulley(1A)and conjure it all the way of life , then head down thelift ( 1B)and be measured as the field of operations is now filled with mountain of enemies . Thetelephone ( 1C)will be ringing , so pick it up to talk to Mr. Crow again . in conclusion , approach thewater tank ( 1D)and interact with it to add thebottle of acid . in the end turn around and head back to the stage , where you ’ll see ared valve .

Screenshot by ProGameGuides
Before using it , shoot the fountainhead off the fairy(which will reveal the key locked in more resin ) and then use the valve . utilise the lift to get back on the stage , and head up to collect the key , which you could now apply to enterMr . Crow ’s Office .
Head on in , and take a warm look around . Thetelephonewill ring once again , so go and answer it . Keep an eye out for thepicture physical body by the statueat the good end of the back wall as this will allow access to anothersafe room .
After you get into the secure room and come back out , Nataliewill be waiting there for you , so eat up her dialogue again . Reading thechalkboard next to the projectorwill inform us we ’ll involve some kind of codification eventually , so it might be best to figure it out now and keep it on hand for subsequently .

Screenshot by ProGameGuides
Projector Puzzle Walkthrough
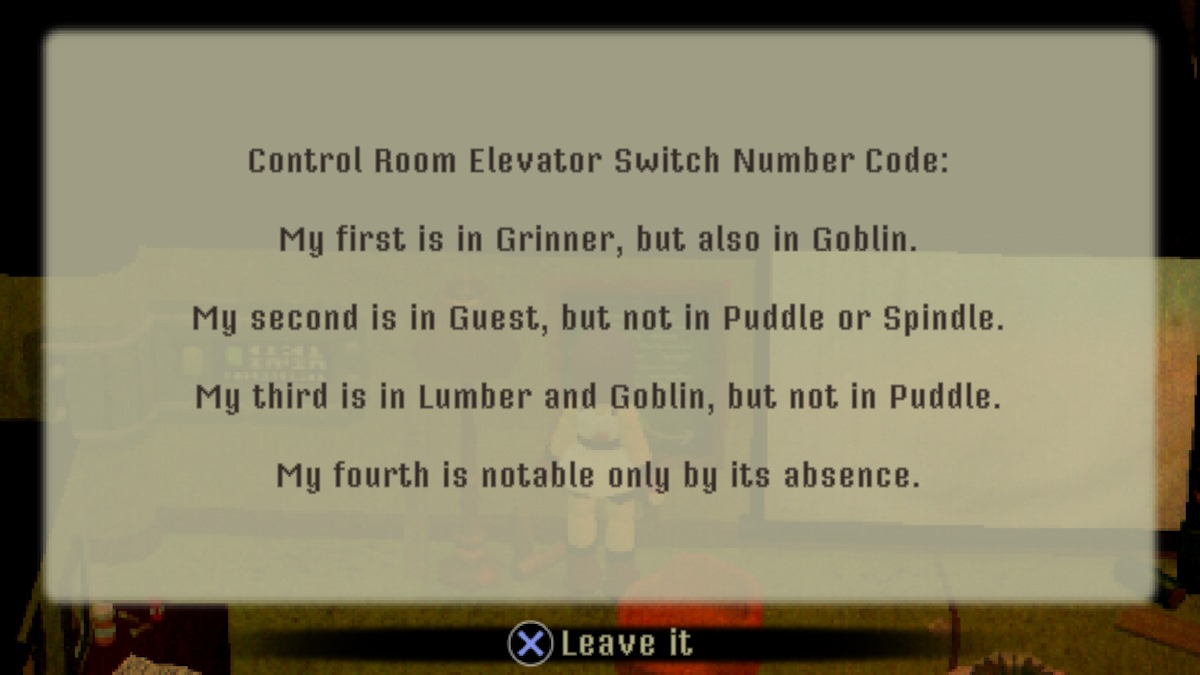
The chalkboard will present you with a list of conditions for picking out number in the card of images of hostiles on the projector .
Breaking it all down , we ’re left with the combination of9 - 2 - 1 - 8 .
Head for thecontrol room , launch the room access and head on in . You ’ll be confronted with two monitors , akeypad , dice scoring on the flooring , and a strange projection screen on the wall opposite the keypad that seems to show random numbers over clock time . you may apply the odd monitor to interact with Arthur , the NPC you saved back in Fairytale Town .

Screenshot by ProGameGuides
Interact with the computer keyboard and input the code we got from the berth , this will show another lift has unlocked somewhere in the centre of the map , in the stem burrow . Be careful on your way out , because as you head to result , thefourth mini - boss will abound out from the bulwark on the rightfulness of the room . Dispatch him rapidly , and if you ’re following this guidebook and playing on the survival repugnance trouble , this should web you an achievement , as this is the final mini boss .
You ’ll also be locked in the ascendance elbow room , but the answer to escape is simple - the die on the floor add bit to the screen at the back of the room - and interact with the logic gate informs you that the code is123456 .
If you ’ve already stepped on some , interact with the blind and come to the reset clitoris . Then take the air carefully around until you ’ve inputted all of the right numbers , and the logic gate will mechanically open .

Screenshot by ProGameGuides
Now with the golden key , we have to return toOcean Kingdom , so we can get our last primal item .
Seven Seas Walkthrough
Remember to employ theroot tunnelsto get back to Ocean Kingdom quicker , using the elevator just outside Mr. Crow ’s office . Once down there , head for thesouth westelevator .
Head up , and you ’ll be in the room with Julie again . Earliershe offer to help us if we unlocked the ride control elbow room door , which we can now do . Head out , and take the very first door on your left as you perish . If you head in , the telephone will be ringing , so answer it to speak to Mr. Crow again .
manoeuver out , back into the elevator way , andspeak to Julie . Once you ’ve mouth to her , head back to theSeven Seasarea , not the control elbow room , and direct for the gravy boat in the middle - remember to seat in the middle , seat routine two .

Screenshot by ProGameGuides
The drive deplorably does n’t last long , as we ’re block almost instantly by a Whale . Get out of the gravy boat , on the right side , andinteract with the large leverto get to the door back to the ascendency room . Julie will be neglect , so direct back into the ride .
Your aim is to find abatterywithin one of the mermaids . Use the box seat on the leftfield to bring a mermaid forward , and the box seat on the right wing to raise them from the weewee . The electric battery is in thethirdmermaid , but thesecondmermaid hold in some shotgun shell .
Battery Charging Walkthrough
The shelling is the last primal detail we need , but we require to charge it , so retrovert to the elevator you took to descend back to Ocean Kingdom , and travel down , being thrifty of the enemy now there . You need to go toRoot Tuesday , which is where the electrocution auto we found originally is tocharge the battery .
Heading right out of the lift and get into the cart will take you straight there if you ’re heading from the lift suggested .
Place the battery into the gadget on the left wing , move over to the button on the rightfield , interact , and carry until the assault and battery is fully charged . ( you may turn your camera whilst holding the clitoris the see how it ’s come along . )

Image by ProGameGuides
Crow Elevator Walkthrough
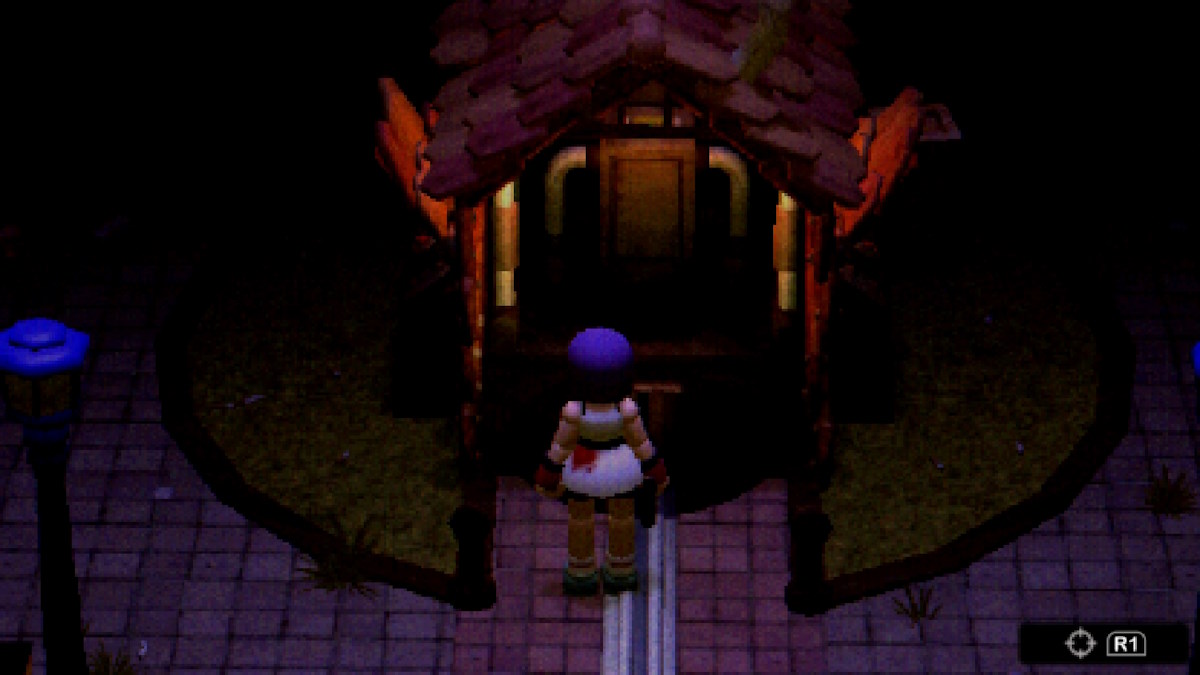
With the battery charged , we have to return to the main hub area . It ’s advised to stop at whatever safe room you’re able to incur before continuing .
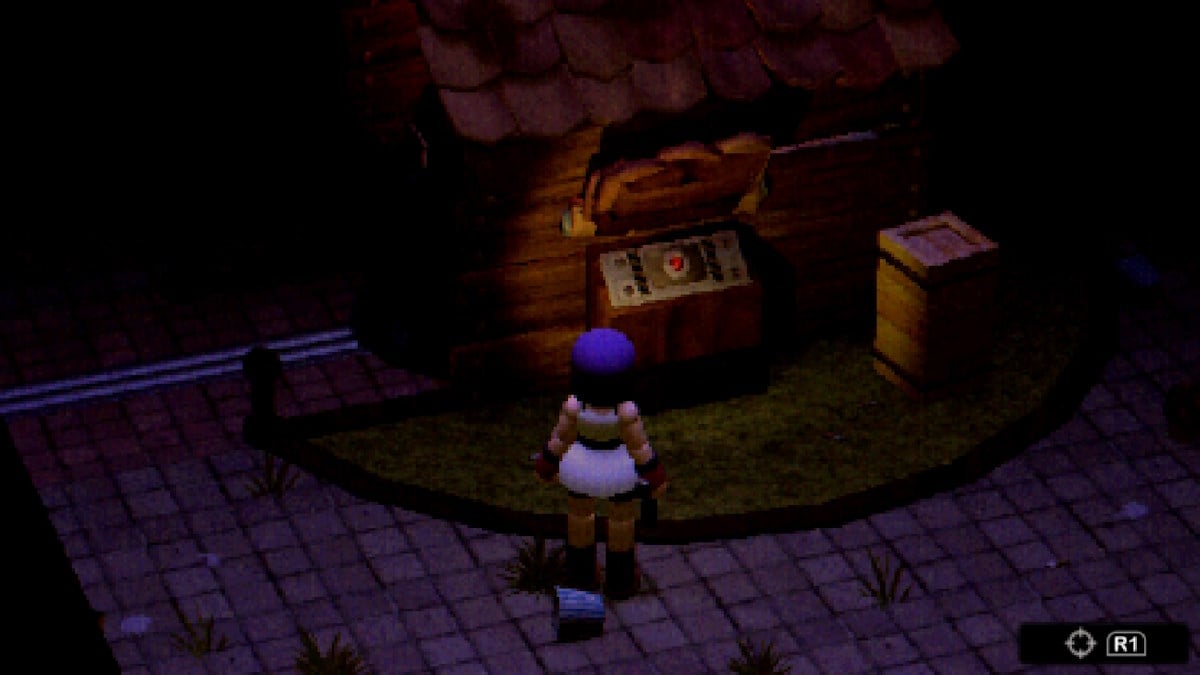
When you attain the hub , head straight for thecrow hutin the essence . maneuver to the back of it , and if you have n’t alreadyinteract with the hidden panel to reveal a clitoris .
Interacting with the button will spread two control panels , head for the one to the right wing of the button first to birl the crow around , and then enter the battery into the slot on his back . Then , return to the turning board and turn him to face the right mode again . Move to the other panel and activate his walk sequence . This will discover the lift .

Screenshot by ProGameGuides
When you get down , the small elbow room you enter will contain many enemies , but your goal is just to trigger off two switches , one on the left and one on the right . you could save the ammunition and head for the hills around them , but be deliberate not to take too much damage .
Keep pressing onward , and in the next room , I suggest taking thesouth west burrow , and operate to remain at Root Wednesdaybefore returning and campaign on . When you ’re done , continue onward to thelantern teaser .
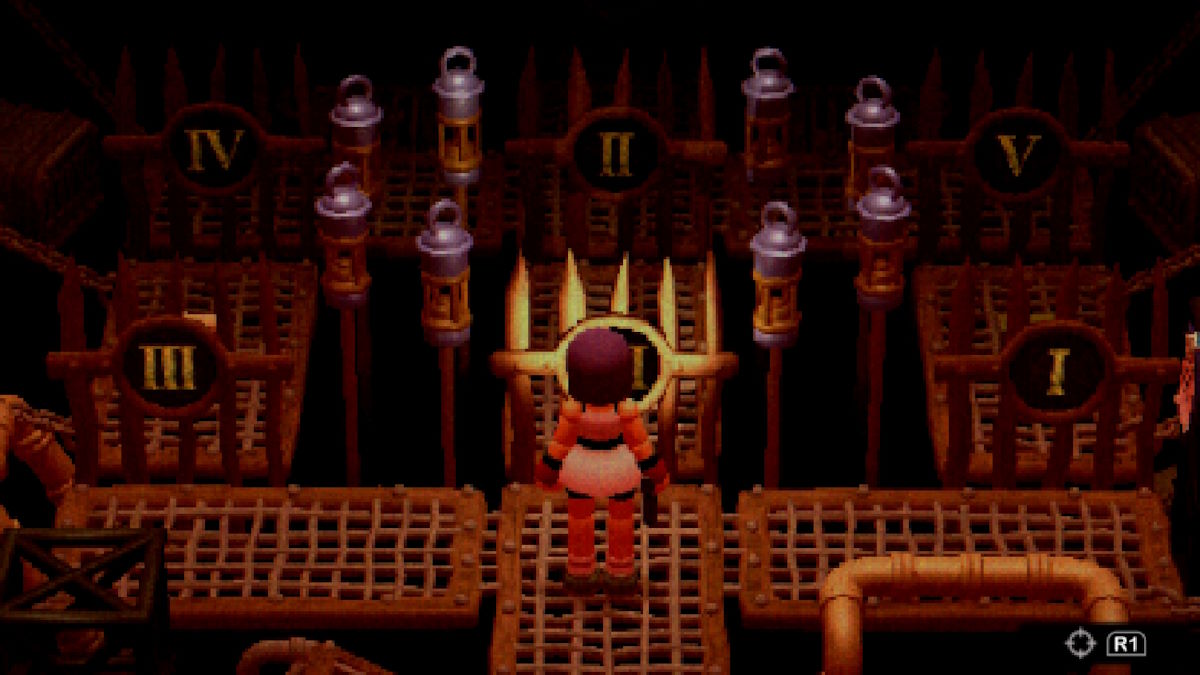
The lantern teaser is n’t as complex as it might first seem , as it ’s plainly a case of each lantern stand for a number one , and you must inject the like amount of lanterns to open up the like gate .

Image by ProGameGuides
For example , shoot one lantern would launch the gate label ' I ' , hit two would open up the gate labelled ' II ' and so on . The most effective way through is to burgeon forth one lantern and ill-use into the ' I ' logic gate before shooting four more and mistreat through the ' V ' gate .
Despite the handgun ammo in the middle row , there is another logic gate that will need you to havesevenlanterns lit , mean the veracious route only ensue in a loss of seven total circle .
Continue on until you reachTolmanblocking the path , interact with him , check the cutscene play out , and thenhelp Julie out from the volcano . verbalise to the pair and exhaust their dialogue , before go forward on . Interact with the gatetwiceto continue .
Screenshot by ProGameGuides
fountainhead past the small pocket billiards ( interacting with it will heal you and strip your histrion good example of any damage ) , and descend down the long ravel to access our next country … The Lab .
Crow Country Lab Walkthrough - How to beat Crow
Our first room is another safe elbow room , interact with the Bunsen burner over in the right corner to keep open . There ’s piles to interact with here , so take your time . When you ’re quick , interact with the intercom next to the big metal threshold .
Once you ’ve utter toMr . Crowon the intercommunication system , he ’ll learn you to grab the vial on the table before continuing on . Do so , and come back . When the door open , continue forwards . Approach and speak to Mr. Crow , he will inform you on the nature of what ’s been going on , and then the final fight of the biz will set out .
Once the boss engagement begins , I suggest shoot the bear traps as you near them , as to not take any damage . The goal is simple : flash ' Crow ' until he go bad — you’ll know how you ’re getting along based on the people of colour of the pool . One thing to look on out for is flashes of red and an dismay auditory sensation . When you see this , move out of the crimson sphere , as the rockfall will induce you damage .
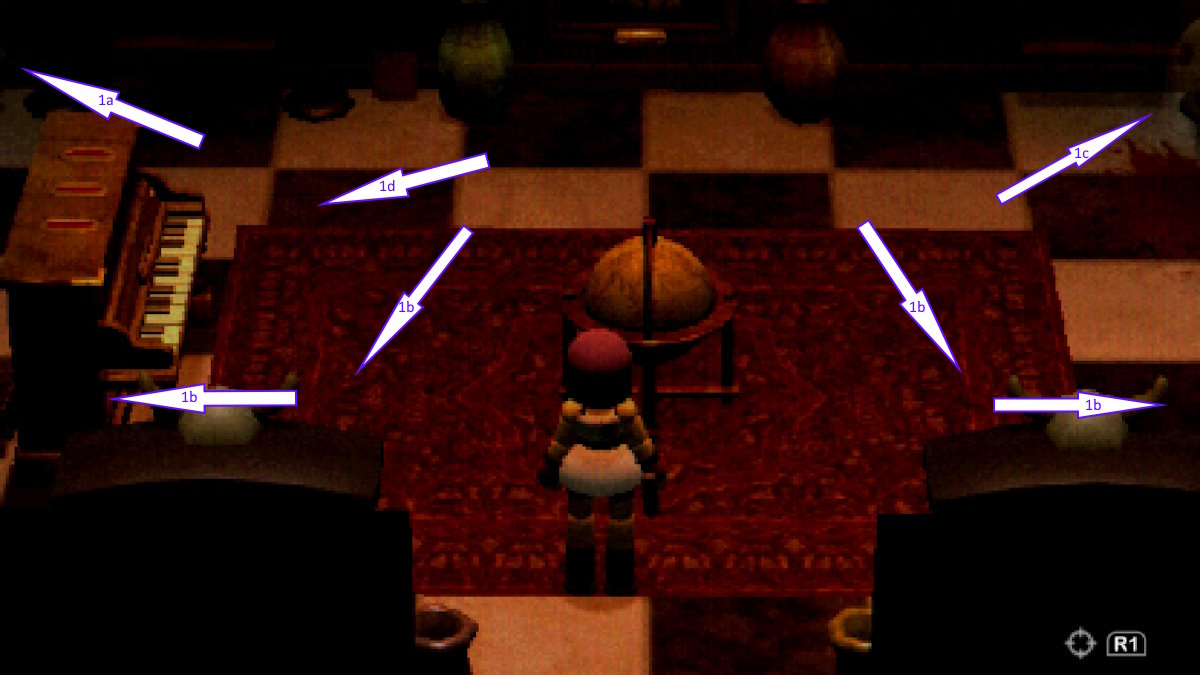
Image by ProGameGuides
Once you ’ve beaten him , you ’ll be prompted to speak to him again - do so , and as you promised , put him out of his misery .
And with that , congratulations!You’ve successfully beat Crow Country !
After watching the credits , you ’ll be shown a silver screen that point your overall social status - higher ranks yield new reward ! In my playthrough , I achieved a entire ' A ' social status , only because I had to take so much damage to essay thing for you , high-priced reader . There are other secret and achievements to get in Crow Country , so apply those completion reinforcement and get back out there !

Image by ProGameGuides
If Crow Country has you in the modality for some more horror related content , check out our10 Best Horror Games of 2023 , or if you ’re not out to face it alone , ourBest Multiplayer Horror Games of 2023will see you right . Whatever the case , we ’ve drive you covered at Pro Game Guides .
Screenshot by ProGameGuides

Screenshot by ProGameGuides

Screenshot by ProGameGuides

Image by ProGameGuides
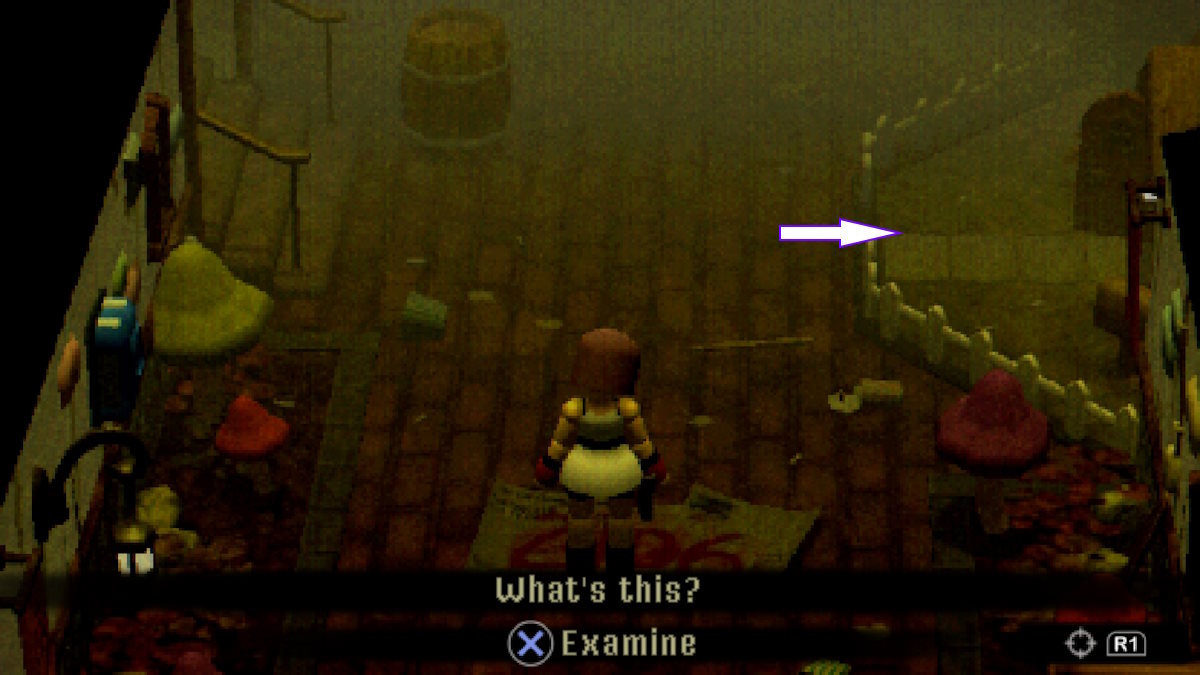
Image by ProGameGuides

Image by ProGameGuides

Screenshot by ProGameGuides

Screenshot by ProGameGuides
Screenshot by ProGameGuides

Image by ProGameGuides

Screenshot by ProGameGuides

Image by ProGameGuides
Screenshot by ProGameGuides

Screenshot by ProGameGuides

Image by ProGameGuides
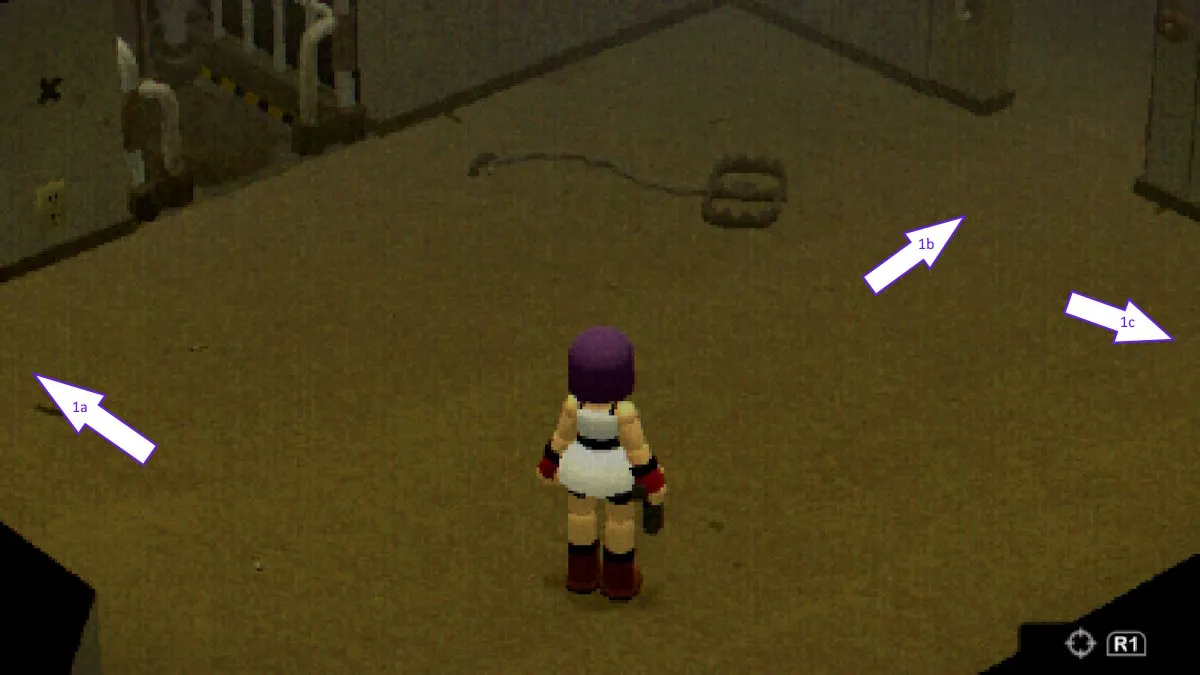

Image by ProGameGuides

Screenshot by ProGameGuides

Screenshot by ProGameGuides

Screenshot by ProGameGuides
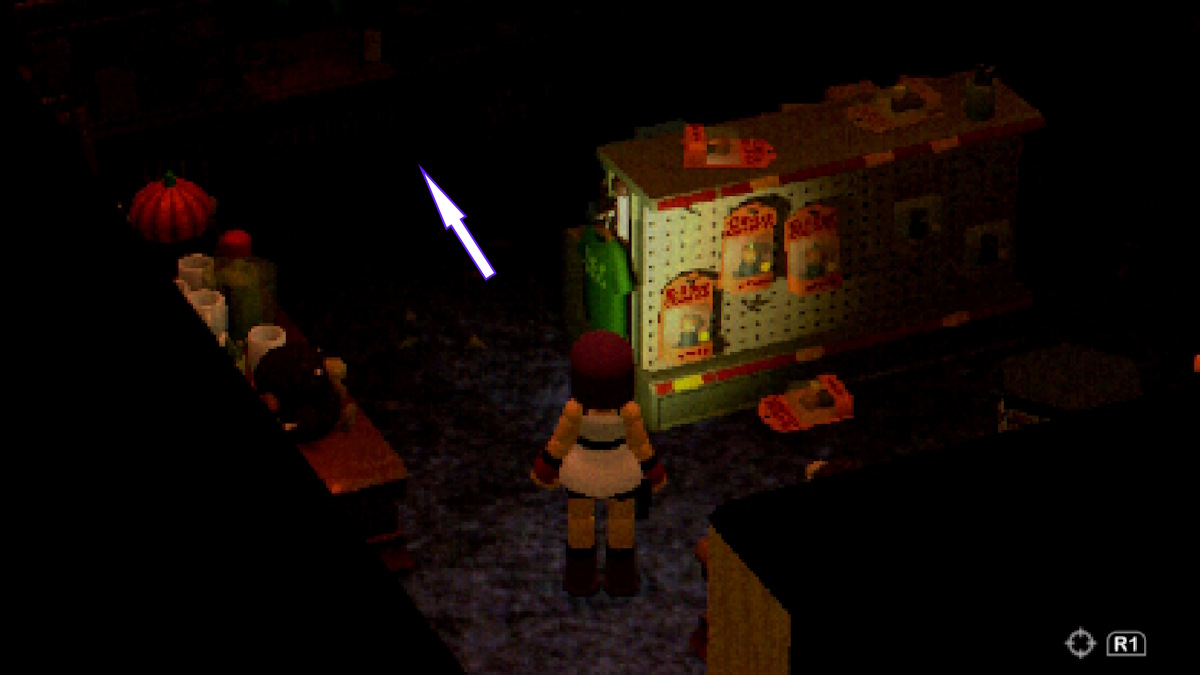
Image by ProGameGuides
Screenshot by ProGameGuides
Screenshot by ProGameGuides
Screenshot by ProGameGuides
Screenshot by ProGameGuides
Screenshot by ProGameGuides
Screenshot by ProGameGuides
Screenshot by ProGameGuides

Screenshot by ProGameGuides

Screenshot by ProGameGuides

Screenshot by ProGameGuides

Screenshot by ProGameGuides

Screenshot by ProGameGuides

Screenshot by ProGameGuides

Screenshot by ProGameGuides

Screenshot by ProGameGuides

Screenshot by ProGameGuides

Screenshot by ProGameGuides

Screenshot by ProGameGuides

Screenshot by ProGameGuides

Screenshot by ProGameGuides

Screenshot by ProGameGuides

Screenshot by ProGameGuides

Screenshot by ProGameGuides

Screenshot by ProGameGuides

Screenshot by ProGameGuides

Screenshot by ProGameGuides

Screenshot by ProGameGuides

Screenshot by ProGameGuides

Screenshot by ProGameGuides

Screenshot by ProGameGuides

Screenshot by ProGameGuides

Screenshot by ProGameGuides

Screenshot by ProGameGuides
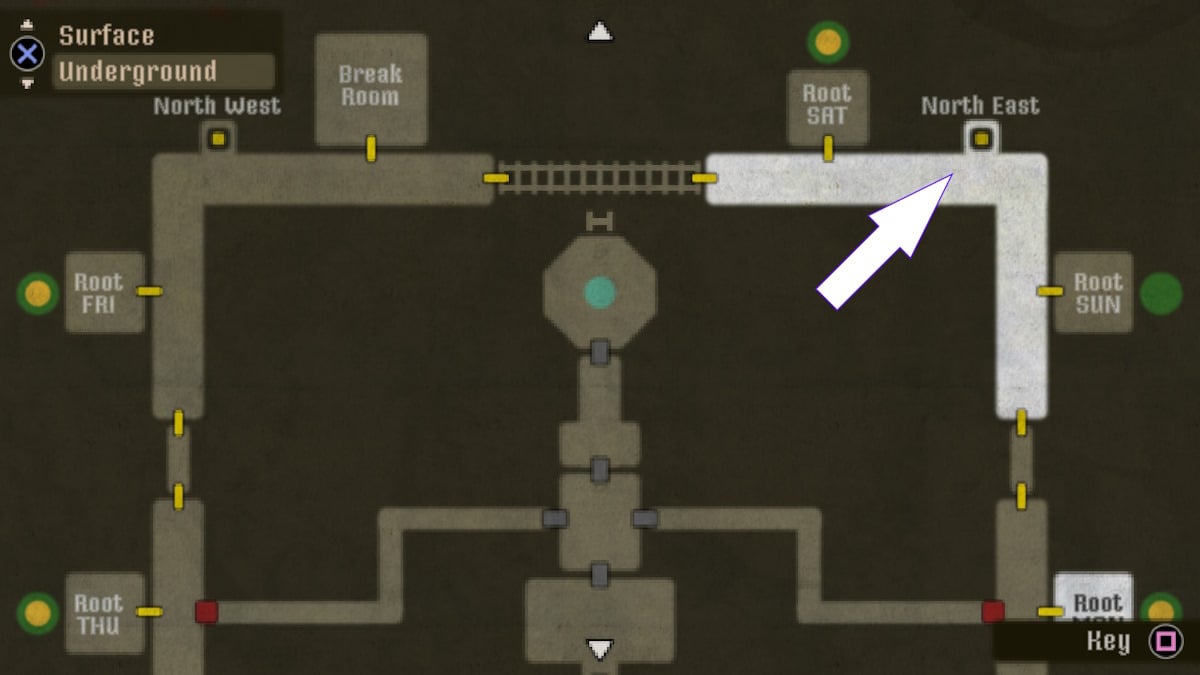
Image by ProGameGuides

Image by ProGameGuides
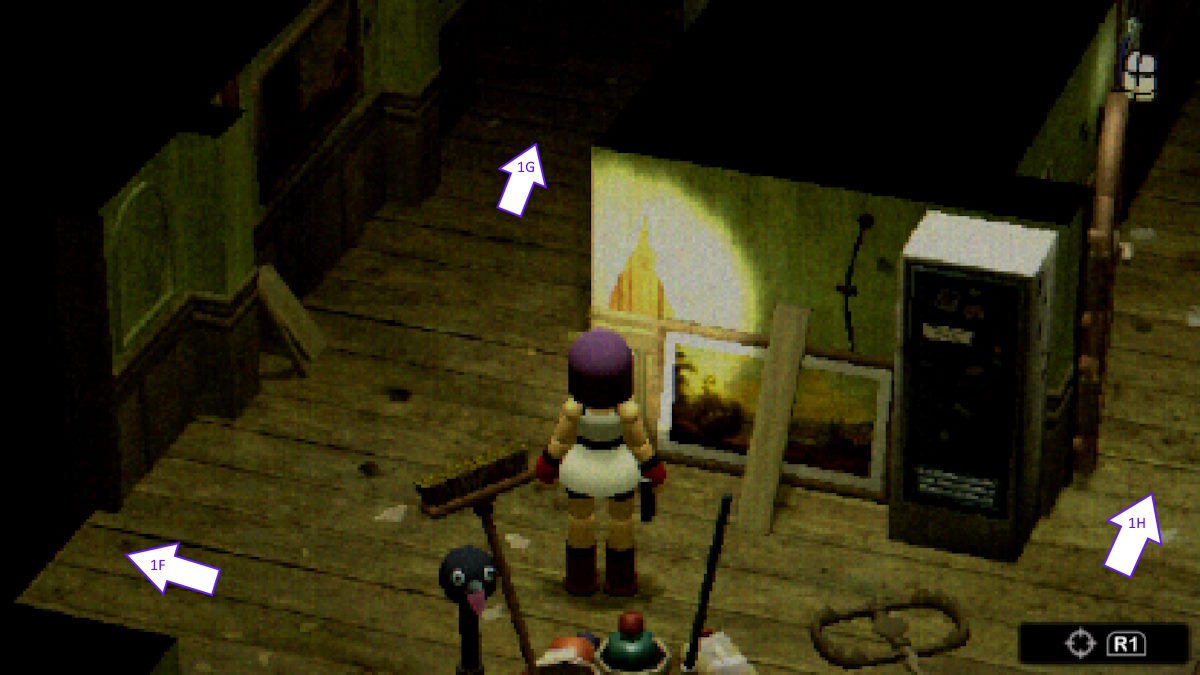
Image by ProGameGuides
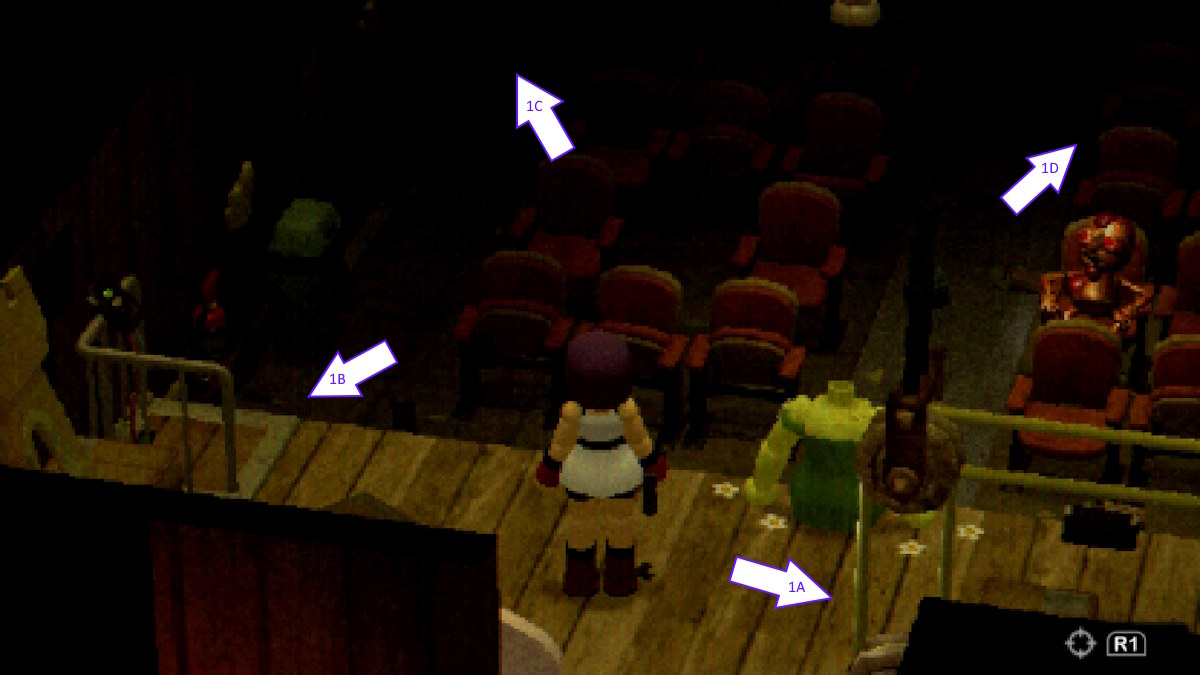
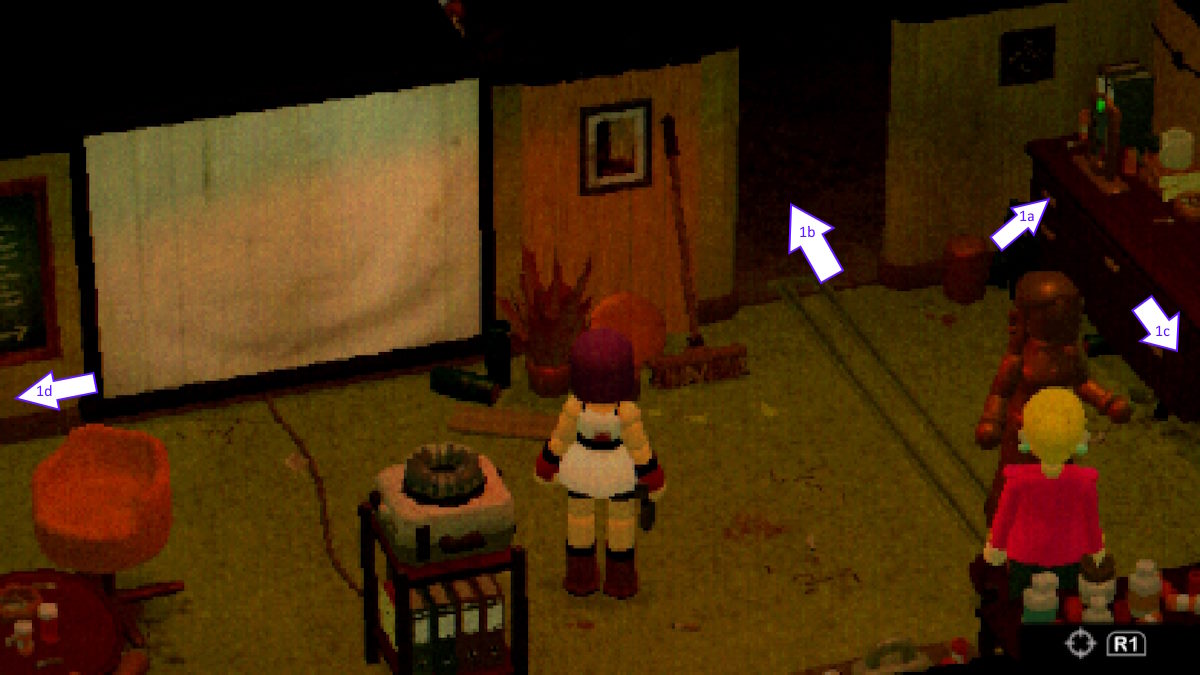
Image by ProGameGuides
Screenshot by ProGameGuides

Screenshot by ProGameGuides
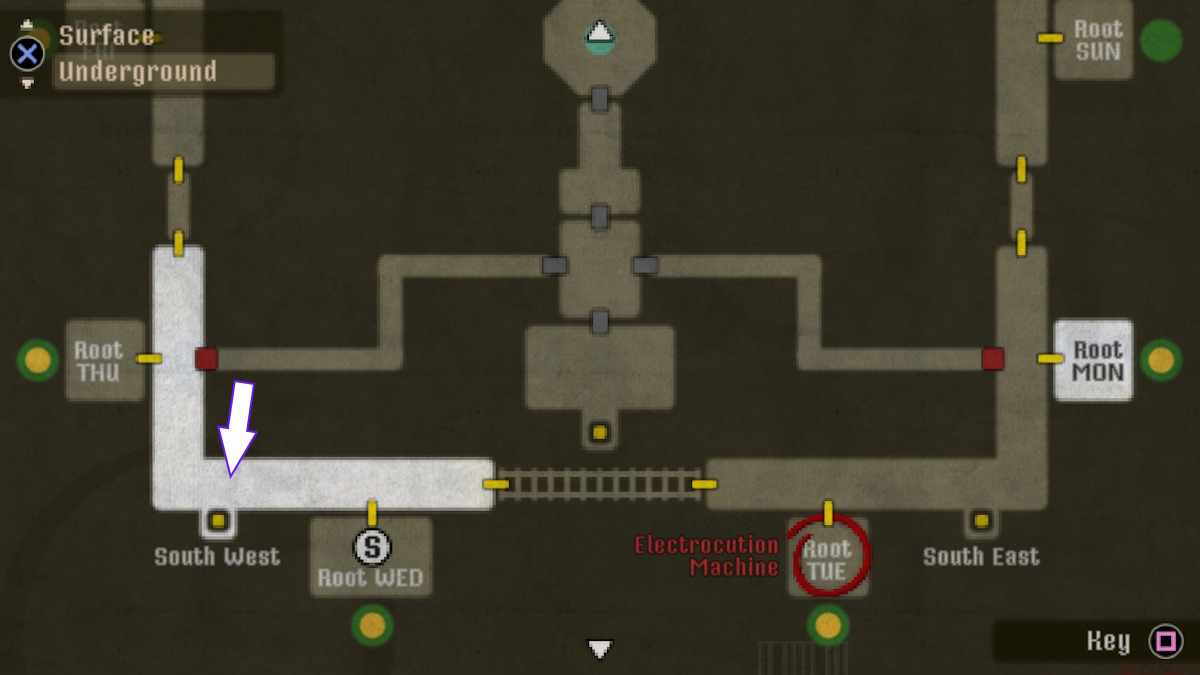
Image by ProGameGuides
Screenshot by ProGameGuides
Screenshot by ProGameGuides

Image by ProGameGuides

Screenshot by ProGameGuides

Image by ProGameGuides

Screenshot by ProGameGuides
Screenshot by ProGameGuides
Screenshot by ProGameGuides
Screenshot by ProGameGuides
Screenshot by ProGameGuides
Screenshot by ProGameGuides
Screenshot by ProGameGuides

Screenshot by ProGameGuides

Screenshot by ProGameGuides

Screenshot by ProGameGuides
Screenshot by ProGameGuides
Screenshot by ProGameGuides
Screenshot by ProGameGuides
Screenshot by ProGameGuides
