metre to learn the local language with the assistant of our Chants of Sennaar walkthrough .
Chants of Sennaar is an indie game about learn newfangled spoken language . If you need to come through in this challenging game , you ’ll most in all likelihood need a hand during your playthrough . you may find answer to every puzzle in chant of Sennaar in the walkthrough below , as well as info on how to unlock all achievements .
Complete Chants of Sennaar Walkthrough Guide (All Endings)
In order of magnitude to complete Chants of Sennaar and get all the achievements , you ’ll require to make out several languages , solve a whole caboodle of puzzles , and dispatch your journals . Here is how to get through the entire game and catch everything you demand to 100 % this challenging puzzler title .
Chapter 1: The Abbey and the Devotees
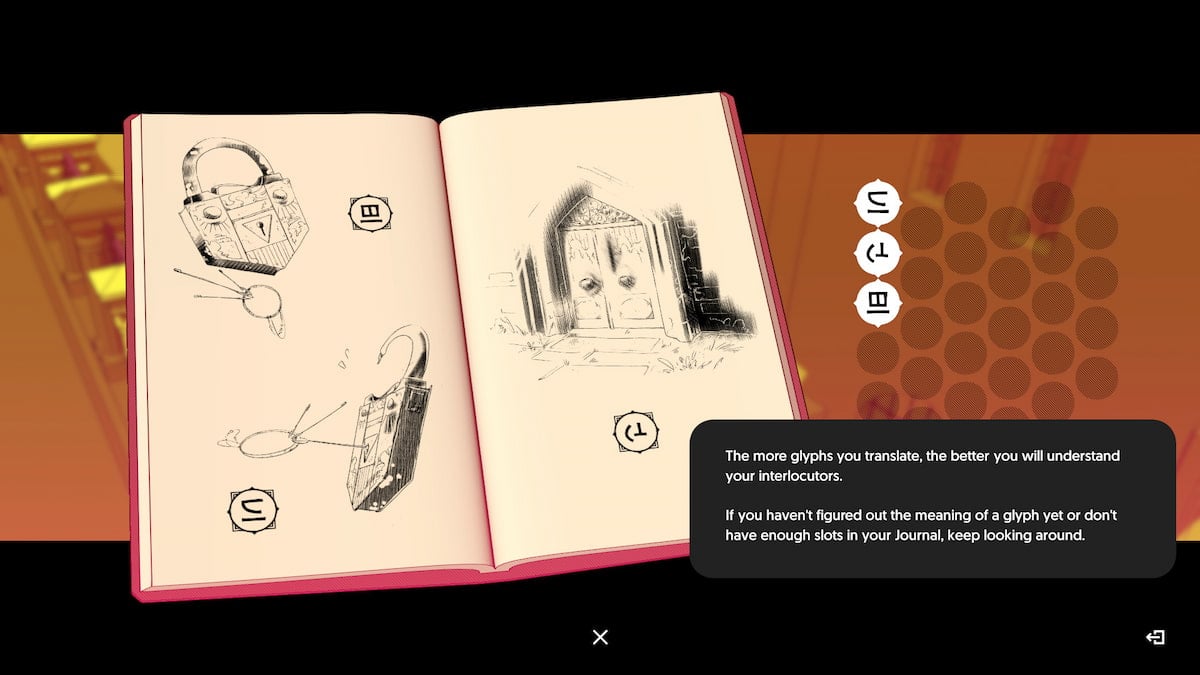
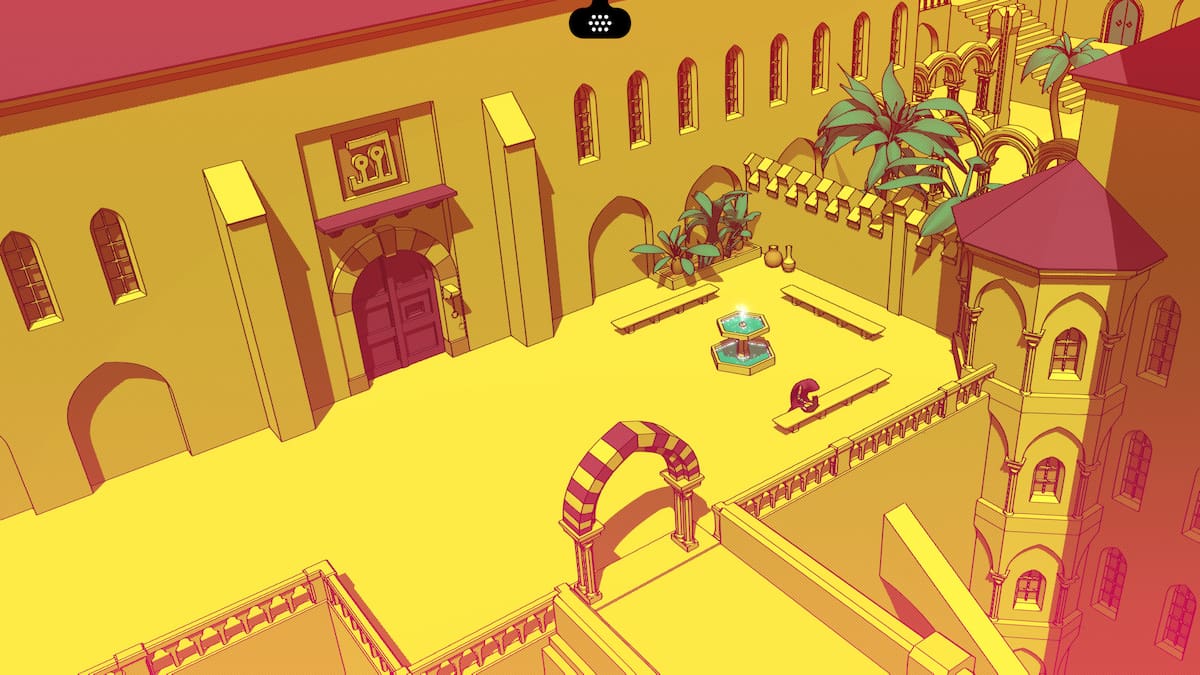
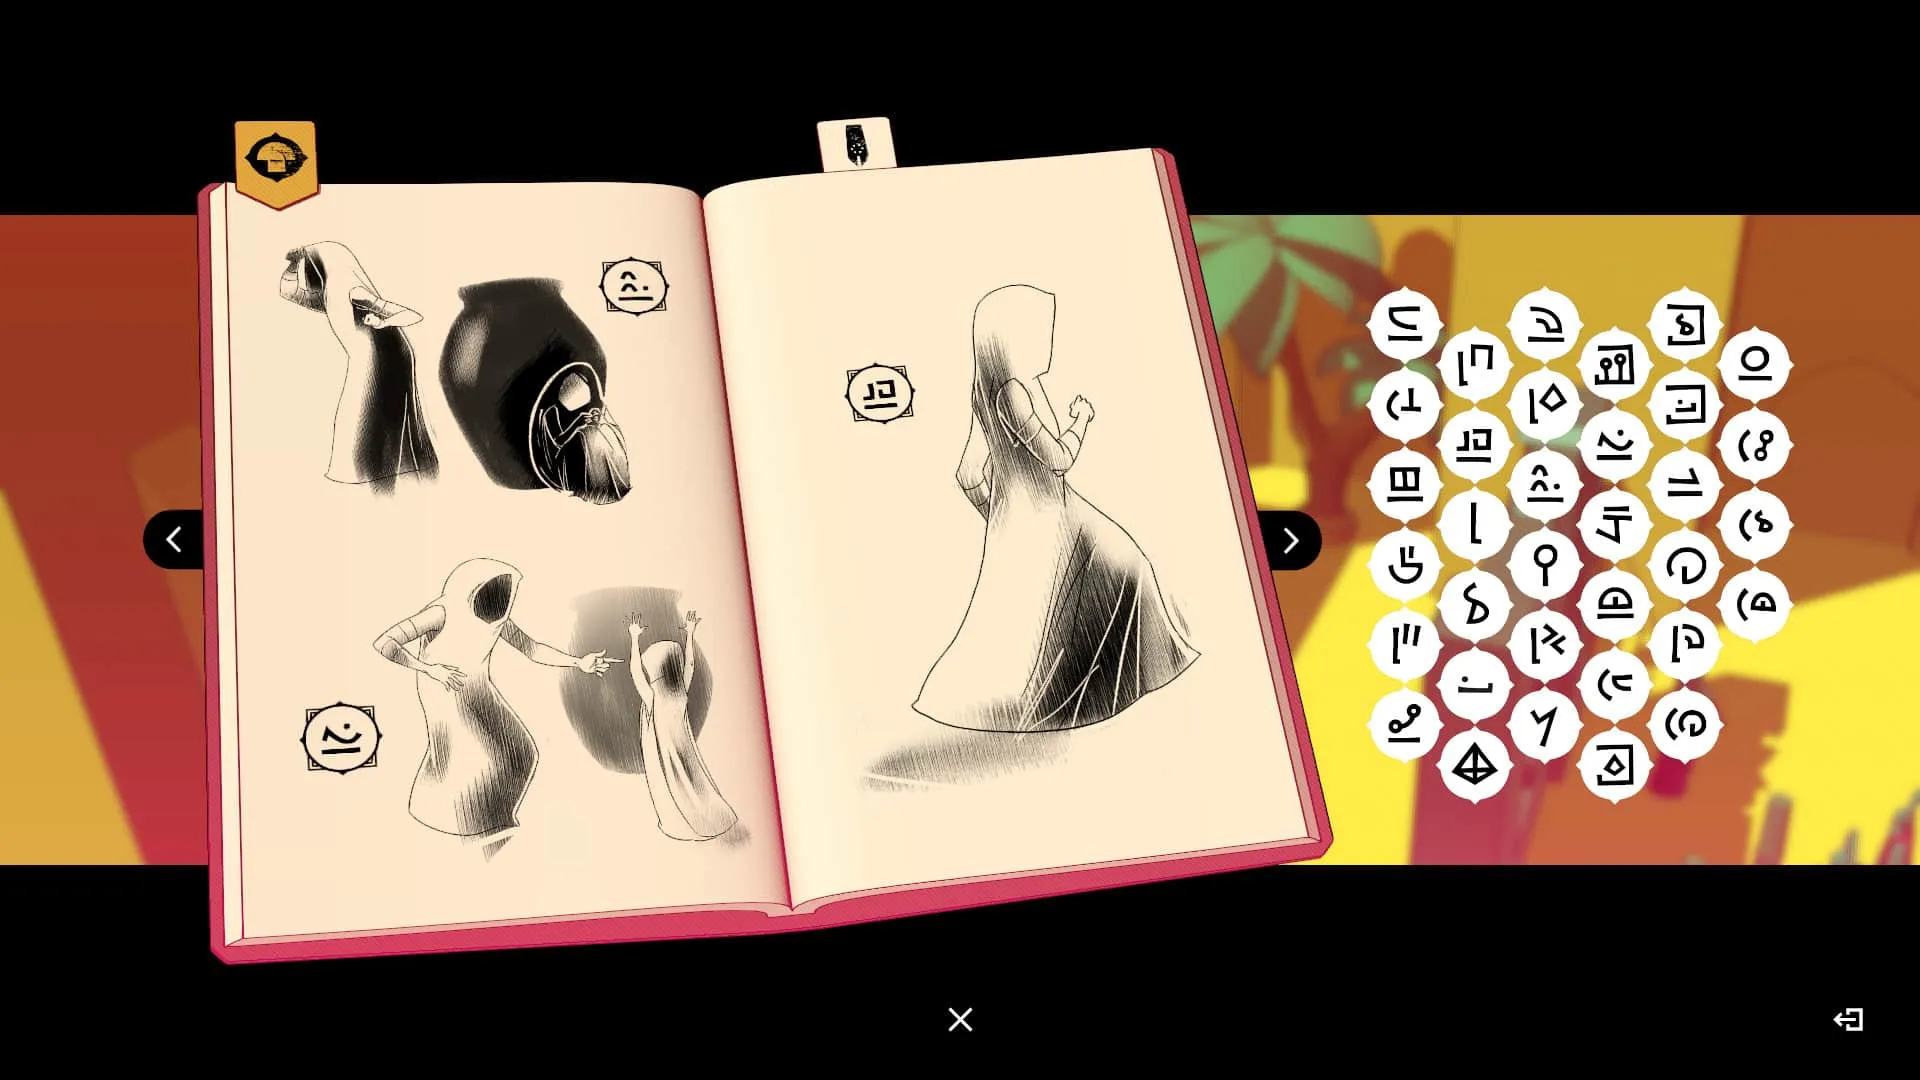
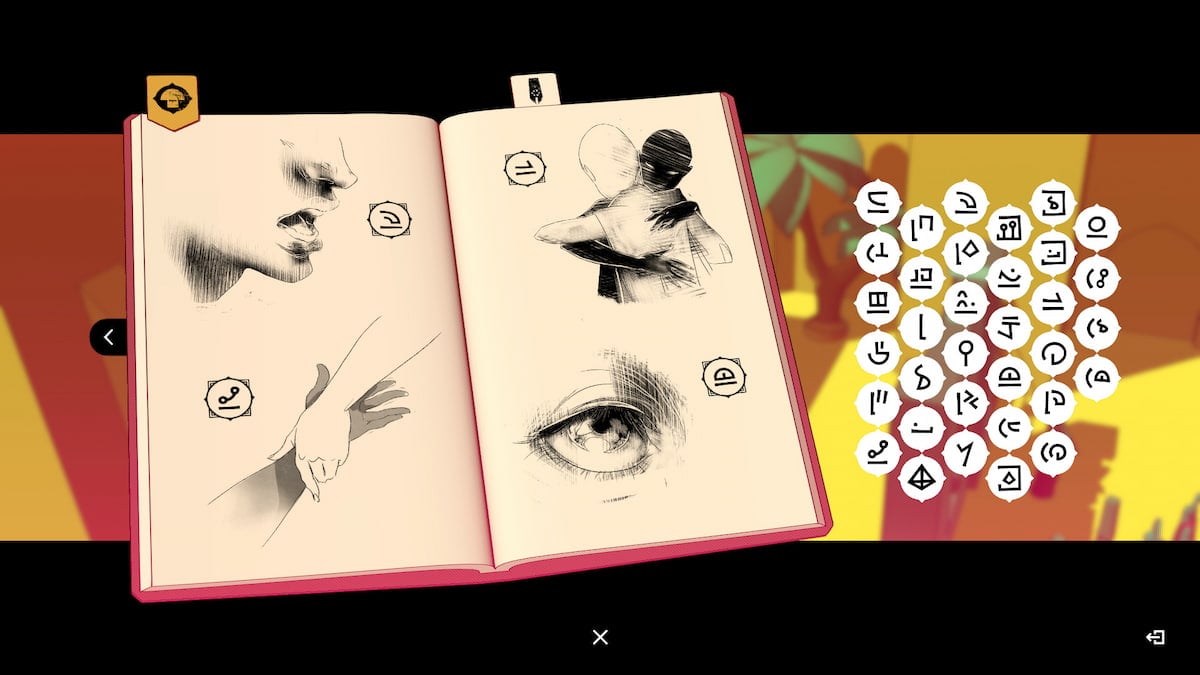
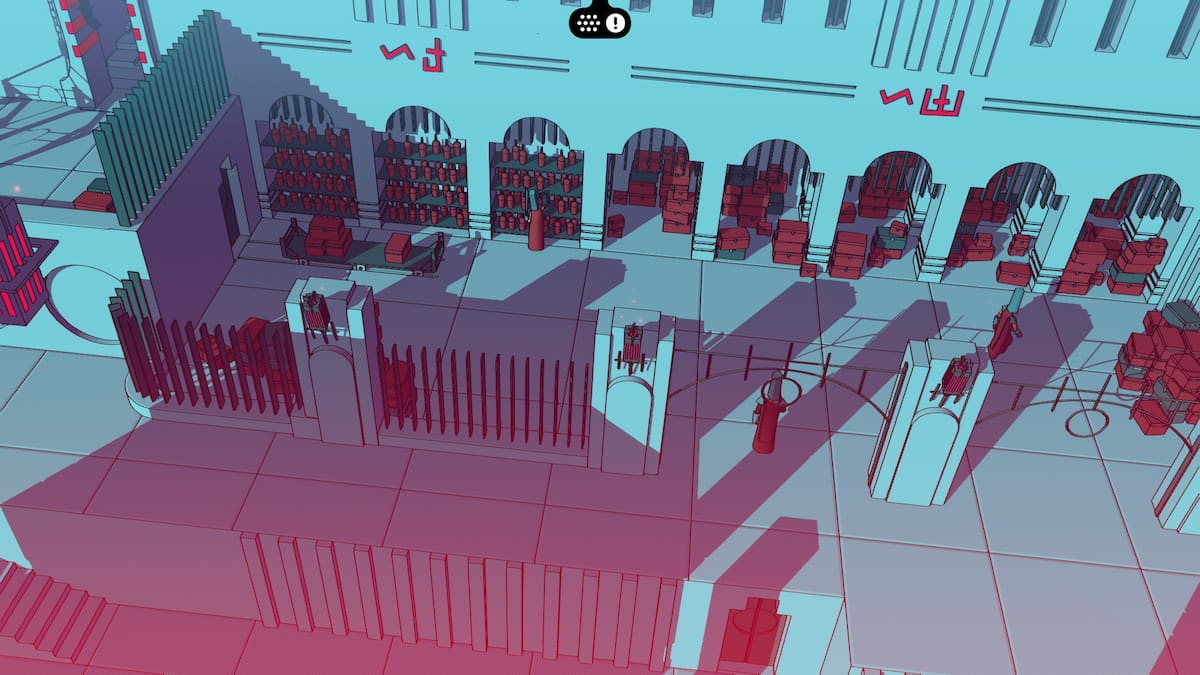
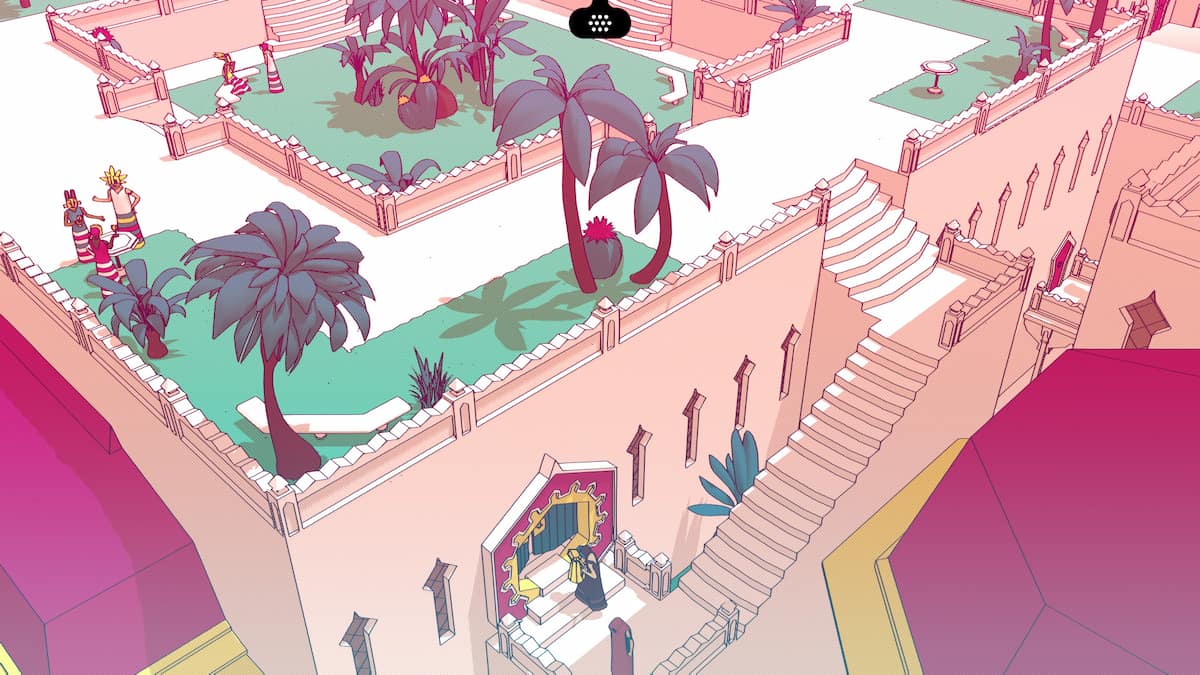
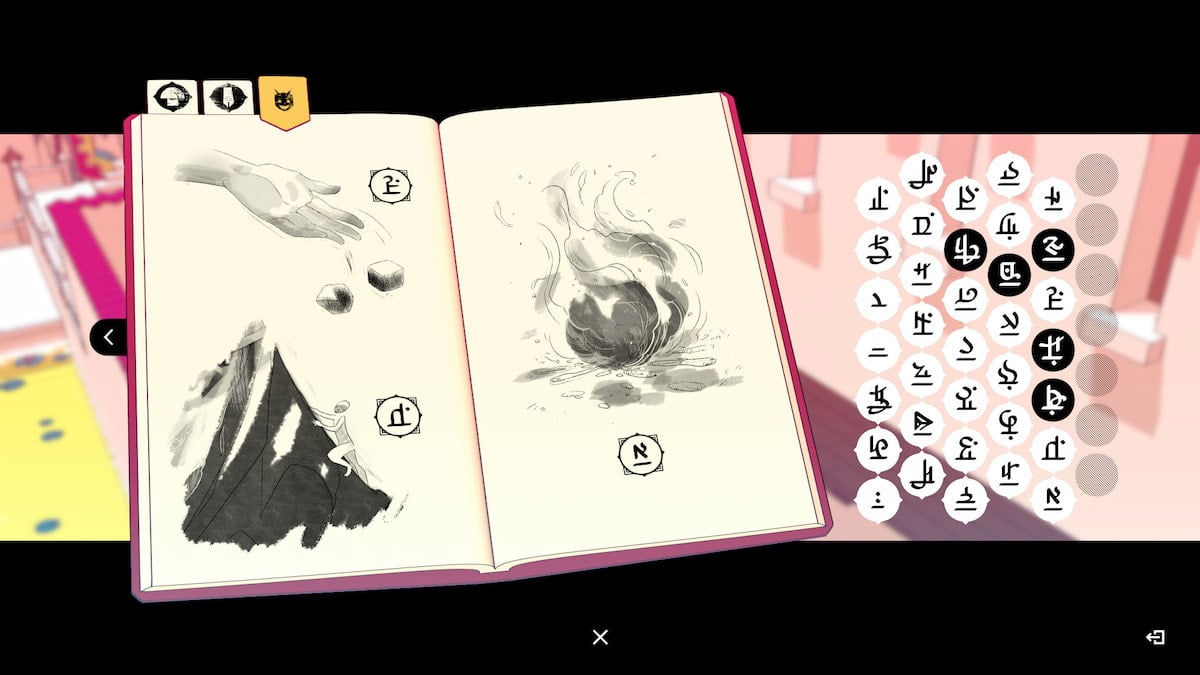
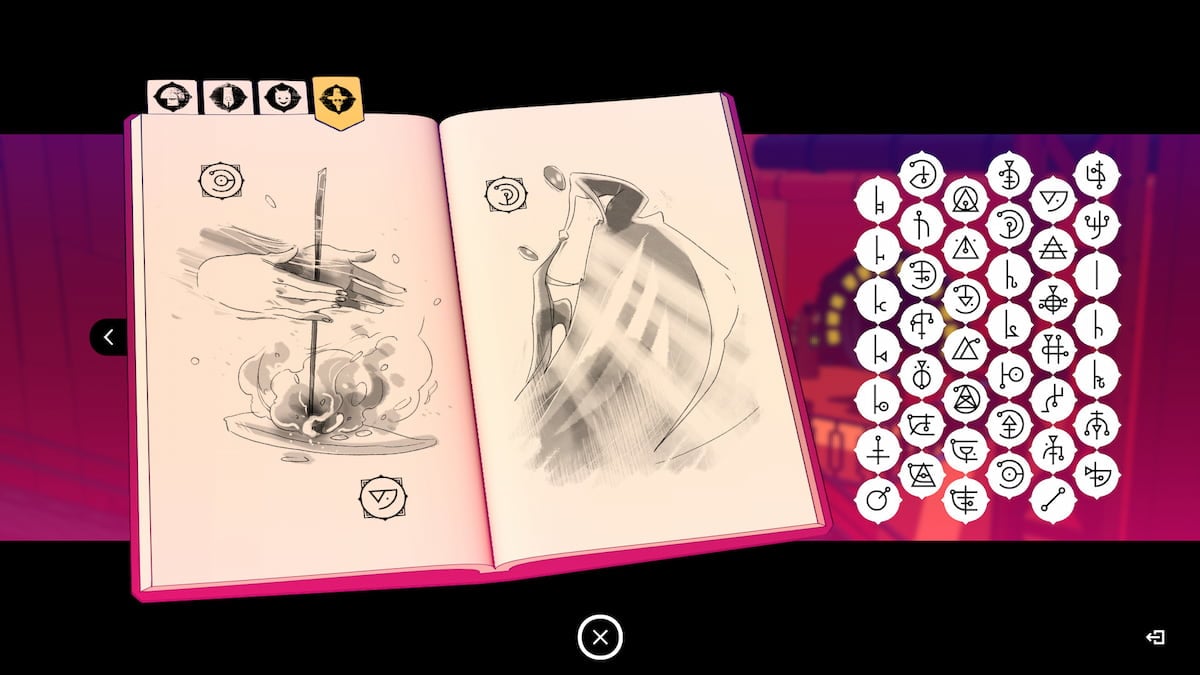
The first location you come across in Chants of Sennaar is the Abbey locating . In it , you will meet a tribe of people called the Devotees , which have a language unique to them . for get through this area , you ’ll need to collect all 34 glyphs and put them in your daybook .
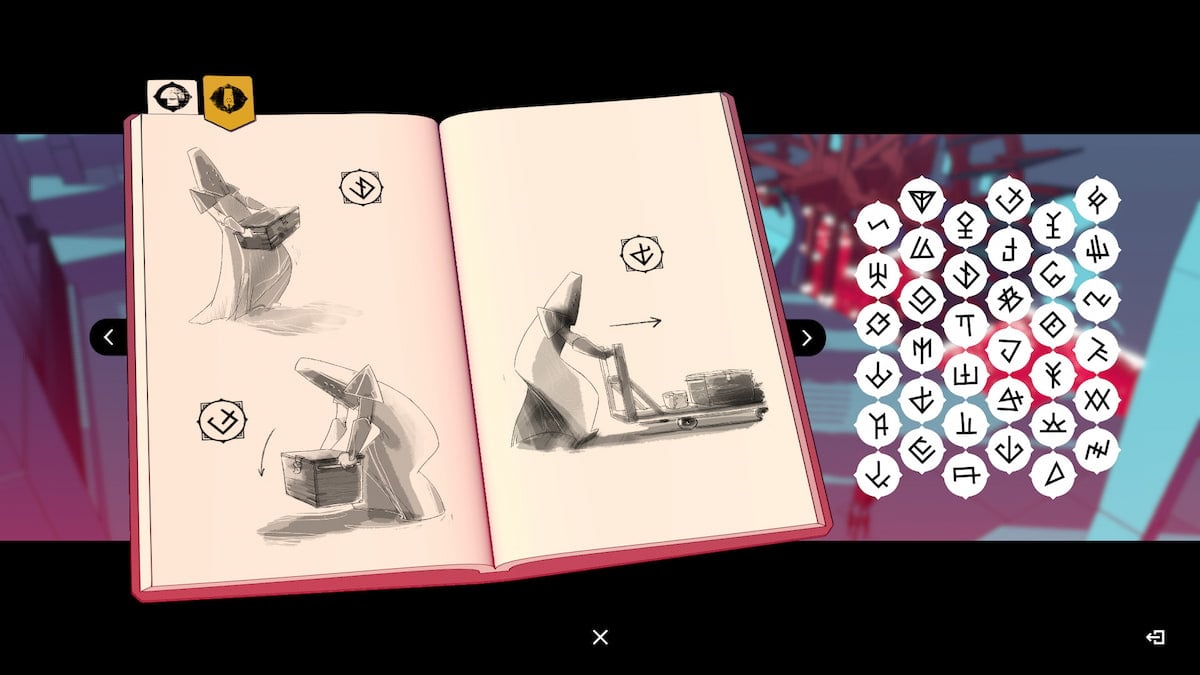
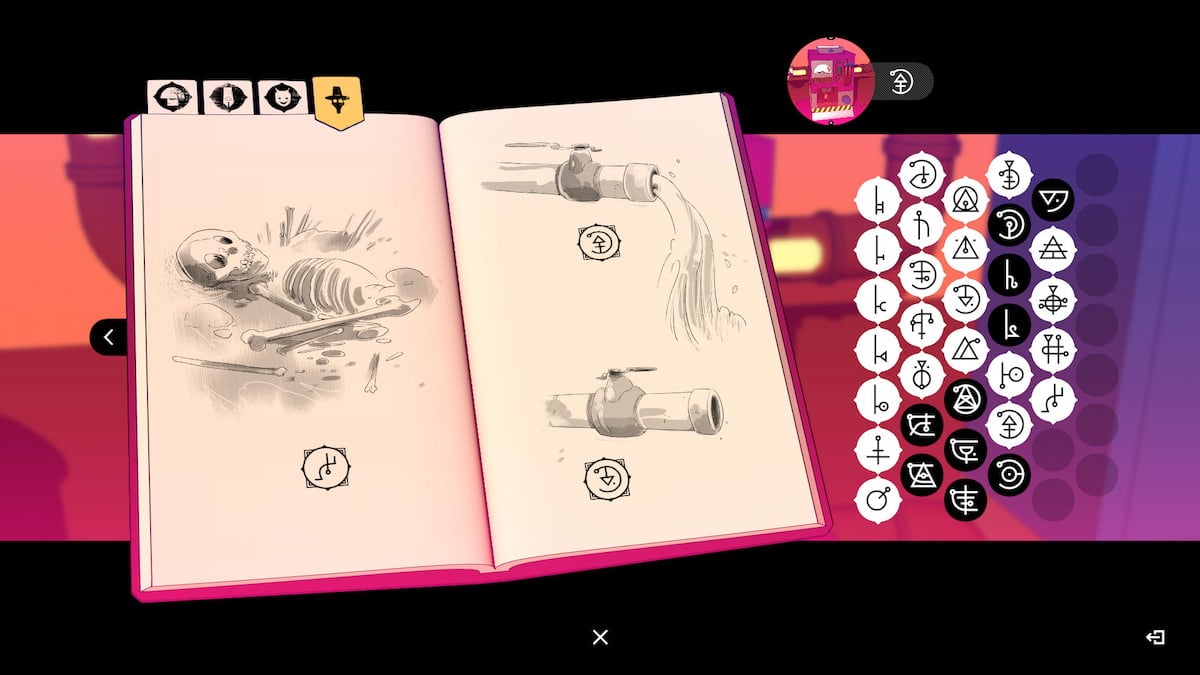
After lead the start country , the first mystifier you ’ll come across is the door opening . This will give you the first glimpse into the speech , and you ’ll postulate to take note of the door mechanism and what it does . When you push it up , the door open , and down the door close . Once you interact with the signboard by the mechanism , you could mark thewords for " open , " " tight , " and " door . "
When you get to the next mystifier , you ’ll now have it off the words for " heart-to-heart " and " close , " so you could figure out which order to open and close up the pee spout . As in the screenshot above , these areOPEN , OPEN , CLOSE , OPEN , CLOSE , OPEN . exposed or shut the spout in that purchase order to empty the pee out and carry on on your way .
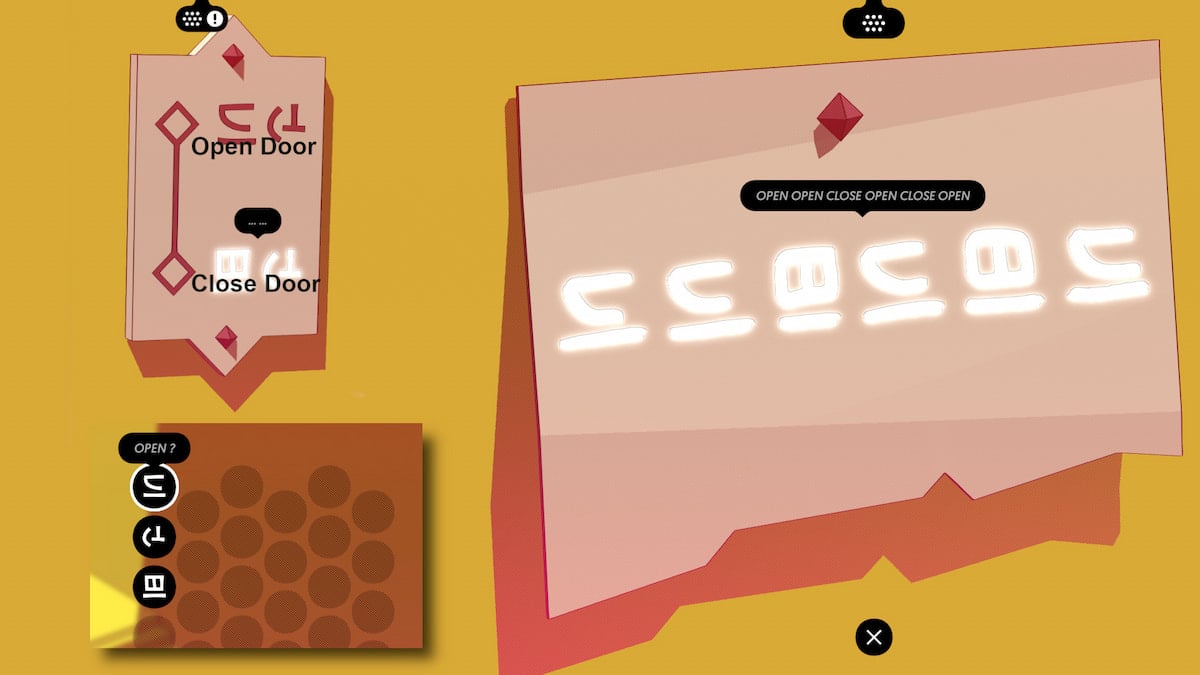
Image by Pro Game Guides
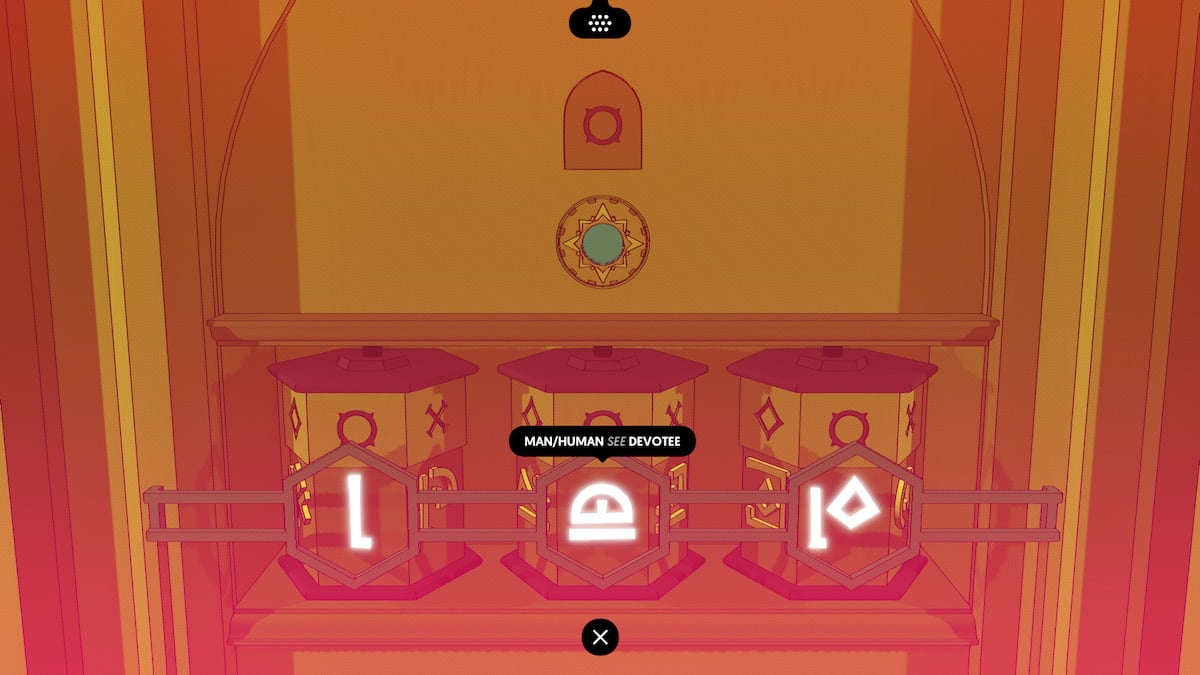
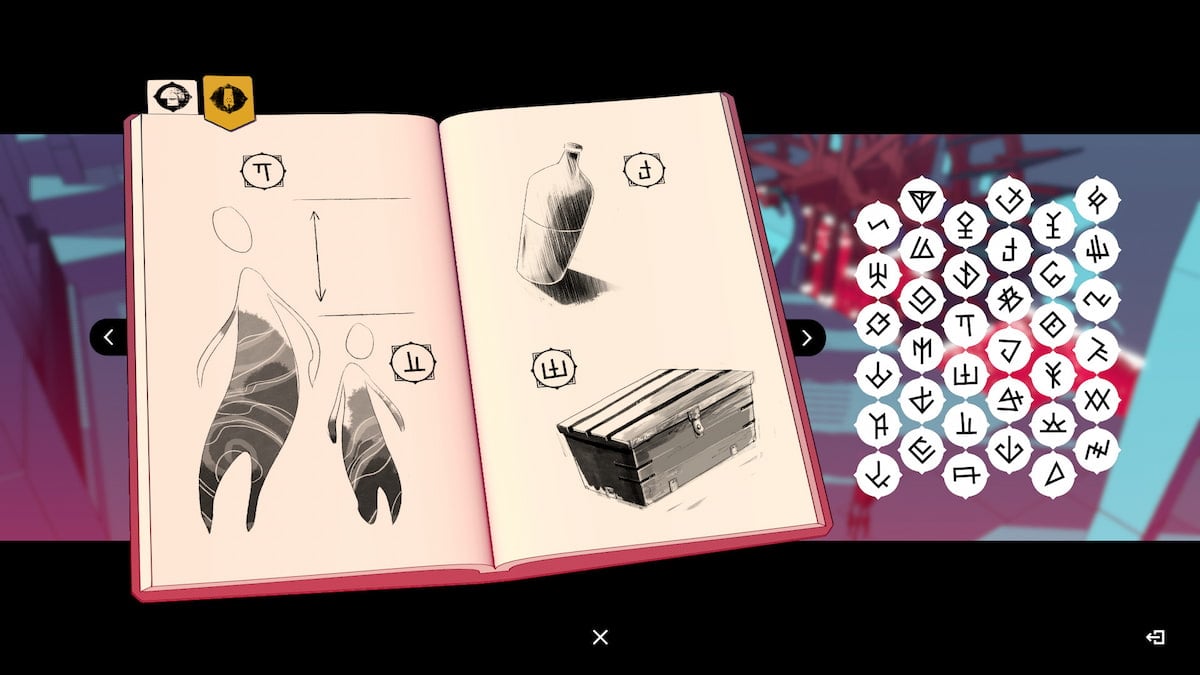
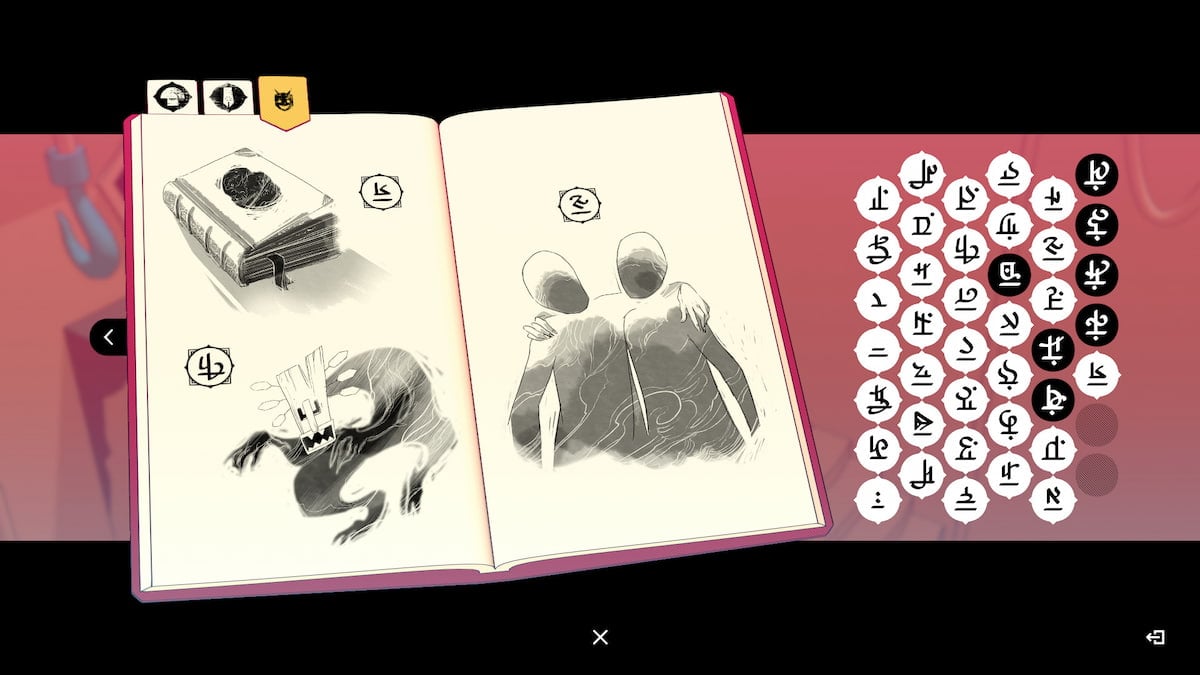
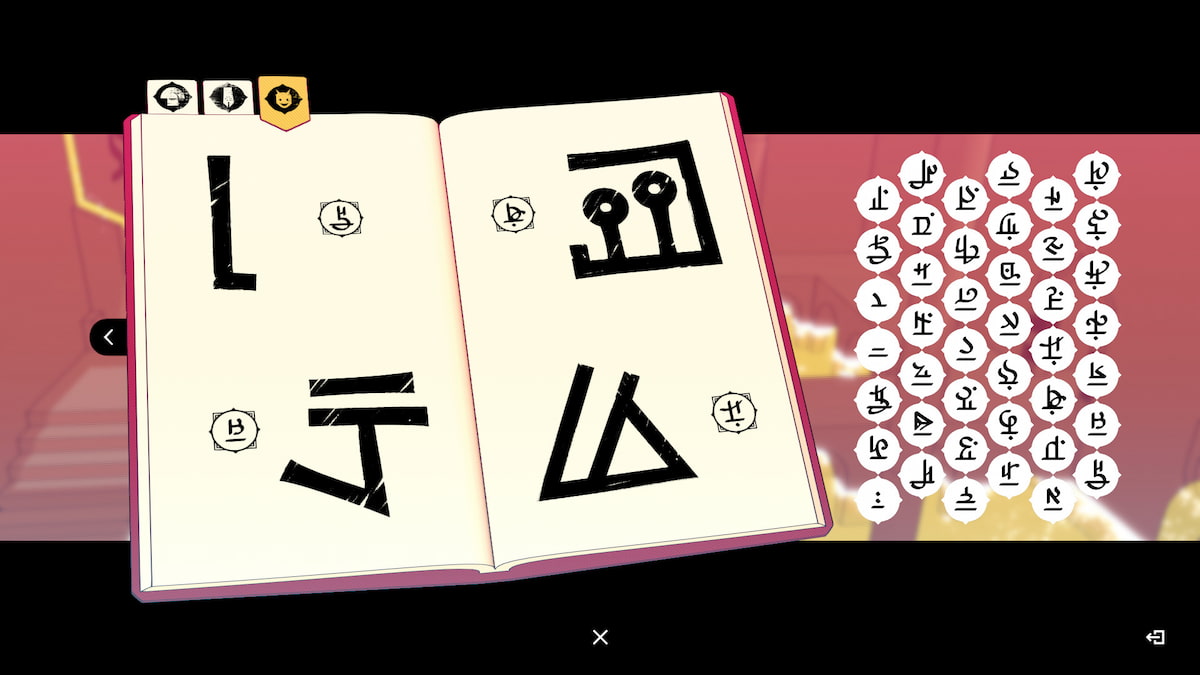
Afterwards , you will have the opportunity to add these to your diary as Book you have learned . Plug the three symbol in for faithful , opened , then Door by the lottery depicting each one of these picture . Your daybook should bet like this when you are done :
Achievement : That ’s the SpiritGet this accomplishment when you fill in this first varlet .
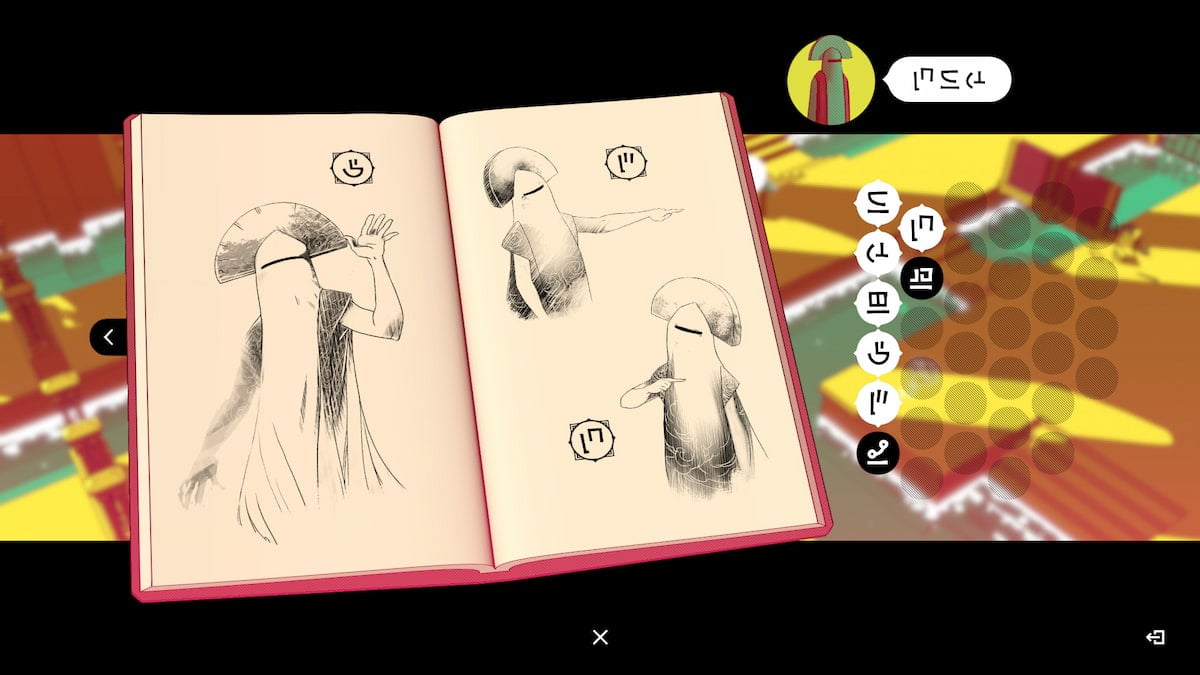
Head to the next department , and you will run across a person . It will be our first time interacting with another person , but thankfully , they will utter in symbols . Since we already know the words for open , close-fitting , and doorway , we can determine that the other somebody is firstgreeting you , then is ask you toopen your door . you’re able to rewatch the other person ’s activeness and word by select thetwenty - side shapewhere the somebody was standing .
Screenshot by Pro Game Guides
so as to get through this puzzler , you will call for to first open up the pathways for yourself , then your friend . When they instigate you to open up the doors , they are asking you to pull the levers in front of you . They will then take out the lever needed to get you through the puzzle as well . First , you ’ll need to extract the lever in front of you so you could both take the air to the next section , then they will draw the lever in front of them . After that , you will both head up some stair to get to the next lot of this waterways puzzler .
You ’ll need to pull the lever in front of you ( the lever tumbler label 1 in the persona above ) , then 2 , 3 , 4 , and then pass to the third lever and commit it again ( 6 ) . Pull lever 5 . Pull the 2d lever one more time ( 7 ) then you both will be able to get through the whole area . Your friend will then start the door at the top of the blind , allowing you to head up to the next area . If you still need helper , here is a agile videoI made of the puzzler .
There are several new Glyphs you may learn if you interact with all the murals on the wall . These glyphs can also be find while playing the basic card game with the person in the main square . Once you have these , you will be able to unlock the church pretty easy as well . But first , you ’ll need to be able to get into the Abbey right .
Screenshot by Pro Game Guides
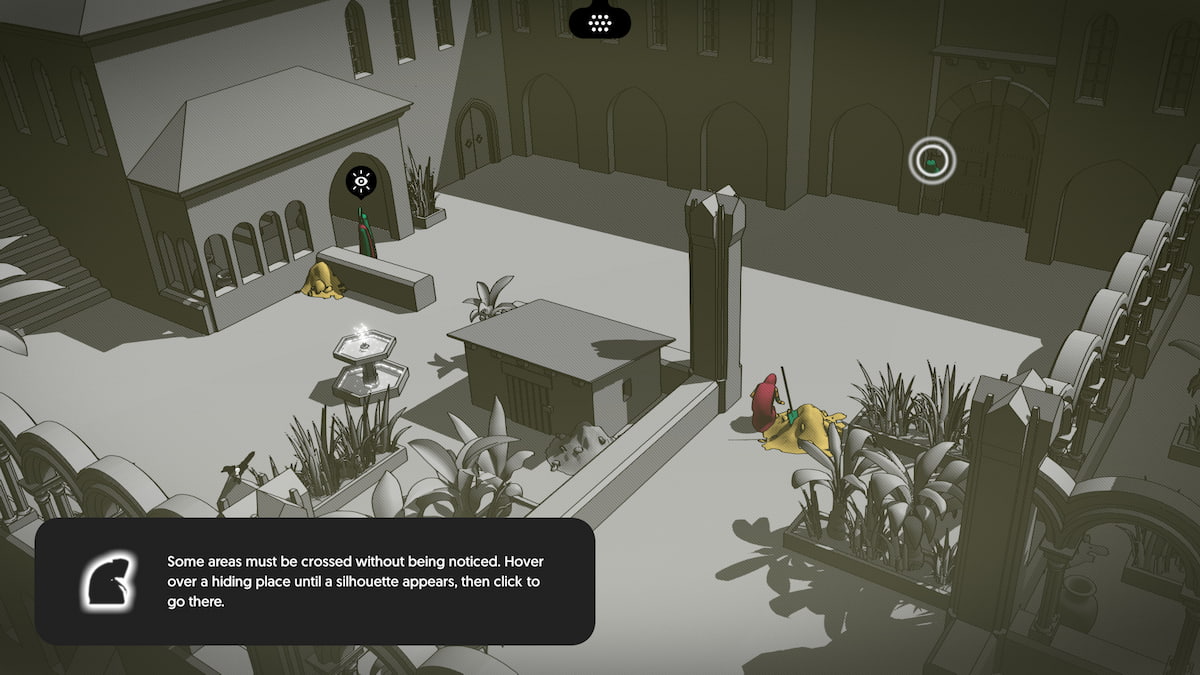
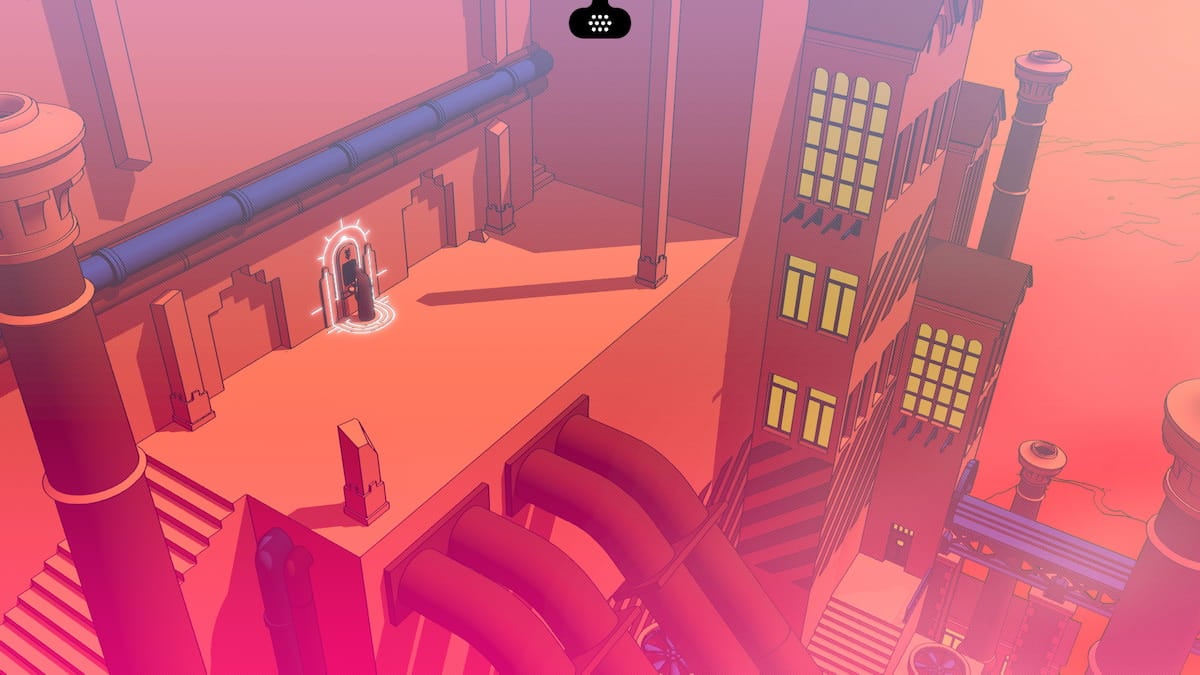
out of doors of the Abbey , if you head down these stairs to the rightfield on the same screen with the first warrior you have met , you ’ll come across aFast Travel spot . Unlocking this does n’t do anything for you yet , but you will need it after . So verify to interact with it before you move on .
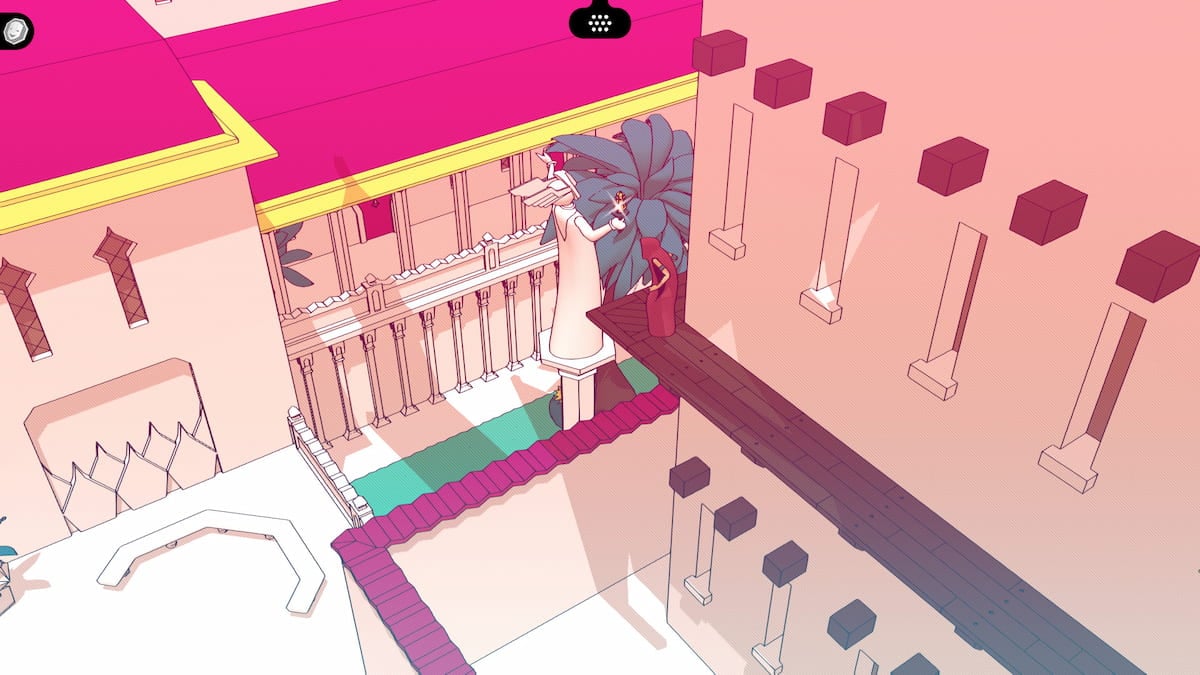
Once you get to the door of the Abbey , you will observe that the Devotee within refuses to let you in . This think that you ’ll have to obtain an substitute entrance . Walk south from the Abbey ’s front door ( after petting the kitten ! ) , and a cutscene will play on the balcony here .
accomplishment : RascalRing the bell and get to the guard three times at the front door of the Abbey .
Screenshot by Pro Game Guides
This youth is asking you to play hide - and - seek with them ; follow them out and encounter them in the independent square where the Warriors are keeping the Devotees put away out of their spiritual building . The youth will then break away away again , asking you to find them . They will be in the country between the murals , near the person that only says " Hello ! " The last place they will hide will be down the stair aright outside the Abbey door . If you interact with the Thomas Kid here , they will show you a room to try into the Abbey .
Achievement : Welcome to the TowerReach the Abbey
After you cease make for pelt and essay with the child , you will get a page to fill out with the Devotee wrangle for seek , find , and go . This is what the ruined page will attend like .
Screenshot by Pro Game Guides
Once you hedge inside thehole in the wallthe child showed you to get inside the Abbey , you will need to hook by the threshold guard . The child will show you how ; you need to interact with the Stone on the ground , then hold one at the bell . Once the Devotee on guard is disquiet , you could swipe up the stairs on the left side of the screen door .
In the next screen door , the youthfulness will call for you tohelp find a keyto get inside the room access . The key will be cover on the top of a shelf on the left side of the screen . Look for something that glitter if you are have fuss retrieve it . It is circled in calamitous in the screenshot below .
After the child leaves you when you are both in the Abbey right , you will get a page with three new symbols on it : the Devotee Logos for Up , Not , and gratis . Fill them in like the page above to nail this page and unlock these words .
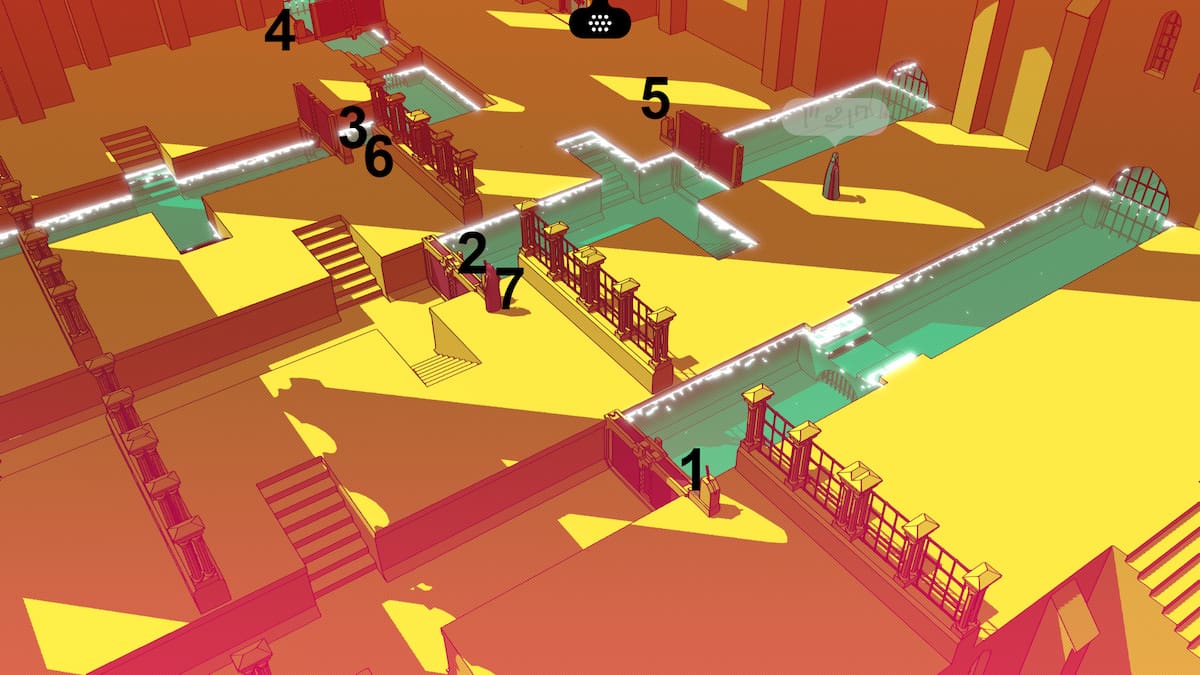
Image by Pro Game Guides
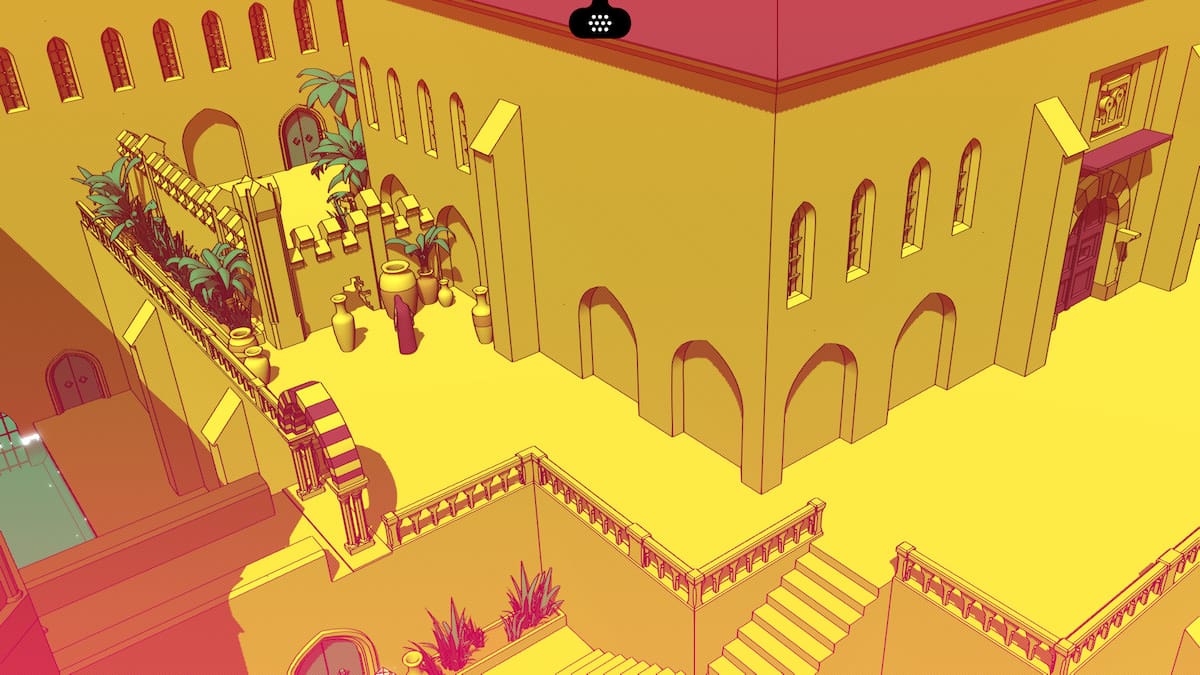
After getting the key , you may interact with the door , then practice the key on it . This will allow you to head into the Abbey right , where there are enough more puzzle to be found . Head across the court , going into thedoor at the right of the concealment . Next , keep heading right until you come across this Trolley Puzzle . The distributor point of this puzzle is be able to push the ladder over to the right until you climb onto it to get the detail out of the bird ’s nest inside the tree .
Move the trolley pieces in order of the pictures above . I have also included a video below to make moving these a little more visceral . Once you have move theladder over to the Sir Herbert Beerbohm Tree , you will be able-bodied to pick up thecoin that is inside of the bird ’s nestin the Sir Herbert Beerbohm Tree . Here is avideo of the solutionof this puzzler .
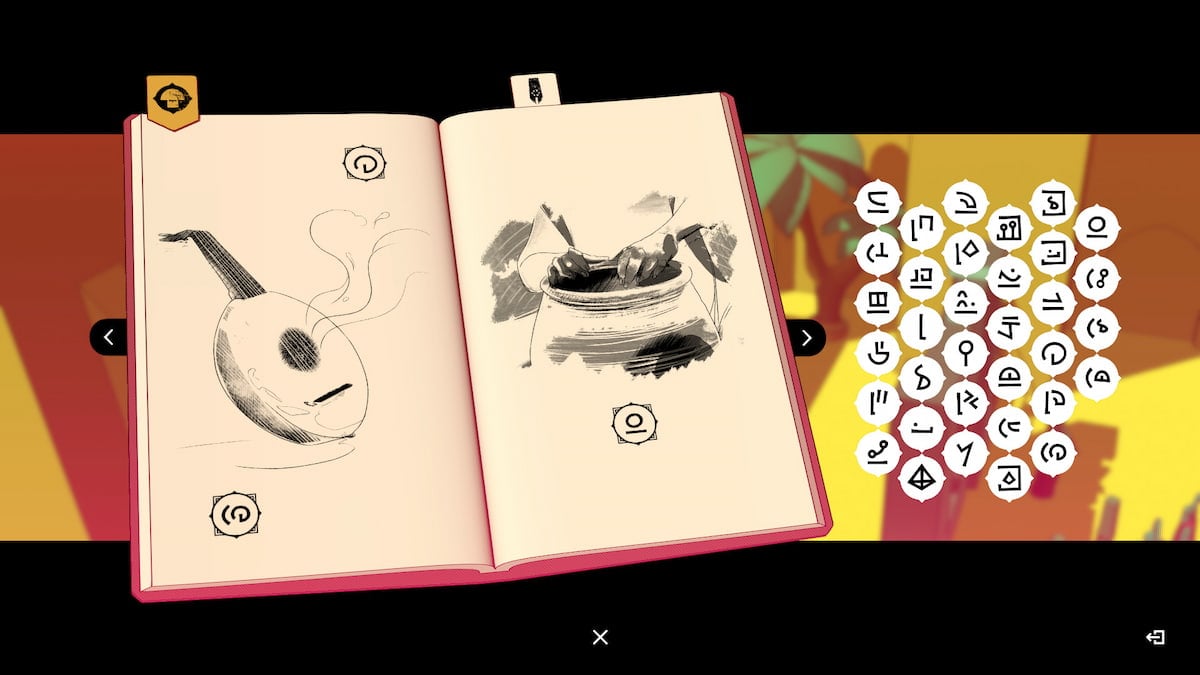
Next up , head south from the Trolley screen and gossip with the people on this screen to get more glyph to fill up in . This Sir Frederick Handley Page will seem if you have talked with the melodic instrument maker , the pottery manufacturing business , and the signs on their doors . you could also interact with the keys sign as well as the potion sign to replete in afterwards .
Screenshot by Pro Game Guides
After you have interact with everything you could come up around the Abbey , head to the front of the church service . Here , you will meet a Beggar who is appear for help . Give the Beggar the coin from the Trolley Puzzle .
There is a puzzle on the church threshold to get inside , and it shows four glyphs you should have filled out by now . Manis thelowest glyph , underneathDevotee , which is secondly lowest . Thesecond highest will be Warrior , and the highest on the list isGod . This hierarchy is displayed during the card game in the square if you have tried it out . It will look like this when you discharge it :
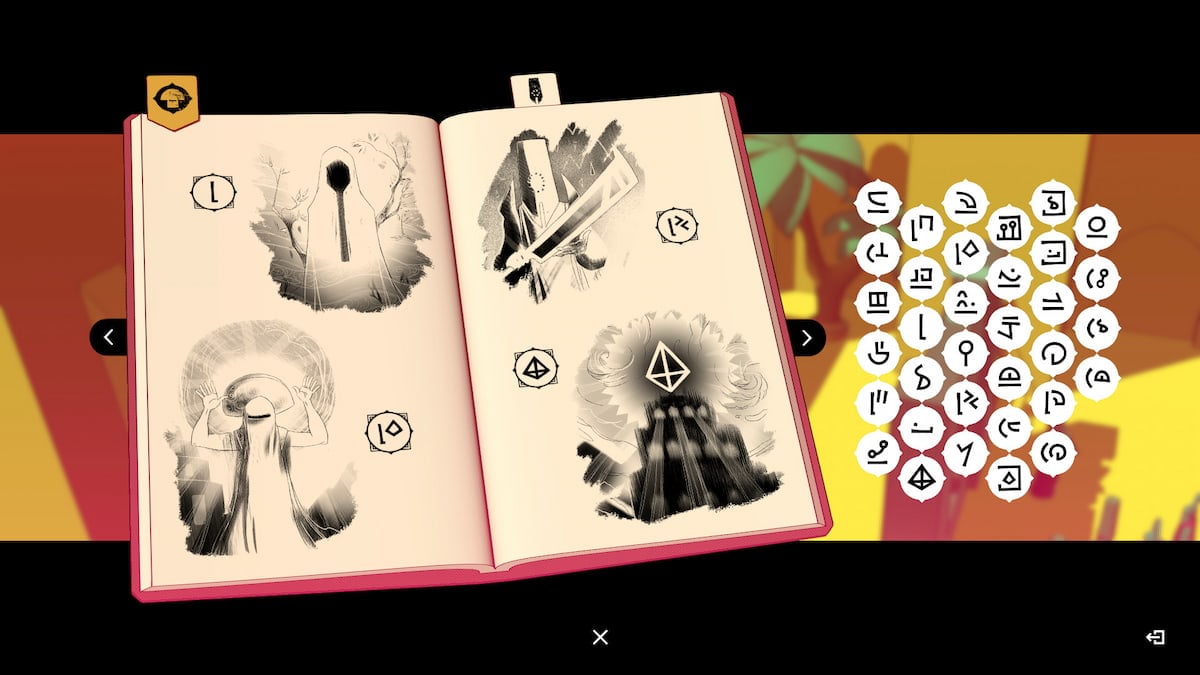
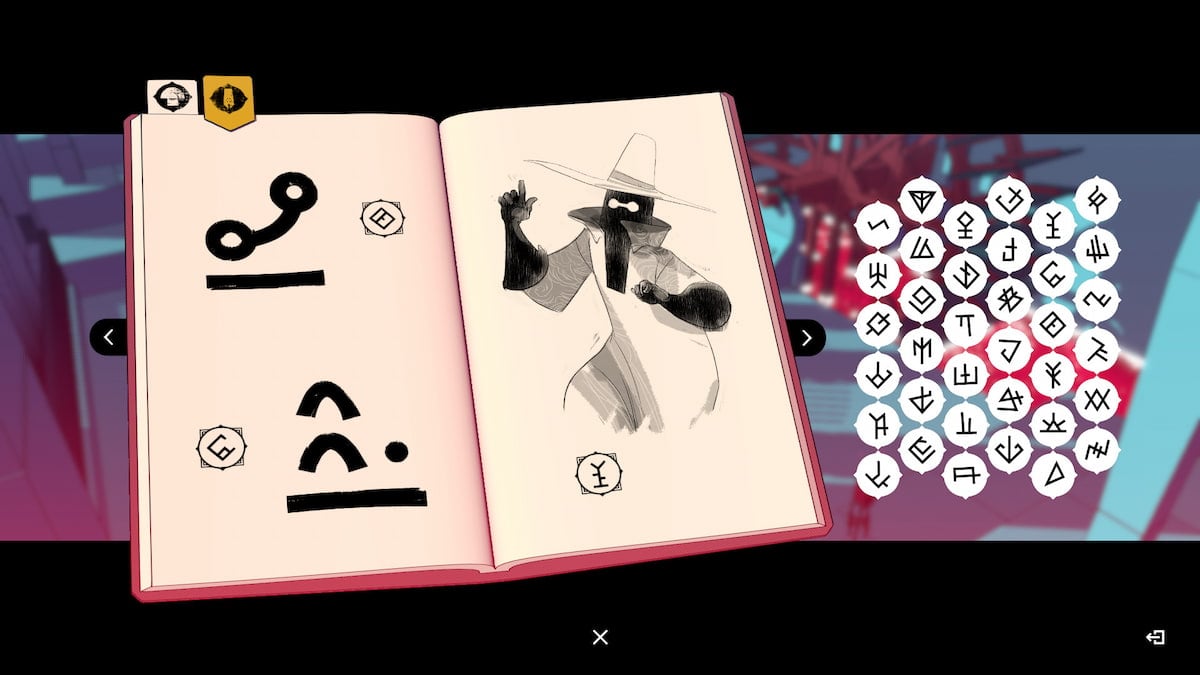
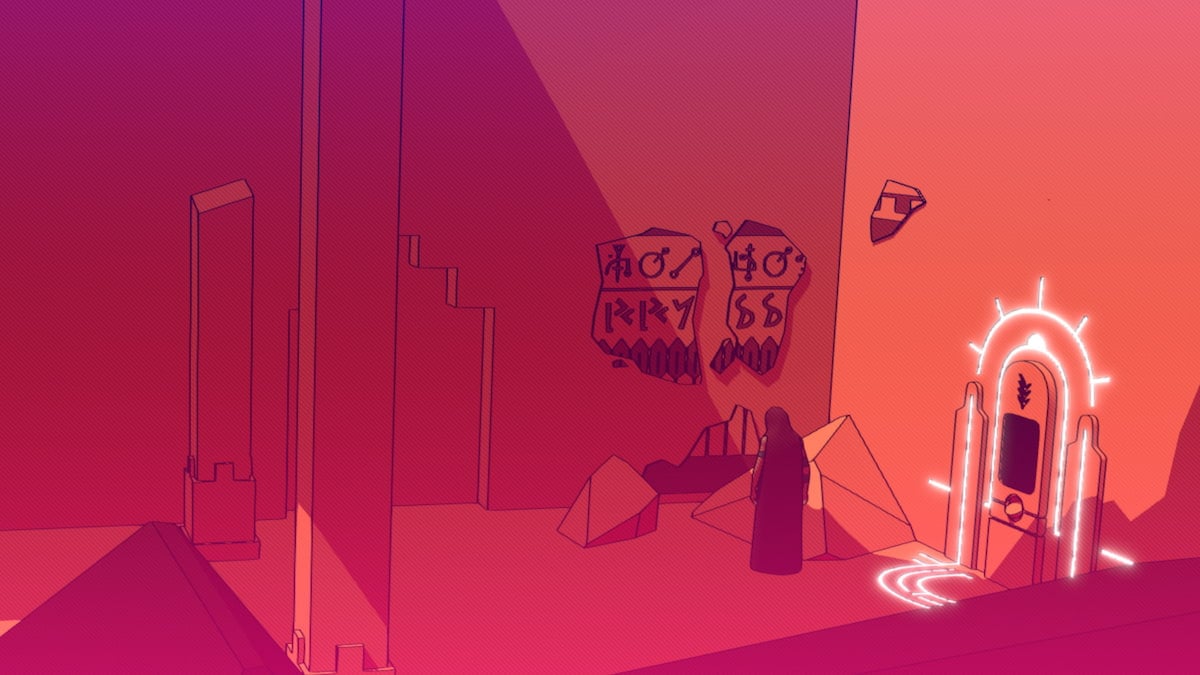
This will mechanically launch the church building ’s door . Head inside and talk with everyone , then search at the mural of the Preacher behind the altar to memorize theglyph for Preacher . This will unlock the Thomas Nelson Page for Preacher , dying , and Plant in your glyph script .
Image by Pro Game Guides
If you have interacted with the Preacher statue behind the Lord’s table in the church building , and the person standing in the garden , you should get the glyph page for Preacher , Death , and Plant . It ask to be fill out like the screenshot above .
Now that you have spoken to everyone inside , lead , and theBeggar will offer to assist you . They will offer you a slice of paper , and they will tell you where to find the Preacher . Take the piece of paper , and guide to theGardens . To get there , direct south from the Beggar , then go northeast in the hub .
This will drop off you in the bottom story of the Gardens , and you will be able to find the three pots you are count for here . channelize to the rightfield until you pass away the step and the fountain , and attend for these three sens in the upper part . It is star below . Underneath , you will be able to find aKey .
Screenshot by Pro Game Guides
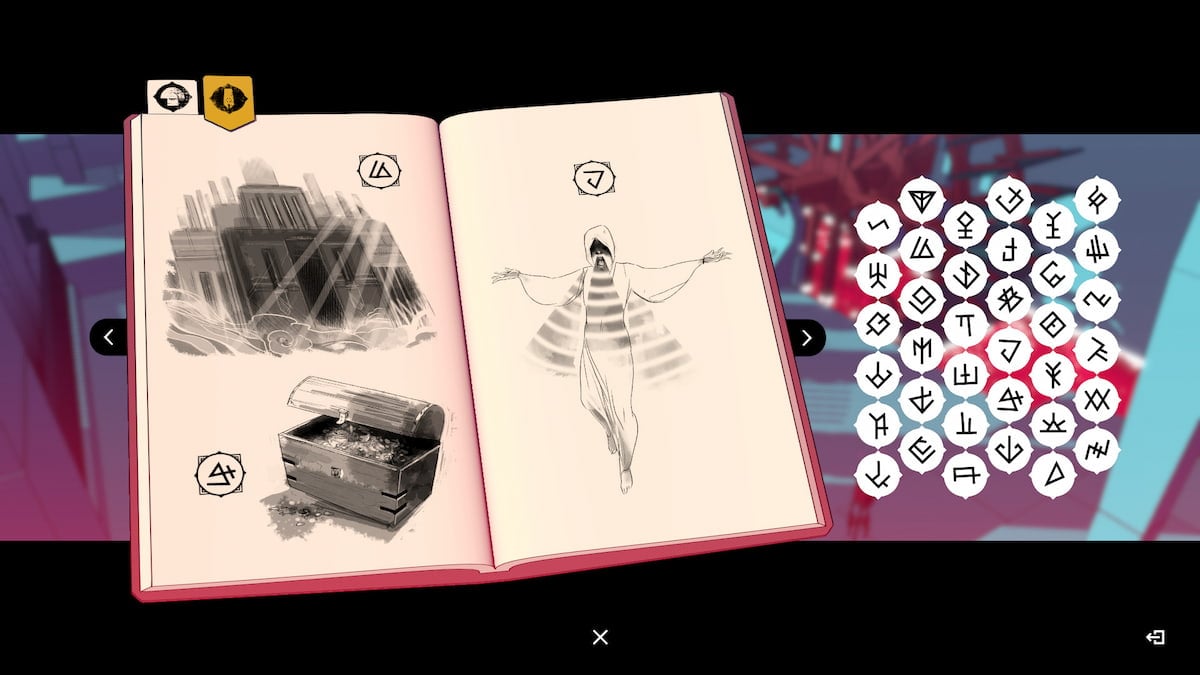
With the winder found under this dope , you’re able to finally unlock thePreacher ’s Garden Room . Go up the stairs , then head right until you see this locked threshold . Interact with it and use the key to open up it up ; go within . Interact with the desk to read thePreacher ’s Note , then pluck up theLens .
If you have interacted with the pottery maker , the potions sign , and the lens in the Preacher ’s locked garden room , you will get this Thomas Nelson Page with Pot , Potion , Key , and Lens on it . You will need to fill in this varlet like I have above to complete it .
steer back to the Beggar and the Church entrance now that you have theLens . Go inside the church service and watch over the priests that walk around the area into the prohibited area on either side of the church . There will be four mural puzzles on the walls . apply theLens to reach the little door on top of the puzzle , thenmatch the symbols on the three spinning Prayer Wheels . Once all three Prayer Wheels match the symbol up top , a bar will come up to show that you have done it aright .
Image by Pro Game Guides
When all four of the puzzle are done , you ’ll have the reply to theCemetery Puzzle . " The Man looks at the Devotee , the Devotee depend at God , the Preacher speaks to the man , and God looks at an Instrument . " You will need to head out of the Church , then in the south to the hub , then go west to find the Cemetery .
Along the path to theCemetery , you may find the secondfast travel point ; you ca n’t do anything with it but turn it on , but you might need it later , so you should verify to interact with it before you head into the Cemetery region .
As you take the air into the Cemetery area , if you have already interacted with the road star sign in the center of the hub , you will get the page for Cemetery , Abbey , Garden , and Church . It will depend like this when completed :
Screenshot by Pro Game Guides
The Lens teaser above gave us the answers to the Cemetery teaser . You ’ll need to turn the statues so that the " Man looks at the Devotee , the Devotee looks at God , the Preacher speaks to the human , and God depend at an Instrument . " So you need to turn the sermonizer to face the man , the Man to face the Devotee , the Devotee toward the God statue in the center , and twist the final statue so the musical instrument so it is facing God ’s oculus . Once the God statue moves , you’re able to get down into the next area .
The last glyphs page will come along when you have interacted with the statue in the Cemetery , as long as you have finish all the other fundamental interaction above . If you are still miss this varlet , you should go around and interact with the other statues in the Abbey with watchword carved below them .
Taking the step down from the Cemetery , you will regain a small atomic pile of sticks on the ground . Use theLenson it to light up the stick so you’re able to use it as a woolly mullein . From the torch , go down the stair and steer up into the maze . First , you ’ll want to find the Preacher . GoRight , Up , Right , Up , Up . Then look down at the Preacher ’s consistence .
Achievement : The Preacher ’s FateFind the Preacher ’s Body in the maze .
From the Preacher ’s Body , goDown , Down , left-hand , Up , Left , Up , Right , Rightto regain the lever to empty the hallway you came from . After flicking down the lever tumbler , goLeft , Down , Right , Down , Down , Left , Downto proceeds to the original hallway . The urine should be out of the way now , allowing you to move on to theFortress .
Chapter 2: The Fortress and the Warriors
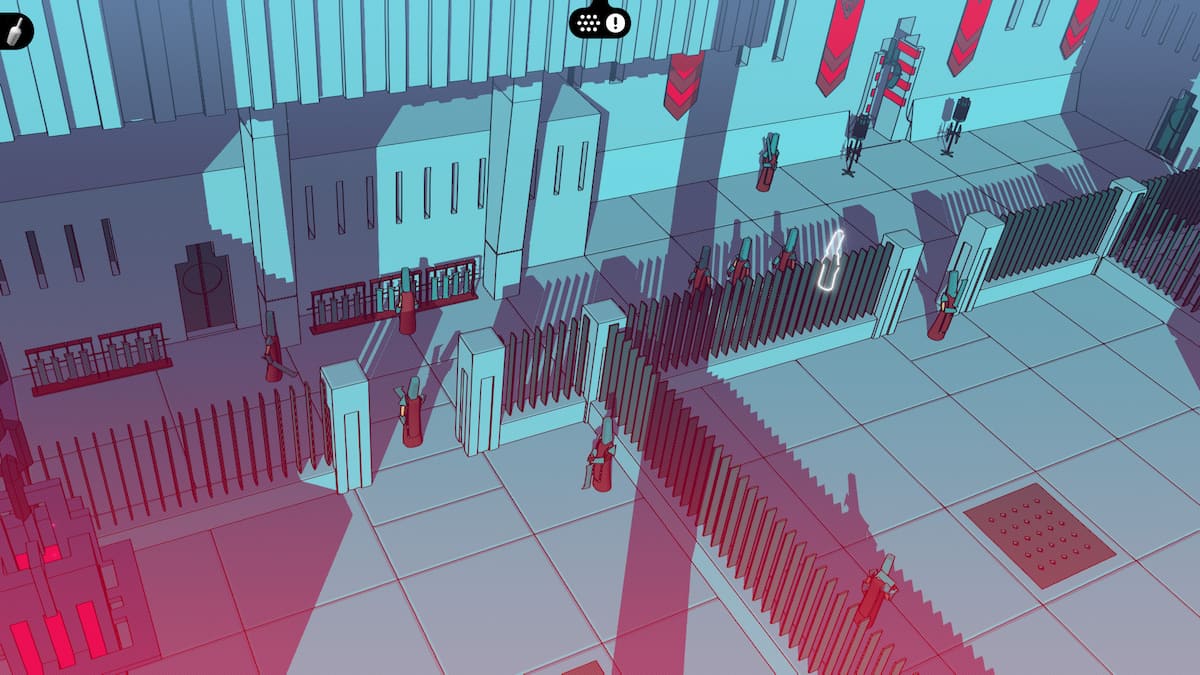
It ’s meter to enrol the Fortress , now that you have gotten around the locked door that the warrior are blocking . There is n’t anything to see in the spaces in between the front gate and the fortress , so you’re able to just keep walking until you find the front threshold .
Achievement : The Great EscapeReach the Frontier outside of the Fortress .
Listen to the warrior tattle to get some new symbolic representation , then interact with the front of the edifice for two more symbols . We ’ll place these later on . Go to the right until you determine a gap in the rampart , then walk into it . You ’ll be in a new room with another Fast Travel point and a shield you’re able to interact with . This will give you the first varlet towards unlock the Warrior Language , and youpick the spear up off of the primer coat .
Screenshot by Pro Game Guides
In the screenshot above , you could see a fast locomotion item next to the shield . You will require to interact with this before moving on to insure you have this point for by and by .
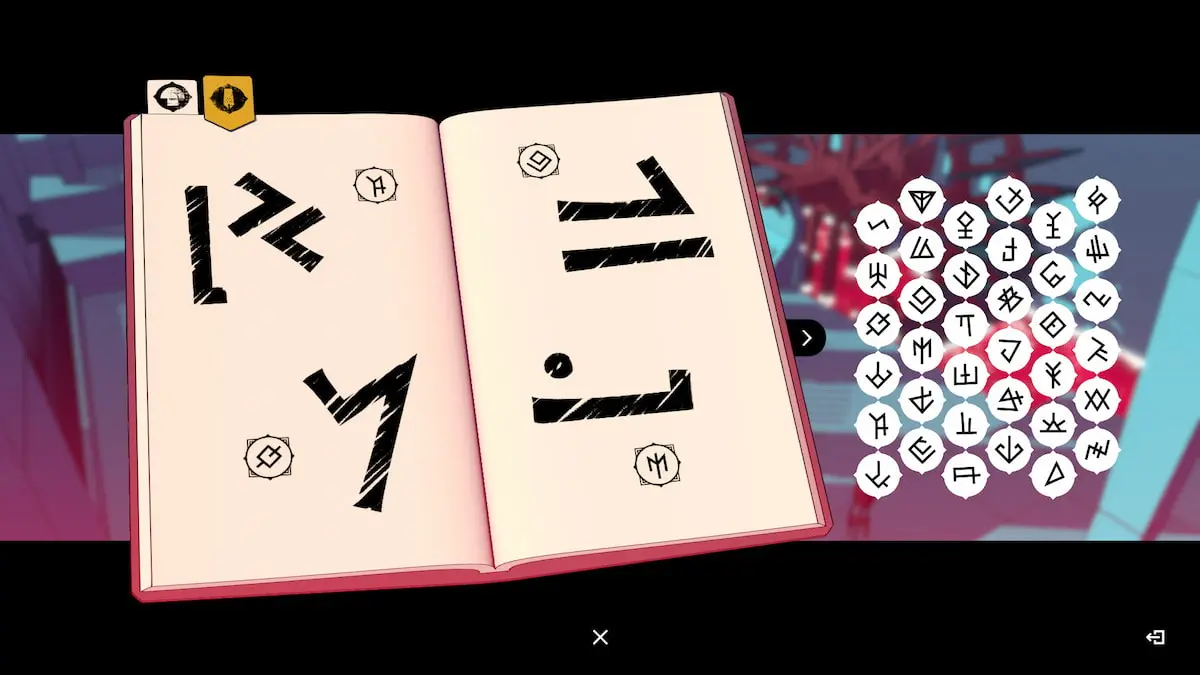
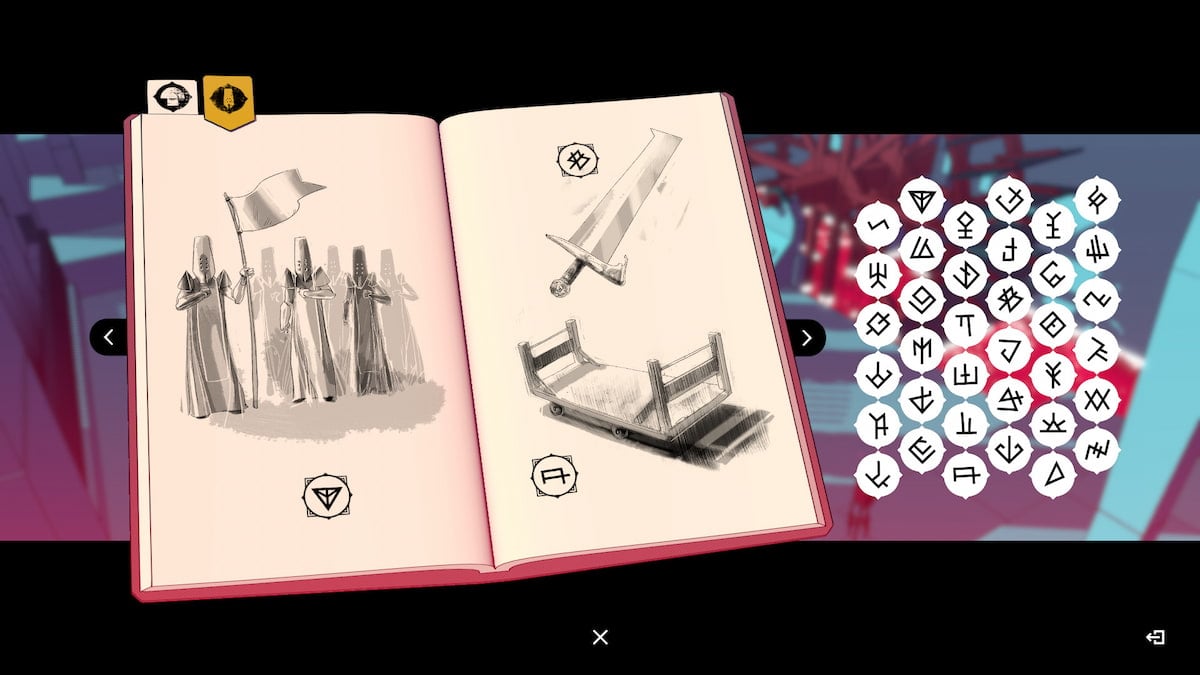
Interacting with the shield will give you a new pageboy for the Glyphs for Warrior , Death , Not , and Like . You take to fill in the varlet as escort below in fiat to get these all right .
Using thespear you collect in the previous room , interact with the column to knock it over and make a bridge for yourself to queer over and go into the fortress proper . Once you are in the next way , you will get a cutscene with the Warriors , who give you a raw varlet .
Image by Pro Game Guides
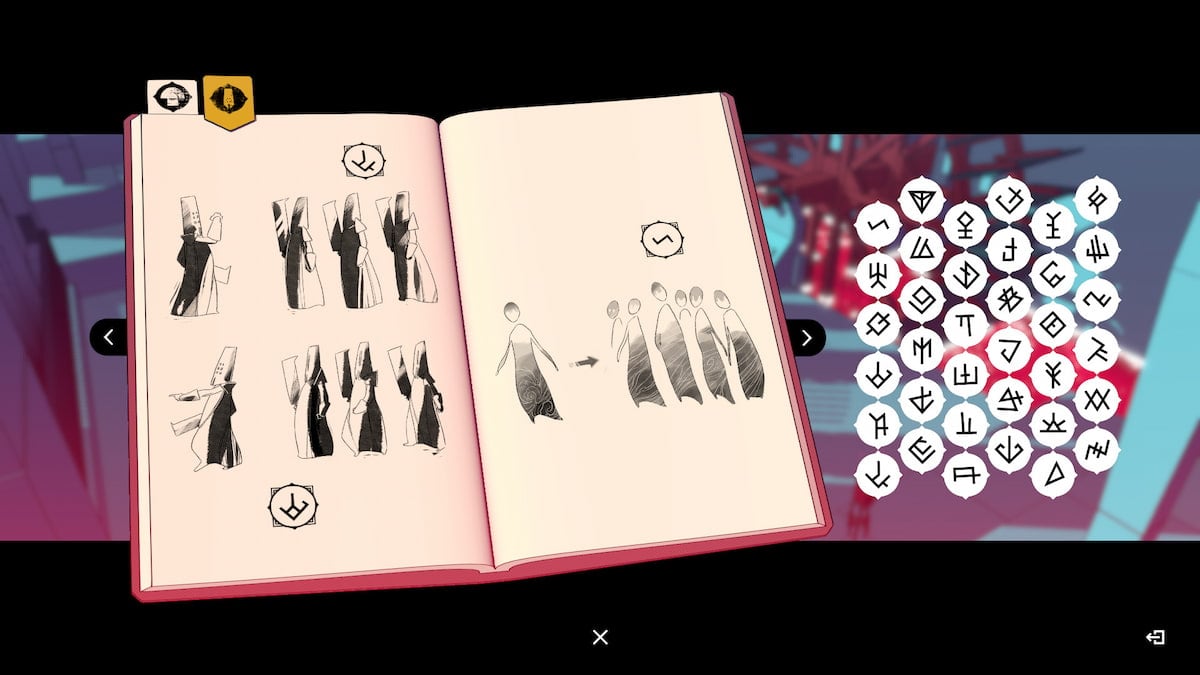
The third varlet will be available after observe the above cutscene with the Warriors kibosh and starting again . It will have the glyphs for Stop , Go , and the symbol to make some pluralise .
The independent hall of the Fortress contains several doorway . Head into the one you’re able to reach ( door 1 ) , and you ’ll fare out threshold 2 . Walk around to door 3 , and you will end up on the platform above this door ( 4 ) . This will take into account you tomove the gargantuan statue in the centre of the way . Use thewheel , then pull the lever , read the words on the statue . Then repeat those steps until you have read all three side of the statue . This will unlock a newfangled glyph varlet .
After you have regard all three sides of the statue in the cardinal room in the Fortress , you ’ll get the glyph varlet for the warrior language symbols for Protect , choose , and Impure .
Screenshot by Pro Game Guides
In decree to sneak around the fortress , you ’ll have to pay off attention to the directions that the warrior are looking , and find ways to get by them without being see . In the first elbow room , you will call for to succeed the Warrior who is walk around the square toes pretty closely to ensure that they do n’t see you , and the other circling Warrior does n’t either .
In the next room , you will ask to cross some more unsafe territory . The first second , you could justwalk bysince the Warrior is facing off from you . The 2nd , you will need towait until the warrior are walk by to movewithout being view .
The next section call for that you hit the gong . Once the two Warriors aredistracted by the chime , you may steer back to the right wing and thenwalk across the the hallwayto the other side . check that there are no Warriors walking toward you before you go . Walk to the left a small more where the independent threshold the warrior are walking through . When the Warriors kibosh in front of the doorway , you may walk across the hall again and down the stairs .
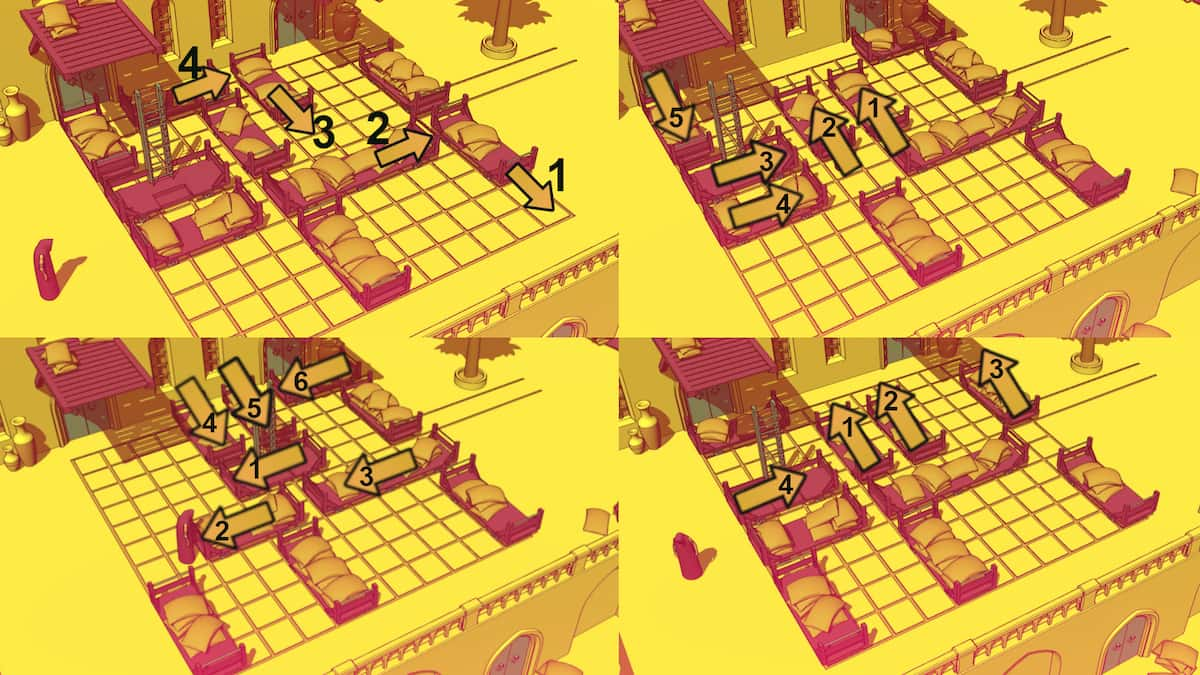
Image by Pro Game Guides
In the next surgical incision , mind to the warrior talk until they start to reprize . After that , take the air to the left across the balcony and depend upon the elevator down . Head into the threshold .
When you hear to the Warrior who is shout out parliamentary law in the third sneaking room , you’re able to fill out a young page . It will have the symbolic representation for Push , Pick Up , and Put Down . satiate them in as keep an eye on to get all these dustup .
This room is pretty well-off to get across , but you ’ll need to pick up an token to help you . First , head up the stairs , then go all the way to the right while avoiding the Warrior who is place crates ( make certain to reckon at the sign of the zodiac above the crates and bottle to get a new page ) . When no one is looking , pluck up the scarlet cratethat is off to one side . Bring it back all the path to the leftfield , andput the red crate on the elevator .
Screenshot by Pro Game Guides
Pull the lever tumbler by the lift to elevate it up . Next , go left and up the stairs on the left hand of the lift . obscure behind the crate , then enshroud behind the crates on the lift . Sneak through the room access when the Warrior is not look .
When in the 4th sneaking room , you will need to see at the signs above both the crate and the bottles in the right part of this screen . Once you look at thebottle and crate glyph on the paries , you ’ll get the page for Bottle , Crate , Big and minuscule . Here are the glyph to put in each one .
This one is the hardest room to mouse through . You will need to take the air across the master halls of the story when the Warrior pushing the cart is hiding you from view , then you will need to utilize the pile of red bags toget a Harlan F. Stone and throw it at the gong . This will allow you to get by the man in the screenshot below , but make certain that theWarrior with the cartis in the way of the other Warrior at the top of the cover .
Screenshot by Pro Game Guides
If you are stuck pussyfoot through the Fortress , it can be hard to figure it out from just the Book above . For those who are move ocular , here ’s a connexion to a video of the sneaking sectionI pile up to help you .
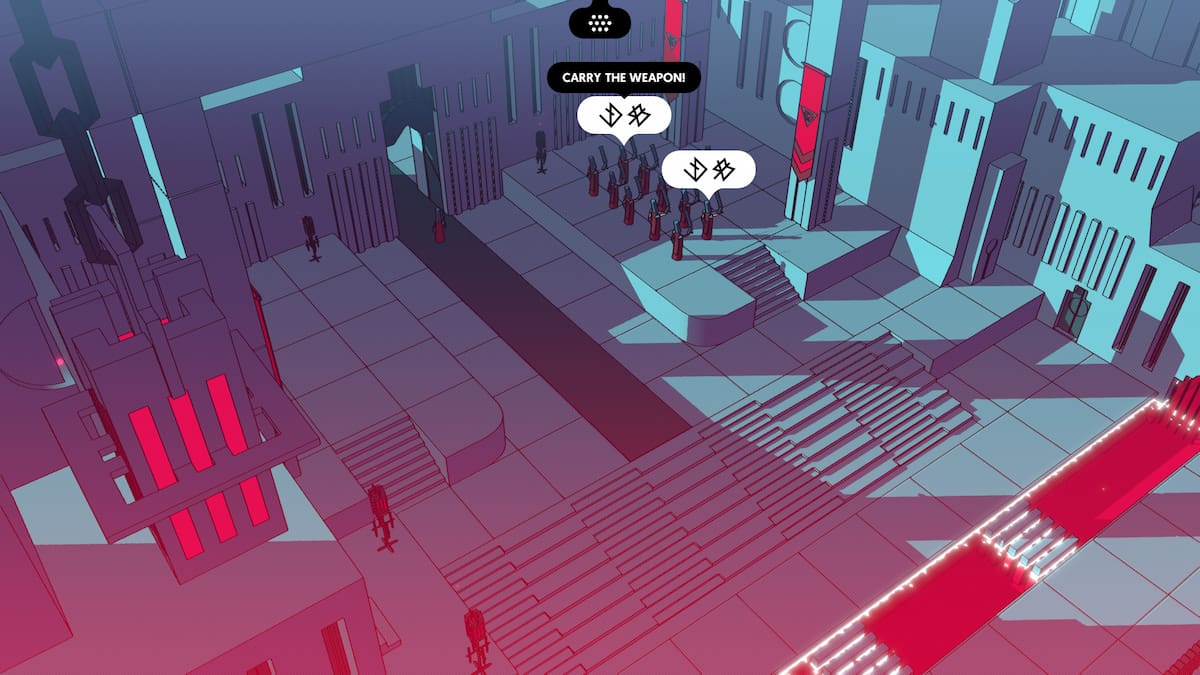
The weapons elbow room has a bunch of different styles of helmet and thing to choose from , but if you prefer the wrong ones , you ’ll get caught right away . In gild to make certain you blend in , you will involve thetall helmet , the branch guards , and the sword . I have highlighted each of the items you ’ll want to wear in the screen door capture above . Now you are good to take the air through the northern - most room access in the last elbow room you had to slip through ( list as sneak elbow room 5 above ) . On the other side , listen to the Warrior ’s talking to get more glyphs .
In the room show in the screenshot above , you may get the page for Duty , Weapon , and Trolley . Fill these three in as view below to get access code to these words .
Screenshot by Pro Game Guides
In the next room , you will encounter a giant steel with glyphs on it . Look at all the glyph on the sword to observe a young glyph , then go down the lift that is markedBottles . South of this fix , you will find another novel glyph marking the southerly - most door ; make line of it before taking the Bottles lift down .
piece up a bottle now that you are mask . You will call for this bottleful later , and it ’s fastest to pick it up now . Then , use the same elevator to head back into the elbow room with the giant brand .
You ’ll need to make a quick pit stop over at the Observatory before heading down to the Treasure Vault . Once you channelise through the Treasure Room door at the south of the elephantine blade elbow room , you ’ll want to go left on the blind past the two Warriors . you could tattle to them , and they will give you a new glyph . Then head up the stairs to theObservatory . calculate at the paper on the mesa to see where to discover themissing lens system : the Treasure Vault . wait at the poster on the back rampart to get two newfangled glyphs .
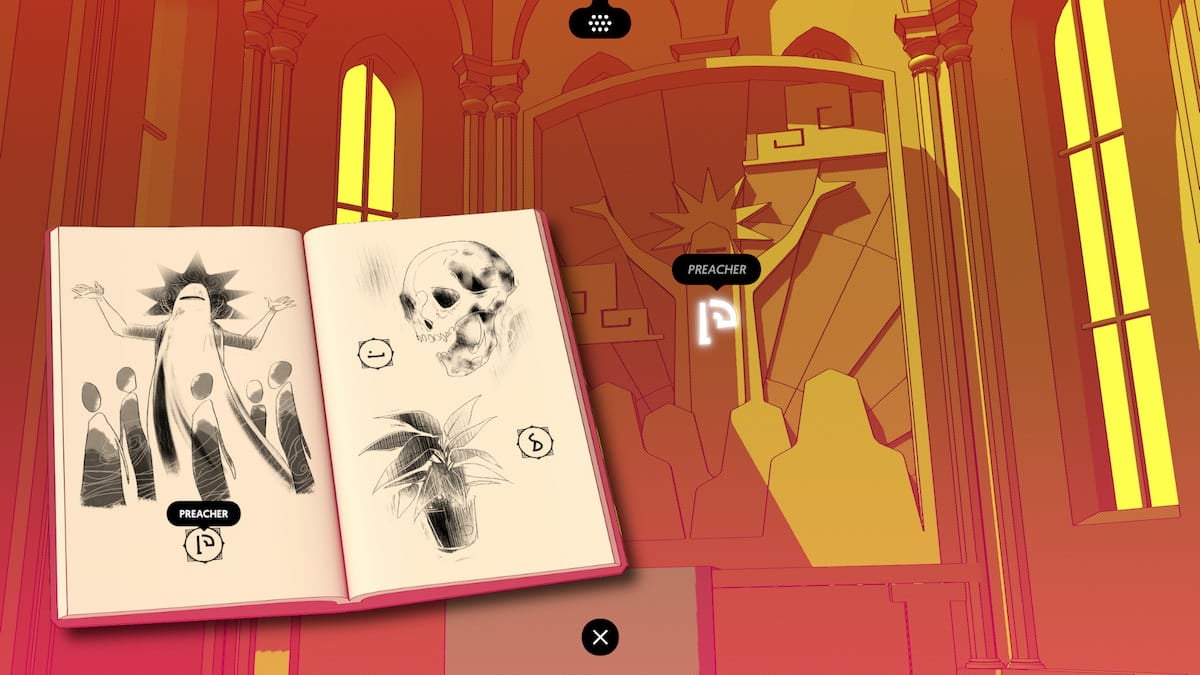
Image by Pro Game Guides
Leave the Observatory , down the stairs , through the door , then manoeuvre south out of the doorway at the bottom of the screen . headway in the south again out of the door that is also cross off gem . You will need to play along with the people inside this new seat in guild to get by the safety equipment here . So , first , walk to theleft and put your sword in the rack of swords . Then , trace the walk Warriors into section that is block off by a guard .
Now that you aredisarmed , you’re able to snarf in behind the walking Warriors . After the two hoi polloi in front of you piece up their objects , the person in front with the clipboard will ordain you to pick upone of three object : a bottleful , a small crate , or a large crateful . ensure you have all the glyph up the this point unlocked so you jazz what they are asking you to nibble up .
The Constellation mystifier will look like the screenshot above . You will need topick up the torchin the left part of the screen , then walk to the right hand until you see a staircase down . You will postulate to have the torch with you , or else you wo n’t be able to see this next part . Place the torch at the bottom of the steps , thenturn the wheel you find down there four times .
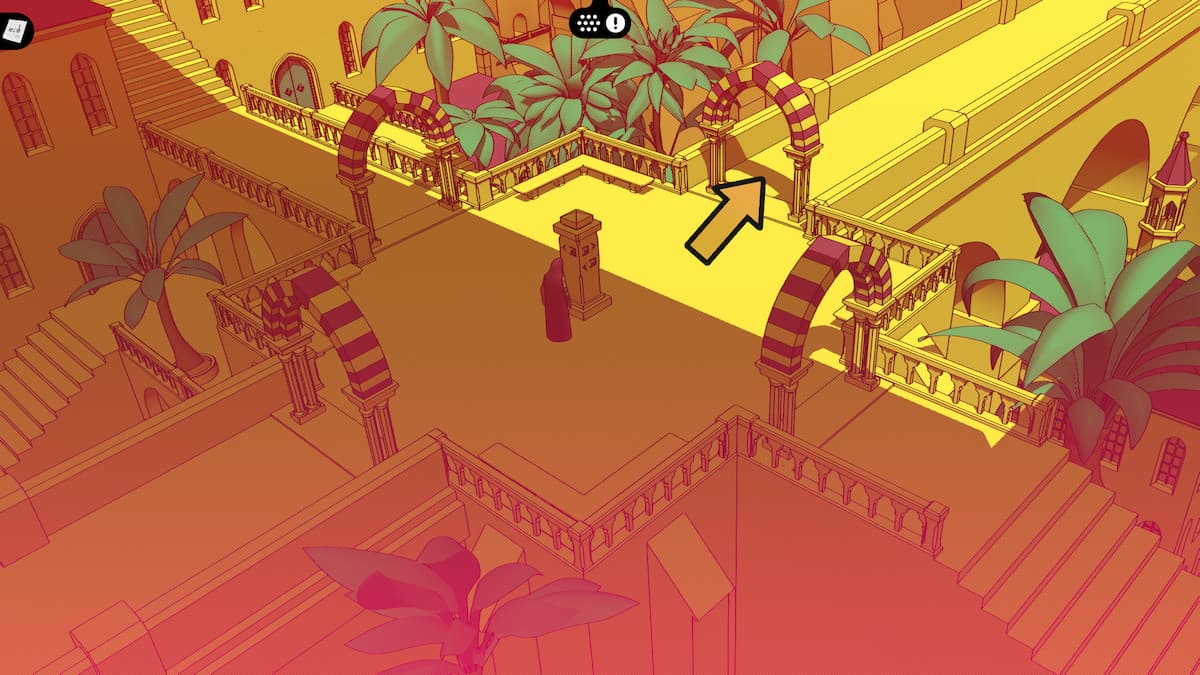
Image by Pro Game Guides
Once you are down the stair you will require todrop off the torch into one of the floor ’s holes . manoeuver through the door north , and there will be a newfast travel point to unlock .
Now that you have unlock the Treasure Room fast travel point and you haveturned the wheel in this lower elbow room four time , you will need to pick the common mullein back up , and head back on a higher floor . Place the torch inside the short cubby , and the constellation will light up the four picture carve into the wall . This willOpen the Treasure Room door . Look at one of the Constellationson the wall to get anew Glyph Thomas Nelson Page . You wo n’t be able-bodied to make full out this Glyph Thomas Nelson Page yet .
Now you are finally in the Treasure Room itself . The item you need is thesquare lenson the second - from the top shelf on the second chromatography column from the left . So you will need tomove the cart underneaththat second to last item , then use thewheelin the right part of the screenfour multiplication . Ride the go-cart up and grab thesquare lensoff of the treasure bulwark . If you have not been to the lookout , you will not be capable to foot up the square lens of the eye .
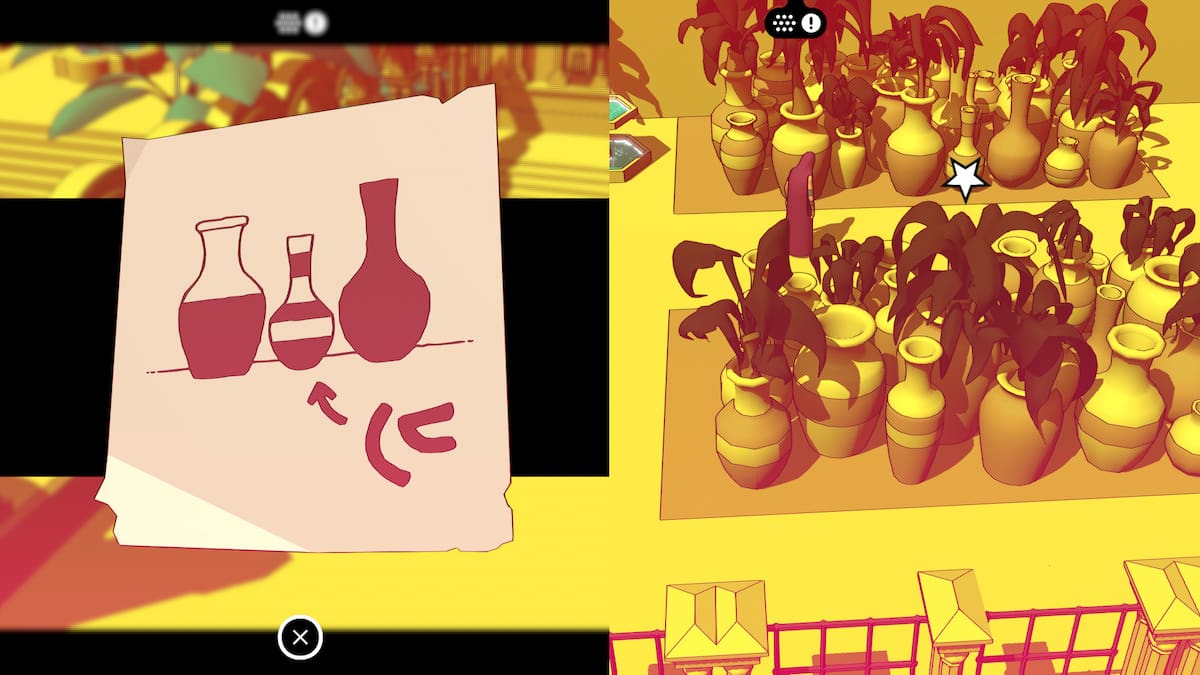
Image by Pro Game Guides
A young glyph rag can be unlock in the Treasure Room ; interact with the broken scrap of wall in the upper lefthand part , just northward of the boat . You will get a new Glyph page for aid , Seek , and Scientist . You ’ll also get the page for Call , Treasure , and Fortress .
Square lens of the eye in hand , you need to go back to theObservatory . Put the hearty lens inside the telescope , then look into the telescope to get another Thomas Nelson Page for your journal . The constellation will match up with the scene you got during the Constellation puzzle . You ’ll be capable to satiate these in during the next incision .
After the Observatory is complete , you ’ll need to go back to the room with the jumbo sword , then go into the door that is mark " The pick out . " Go up the steps and into the next room . There are two charge you’re able to manoeuver in the next room ; you’re able to choose to go left and up , or you’re able to prefer to go along leave behind . Go into the room that is to the left and up .

Screenshot by Pro Game Guides
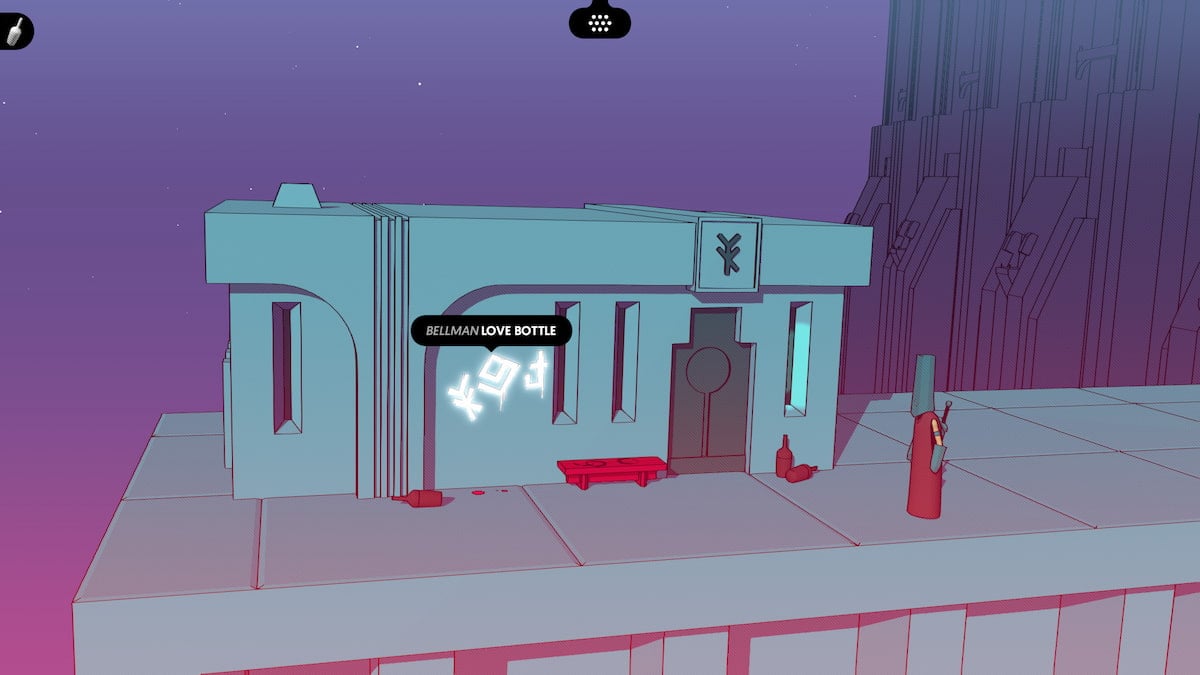
Next , go to the other way you walked by previously . This will lead you up to theBellman ’s dwelling house . you may read most of the glyphs by now , so you ’ll see that the painted symbolization on the wall says " Bellman loves the bottle . " Good matter youalready picked up a bottle from the Bottles room . reckon inside the Bellman ’s Homethrough the windowto see a account book , and the fantasm of the Bellman himself . You will need toset the nursing bottle down on the benchwhere there are soaked rings from previous bottles place .
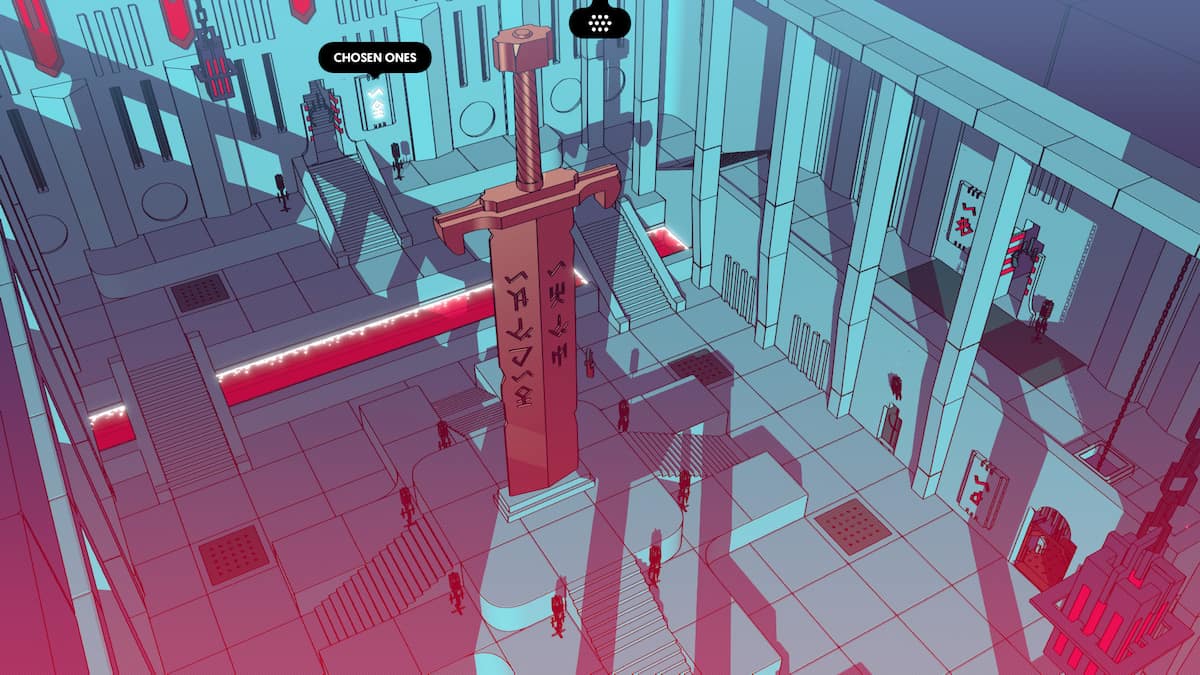
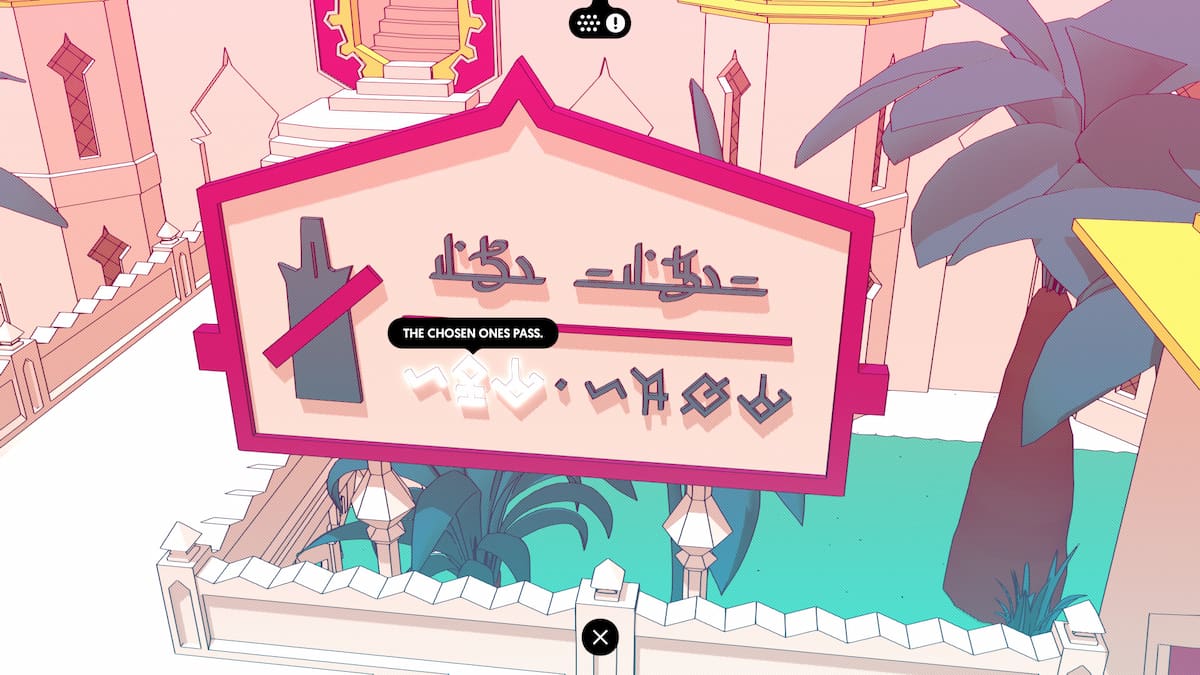
After setting the bottle down on the bench , leave this area and come back . The Bellman will now be on the roof with the bottle , and you will be able to enter his home , and interpret the book on his shelf . If you take the book , you will get some raw glyph and a novel page . This will give you all the glyph you need to fill out the bell puzzle . You will want to do theCall of the Chosen Ones . Head out of the Bellman ’s home base and to the right over to the bells and input all the glyphs in ordering .
Once you read the book inside the Bellman ’s habitation , you ’ll in the end have the four glyphs to put into this Thomas Nelson Page in your journal . Here are the symbols for Vessel , Key , Balance , and Harp . You ’ll also have Sun , Moon , and Bellman to fill up in the above page too .
Screenshot by Pro Game Guides
The solution for Call of the Chosen Ones is Balance , Instrument , Key , Vessel , then Key . Plug these into the Melville Bell ’s panel , then pull the lever to complete the call . After you have draw the lever tumbler , then allow the Bellman ’s area . Head down and to the left wing on the next covert .
accomplishment : Fashion VictimAt this point , you’re able to get this accomplishment by going back into the Weapons room and leave wear thin the wrong turnout . It wo n’t get you killed !
All the Warriors will be run by , but you will postulate to direct against the tide up to the room access on the left label " The pick out . " Head in spite of appearance . There will be three statues , and you ’ll want to interact with the glyphs underneath each of them to getall but one of the glyphsyou need to complete the Warrior ’s language . In the next room , interact with the glyph on the floor of the lift to getthe last glyph . Ride the elevator up to the Gardens .
Screenshot by Pro Game Guides
The glyphs on the floor of the Chosen ’s room contains the final glyph for the Warrior ’s linguistic process , and you will unlock the page automatically after interacting with it . fill up in Fear , Make , and Music to complete the glyphs .
accomplishment : A New DawnReach the Garden .
Chapter 3: The Gardens and the Bards
You have finally reached the third location , call the Gardens . This is where you’re able to find the Chosen Ones and their language . Thankfully , there will be a lot less sneaking around in this chapter , so you may loose and enjoy the lulu of the Gardens .
The first novel glyph will beon the sign in the first screenof the Gardens . Interact with it in edict to get the glyphs page establish below .
With the augury above , you have admittance to four glyphs for the Bard ’s Garden language . replete in the glyphs like they are below to get all these words for your newest language .
Screenshot by Pro Game Guides
Use the boat to get into the Gardens proper , andchat with the two Bards on the other side of the waterto get Modern glyphs . Cross over the bridge , then visit with the personholding a mirror .
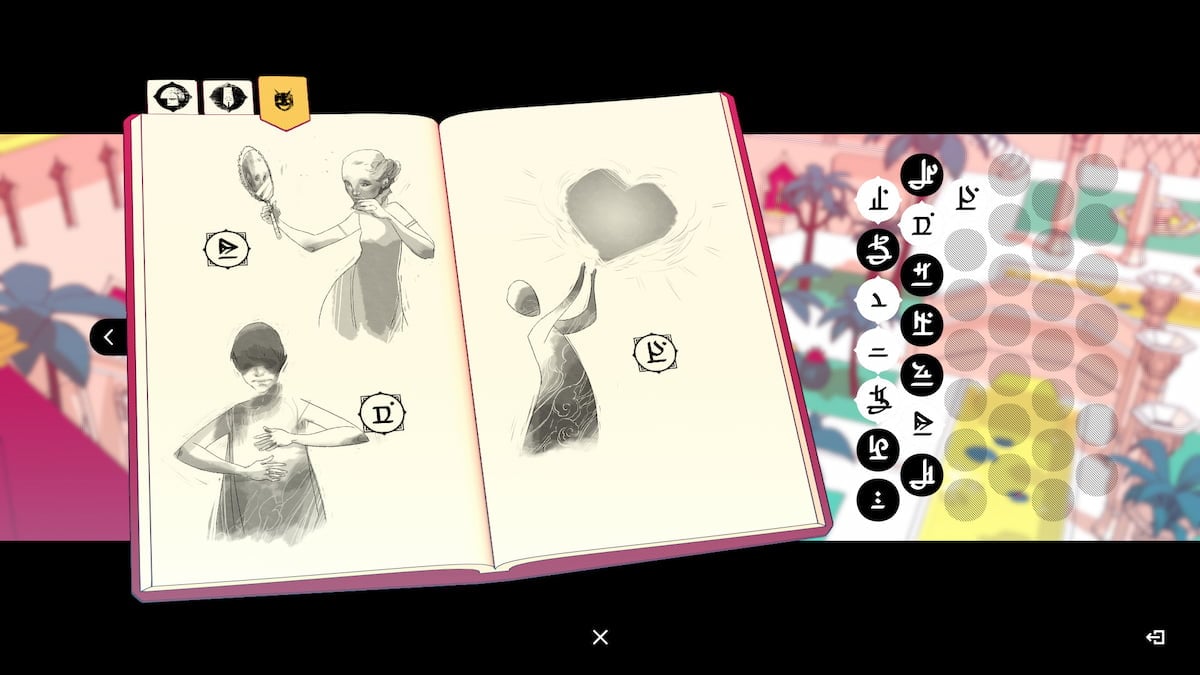
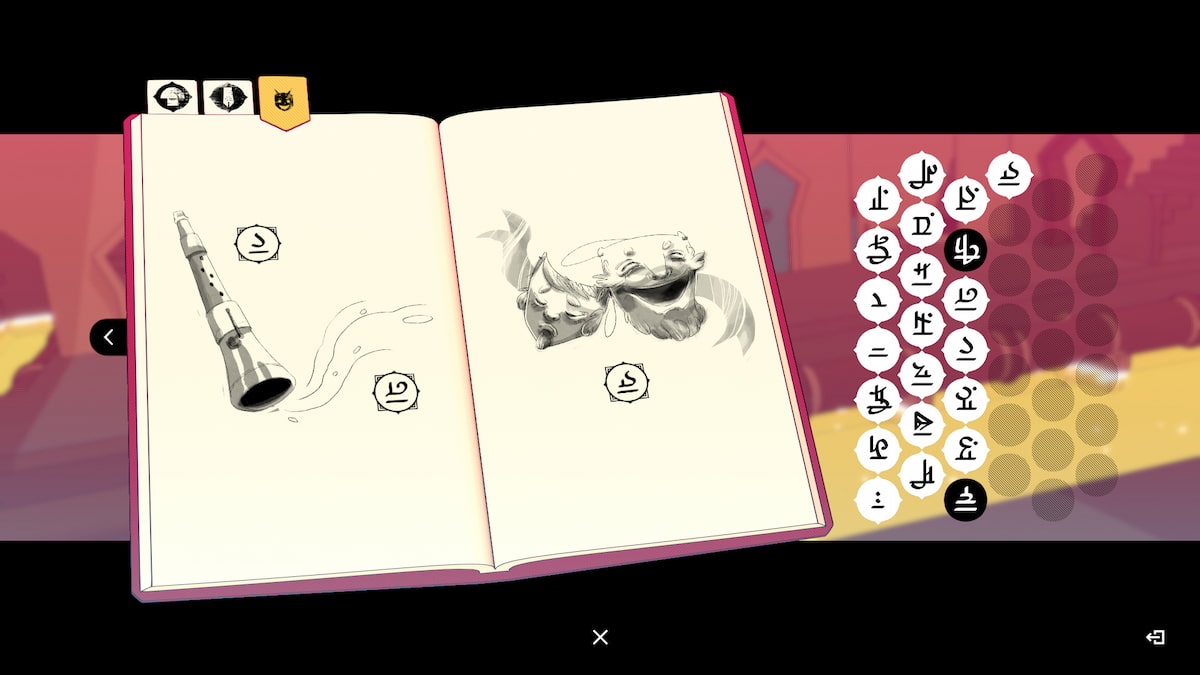
When you speak to the Bard holding a hand mirror and admiring themselves , you ’ll get the page with the glyphs for Beauty , Be , and Love . Fill them out as they are in the page below to get these three words .
To the top of the screen , there is an creative person painting ; you could talk with them to gain somenew glyphs . After that , manoeuver through the threshold on the odd side of this field . You will find yourself in a square courtyard ; to the north , Orient , and west , there aremonkeys with boxes . point north and chat with the harp - playing Bard for a new page .
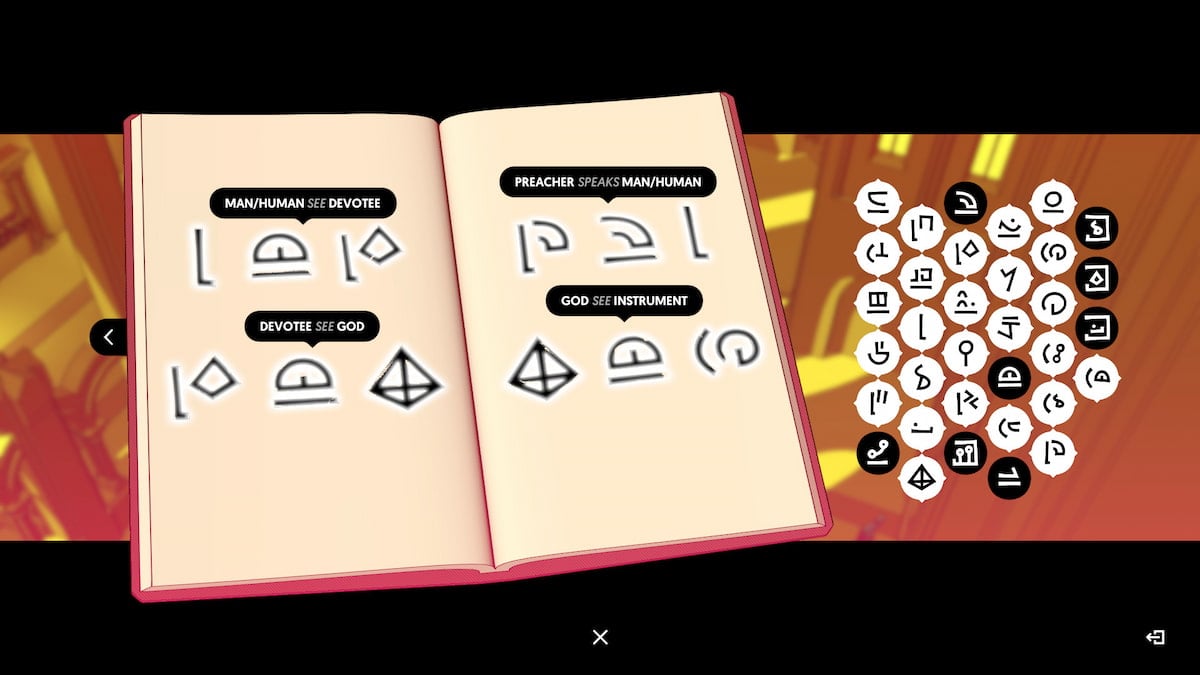
Image by Pro Game Guides
When you are in the screen with the harmonica - playing Bard , you could speak to them to earn another page . This one is for Greetings or Hello , the signaling for doubt that goes on either side of the sentence , and Bard , which is what these Chosen Ones call themselves .
There is a court that is one of the first screens you will come across in the Gardens . There will be three monkeys that are standing around the courtyard ; you will need tofeed each of them a fruitto see the petty plays that their box act out . There isone fruiton this screen , in the center of the courtyard , hanging off of a tree .
Headnorth from the monkey courtyardto line up thesecond yield . It will be on a tree to the left of the bard playing a harp . Move to the next covert from the Bard playing the harmonica , and you could find thethird yield on a tree diagram to the left wing of the dais with the three statueson it ( check that to interact with the glyph on the statue in purchase order to get these glyphs for later ) . Head back to the Monkey Courtyard , andfeed the three fruit to the three monkeys . This will unlock a new page .

Image by Pro Game Guides
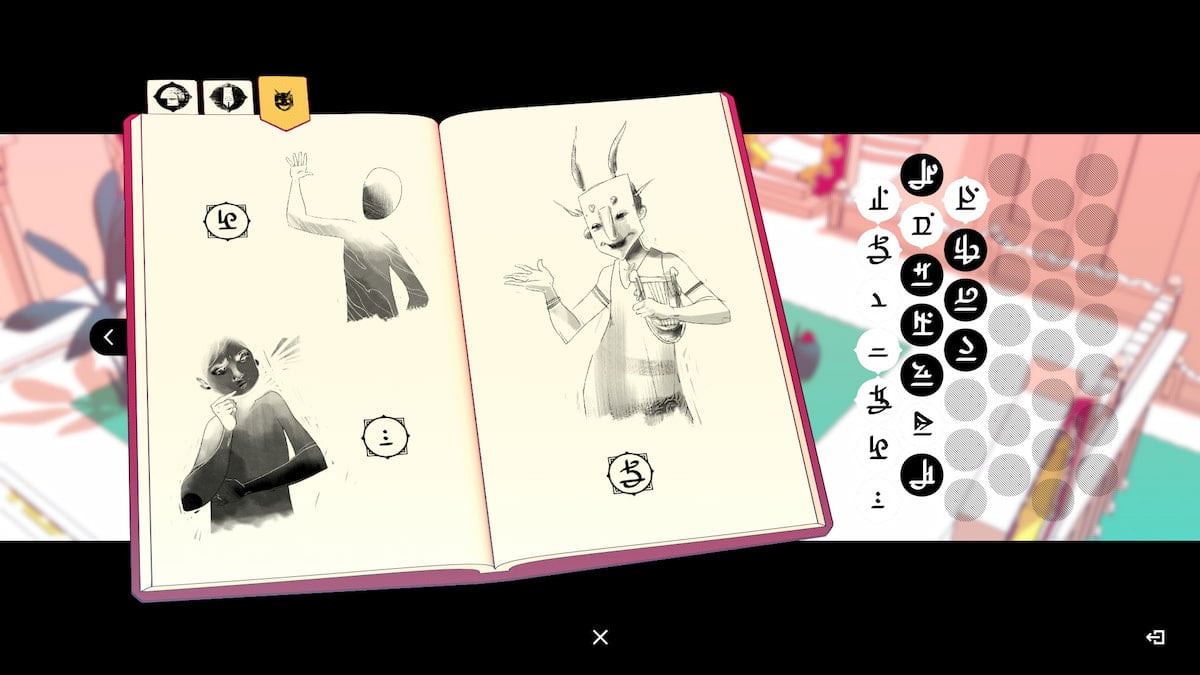
Once you have finished listening to the monkey ’s little boxful play , you will get a newfangled page . It will have the glyphs for weapon system , Hold or Possess , and Idiot . occupy the page in like so to complete it :
After you have completed all the page above , it ’s clip to move on . to do that , you will have to adopt the servant into theservant ’s passage , which is locate in the southern part of the monkey courtyard . The room access will be locked , so you will involve tofollow the servant into the transition when they start the doorto get in .
Once you are in the retainer ’s transit , you will need to channelize down the stairs and to the left . Take thetop door , and it will lead you to another Fast Travel Point .
Screenshot by Pro Game Guides
In the same room with the Fast Travel point above , you could find a broken carved mural . If you put the piece together , you ’ll get some Devotee language translated straight off to the Bard ’s language , earning you a cluster more glyphs . Put the piece back as the guide states above .
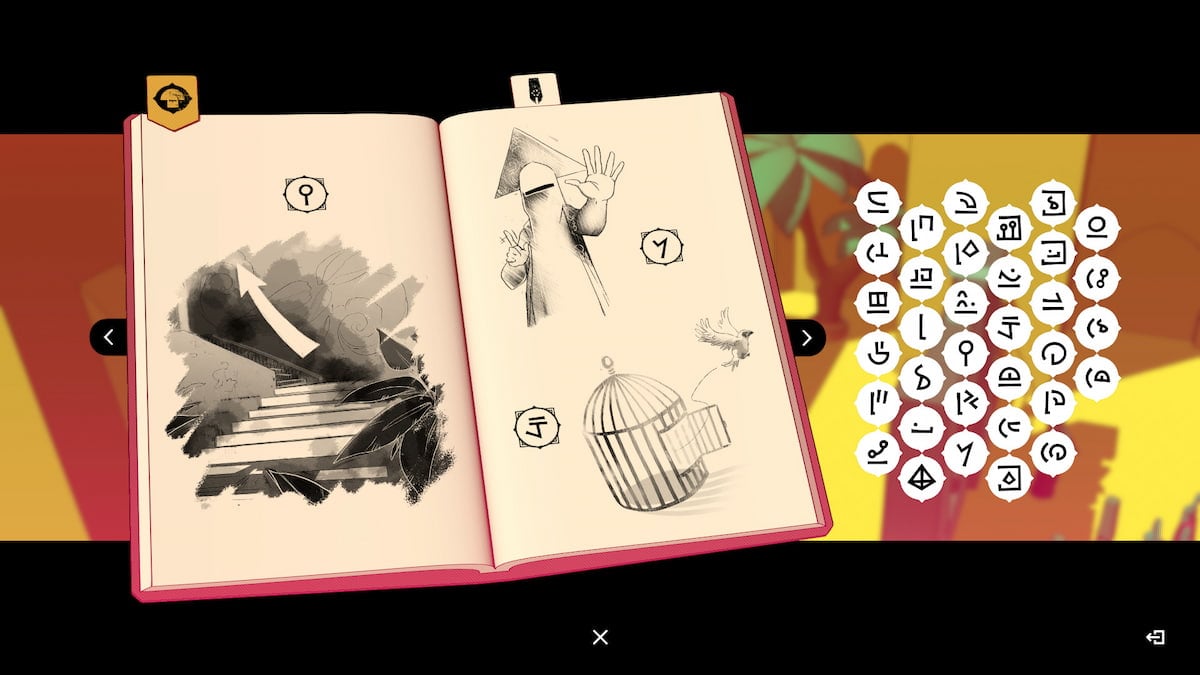
If you fill out theFast Travel room puzzleas state above , you ’ll get yet another page for your notebook . This entail you ’ll know the run-in for Me , You , essay , and Find if you fill it out aright .
Leave the Fast Travel elbow room , and then direct to the left field . If you pass away out of that door , you will determine a retainer ’s quarters fix with several servants work . One is making instruments ; you’re able to see them through a piddling window , and there is a augury with a glyph on it near the window . Interactwith the window to earn a new page .
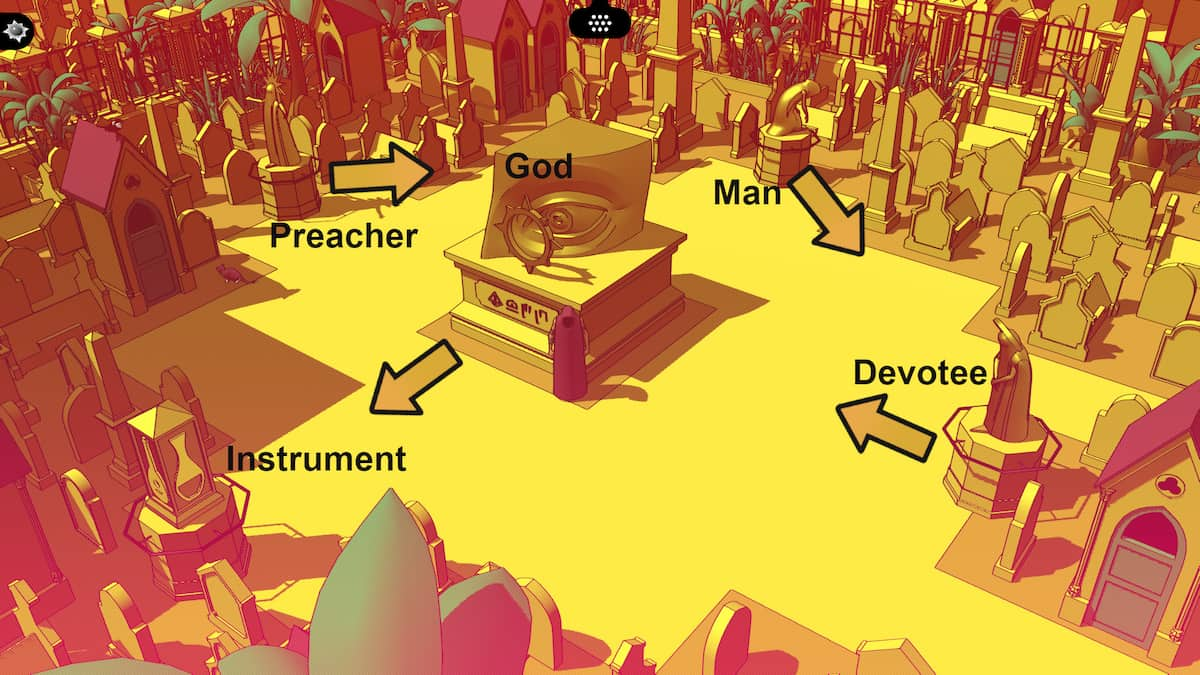
Image by Pro Game Guides
If you have interact with theservant ’s instruments windowand thestatues near the start screenland of the Gardens , you will earn a new pageboy . It will have the glyphs for Instrument , Music , and Comedy .
Walk past the instrument windowpane after filling out the glyphs Sir Frederick Handley Page , and head into the first door to the left of it . This will pass you up to the Agora . ensure to look at theglyph on the gazebo - wait structure . You ’ll need this one later on . Next , steer over to thepeople suffer around the grateon the remaining side of the screenland . If you interact with them , you ’ll see that one of themdropped an item down the waste pipe . You will be able-bodied to think this later on on . From the gazebo thing , head out the northwest part of the covert .
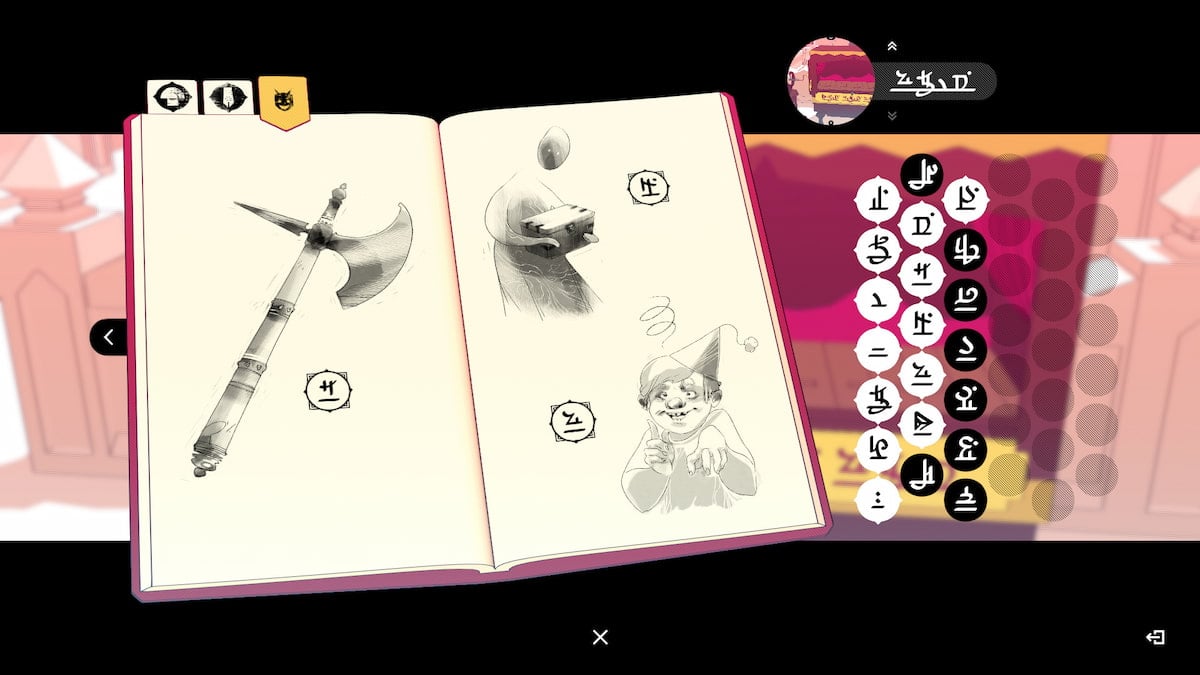
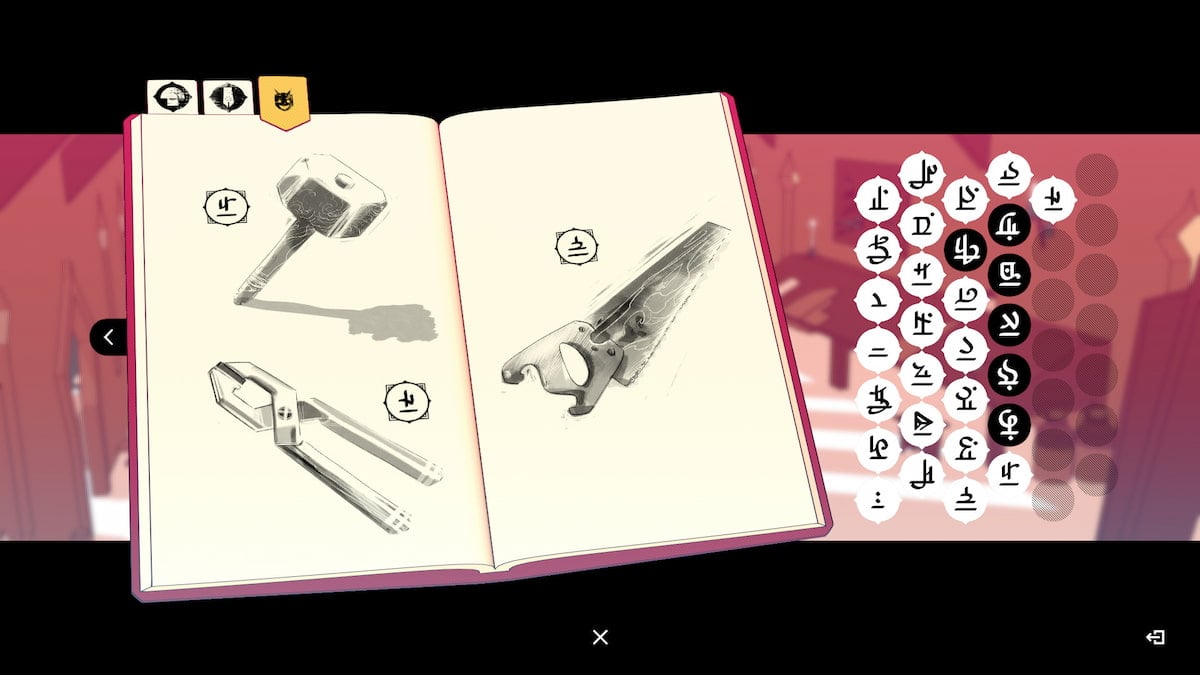
Next up , you will have to help a servant snaffle a tool to specify the boat . The retainer will ask you for something , but you wo n’t know the word for hammer yet . Head into the workshop to the left of the screen , and clean up the hammer on the back board . Then , interact with the mansion on the paries to get a line the words for hammer and plyer . Bring the hammer back out to the servant posit the boat , and they will complete the repairs .
Screenshot by Pro Game Guides
Once you have interact with everything in the toolhouse , you will be able to fill up in this new Sir Frederick Handley Page . You will get the glyphs for Hammer , Saw , and Pliers , and you may put them in the page just like this :
Achievement : ScholarIf you have picked up and filled in all the glyph pages up to this detail , you have half the glyph for the whole game .
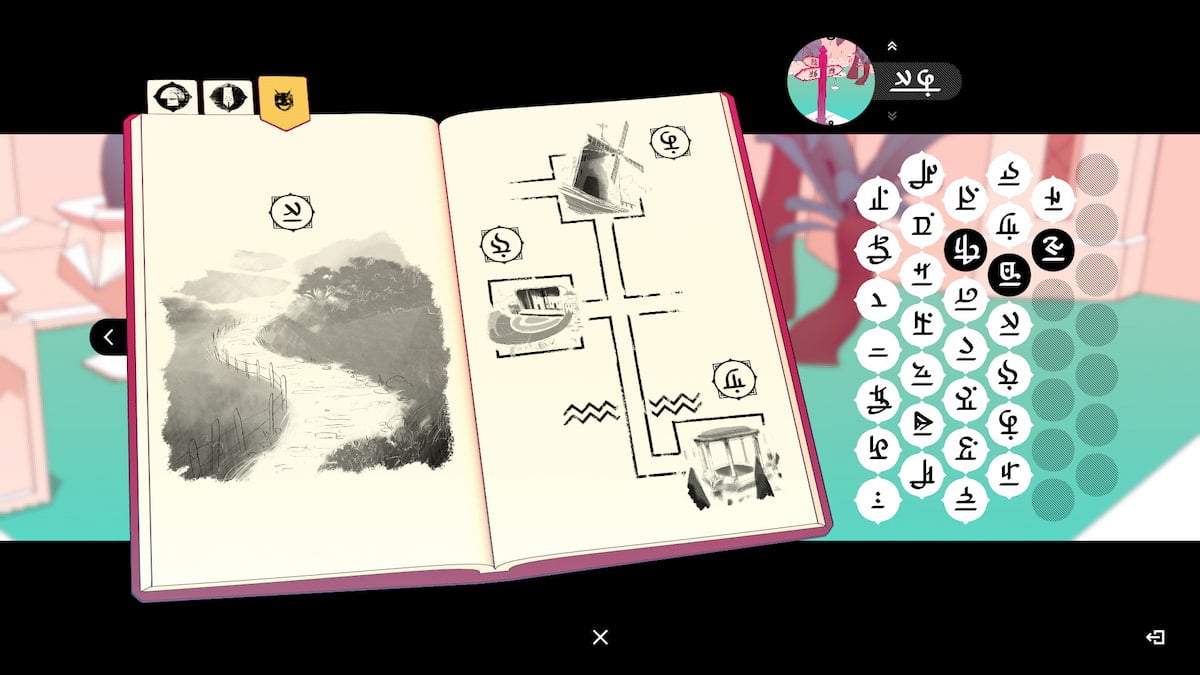
After riding the now - set up boat across the water , you will be in a Modern part of the Gardens . Head up the stairs and up through the door . Interact with thesignpost , then head magnetic north two more CRT screen . You will find yourself in the Windmill emplacement , and you will instantaneously fill out another glyph page .
Screenshot by Pro Game Guides
Once you haveentered the screen with the Windmill , you will unlock a new Thomas Nelson Page with the words for Path , Windmill , Theater , and Agora , which is the name of the gazebo - look affair . If you do n’t have this Thomas Nelson Page , verify you interact with thesignpostsin the area to help unlock it .
Next , direct south from the Windmill , then east from the hub . This will bring you to a balcony overlooking a beautiful prospect . On the top wall , there is a person offering you an item if you play their games . There are two game ; you only require to beatone of them to get a theater coin . But you should beatbothof them in ordination to get the achievement . The first game is a Flappy Birds - copycat , and the 2nd is a whack - a - mole game called Find the Idiot . In the first plot , you need to fly in between the gap of the columns using theAscendbutton in the bottom center . find oneself the Idiothas you bopping thegreen - facedmasks that are an obvious eluding to the Warriors that bard retrieve are big dummies .
Achievement : True G4M3RBeat both the Flappy Bird - alike game and the ascertain the Idiot whack - a - mole game .
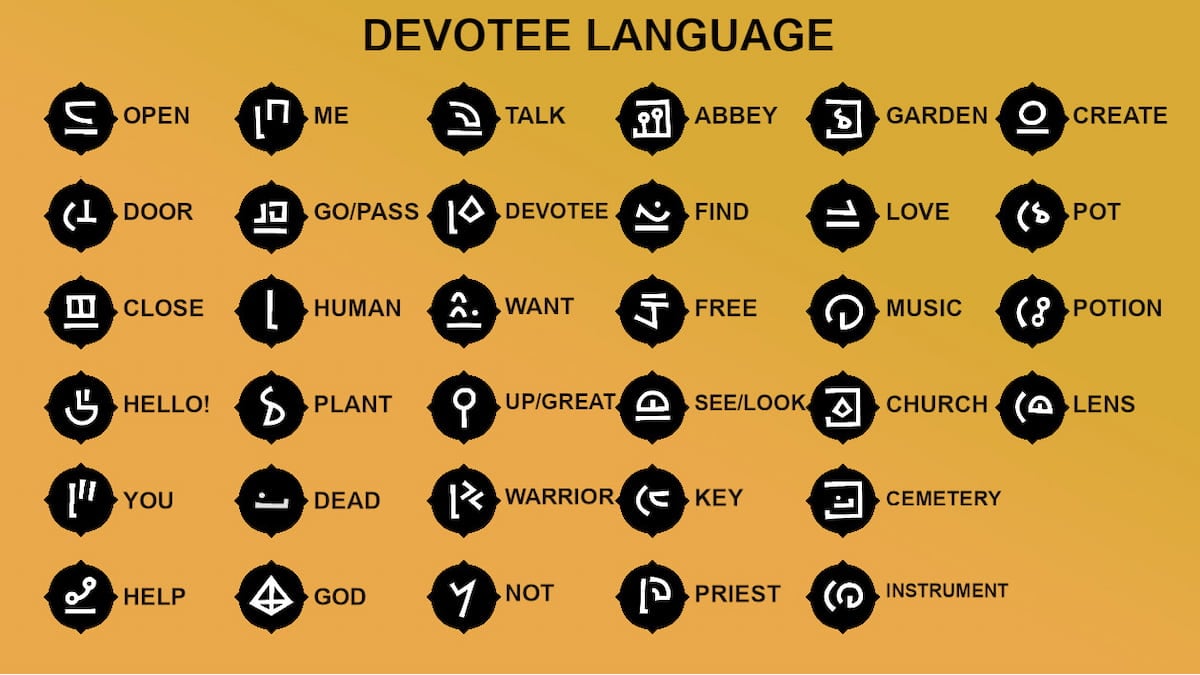
Image by Pro Game Guides
Next up , it ’s time to head to the Windmill . Speak to the ternary of people gathered by the Windmill , and they will channelise you to the " flame " that is on a statue . The one proclaim that if youtake the fire , you will be able to find thepath to Ascension Day ; they are alluding to theflamethat the statue is hold by the Windmill . Walk into the Windmill proper , then guide up the stairs to discharge thejumping puzzler . You essentially just have to wait for the way to be clear before hopping across .
Once you have shed light on the jumping puzzler , you’re able to take the air around the exterior of the building , walk up to the statue , andtake the flameit is bind . go on in the same direction past the statue , and you will come out at the bottom , get to the threshold to the Windmill . The Bards will ask you if you found the flame , which will unlock a unexampled glyph page . The Bards will need if you chance the flame ; show them the flaming , and they will take a firm stand you are an idiot for trying to ascend .
After complete the Windmill jump puzzle and getting the flaming , you will be face by the Bards . They will address to you and unlock a Modern page of glyph with the words work , Ascend , and Fire or Flame .
Screenshot by Pro Game Guides
Next up , head over to the Comedy club . Make certain to verbalise to everyone you see along the way , just in typeface you missed a glyph or two . This include the two , on the face of it drunk men hang out in front of the Theater . Walk to the mortal in front of theTheater and give them your entrance token . Head up the stairs into the Theater , and interact with the drapery to watch the frolic .
When it is done , head to the left and out the servant ’s entry . Inside this room will be a book you may interact with and a circle of steps to walk down . Interact with the ledger to unlock a glyph page .
After interacting with the Good Book in the theater backroom , you ’ll unlock another page . It will have the glyph for Book , Monster , and Brother , and they can be completed as shone below .
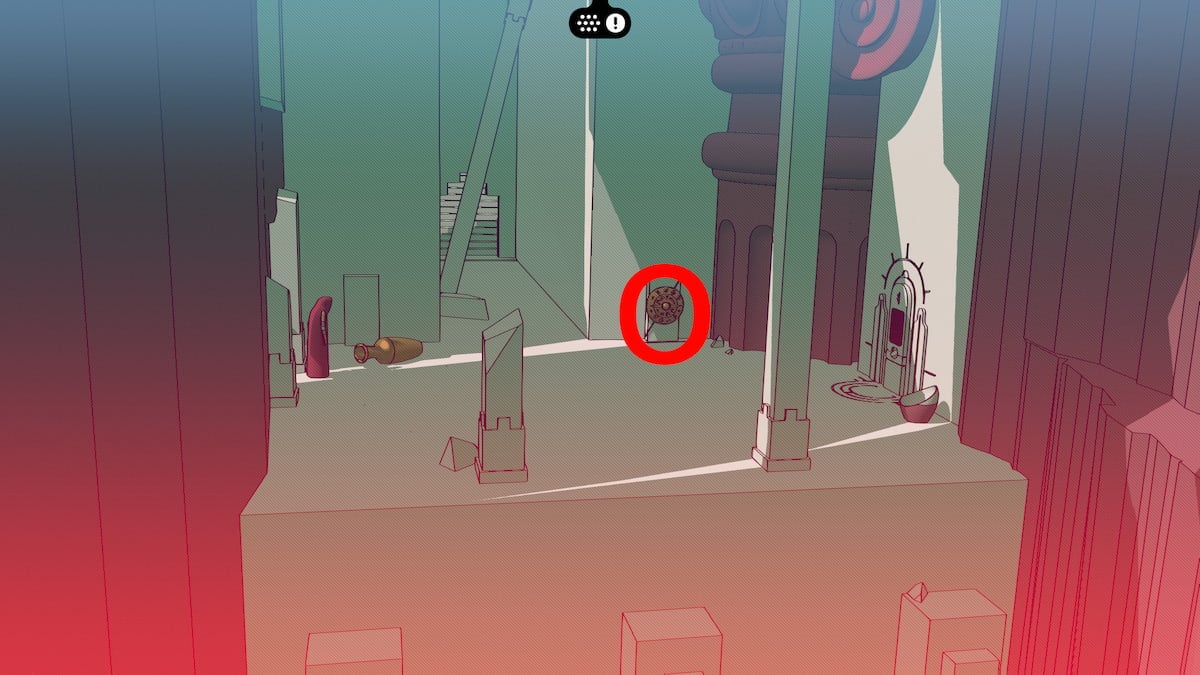
Image by Pro Game Guides
If you head up down the stairs in the Theater ’s backroom , you will come across a debauched travelling point . Interact with it before incite on so you’re able to unlock the conversations by and by on .
From the fast travel distributor point , you’re able to unlock the room access to the outside of the theater with the lever to the southwest of the fast change of location gunpoint . you could also head through the threshold north of the point and unlock a bypass from the Theater to the Servants Passage .
After interact with the memorial tablet underneath the Theater in the Servants Passage , you will last have the glyph for Fortress and Abbey , as well as Man and Free . Fill them out like they are below to fill out this page .
Screenshot by Pro Game Guides
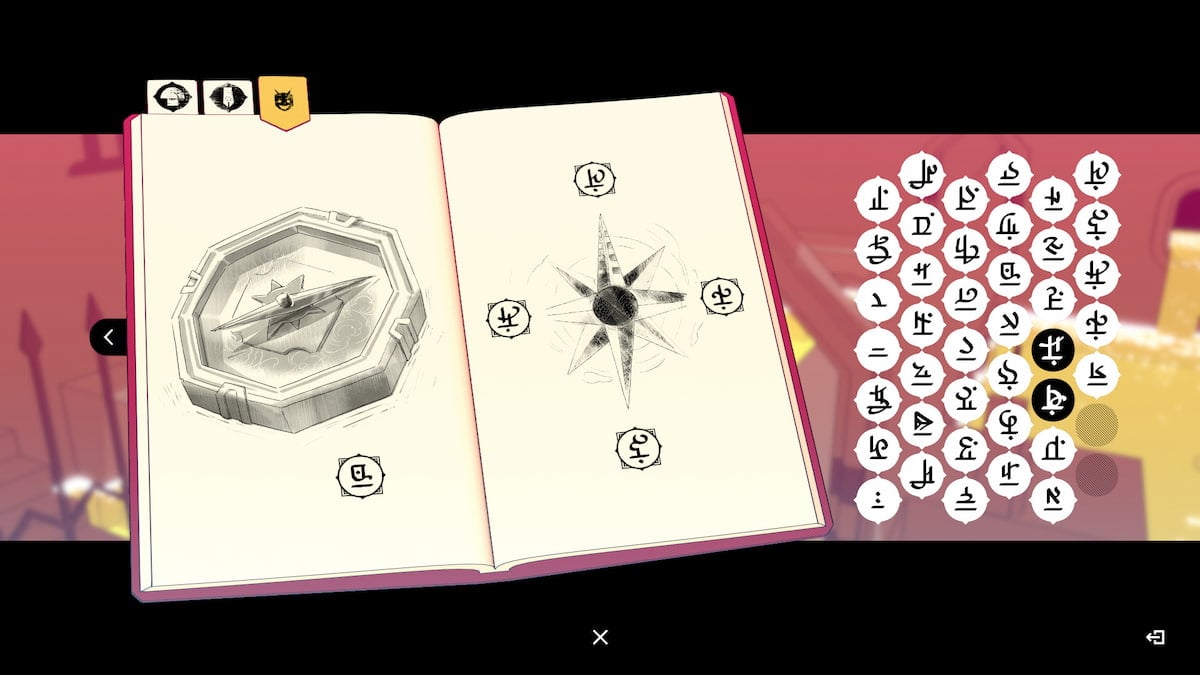
Head through the Servant ’s Passage , always point toward the signs marked Agora . From the purple door , you will need to go : Right , Right , then the Right threshold commemorate Path to Agora , Right , Right , Down , Left , then Down . Once you have attain the locating underneath the Agora , you will be able-bodied to unfold another lever to unlock the door toopen a shortcut , and you will be able-bodied to find fault up theCompass that the Bard dropped down the grate . The compass will be in the small puddle underneath the carve symbol for Agora .
Looking at the compass you have peck up will unlock the page for Compass and the key focal point . You will need all of these to get through the next plane section , so make certain to fill these out . Now the Bard ’s speech communication will be complete .
last , it ’s prison term to head tothe Way Up . In spitefulness of the fact that every Bard you have ask so far tell only idiots need to render toAscend , you will need to do it anyway . The Way Up can be access through the Servant ’s Passage , or you could steer to the upper primer and look for it between the Windmill and the Theater . Either way , there should be mountain of signposts pointing you in the right direction . maneuver at bottom and put theflame from the Windmill statueinside the door to get it to open .
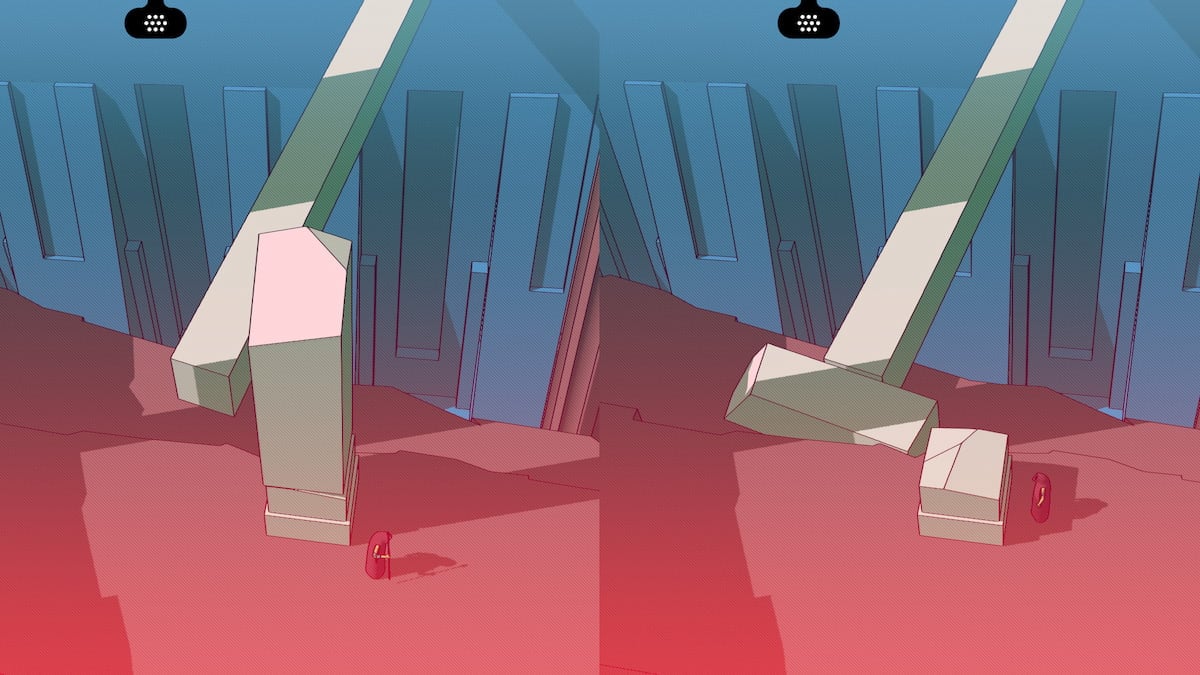
Image by Pro Game Guides
During theplay in the Theater , you got the direction you take to go in the style Up to get out . When youlooked at the Book in the Theater backroom , you replicate the text into your notebook . This is what you involve to practice to get through the Way Out . They state that if you see a saw , you should go west ; if an pawn , you should head north ; fire will go eastward , range southward , and arm west .
The first particular you will come across in the dark is asaw , so you will require to gowest . attract out your compass andorient it to north , so you may see which direction is west . take the air to the west and calculate for the next picture . You will have to reorientate your reach each time . The directions you have to go on the screenland areUp , Up , Right , Right , Left .
accomplishment : The DarknessReach the Galleries where the monster go .
Screenshot by Pro Game Guides
receive to the Galleries . This location will get you to the next chapter , but it will also incorporate a giant that wants to murder you . Thankfully , the monstrosity isallergic to light , so you could obviate it that way . Head to the left , and in the next room , the monster will be wait . take the air down the stairs and hit thelever , then go through the door once it is lit up .
In the next room , you will need to sneak all the style around the blocks while the monster is n’t search , then you will want topick up a rock ‘n’ roll , throw it at the minecart , then push thelever mark with a starin the screenshot below . Then you will need to run as fast as you may into the light before the ogre can catch you . Here is avideo of this sectionif you are stuck .
The last room with the monster has you trying to beat the clock . Move to the right wing as quickly as possible , move the cartout of the way , thenpull the leverbefore the monster can enamor up to you . It will be running down the hallway for you , and you will have just enough time to shut the door before it reaches you .
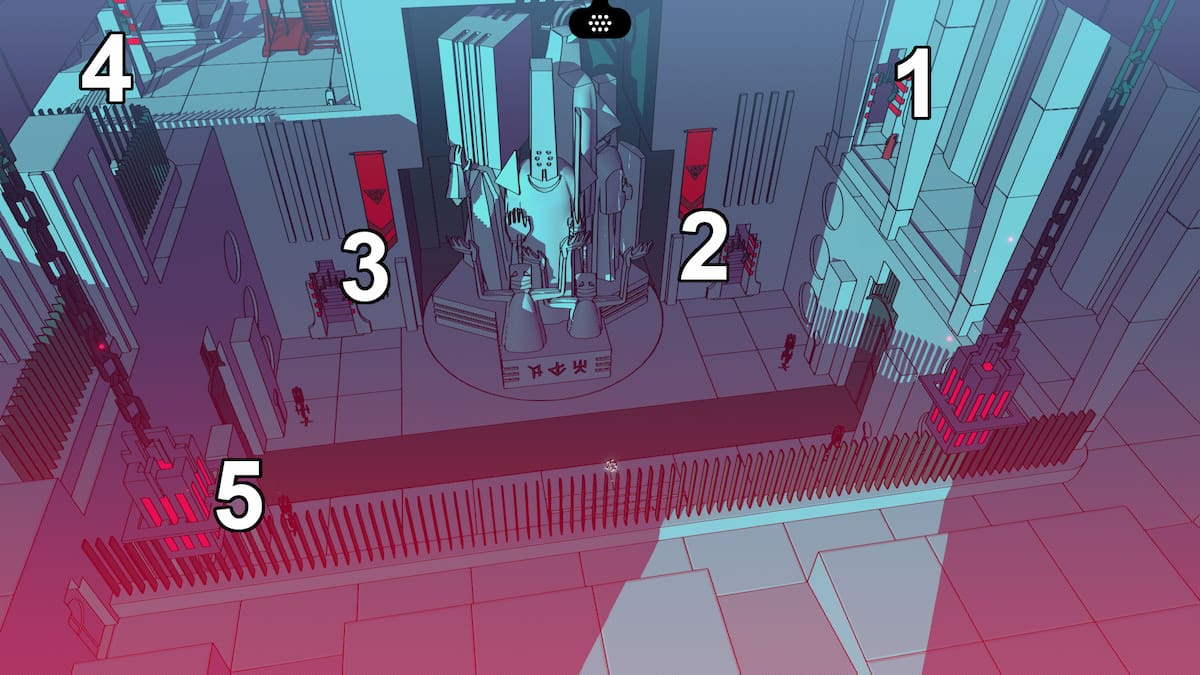
Image by Pro Game Guides
Chapter 4: The Laboratories of the Alchemists
We have made it to the res publica of the Alchemists . You have yet another language to image out as well as a aggregation of items to get . Here is a over walkthrough of this challenging area .
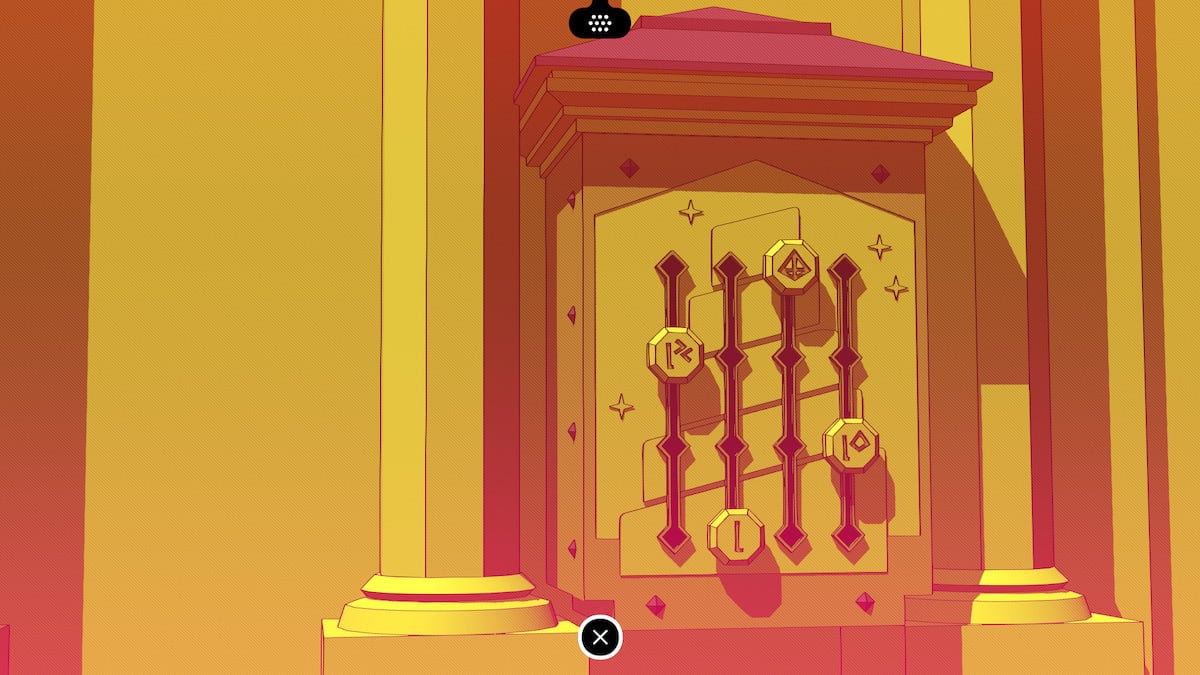
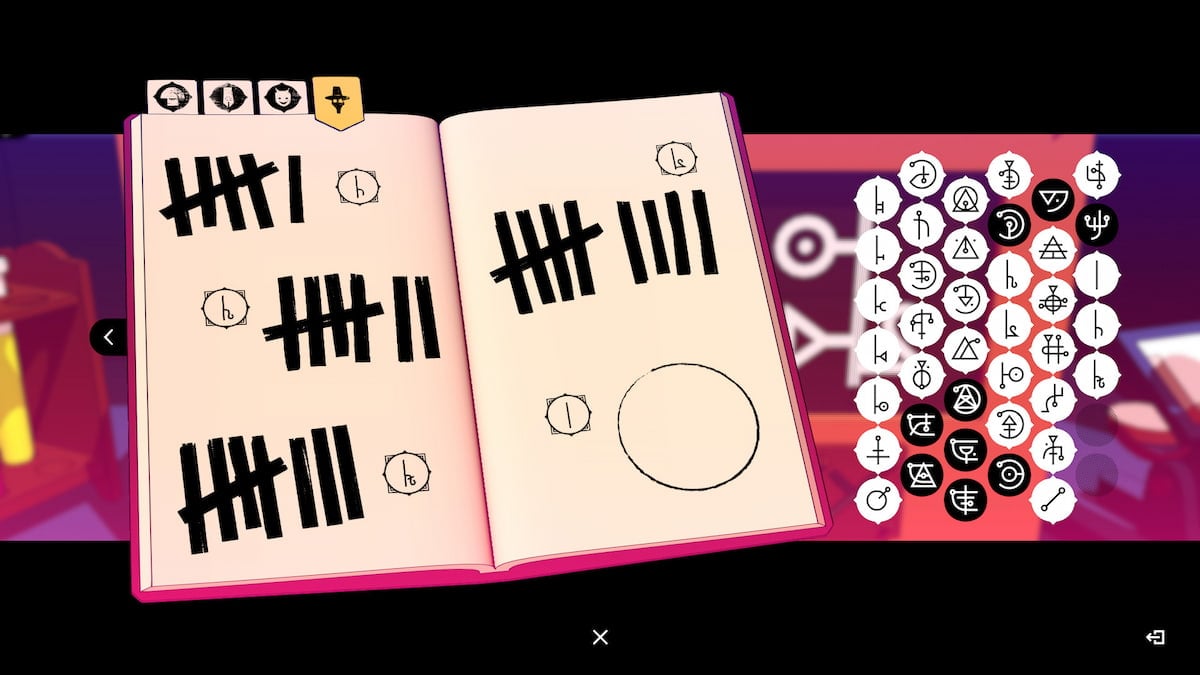
Now that you are free of the monster , lead to the right field through the now - open door . You will see an lift with no power and a teaser beside it . If you monkey around with it long enough , you will realize that each of thesymbols are numbers , and each one needs to be weightlift , move , or pulledin the veracious orderto get the elevator working again . The phone number are listed below in the right order so you could pull the right the first meter . Once this mystifier is complete , the lift will turn on and you could depend on it to the next chapter .
After you finish up the lift puzzle , you ’ll get a Modern page for all the numbers you just learned . This will be the first varlet in a whole new language for the Alchemists .

Screenshot by Pro Game Guides
Before going up the elevator , check that to head through the northerly doorway to get a few young symbols for your new language and a fast travel point .
If you interact with the wall painting above by moving the go-cart out of the way , you will need a Bard passage that has been translate into the Alchemist language . You will get a new page from this , and you could take in You , Me , Plural , Find , and Seek .
Ride the lift up into the Alchemists ' metropolis . The first thing you will require to do is interact with themap . Head up the stairs and appear at the bigwhite polarity on the left side of the screen . While these glyph wo n’t mean much to you now , they will be important .
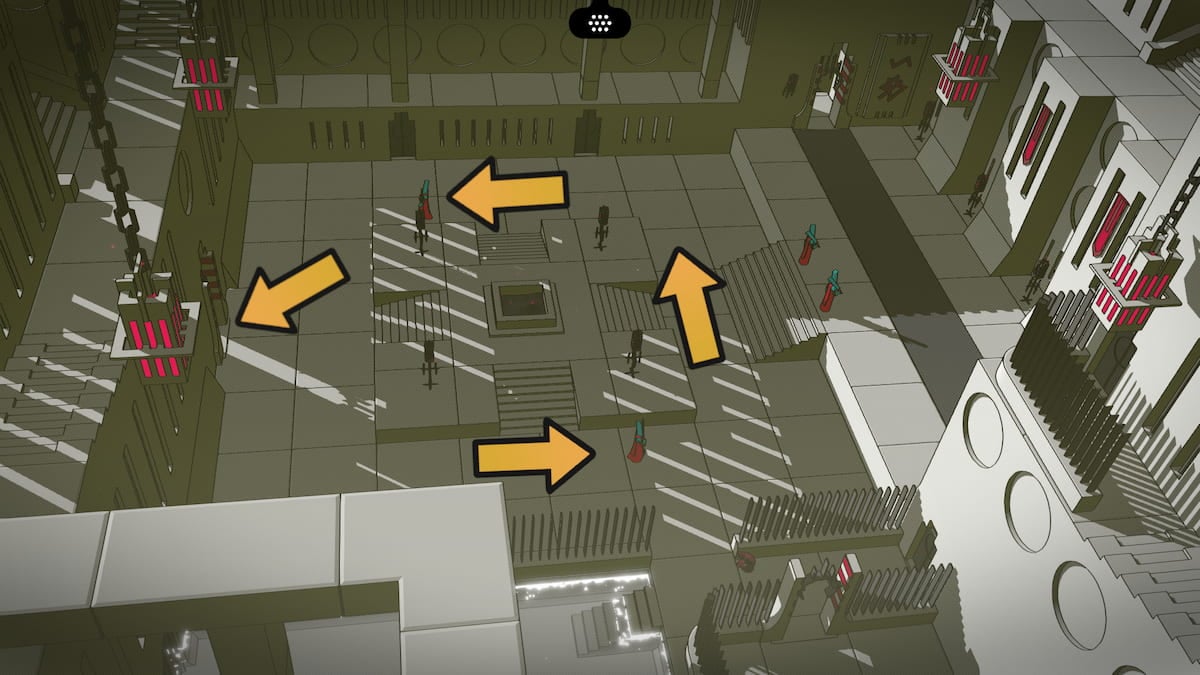
Image by Pro Game Guides
Next , go up the step to the right field , chat with the two people standing by the lift , and get a couple of raw glyph . After that headup the lift . At the top , you ’ll find another person ; chat with them to get some more glyphs . There is also another map ; it will expect the same as the one in the screenshot above , but it will be vindicated that you are on the second grade and not the first . Head leave alone , and you will find thelibrary , which is where you want to go first .
Just inside the door of the depository library is a book you’re able to look at with adiagramsome glyphs on it . Interact with it , then head to the left of the CRT screen . You will find another book you’re able to interact with as well as a person you’re able to talk to . All these will give you more glyph for your language book .
After that , you will need to head to the top of this concealment , where you will findtwo glass cases . Once containssilver coinswhile the other containsa amber hoop . Make indisputable to look at the telephone number below each of these as well . Interact with the sign on the wall , and you ’ll notice it has the number one with a symbol . This correlates to the numbers underneath the object , makingone equal amber and two equal silver , meaning there are two more item to find in the depository library .

Image by Pro Game Guides
Go back down towards the entryway of the library and climb thestairs to the 2nd flooring . Up here , you will come across several young things you could interact with . First , look at the book that is slenderly up from the top of the stairs . Next check out the wall painting on the back paries , and then talk to the person standing near the wall painting . This will unlock a glyph page .
Once you have interact with thebook on the 2nd floor , the wall painting on the rampart , and one of the two instances of thebook symbol , you will get this pageboy . It has the symbolic representation for Fairy , Door , Book , Brothers , Alchemists , and Bards .
After completing the Sir Frederick Handley Page , you may interact with the thirdglass subject , which is on the left side of the upper part of the depository library . It is pronounce with a three and arrest acopper fall guy . So now you haveone match atomic number 79 , two equals silver , three is copper , and a last enigma metal for four . Head down the stair in the back nook in the upper left to get to the next localisation .
Screenshot by Pro Game Guides
Down the stairs , you ’ll find a study corner or an office . Inside it , you may find three things to interact with : another glass lawsuit , a paper on the desk , and a hat laying on the floor by the desk . The papers on the desk wo n’t be much serious , but thehat has some helpful selective information insidethat you will copy down into your daybook . When you interact with theglass case , which hasthe number four and some carbon inside , you ’ll get another glyph page .
Now that you have interact with thefour glass cases in the program library , you ’ll get another varlet . This will have Gold , Silver , Copper , and Carbon . fill up it out like this to complete it .
From the office with the fall hat , take the air down the stairs at the bottom of the screen . This will lead you out to a political program with a degenerate travel point . Activate it so you could come back here later .
Screenshot by Pro Game Guides
Next up , it ’s meter to run through ! lead over to thecafeteria , which is this building on the right side of the 2nd stratum . It has a knife and branching on the front of it . As you may see , the clock nearby has three prison term where the doors will open to flow the population . You ’ll need to expect until the small , hour hand is indicate at one of these three times:12 , 4 , and 8 . Then a bell will ring , sounding a lot like a school bell ( you may also hold off for the bell to ring , then hold it to the entry ) . The doors will afford , and the people standing outside will teem in . Once you are inside , there is a person to speak with , and you may pick up aknife and forkfrom the silverware in the back .
Now that you have possession of thefork and knife from the cafeteria , it ’s meter to go to the Gold Mine . You ’ll need to head to level 1 via the elevator or stairs , then go leave behind to get to this projection screen . Once you see the skull with the X sign , you are in the veracious place . Pull the lever , then skip into the cartto ride into the mine .
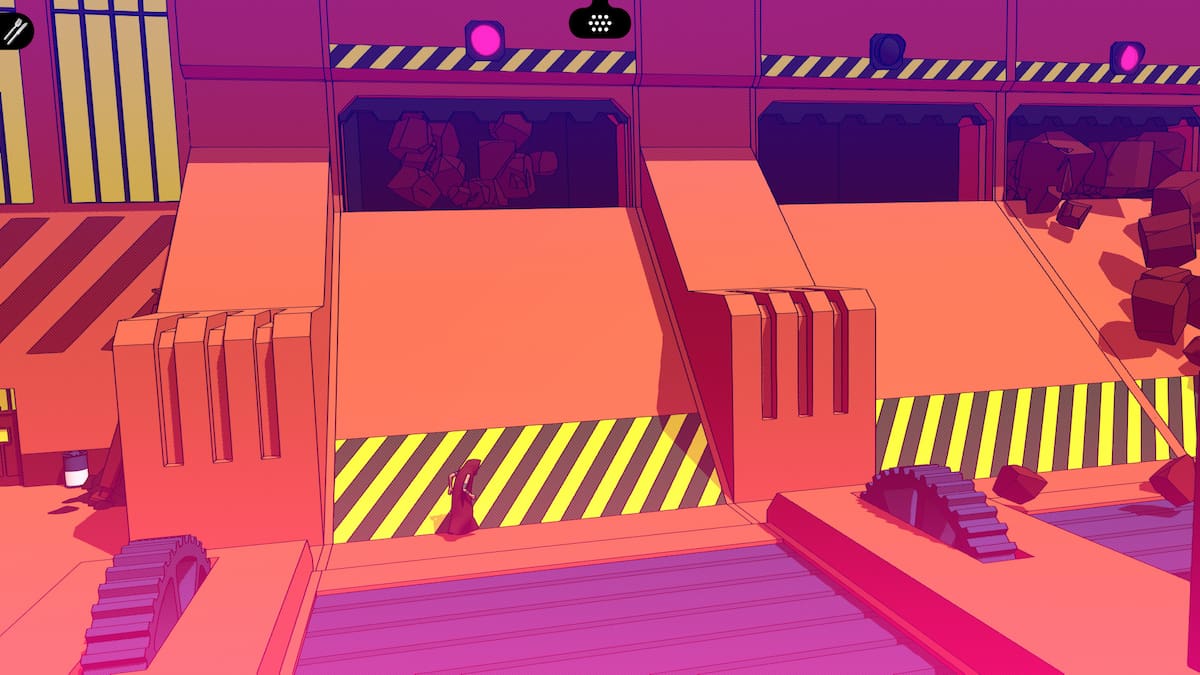
As you step off the cart , learn out the sign with a new glyph forDangeron the bulwark , then walk through the puzzle with the falling rocks . You ’ll just need to time it right to make it through the puzzle .
Screenshot by Pro Game Guides
On the far right side of this way is a staircase ; channelize up it , then interact with thepink machinein the next elbow room . You will necessitate to turn on the machine , put the knife and forkinside the top of the machine , get out the lever until the reading is in the red , then press the blue button . This will cause the silver grey to mellow out and make into a smooth-spoken stripe .
After interacting with thepink machine in the Au mineand thedanger sign in the gold mine , you ’ll get this Sir Frederick Handley Page for Dead , Open , and Closed . Fill it in as it is below to get these three actor’s line .
In the next room , pick up aGold Baroff of the peck of amber parallel bars along the back rampart . Now you have both agold bar and a silver prevention , which will be needed for the Transformation Key after on . Head out of this room through the doorway on the bottom of the screen .
Screenshot by Pro Game Guides
In the next way , you will happen several locker . Inside the third locker from the left , there will be a hardened oftwo keycard . clean these up . There is nothing else in the lockers you want to grab .
apply the first keycard to spread the door in the unexpended side of this room , and it will lead out into the entering of the mines again . Head to the top of this screen and to the left , looking for a stairway down . This will head you to the entering of theSilver Mine . You will postulate to use thesecond keycardto open this door and point in spite of appearance .
Inside , maneuver to the left hand to find an Alchemist trapped by a cart . If you move the cart for them , they will drop an objective on the ground that you will automatically pick up . It is alighter , which can be used to light fires . You will also eff the glyph forHelpnow .
Screenshot by Pro Game Guides
Walk back to the right ; there will be a staircase hidden at the bottom of the screen under the doorway out of the Silver Mine . at heart will be a wall painting with moreglyphsand afast traveling pointedness .
In theSilver Mine , nous flat down from the entering ; there will be a well - hidden staircase at the bottom of the screen . Walk down it to come up this hiddenFast Travel Point .
You will get this page after interacting with the wall painting on the rampart above the profligate change of location point in the Silver Mine . You will get the words for Not , Warrior , and the Scripture for Plant .
Image by Pro Game Guides
From the Cafeteria , if you head to the south and down the stair , you ’ll come across the Laboratories . In the first lab , you ’ll receive three things you’re able to interact with : a ruler , which has all the numbers in order , amachine with numbers on it , and achalkboard with more glyphs . If you interact with the number machine and flip through all the numbers , you will unlock a Modern glyph page .
If you interact with the machine in the Laboratory with all the numbers on it , it will unlock this fresh Sir Frederick Handley Page for the other numbers you ’ll ask to beat this part of the game . It will have the symbol for the bit Six , Seven , Eight , Nine , and Zero .
for make the symbol on the right , which is the same symbol from thelibrary in the bank bill inside the hat , you will want to put in the symbolic representation for5 - 0 - 3 - 9 . Take bank bill of this number ; you ’ll need to it get into Lab number 3 . After that , godown the stairs to the leftto the next science lab .
Screenshot by Pro Game Guides
Now that you have seen the primary four segment of the Factory , you will get a new pageboy for the Library , Cafeteria , Lab , and Mines glyph . replete out the varlet like this to complete it :
Laboratory figure 3 is lock up up . so as to get there , you will need to walk out the back threshold of Laboratory 2 ; channelize out into the logic gate , then interact with themonster paintingon the paries to get more glyph . This will give you a new page .
Transform , Formula , Monster , and Fear are the four new glyphs from this pageboy . If you do n’t have it , verify you have interact with thegraffition the wall by Lab 3 , theglyph on the story of the Transformation elbow room , and the people in Lab 1 .
Image by Pro Game Guides
In monastic order to get into Lab 3 , which is blue , you will require tolight the unlit lanternby the doorway with thelighter you got from the Silver Mine . Lighting it will give you the final Sir Frederick Handley Page of glyphs in the Alchemists language .
Once you havehelped the trapped person in the eloquent mine , watch the page about thelighter in the library , and illume the lamp by the entrance to Lab 3 , you will have the last Sir Frederick Handley Page for the Alchemists Language . This last page has glyph for Make , Fire , and Help .
arm with a faint source , you could at last head into research laboratory 3 . The doorway to get inside it will be interlock , and you ’ll need thatfour - digitnumber from the machine in science laboratory 2 , quicken the symbolisation on thenote inside the hatfrom the library . This number is5 - 0 - 3 - 9 . typewrite it into the keycode to go into the lab itself .
Image by Pro Game Guides
There are two points you could interact with in science lab 3 . One is the hole in the floor ; the 2d is the blackboard . The chalkboard is the important thing here ; make indisputable to await at it to get theformula you need for the Fairy Gate .
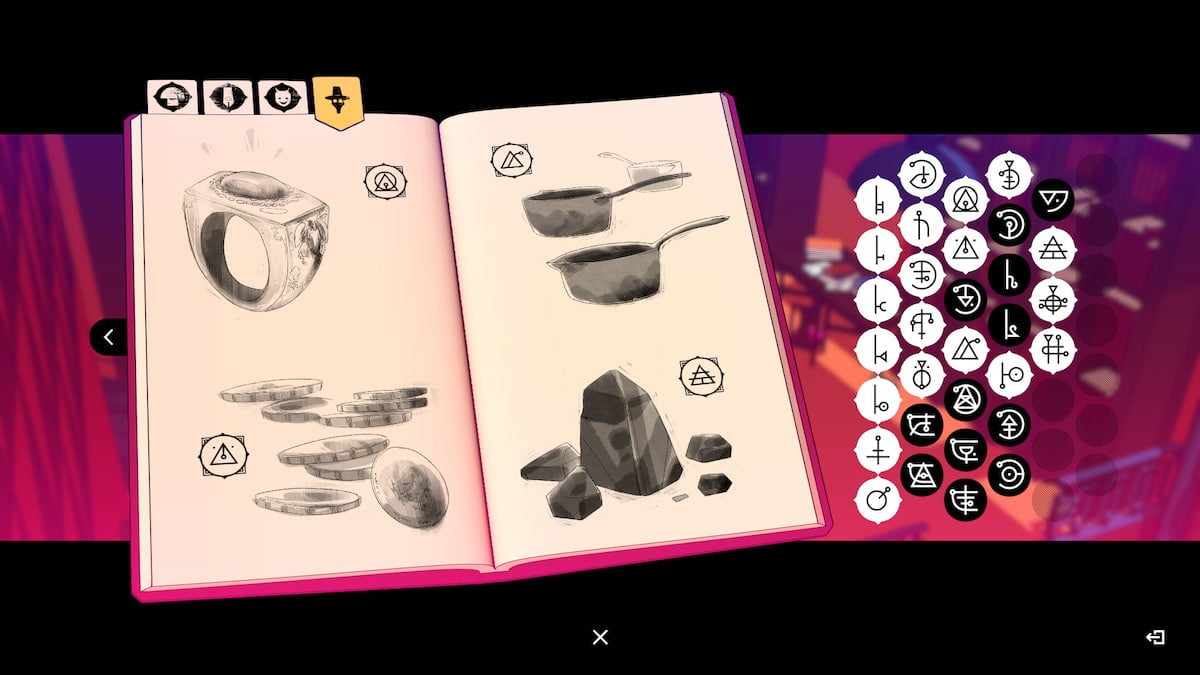
As shortly as you interact with the blackboard , you will mechanically write down the formula in your notebook computer after look at it . The Formula has the symbols forGold , Silver , and Carbon . Each one has a symbolic representation next to it .
The way these symbolisation work is fairly simple , so allow ’s conk out it down . The upper left hand corner of the phone number ( 1 ) is the 1,000s position . ( 2 ) is the 100s position , ( 3 ) is the 10s , and ( 4 ) is the in the single position . So if you take this number below , the first number is 1 , the second is 4 , then 0 , and 5 . So1,405 . If you look at the pageboy with the numbers on the page copied from the blackboard , you get Gold1405,Silver0812 , andCarbon0046 .
Image by Pro Game Guides
Head over to the transformation room , which is in the upper - right part of the Factory . Take theSilver barand theGold baryou get from the Gold Mine , and put them into the right places in the simple machine . This will fill up all four sections of the transformation car .
Next up , you will need to graduate the flatware , Au , and carbon copy sections of the transmutation machine to make trusted to get the veracious mix of gold , silver , and carbon copy in your key to make the Fairy Door employment . The first glyph on the machine is forSilver , and you want to get the weights to equal812 . The numbers on the weights correlate with the telephone number system you had to use to get to the numbers above from the formula on the chalkboard ; the small weights are ace , the second is a five Egyptian pound weight , then 10 lbf. weights , then 100 , 200 , and 500 lbf. weights . Make them tot up to the number from the formula .
In social club to makeSilver equal 812 , you demand the 500 , the 200 , the 100 , a 10 , and two one - hammer weights . Au , which is1405 , call for both 500 - dog pound weights , four of the 100s , and one five - hammering weight . For the final one , selectionCarbonbutton , and tote up four 10s , one five - Syrian pound , and one one - Ezra Loomis Pound weight to make46 . direct over to the next political machine , and press thetransform button . This will form a key that will fit in the Fairy Gate .
Screenshot by Pro Game Guides
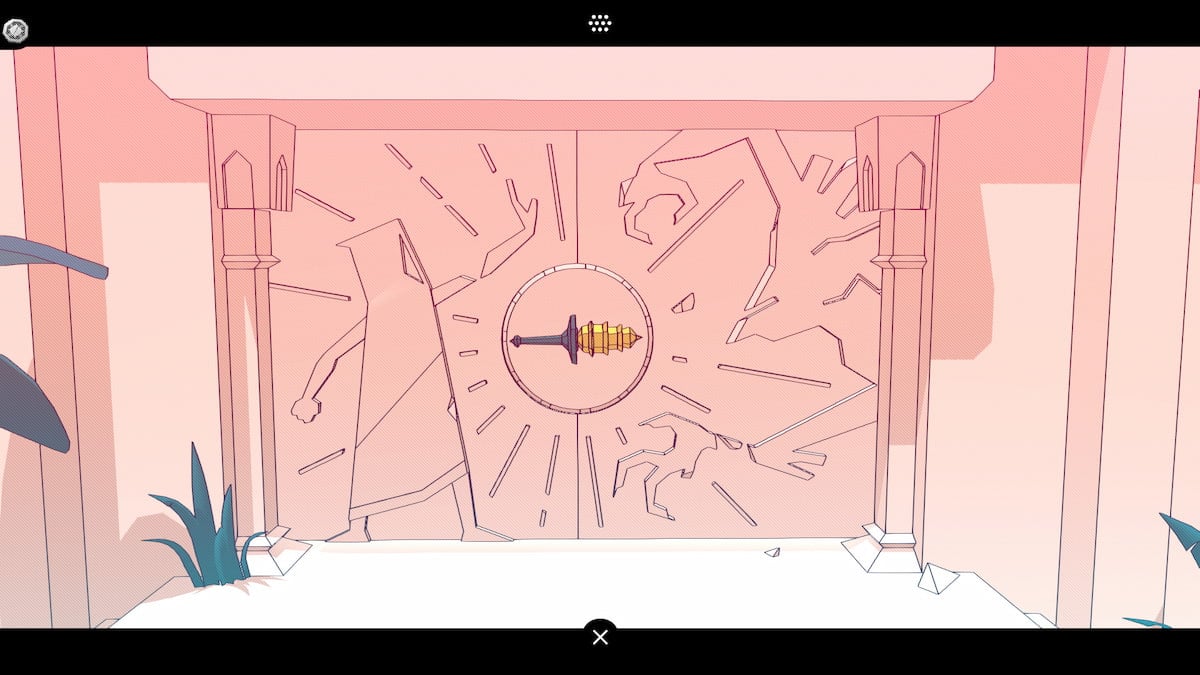
Using the step on the left side of the sieve , head up to the Fairy Gate , and put the Francis Scott Key in the door . If you have mix the metals decent , the winder will open up the doors , allowing you to walk intoExile .
accomplishment : One Last StepReach the fifth stratum of the Tower call Exile .
Chapter 5: Exile and the Top of the Tower
In the terminal chapter of Chants of Sennaar , you will have to gather a whole new language and unlock a room access . It ’s a very quick chapter — much short than the ones before it if you need the bad end . Here is an account for how to get both thegood and the regretful endingin this indie title .
Head into Exile , and interact with the sign on the left side of this screen . It will give you some new glyph that you will need to learn in this fifth and final language . It will also give you your first Exile glyph Thomas Nelson Page .
interact with the first poster will give you a Sir Frederick Handley Page in your journal . You have now learned three new words in this unexampled speech : Tower , People , and Exile .
Screenshot by Pro Game Guides
The last fast change of location item is inside Exile . Once you are at bottom , take the stairs at the bottom of the screen , then direct to the left field to the next screen . Thefast locomotion pointwill be along the main way . If you have gotten the premature portals in this list , you will earn an accomplishment . If you need to know what to do with these consoles , check out thegood ending department of this clause .
Achievement : Cable GuyActivate all 10 fast travelling terminals .
If you head up up from the previous screen , you ’ll regain a yellow end . On the filmdom of the terminal , you could find a assemblage of different glyph from all the languages you have larn so far . Line up the meet glyphs with one another , and you will unlock a new page in your glyph journal .
Screenshot by Pro Game Guides
If you turn the puzzle in the correct way on theyellow terminal , you ’ll earn a whole bunch of novel glyphs for the language of Exile . The Sir Frederick Handley Page will machine - fill in , you do n’t have to worry about matching up the glyph right . If you read the glyphs in order , it will lead off to tell you the floor of why you are here .
The there are two more yellowed depot , each one with a novel rotation teaser . you may notice the 2d one at this intersection express below . This one will also give you a new , autocompleting glyphs Thomas Nelson Page when you get glyphs in the correct club .
The terminal above will give you another Sir Frederick Handley Page with another sentence about why you have been summoned to Exile . Solve the mystifier in the second jaundiced end to earn this page .
Image by Pro Game Guides
The third jaundiced terminal will be located by the large door ; walk past the elephantine laser - ptyalise nerve , then head to the next screen and look to the left of the golden threshold . Solve it with this solution to get another glyphs Sir Frederick Handley Page .
The third glyph teaser will give you this Modern varlet with the glyphs for Not , Wait , Plural , Greeting , Open , and Fear . This will be the last piece of music of the puzzle you want to open up the locked room access in Exile .
With these glyphs , you will be able-bodied to unlock the room access at the western - most part of the map . In rescript to unlock it , use the glyph you have now ascertain forKey , Open , and Doorin that order , and you will able-bodied to enter . Inside , speak to the person , then interact with theterminal at the back of the room . It will give you another hardening of challenge .
Screenshot by Pro Game Guides
to complete these three screens , you will need to recall critically about how the new glyph can be made by combining the ones you already live . For lesson , in the the screen seizure above , you’re able to see that the glyphs for " go " and " up " combine to make " uprise . " make out these pages will unlock all the remaining glyphs .
Achievement : ChampollionGet all 186 glyphs in the game and validate them all .
Now that you have all the glyphs , and your raw admirer has give you a weirdly shaped key , you may finish up the secret plan . point back to the golden door , introduce the key , and guide up to the top of the Tower . You will get the unfit ending .
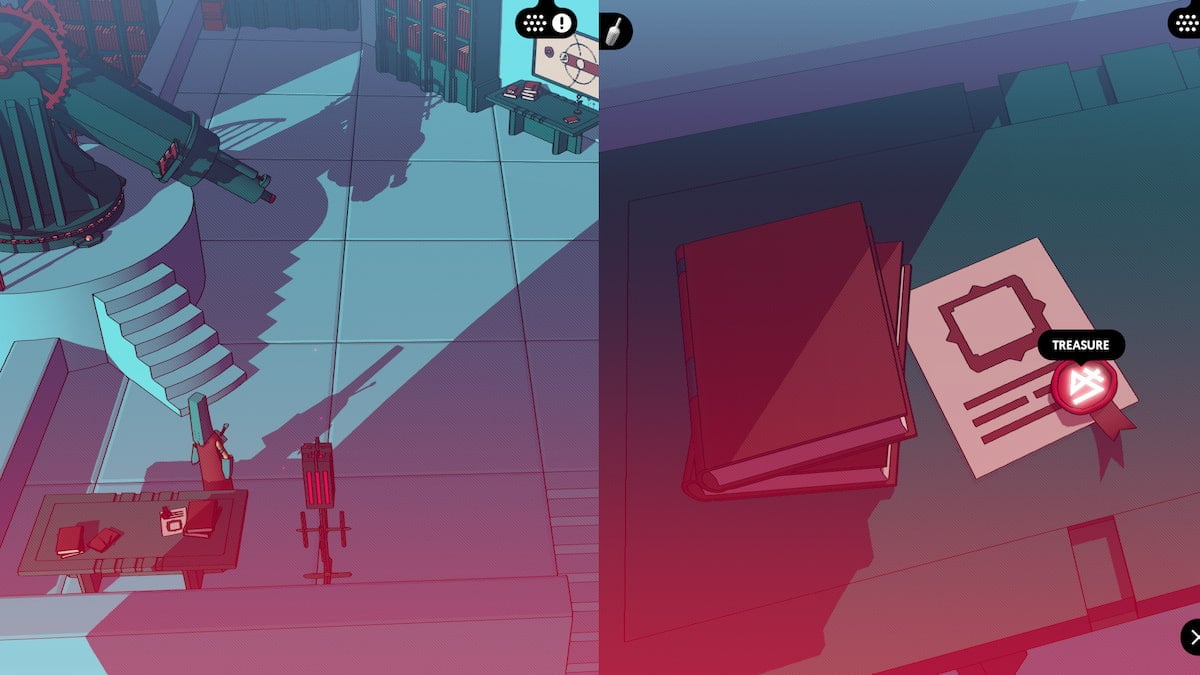
Image by Pro Game Guides
Achievement : I Did ItFinish the biz with the bad ending .
Thefast travel pointsorterminalslocated throughout the humankind now have to be reconnected to keep the Tower alert . You will need to channelize to the first fast travel level , which will contribute you to the area outside of the Abbey . This first terminal need some rendering .
flying traveling to the first terminal , and interact with it . This terminal ask a translation ; you will take to translate the Devotees speech to the Alchemists in order for them to understand . The Devotee will ask for service with the plants , and the Alchemist will settle to help .
Screenshot by Pro Game Guides
Achievement : A Good BeginningComplete the first Terminal link to get this trophy .
degraded locomotion to Terminal 2 , which is inside the Abbey near the Cemetery . You will postulate to use the key for this one . From the second terminal , head out to the other side of the Abbey where the mortal is play guitar . There is a hidden nook in the background . within there will be apurple door . at bottom , you will need to first work a puzzle of sorts . The answer to this one isPreacher , See / Look , Potion , Potion . Head inside the Exile room and weightlift the clit next to Exile to turn it off . This will unlock build the 2nd terminal ’s connection .
Terminal 3 is locate near the entrance of the Fortress . Unlike the last two terminal , you will need to dobotha translation puzzler and a imperial door . First and foremost , the interlingual rendition mystifier . Since the Warrior is enjoin that the Devotees ( Impure Ones ) ca n’t inscribe the Fortress because they ca n’t make music , you just have to prove they do make music with a translation . The first air is " Devotee , Devotee , Not , Go . " Then " Devotee , Devotee , Not , Make , Music . " In result , the Devotee will say : " Devotee , Devotee , Make , Music . " The Warrior ’s answer need to be translated with : " Warrior , Warrior , Love , Music . "
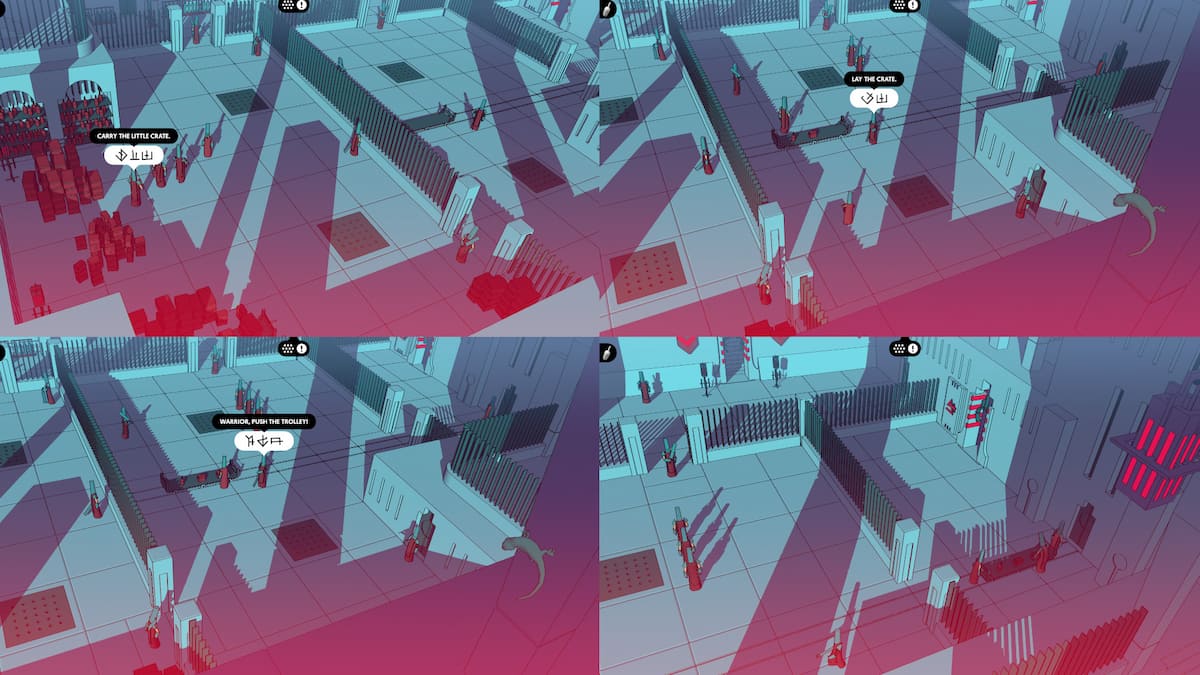
Image by Pro Game Guides
After that , head into the Fortress and into the first independent room with the spinning statue . The key to this door will wink quicker the near you get to the door , which should help if you get lose on the way . heading inside this room access located below , then use the key to get inside the purple door .
Just like the last violet door , there will be a teaser to get inside the Exile ’s sleeping room . This one is a video of Warriors carrying a gravy boat , so you need to use the glyphs for"Plural , Warrior , Carry , Vessel . “This will unlock the door to get into the sneak mystifier elbow room .
This guy patrol the next room is up to no good ; Exile know you are here to turn it off , and it wo n’t go quietly . to get through this tangle , you will want to waitress until the robot guy cable is facing off , then move to the next placement as argue below .
Screenshot by Pro Game Guides
Once you have fall in the golem guy wire the slip , it ’s time to release Exile off with the clitoris to the left of its screen case . You do n’t have to sneak on your way back as turn off Exile will also turn off the robot guy cable . leave alone the area , and a Fairy someone will stop you and thank you . This will complete the second connection for Terminal 3 .
terminus 4 is locate in the Fortress in the Treasure area . for complete this one , you just need to translate some lines from Alchemist to Warrior . The Alchemists are asking for the warrior to help them aid the Monster , and the warrior will answer that they are happy to aid . Here are the Glyphs to choose for each of the lines below .
terminus five is fill in by finishing up the purple door nigh to Terminal 3 , which is listed in the subdivision on Terminal 3 above .
Screenshot by Pro Game Guides
accomplishment : Half the WayRebuild one-half of all the terminal links .
Once again , this Terminal 6 will have two things you have to do . First , you will need to translate between Bard and Devotee . Next , you will necessitate to find the concealed purple threshold nearby and get rid of the Exile inside . Here is the solution to the Terminal 6 version puzzle .
Once that is accomplished , headUpfrom the Terminal screen into the Servants Passage , thenUpagain , then to theLeft . There will be the over-embellished doorway call for for the next challenge . practice the keystone to open up it up , then head deep down .
Screenshot by Pro Game Guides
Just like all the other rooms so far , you ’ll see a mortal sitting near a closed door with the Exile sign on it . To get it receptive , you ’ll have to solve the mini mystifier below . The glyph in monastic order require to start the door areTheater , Bard , Plural , Go / Pass .
To sneak around the two robot now move around , wait until they are in this formation . Robot 1 will be walking towards the top of the cover , and two will be walking to the south . embark on go along the wall , following Robot 2 until you could luxate around the corner and through the door on the other side . Once you are in the other room , ferment off Exile . This will relinquish the Fairy behind this royal room access .
There is nothing to do at Terminal 7 ; you ’ll need to go on onto Terminal 8 instead .
Image by Pro Game Guides
The Silver Mine Terminal is another interlingual rendition puzzle , going from Alchemist to Bard and back . so as to fill in this mystifier , you ’ll need to input these glyphs in monastic order :
Terminal 9 sport both a empurpled door to find and a translation puzzle . To get to the purple doorway , leave the Terminal Confederacy , then head down the stairs that will be at once to your part ’s left . This will lead you right to the purplish door , and you may point inside with the key .
The teaser to get into the threshold is a characterization of six books . to afford it , you ’ll need to put in the symbols for6 , Book , thenPlural . Then , you ’ll need to sneak around even more robot friends . When the first two robot are n’t appear , slip around the far side of the middle lane , then wait there for the elbow room to be well-defined to the doorway . It looks really challenging , but it is in reality quite easy to get through .
Screenshot by Pro Game Guides
This will get you into Exile ’s room . It will peril you , but it ’s jolly toothless at this point , so you will be capable to turn it off without issue . verify to press the push , power him down , then have a chat with the Fairy you have released from Exile ’s control before head out .
Once you ’re back at the terminal , you’re able to solve the translation teaser . The resolution ask you to translate Warrior to Bard and the other way too . Here is the solvent for this teaser :
This terminal does not have any puzzle associated with it ; it will be completed by completing the purple doorway near Terminal 9 .
Screenshot by Pro Game Guides
Achievement : Peace WalkerRebuild all 10 terminal links .
There are a dyad of accomplishment you will only be able to get after you finish up all the terminal as list above . As soon as you start to spread out up the layers of the Tower , different people will cross over between different location , permit you to watch these people interact . Here ’s how to get all those accomplishment .
go back to the Garden where you looked for the Preacher , and you could see how well the Alchemists potion worked to fix the snuff it plants . From Terminal 2 , head Down , Right , and mighty to get back to the garden .

Screenshot by Pro Game Guides
Travel to the front door between the Abbey and the Fortress and see the door is opened . It ’s well-off to get here from Terminal 1 .
There is a Serf who is hang out with the Beggar you met in Chapter 1 in front of the church . you may get there apace from Terminal 2 if you manoeuvre right away from the burying ground and then manoeuvre north .
see the bard ' show in the Fortress the step up to the Bellman ’s house ; you may get there by go to Terminal 4 , then manoeuver up the stairs , northward , north , then climb the stairs toward the Bellman ’s billet .
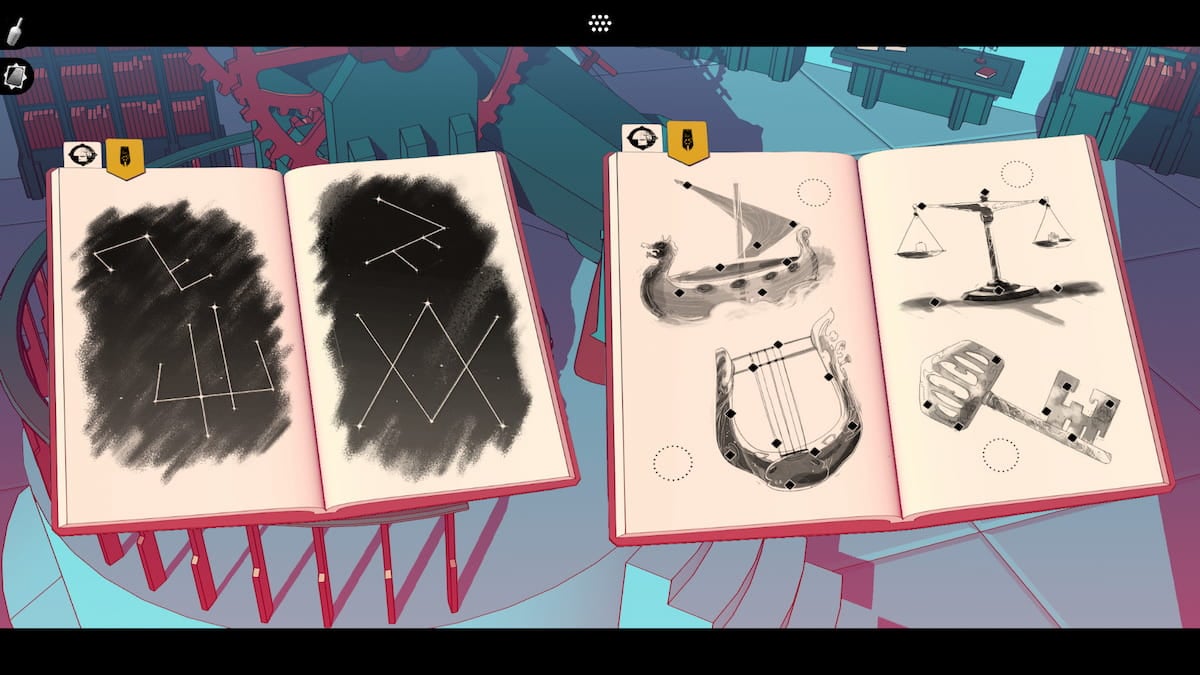
Image by Pro Game Guides
If you leave from Terminal 8 , heading out of the silver mine , you’re able to keep heading right until you run into the Labs . Go into science laboratory 1 to see the captured monster acquiring solve on by the Alchemists .
If you direct to Terminal 9 , you could get to the depository library by kick the bucket right and up the stairs . Once inside , go up the stair on the left side of the covert , then find the Bards hanging out on the upper floor of the depository library .
Also from Terminal 9 , you’re able to see that there is a trolley car that was n’t there before ; you’re able to ride it back down the Gardens .
Screenshot by Pro Game Guides
As you head back up to the prosperous room access in Exile , you will find two of the Robot guy you have been trying to avoid behind the purplish doors . They will shoot you down , but you will do back . Use the winder in the golden door , and then wax the Tower to the top . Interact with the console table at the top , and the game willrestart . But thing willlook a piddling differentthis time around .
Walk down from your respawn distributor point and head down to the doorway where you first learned the Devotee words for Open , Door , and nigh . If you interact with it , then head back toward the start point , you ’ll fare across the child you play with in Chapter 1 . Walk further towards the bottom of the screen , and the child will open up the way for you to cross over .
You ’ll both stop up in the Fortress . Head up the stairs and then down out of the threshold at the bottom of the filmdom . Head up the stairs , and look for what is dissimilar on the mural . It will give you the answer needed to open what used to be the Treasure door . Type in these four glyphs : Plural , Impure , Create , Music .
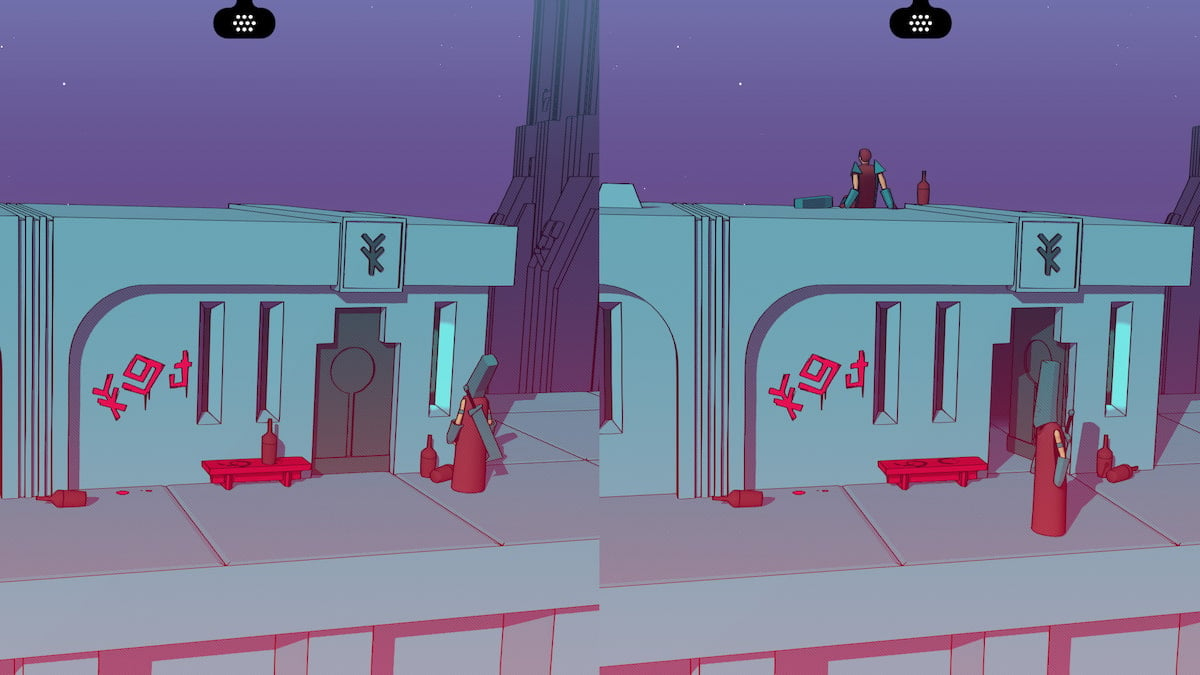
Image by Pro Game Guides
Next up is the Comedy Theatre . Go in spite of appearance and grab the keepsake out of the water fount . Give it to the Bard out of doors , and then head at heart .
The nestling will assist you climb to the second level , where you may watch the gaming again . But things are a little unlike . Once the sport is over , go through the servant ’s threshold to the left , then look for thebook stuck to the wall on the left side of the book sign . It will say " _ _ _ _ _ _ _ _ Bard , Found . "
Head down the stairs and then out the other door , then interact with the Terminal there . The glyph for this puzzle are " Brother , Idiot , Bard , Find . "
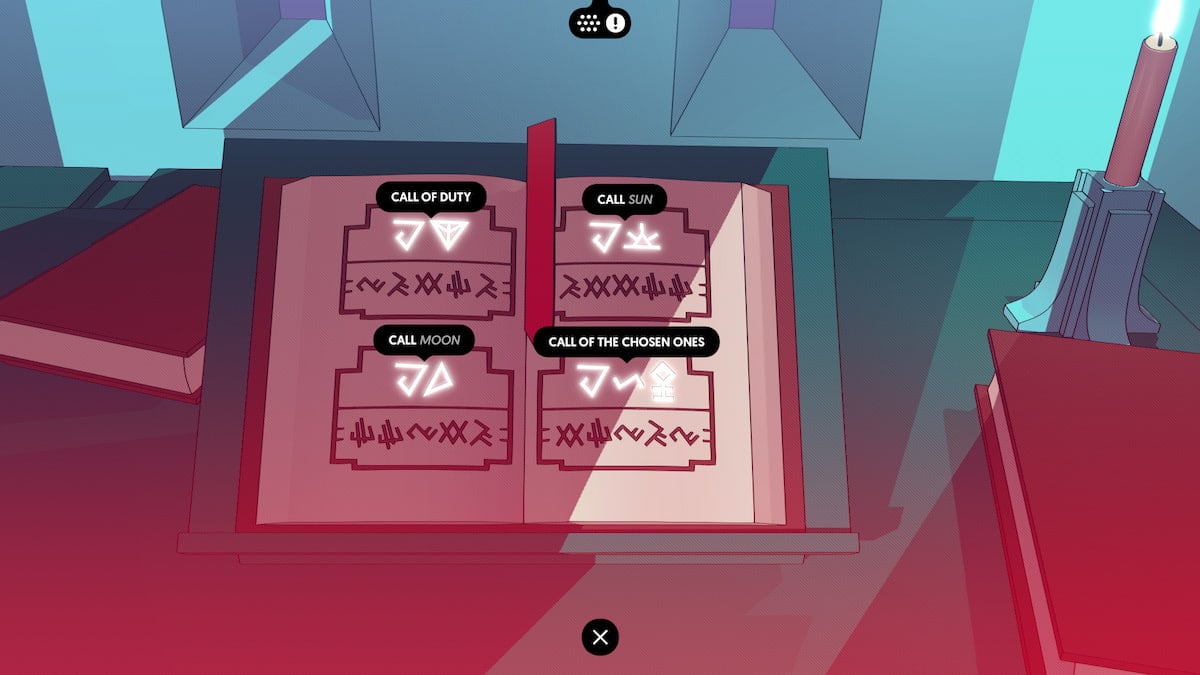
Image by Pro Game Guides
Now we are back in front of the Fortress ' room access in the Abbey . channelise out and down . The Murals will all be there except one , which is the one you take . Keep lead to the left wing . You will eventually find a piece of the mural , and then most of it lying in the first localisation you start the plot in .
In order of magnitude to get in through the Fortress gate , you ’ll need to input what you saw on the mural , even though it was mostly opaque . But you should have an theme of what it sound out from your translation puzzle from Terminal 1 : Alchemist , Plural , Make , Formula .
This will set about a chase conniption with the Monster . Keep running and stick to the child when prompted . You ’ll cease up in a recreation of the tangle from the infinite between the Abbey and the Fortress ; you ’ll need to headUp , Right , Up , Up , Left , Up , Right .
Screenshot by Pro Game Guides
After that , channelise down the hallway , and when the monster jumps out in front of you , verify to take the path across the gravy holder to the south . When you get to the rail , pull the lever tumbler to deteriorate the Monster into the depths of the mine . After that , you ’ll just have to interact with the button , then head back to the gilded room access . Head to the top of the Tower for the good ending you worked so severely for .
accomplishment : In This TogetherGet the good termination .
What happpens in the bad ending in Chants of Sennaar?
As noted above , there are two different ending in chant of Sennaar . The libertine finish , or the unfit ending , hap if you do n’t complete all 10 terminals before head to the top of the Tower . rainfall pour from the sky , and you walk to the top , alone and without the force to light the solar apex . Instead , you sit in the rain , wait out over the cosmos . You did n’t complete your pursuit that you were made for , and you will have to just find out as the Tower , and everyone inside it , dies .
What happens in the good ending in Chants of Sennaar?
If you put in the time to do all the Terminals , you will get approach to the near ending . It takes a passel long to complete in comparison to the big one , but it is deserving the effort . Once you interact with the golden doorway in Exile , two robot guy ( just like the ones behind the purple doorway ) will show up an shock your character to expiry in front of the open door . After a few moments , however , you handle to drag yourself back up somehow ; walk up the Tower ’s apex show that it ’s still raining , still dark and stormy , and the top of the Tower does n’t react in the manner you believe it would . " The End " shows up on the screen , but is it really the remnant ?
You awaken up at the beginning of the plot again , but alternatively of the title of the game coming up on screen , it just enounce Exile , which is a bad polarity . As you take the air through the first chapter ’s beginning again , you ’ll bug out to notice some eldritch change , extra doors , staircase , and jumbled letters . The child who you played hide and seek with will help you through the next locations , all shuffle up and foreign . You take to solve a pair of puzzles , then run away as the Monster from the Galleries chase you . After you excite him , you will bump yourself in a eldritch location . It looks like a broken program , and Exile ’s face pip and waggle in the background knowledge . As you get to the end of the platform you are on , you find yourself face - to - face with your own body .
You are locked into one of the Exile ’s helmets . You have been playing Exile ’s game , and you are not out of the Matrix just yet . Next to your body that is hooked up to the ultimate VR motorcar , there is an off button . Once you wrench the program off , you will stir up up in the genuine world , where your body has been all along . You are now in the real Exile , and you have defeated the program Exile . Exile was restrain all the people of the Tower divide , keeping them all locked in the program to keep itself going , even if it was slowly pour down all the people in the Tower off .
Screenshot by Pro Game Guides
in conclusion , you take the air out into Exile , and all the people who were lock in into their VR helmets have been countenance go . you’re able to finally walk up to the actual top of the Tower , and the sun has follow out . At the top , a accumulation of people , a couple from each layer of the Tower , are present . You take the air ahead and turn over on the machine at the top of the Tower , and it lights up with the symbol from the Terminals .
As the 3D diamond - conformation turns , you could see that from dissimilar perspectives , it take form the glyphs that are most important to each of the groups : the symbolization forGod in the Devotee words , the symbol for Duty in the warrior tongue , Beauty in Bard , Transformation in Alchemist , and finally , it careen to make Exile in the Fairy language . The affair that was most powerful most important to all was the same matter , just from a different perspective . Here is avideo of the full well endingfor chant of Sennaar .
For more indie biz , train outWhat is common June ? discharge date , prevue , platform , & more!on Pro Game Guides .
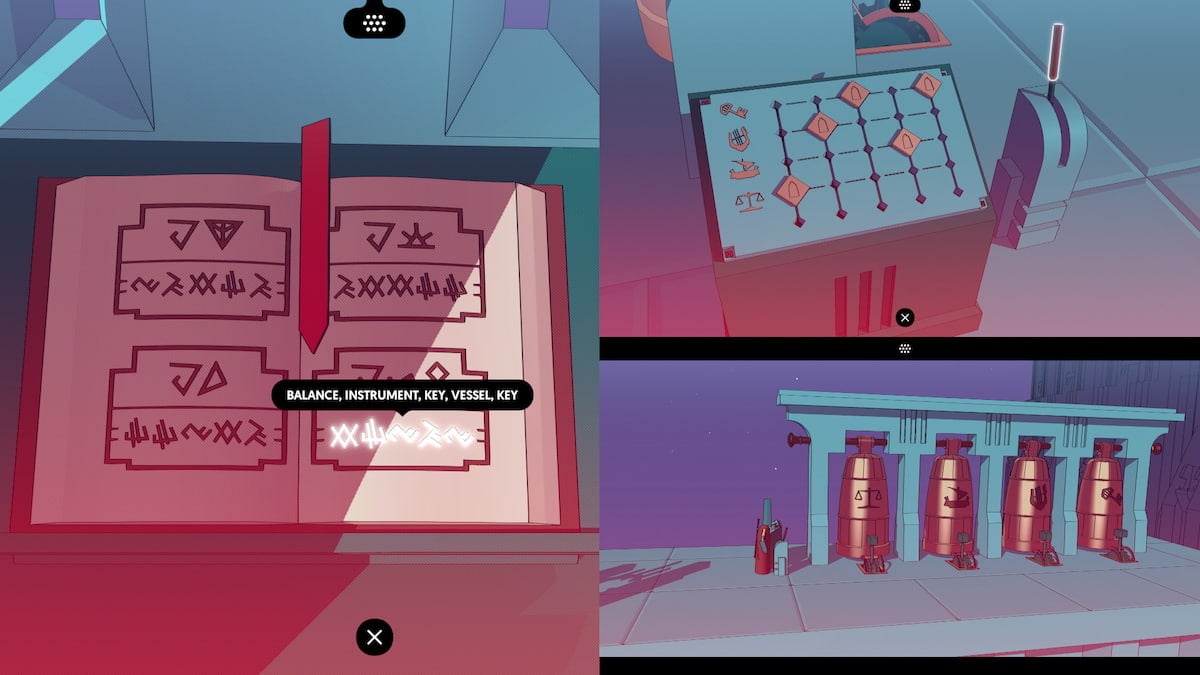
Image by Pro Game Guides
Screenshot by Pro Game Guides
Screenshot by Pro Game Guides
Image by Pro Game Guides
Screenshot by Pro Game Guides

Screenshot by Pro Game Guides
Screenshot by Pro Game Guides
Screenshot by Pro Game Guides

Image by Pro Game Guides
Screenshot by Pro Game Guides
Screenshot by Pro Game Guides
Screenshot by Pro Game Guides
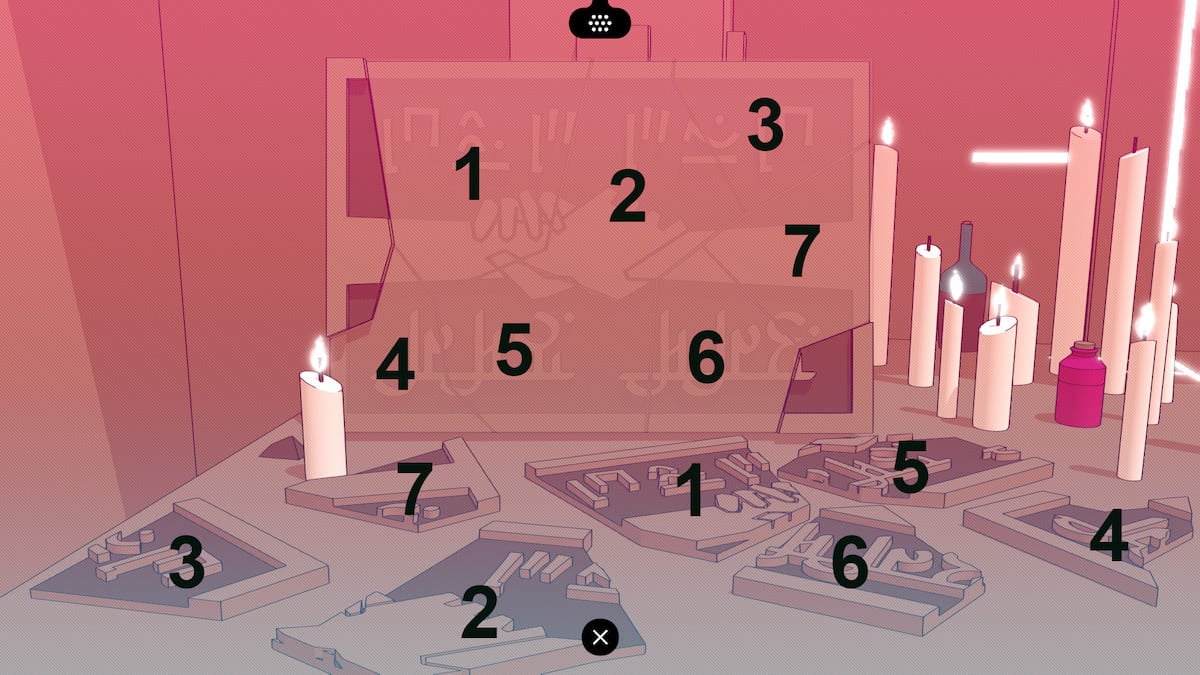
Image by Pro Game Guides
Screenshot by Pro Game Guides
Screenshot by Pro Game Guides
Image by Pro Game Guides
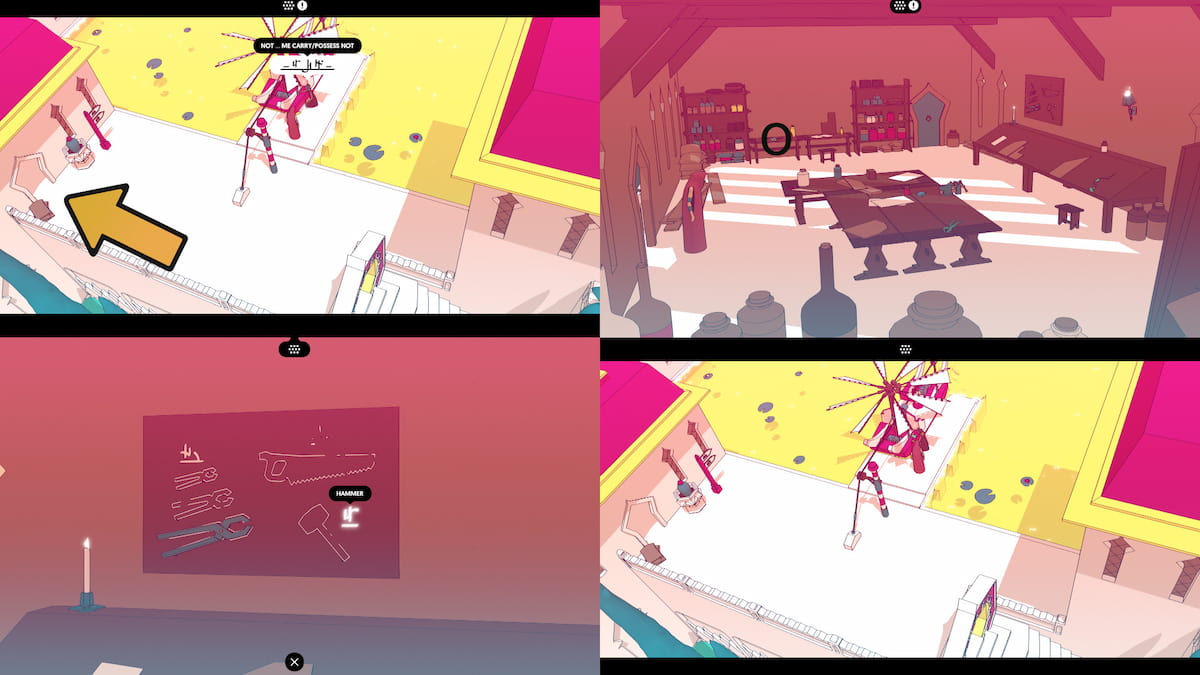
Image by Pro Game Guides
Screenshot by Pro Game Guides
Screenshot by Pro Game Guides
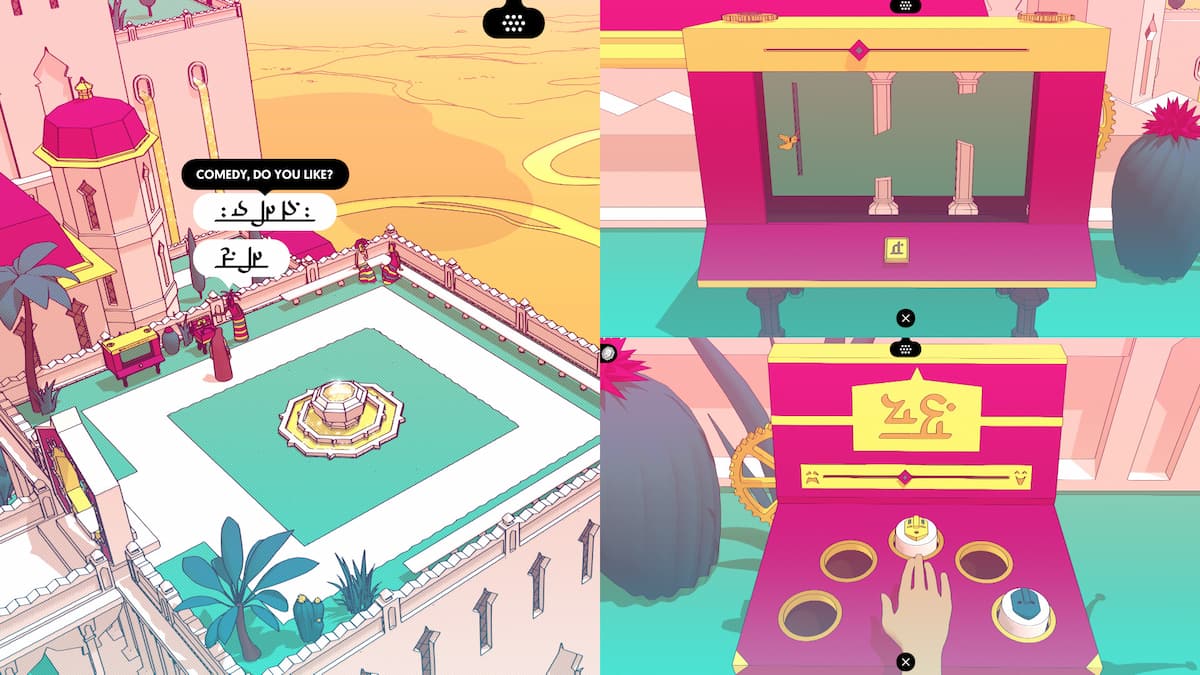
Image by Pro Game Guides
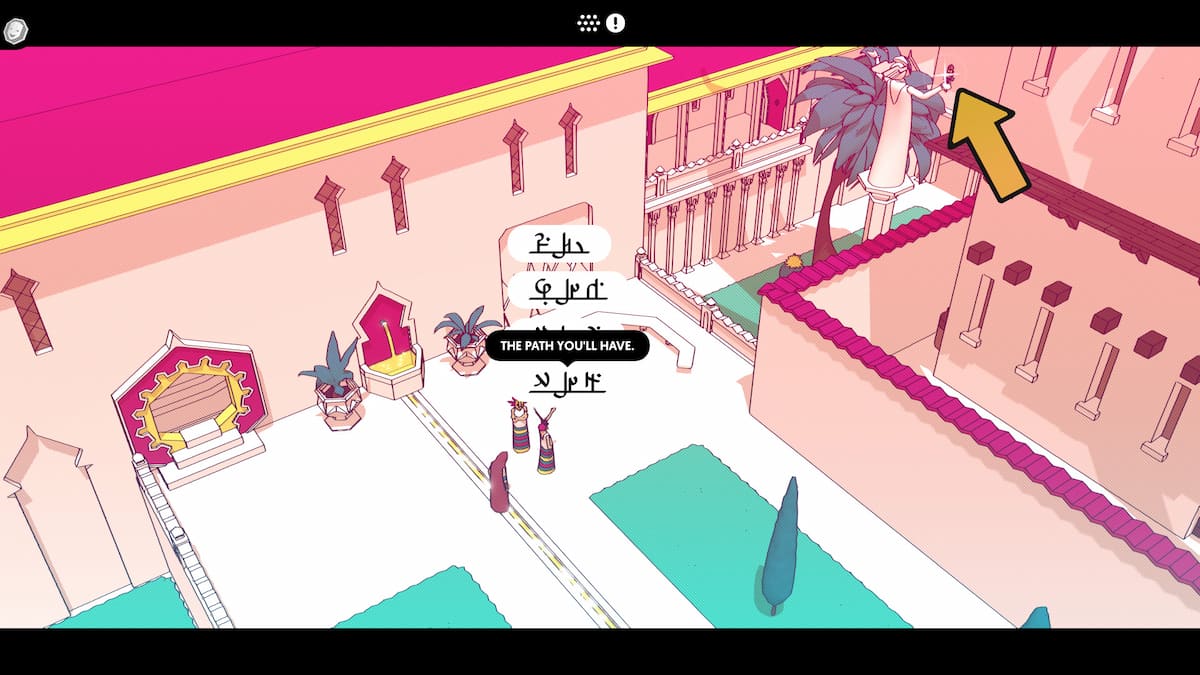
Image by Pro Game Guides
Screenshot by Pro Game Guides
Screenshot by Pro Game Guides
Screenshot by Pro Game Guides
Screenshot by Pro Game Guides
Image by Pro Game Guides
Screenshot by Pro Game Guides
Screenshot by Pro Game Guides
Screenshot by Pro Game Guides
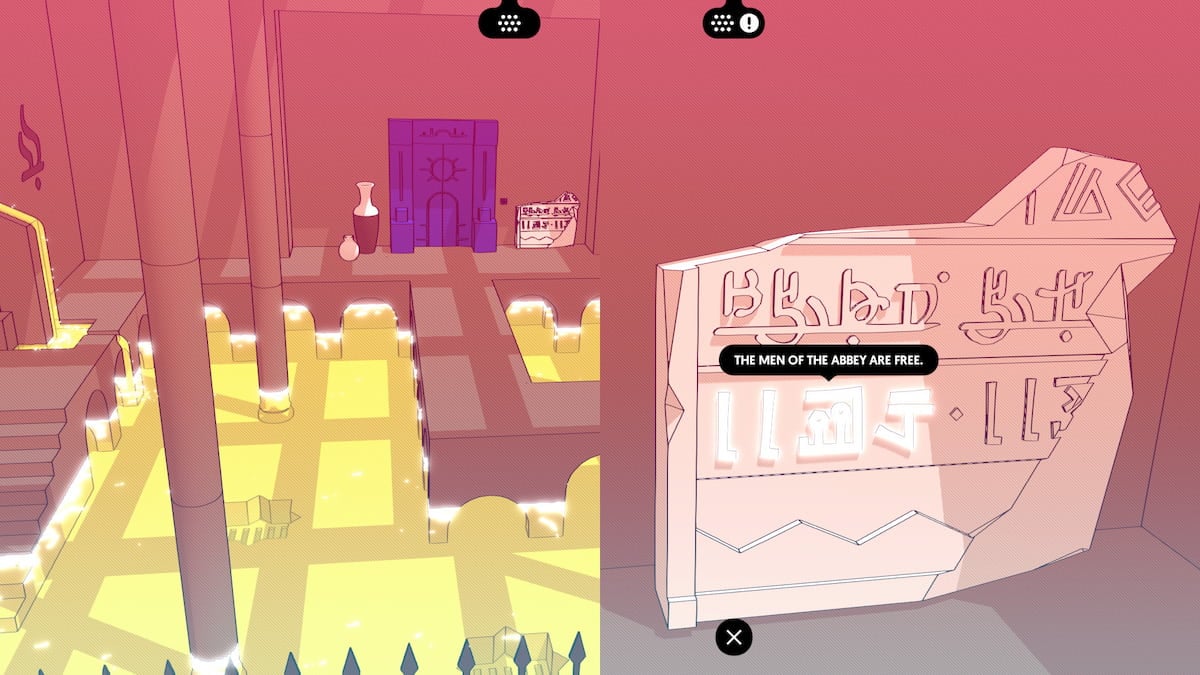
Image by Pro Game Guides
Screenshot by Pro Game Guides
Screenshot by Pro Game Guides
Screenshot by Pro Game Guides
Screenshot by Pro Game Guides

Image by Pro Game Guides
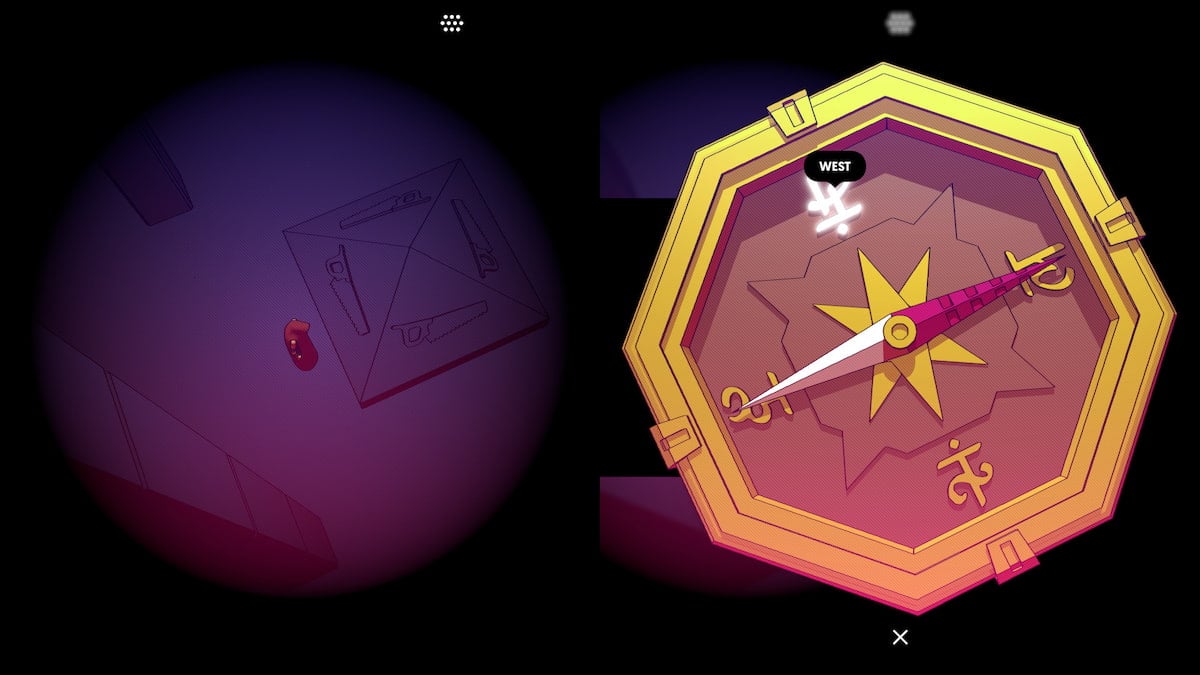
Image by Pro Game Guides
Image by Pro Game Guides
Image by Pro Game Guides
Screenshot by Pro Game Guides

Image by Pro Game Guides
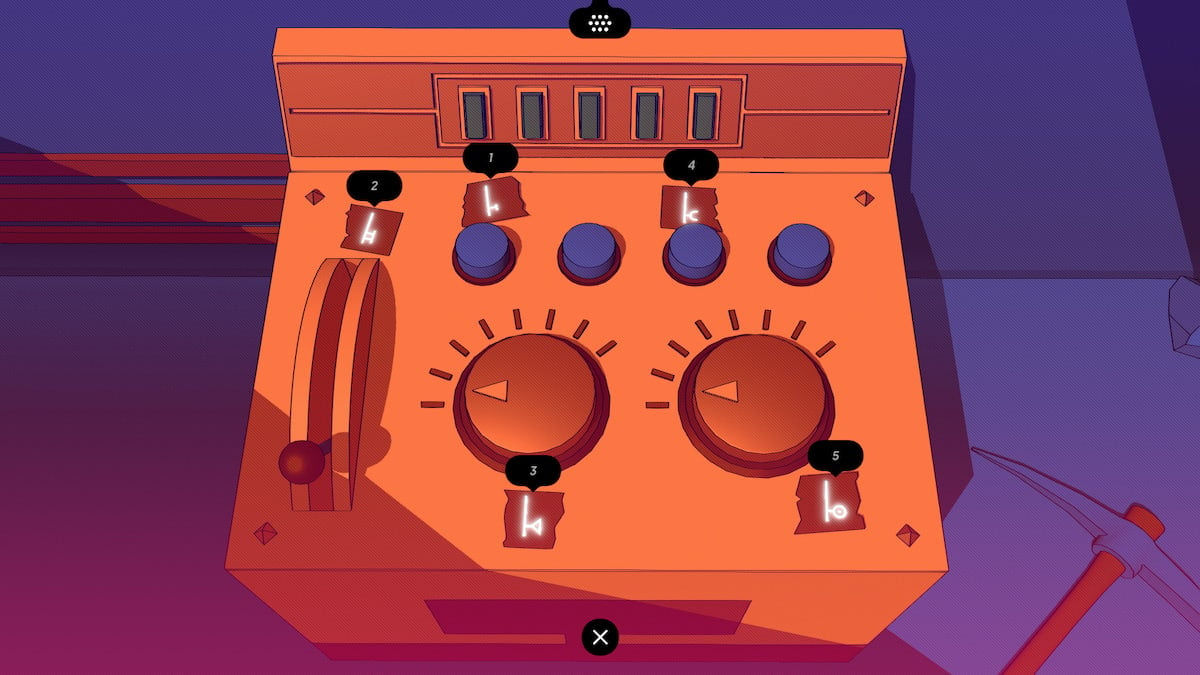
Image by Pro Game Guides
Screenshot by Pro Game Guides
Screenshot by Pro Game Guides
Screenshot by Pro Game Guides
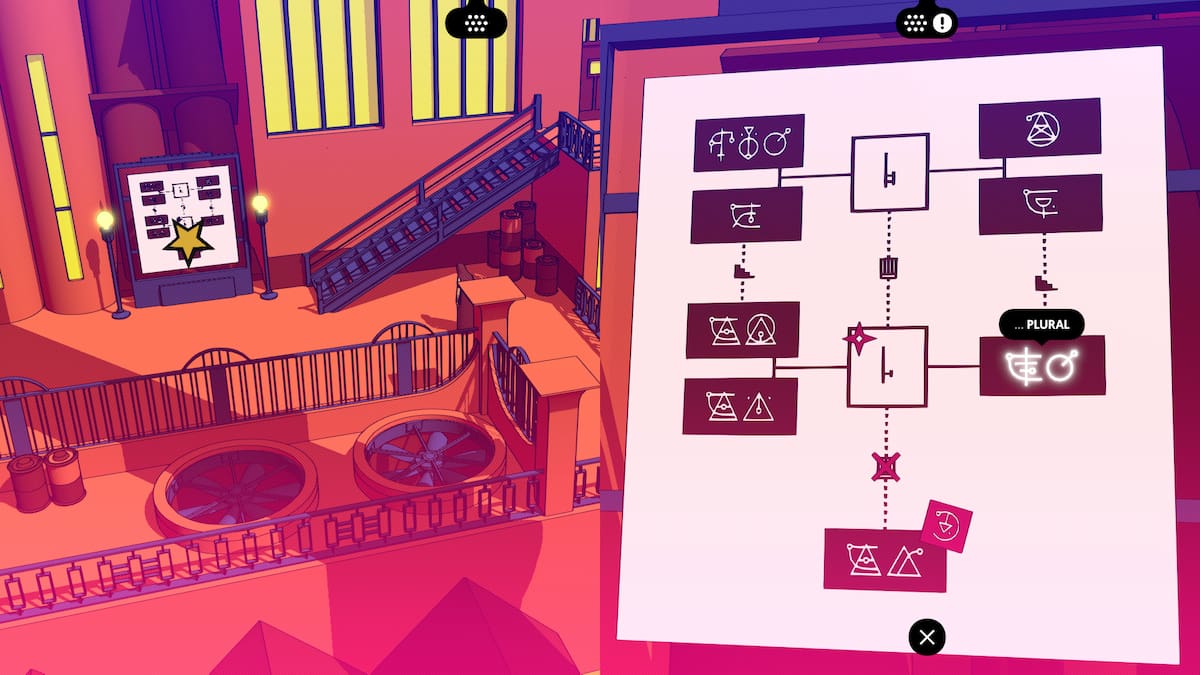
Image by Pro Game Guides
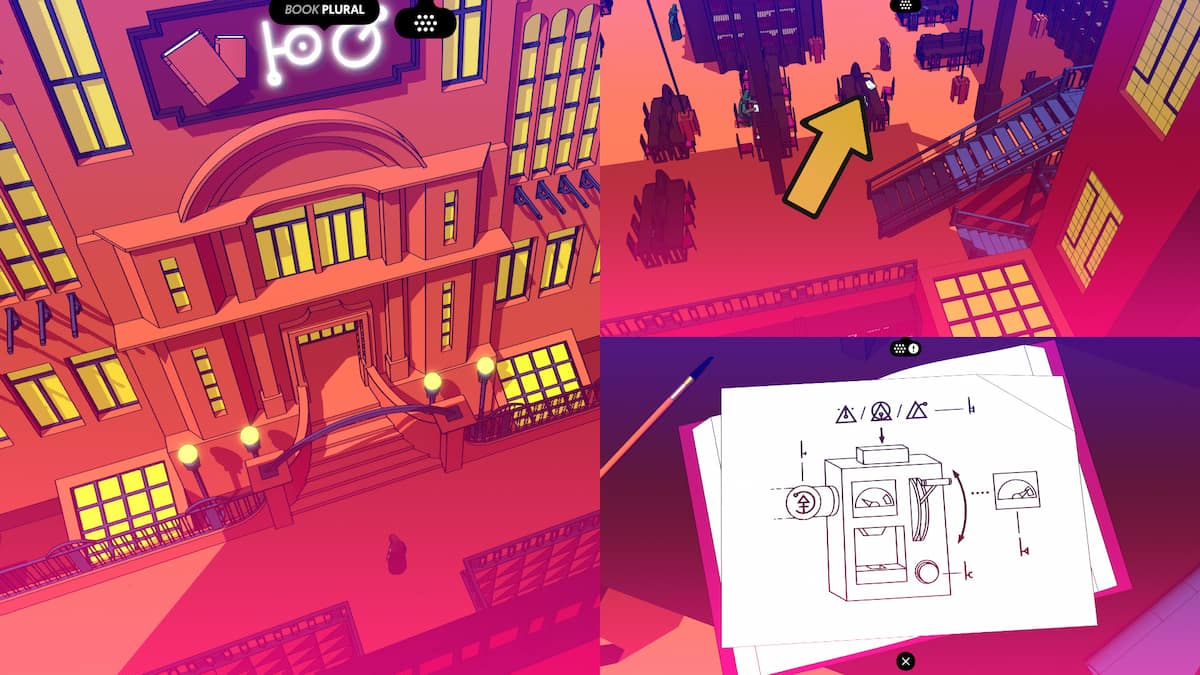
Image by Pro Game Guides
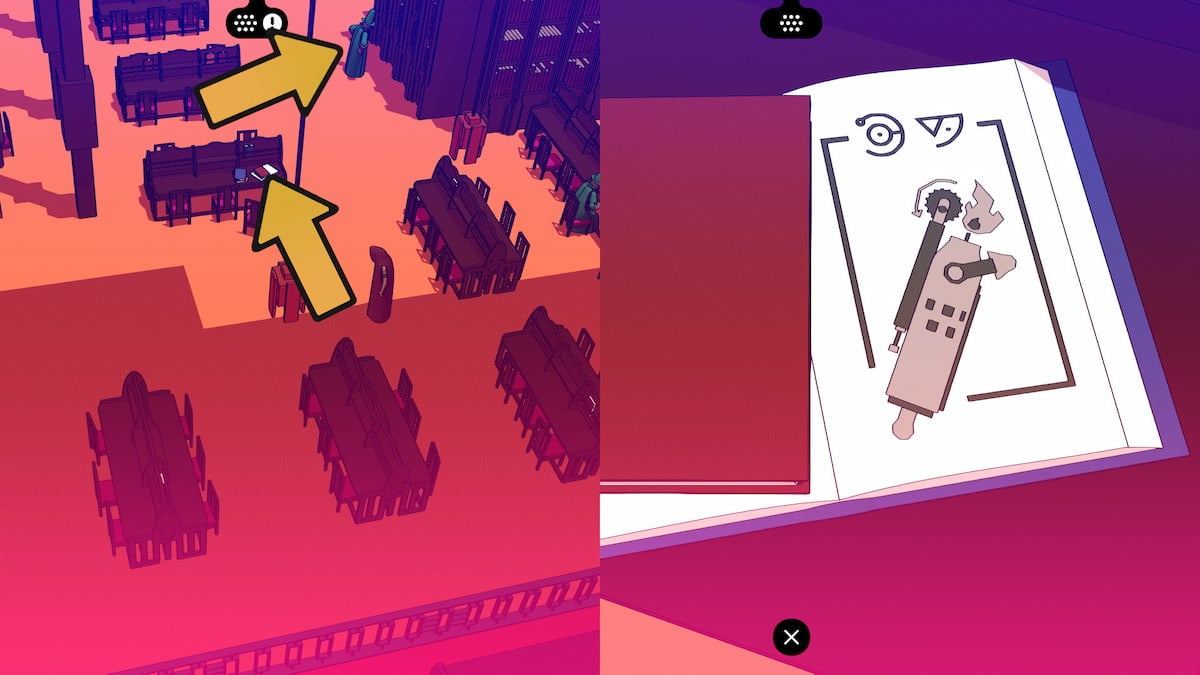
Image by Pro Game Guides
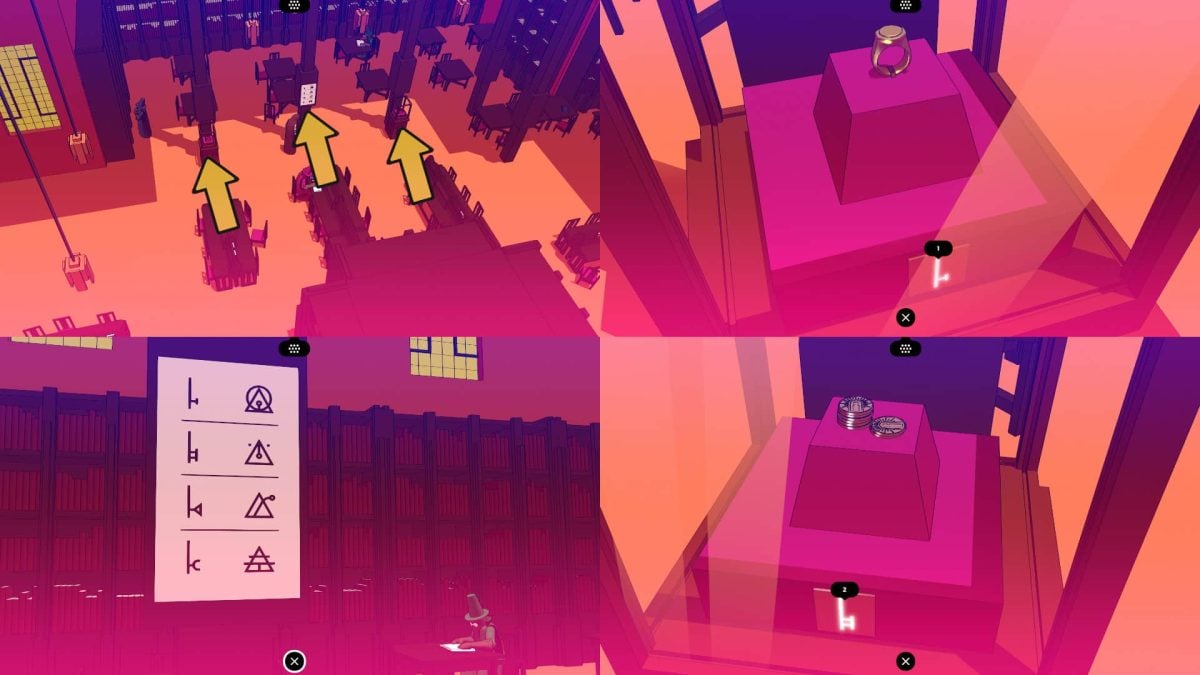
Image by Pro Game Guides
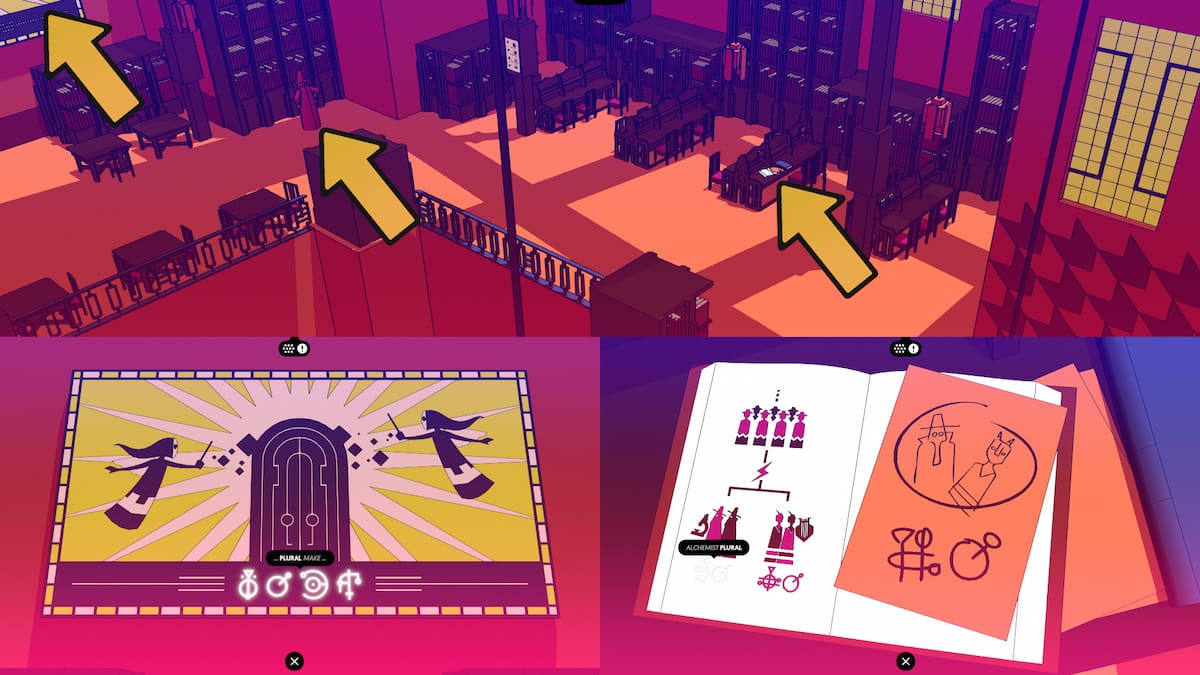
Image by Pro Game Guides

Screenshot by Pro Game Guides
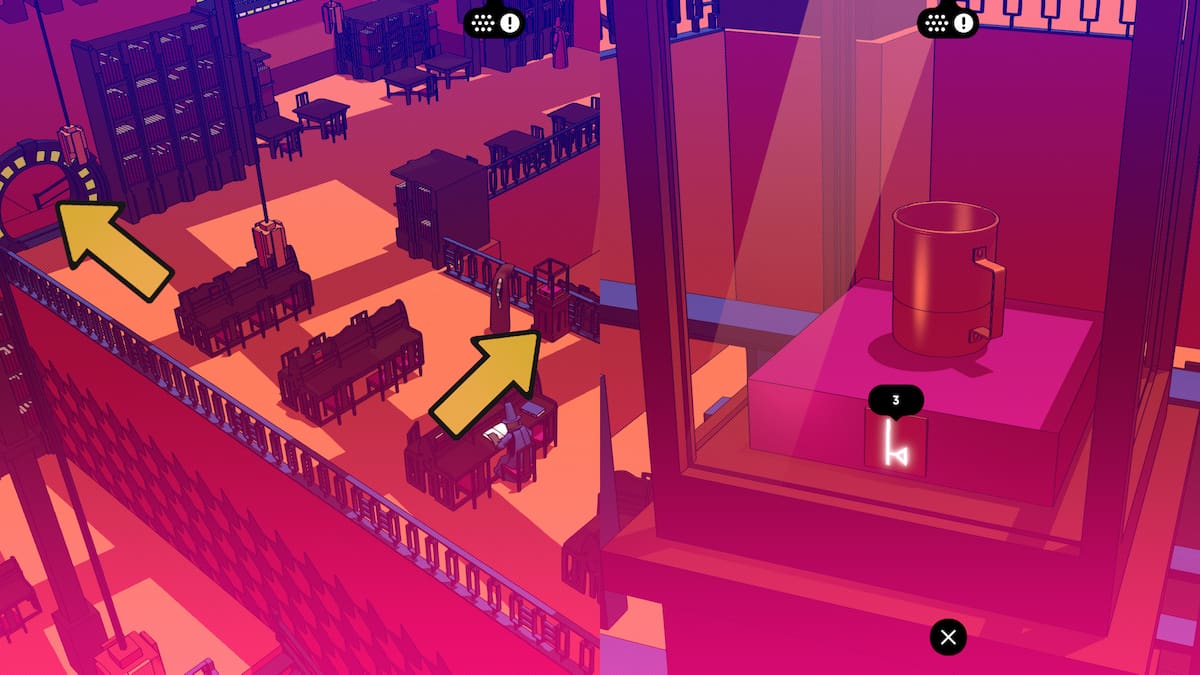
Image by Pro Game Guides
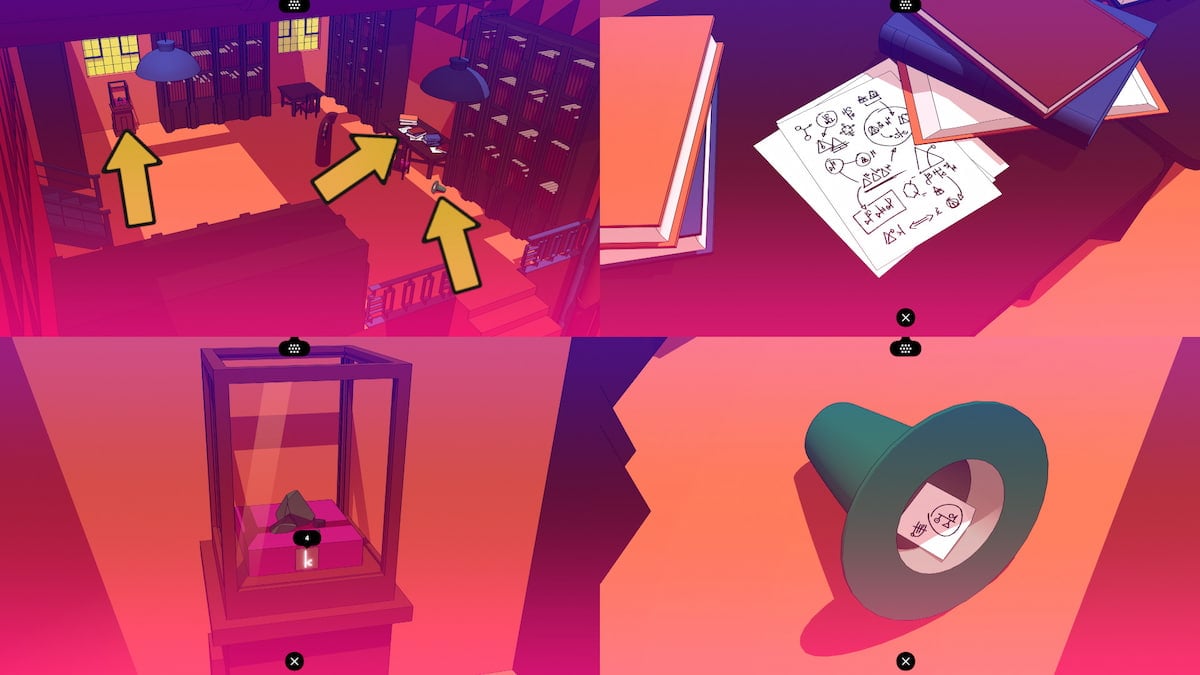
Image by Pro Game Guides
Screenshot by Pro Game Guides
Screenshot by Pro Game Guides
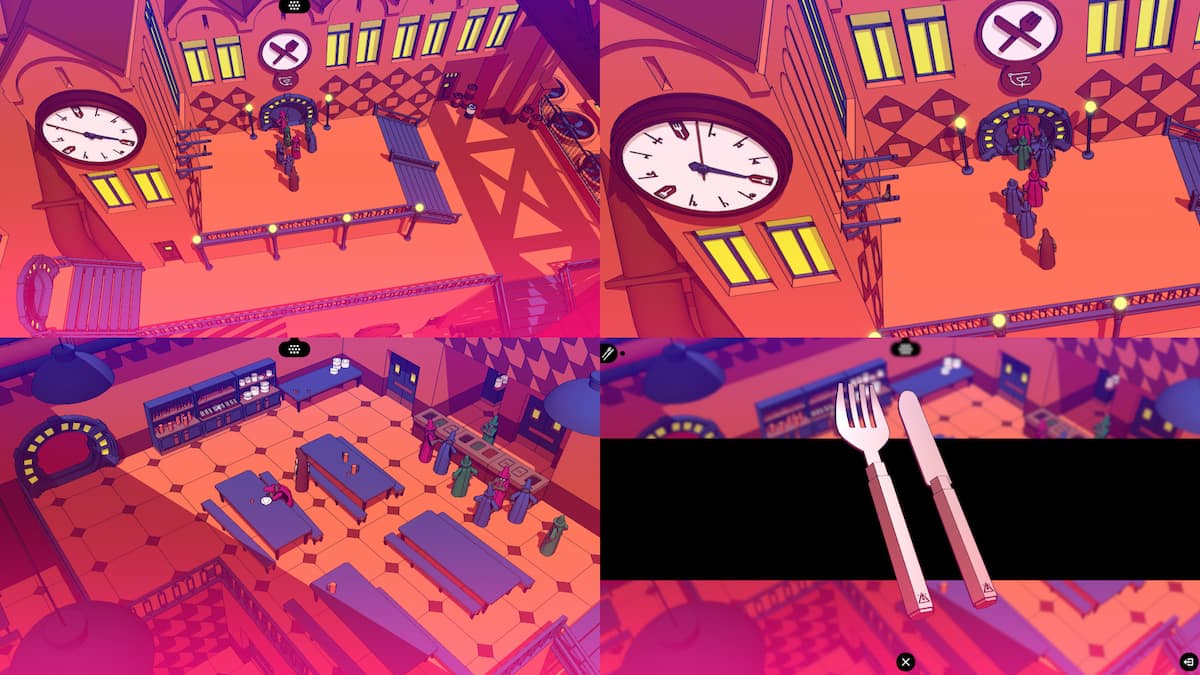
Image by Pro Game Guides
Image by Pro Game Guides
Screenshot by Pro Game Guides
Screenshot by Pro Game Guides

Image by Pro Game Guides
Screenshot by Pro Game Guides
Image by Pro Game Guides
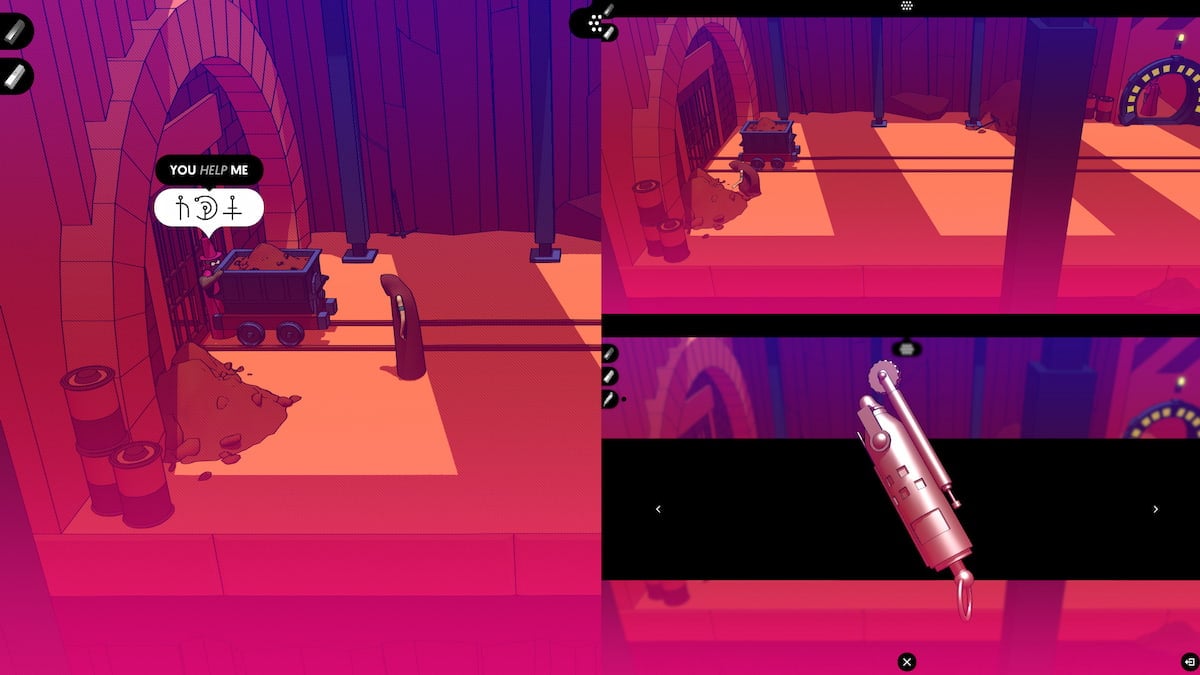
Image by Pro Game Guides
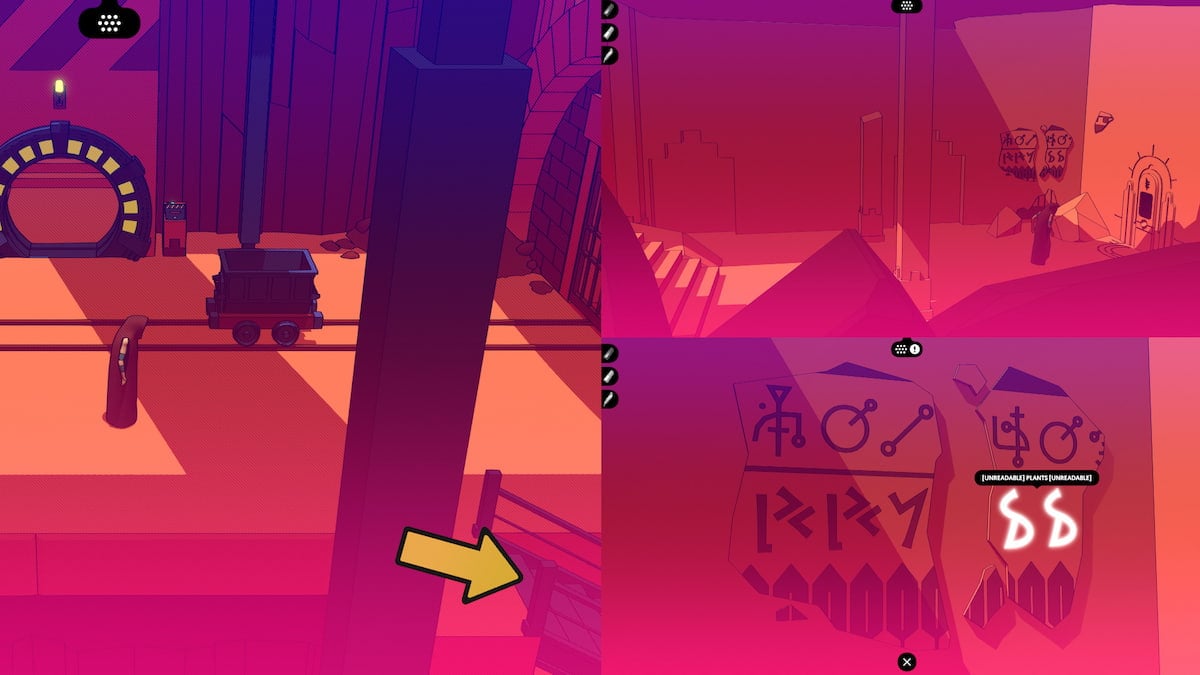
Image by Pro Game Guides
Screenshot by Pro Game Guides

Screenshot by Pro Game Guides
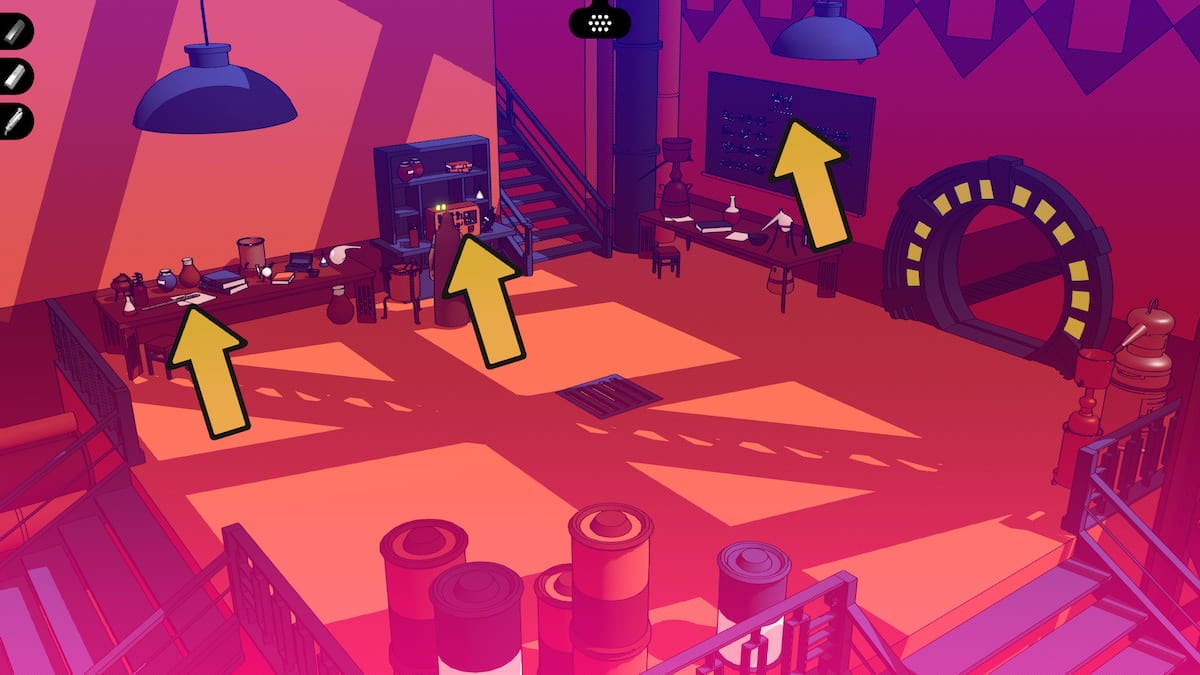
Image by Pro Game Guides
Screenshot by Pro Game Guides
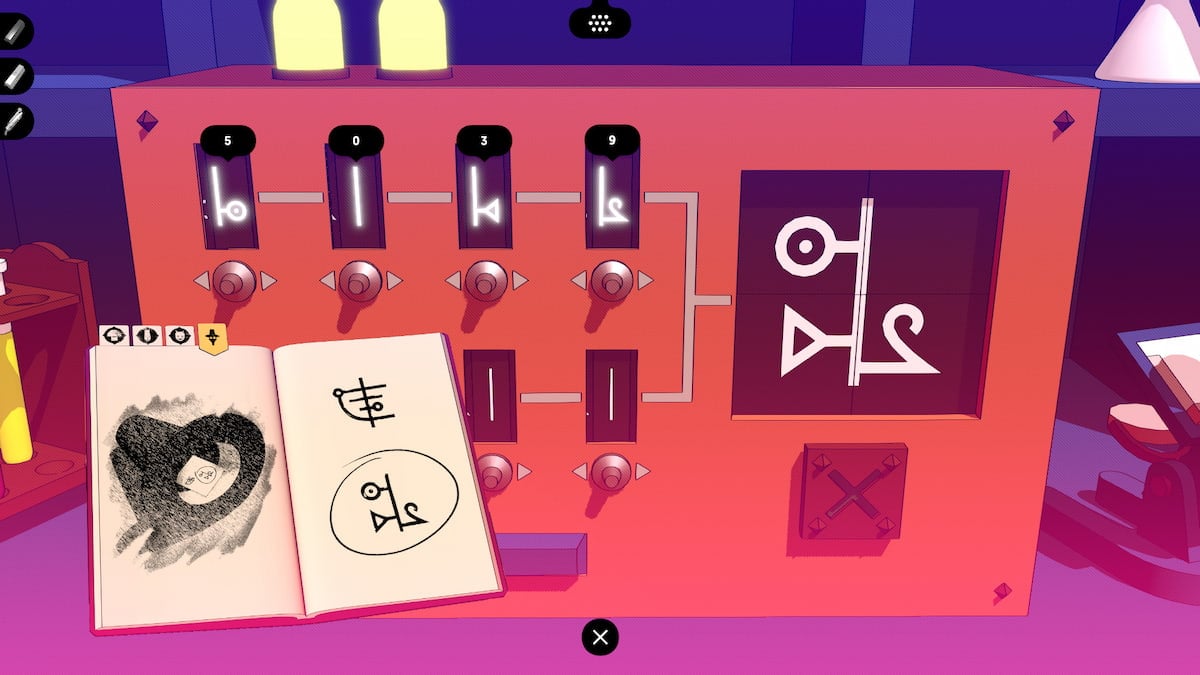
Image by Pro Game Guides
Screenshot by Pro Game Guides
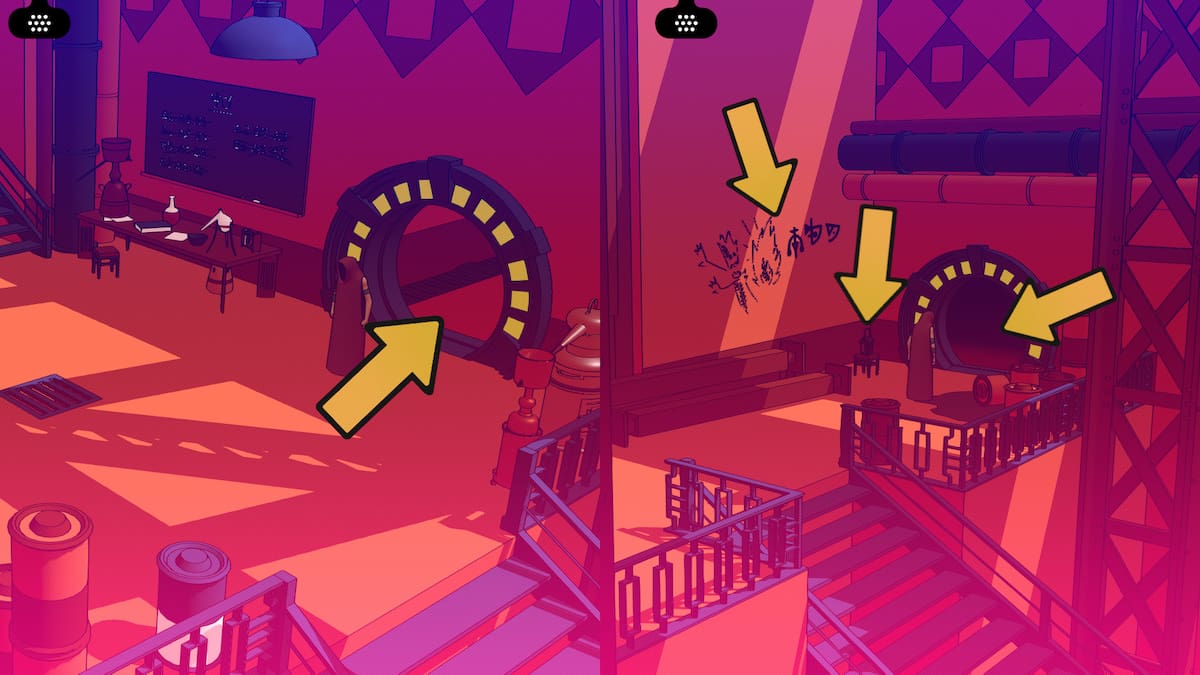
Image by Pro Game Guides
Screenshot by Pro Game Guides
Screenshot by Pro Game Guides
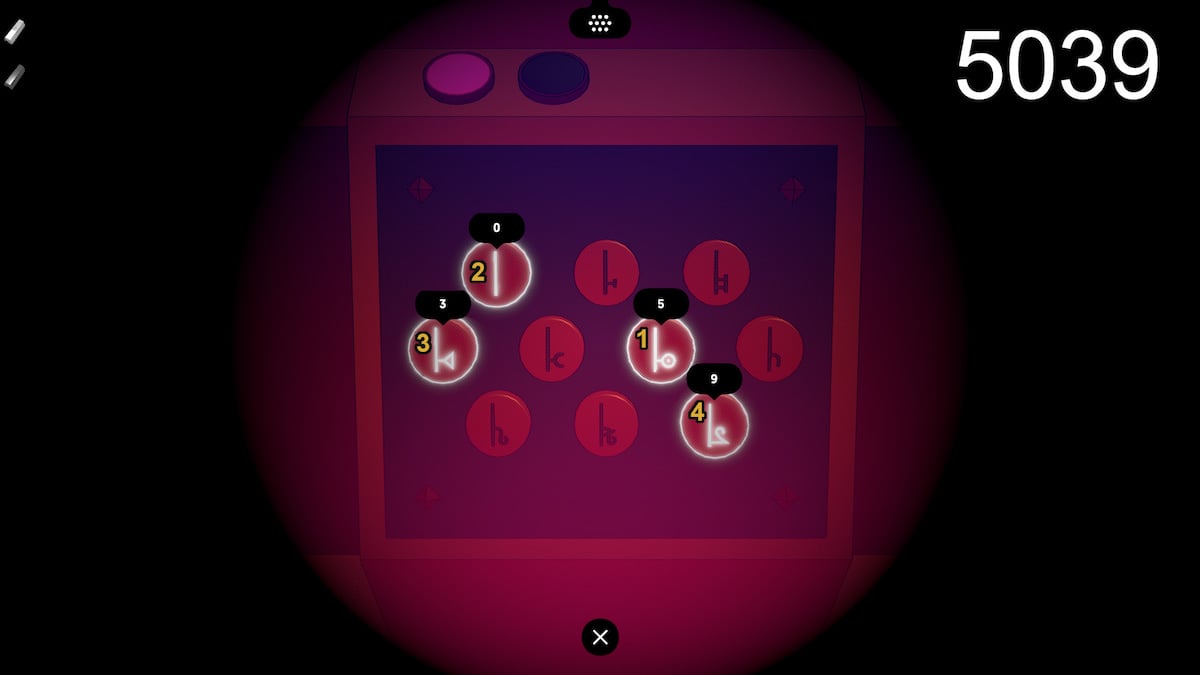
Image by Pro Game Guides
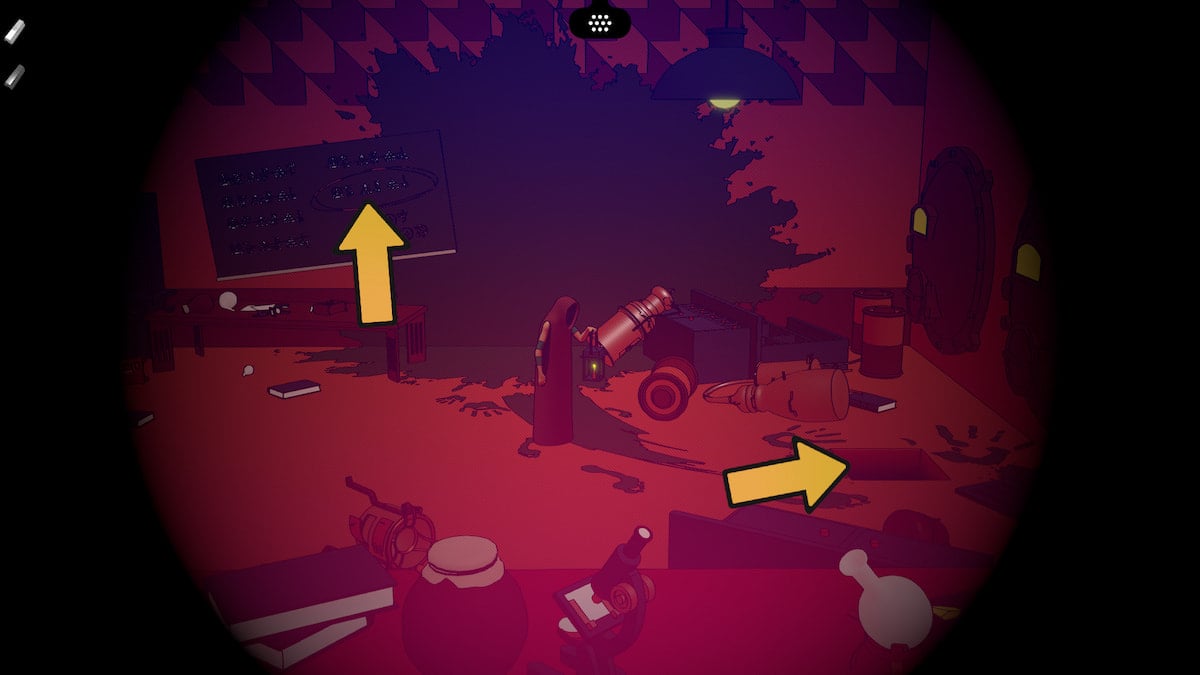
Image by Pro Game Guides
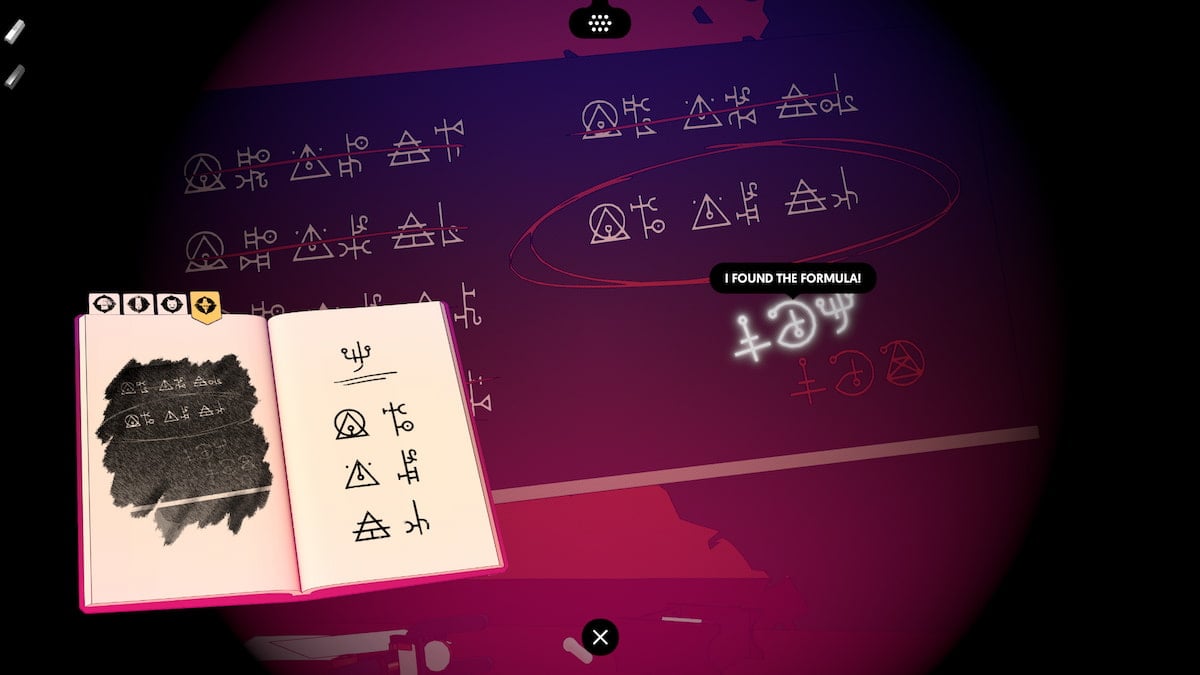
Image by Pro Game Guides
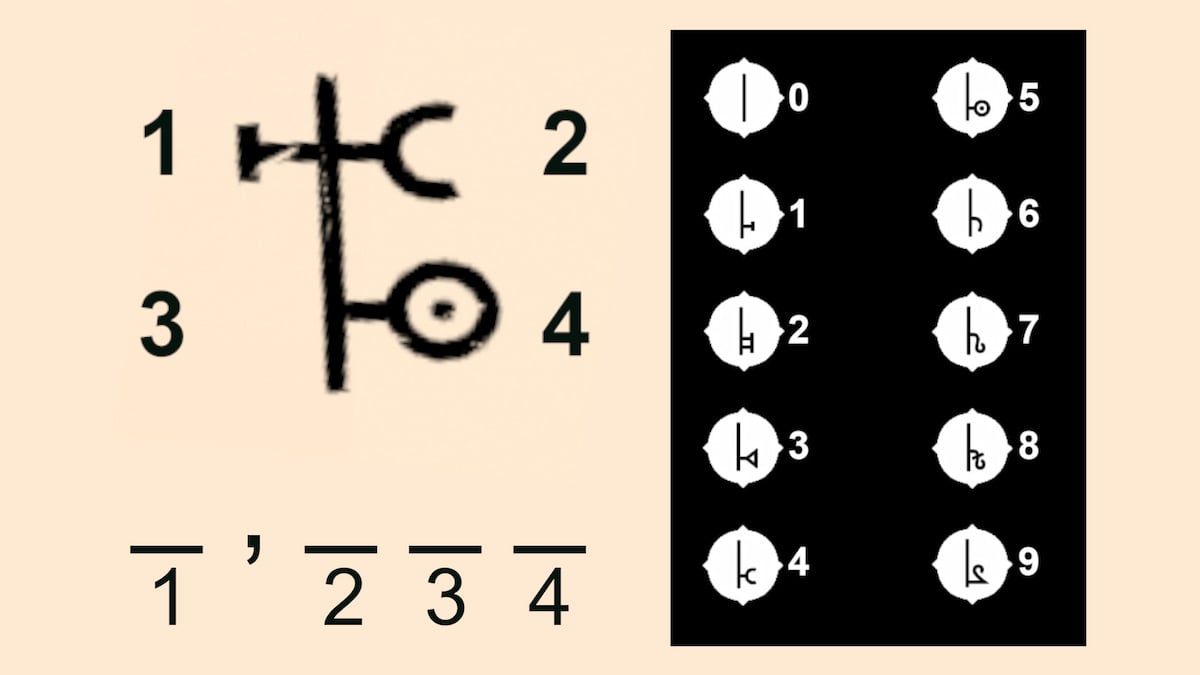
Image by Pro Game Guides
Image by Pro Game Guides

Image by Pro Game Guides
Image by Pro Game Guides
Screenshot by Pro Game Guides
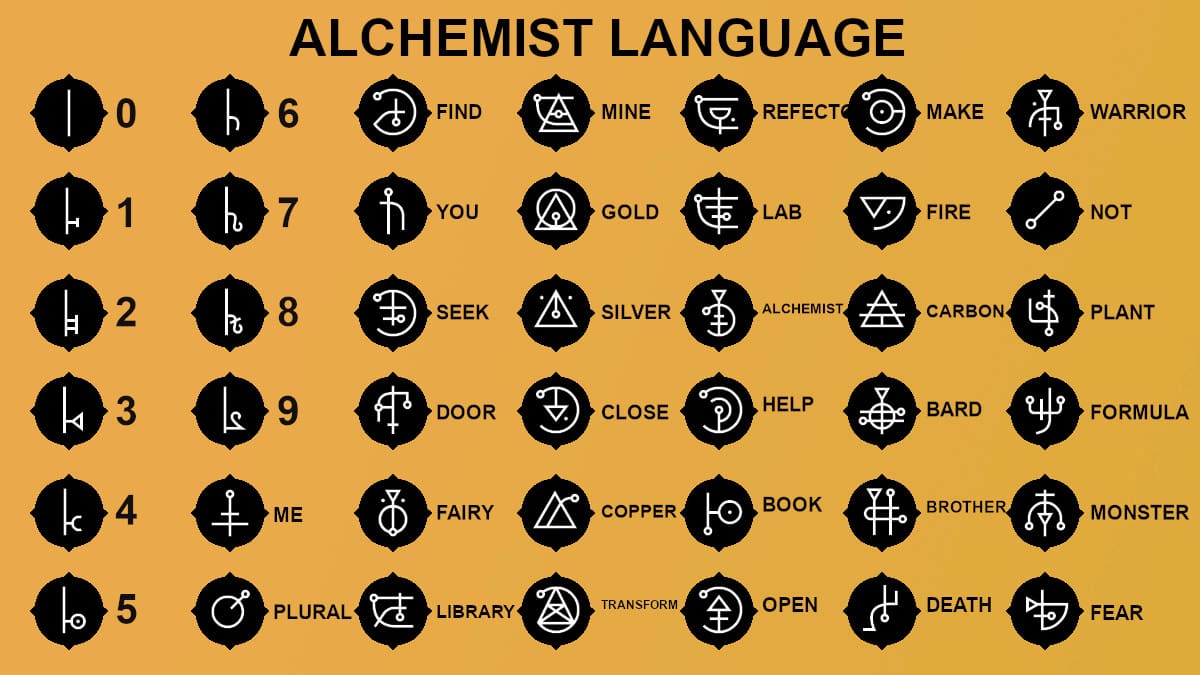
Image by Pro Game Guides
Screenshot by Pro Game Guides
Screenshot by Pro Game Guides
Screenshot by Pro Game Guides
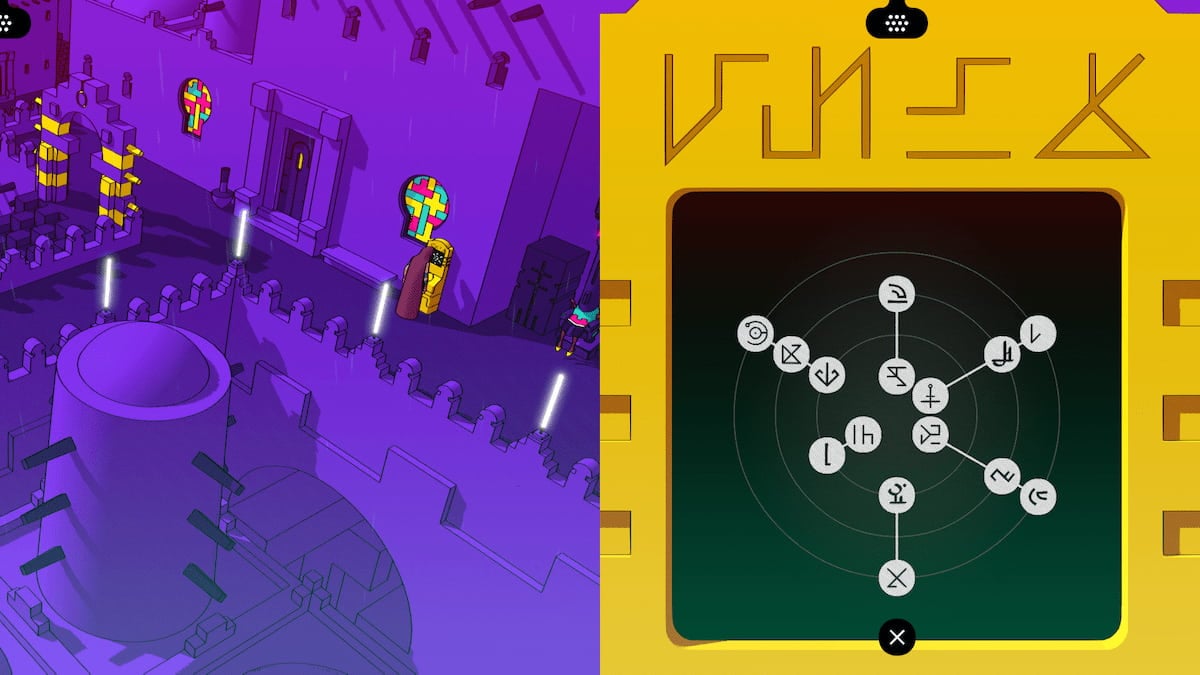
Image by Pro Game Guides
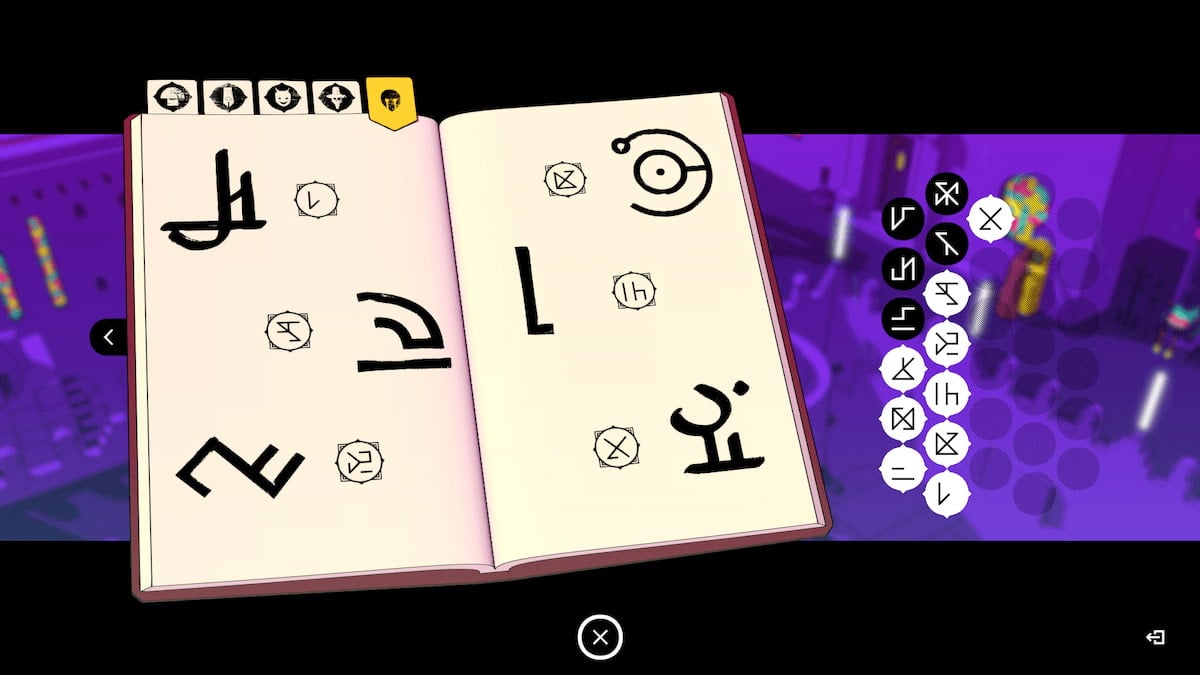
Screenshot by Pro Game Guides

Screenshot by Pro Game Guides
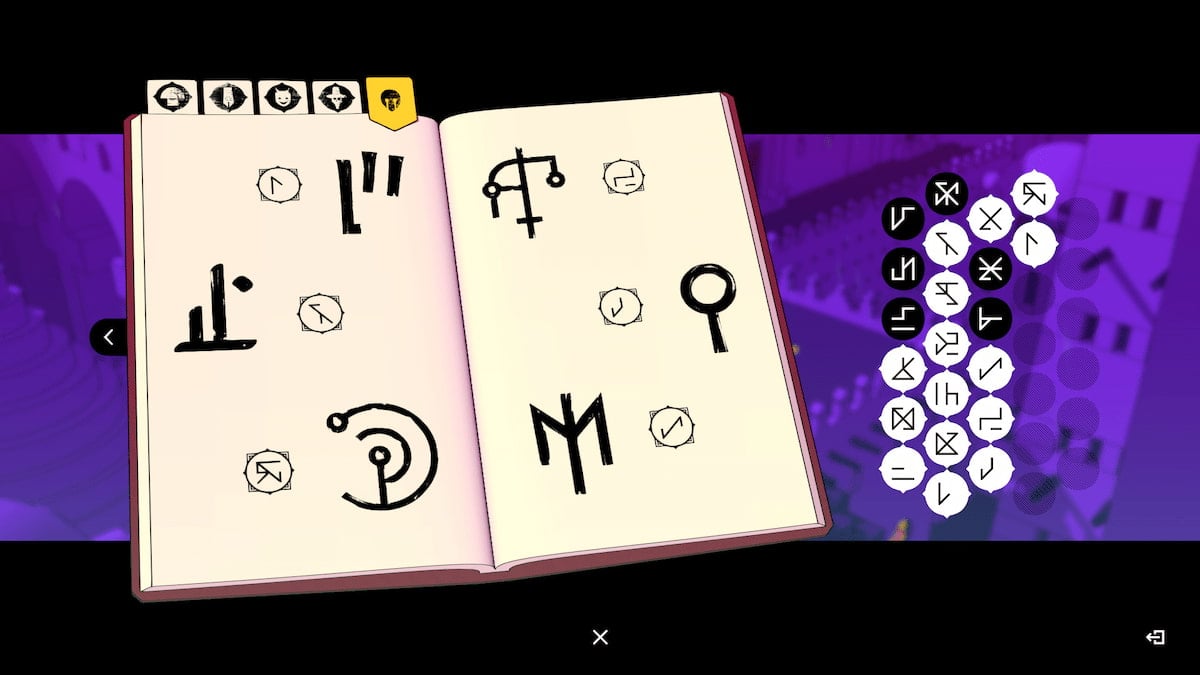
Screenshot by Pro Game Guides
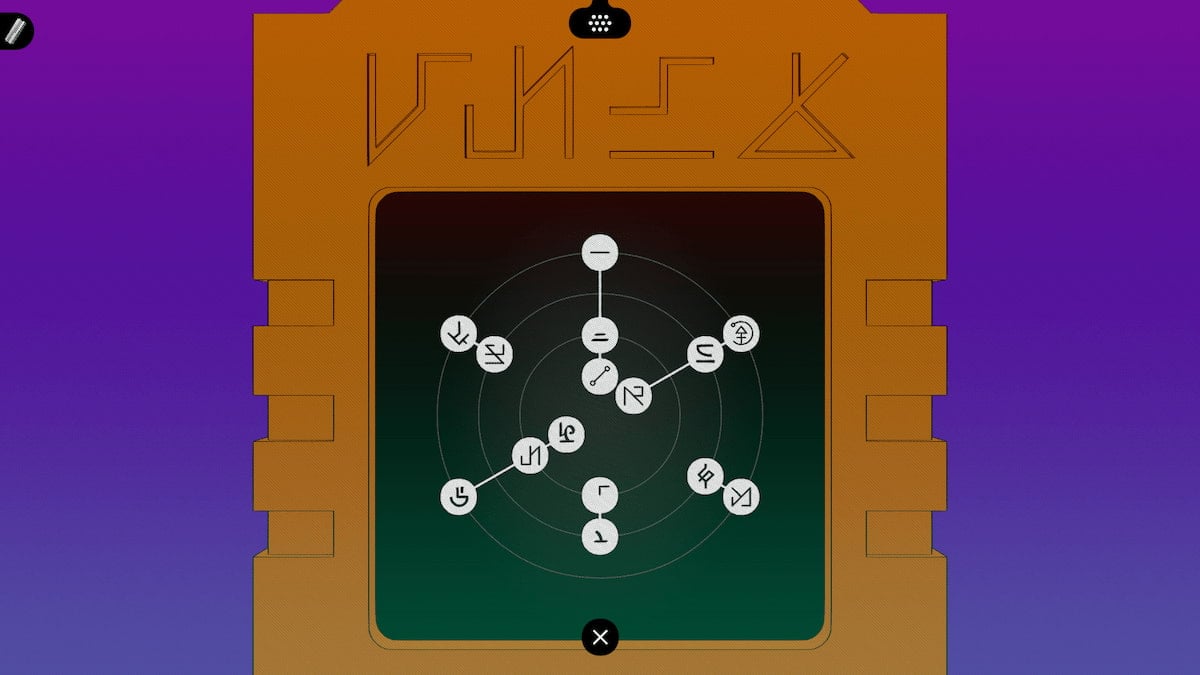
Screenshot by Pro Game Guides
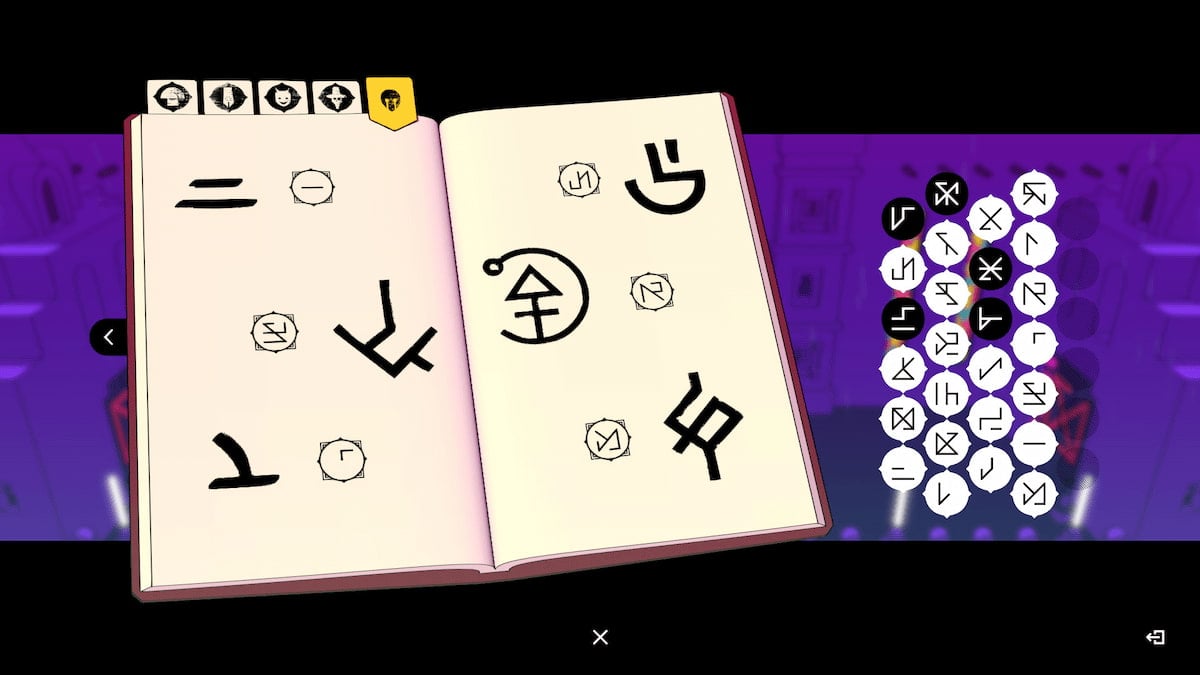
Screenshot by Pro Game Guides
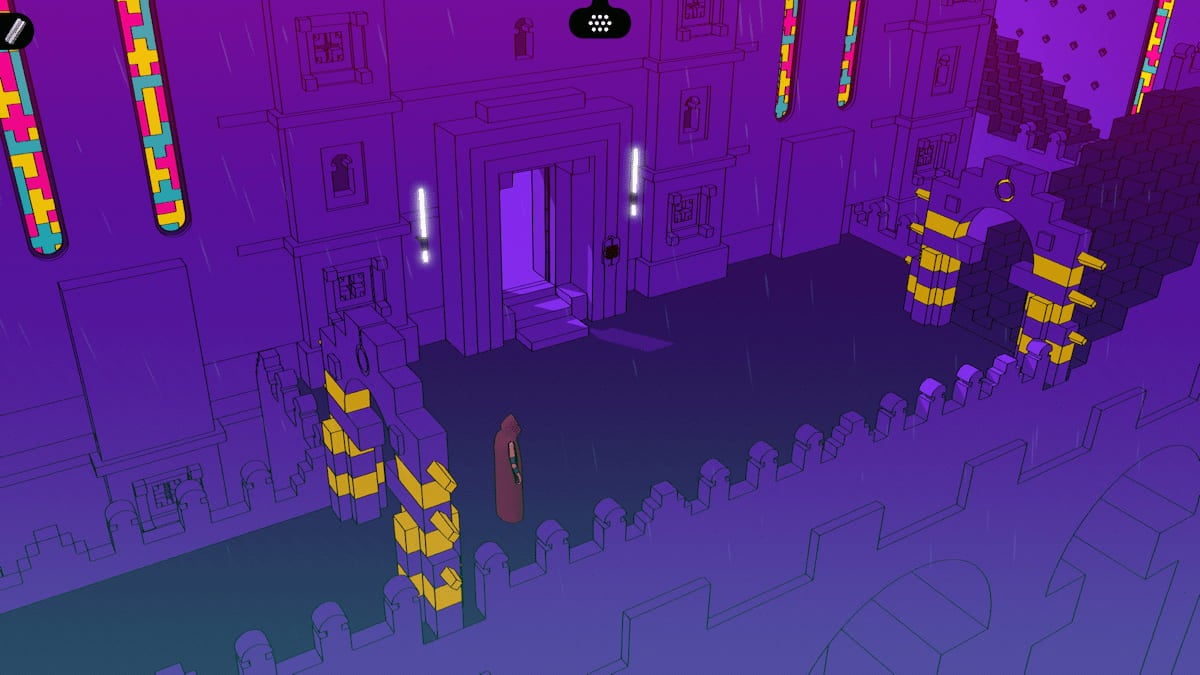
Screenshot by Pro Game Guides

Screenshot by Pro Game Guides
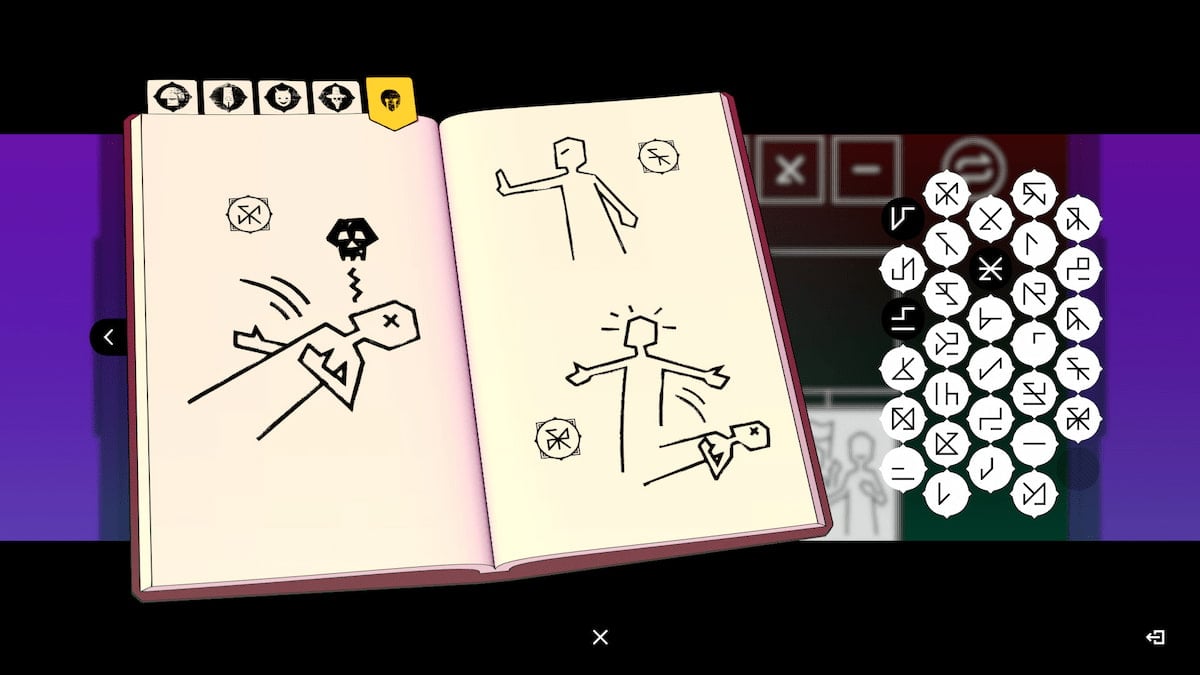
Screenshot by Pro Game Guides
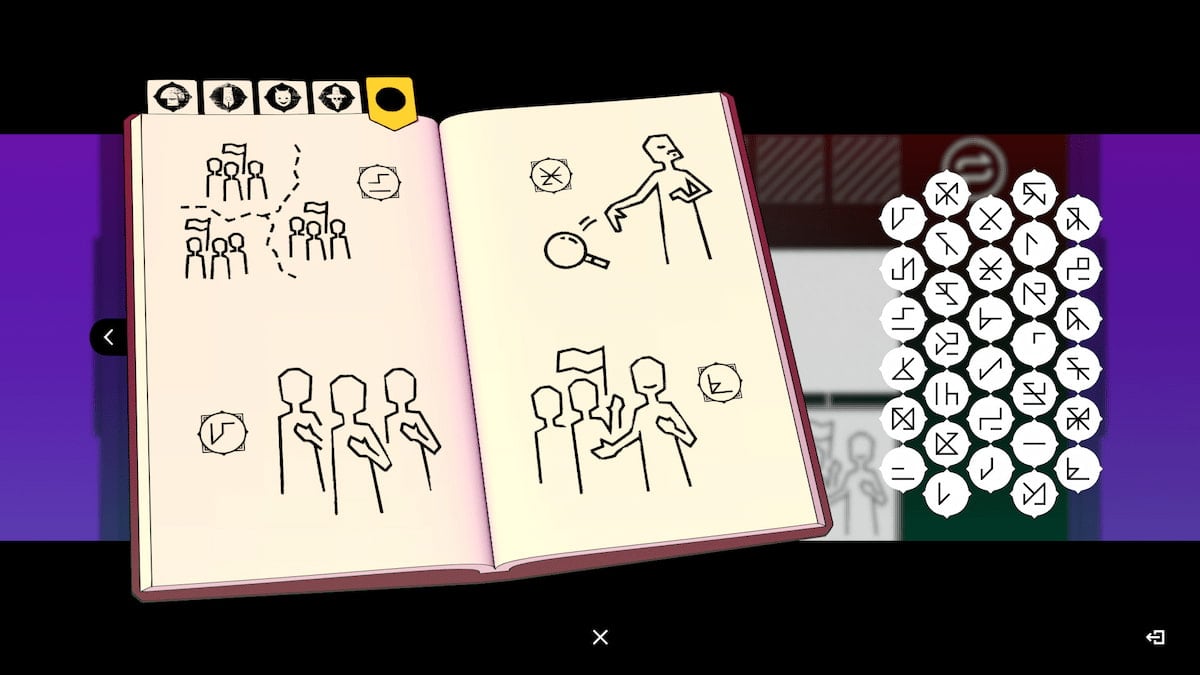
Screenshot by Pro Game Guides
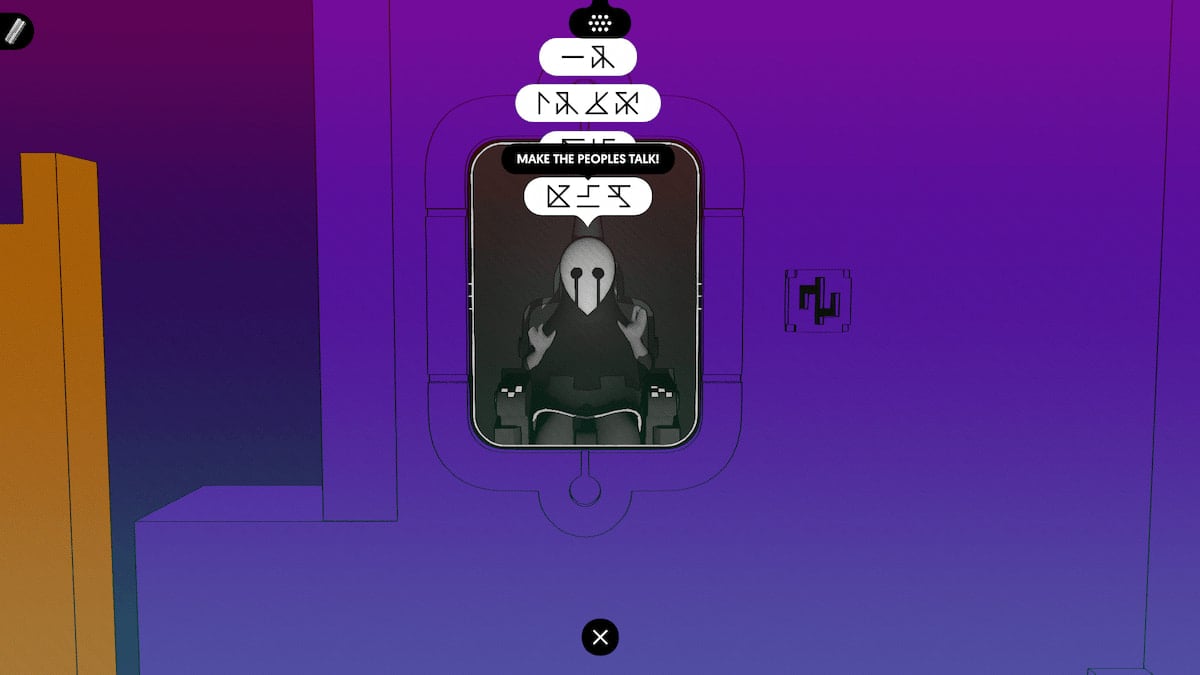
Screenshot by Pro Game Guides
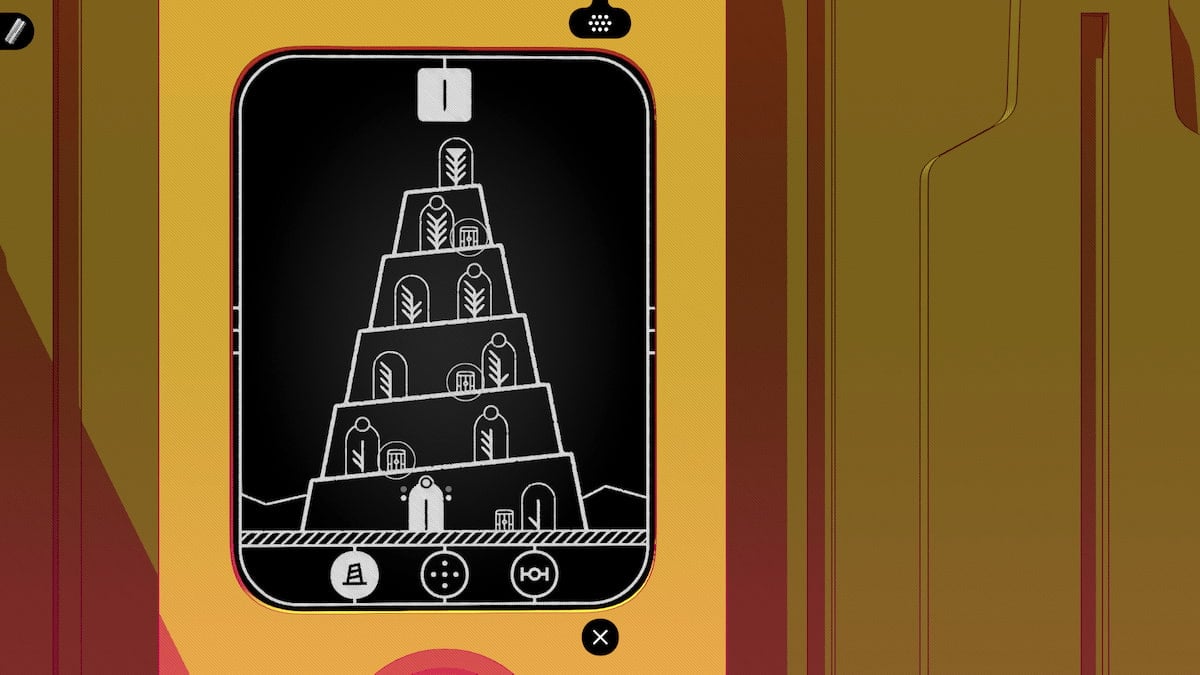
Screenshot by Pro Game Guides
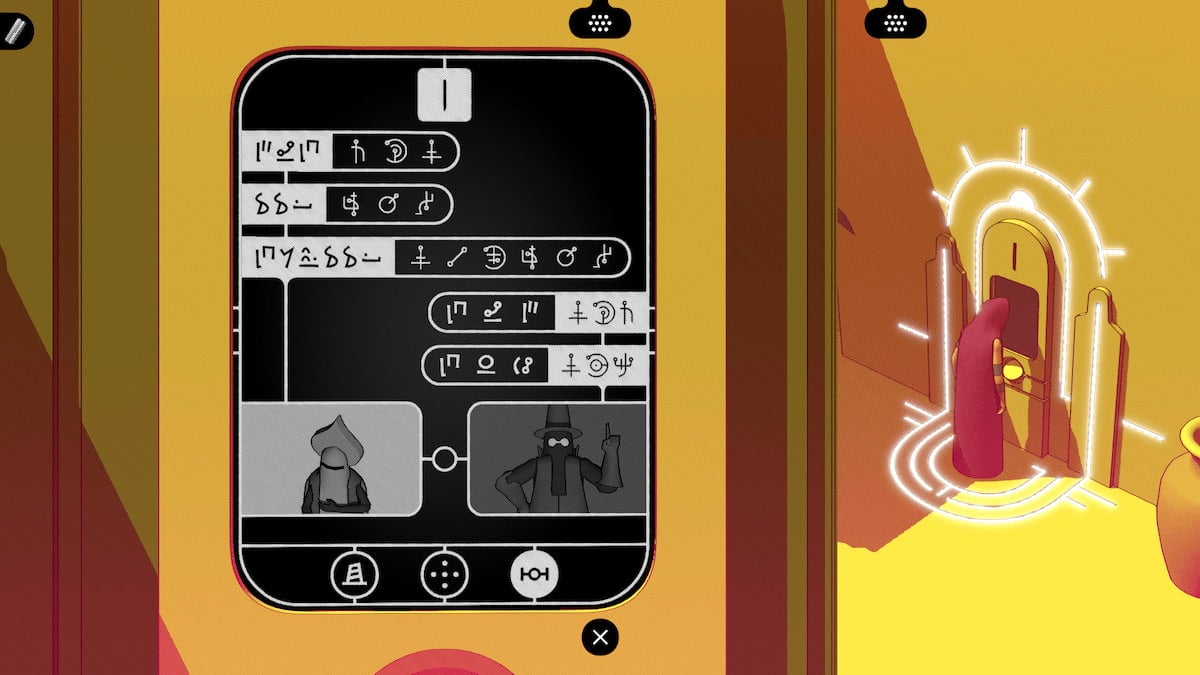
Image by Pro Game Guides
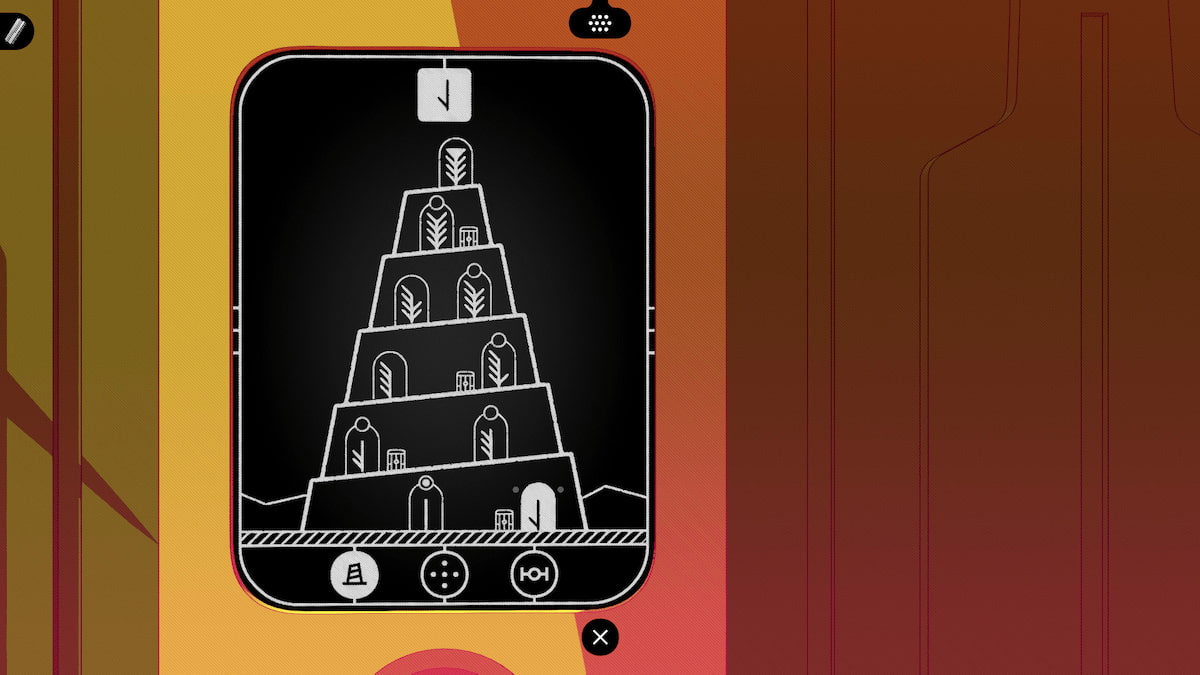
Screenshot by Pro Game Guides
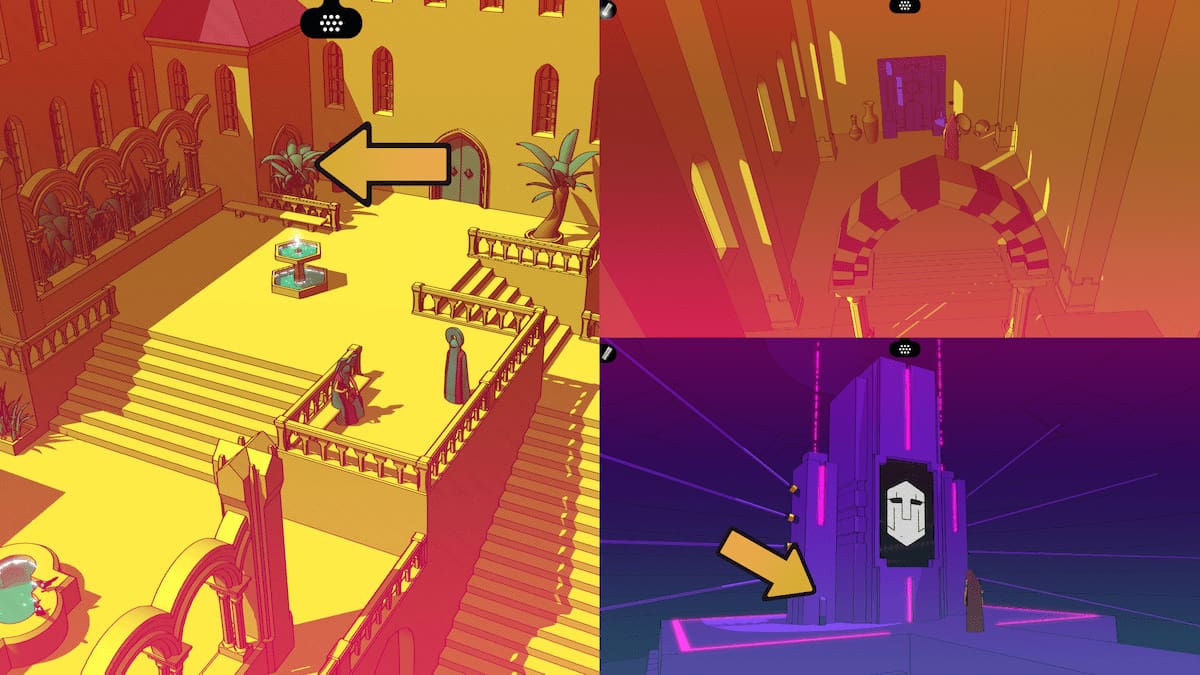
Screenshot by Pro Game Guides
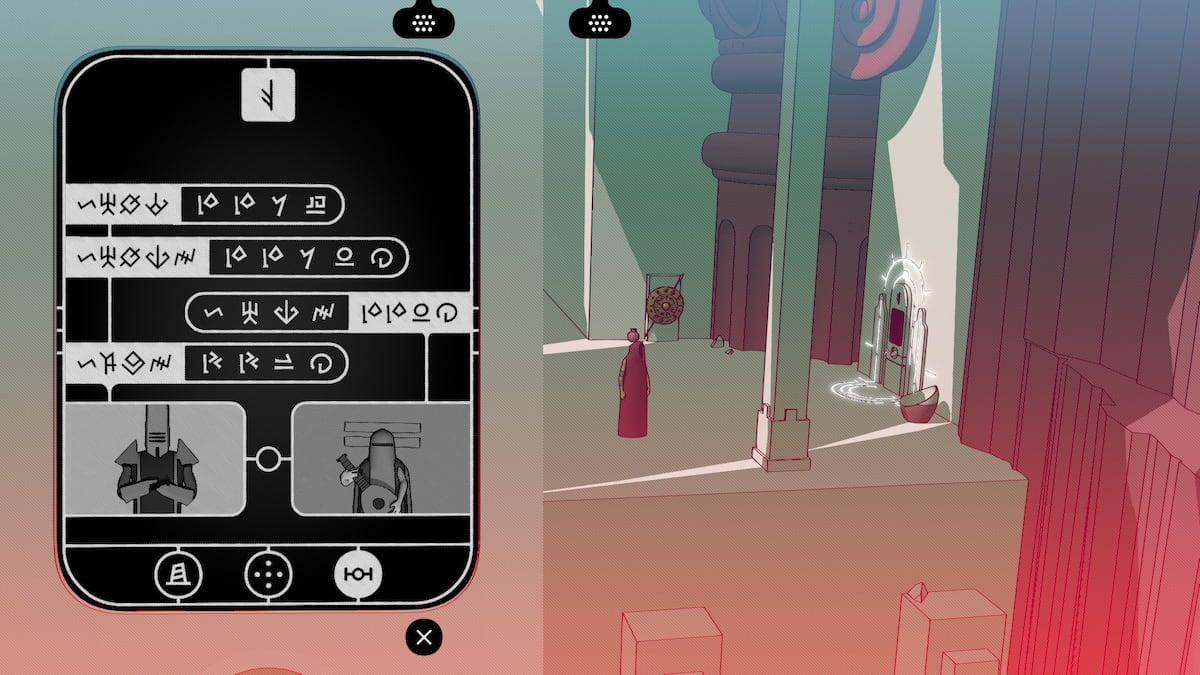
Image by Pro Game Guides

Image by Pro Game Guides
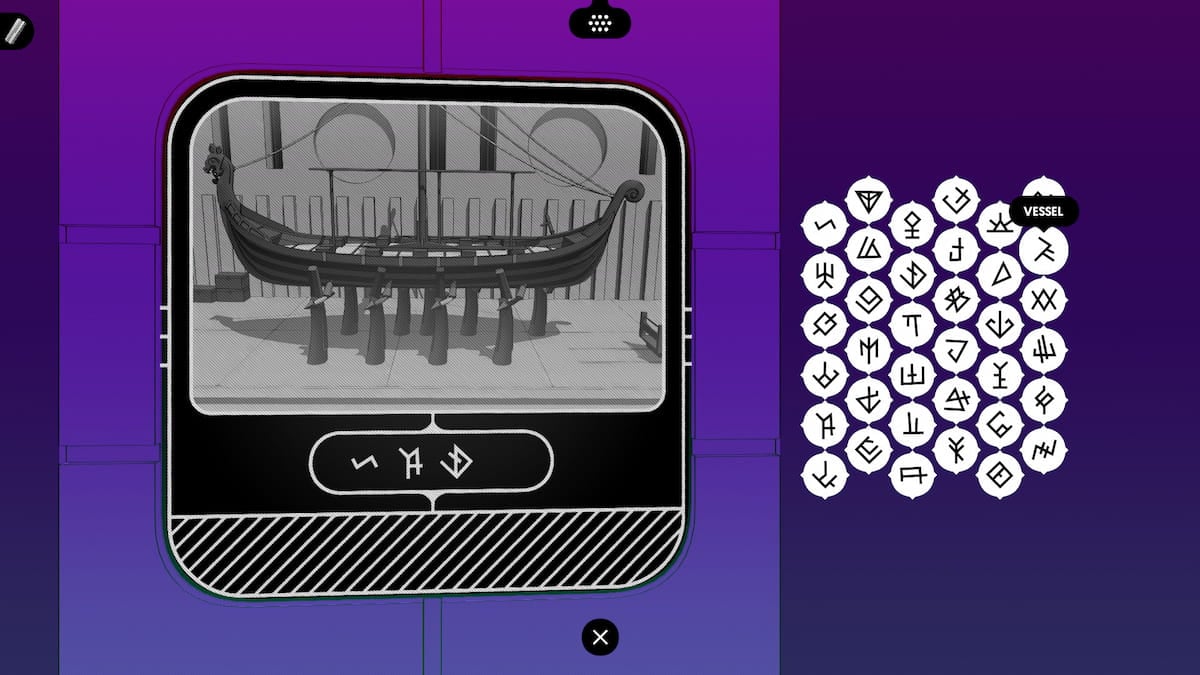
Screenshot by Pro Game Guides
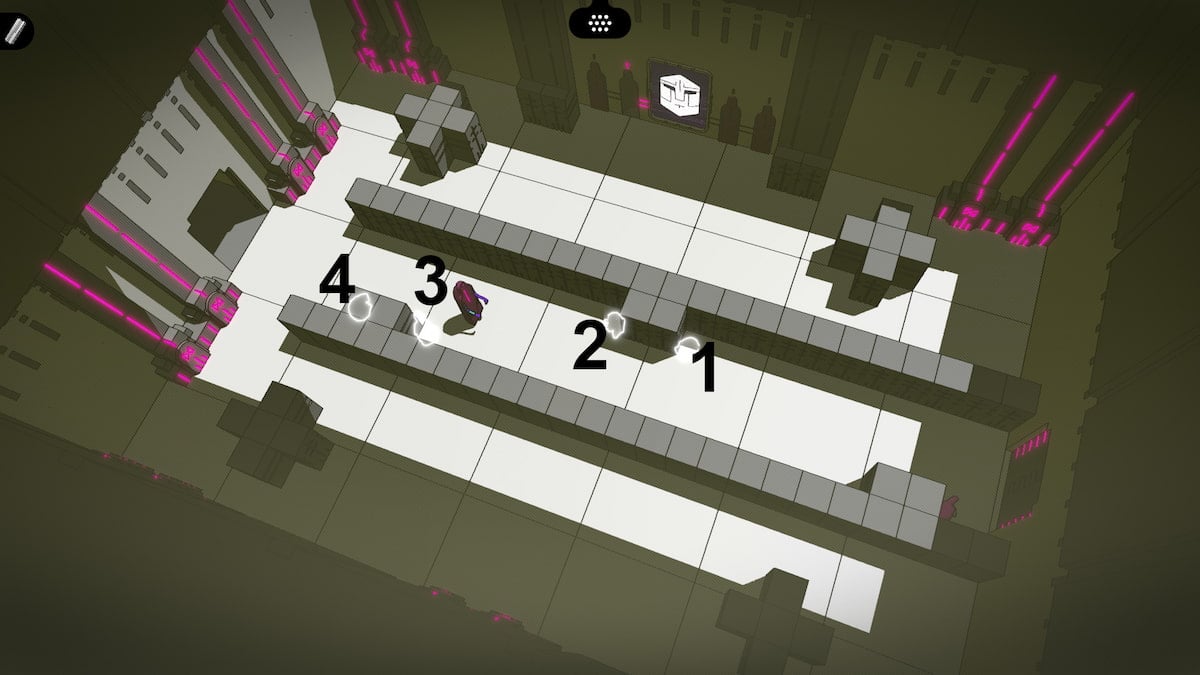
Image by Pro Game Guides
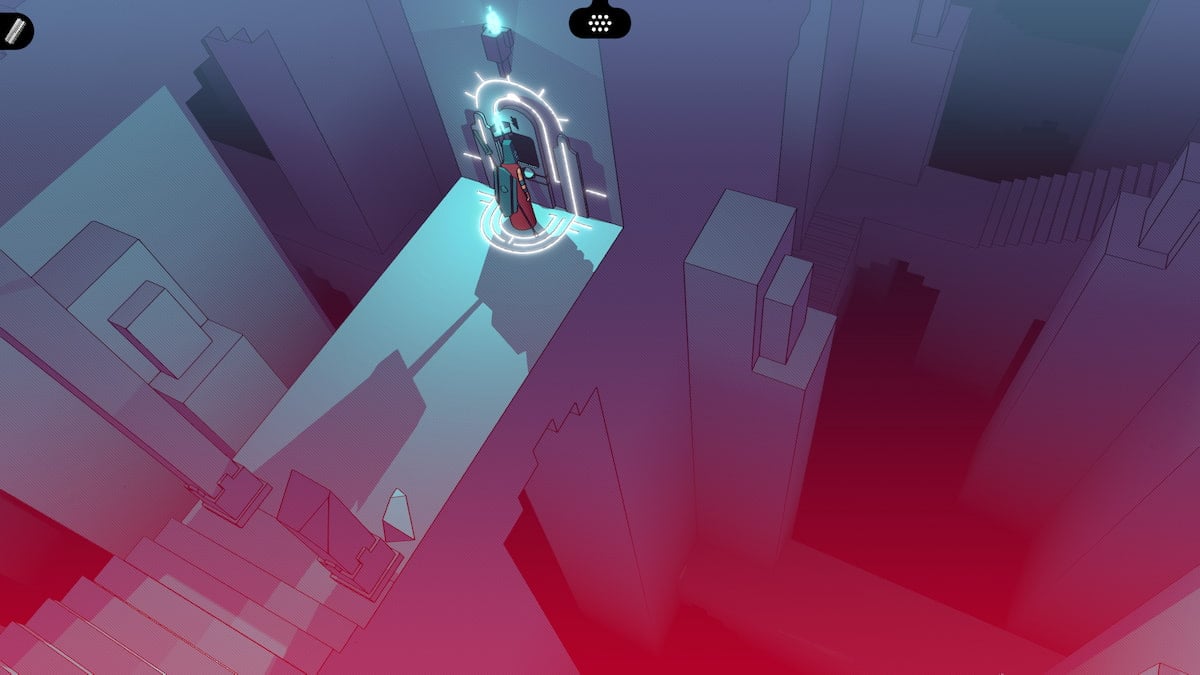
Screenshot by Pro Game Guides
Image by Pro Game Guides
Image by Pro Game Guides
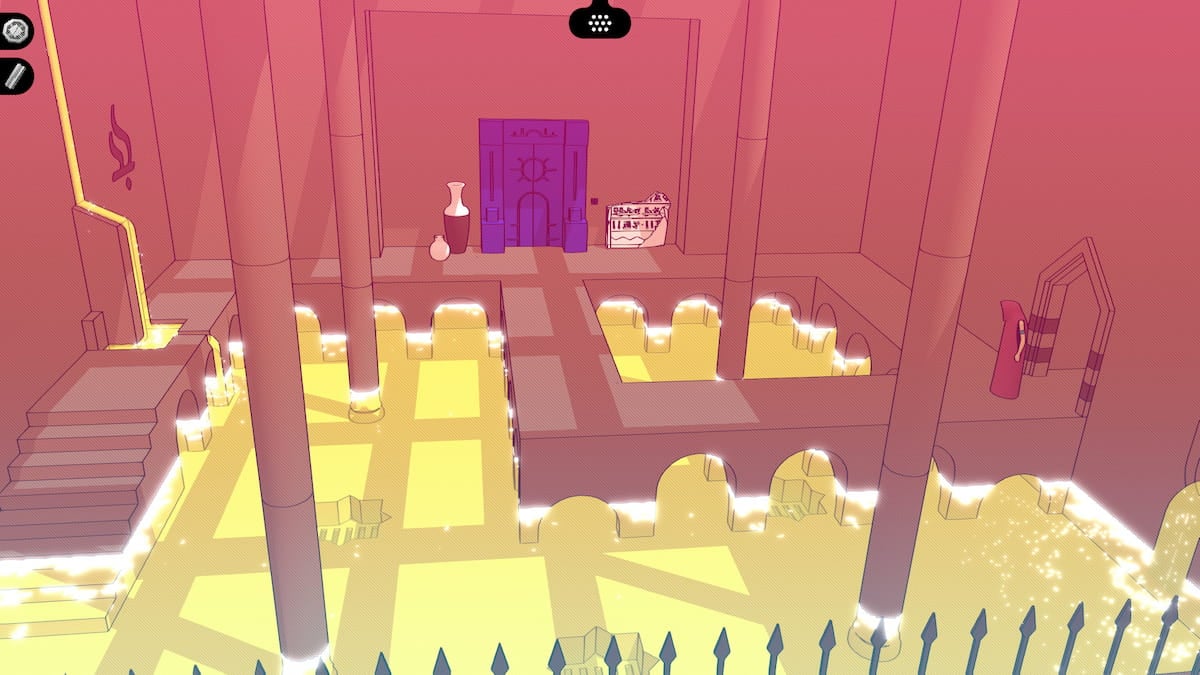
Screenshot by Pro Game Guides
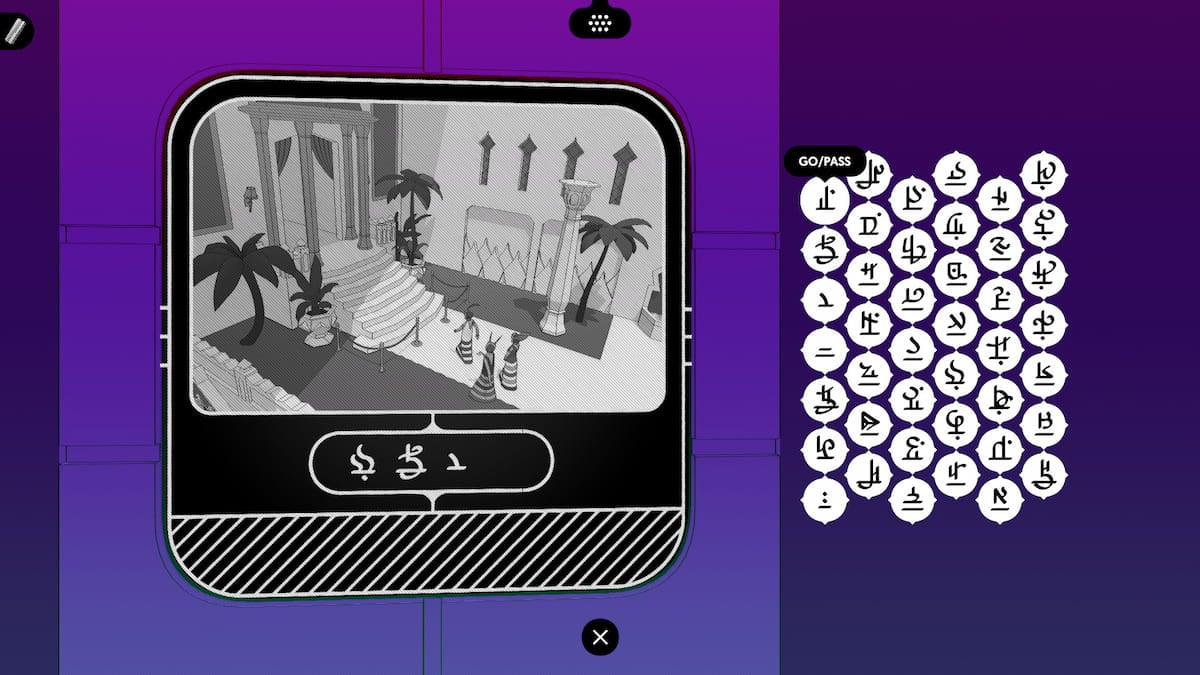
Screenshot by Pro Game Guides
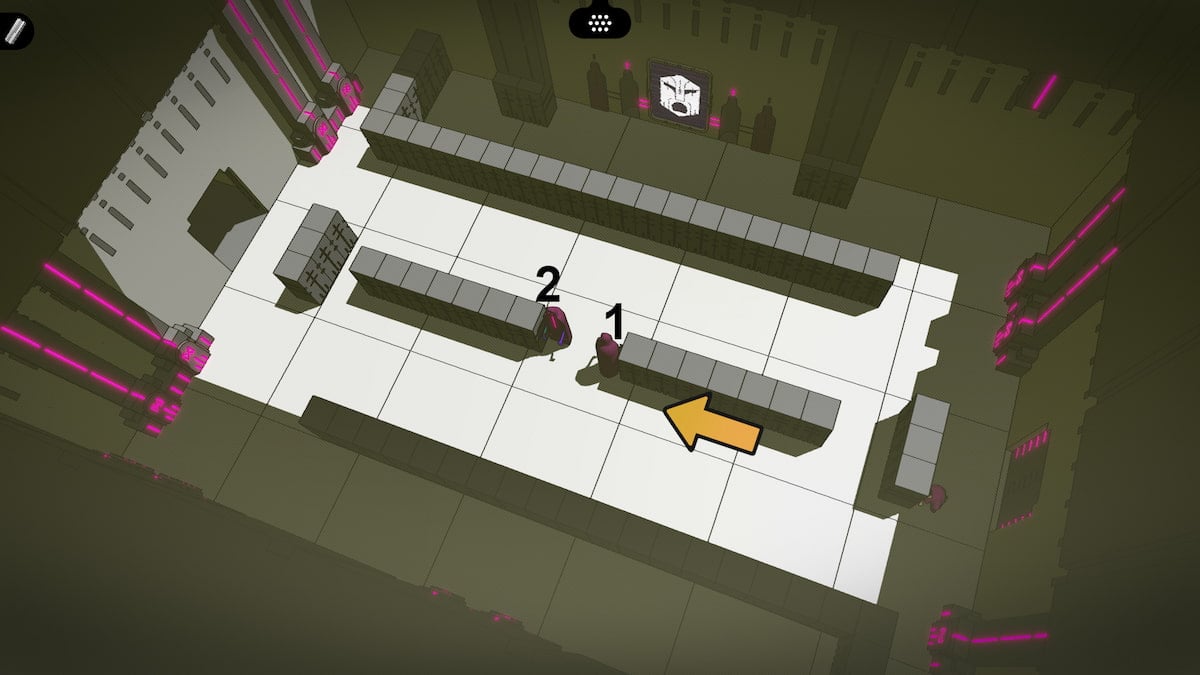
Image by Pro Game Guides
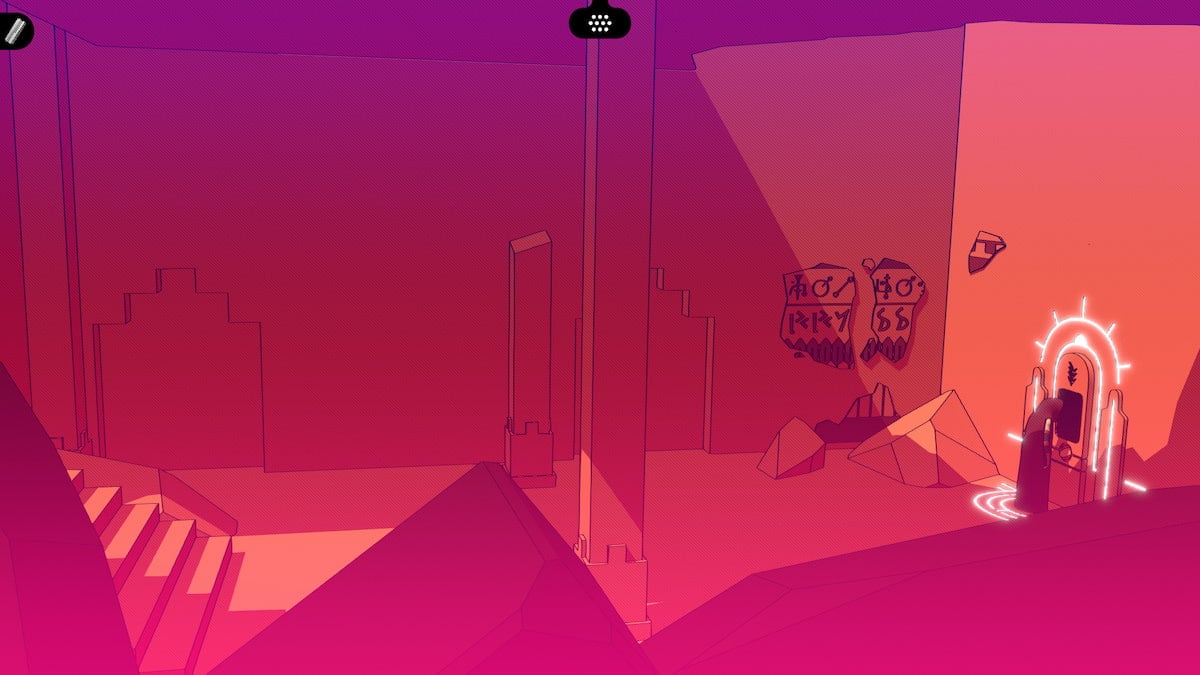
Screenshot by Pro Game Guides
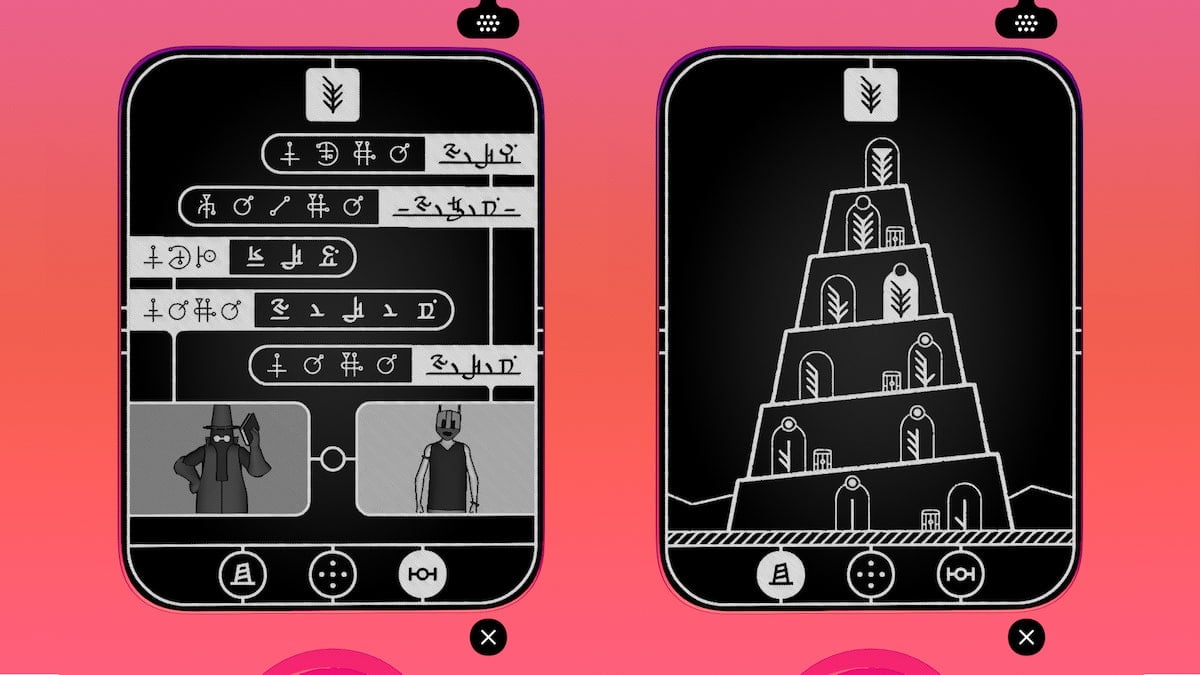
Image by Pro Game Guides
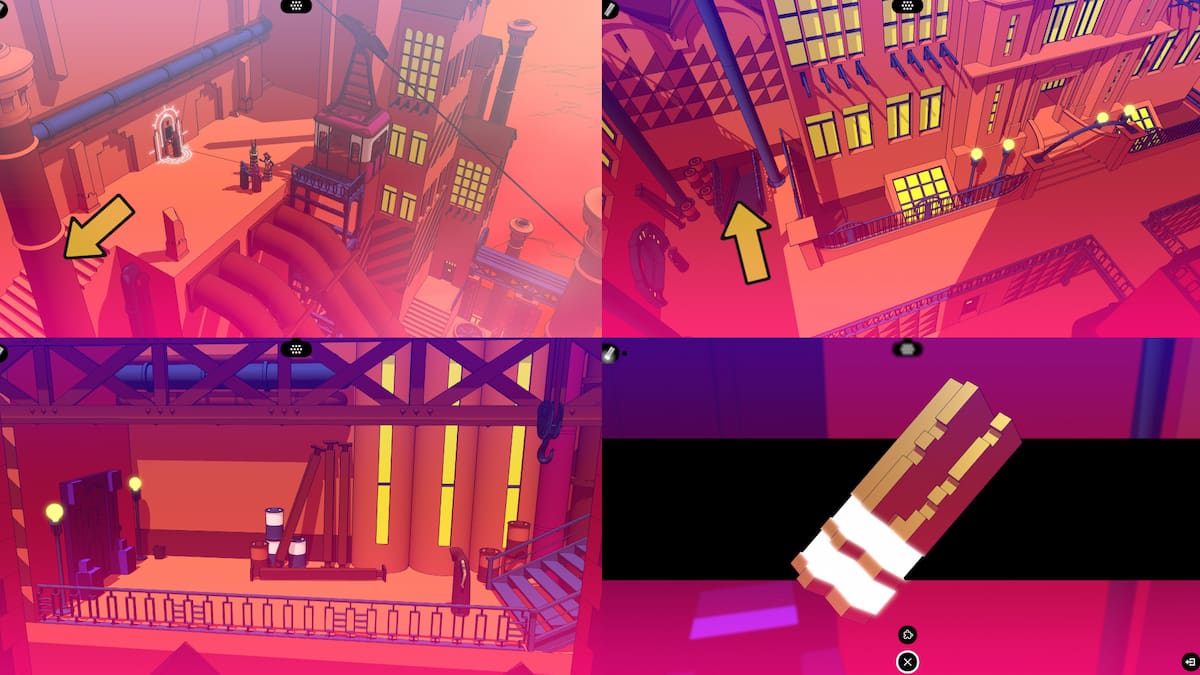
Image by Pro Game Guides
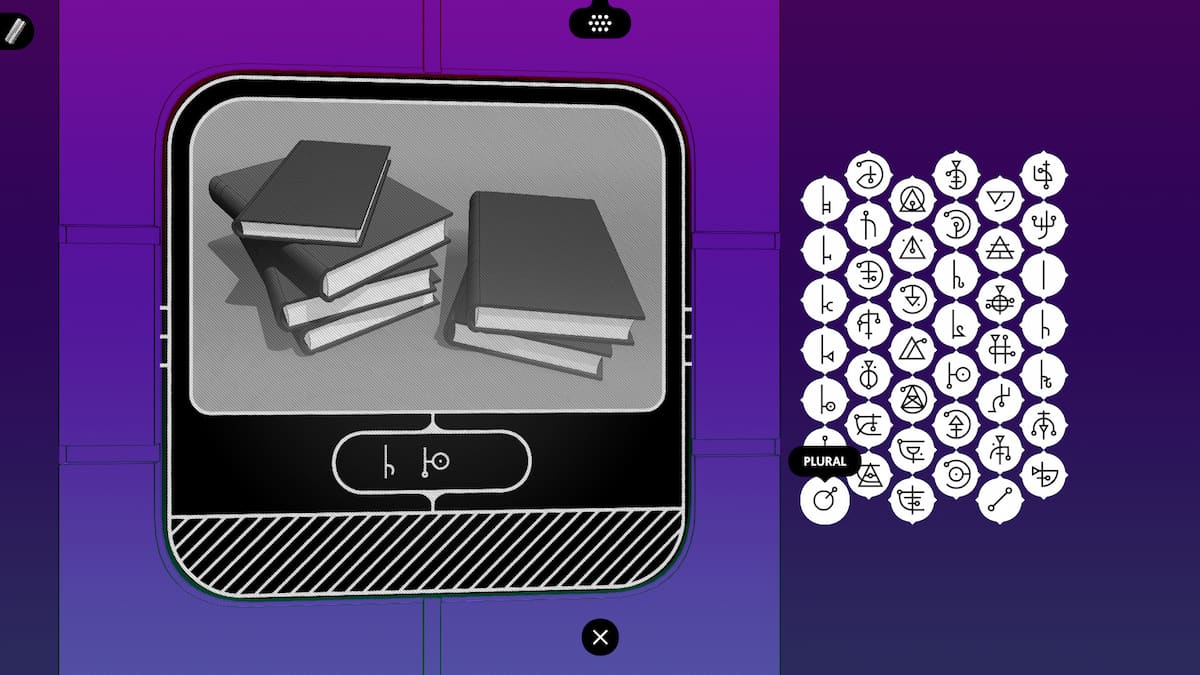
Screenshot by Pro Game Guides

Image by Pro Game Guides
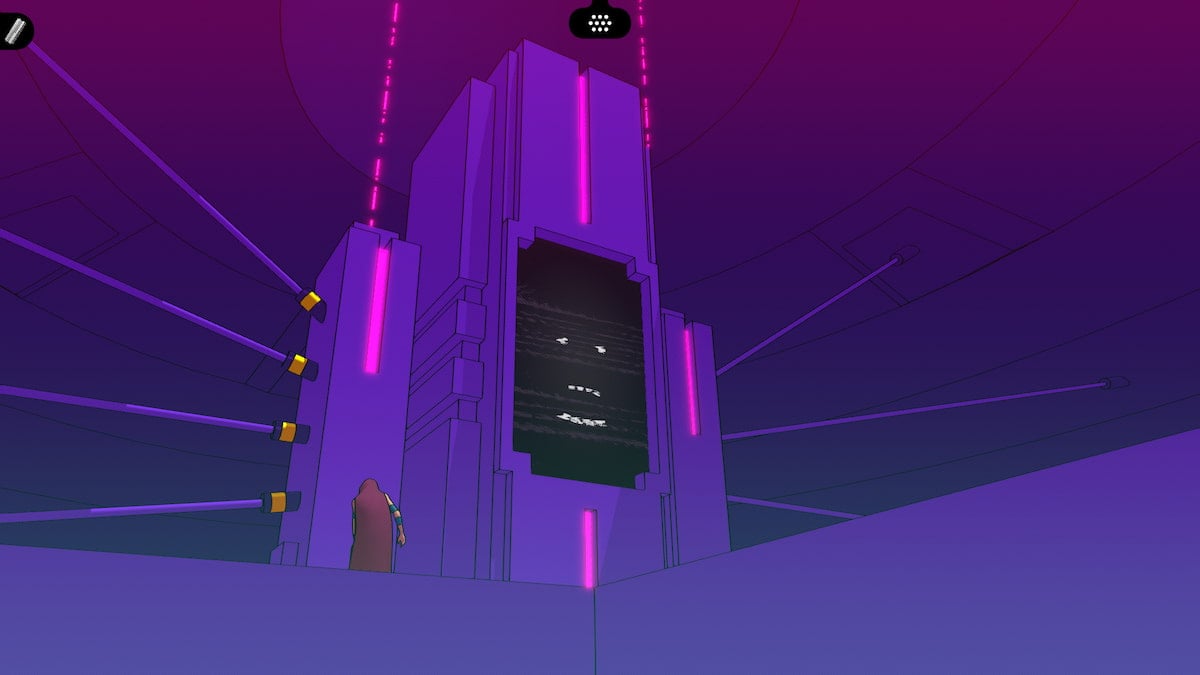
Screenshot by Pro Game Guides
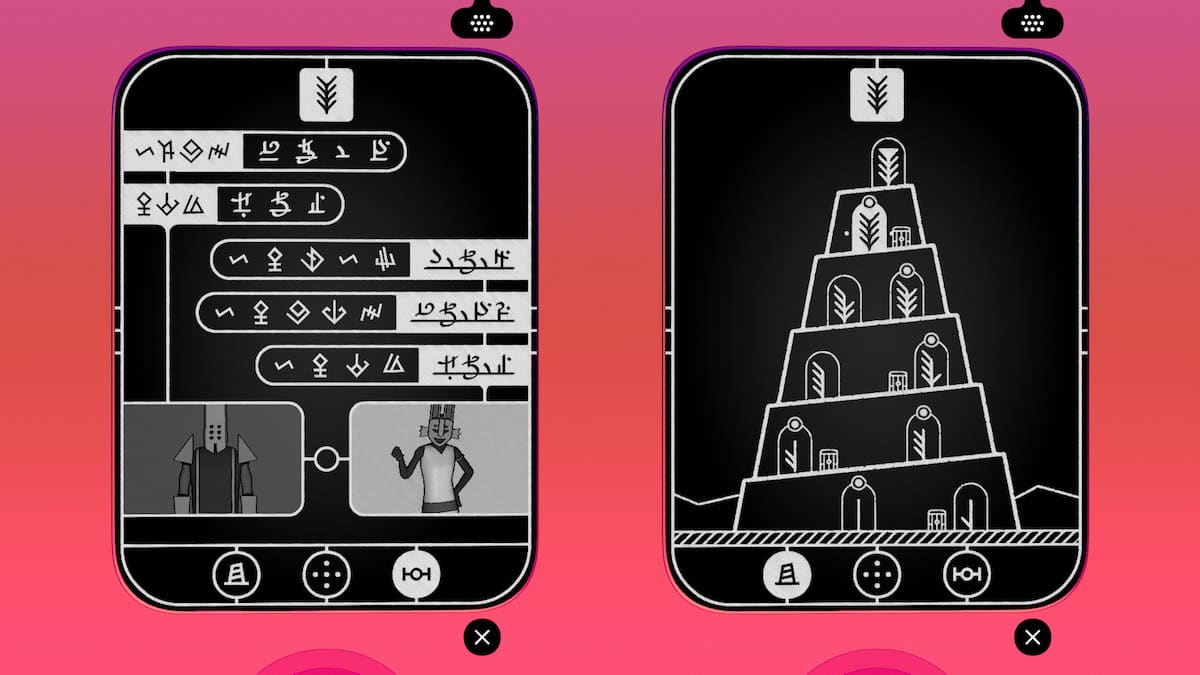
Image by Pro Game Guides
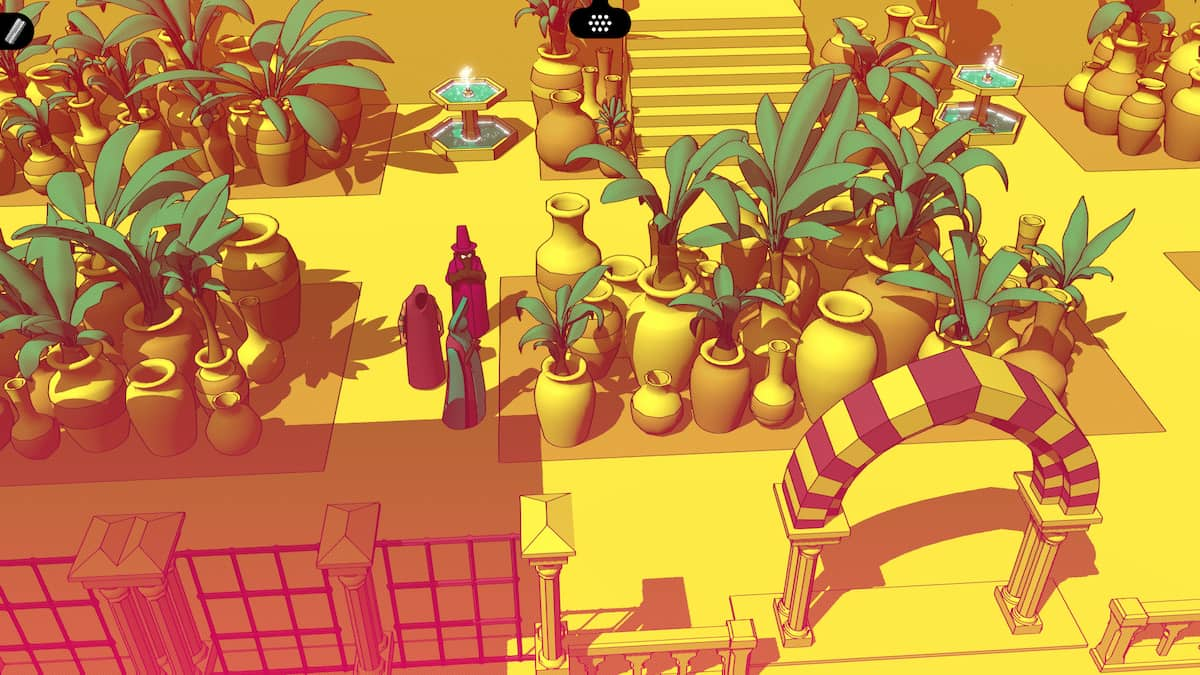
Screenshot by Pro Game Guides
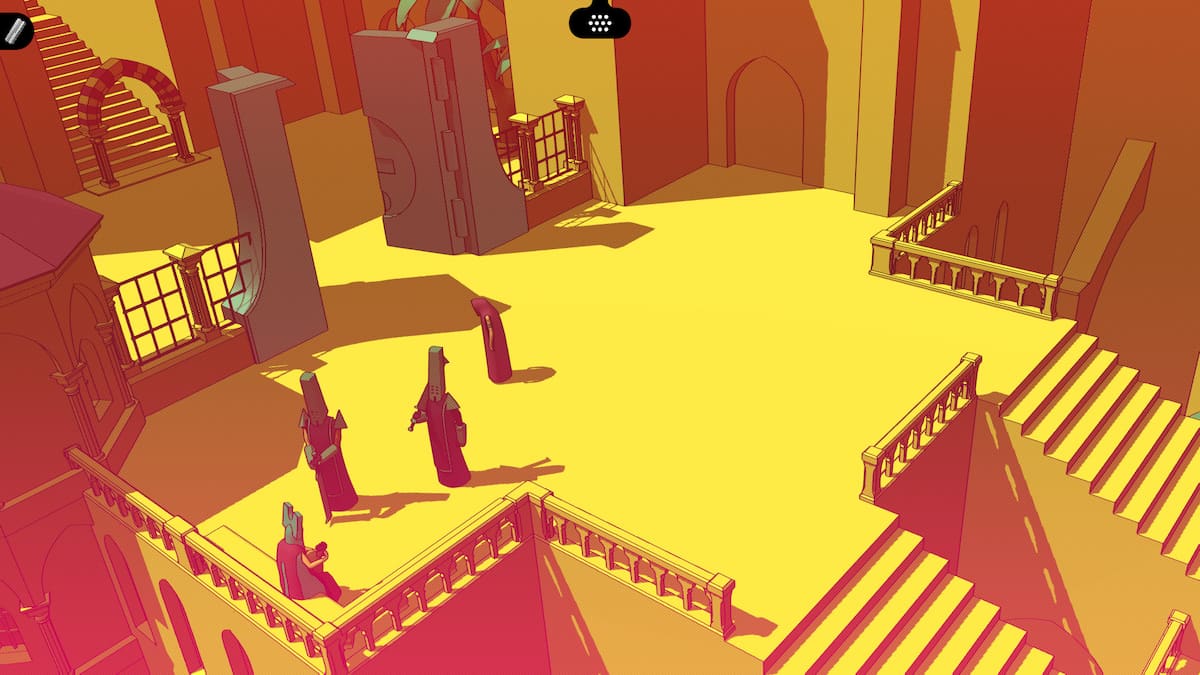
Screenshot by Pro Game Guides
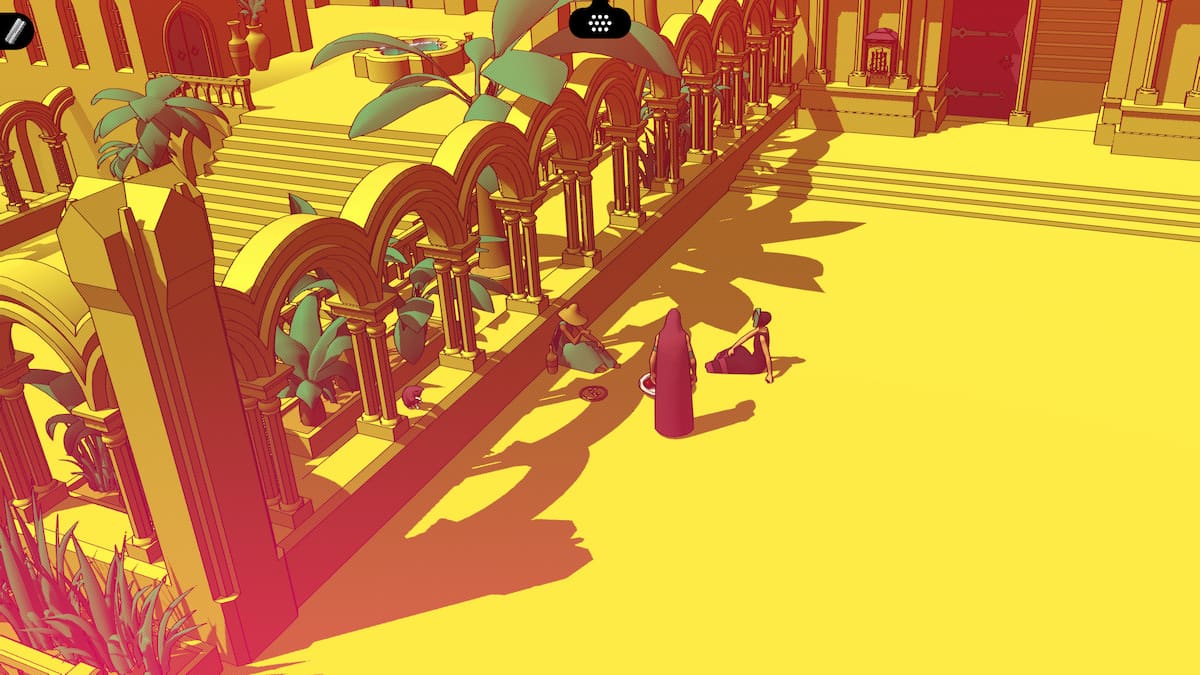
Screenshot by Pro Game Guides
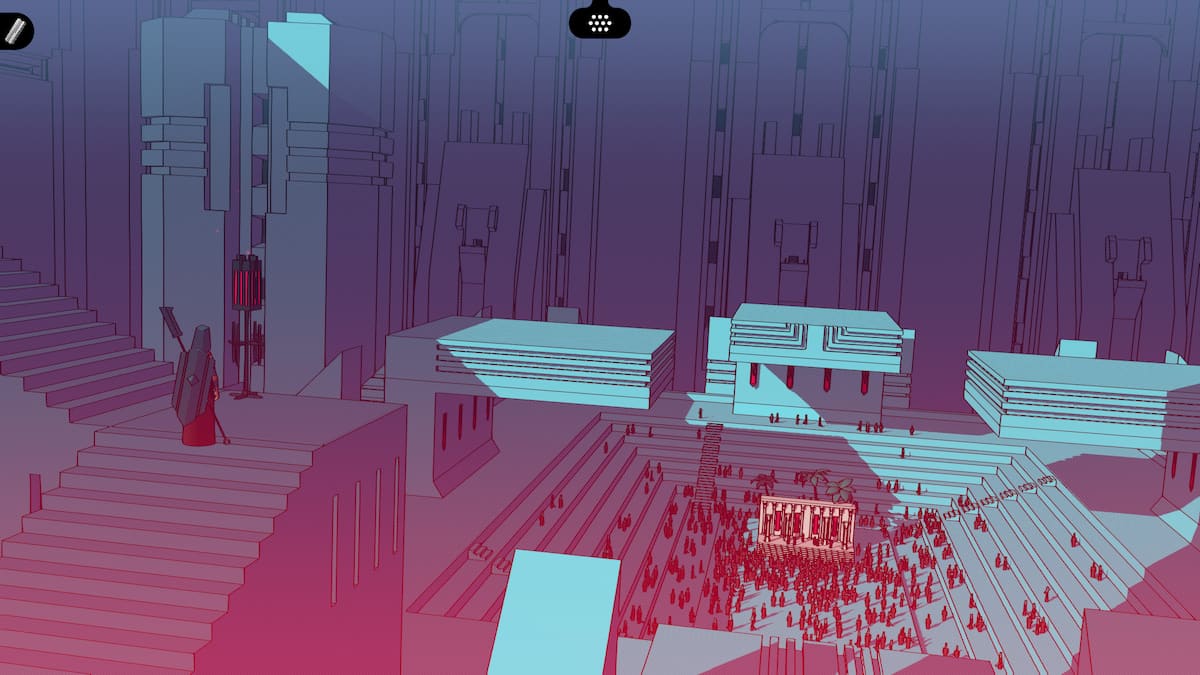
Screenshot by Pro Game Guides
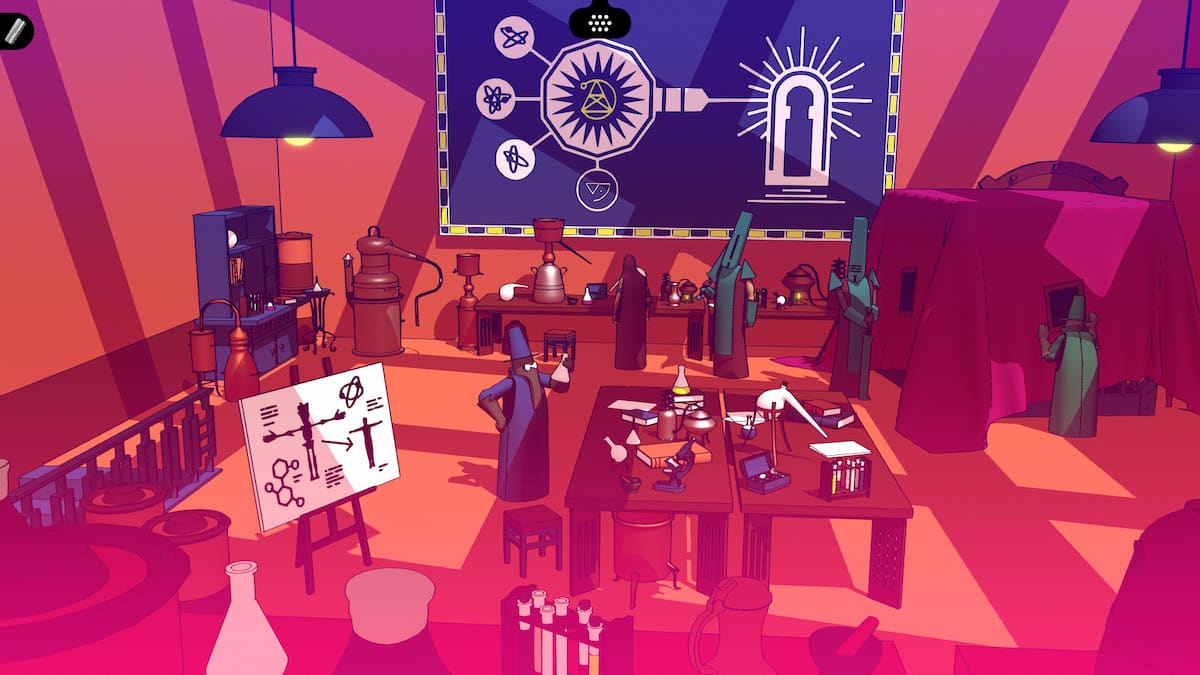
Screenshot by Pro Game Guides
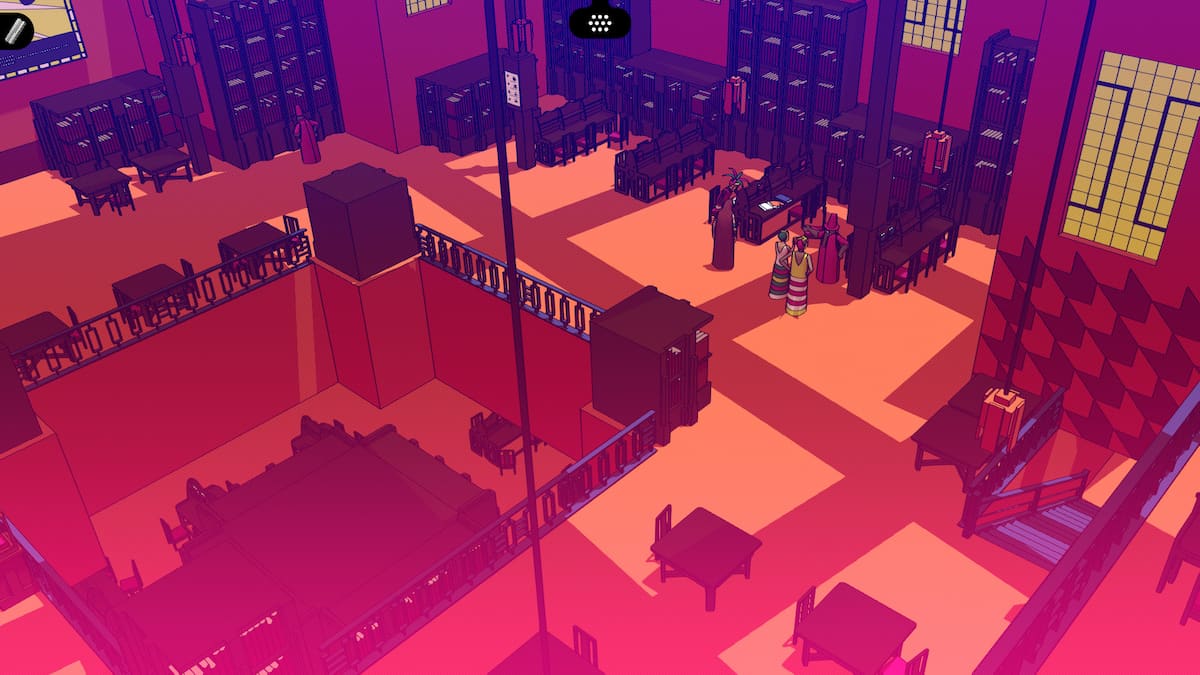
Screenshot by Pro Game Guides
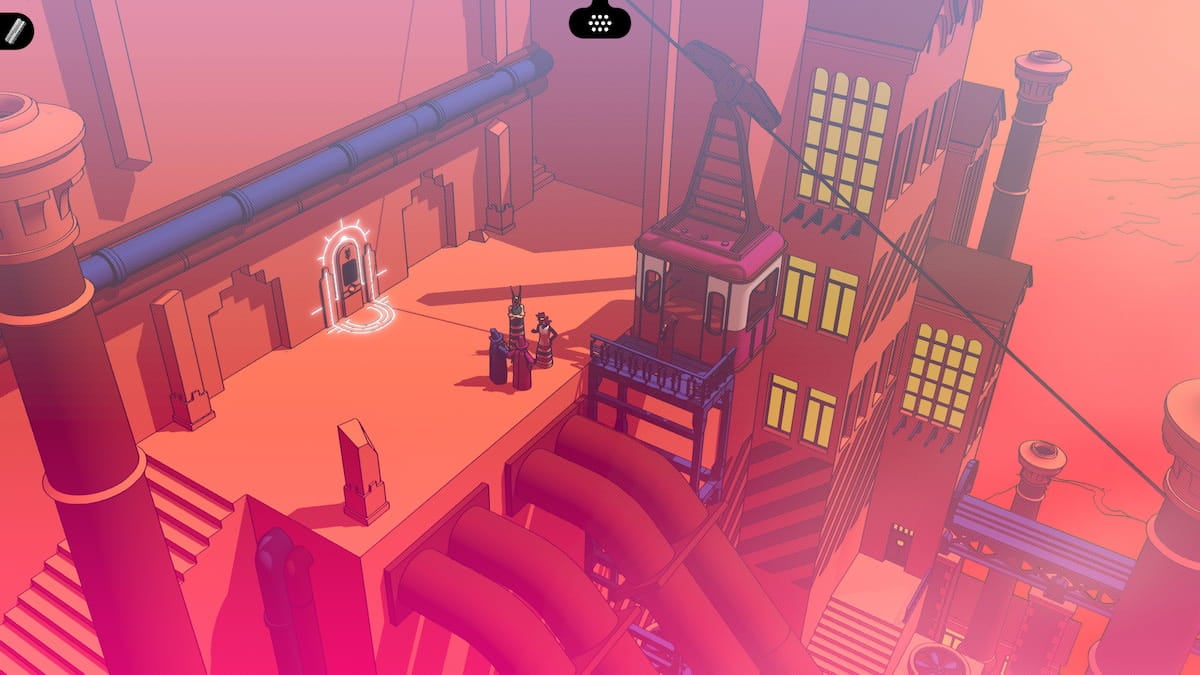
Screenshot by Pro Game Guides
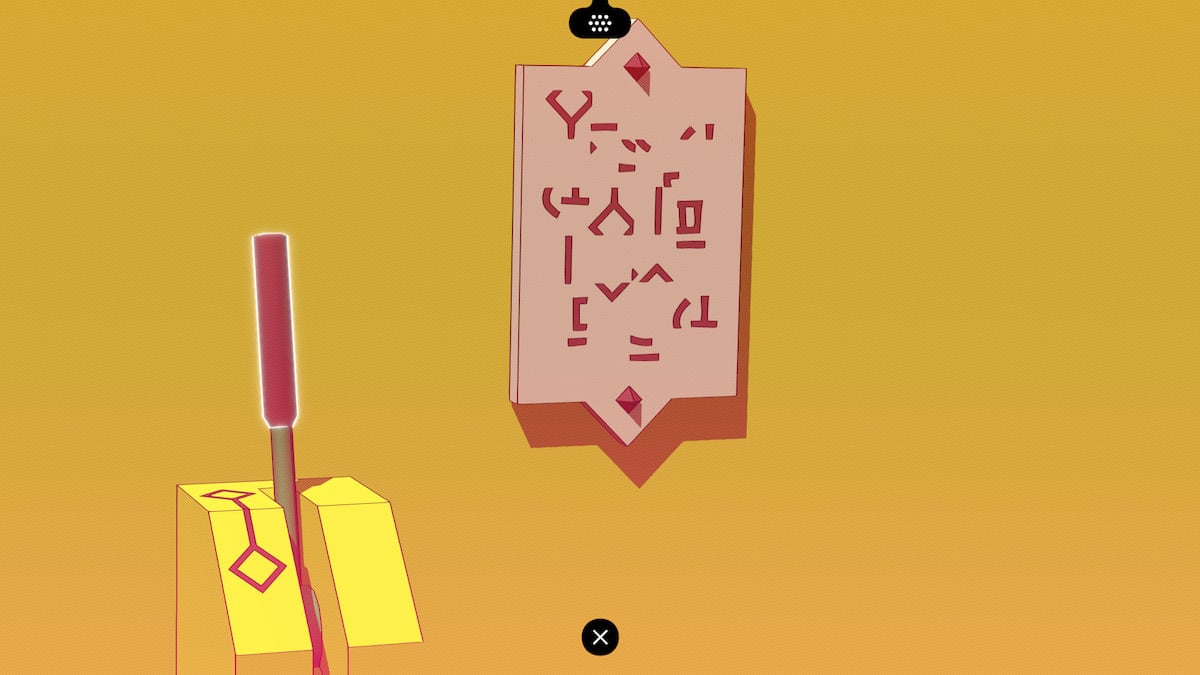
Screenshot by Pro Game Guides
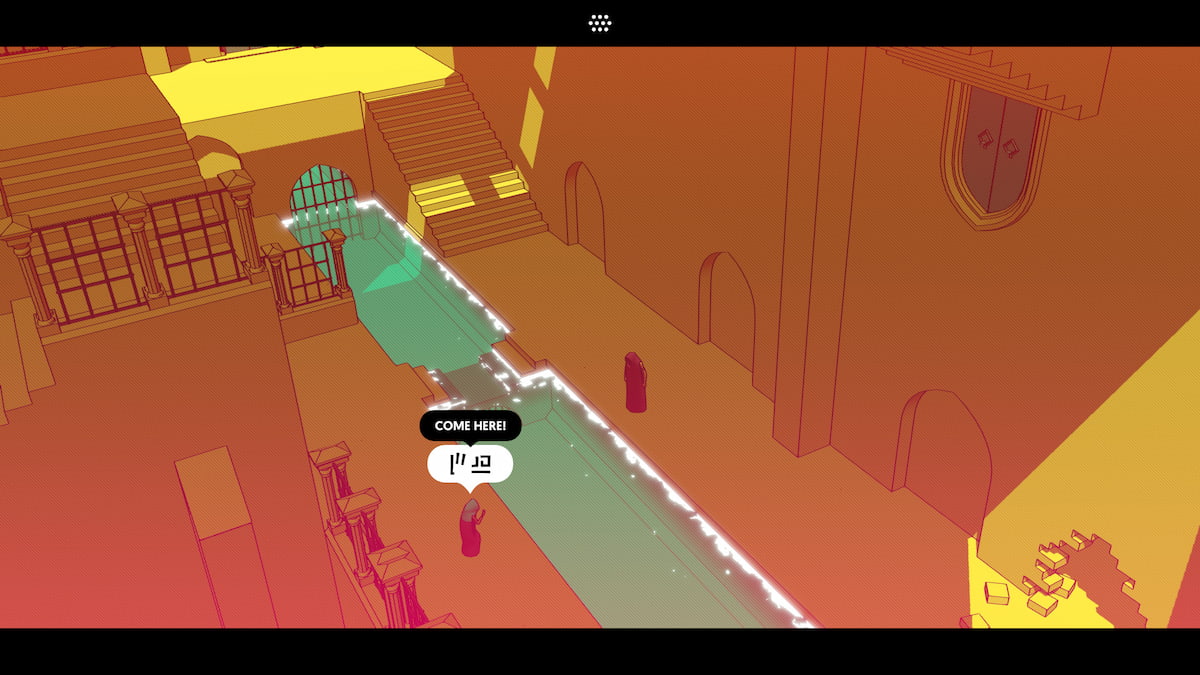
Screenshot by Pro Game Guides
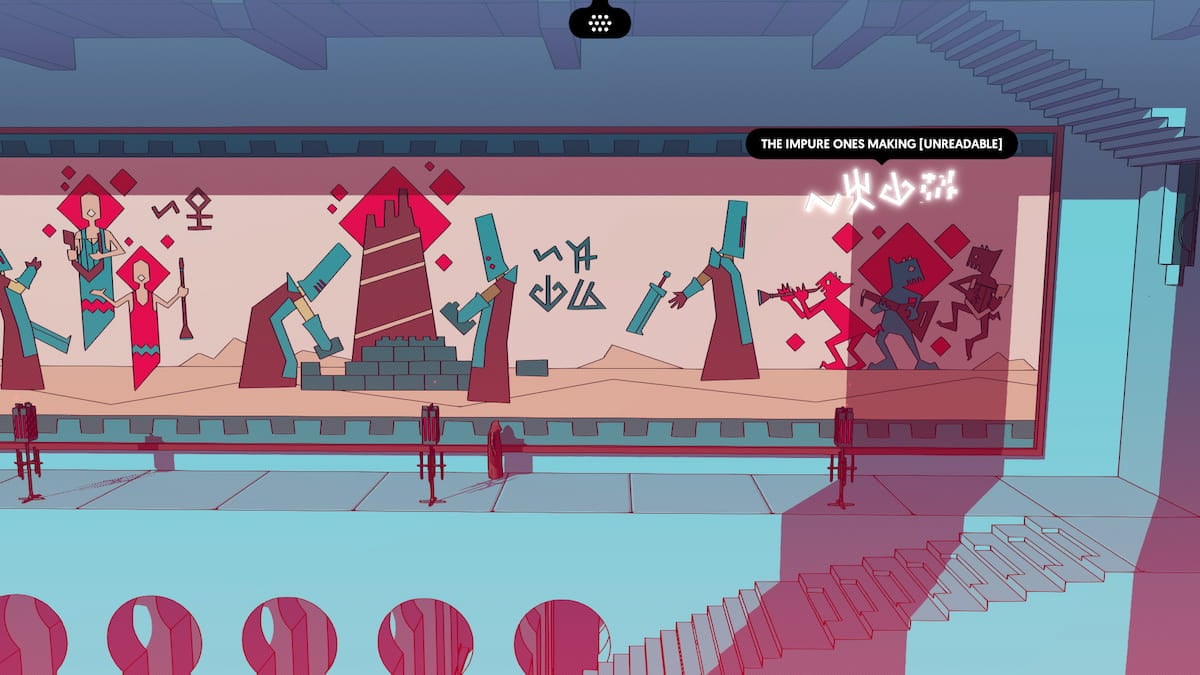
Screenshot by Pro Game Guides
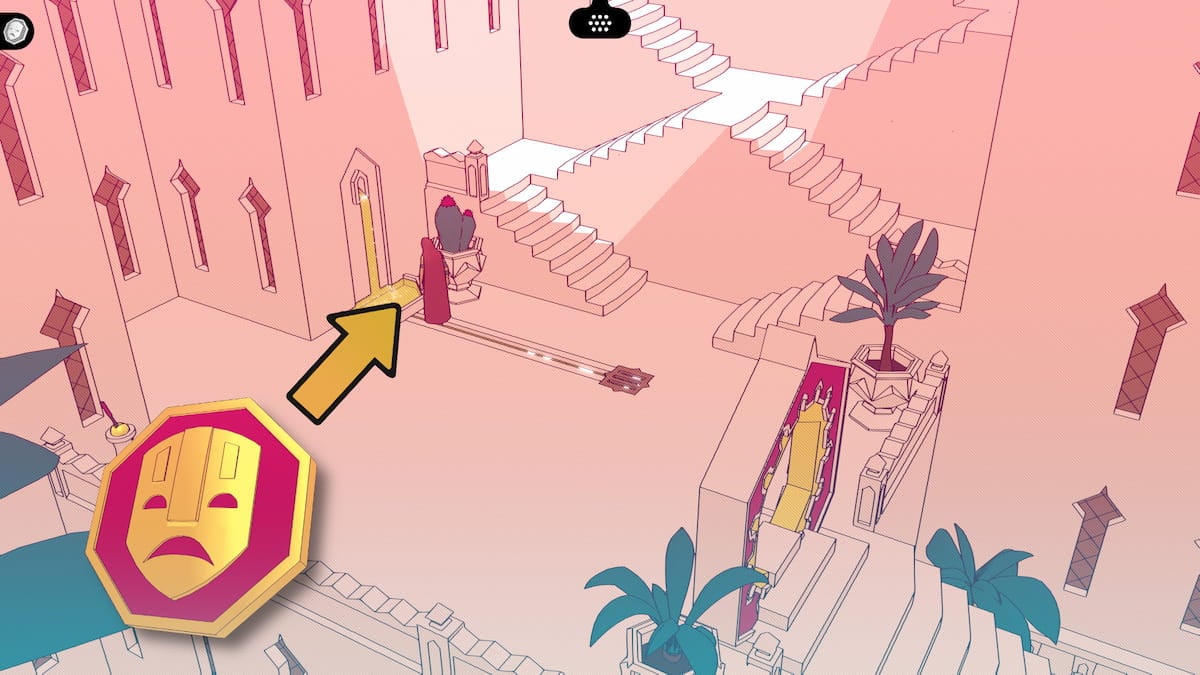
Image by Pro Game Guides
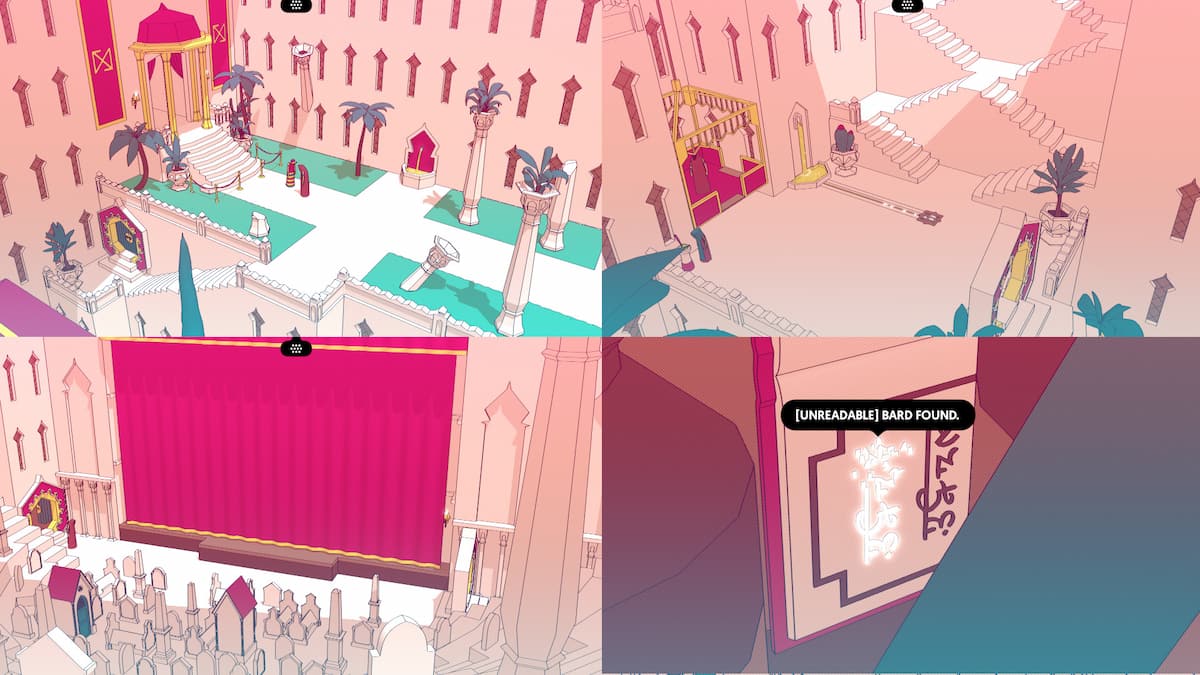
Image by Pro Game Guides
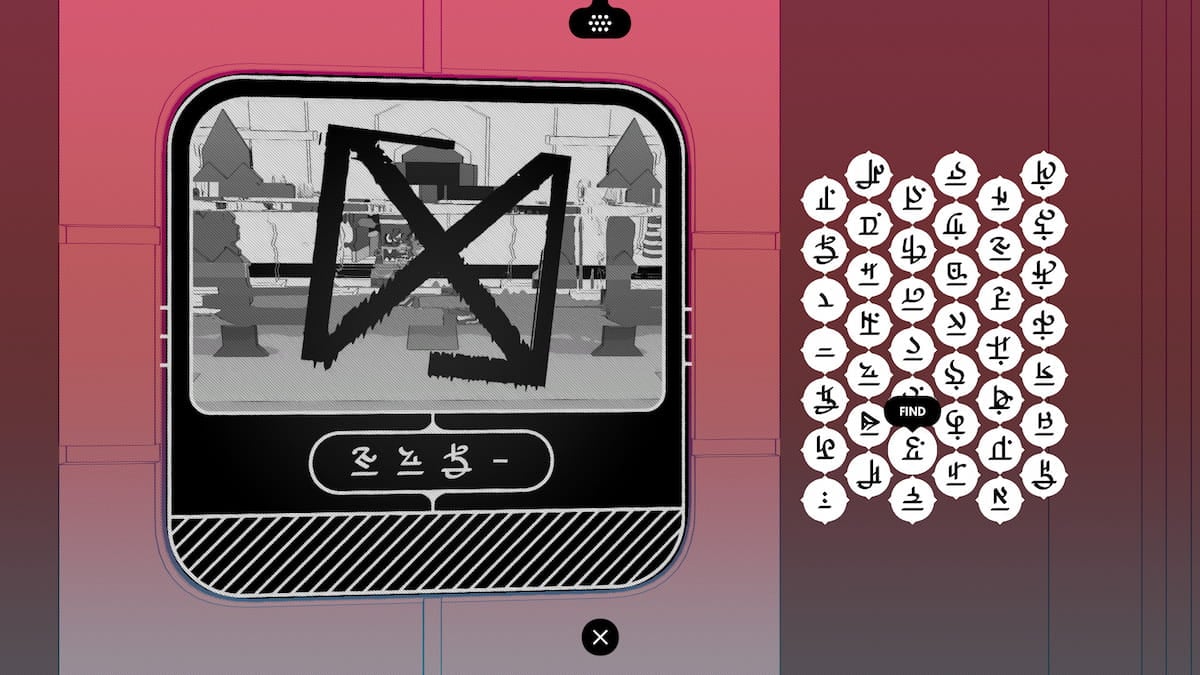
Screenshot by Pro Game Guides
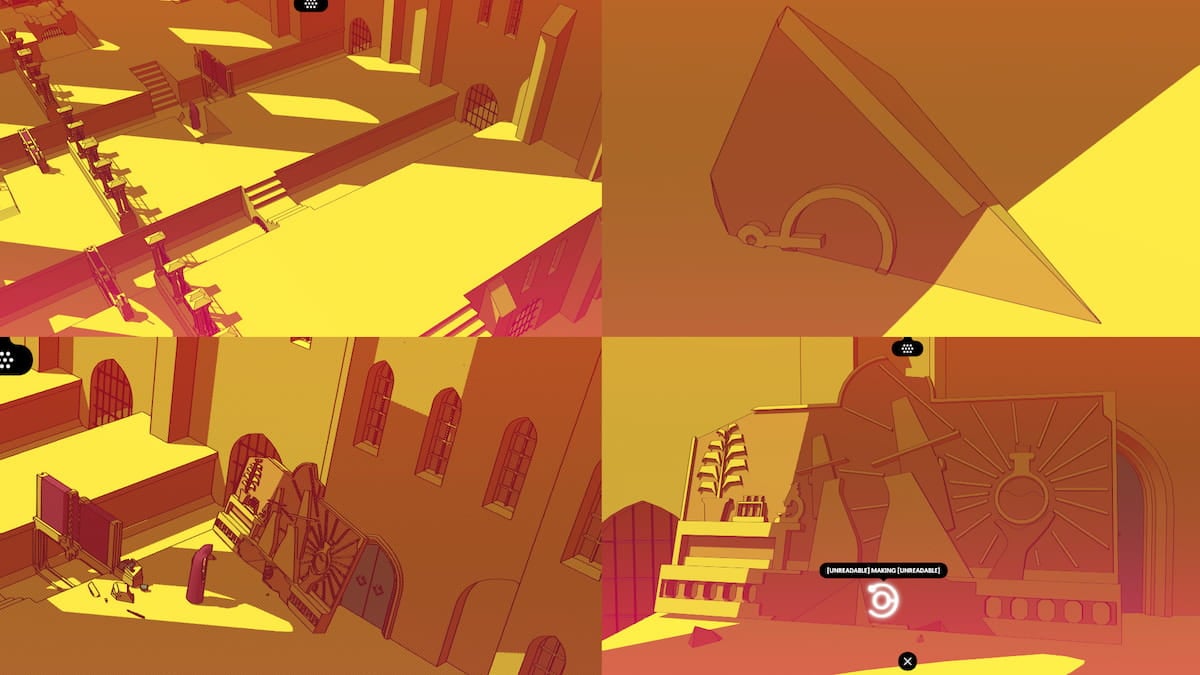
Image by Pro Game Guides
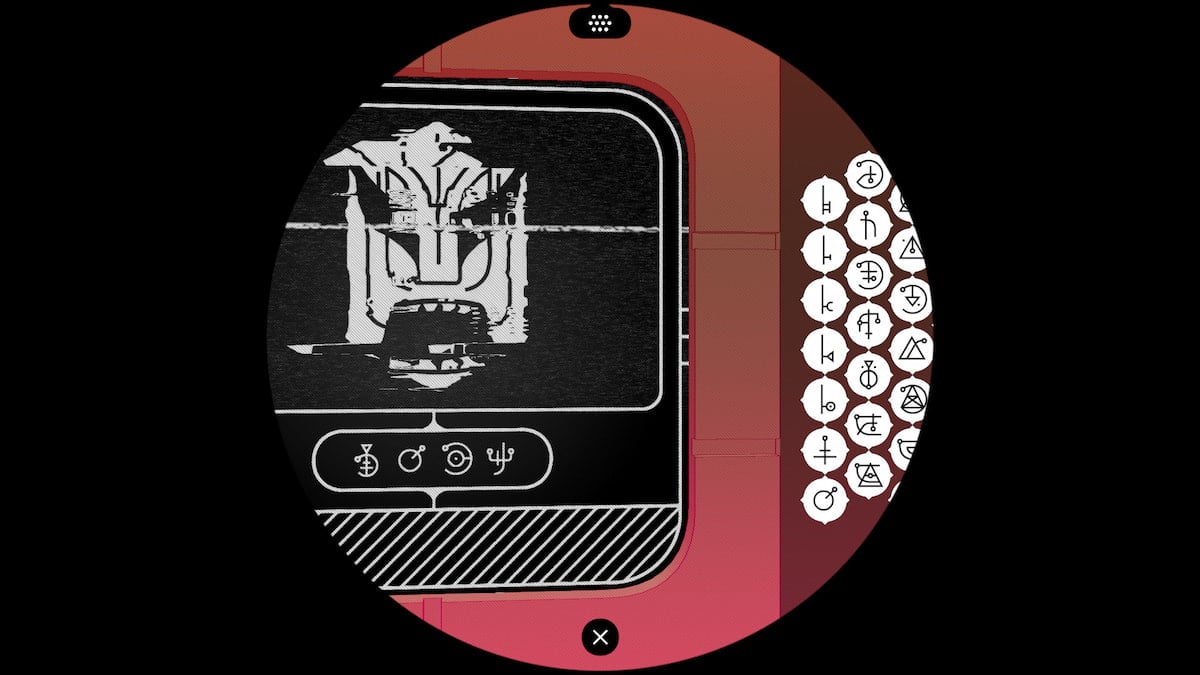
Screenshot by Pro Game Guides
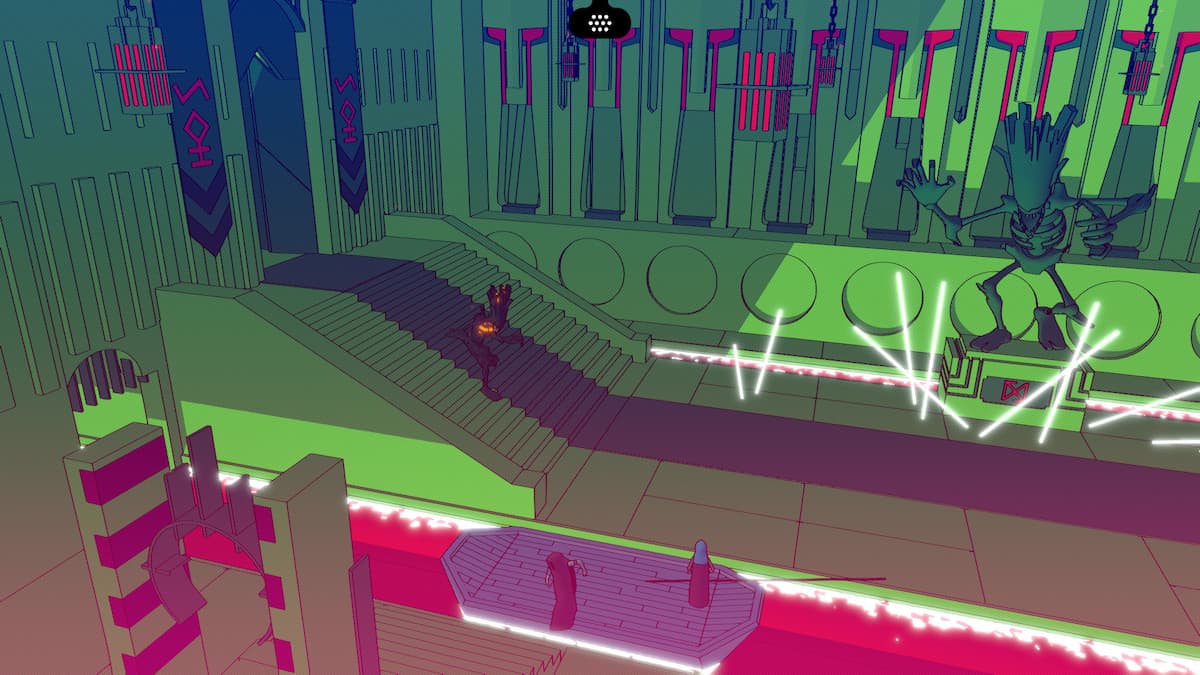
Screenshot by Pro Game Guides
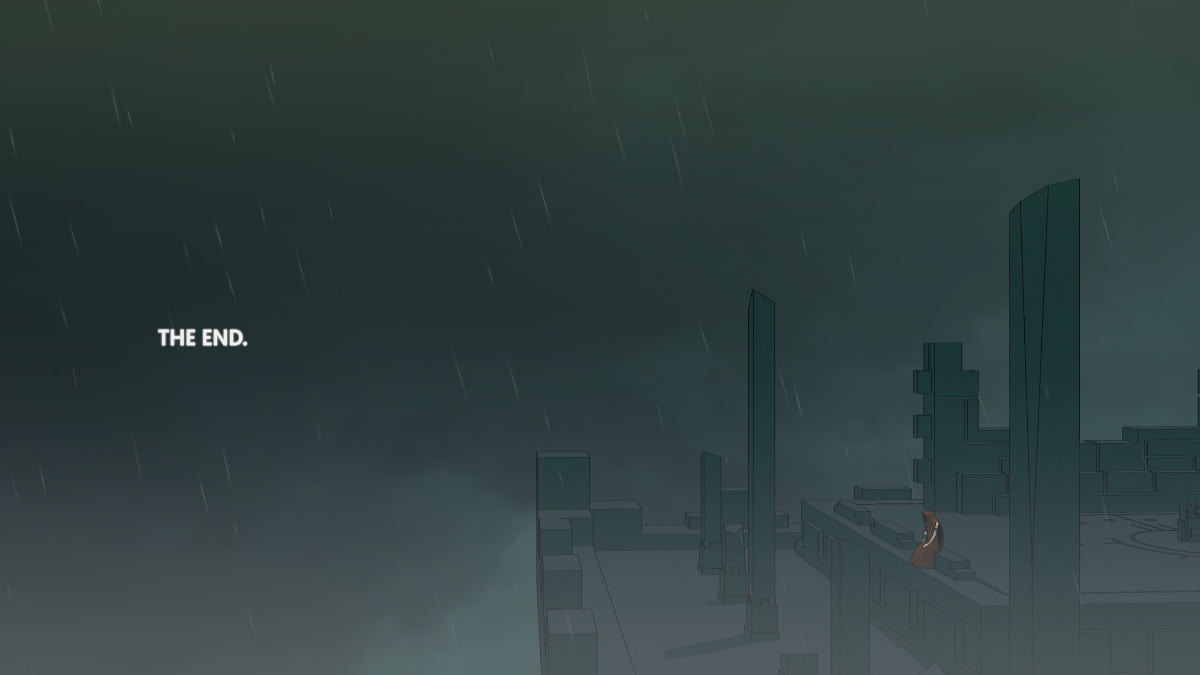
Image via Steam
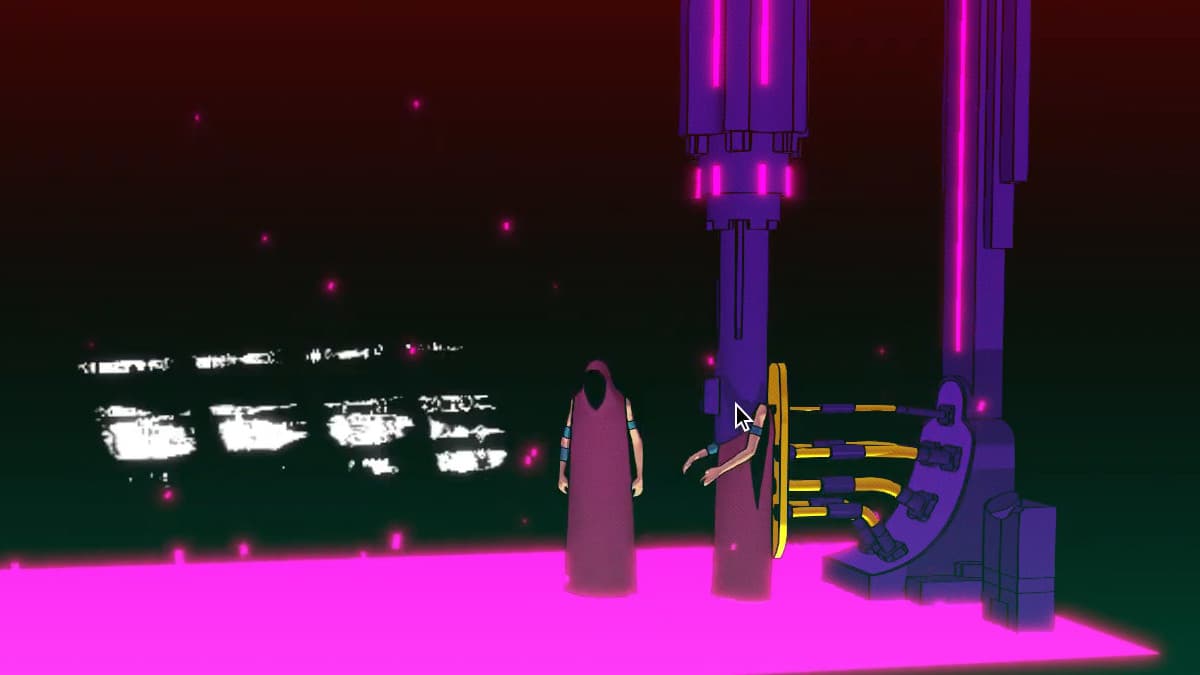
Screenshot by Pro Game Guides
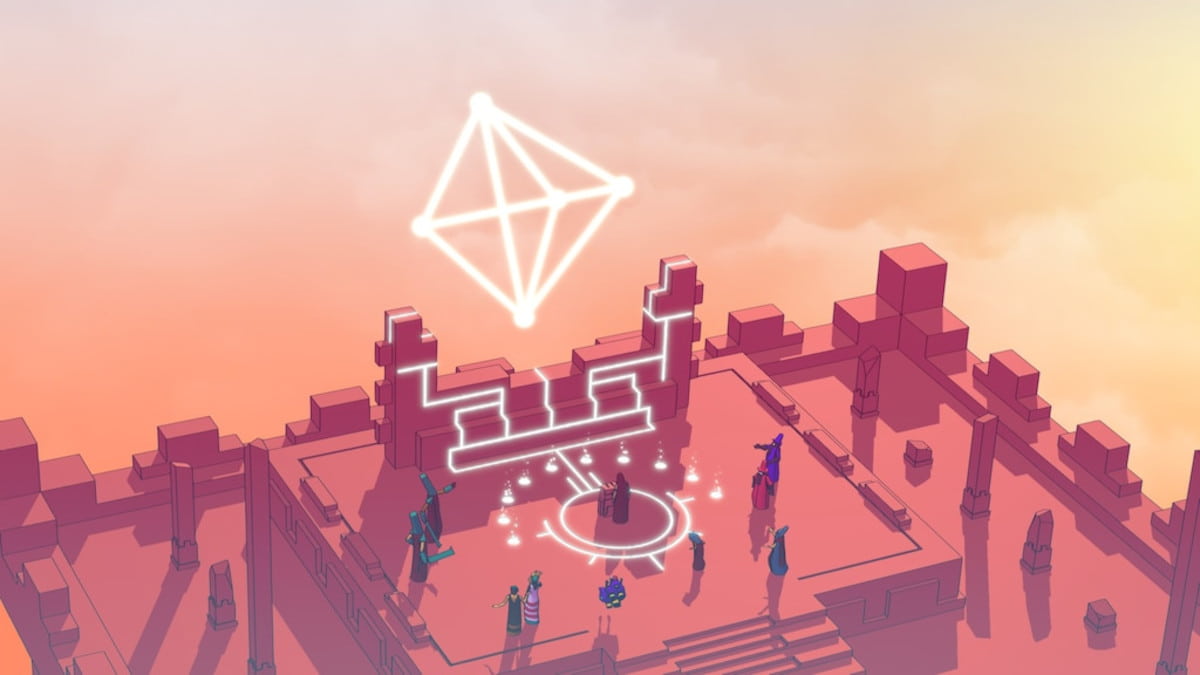
Image via Steam
