Show off your artistry as a investigator .
The terminal chapter of Boxes Lost Fragments is filled with intricate teaser and information on the plot ’s lore . In this guide , I ’ll assist you complete the final levels of Chapter 5 of Boxes Lost Fragments .
Boxes Lost Fragments Chapter 5 Aurora part 2 walkthrough
This guide covers the third and fourth levels of the fifth chapter , as well as the ending of Boxes Lost Fragments . If you ’re not quite to the end yet , I ’ve supply links to guide for all of the other voice of the game .
Third room puzzles
The door for the third room will become available .
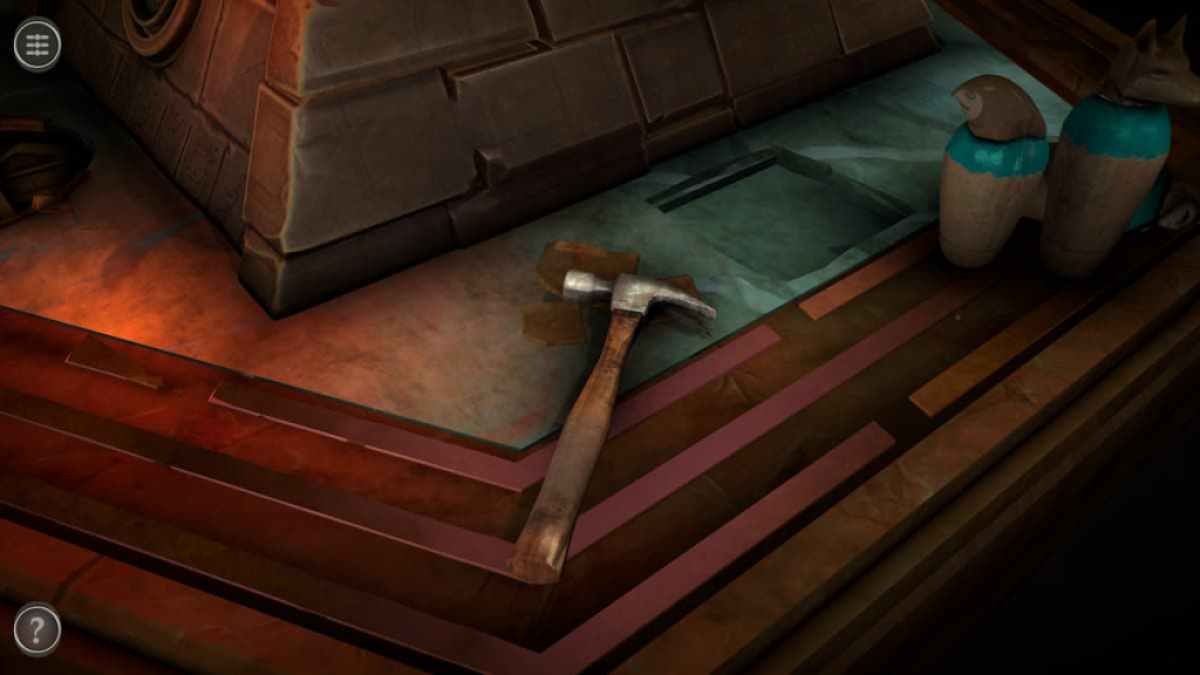
Entering it reveals an Egyptian - themed way .
Grab the Hammer from the side of the mesa .

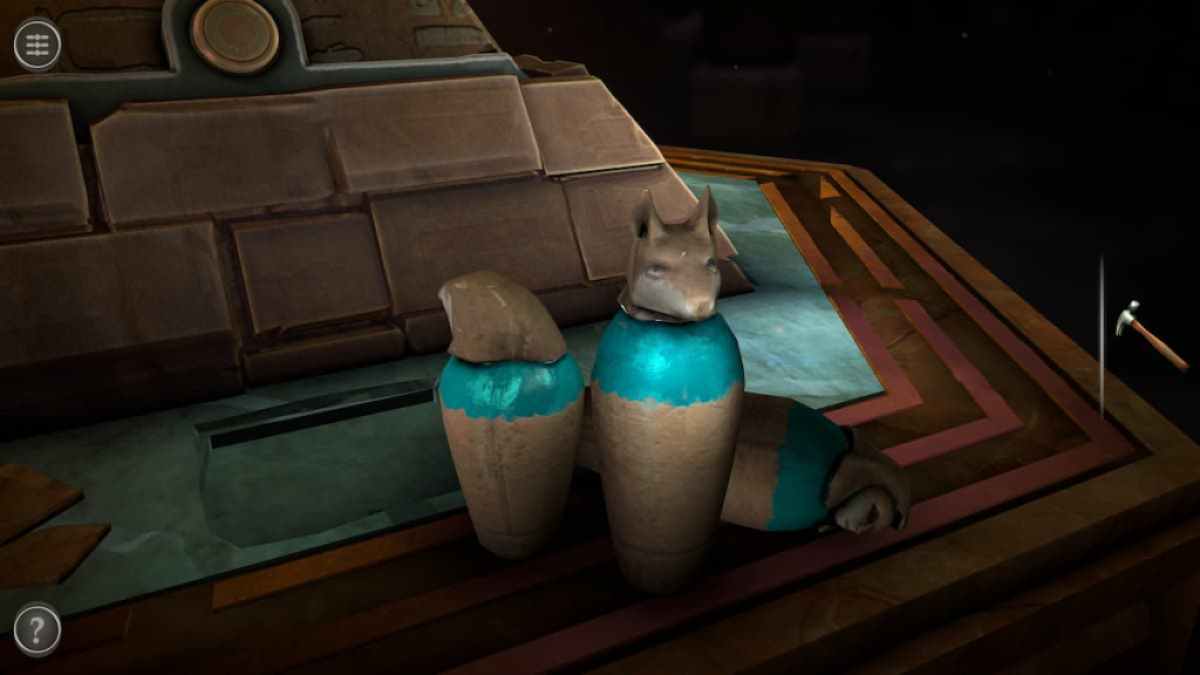
A set of three pots rest next to the pyramid .
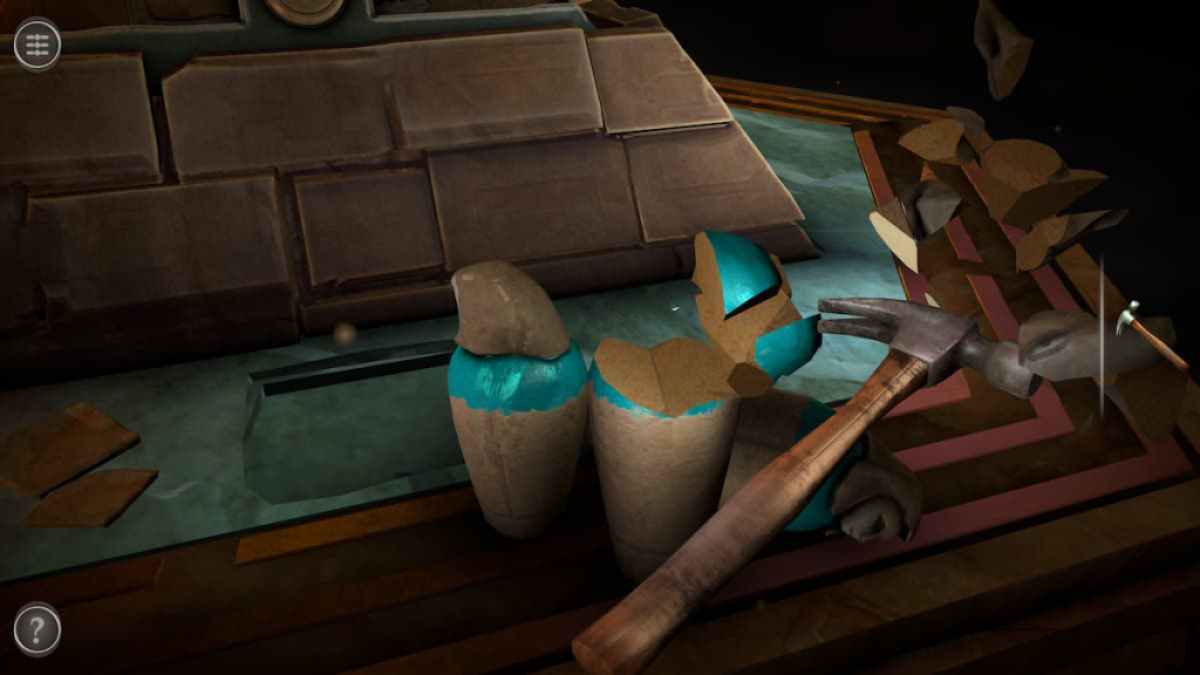
Use the Hammer to smash through the pots .
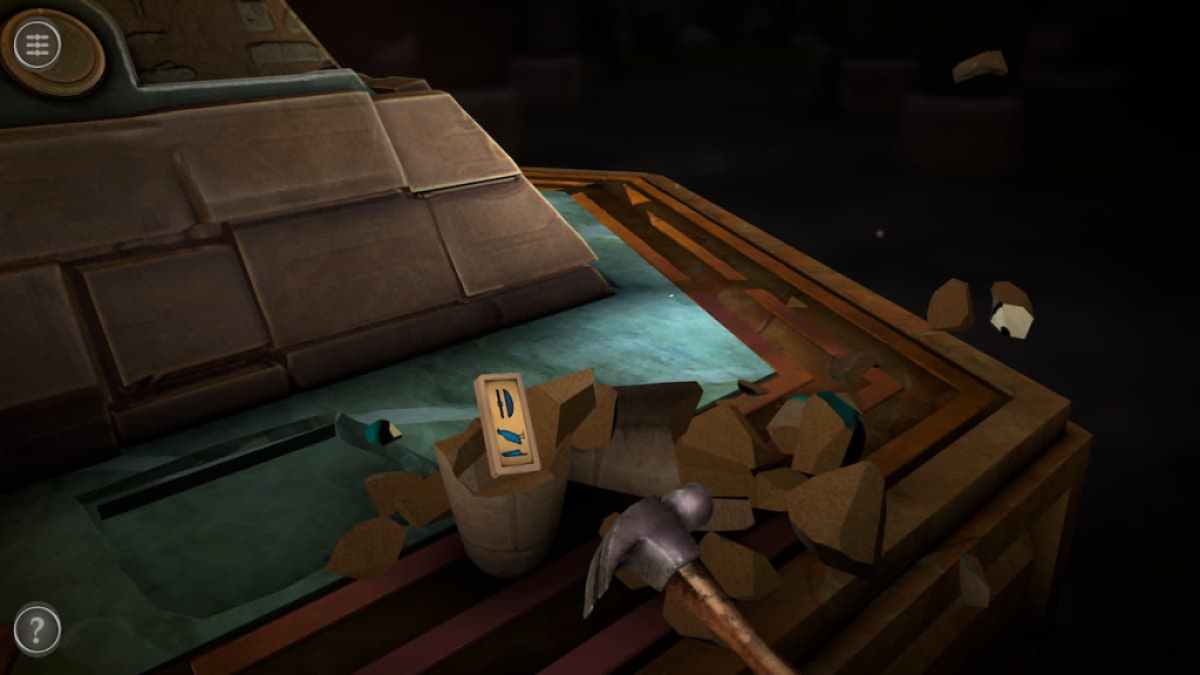
Once the pots have been smashed , you ’ll regain a Puzzle Piece .

Screenshot by Pro Game Guides
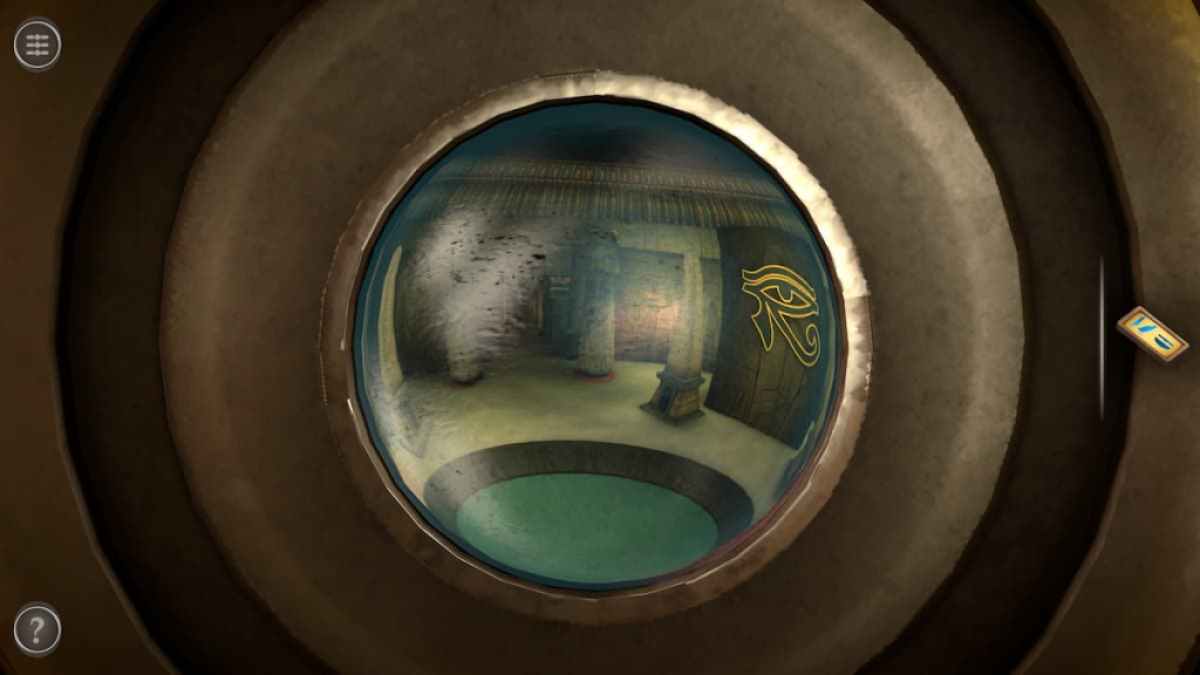
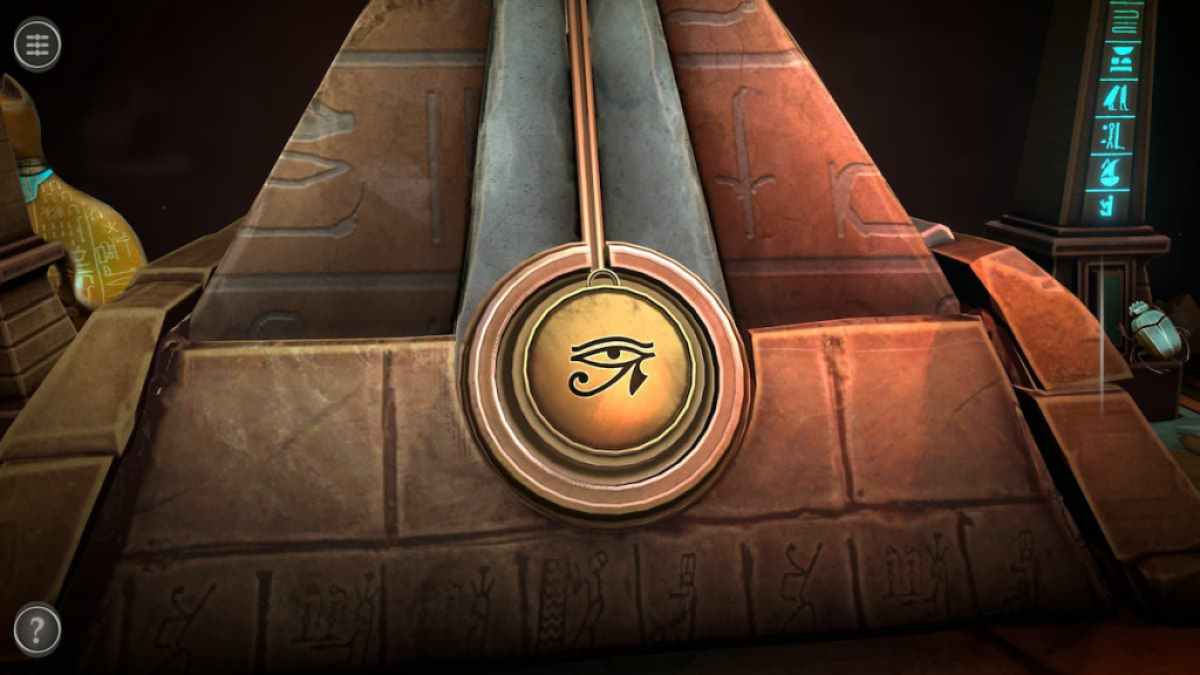
The right side of the Pyramids of Egypt has a small amber medallion . Rotate it to remove the hat .
open up the medallion allows you to look into a room with a red light that moves as you scroll the camera . Move the camera around until you find an identical golden Gospel According to Mark on the wall .
Move the camera around until the light fits into the marker on the wall .

Screenshot by Pro Game Guides
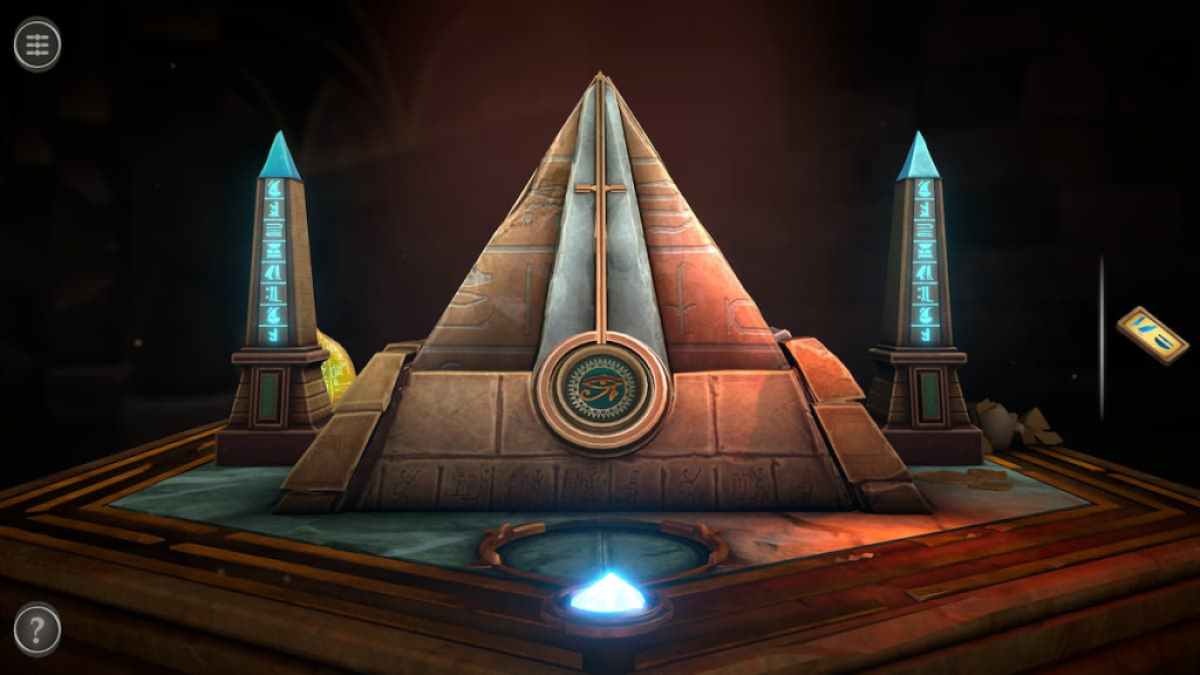
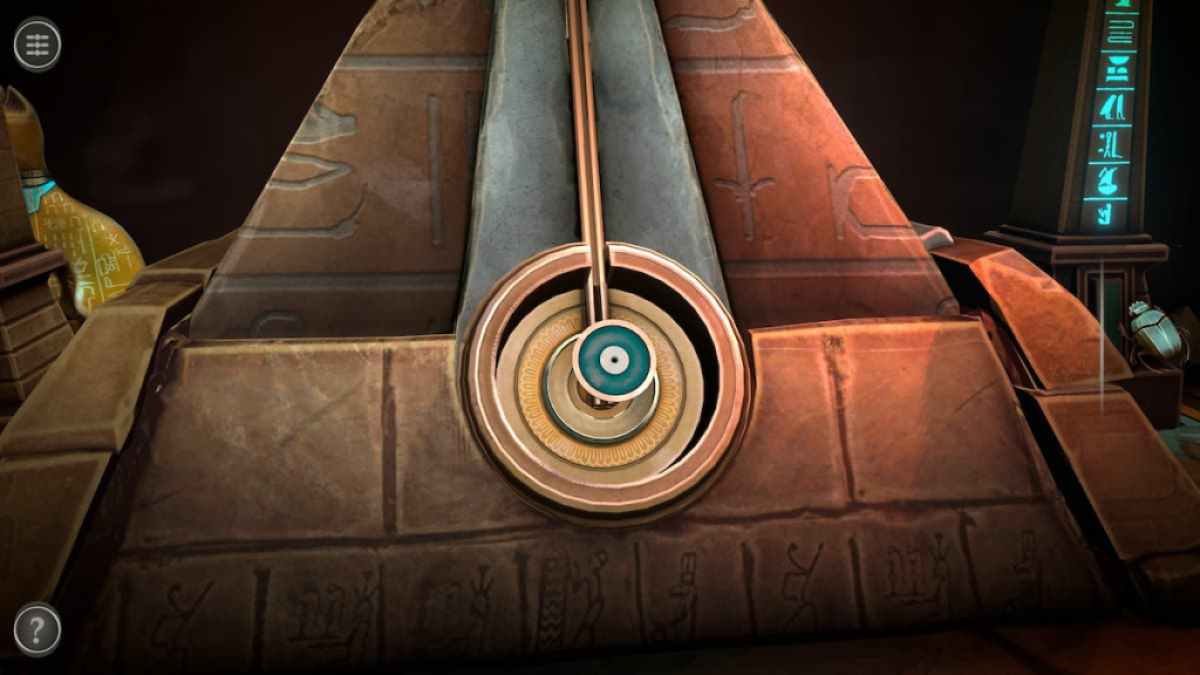
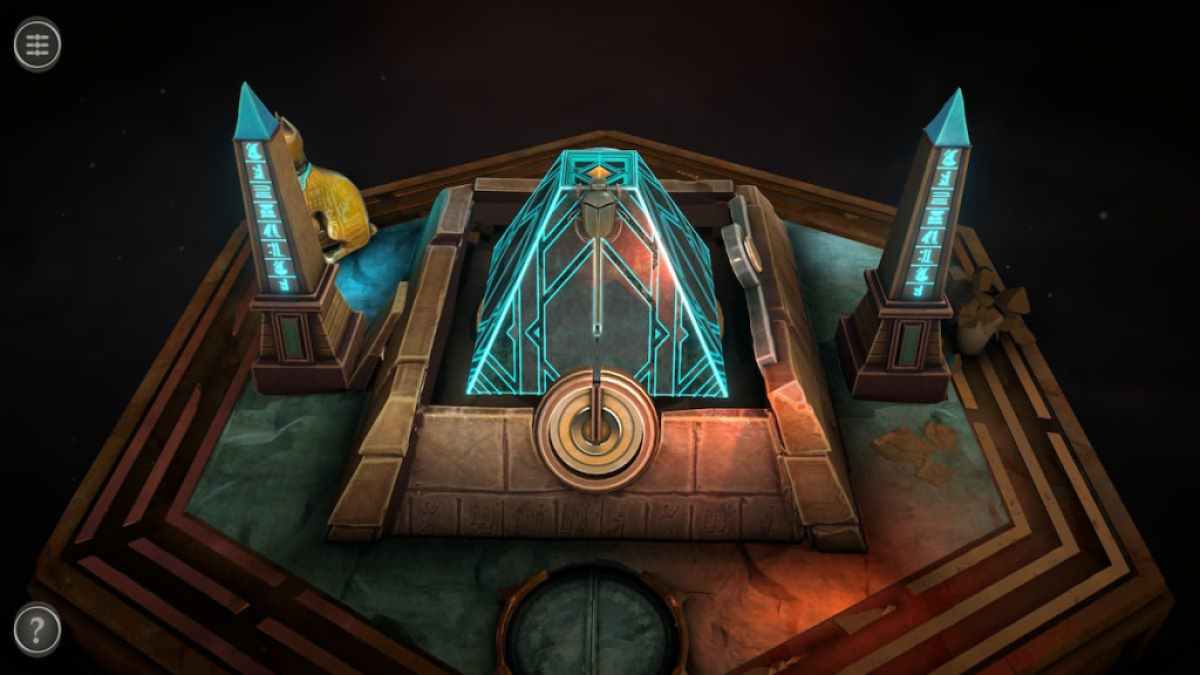
Doing so will make two towers rise on either side of the Pyramids of Egypt , cause a light and political platform to appear at the nucleotide as well .
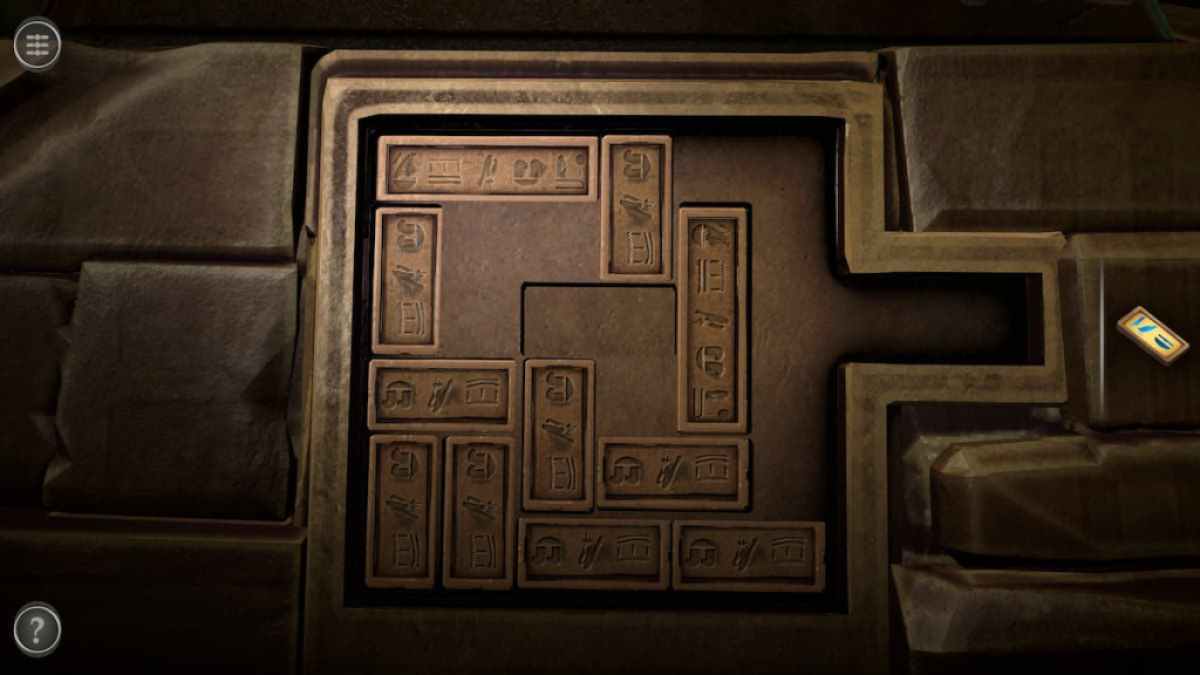
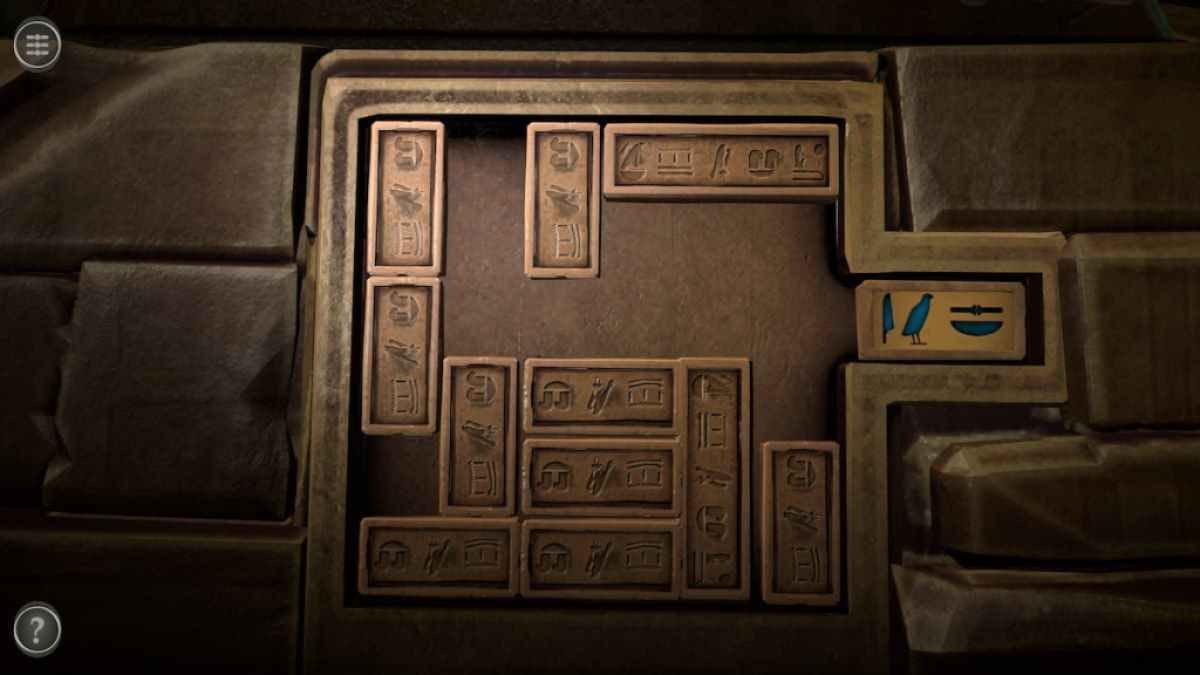
The hieroglyph puzzle is find at the back of the Great Pyramid .
Place the Puzzle Piece into the slot at the center of the puzzle .
Screenshot by Pro Game Guides
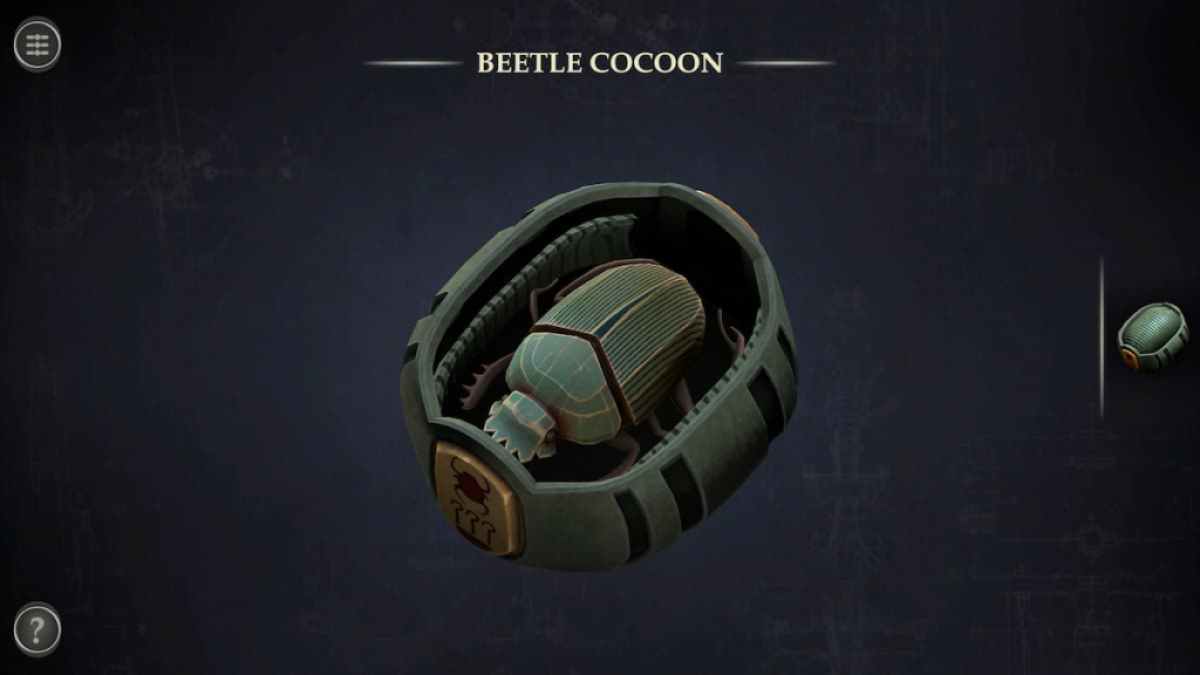
Move the pieces around until the Puzzle Piece is at the remnant to get a Beetle Cocoon .
Pull apart the top of the Beetle Cocoon . Inside of it is a Scarab .
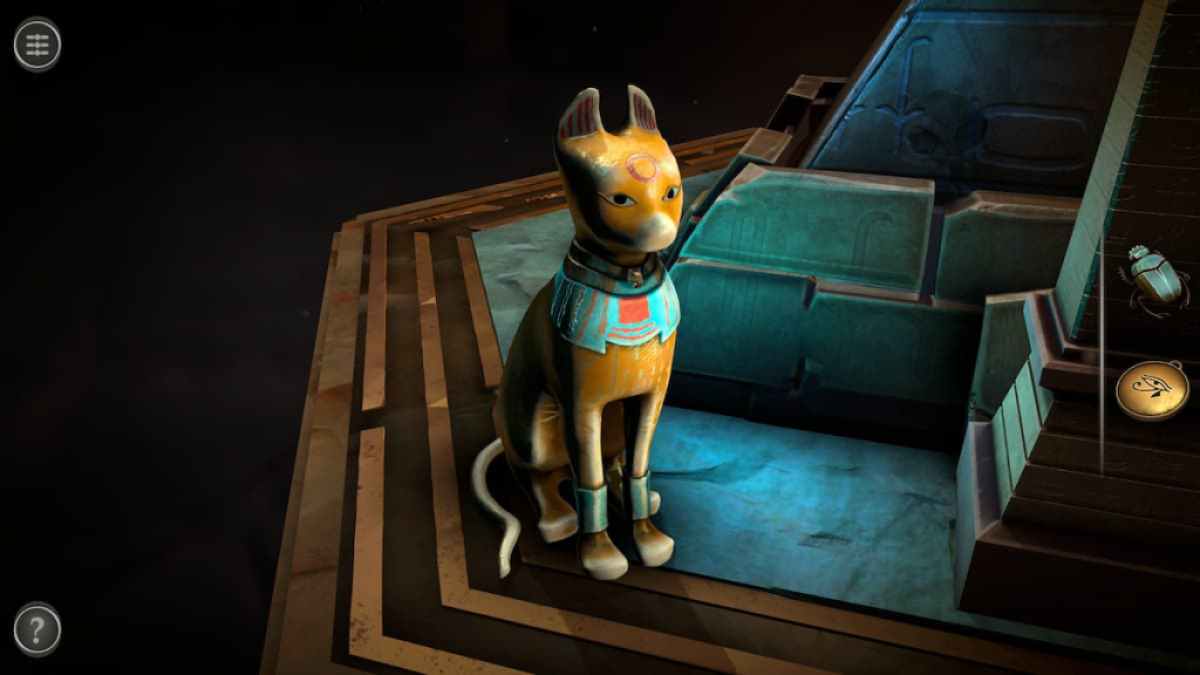
The qat statue by the period has a Medallion on its collar . snaffle it now .
Screenshot by Pro Game Guides
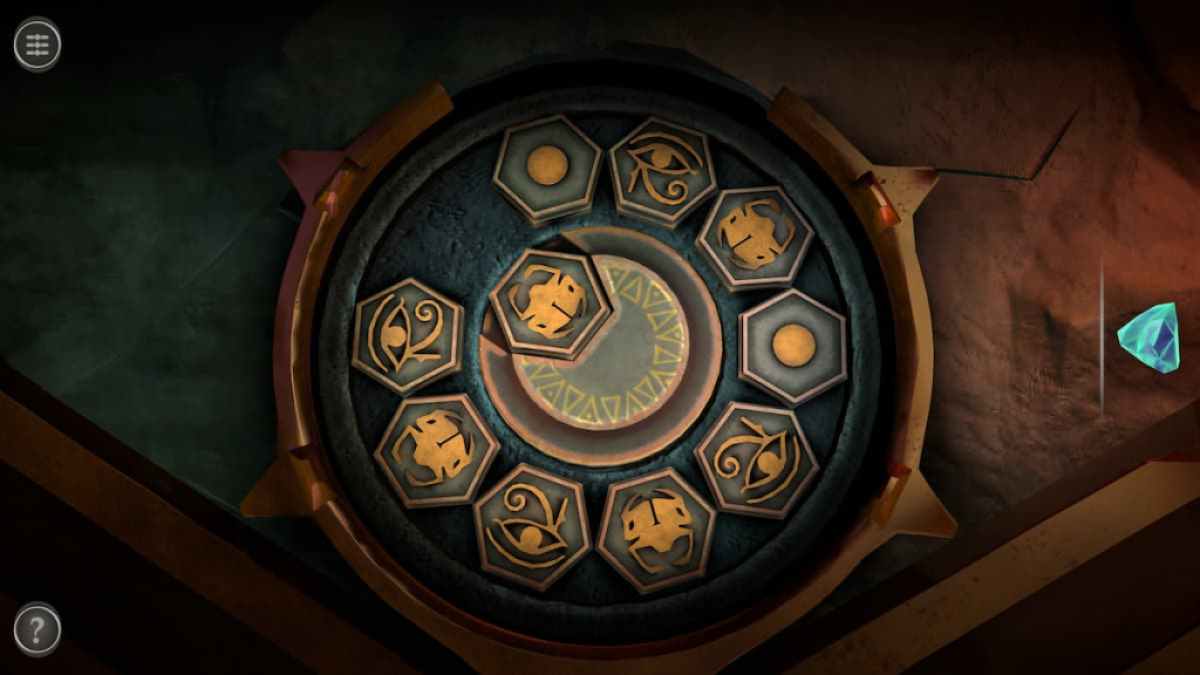
localize the Medallion in the circle at the front of the period .
This flips the center , let out the base for a slider .
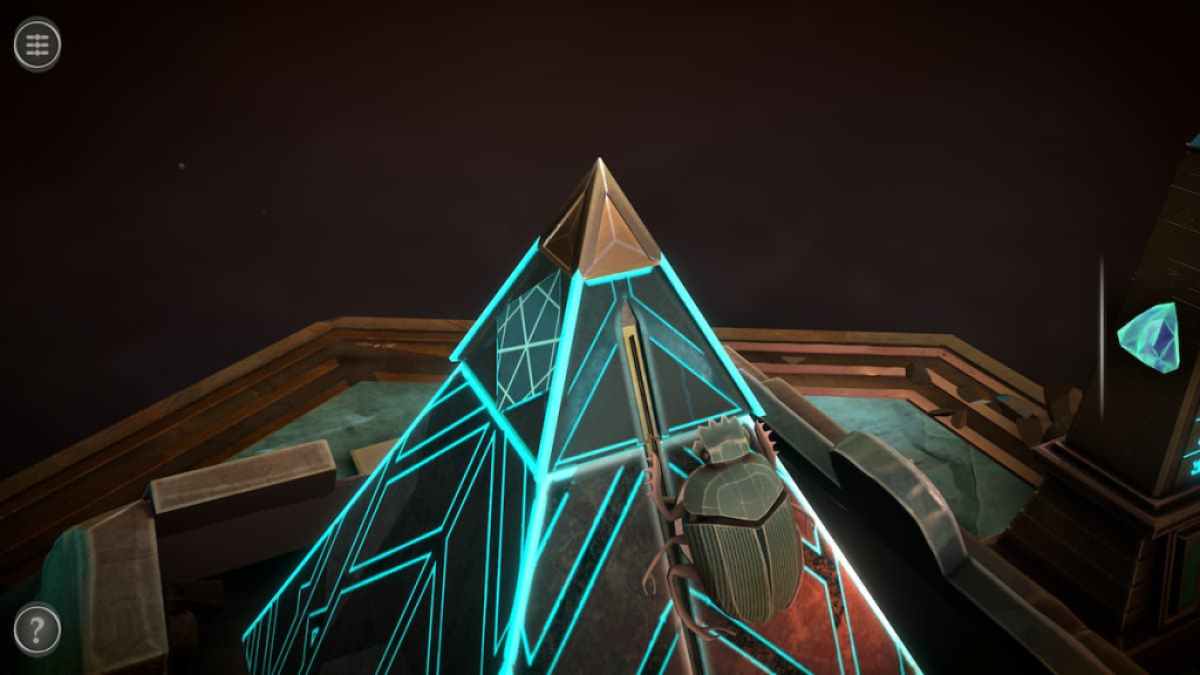
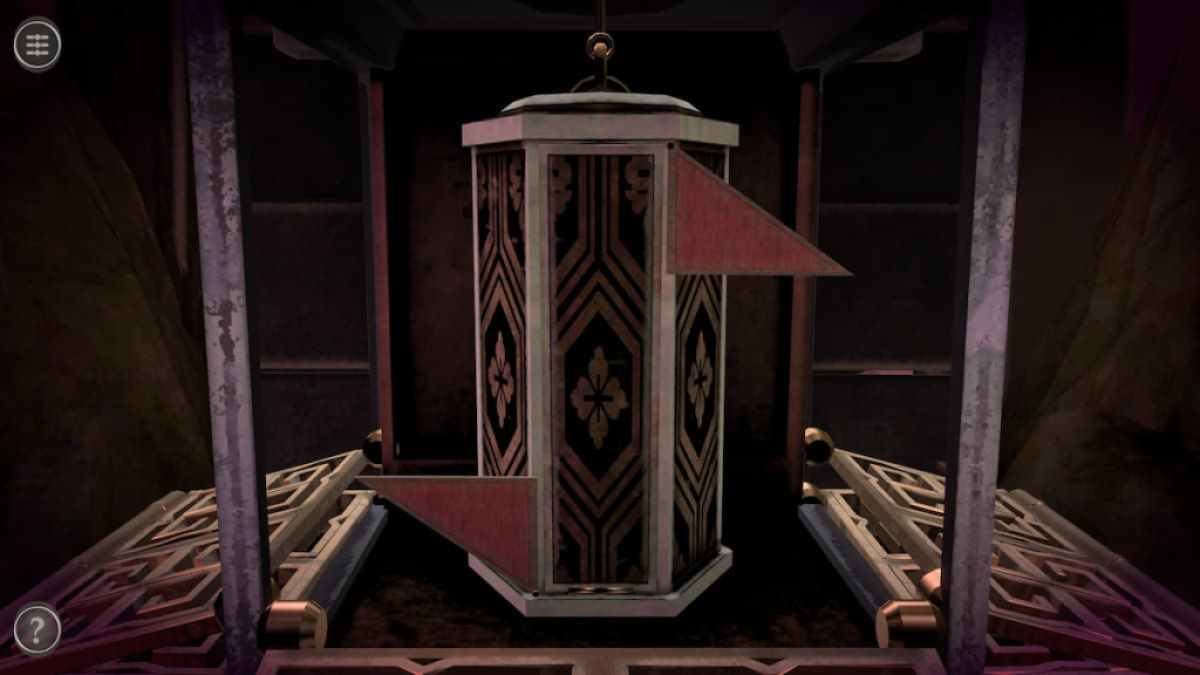
range the Scarab onto the slider and push it up to remove the outer layer of the Great Pyramid .
Screenshot by Pro Game Guides
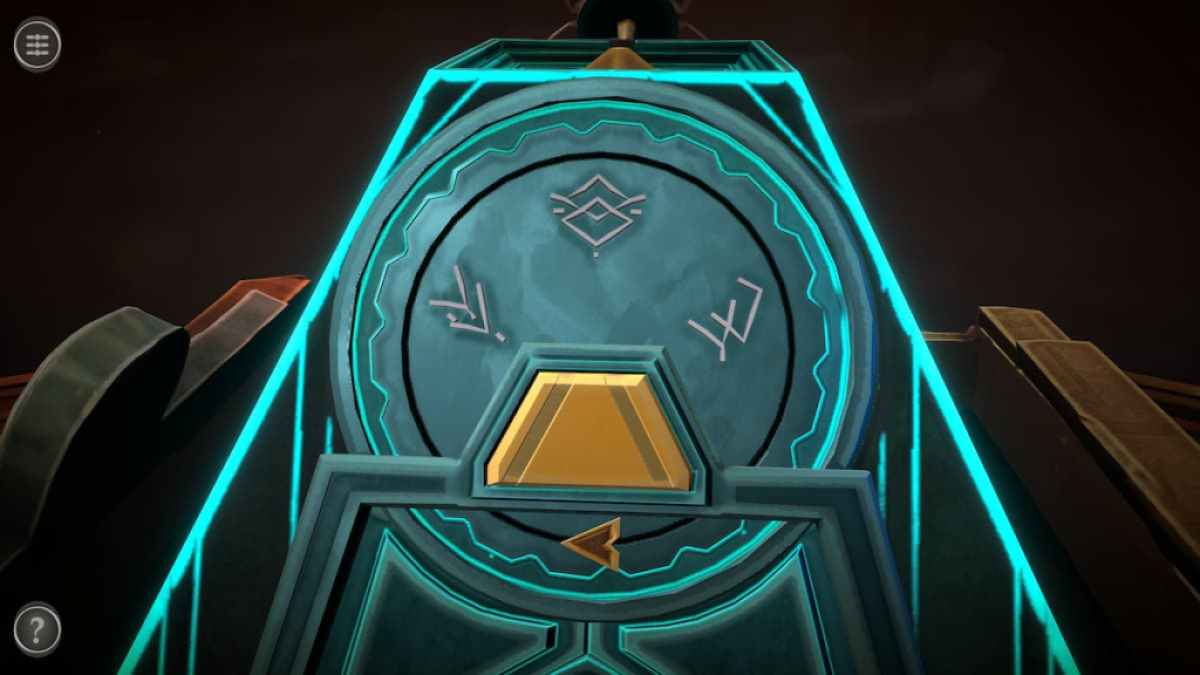
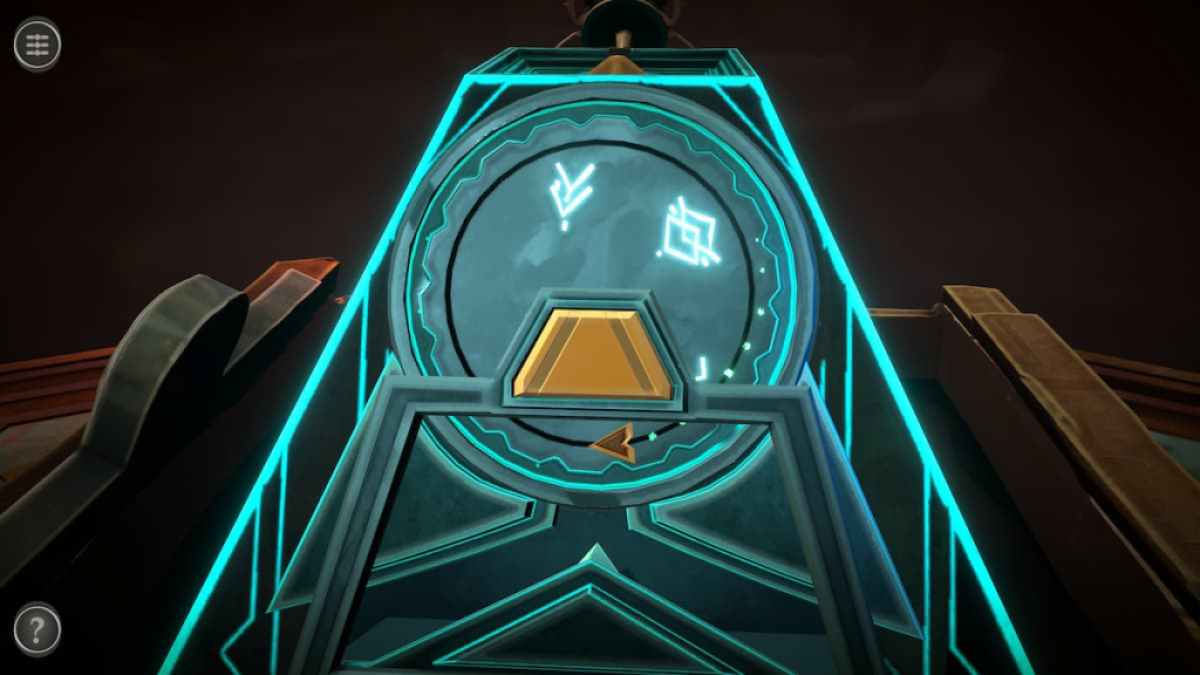
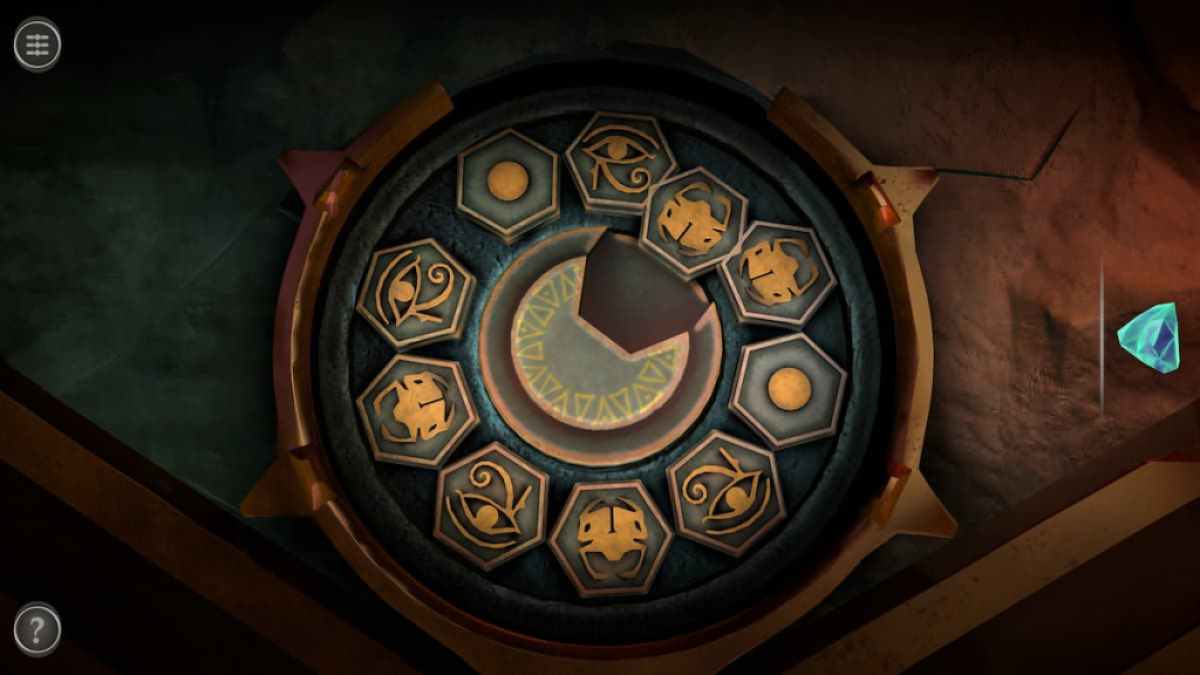
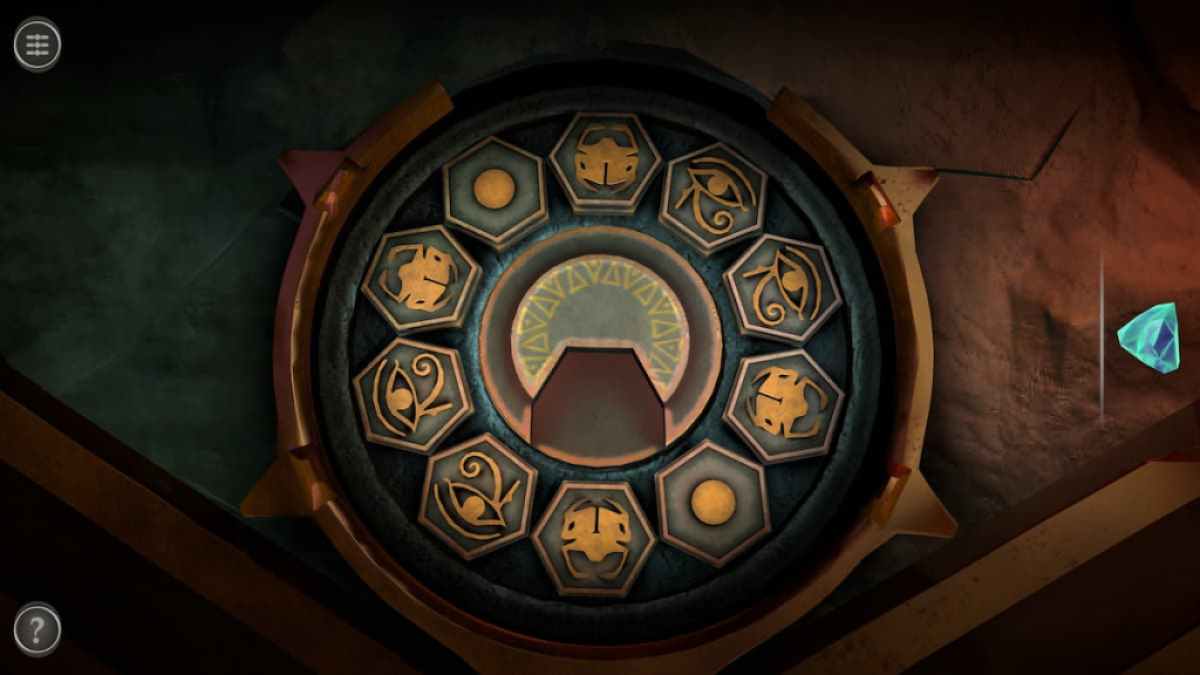
In this puzzle , press the clit once to station it fly and press it again to stop it in front of one of the symbols .
Do this for each symbolization to light them all up . Once light , the mystifier will move to give you a Small Crystal .
Related : Vanishing Act walkthrough ( Adventure Escape Mysteries )
Screenshot by Pro Game Guides
Move the two panels off of the rophy in front of the pyramid to reveal a puzzle .
This puzzle acts similarly to those online house of cards shooter games . start by rotating the center and sliding a piece into it .
Then , " pip " the piece out of the center by splay the core to face where you want it to go and slip the piece of music out of it .

Screenshot by Pro Game Guides
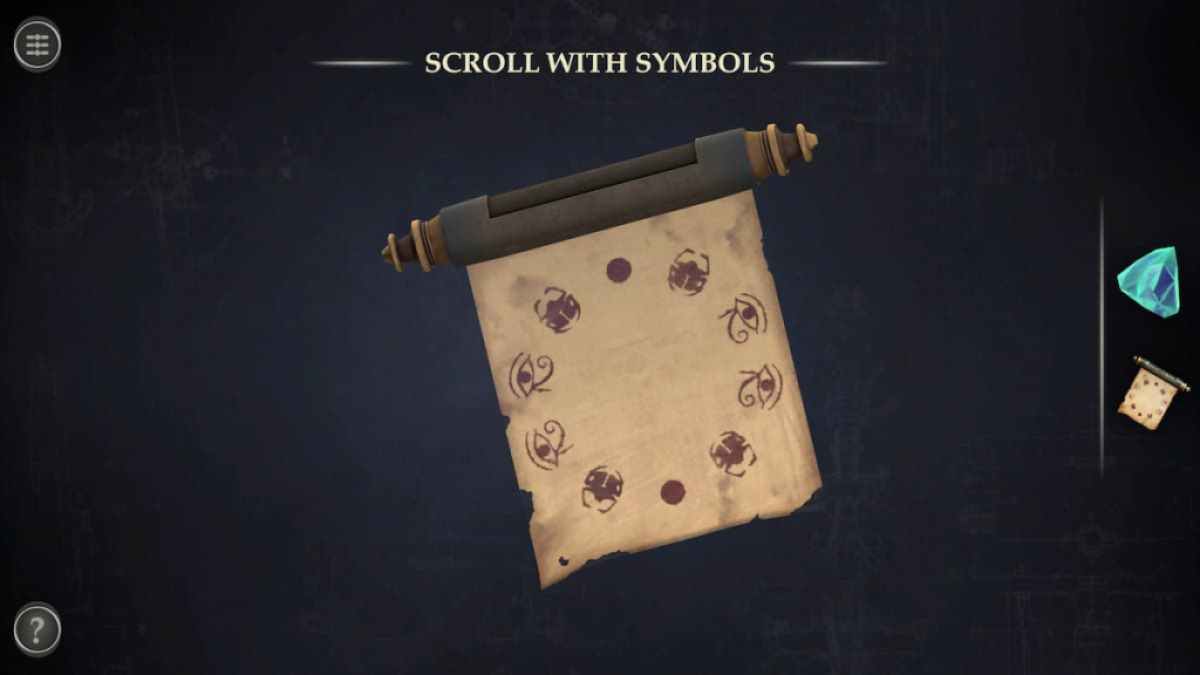
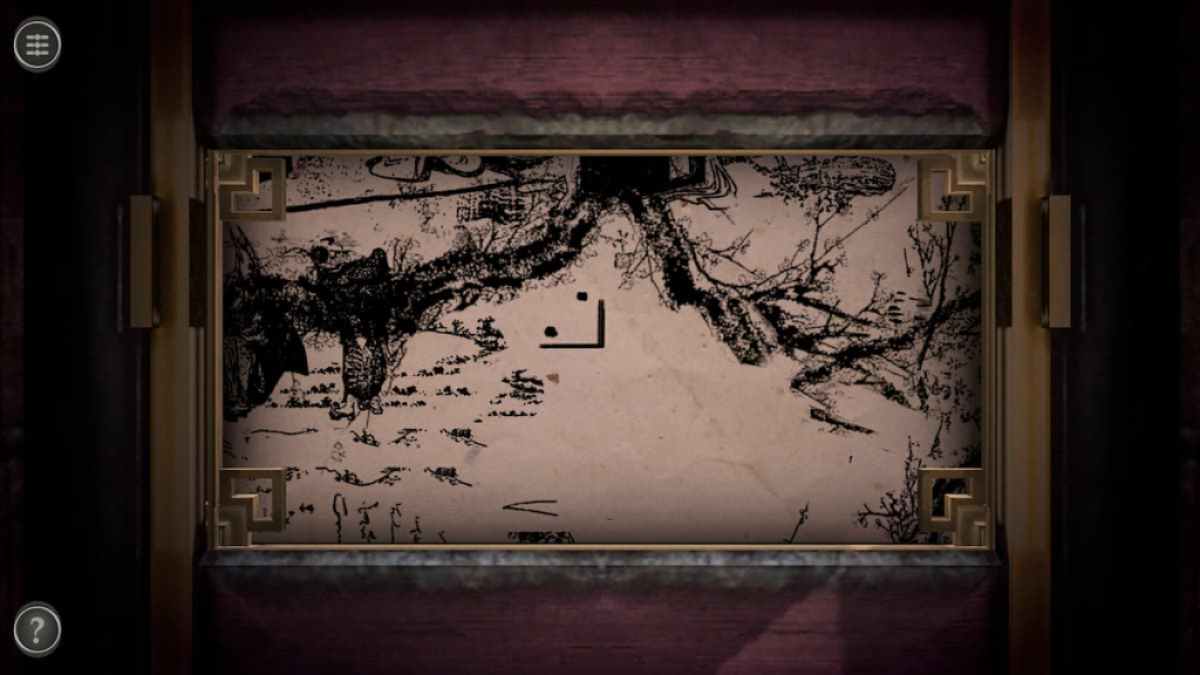
To solve this teaser , you postulate to grab a curlicue hidden in the left-hand side of the Great Pyramid .
launch the Scroll in your inventory and unravel it to create a Scroll with Symbols . The symbols on the curlicue reveal the ordination the pieces demand to be in .
Completing the teaser gives you a Strange Pyramid .
Screenshot by Pro Game Guides
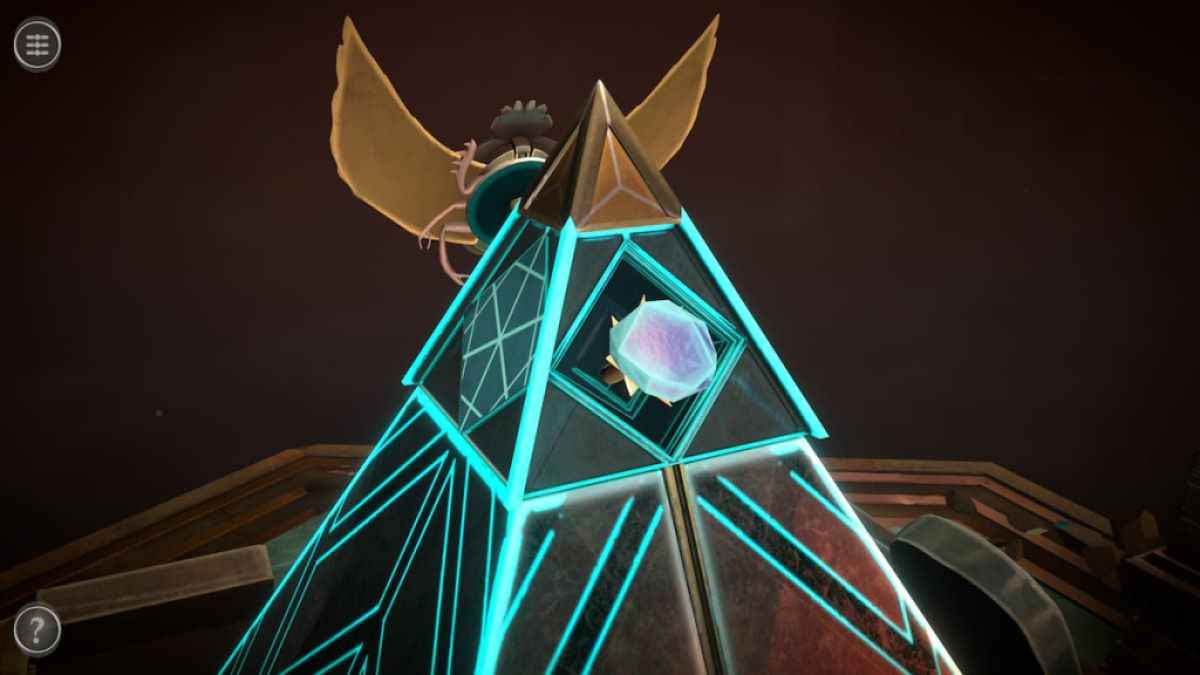
site the Strange Pyramid on top of the Pyramids of Egypt .
Push the Scarab to the top to open up a small compartment at the top of the Pyramids of Egypt .
pose the Small Crystal into the compartment to finish the teaser .

Screenshot by Pro Game Guides
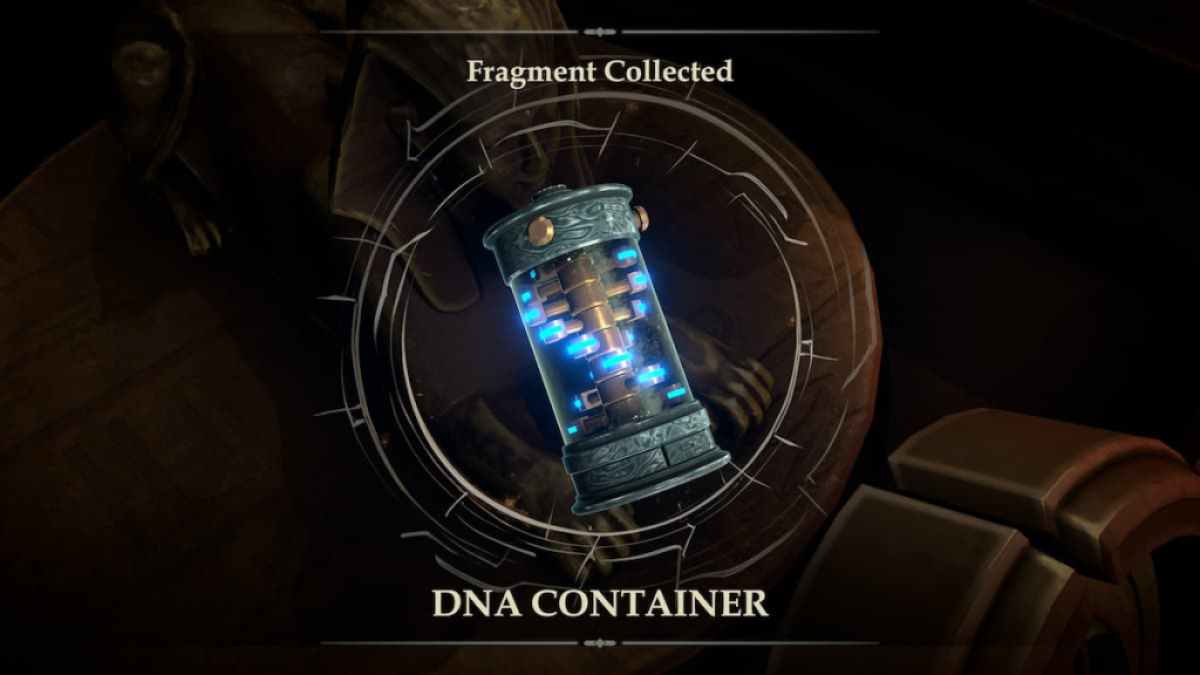
Afterward , the top of the pyramid will disappear . A sphinx holding the desoxyribonucleic acid container is launch in the nitty-gritty . Grab it and give-up the ghost the grade .
Room four puzzles
The room access to the concluding room will be open .
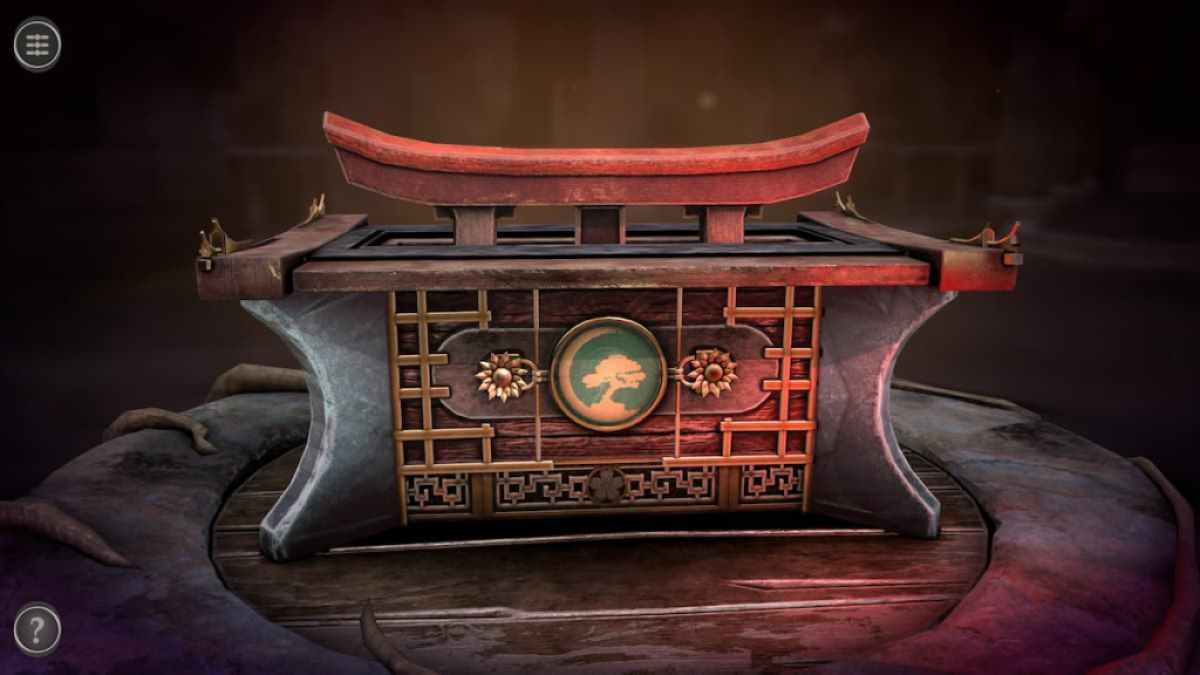
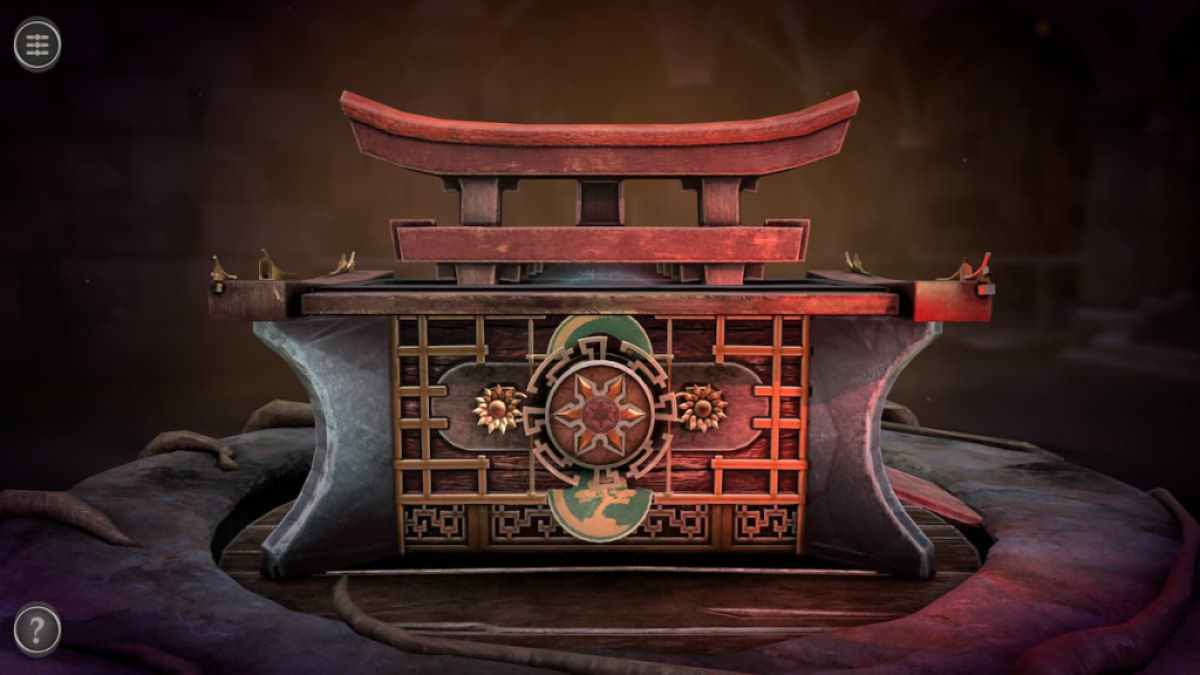
The box seat take stirring from Nipponese computer architecture .
The golden ornamentation on the front entrust recess of the box ’s roof is a slider . Move it to the left .
Screenshot by Pro Game Guides
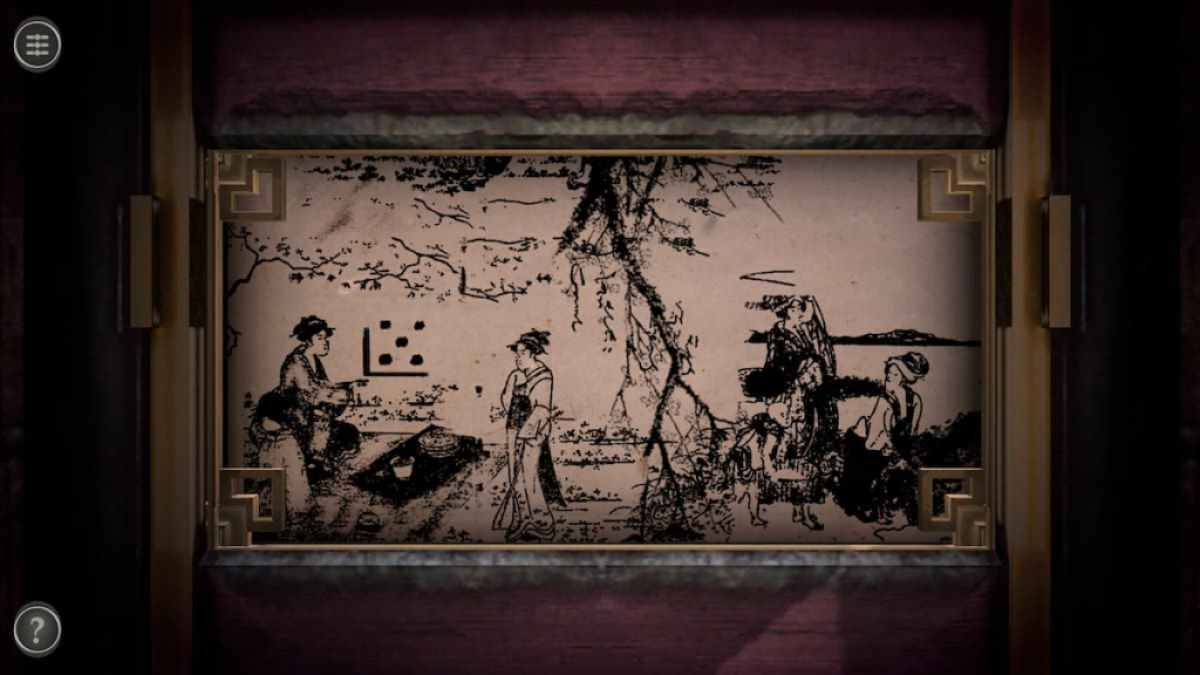
Using the slider unlocks a house painting puzzle on the left-hand side of the box .
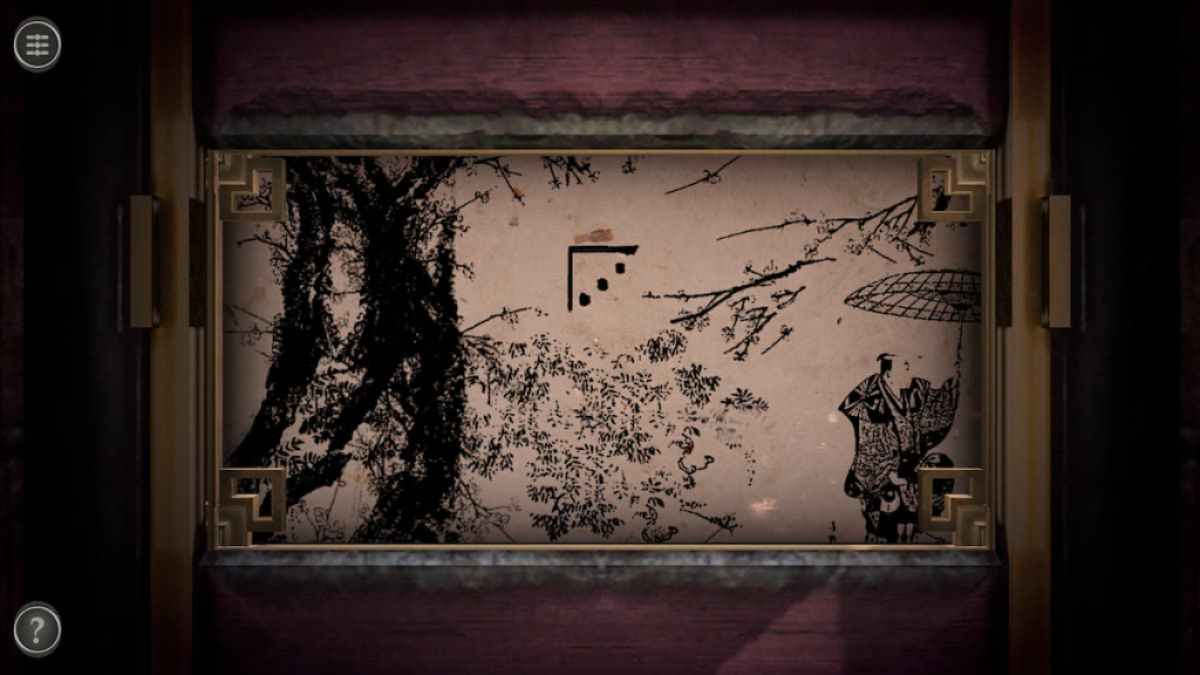
There are four delineation of dice in the mystifier that serve as hints for the next puzzle . Pay tending to the Book of Numbers on the dice as well as the dividing line painted around them . The mental image of the dice with the number 3 has the top and lead borders painted , incriminate that it ’s in the upper unexpended corner of the next mystifier .
The die with the number 4 has its top and right sides painted , localise it in the upper ripe corner .
Screenshot by Pro Game Guides
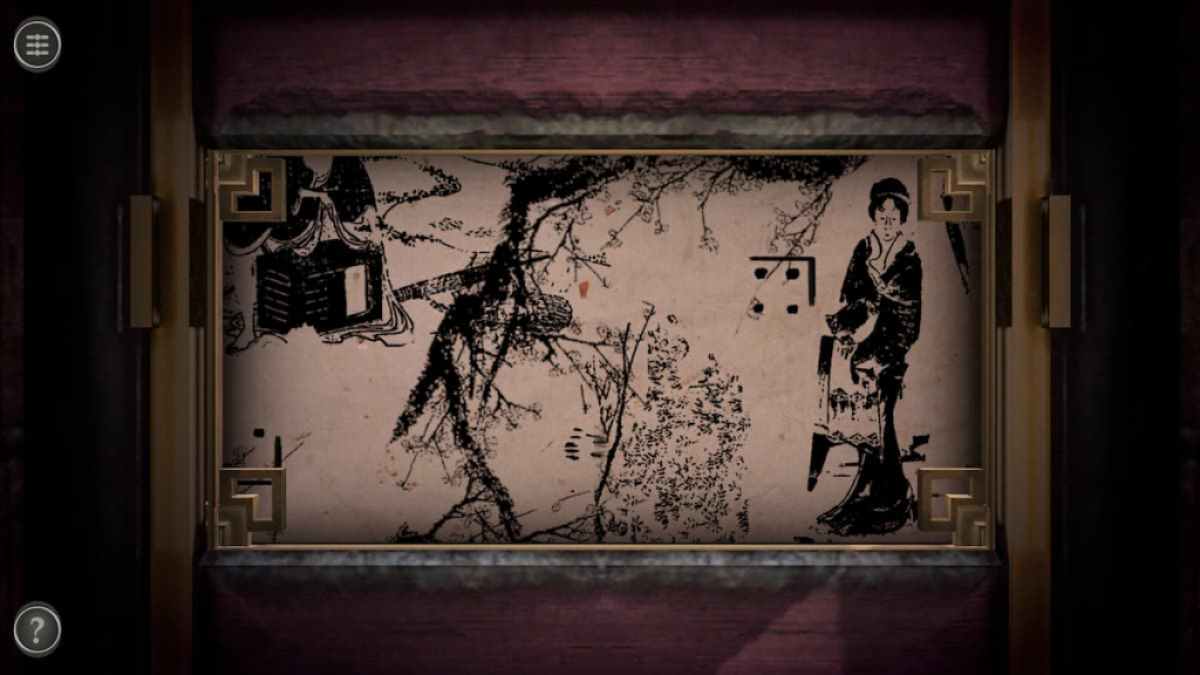
The dice with the routine 2 has the bottom and right line paint , so it will go into the bottom correct corner .
The last dice , number 5 , has the left and bottom lines painted . This pose it in the broken left corner .
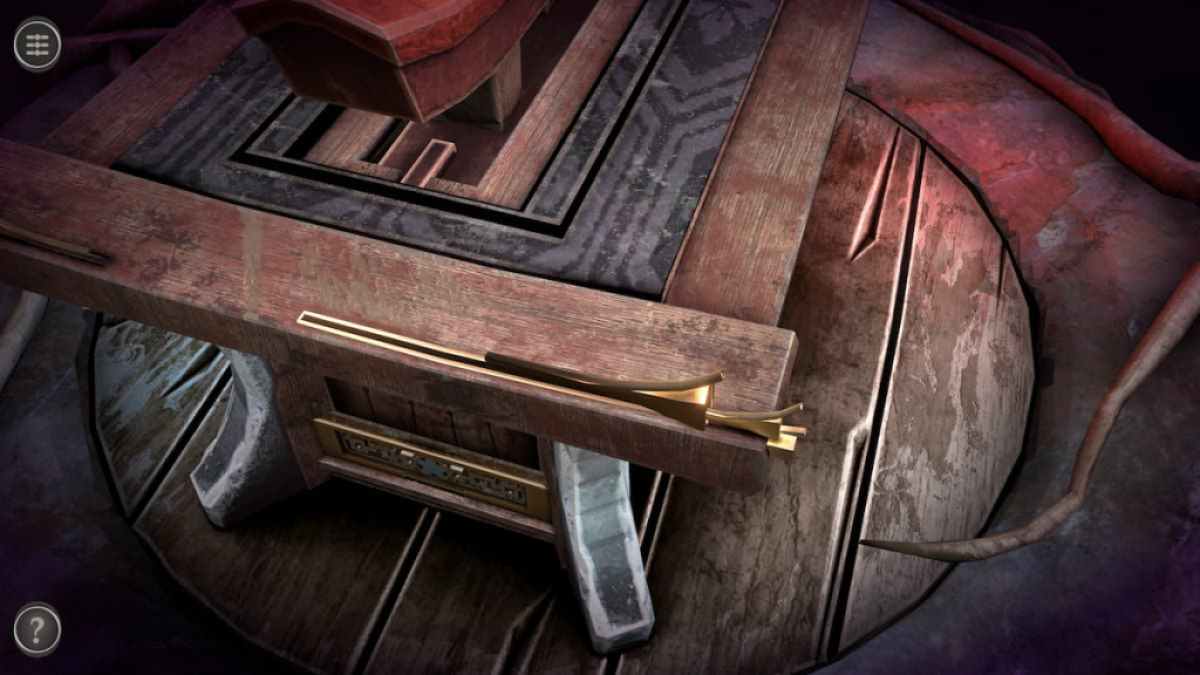
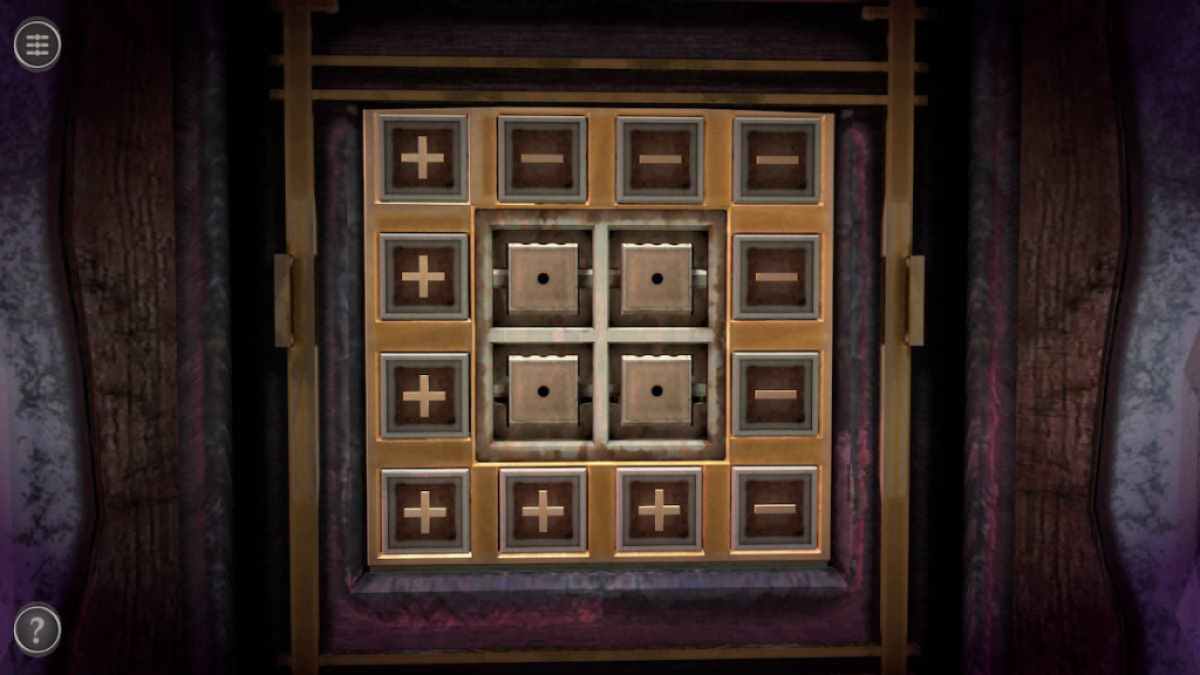
The right side of the box has a puzzle with five spinnable pots .

Screenshot by Pro Game Guides
Rotate the upper entrust one to find a violent electrical switch . Pull it to reveal the next puzzler .
The goal of this puzzle is to get the number on the dice to oppose those on the painting .
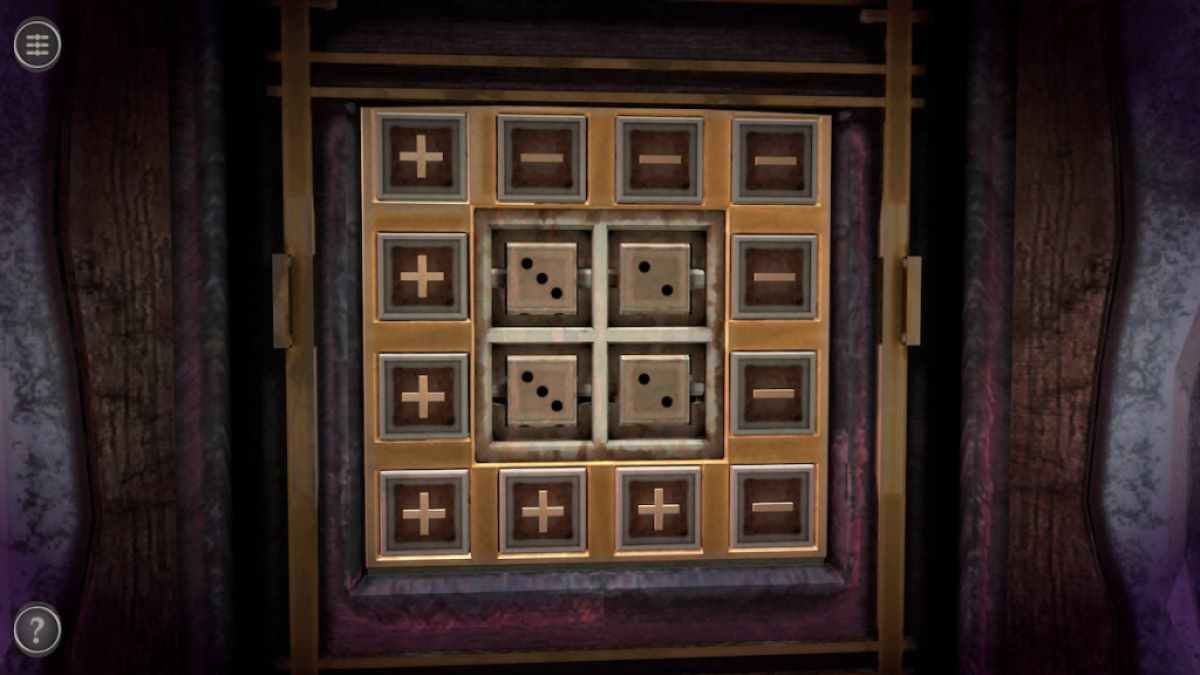
The upper left die should be a 3 , the upper good dice should be a 4 , the low right die should be a 2 , and the lower unexpended dice should be a 5 . set off by making adding two to the dice on the left wing using the plus sign of the zodiac beneath them , make each one deserving three .
Screenshot by Pro Game Guides
Repeat the process on the correct two die with the plus sign beneath them to make them equal two .
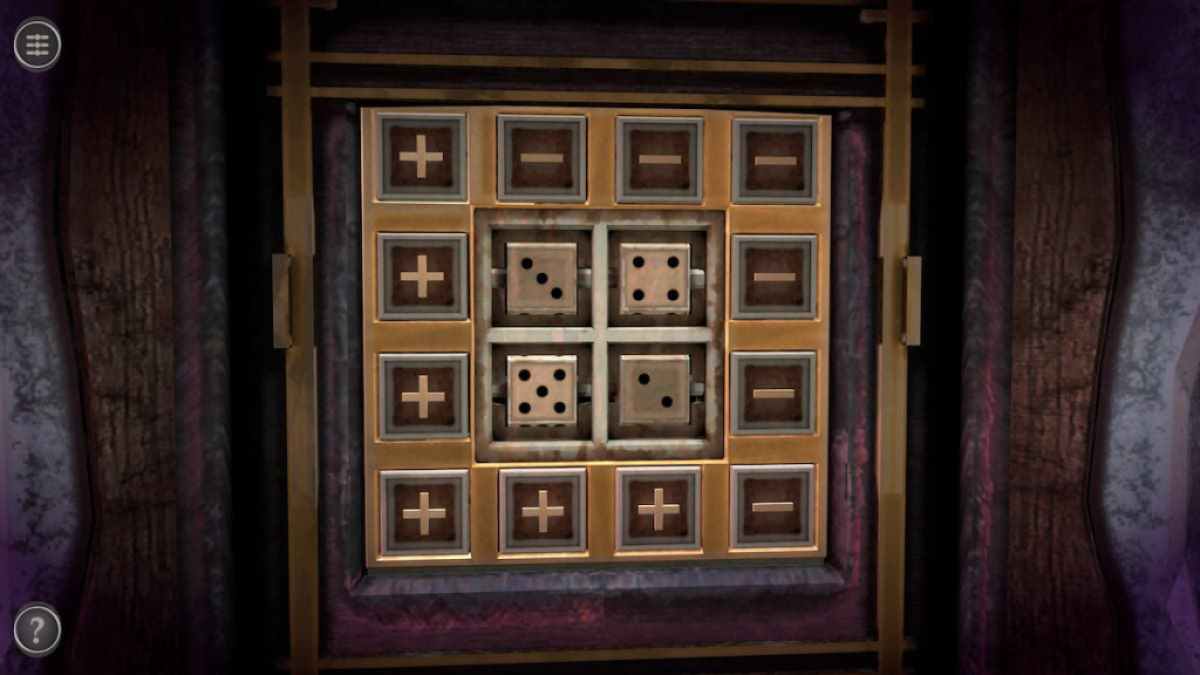
Complete the puzzle by tap the plus sign in the depressed left corner doubly . The teaser will be solved , giving you a Bronze Handle .
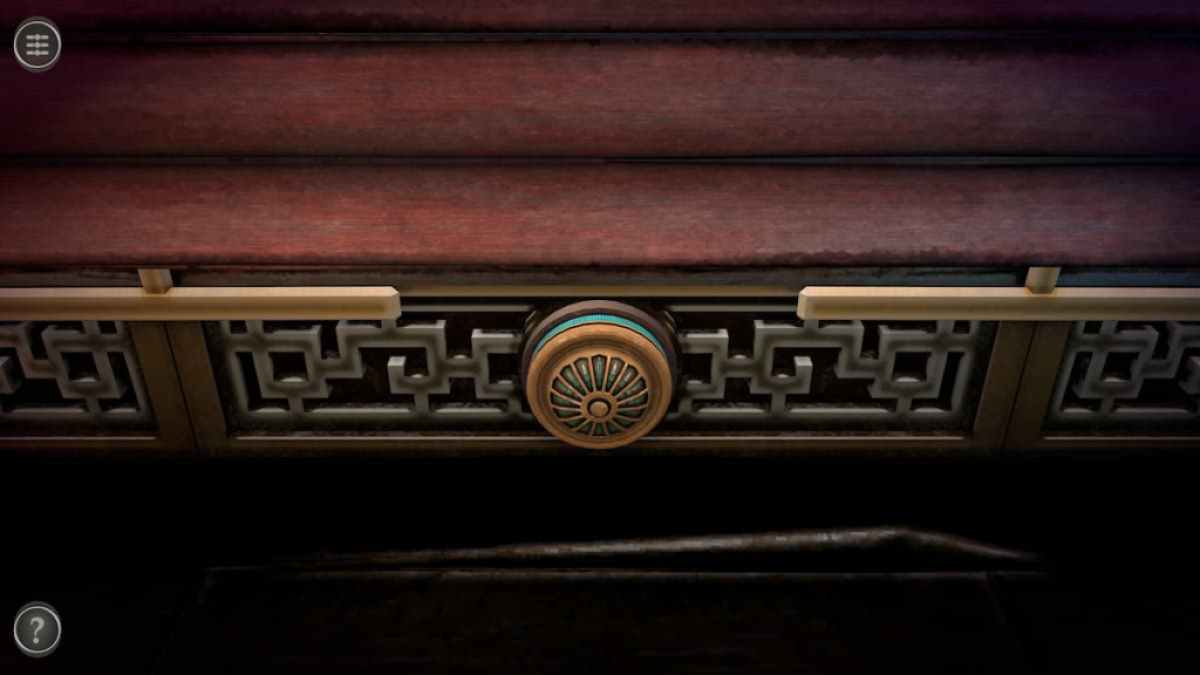
Add the Bronze Handle into the circular vallecula at the back of the boxwood .
Screenshot by Pro Game Guides
This remove the blinds cross the puzzle above it .
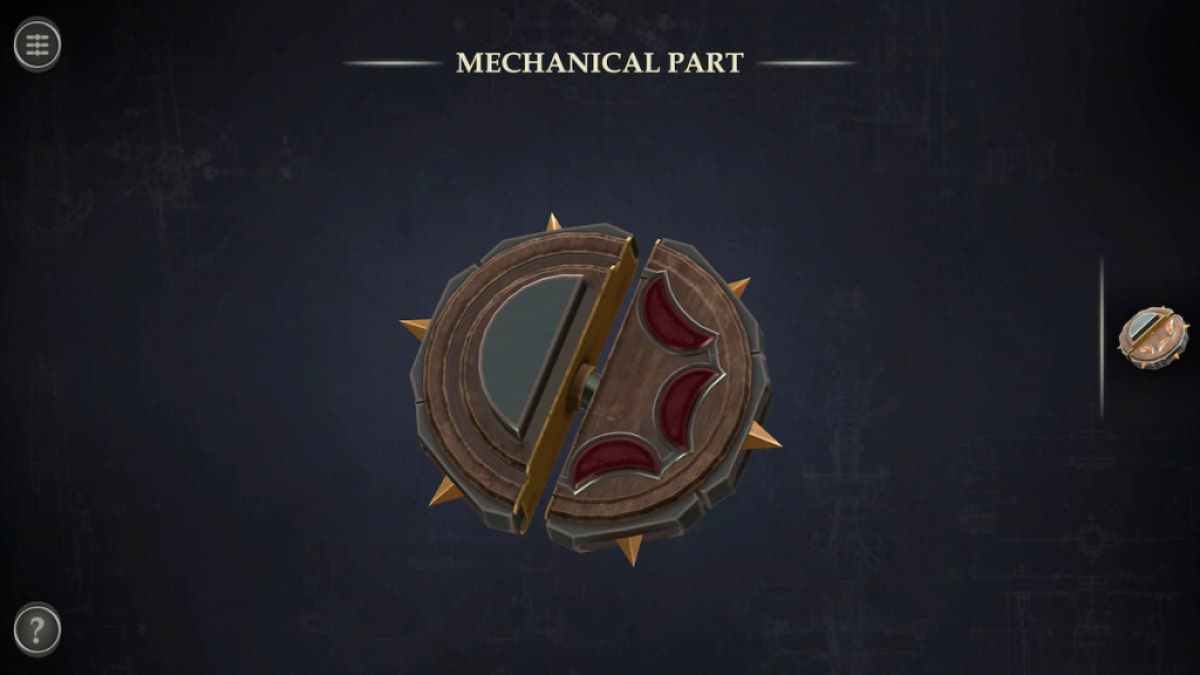
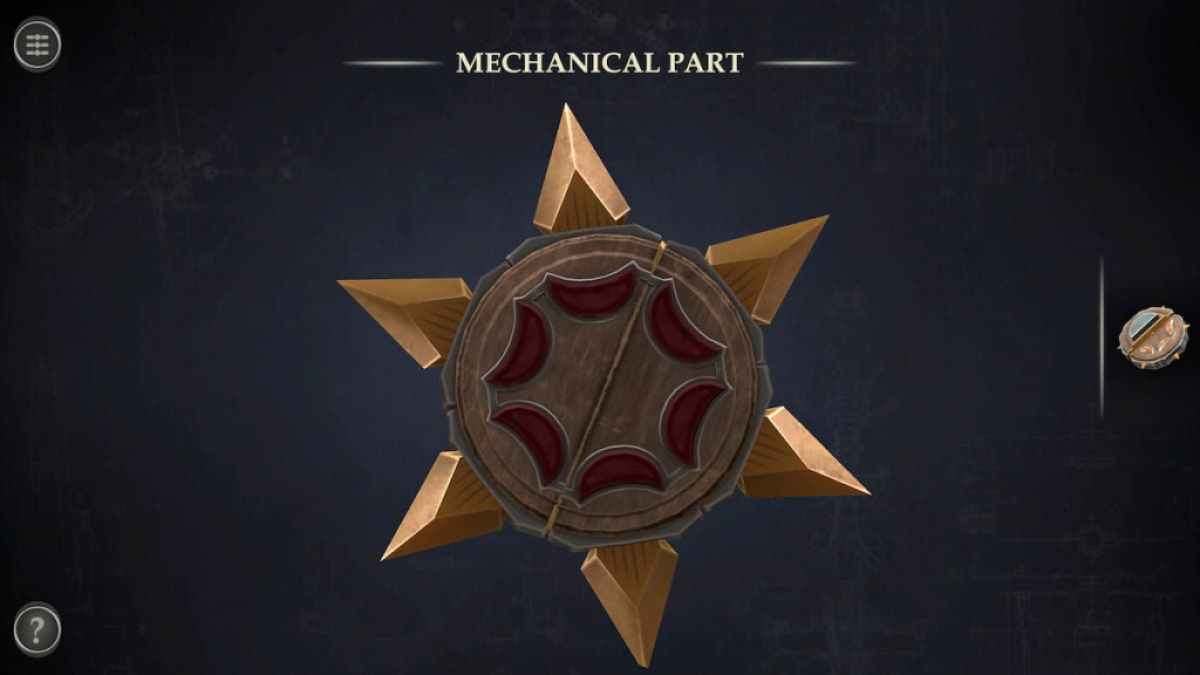
To resolve this puzzle , use the odd and good buttons to spread out the ring . Whatever piece land underneath the reddened arrow will be flipped . The left push button rotates the ring two pieces clockwise , while the right button rotates the annulus three while clockwise . Turning all of the pieces Marxist gives you a Mechanical Part .
start the Mechanical Part in your stock-taking .
Screenshot by Pro Game Guides
Rotate the left over one-half until the piece combine and the spikes bolt down out .
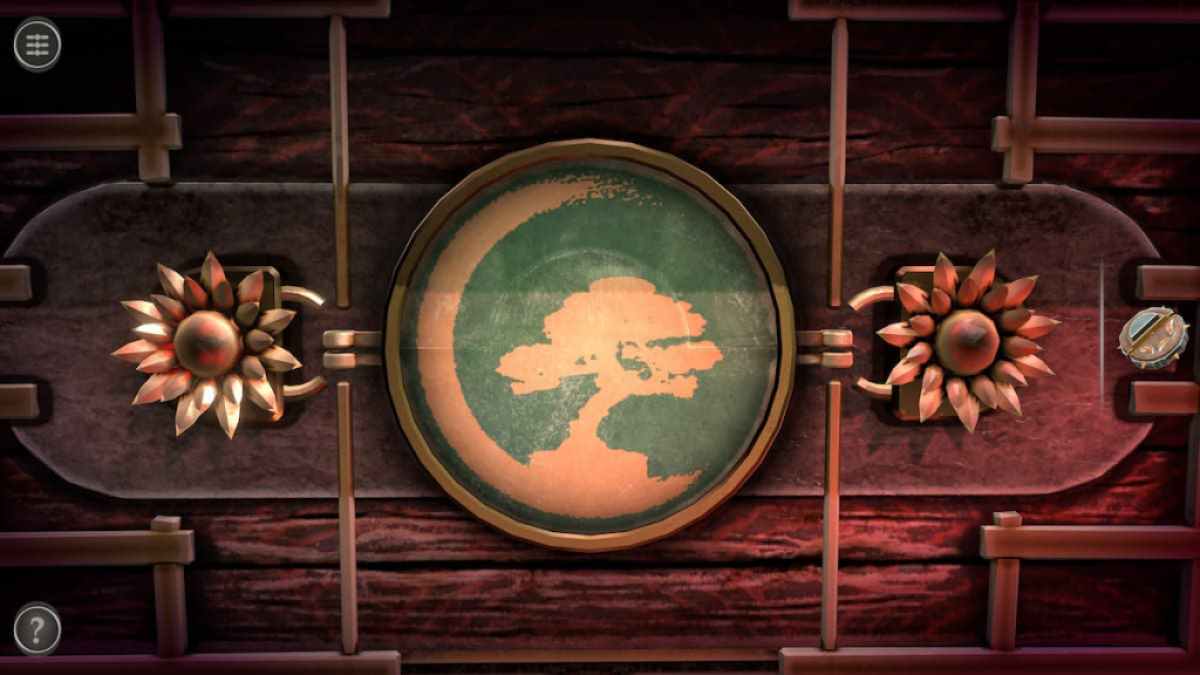
The next puzzler to shape on is the front door .
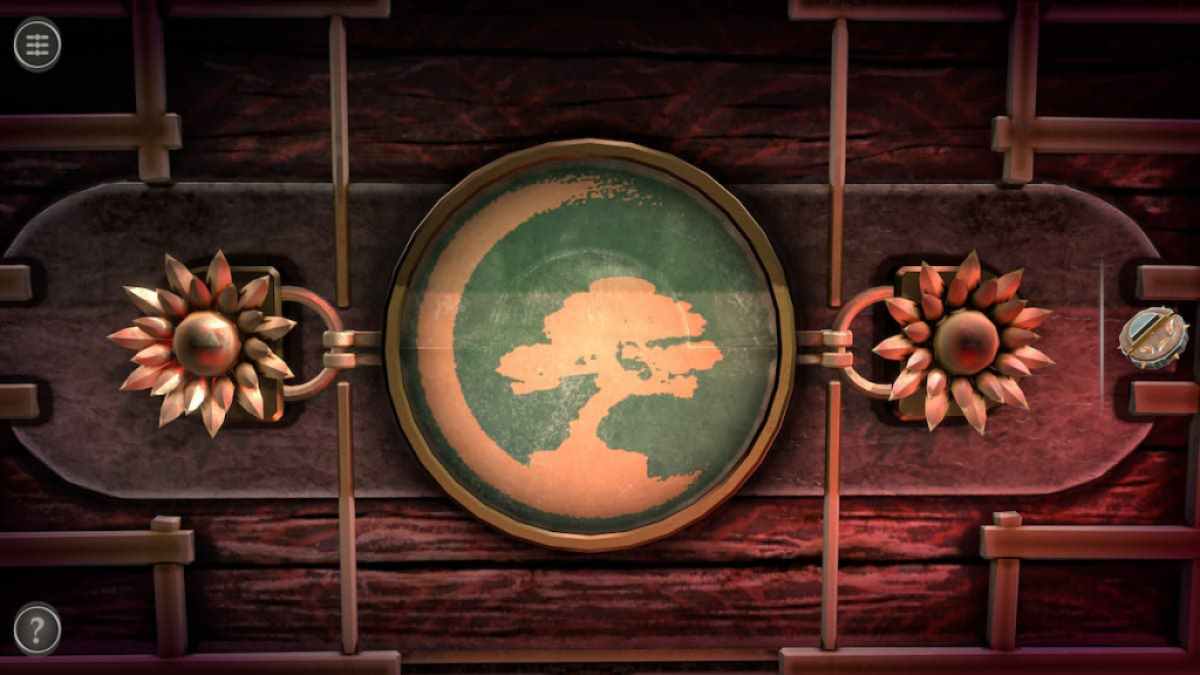
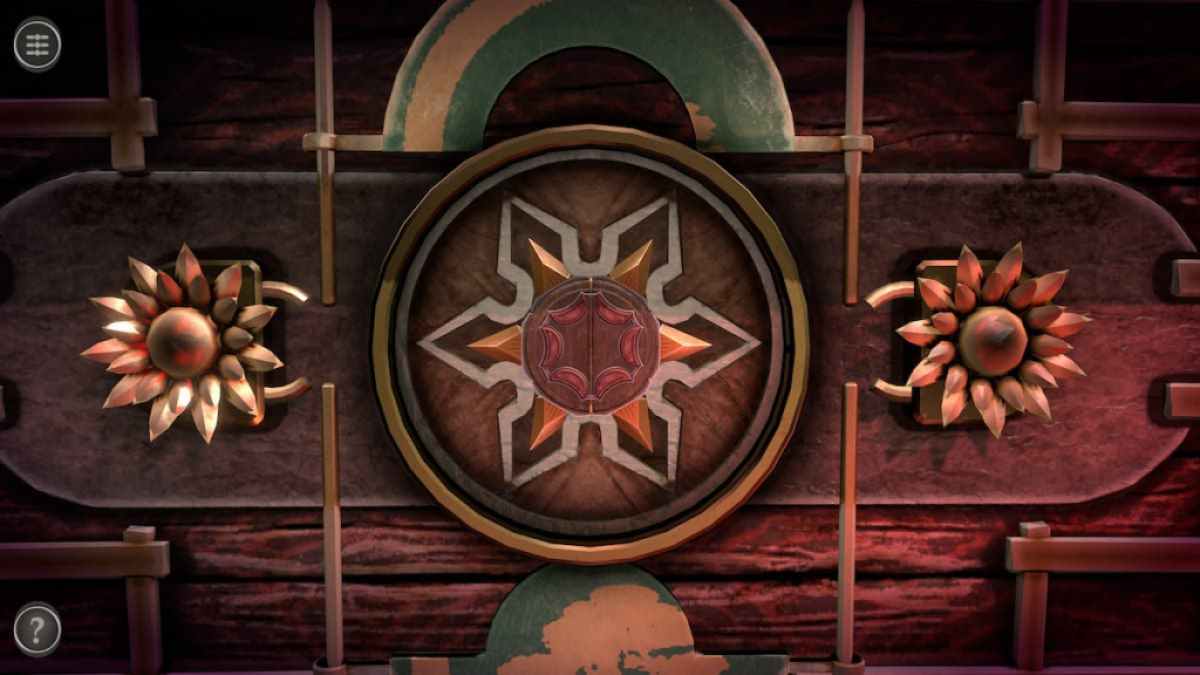
Spin each of the flowers until their whorl are disconnect from the image of the bonsai .
Screenshot by Pro Game Guides
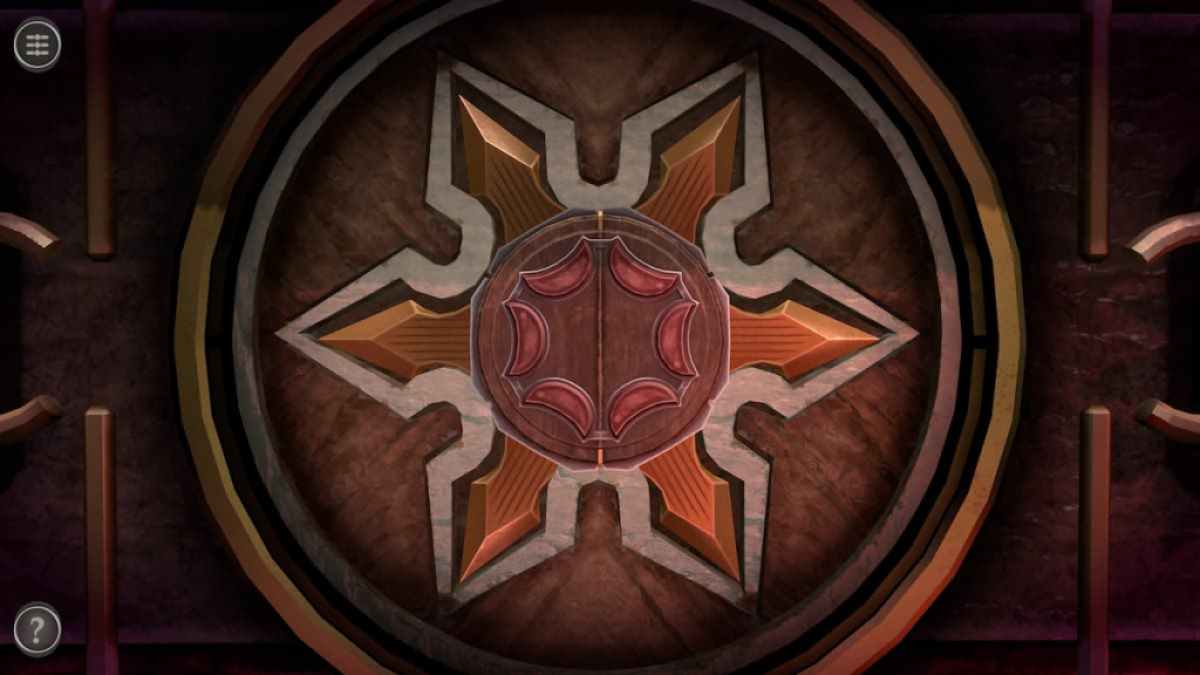
root for the top of the bonsai image up and the bottom of it down to reveal a hole . site the adjusted Mechanical Part here .
To unlock the threshold , you demand to press the six red buttons on the Mechanical Part in a specific Holy Order . The order is :
A rack will appear behind the Mechanical Part .
Screenshot by Pro Game Guides
whirl the Mechanical Part and the attach wheel to reveal a portal .
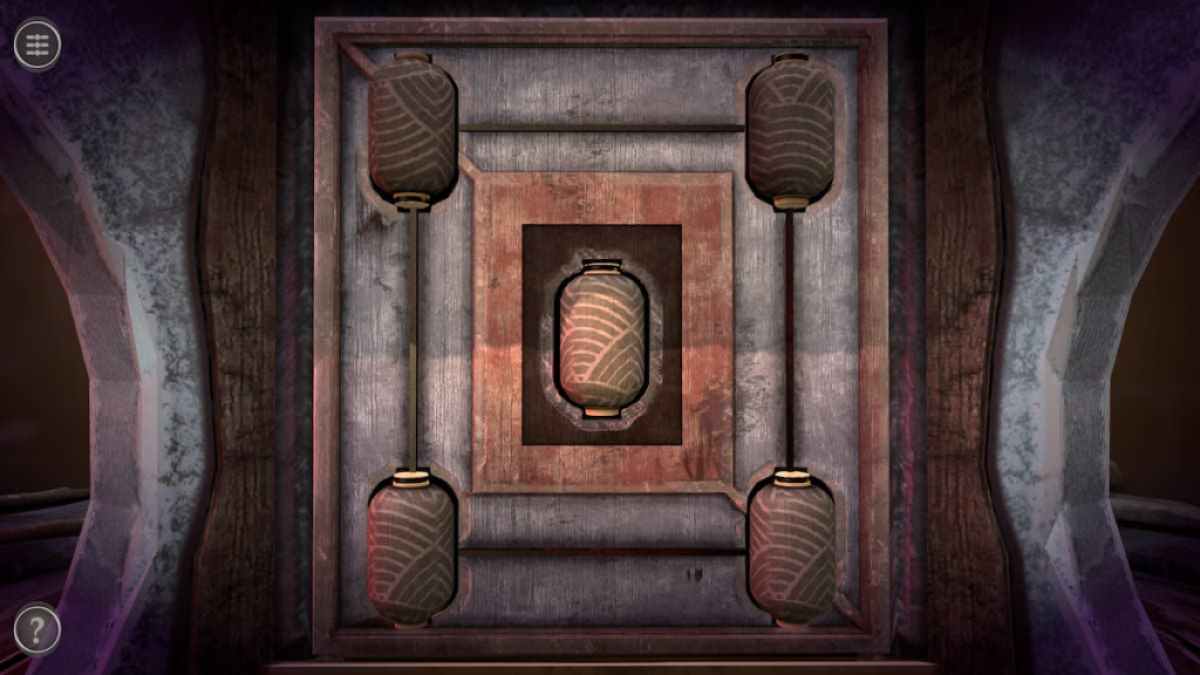
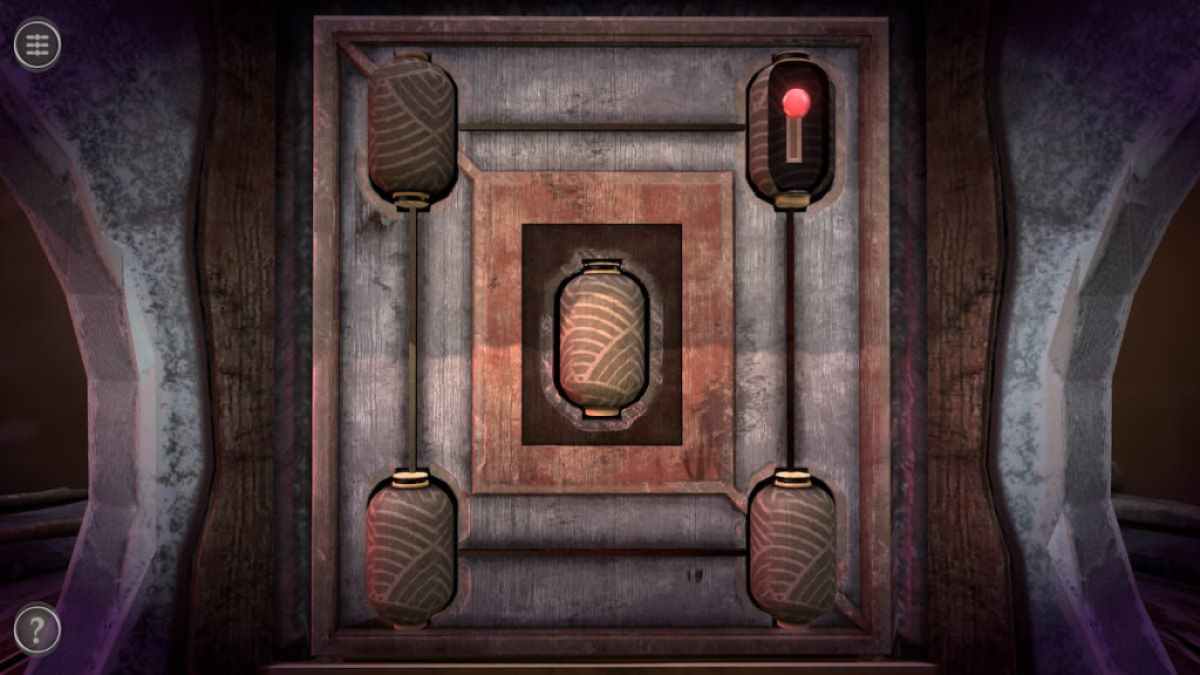
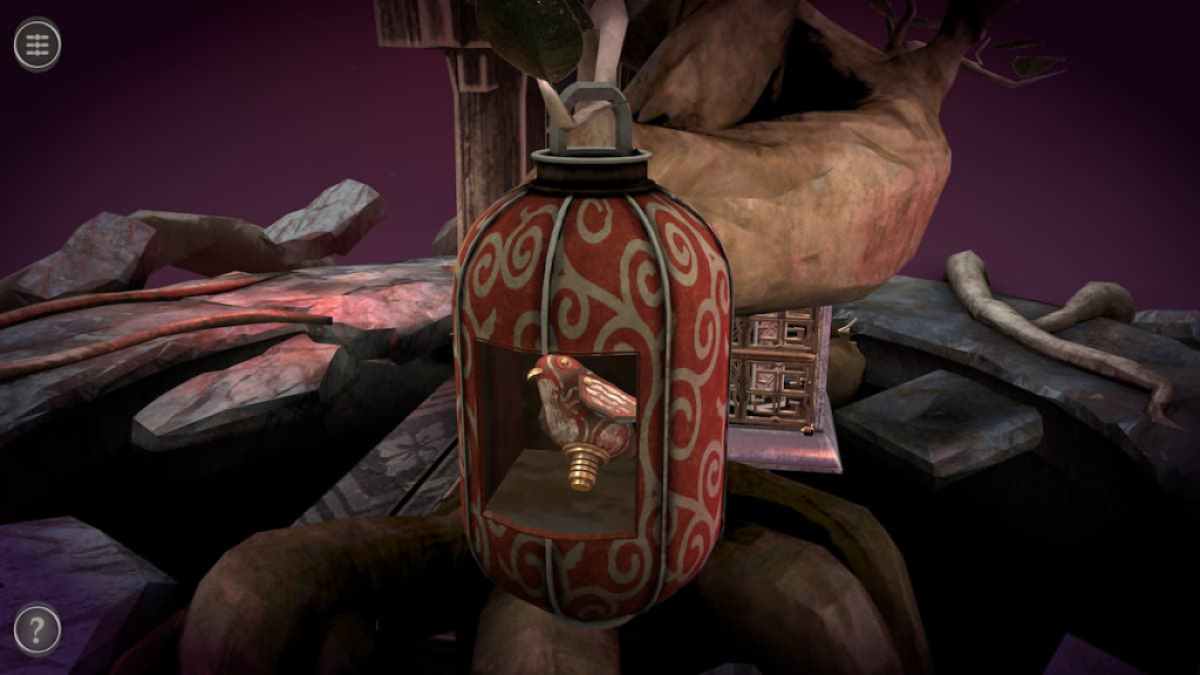
The first vena portae has two lantern and a birdcage behind it .
Rotate the lantern on the right and open its privy compartment to find a Bird Model .
Screenshot by Pro Game Guides
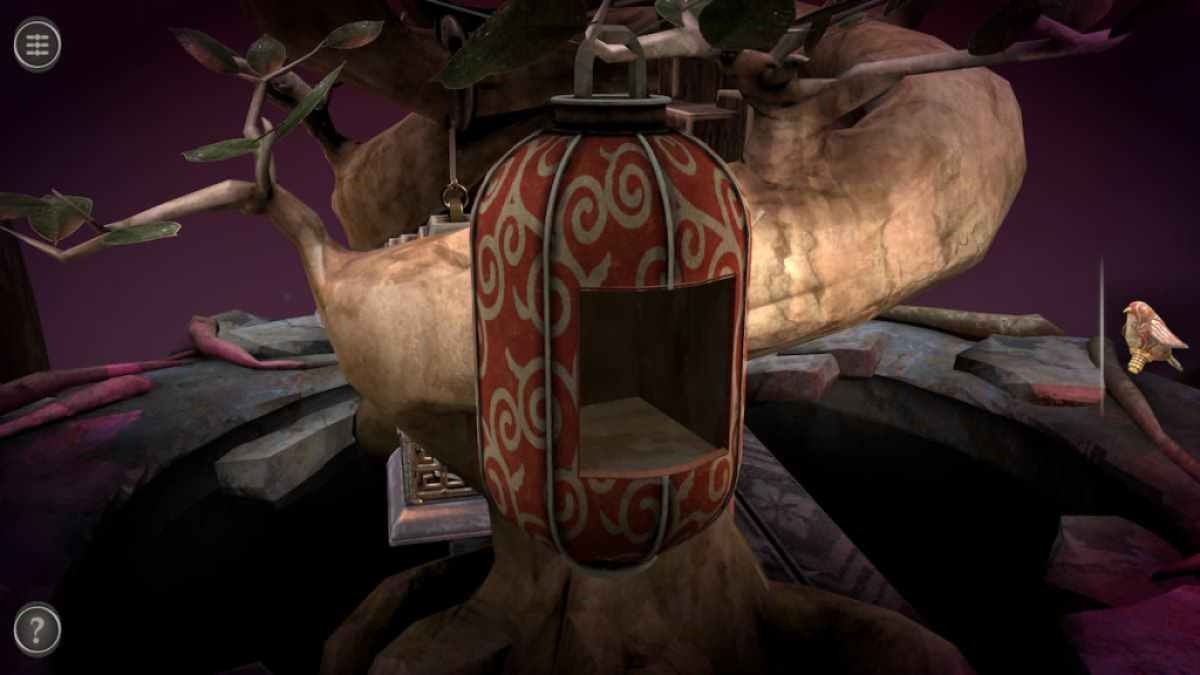
Opening the leftover lantern reveals that it is currently empty .
Screw the Bird Model into the hole on top of the birdcage .
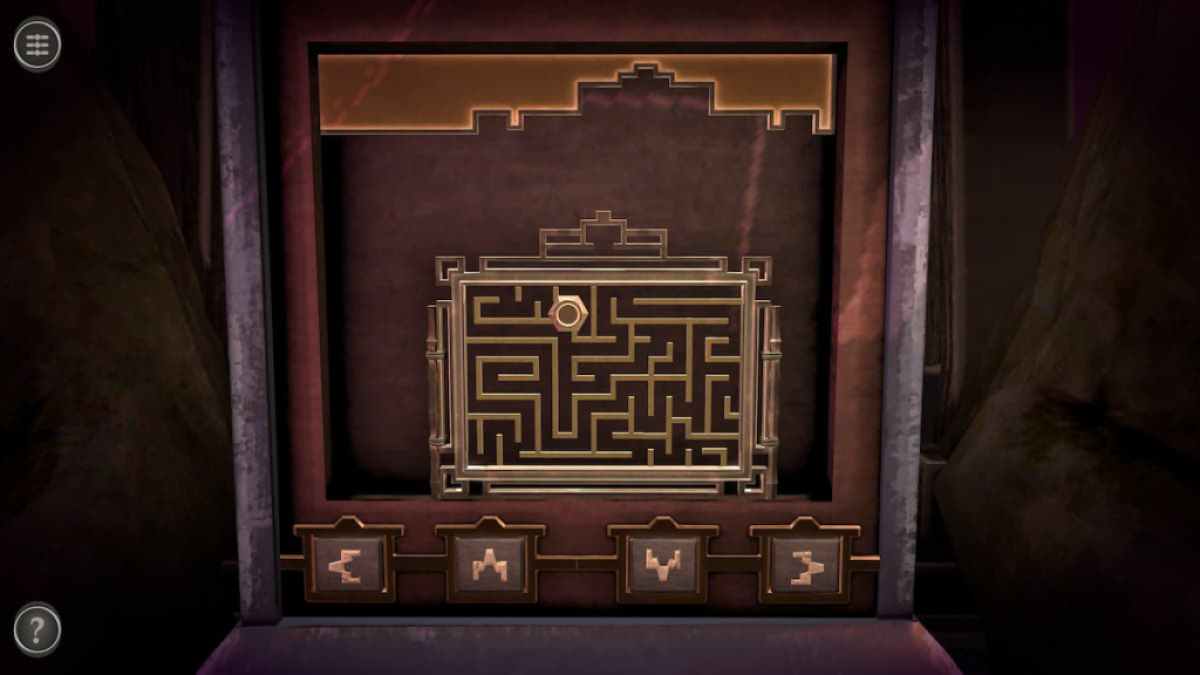
This puzzle requires start the gear from the top of the maze to the bottom by using the four arrow keys on the bird cafe .
Screenshot by Pro Game Guides
From left to rightfulness , the first key moves you left , the second up , the third down , and the 4th moves you to the right .
Getting the gear to the bottom unwrap a fatal container in the cage . Rotate it until you see the side with the crimson triangle , then pull the red triangles to the side to get a Key .
Related : Isoland 4 Walkthrough – The Anchor of Memory
Screenshot by Pro Game Guides
channelize through the first logic gate to the 2d portal location .
calculate at the box seat behind the logic gate . Twist off the top to incur a keyhole .
stick in the key into the corner and rotate . This will give you a Power Source and return you to the main room .

Screenshot by Pro Game Guides
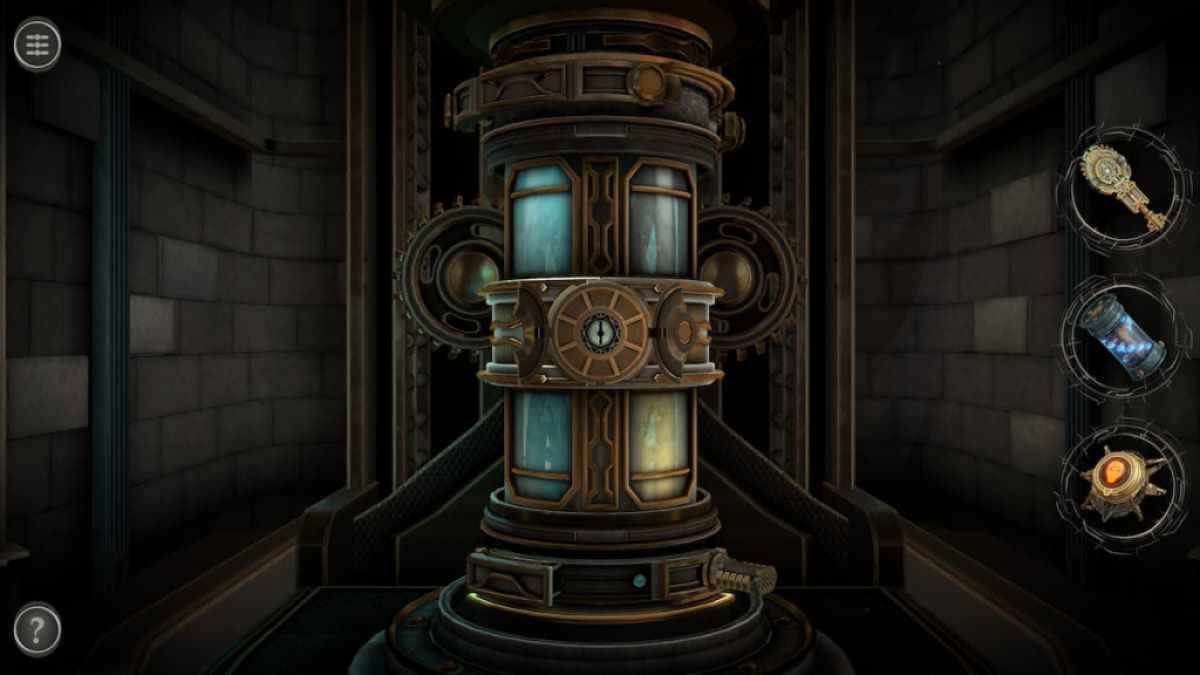
Final chamber puzzles
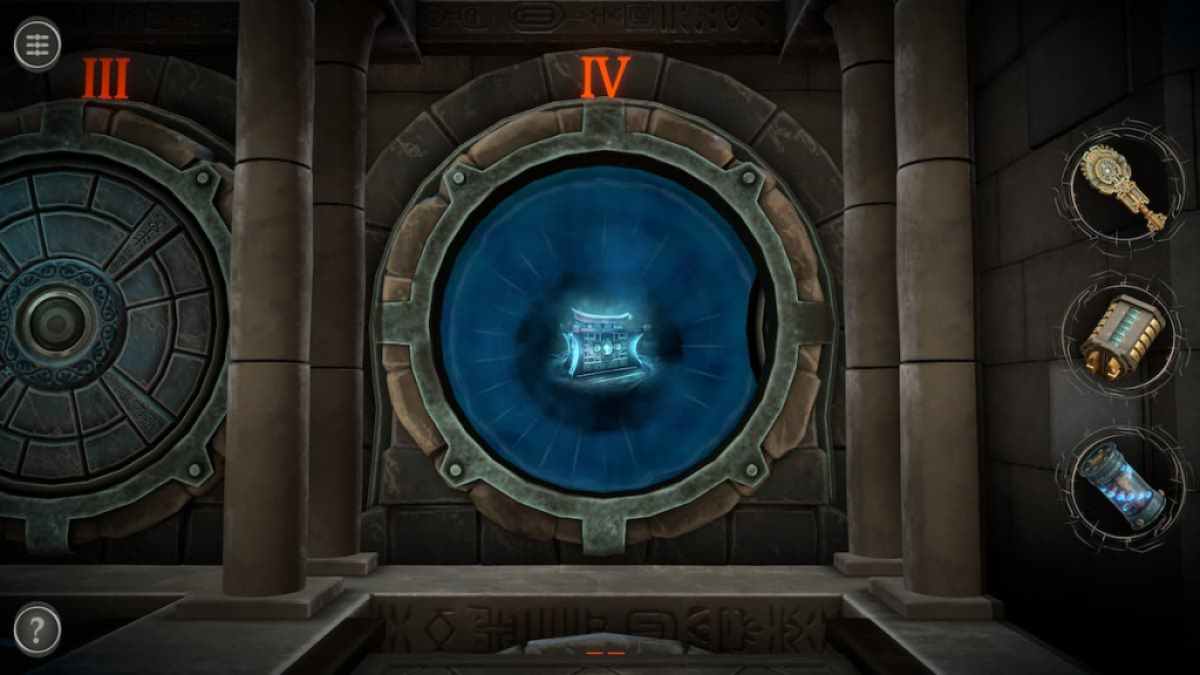
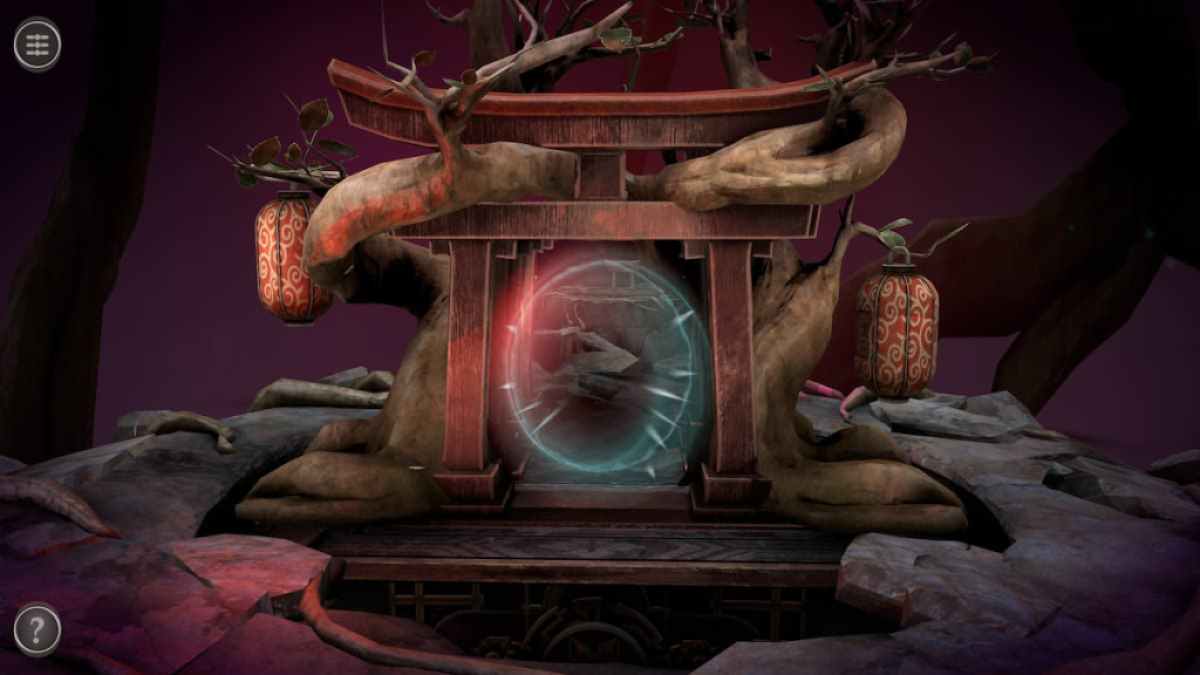
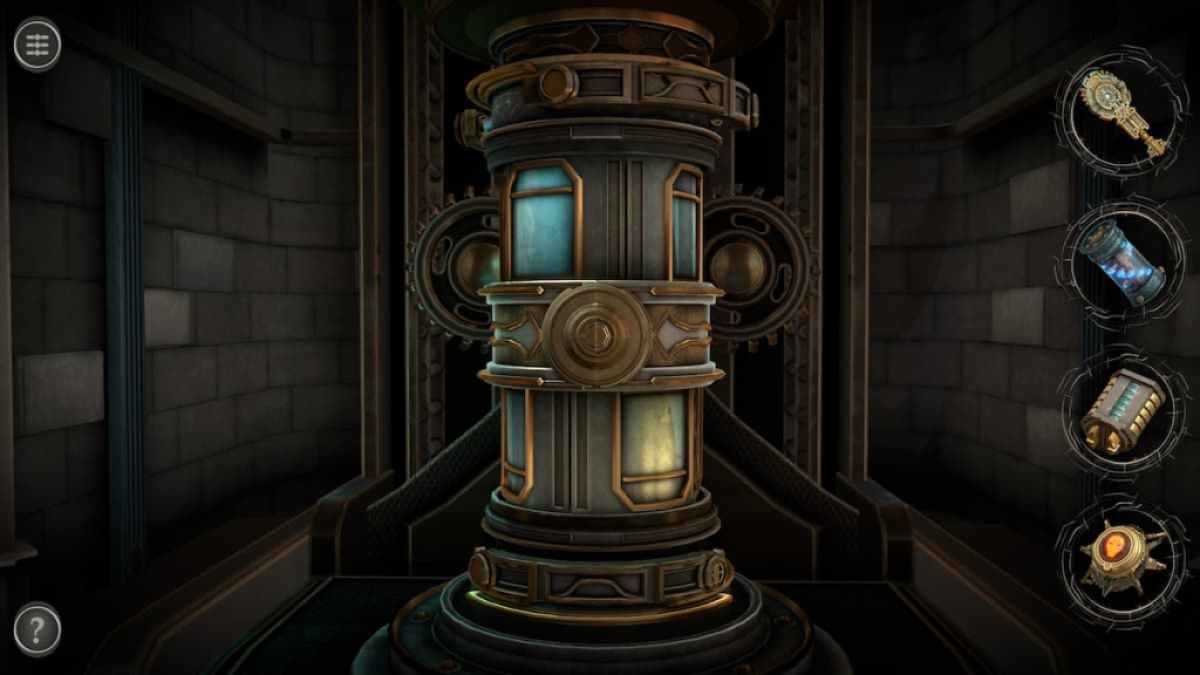
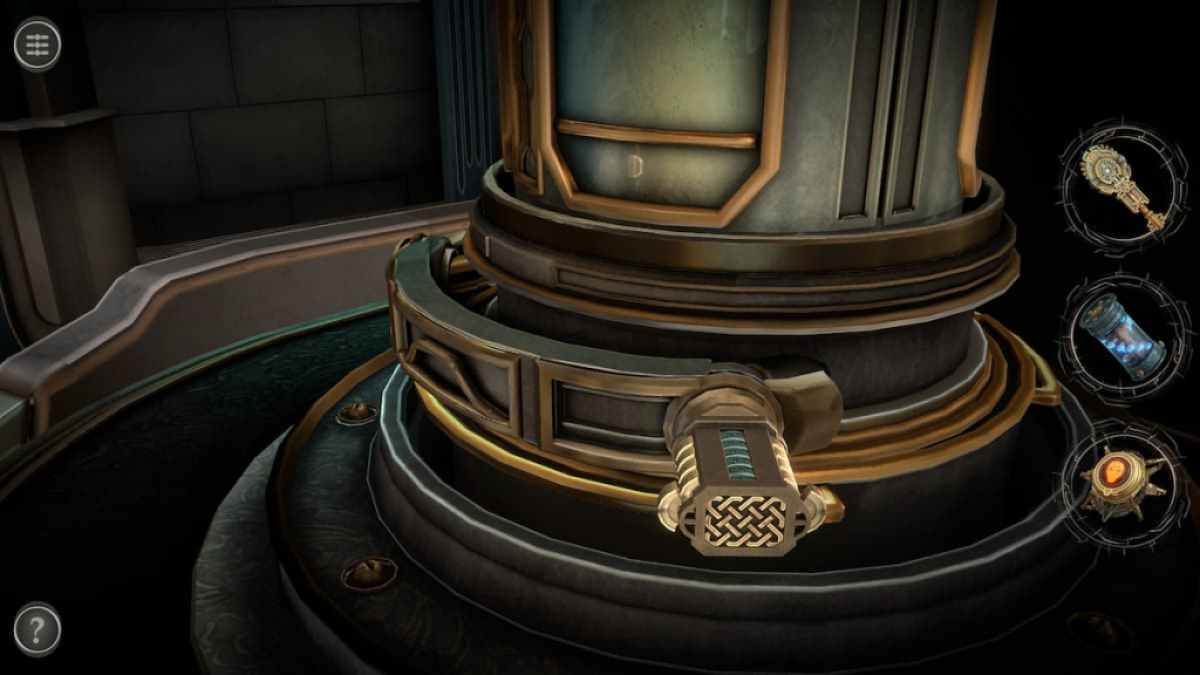
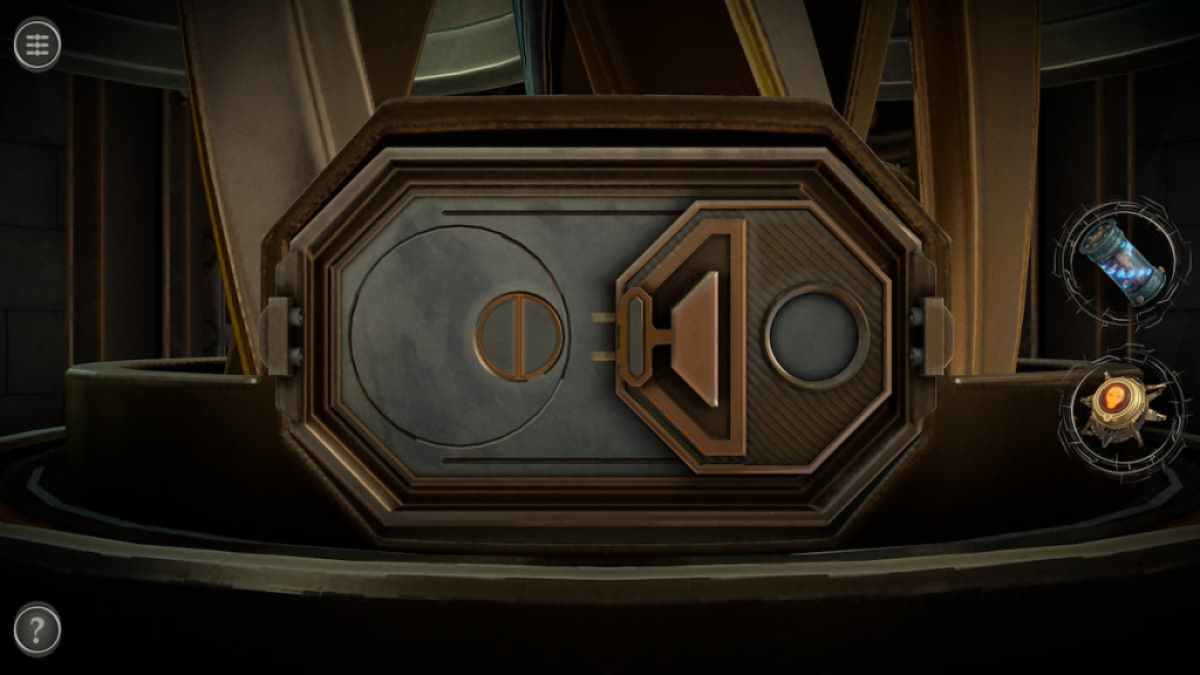
The Fragments from Chapter 5 will be used on this vacuum tube .
impart the Cryptex to the empty slot on the bottom right of the subway system .
This pops one of the drawers out . Slide it to the right to bring out a slider .
Screenshot by Pro Game Guides
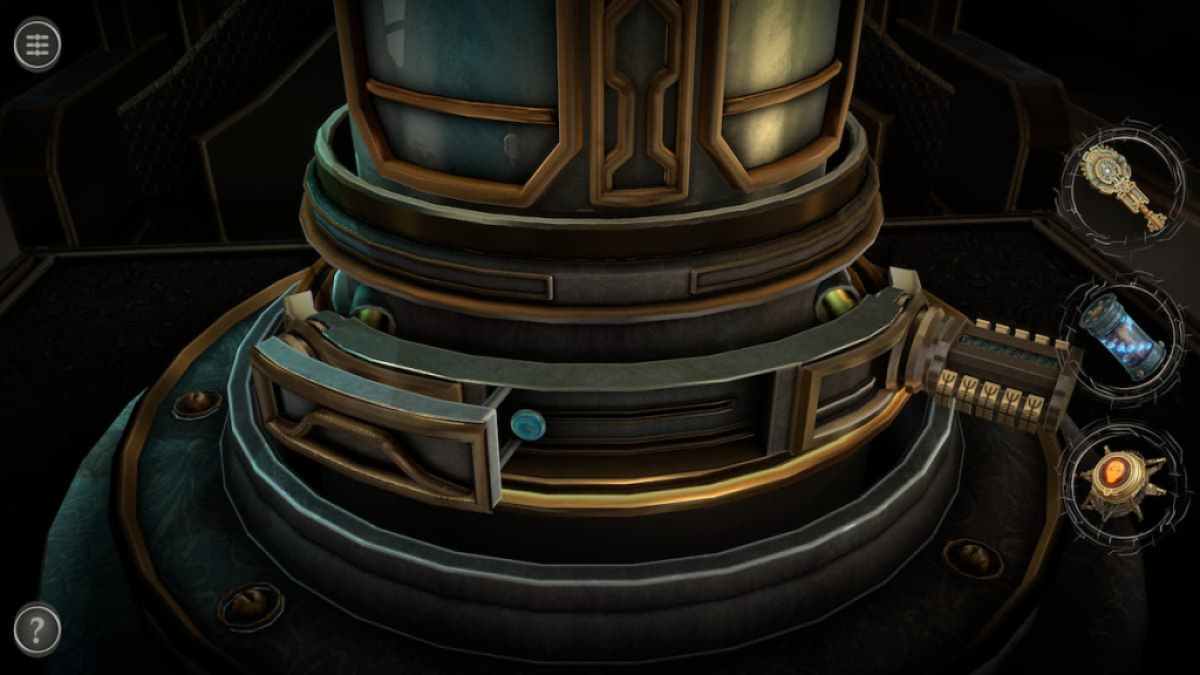
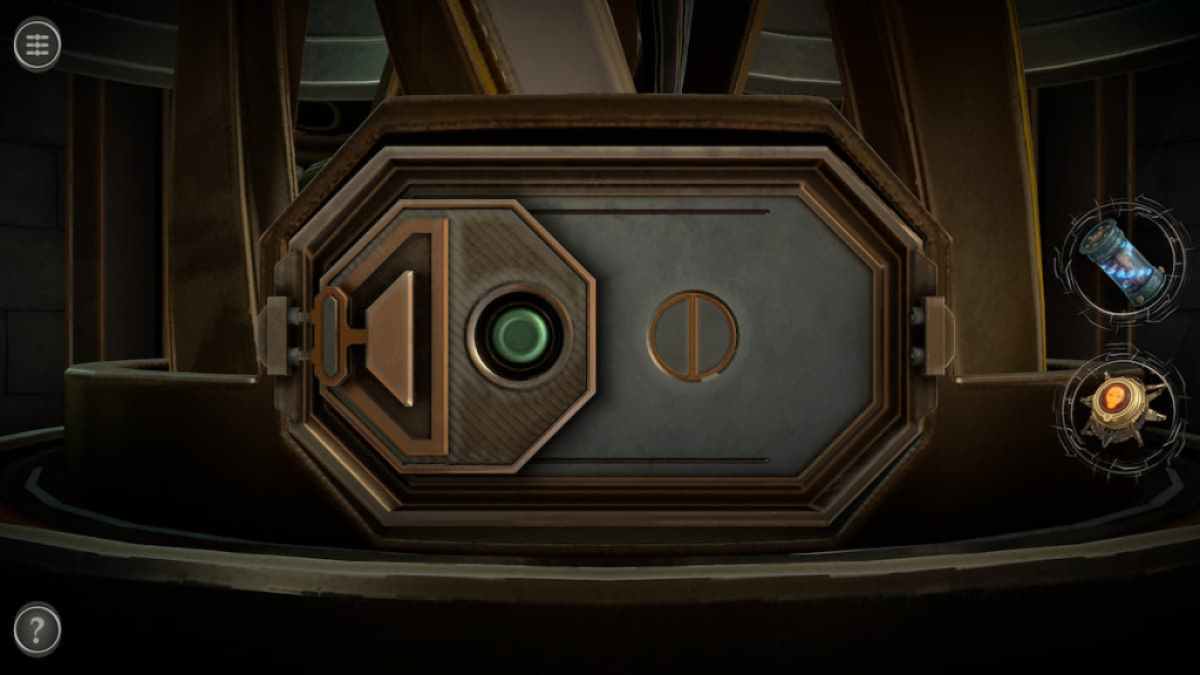
Pull the slider to spread the panel in the centerfield of the tube-shaped structure .
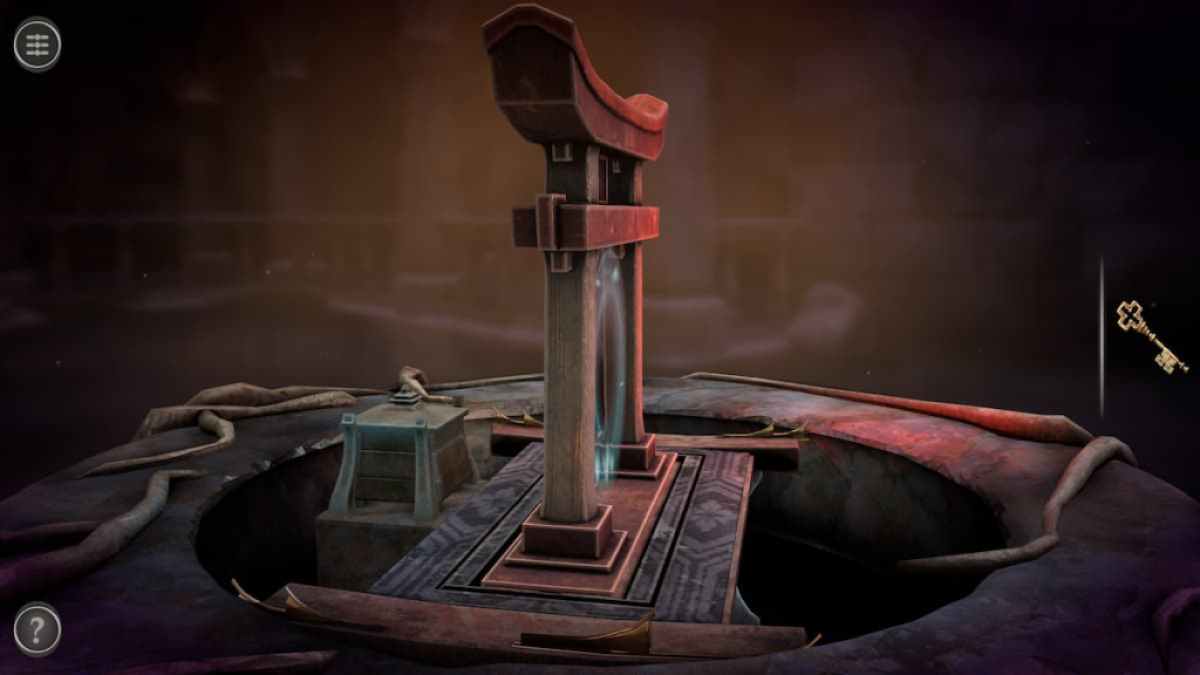
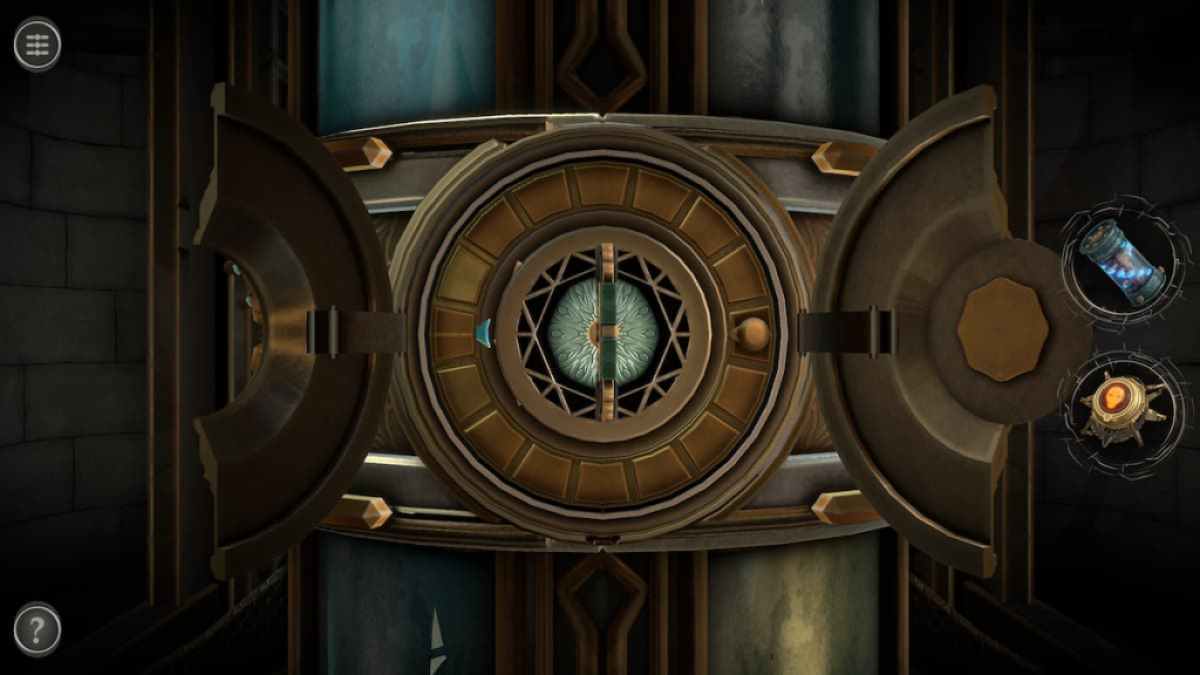
put in the Ancient Key into the novel time slot in the center .
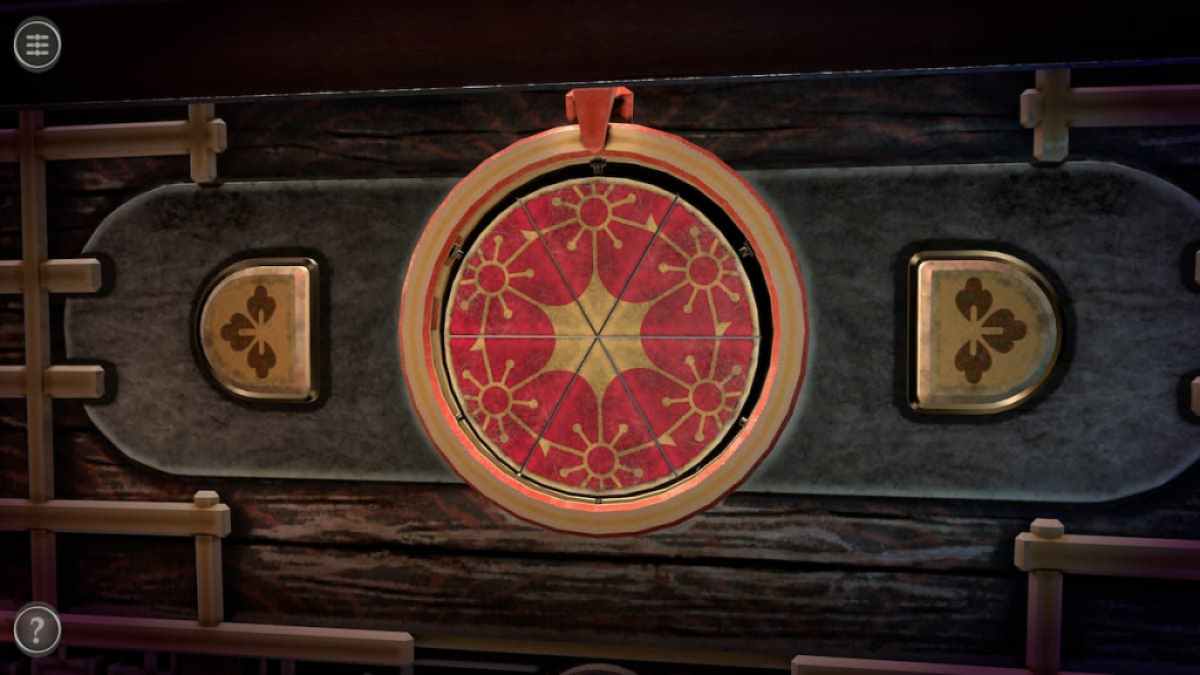
Rotate the key to let on a Pseudemys scripta puzzle around it .
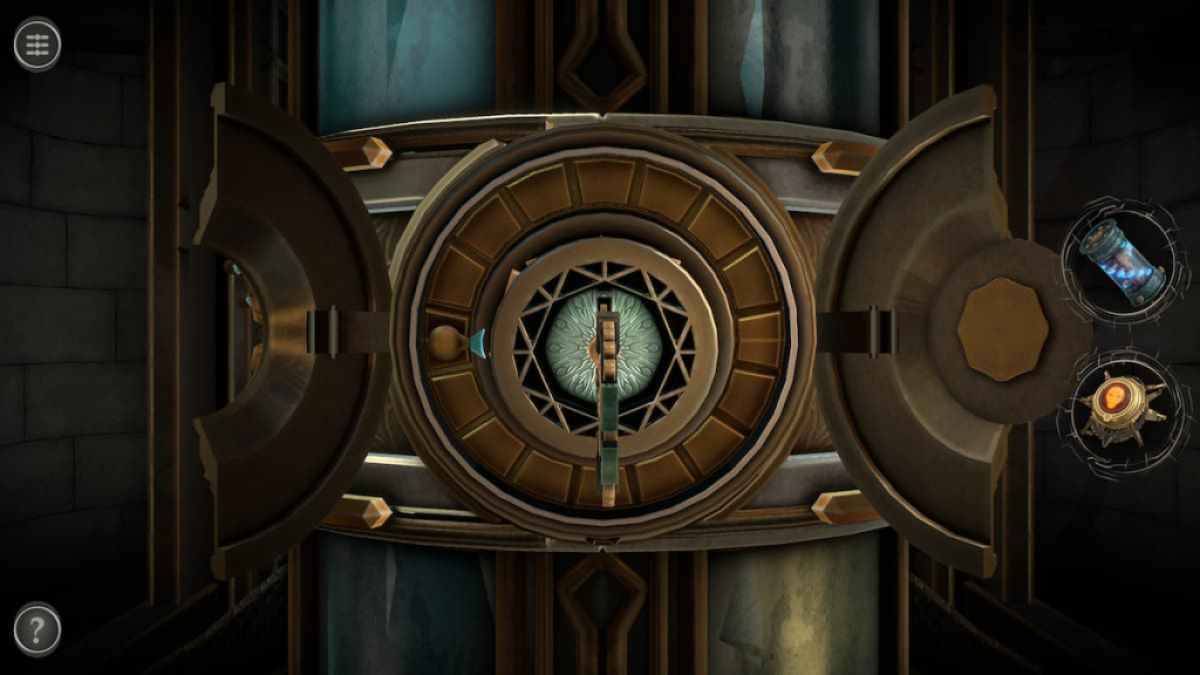
Screenshot by Pro Game Guides
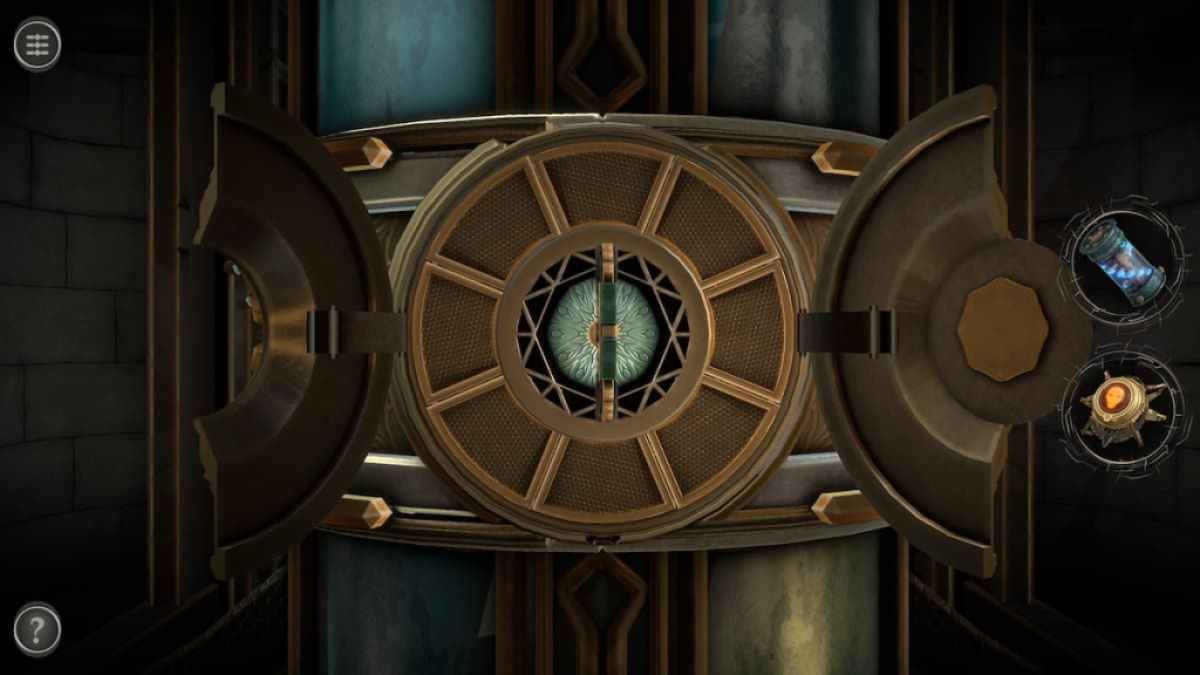
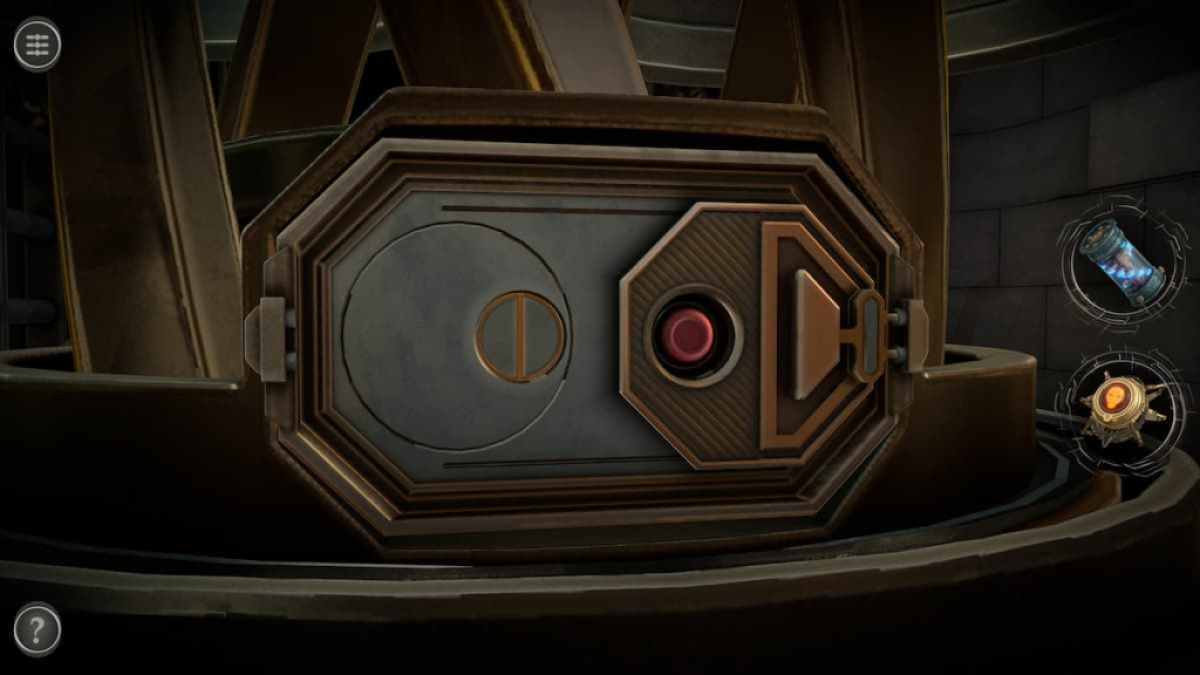
Rotate the outer ring until the brown cursor touches the blue one to complete this puzzle .
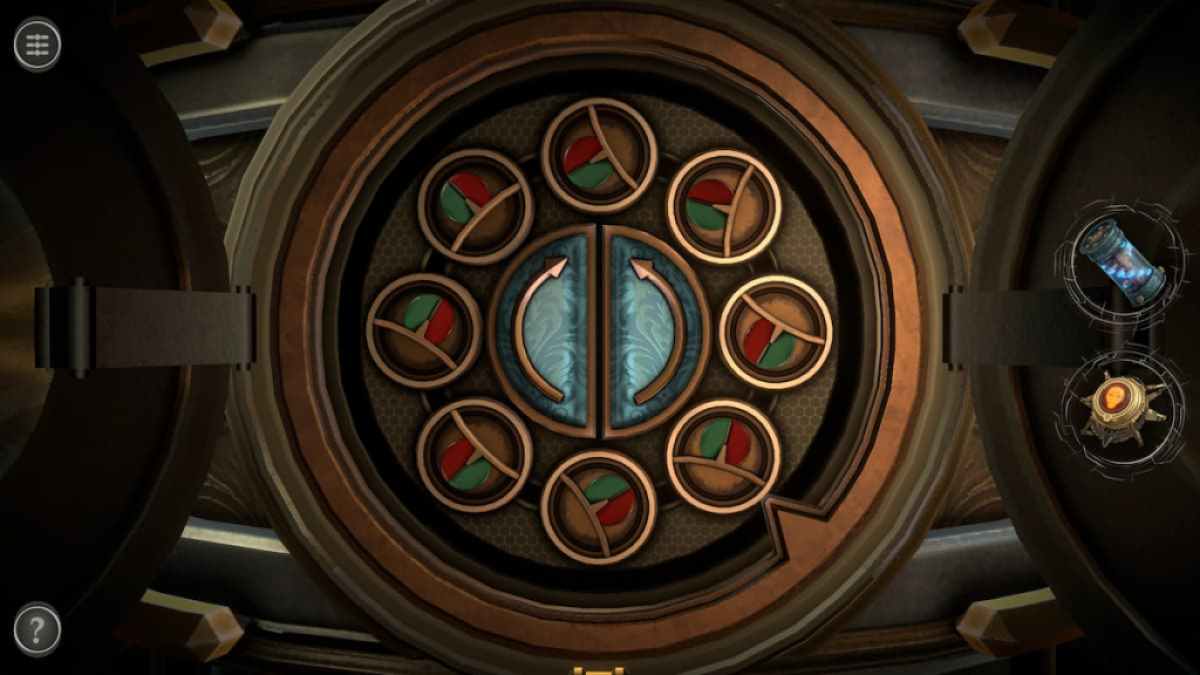
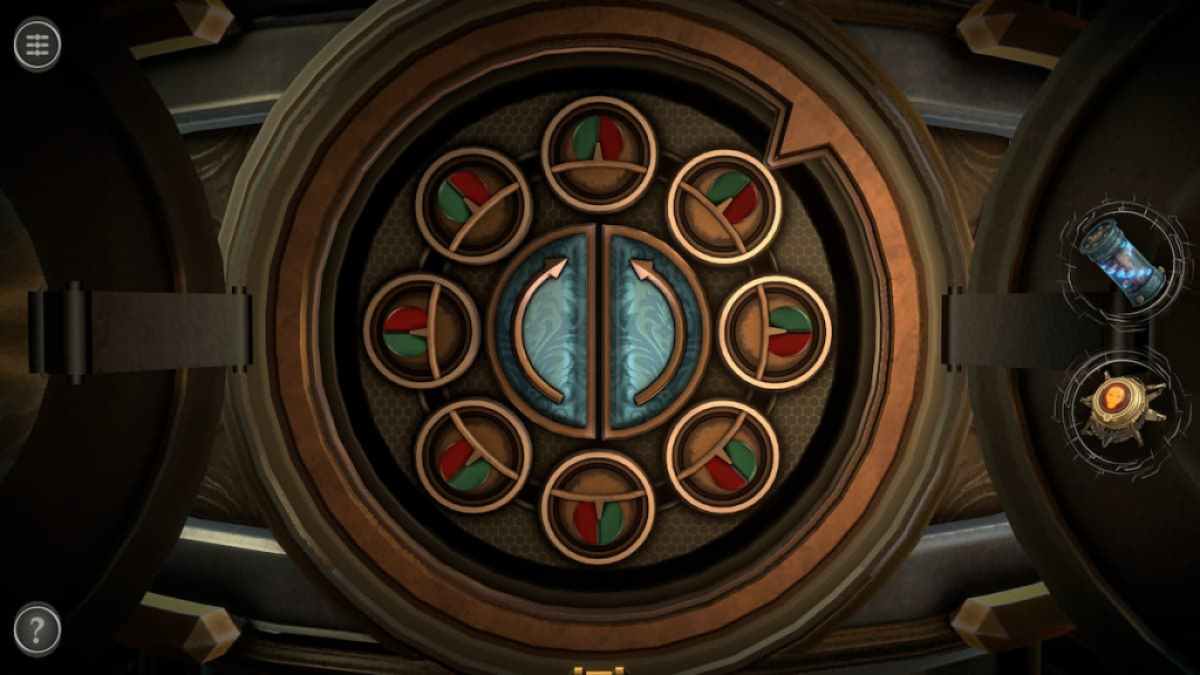
To resolve this mystifier , tap the pointer in the center to move the pointer to the leftover or right . you may circumvolve the same item doubly in a row by using the two arrows to concern it , allow , and come back .
To complete the puzzle , rotate all of the badges so that a circle is formed around the center arrows .
Screenshot by Pro Game Guides
Go to the instrument panel in front of Aurora .
Use the handle to tear the hexagon to the left hand , give it electrical energy . bid the greenish release to disconnect and rotate it .
Pull the hold to the right wing and connect it to that plug . campaign the red button to finish this mystifier .
Screenshot by Pro Game Guides
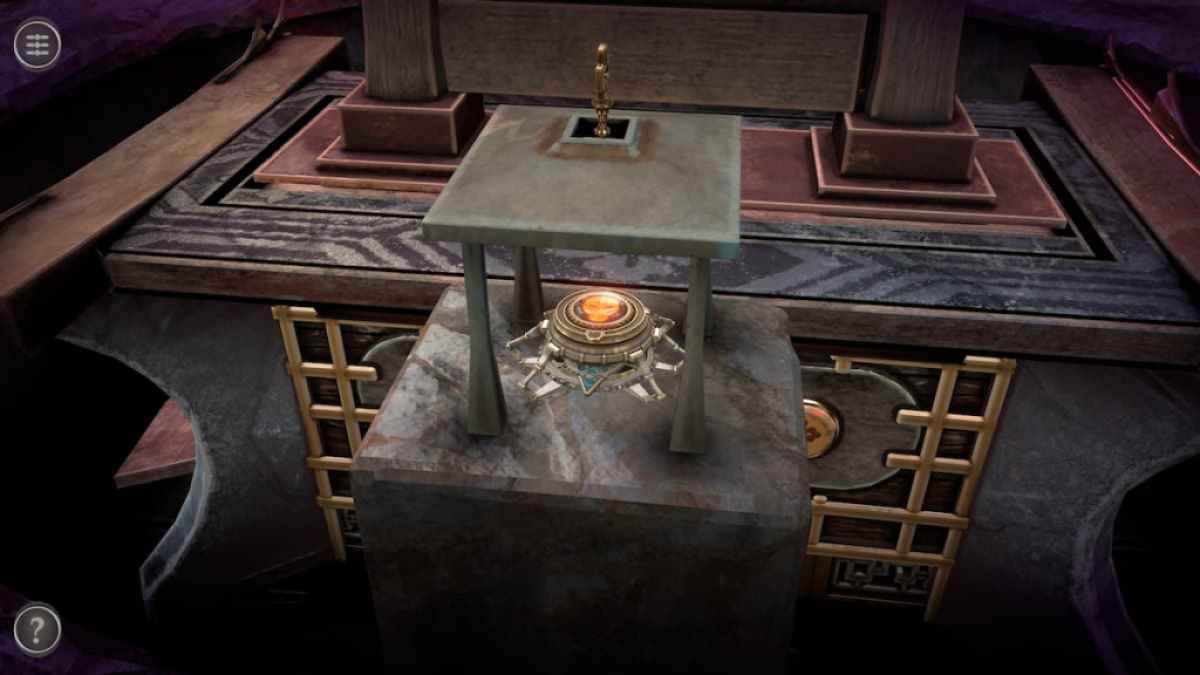
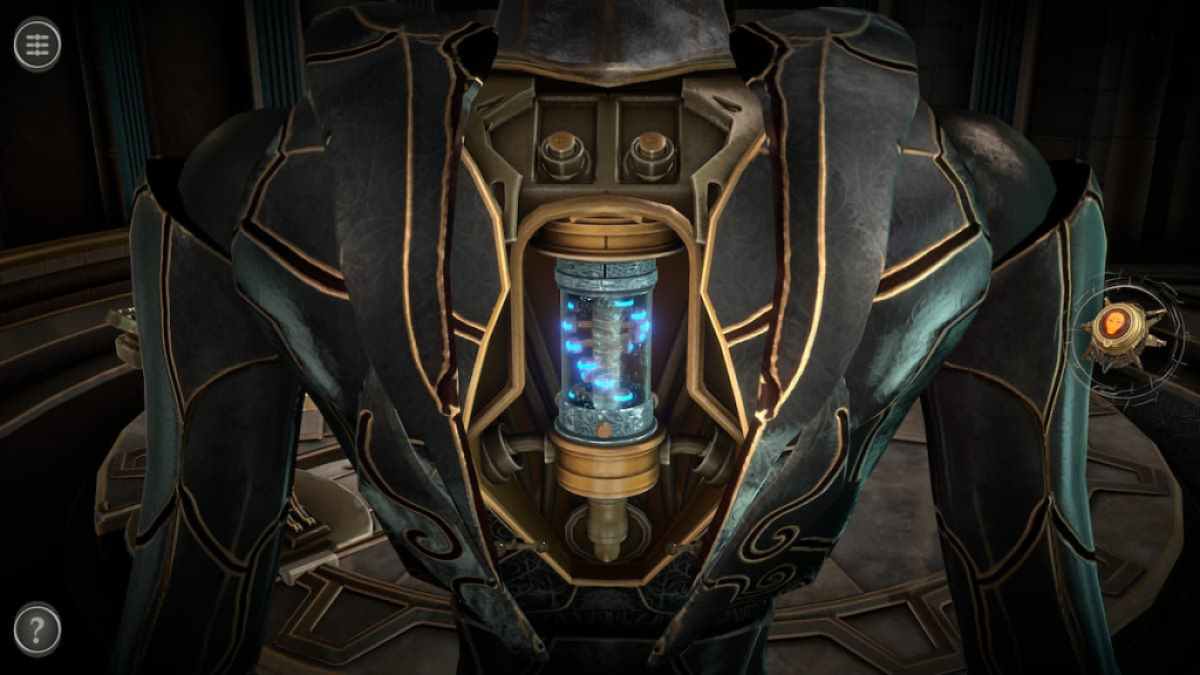
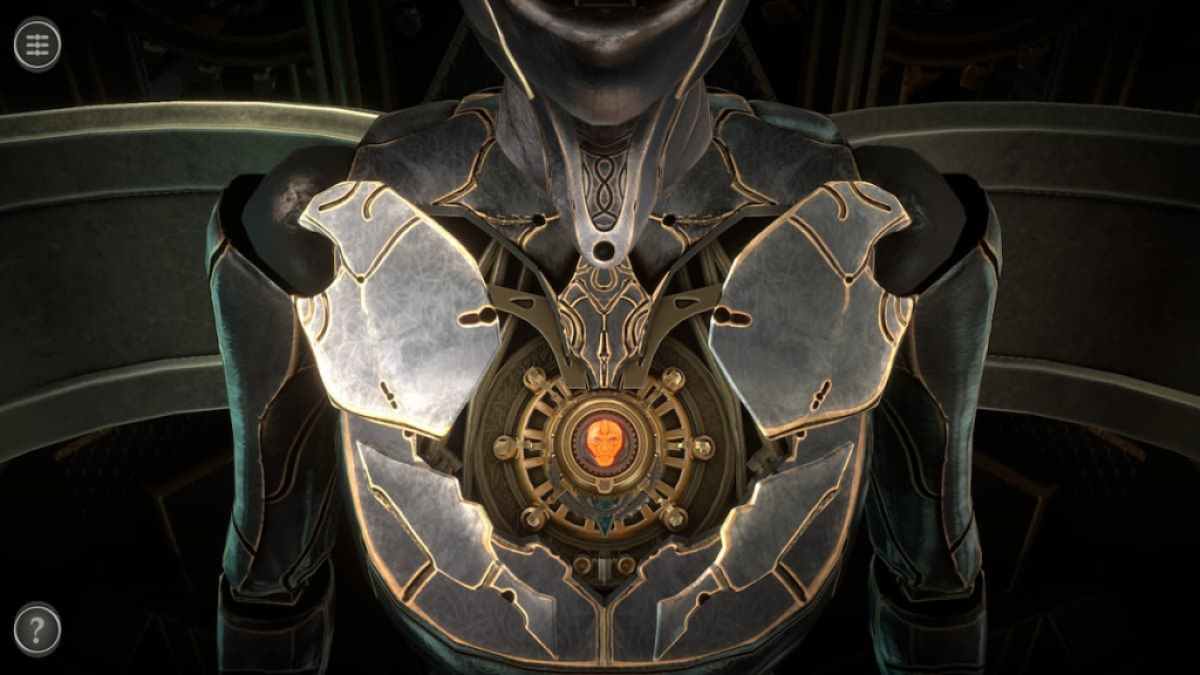
Place the DNA Container into Aurora ’s upper back .
This unlocks her chest . Place the Power Source here .
Adding the Power Source leads you into the cutscene that ends the game .
Screenshot by Pro Game Guides
For more unique escape elbow room game , check out ourSweet Dreams walkthrough Chapter 6 – risky venture leak Mysterieshere on Pro Game Guides .
Screenshot by Pro Game Guides

Screenshot by Pro Game Guides
Screenshot by Pro Game Guides
Screenshot by Pro Game Guides
Screenshot by Pro Game Guides
Screenshot by Pro Game Guides
Screenshot by Pro Game Guides

Screenshot by Pro Game Guides
Screenshot by Pro Game Guides
Screenshot by Pro Game Guides
Screenshot by Pro Game Guides
Screenshot by Pro Game Guides
Screenshot by Pro Game Guides
Screenshot by Pro Game Guides
Screenshot by Pro Game Guides

Screenshot by Pro Game Guides
Screenshot by Pro Game Guides
Screenshot by Pro Game Guides
Screenshot by Pro Game Guides

Screenshot by Pro Game Guides
Screenshot by Pro Game Guides
Screenshot by Pro Game Guides
Screenshot by Pro Game Guides
Screenshot by Pro Game Guides
Screenshot by Pro Game Guides
Screenshot by Pro Game Guides
Screenshot by Pro Game Guides
Screenshot by Pro Game Guides

Screenshot by Pro Game Guides
Screenshot by Pro Game Guides
Screenshot by Pro Game Guides
Screenshot by Pro Game Guides

Screenshot by Pro Game Guides
Screenshot by Pro Game Guides

Screenshot by Pro Game Guides
Screenshot by Pro Game Guides
Screenshot by Pro Game Guides

Screenshot by Pro Game Guides
Screenshot by Pro Game Guides
Screenshot by Pro Game Guides
Screenshot by Pro Game Guides
Screenshot by Pro Game Guides
Screenshot by Pro Game Guides
Screenshot by Pro Game Guides
Screenshot by Pro Game Guides
Screenshot by Pro Game Guides
Screenshot by Pro Game Guides
Screenshot by Pro Game Guides
Screenshot by Pro Game Guides
Screenshot by Pro Game Guides
Screenshot by Pro Game Guides
Screenshot by Pro Game Guides
Screenshot by Pro Game Guides
