Are you ready to delve late into Dreamscapes ?
The Reverie ( Dreamscape ) is a dizzying area within Honkai : Star Rail ’s Penacony , living accommodations 29 Chests among other collectibles . The expanse unlocks after completing Trailblaze Missions in Penacony .
Where to find all Treasure Chests in Penacony’s The Reverie (Dreamscape) in Honkai Star Rail
Since the single-valued function for The Reverie ( Dreamscape ) is huge , I split it up into sections to make your Chest hunt easier . you could look for the Chests in any society , but I recommend searching for the one inside the Dreamscapes in the prescribed order below to avoid mix-up .
F3 northwest
Refer to the scandalmongering pin in the effigy above to regain all Chests in the northwestern part of The Reverie ( Dreamscape ) F3 . The pins marked in unripe are all inside the three - dimensional Dreamscapes and are harder to find oneself , so comply the steps below to discover them .
I recommend claim the Dreamscape Chests in the exact ordering below to avoid confusion .
Head to the three - dimensional Dreamscape northwest of F3 via thenorthern entrancecircled in the effigy above .

Once at bottom , go downtwo flights of stair . Once on the lowest trading floor , ignore the room to the right . Instead , make aleft atomic number 92 - turntoward the back of the staircase , where you ’ll find the Chest waiting .
Like the previous Chest , capitulum toward the three - dimensional northwest of F3 through the northern entrance .
Once inwardly , go downtwo flight of steps of stairs . This time , you mustenter the room to the right hand . You ’ll find yourself in a big clearing with a Bubble Charger . take off by interact with the Bubble Charger .
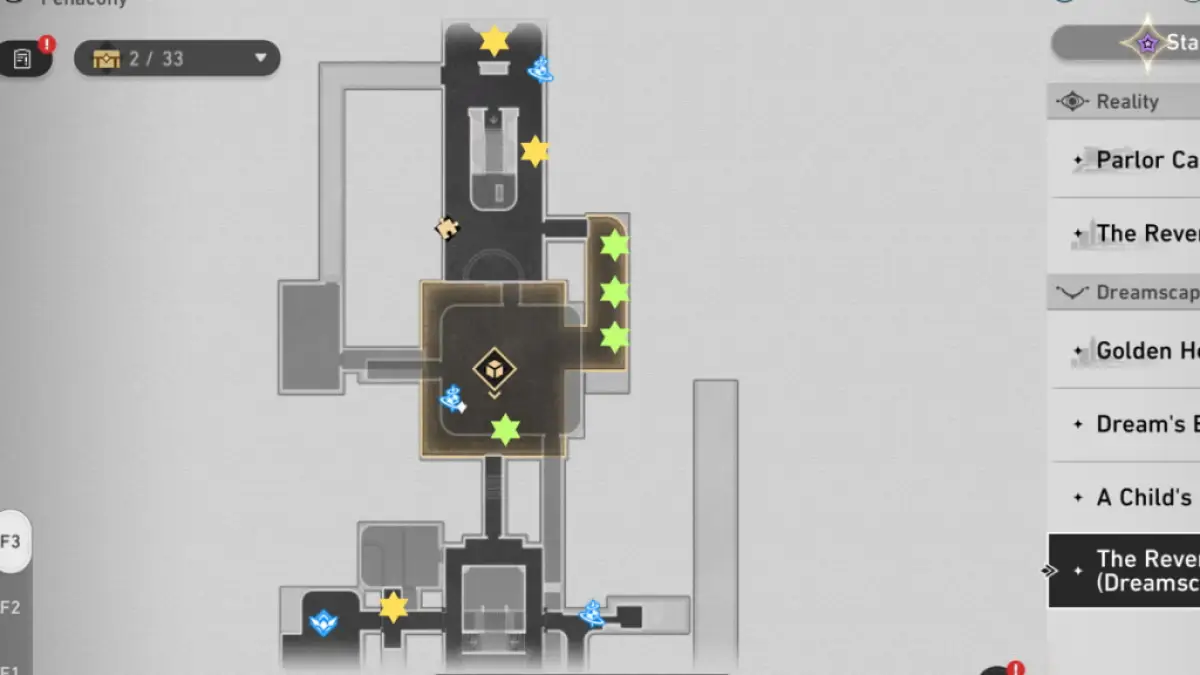
Image by Pro Game Guides
Once you ’ve charged , psyche to the Bubble Bridge skinny to the entrance . The map is easy to translate in this surface area , so I promote you to open it and head to the exact location circled above . utilise it to climb to the other side of the wall .
The Chest is veil behind an arch just up ahead . There are multiple similar structure in the elbow room , so use the balloon as landmarks to find the right one .
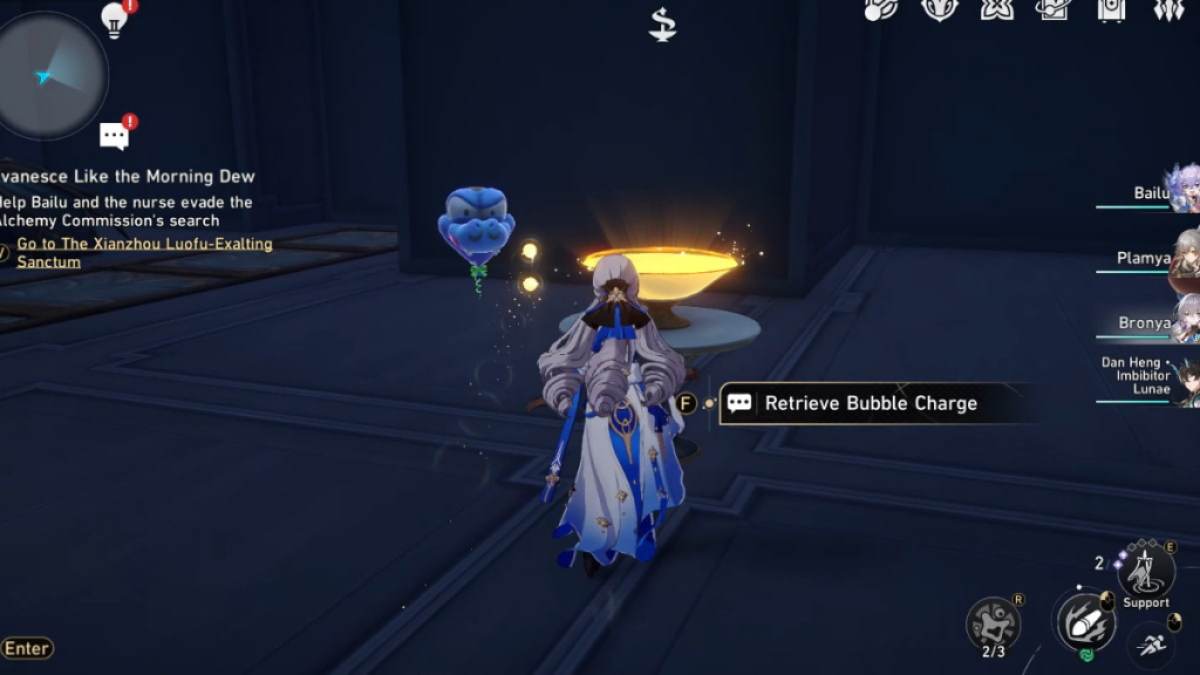
From thesame room as the previous Chest , interact with the Bubble Charger toretrieve Bubble Charge . Doing so will increase your explosive charge from one to three . Once done , go back to the prominent clearing by crossing the same Bubble Bridge you used to enter .
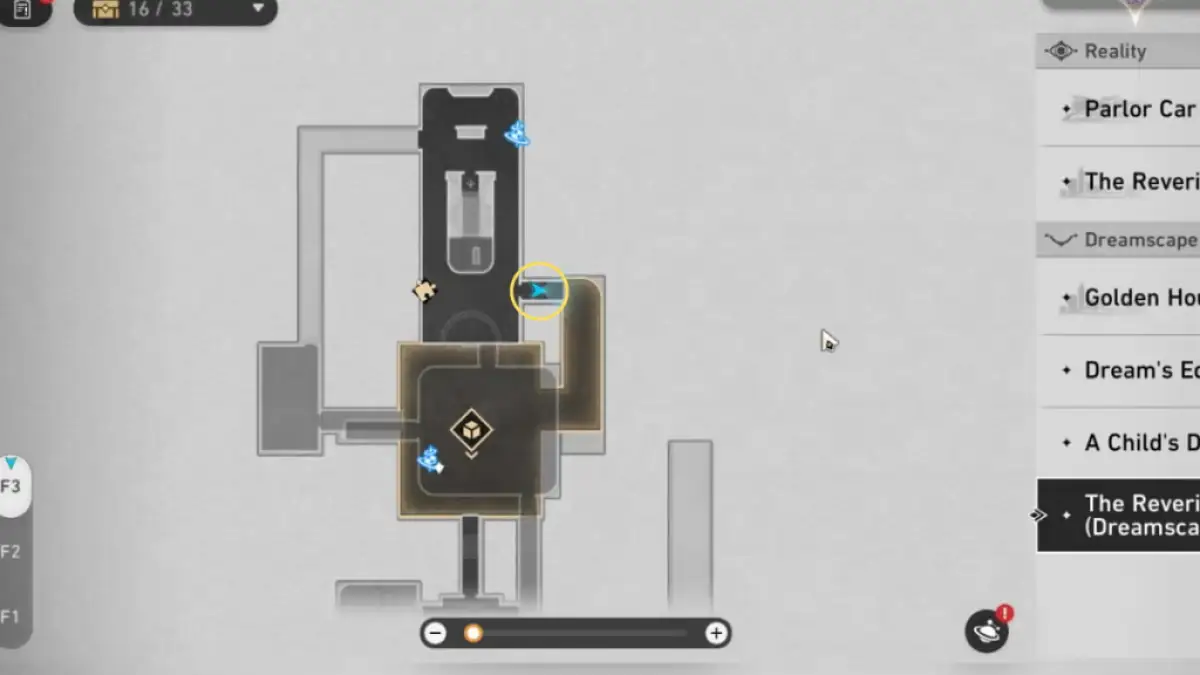
Image by Pro Game Guides
In the large clarification , interact with the Bubble Chargerto increase your rush counting to three . It ’s important as you need exactly three to get to the denominate emplacement . Once done , go up the Bubble Bridge up ahead — the precise localization is circled in the second figure of speech above .
Next , turn leave to find another Bubble Bridge . expend it to go up to another part of the bulwark . Up ahead , you ’ll recover the third and last Bubble Bridge , which you also need to go up to reach your destination . There should have been a total of three bridge at this peak .
Once you get through the top , head word to the area encircle above to find the Bountiful Treasure , which is part of the official in - game Chest return .
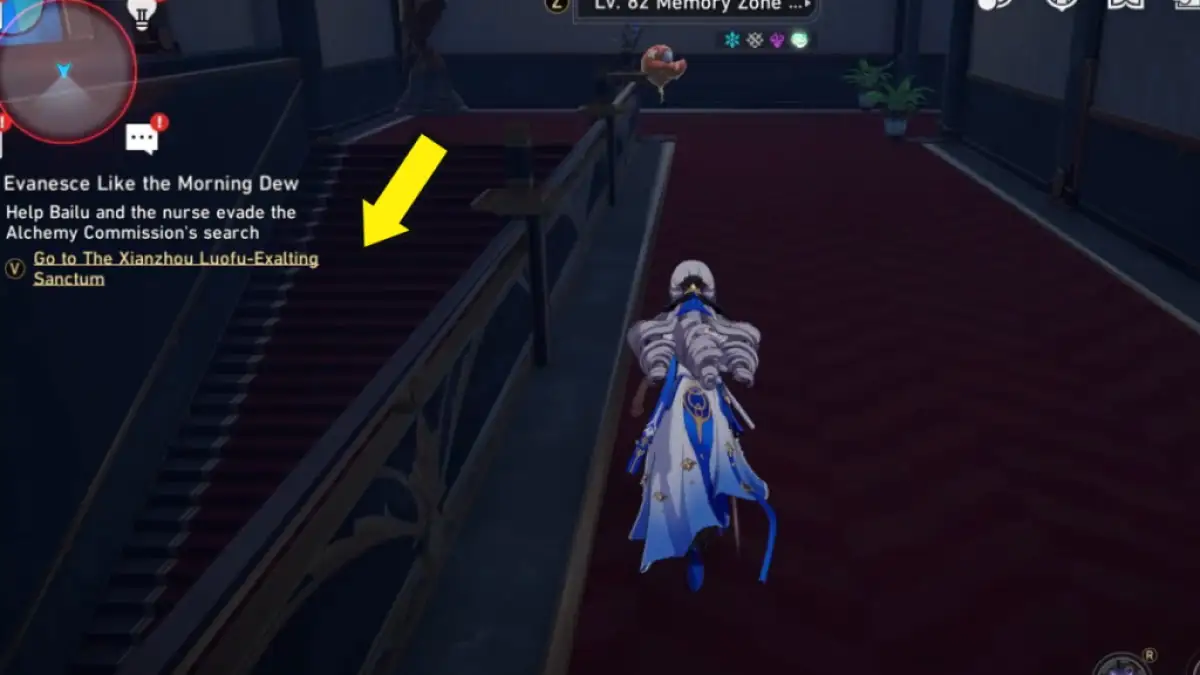
Image by Pro Game Guides
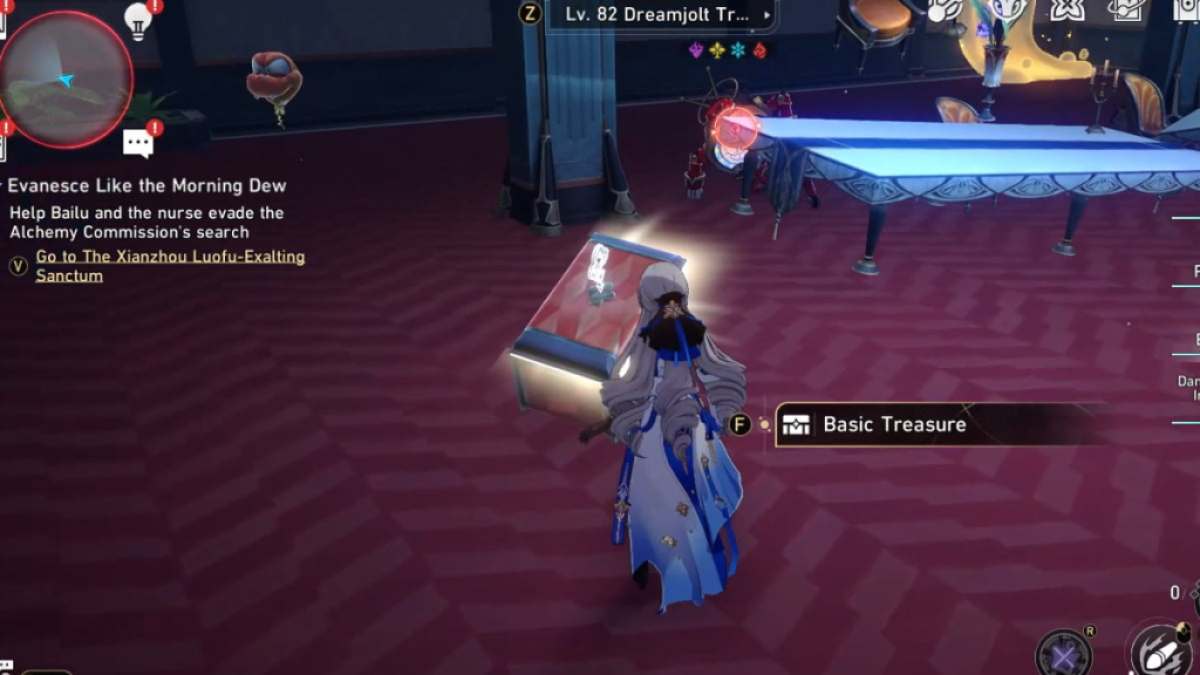
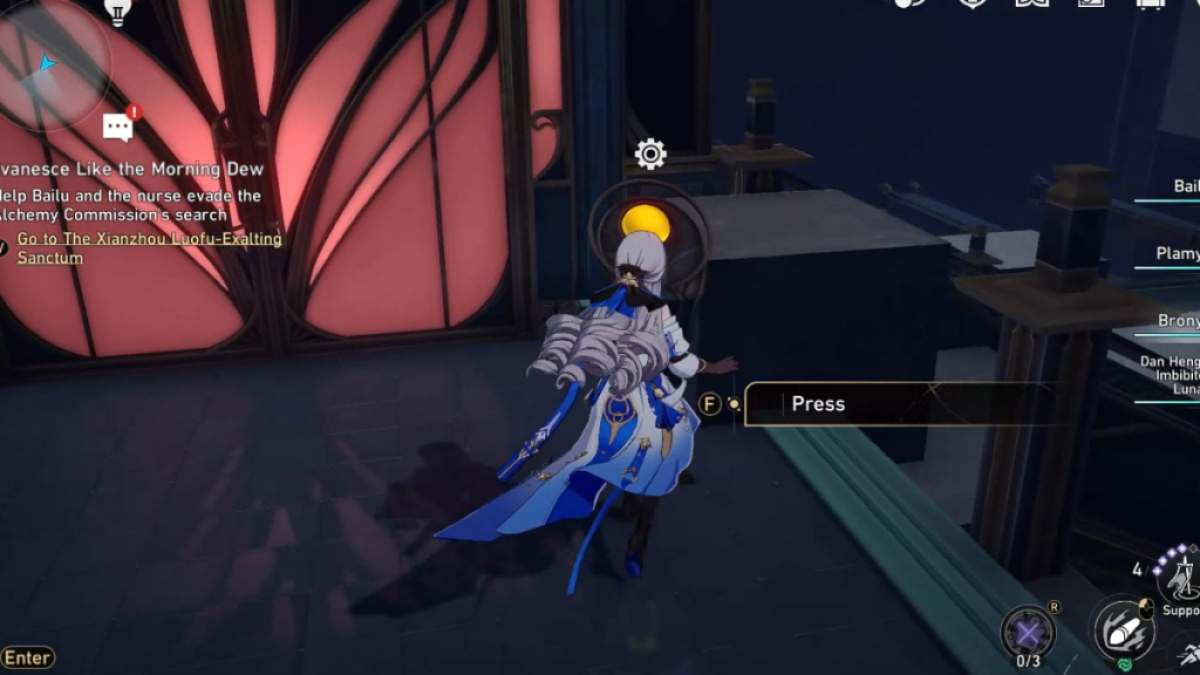
Head to the northwest Dreamscape in F3 via thesouthern entrance , pictured in the look-alike above .
As before long as you enter the clearing , you ’ll find the Basic Treasure hiding behind a column to the left . look up to the image above for its accurate location .
Related : All Penacony Dream ’s Edge Treasure Chest Locations ( Map ) in Honkai Star Rail
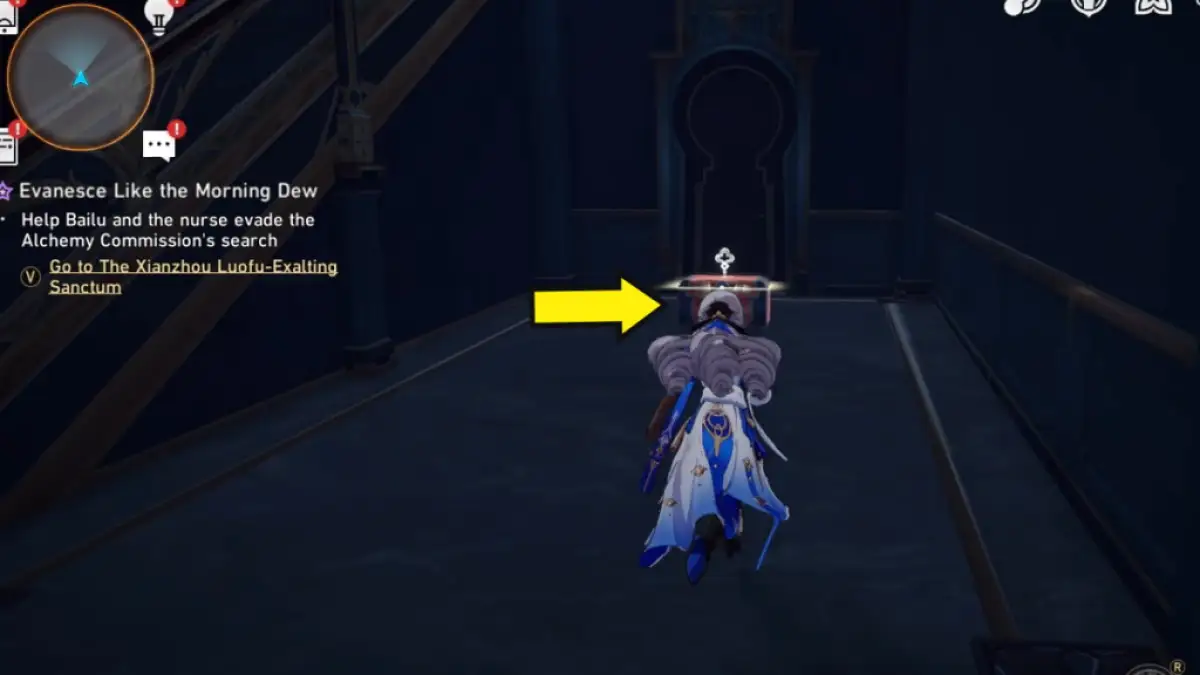
Image by Pro Game Guides
F3 southwest
direct to the yellow rowlock above to find the Chests in the southwestern part of The Reverie ( Dreamscape ) F3 .
Start by heading to the three - dimensional space sou'-west of F3 . Once within , you ’ll immediately see a Bubble Charger . Interact with the Bubble Charger , thenturn left and go up the Bubble Bridge .
Once you ’ve pop off up , you ’ll happen yourself in a narrow-minded area with another Bubble Bridge and nothing else . Simplygo up the Bubble Bridgeto get to the third area .
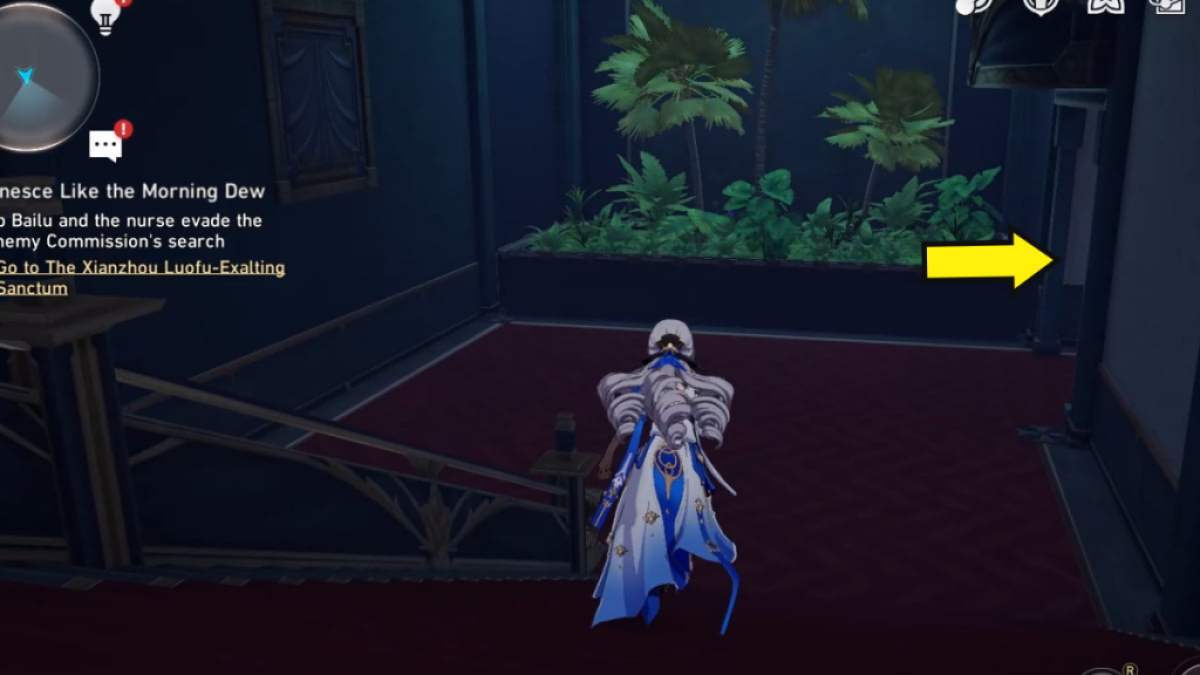
Image by Pro Game Guides
Next , you need to recharge , so go flat forward , then flex decently to encounter a Bubble Charger . utilize it to charge up .
Once done , go up the Bubble Bridge up ahead to lead you further into the dreamscape . You ’ll find yourself in a large , maze - like surface area . Here , you demand to go up another Bubble Bridge .
Go through the route lined by boxes on the left to get to the Bubble Bridge circled above , then climb it to achieve your goal .
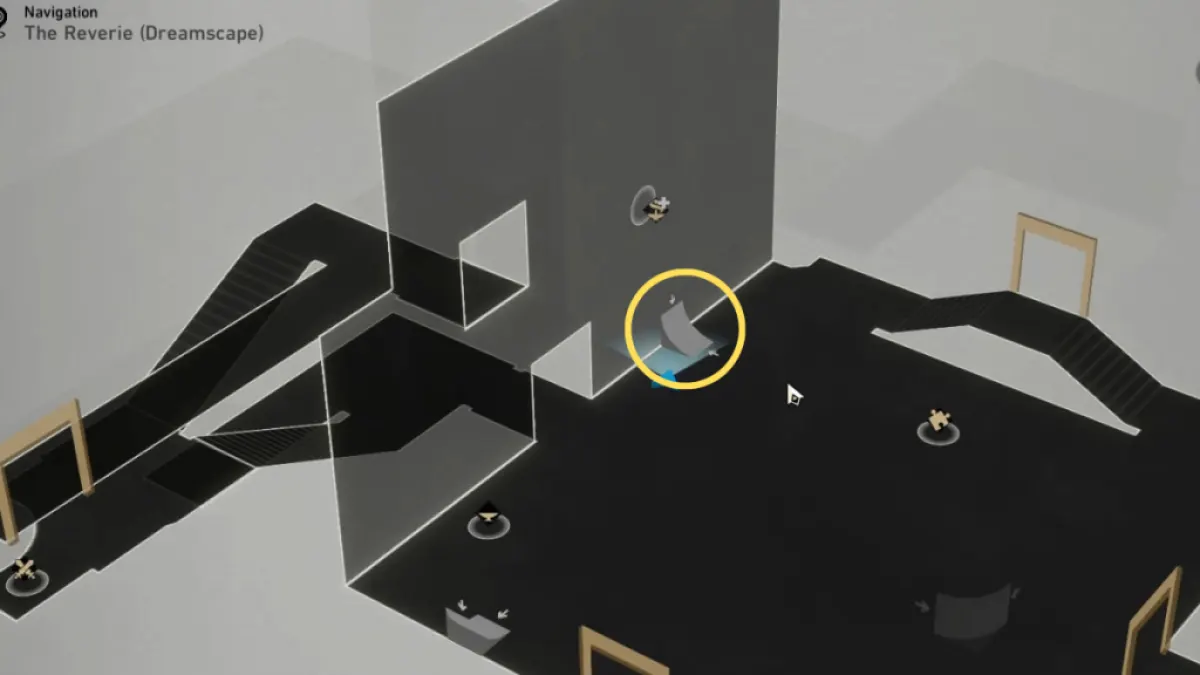
Image by Pro Game Guides
As presently as you climb up , you ’ll recover Bountiful Treasure , which is part of the in - game Chest counter . But we ’re not yet done — there ’s another Chest to claim . Interact with the Bubble Charger .
Once you ’ve institutionalise , go to the Bubble Bridge up ahead , as circle in the image above . climb up up to immediately spot the Basic Treasure .
Head to the southwest three - dimensional space in F3 . Upon entering , immediatelyinteract with the Bubble Chargerto obtain Charges .

Image by Pro Game Guides
at long last , head to the Bubble Bridge circled in the image above . It slope downward , so practice it to go down and claim the Chest waiting for you .
F3 northeast
Head to the yellow peg above to find all the Chests located in the northeast part of The Reverie ( Dreamscape ) F3 .
F3 southeast
Head to the yellow pin by theCavern of Corrosionin the southwestern part of The Reverie ( Dreamscape ) F3 to find a Chest .
startle by heading to the three - dimensional Dreamscape east of F3 via thenorthern incoming , circled in the first image above . Once you ’re inside , interact with the Bubble Charger , then go up the Bubble Bridge ahead . There are a few Bubble Bridges in the room , so refer to the second image above for the exact one .
After climbing , you ’ll find yourself in a narrow way with another Bubble Bridge up ahead , so climb it .
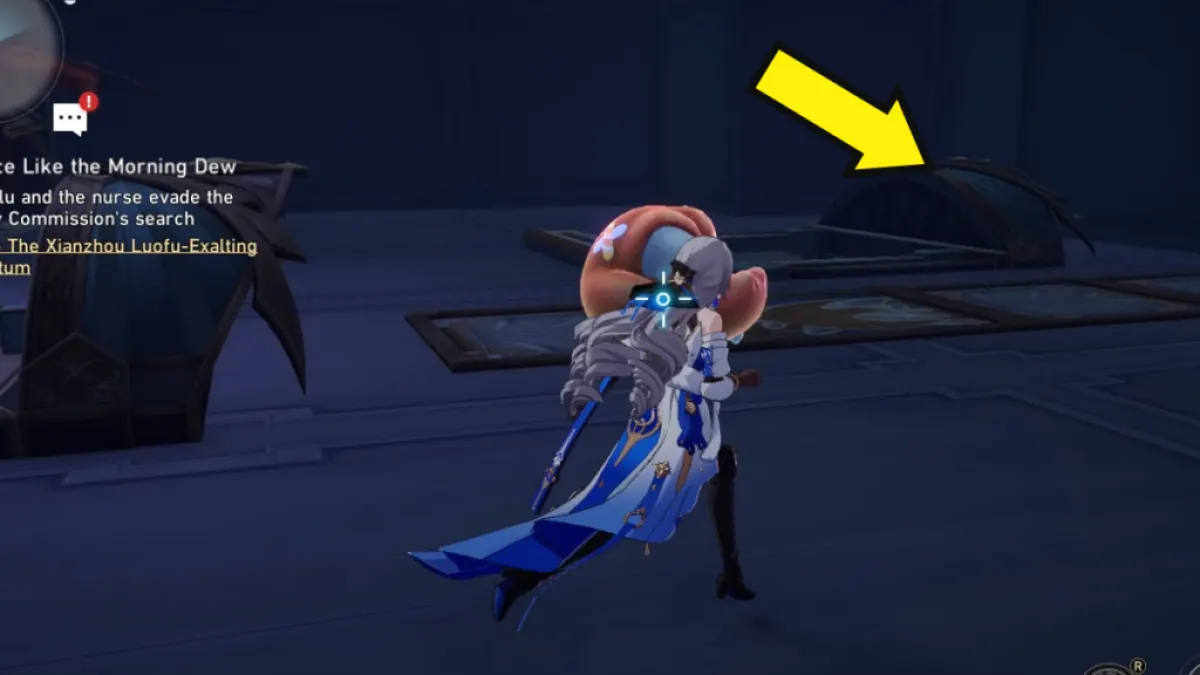
Image by Pro Game Guides
You ’ll find yourself in a large , messy way with floating board . manoeuver to the centre of the room to loot the Basic Treasure .
direct to the three - dimensional Dreamscape E of F3 via thesouthern entrance , circled in the first image above . Upon entering , you ’ll now spot a staircase up forward . Climb the stairs to loot the Bountiful Treasure waiting for you .
F2
Head to the yellowed pin above to find the Chest in F2 . You canget there via the lift northwest of F1 .
Meanwhile , the pin marked in purple refer to chest of drawers you’re able to get from the Hanu ’s Adventure challenge in F2 , which you’re able to get at by locomote down the step from the F3 Space Anchor on the proper side .
Refer to ourOrigami Bird guide ( Brave Bird section)to reset the Hanu ’s Adventure challenge in this country . Once ended , re - enter Hanu ’s Adventure and use the rocket engine beside the broken foe machine to enter a narrow-minded outer space living accommodations the second Chest .
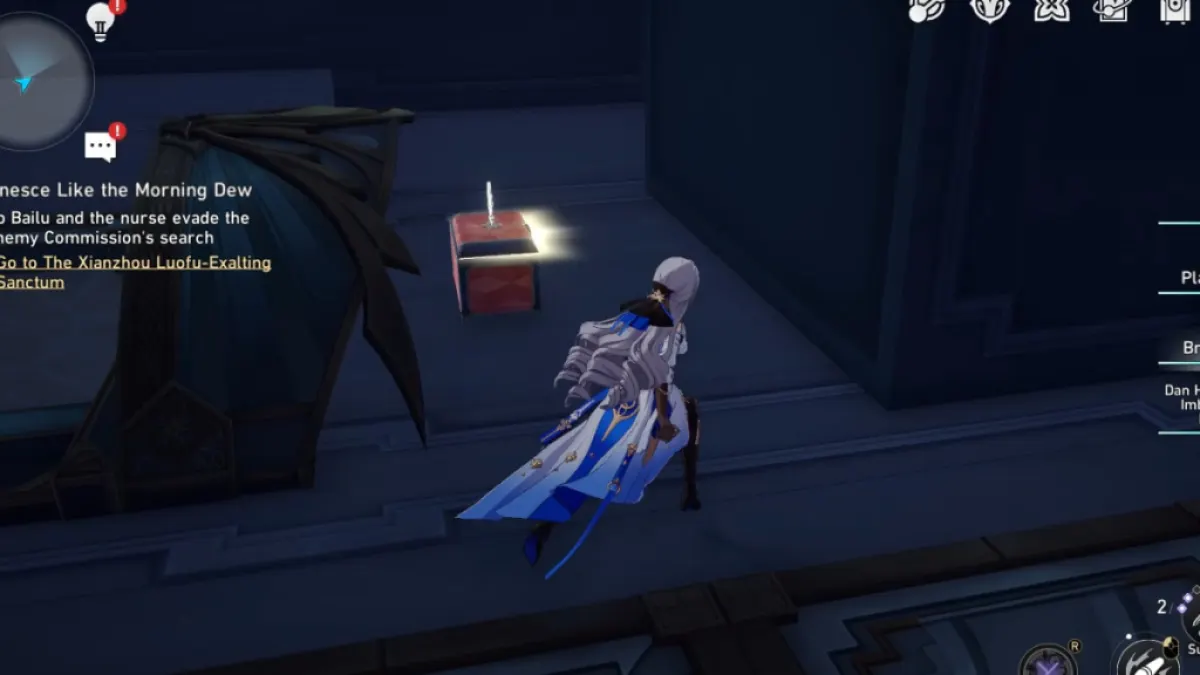
Image by Pro Game Guides
refer : All Dreamscape Pass sticker locations ( Map ) in Honkai Star Rail
F1 northwest
maneuver to the yellow pin above located in the northwest section of The Reverie ( Dreamscape ) F1 to find a bureau .
F1 center
Head to the cardinal part of F1 to find the Chests differentiate in the pins pictured in the image above .
Arcane Artwork (F3 & F1)
The Arcane Artwork is site in the eastern part of F3 . Upon enter the space , you ’ll be transported to the small area south of F1 . The map of the area is shown below .
Once inside , you ’ll immediately distinguish the Treasure Chest up ahead . You ’ll also be able to find a few more Chests inside the three - dimensional blank space on the left hand , which you may get at by interact with another art .
Enter the Arcane Artwork , then head to the northwest side to determine the entrance to a three - dimensional space in the word form of another artwork . Once inwardly , interact with the Bubble Charger .
Screenshot by Pro Game Guides
Next , head to the Bubble Bridge further away from the Bubble Charger , circled in the paradigm above . expend it to rise to the other side of the wall .
Once you ’ve climbed the Bubble Bridge , go behind the stack of box up in front to find a staircase . climb up the stairway , then descend on the other side to discover a door , Bubble Bridge , and balloon . Start by go to the back of the stair , where the balloon is face up . You ’ll find a Basic Treasure .
Once done , go up the Bubble Bridge to enter another side of the room . You ’ll instantly spot the second Treasure Chest behind the Bubble Charger . Be careful as enemy are stymy the path .
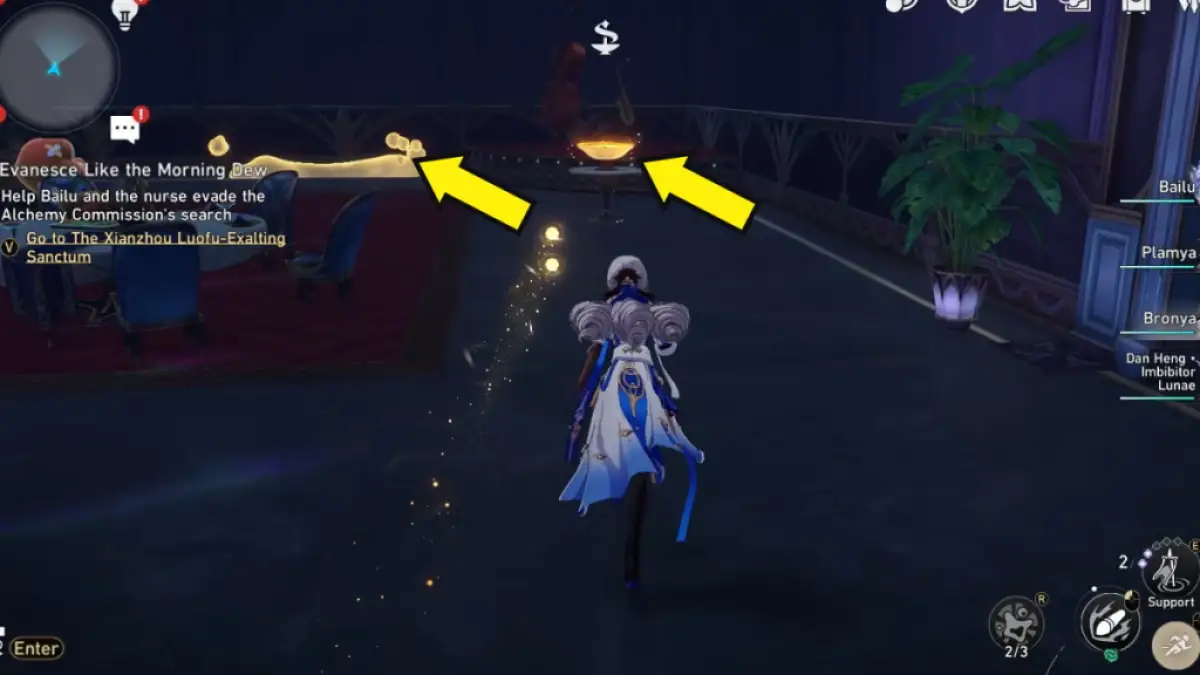
Image by Pro Game Guides
For this chest of drawers , I commend re - insert the Dreamscape and initiate from the beginning to avoid confusion . There ’s quite a farseeing way of life to find out the Treasure , so follow the steps below carefully . Upon entering the Dreamscape , interact with the Bubble Charger .
After charge , head to the Bubble Bridge picture in the image above , then mount it .
Next , manoeuver to the back of the stacked boxes to find a stairway . wax it and go down to the other side , where you must mount another Bubble Bridge to get to another way .
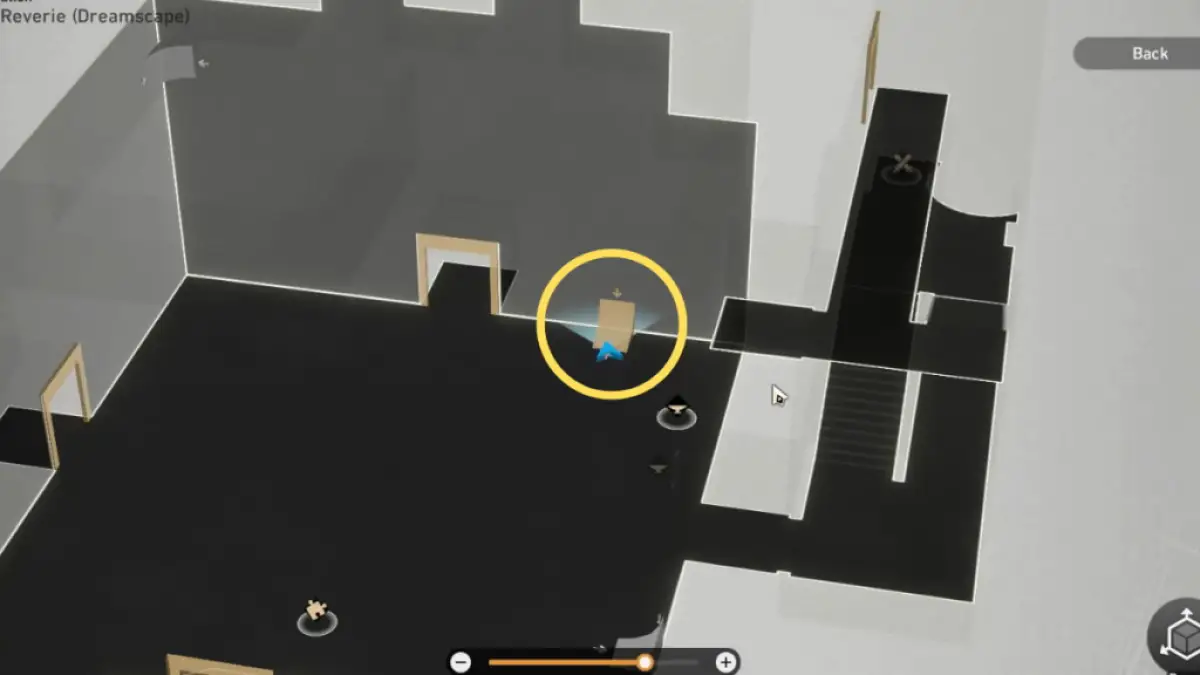
Image by Pro Game Guides
You will immediately spot aBubble Charger . It ’s important tointeractwith it to increase the number of your charges from two to three . Once done , change by reversal back and go up the Bubble Bridge , which will take you back to where you came from .
This sentence , you must go through the disconsolate door where you ’ll be greeted by another Bubble Bridge . go up the Bubble Bridge to refund to the start position . Interact with the Bubble Chargerto continue to the next part .
Next , go up the Bubble Bridge by the two chairs . Its exact location is circled in the image above .
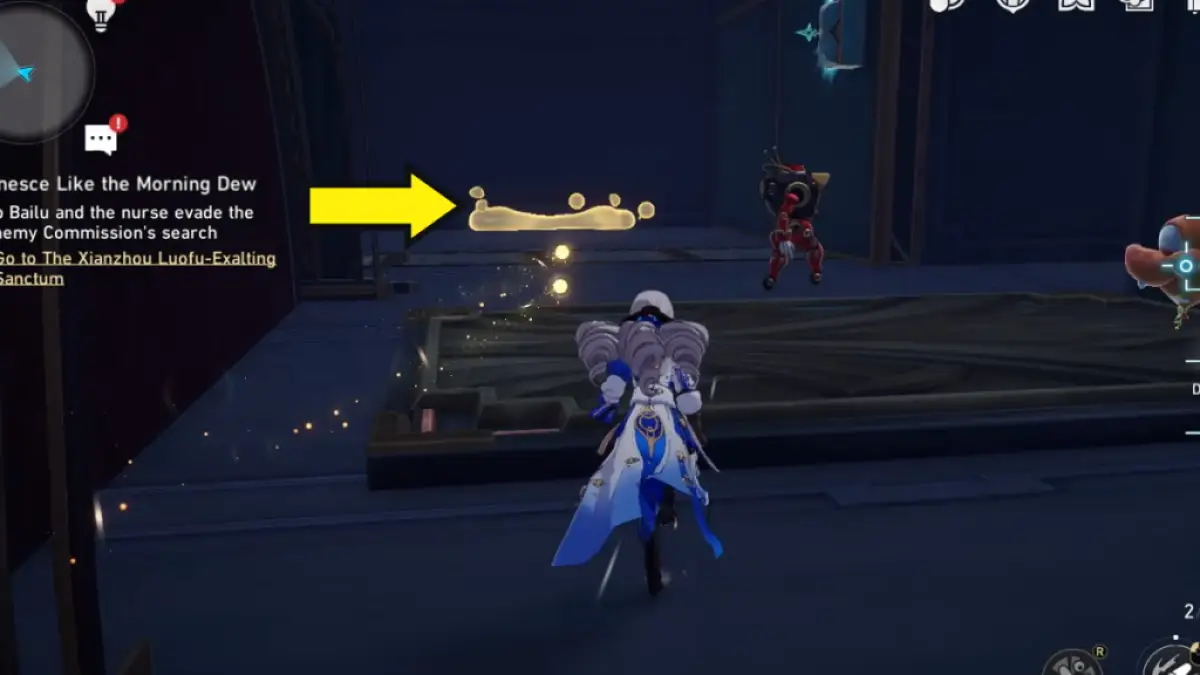
Image by Pro Game Guides
Then , turn left and go down the step to discover another Bubble Bridge . Climb the bridge to get to another elbow room .
As soon as you go up up , make a sharp right to observe another Bubble Bridge , then climb up it to reach another side of the elbow room .
Once you attain the top , go straight ahead and go up the stairway , then press the switch beside the threshold to unlock it . This is an important footmark for finding the Chest .
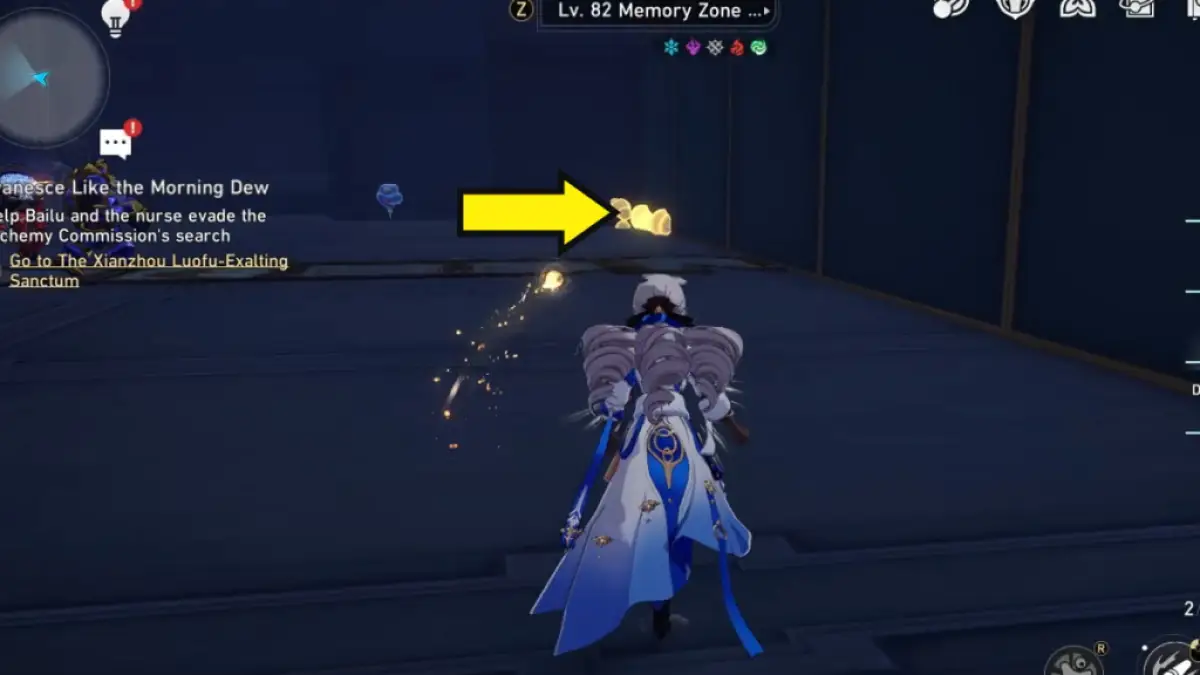
Image by Pro Game Guides
After that , go through the room access and rise the Bubble Bridge to return to the starting area . Interact with the Bubble Chargerone more time .
Like before , go up the Bubble Bridge locate beside the two chairs . While this footmark may seem repetitive , your Dreamscape is now fully correct up to allow you to reach the last destination .
After climbing , you ’ll now be greeted by the room access , which was red earlier . But since we unlock it , it should now be gloomy . Go through the doorway to happen another Bubble Bridge , then climb it .
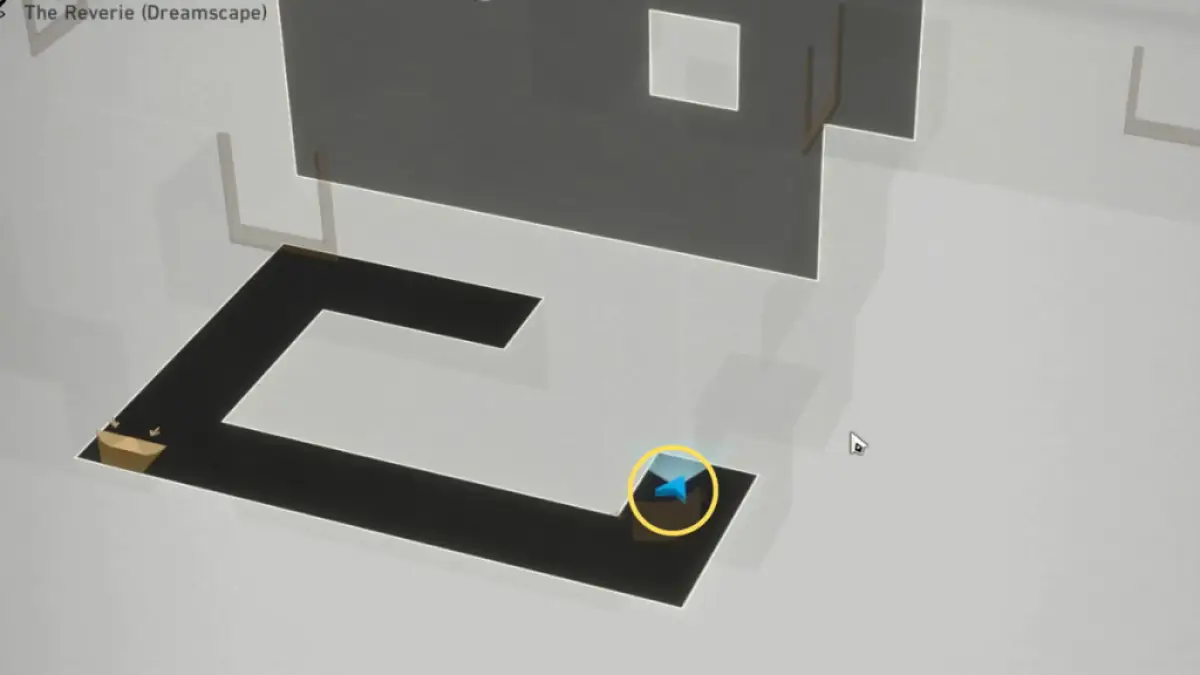
Image by Pro Game Guides
As shortly as you put down the way , go down the Bubble Bridge on the right , which slosh downwards . As soon as you go down , you ’ll spot a Precious Treasure , which reckon toward the in - game Chest counter .
you could claim one Bountiful Treasure by make out the Hanu ’s Adventure challenge in the surface area . To get there , go back to the entrance of the Arcane Artwork and re - insert the Dreamscape .
Upon enter , go down the staircase and make a left atomic number 92 - turn to find the challenge . Its accurate location is circled in the figure of speech above . You canrefer to our Origami Bird guide to complete the Hanu ’s Adventure challengein the country .
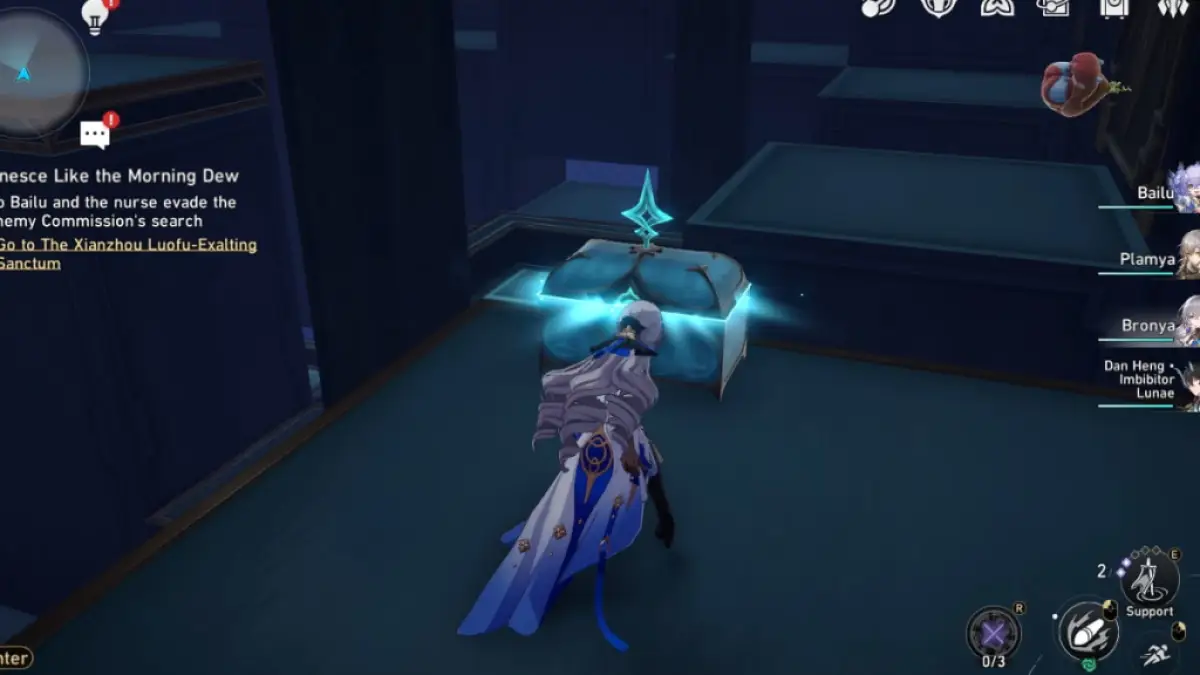
Image by Pro Game Guides
For more on HSR , hold back out our guidebook onHanu ’s Prison Break Event All Puzzle Solutions – Honkai Star Railhere on Pro Game Guides .
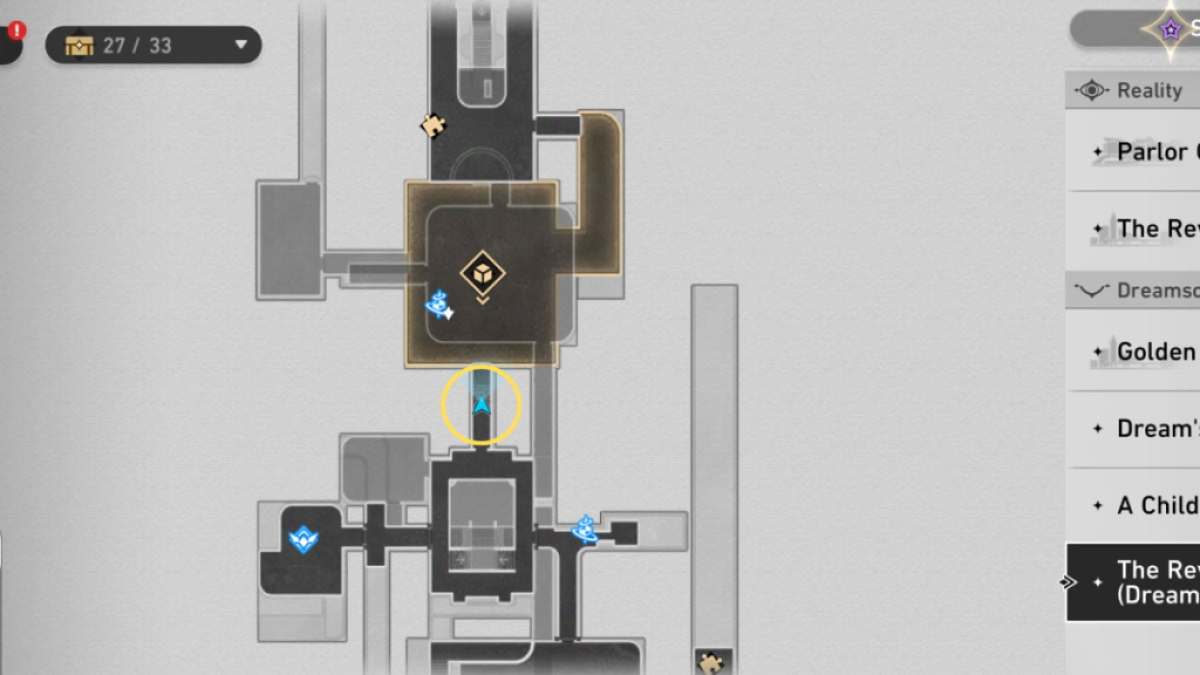
Image by Pro Game Guides
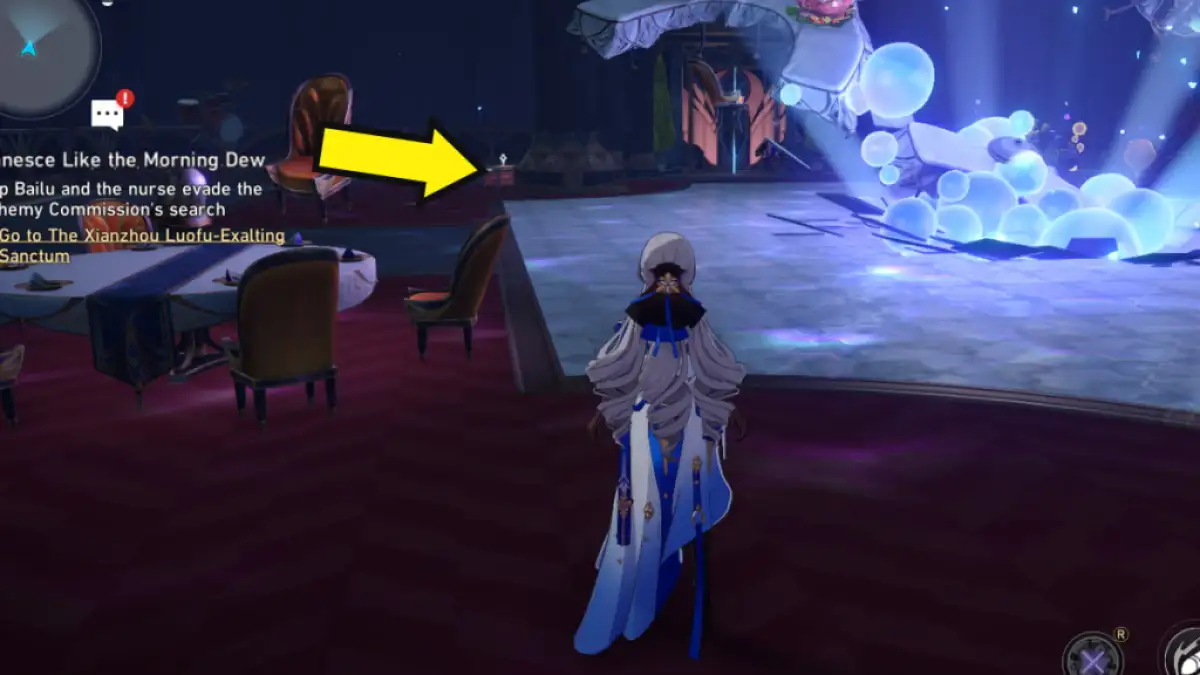
Image by Pro Game Guides
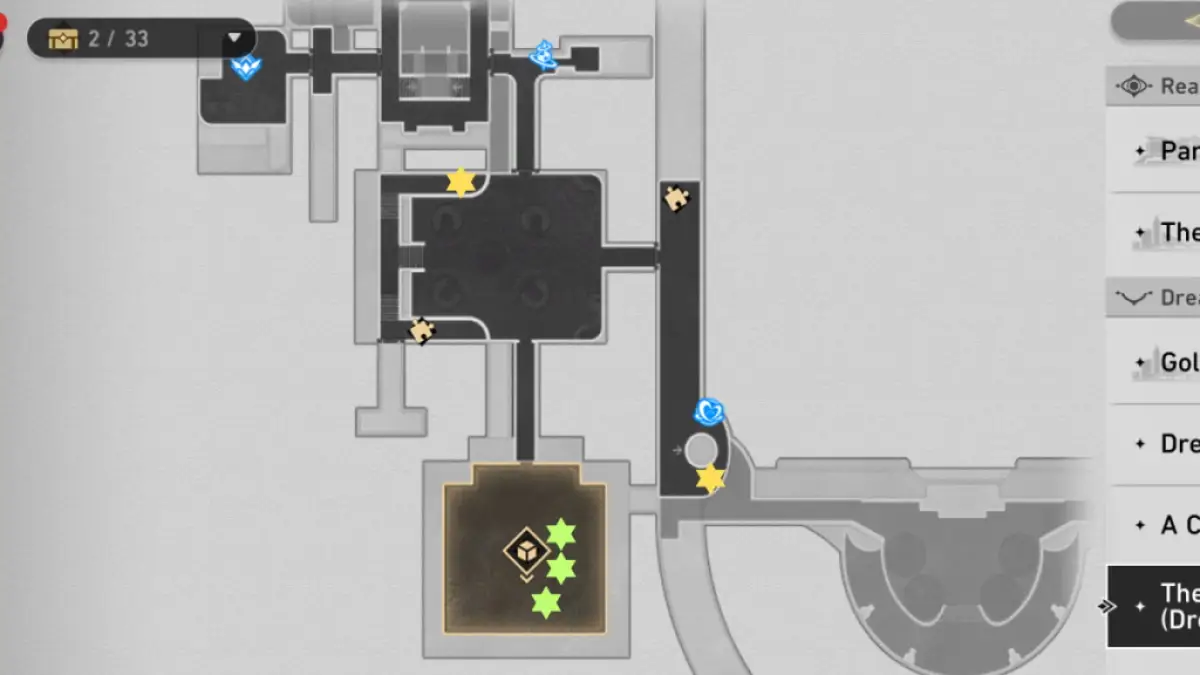
Image by Pro Game Guides
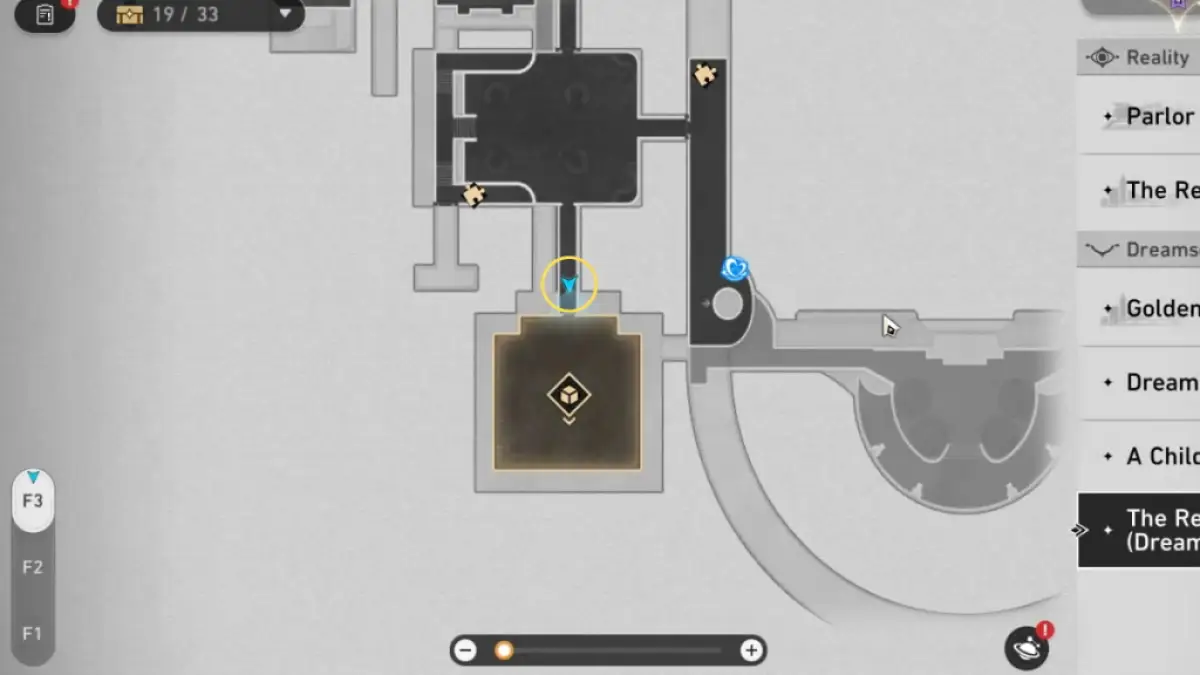
Image by Pro Game Guides
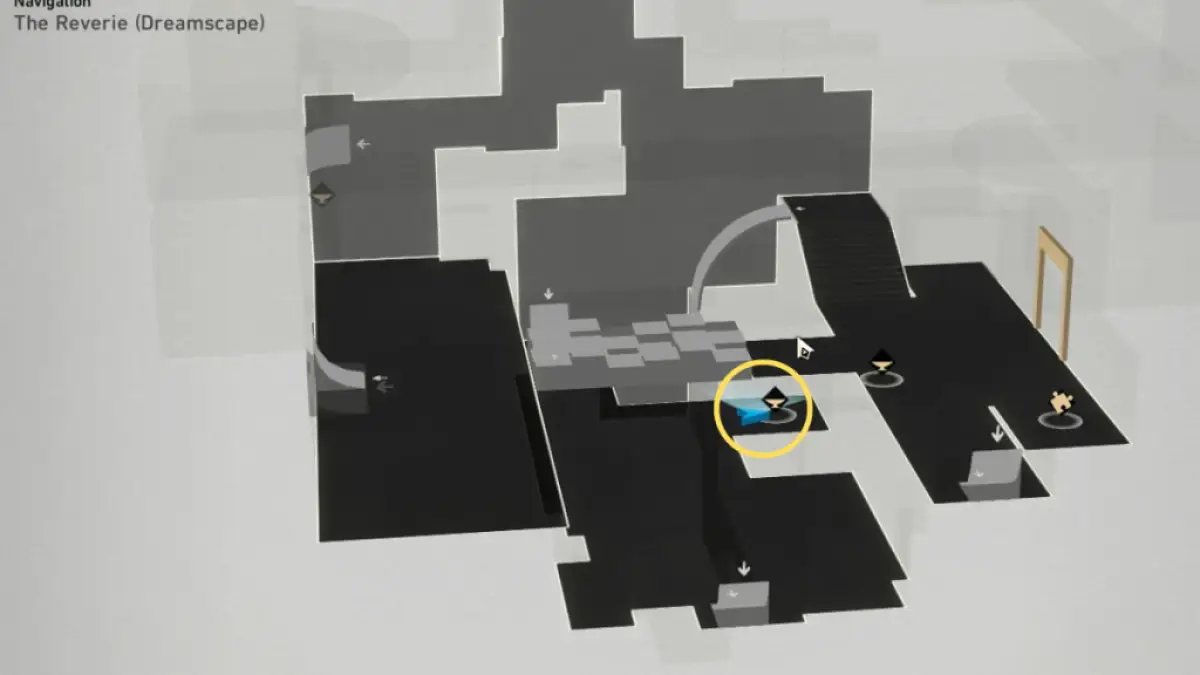
Image by Pro Game Guides
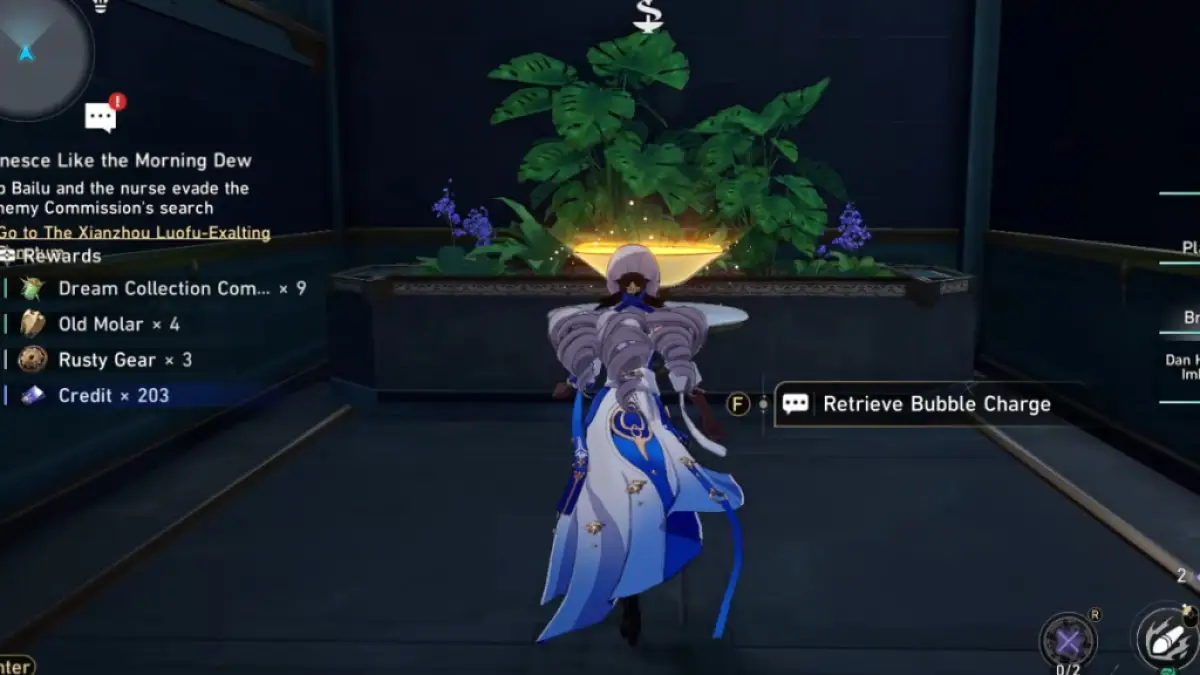
Image by Pro Game Guides
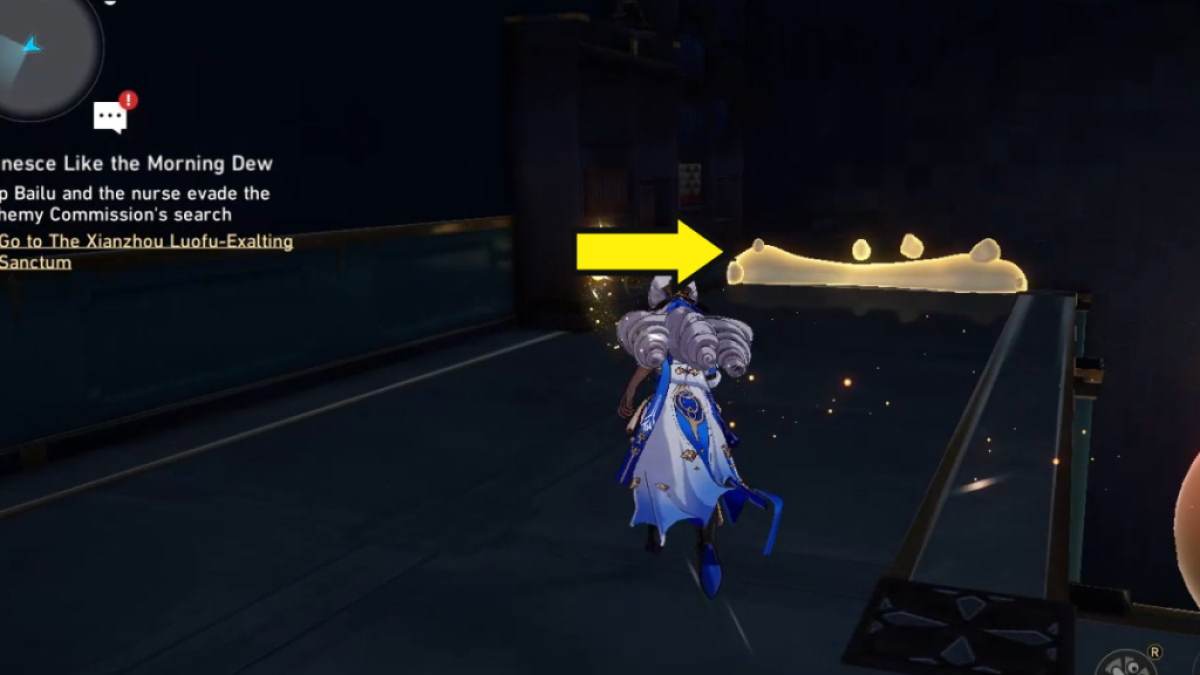
Image by Pro Game Guides
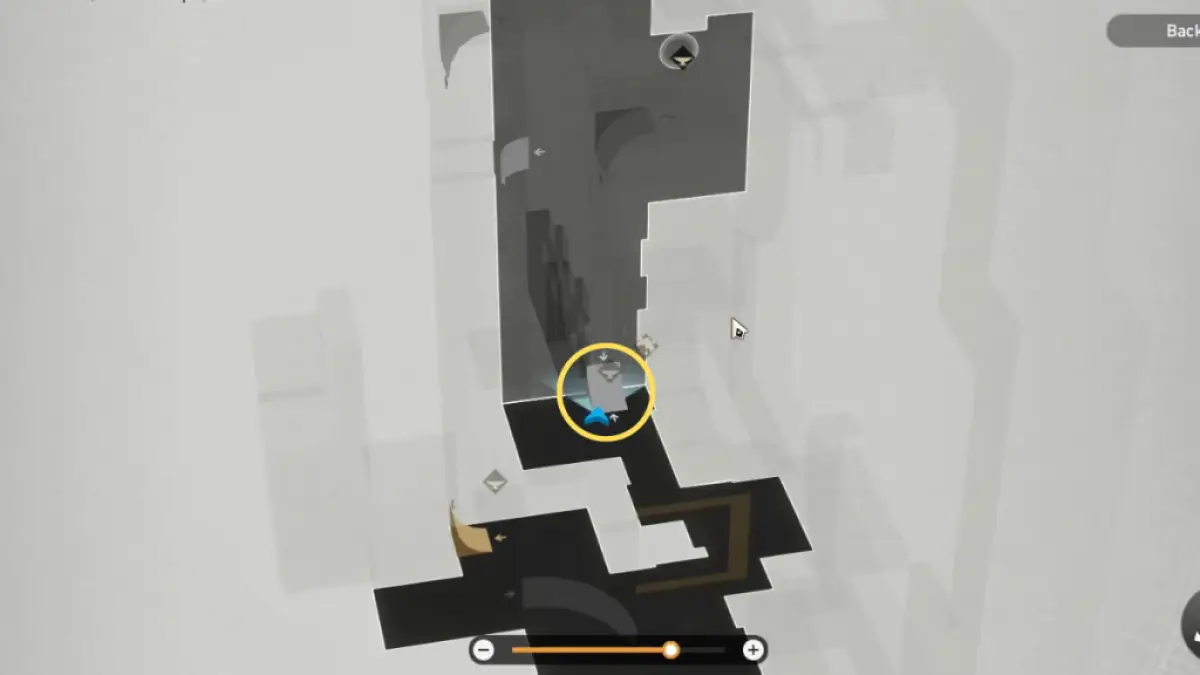
Image by Pro Game Guides
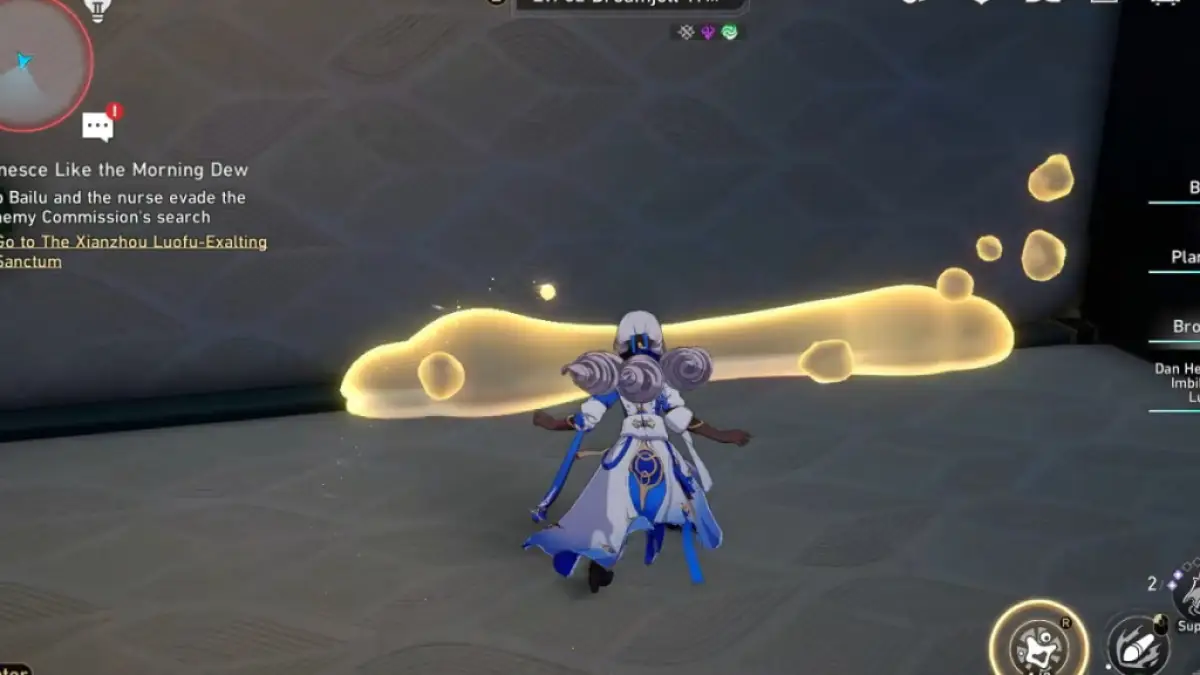
Image by Pro Game Guides
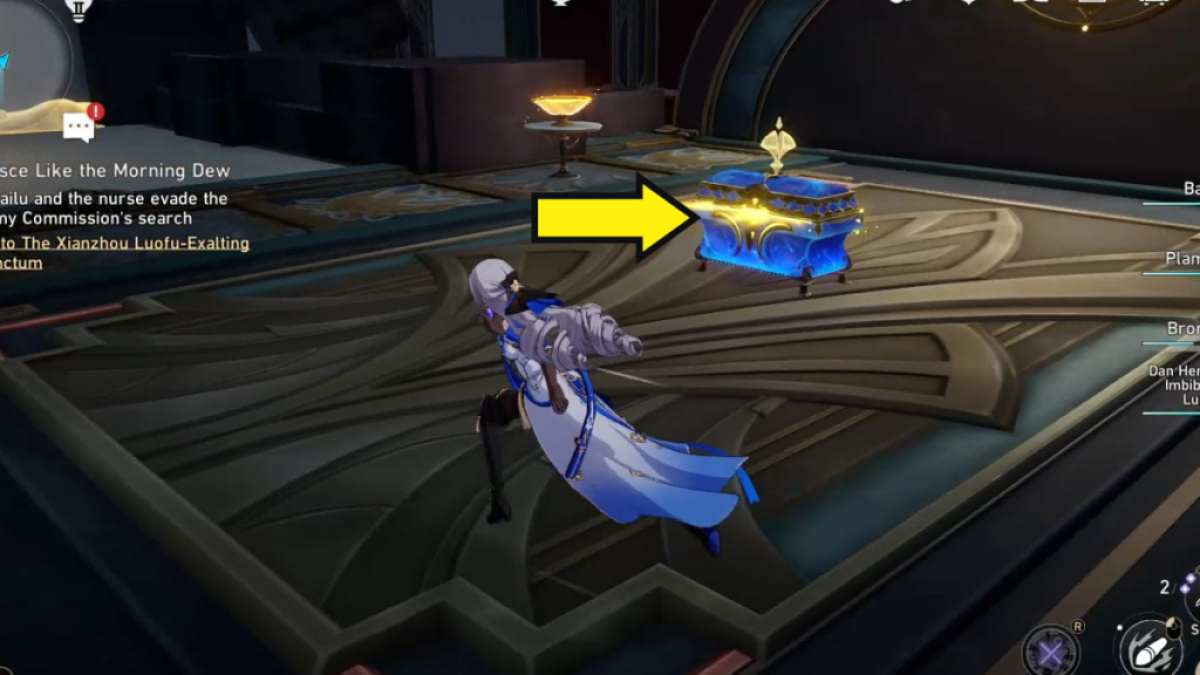
Image by Pro Game Guides
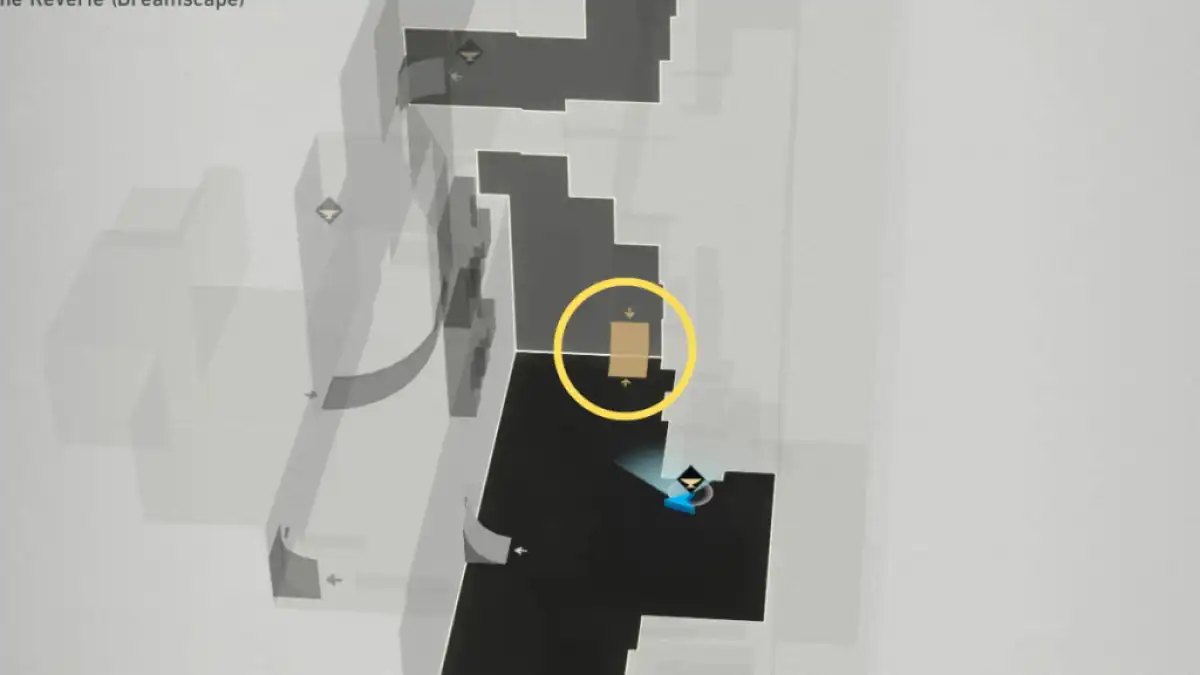
Image by Pro Game Guides
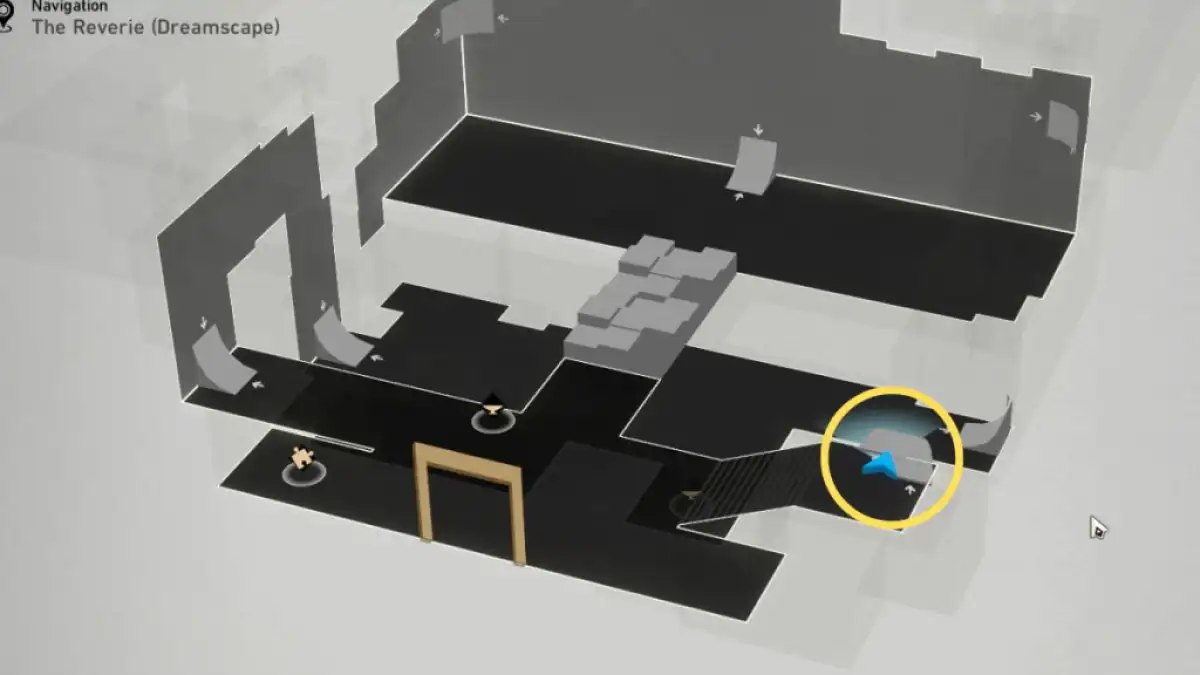
Image by Pro Game Guides
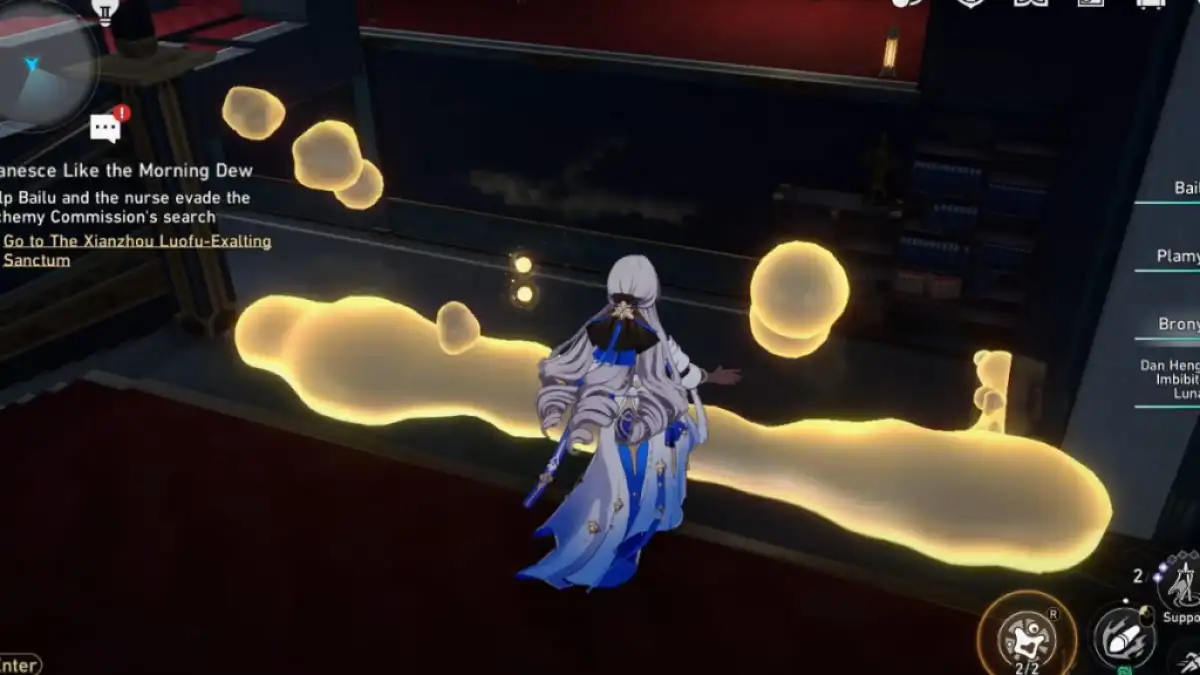
Image by Pro Game Guides
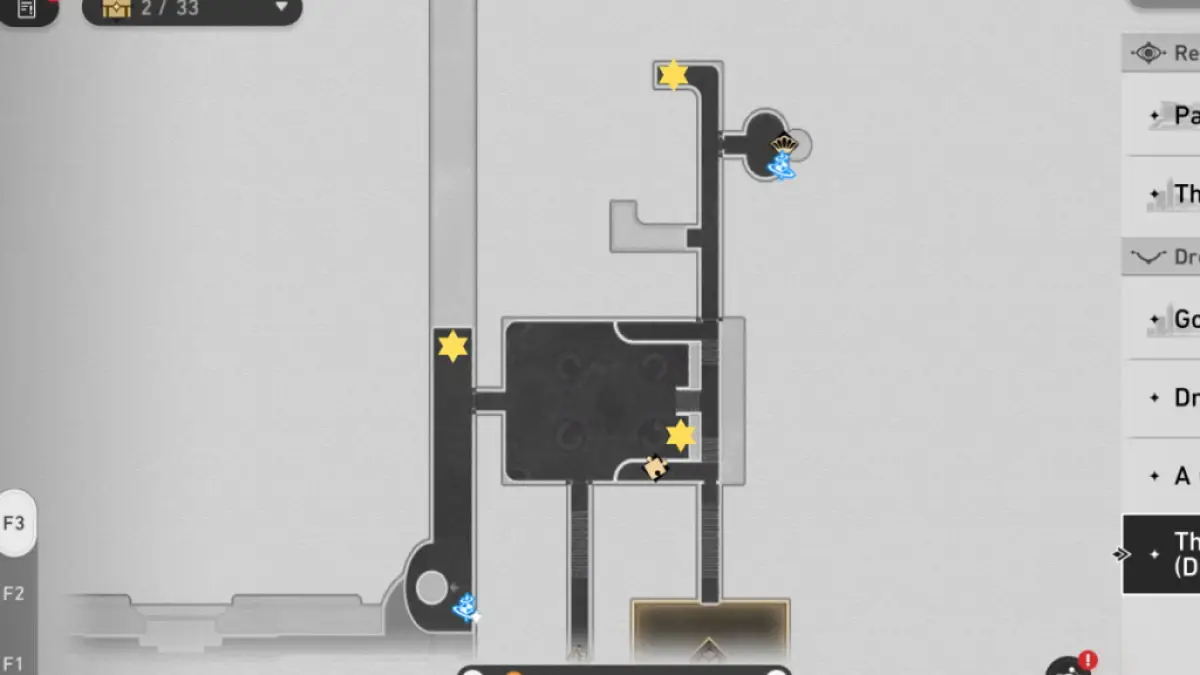
Image by Pro Game Guides
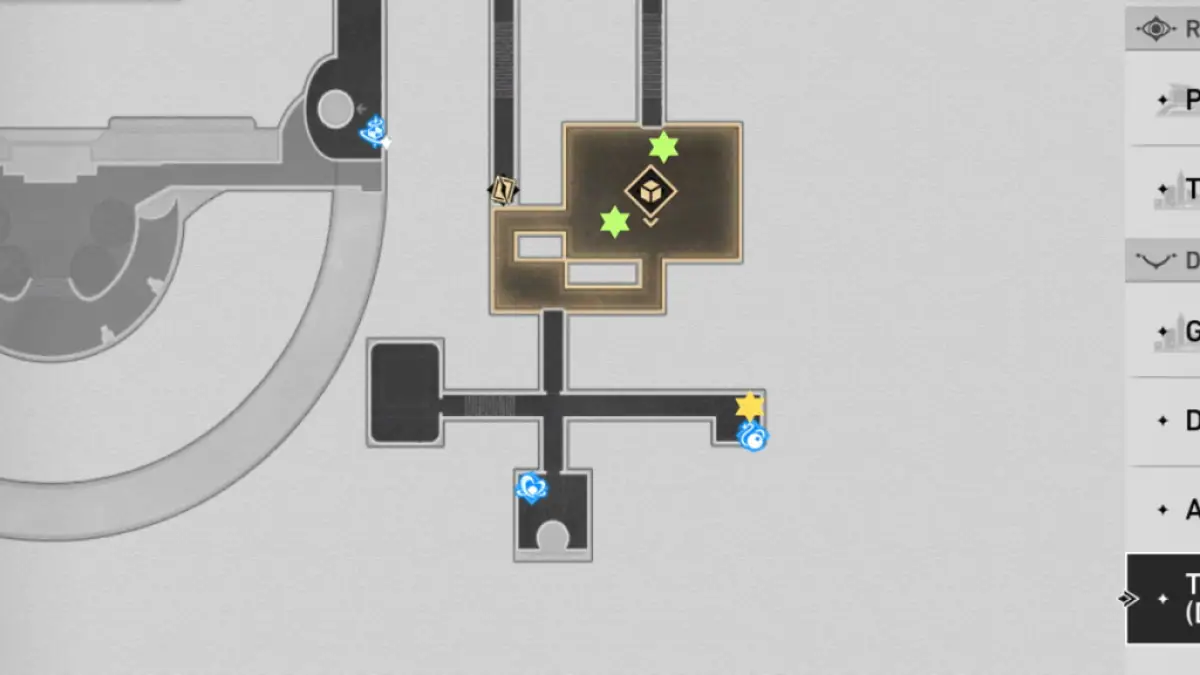
Image by Pro Game Guides
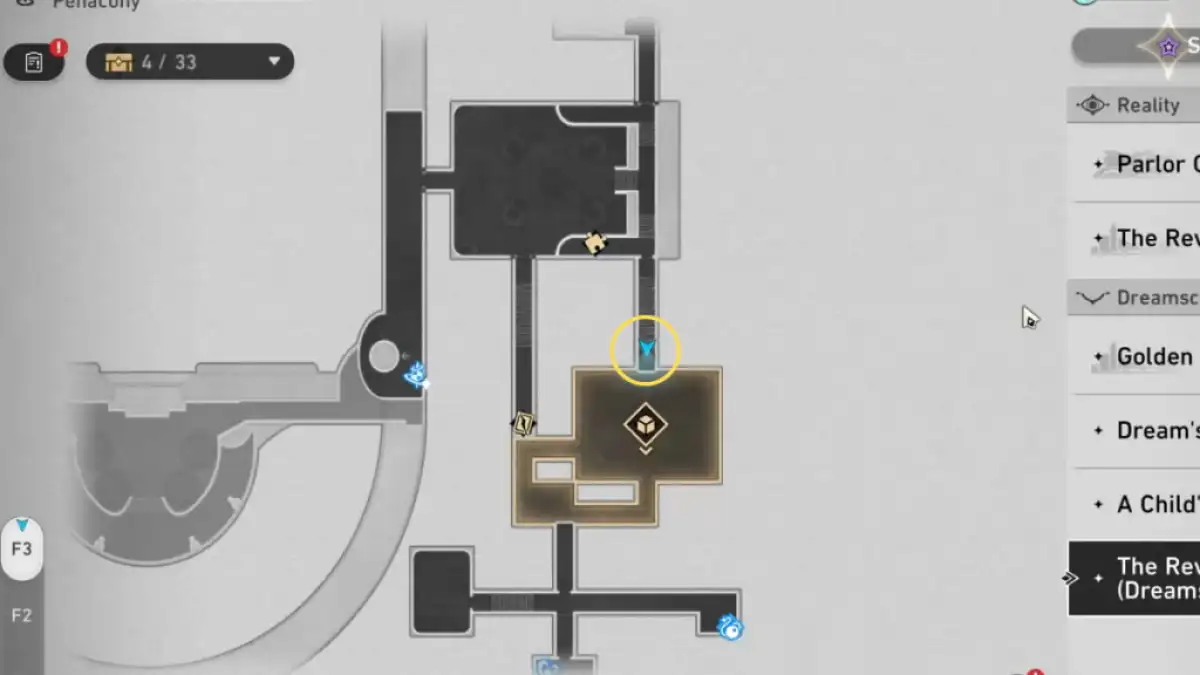
Image by Pro Game Guides

Image by Pro Game Guides
Image by Pro Game Guides
Screenshot by Pro Game Guides
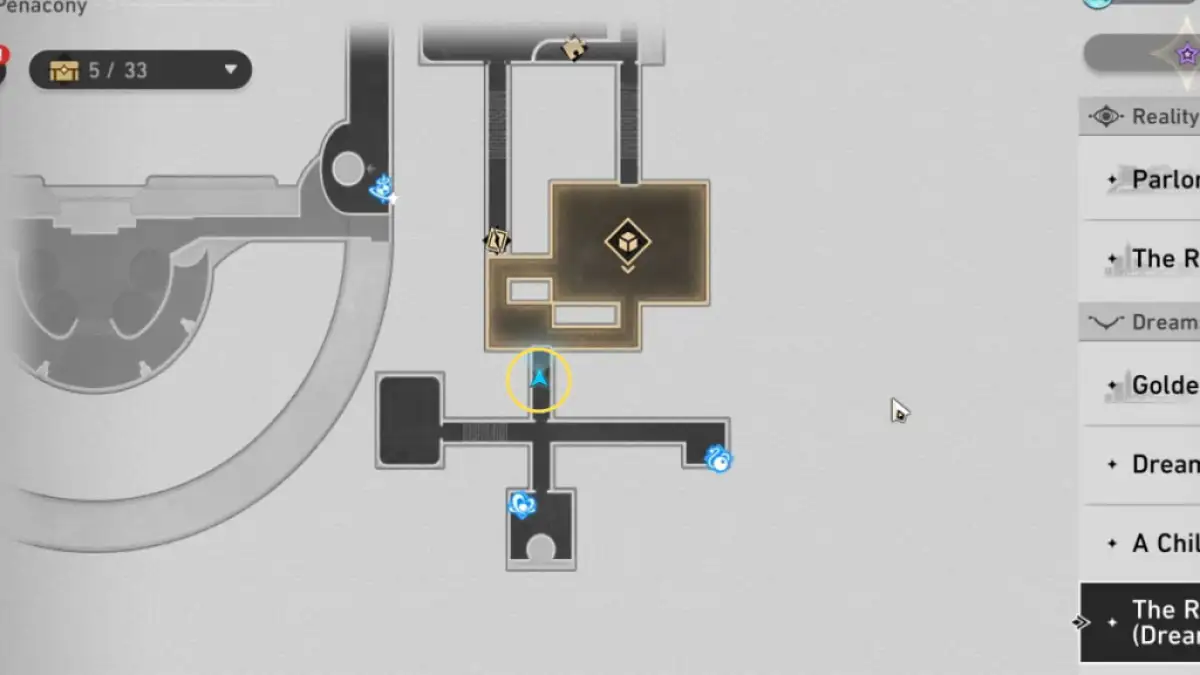
Image by Pro Game Guides
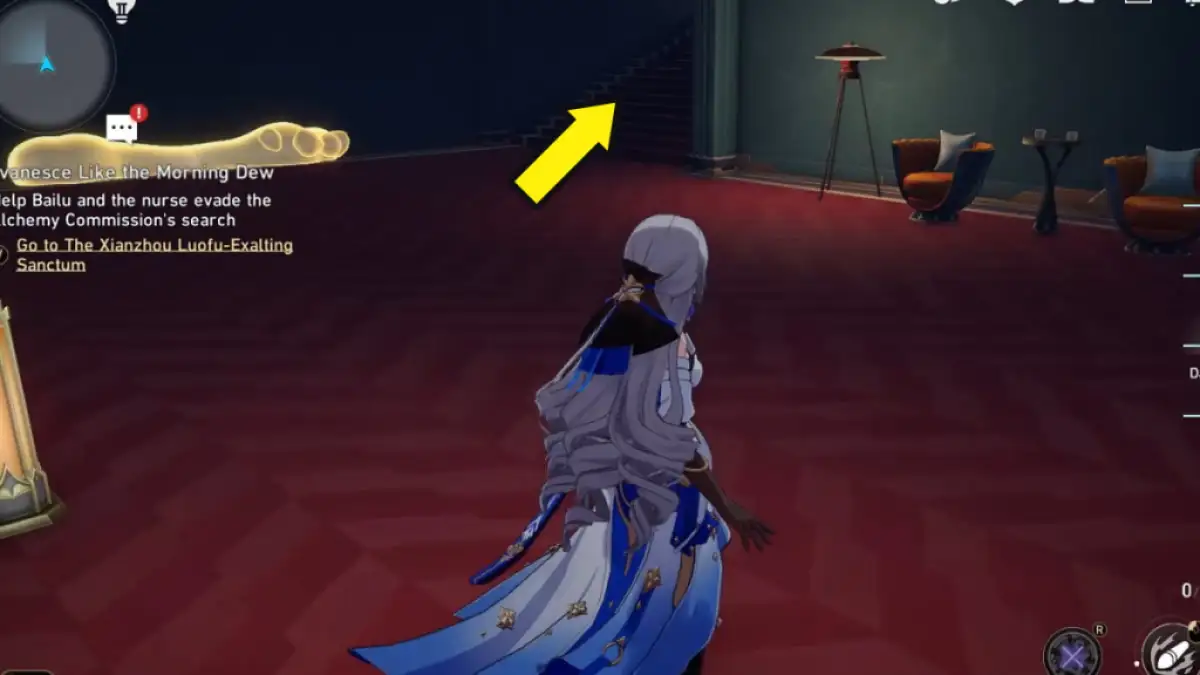
Image by Pro Game Guides
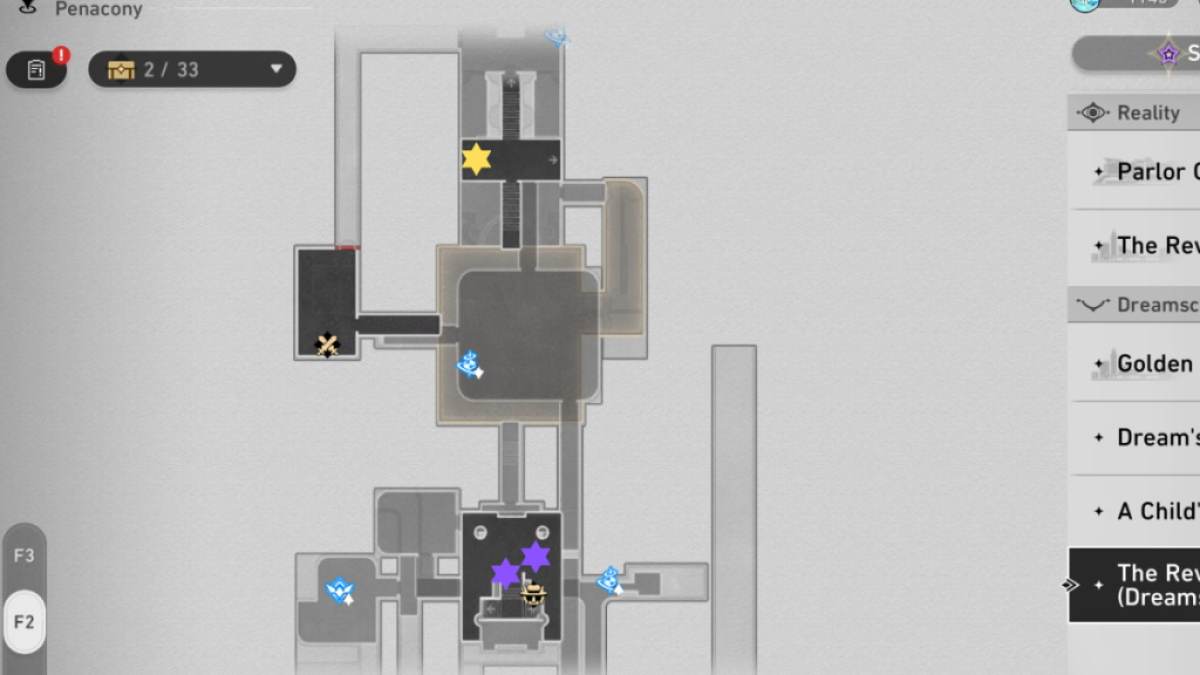
Image by Pro Game Guides
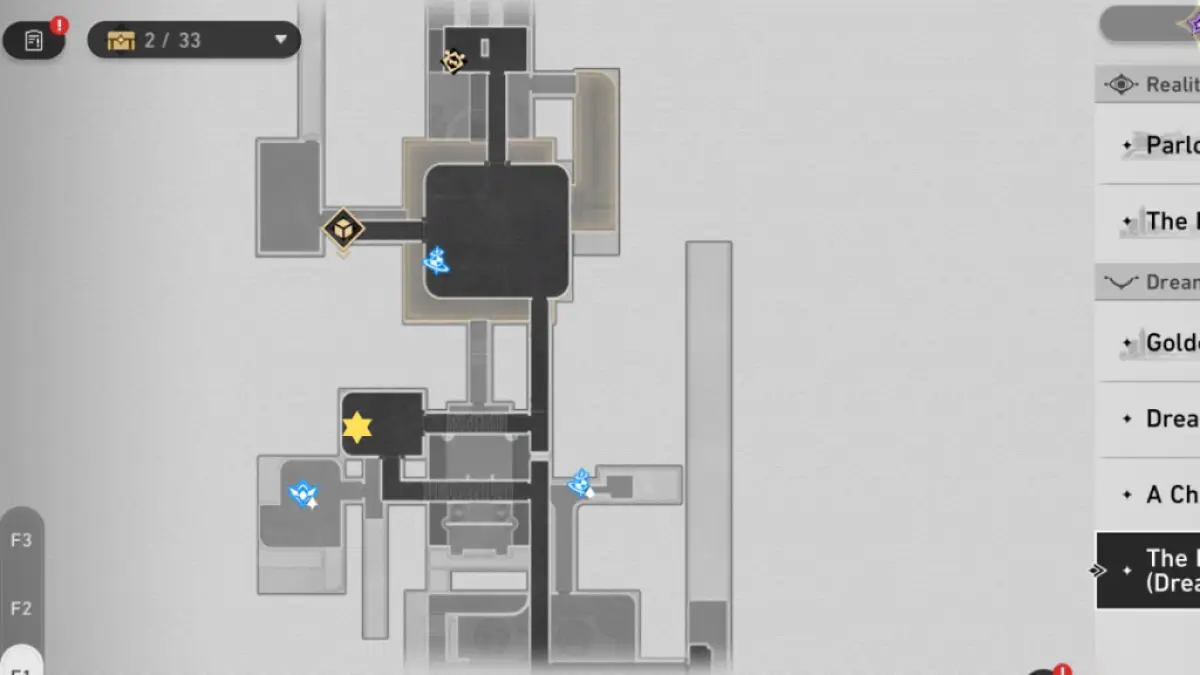
Image by Pro Game Guides
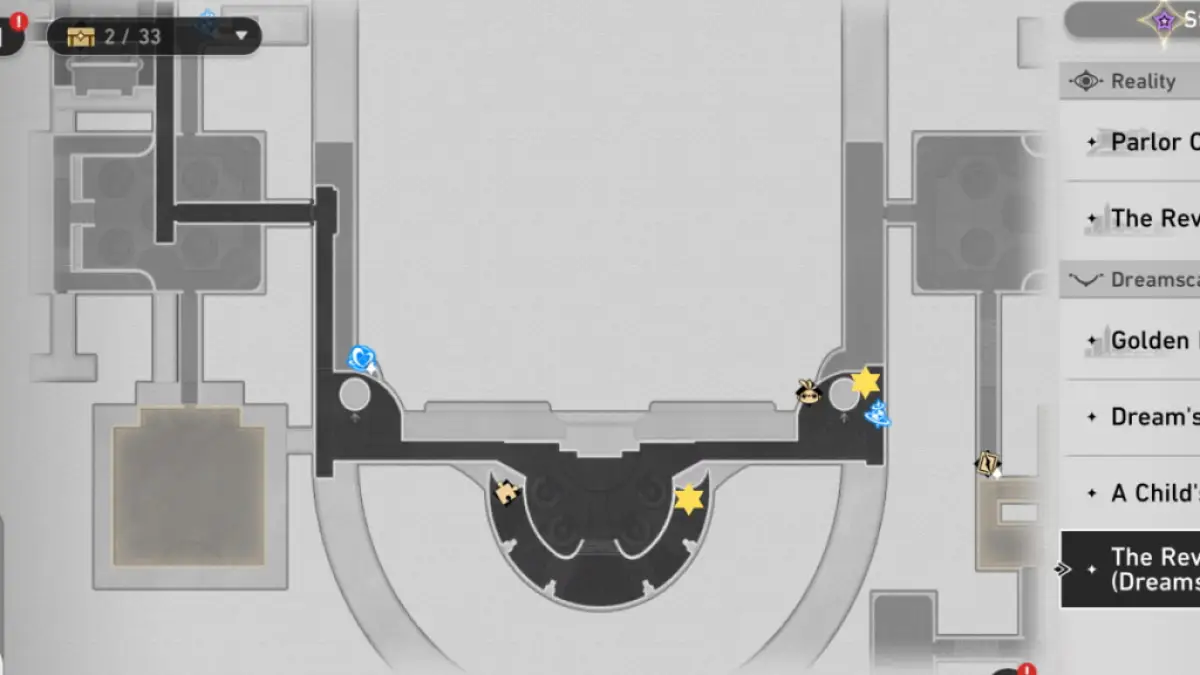
Image by Pro Game Guides

Image by Pro Game Guides
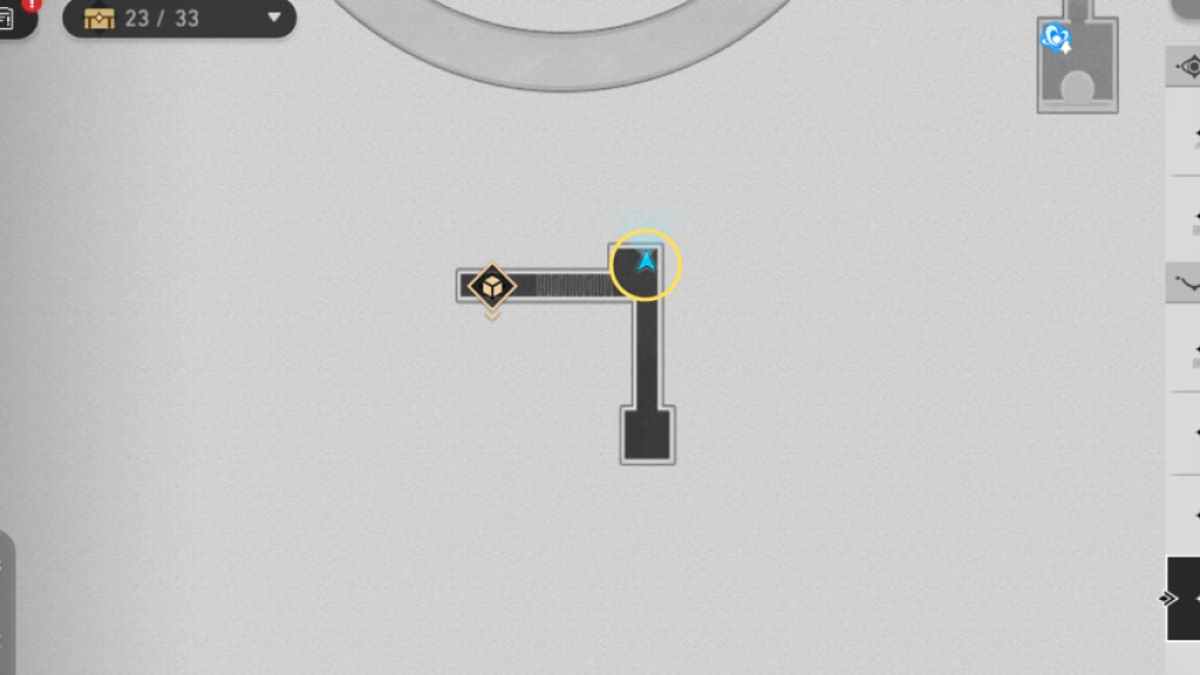
Image by Pro Game Guides
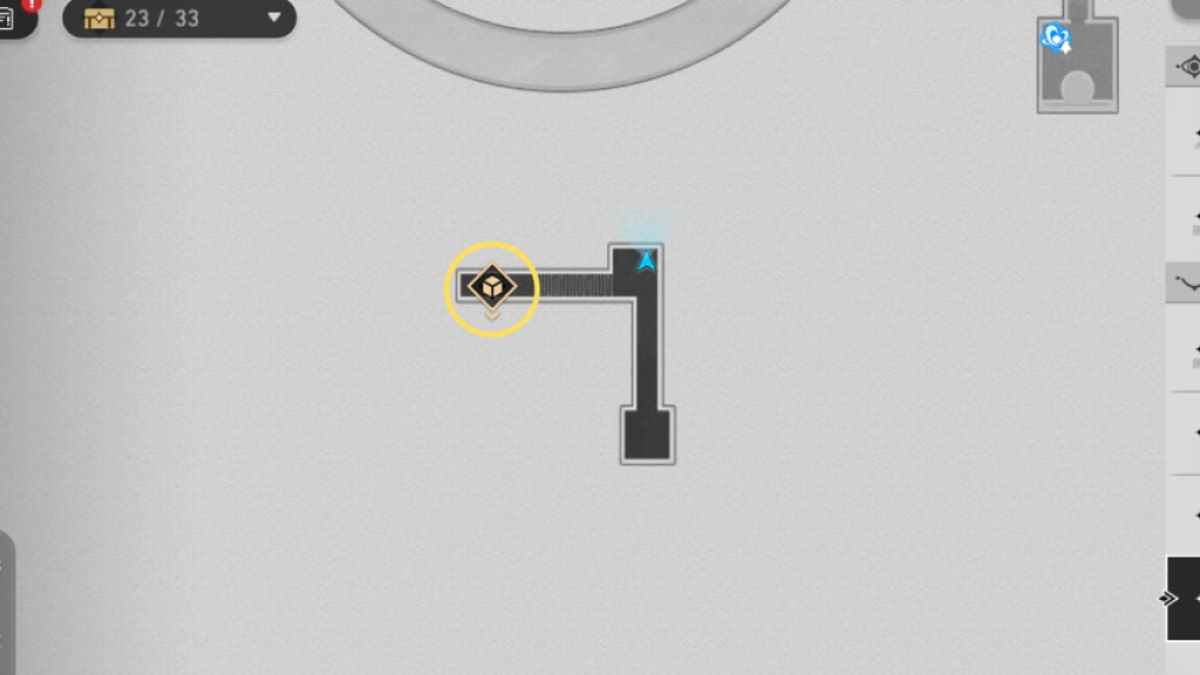
Image by Pro Game Guides
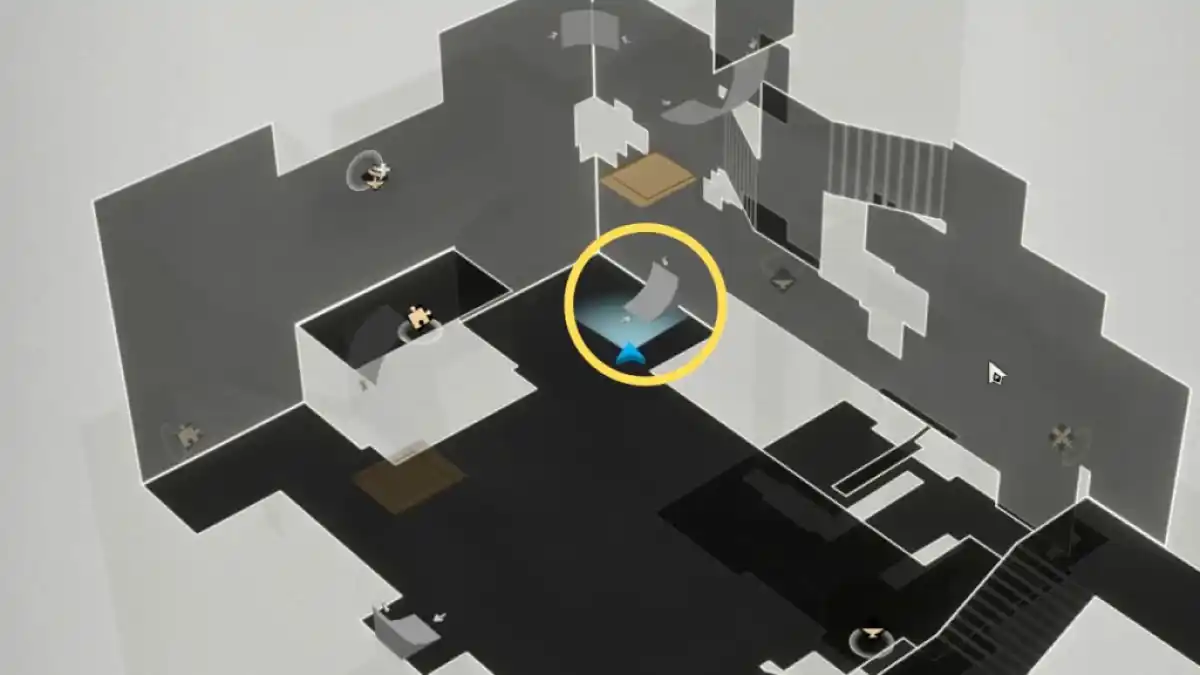
Image by Pro Game Guides
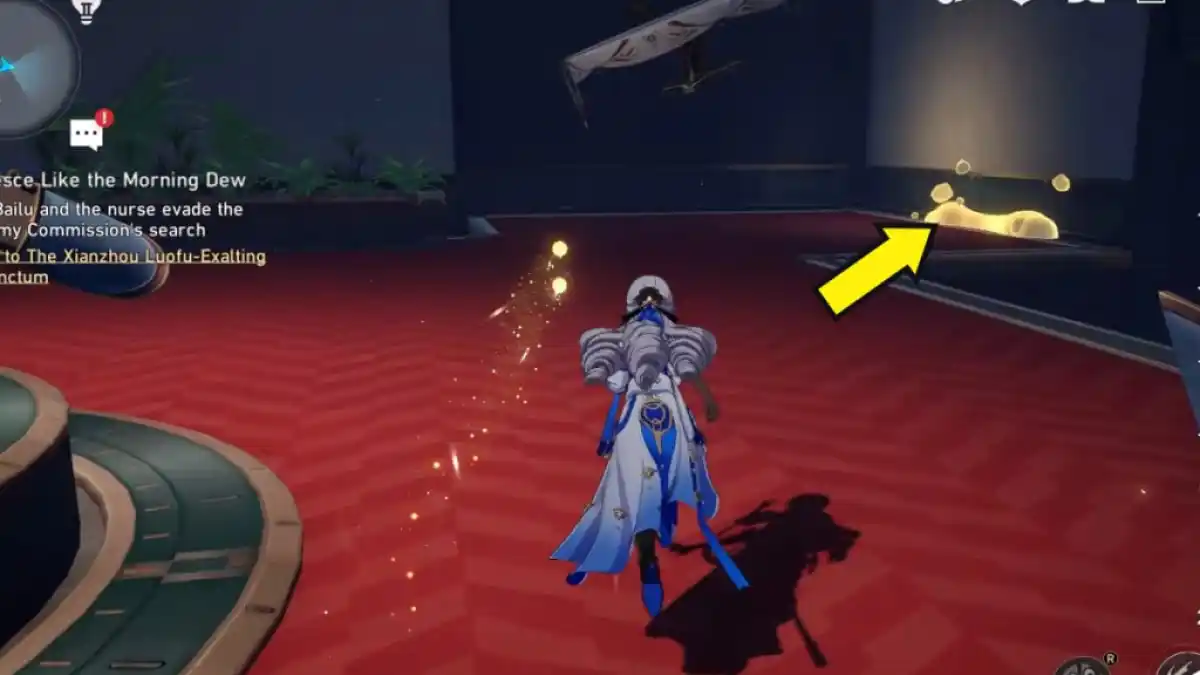
Image by Pro Game Guides
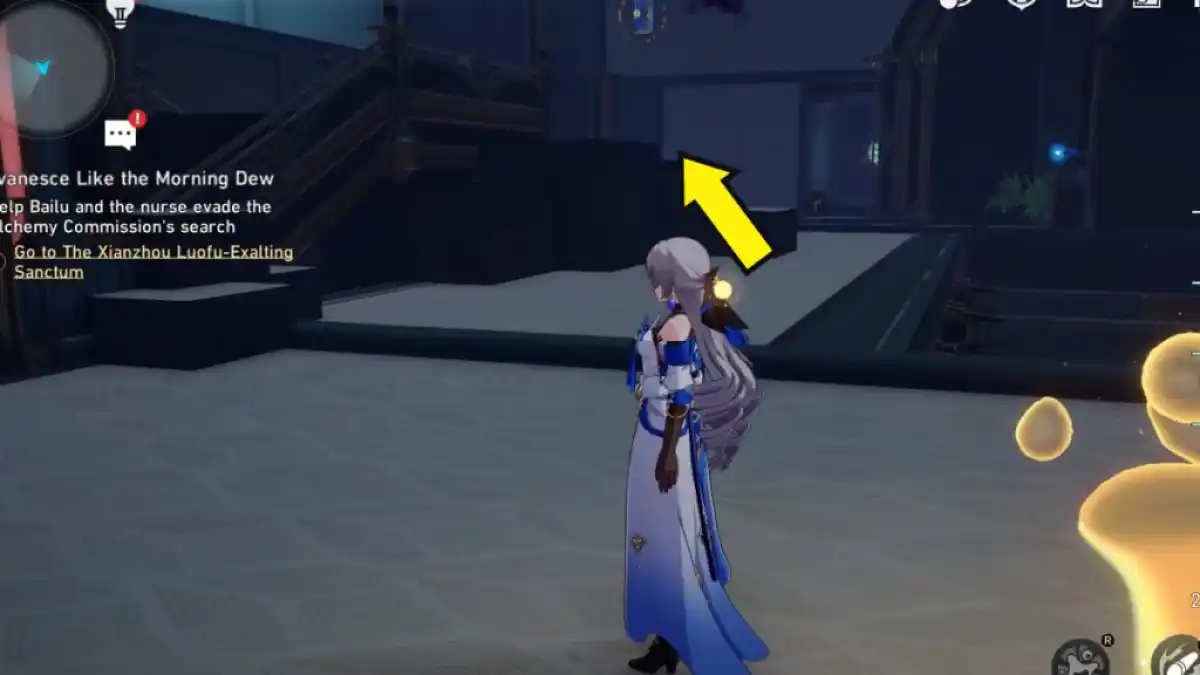
Image by Pro Game Guides
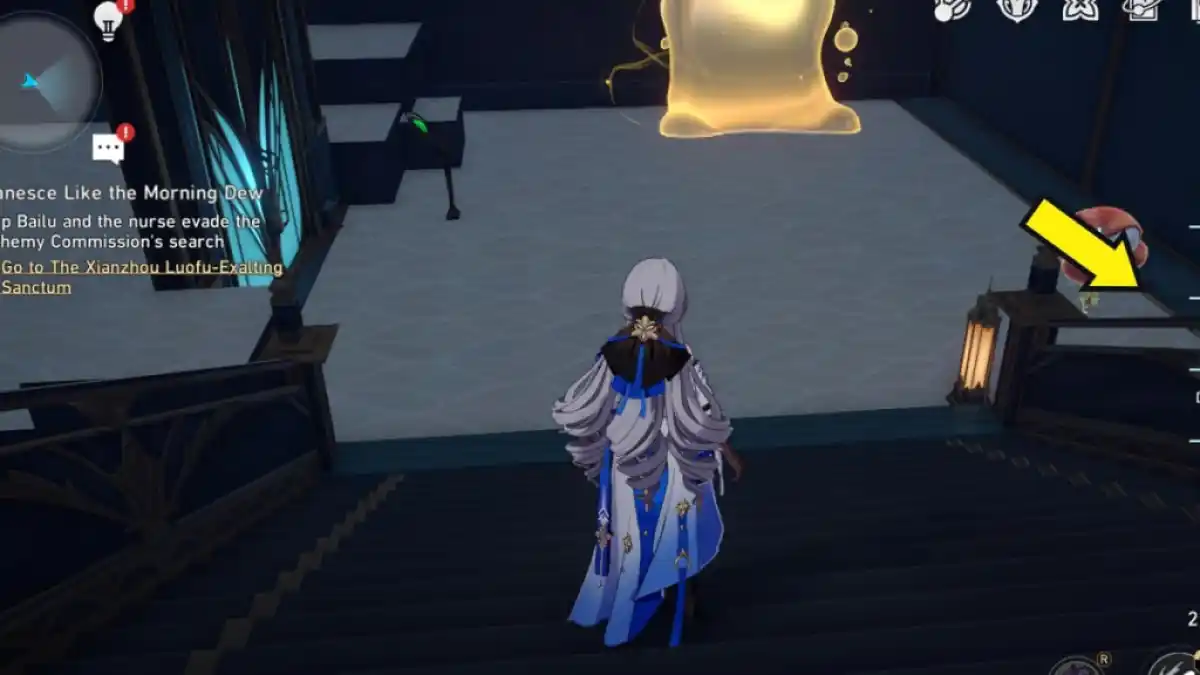
Image by Pro Game Guides
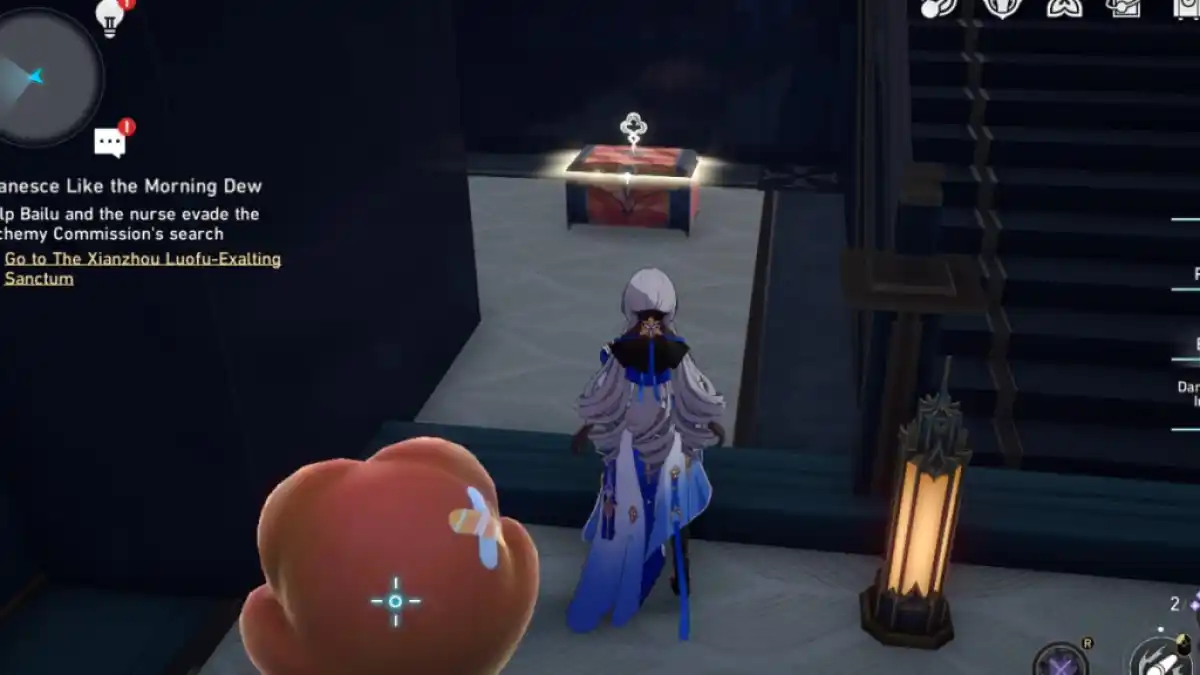
Image by Pro Game Guides
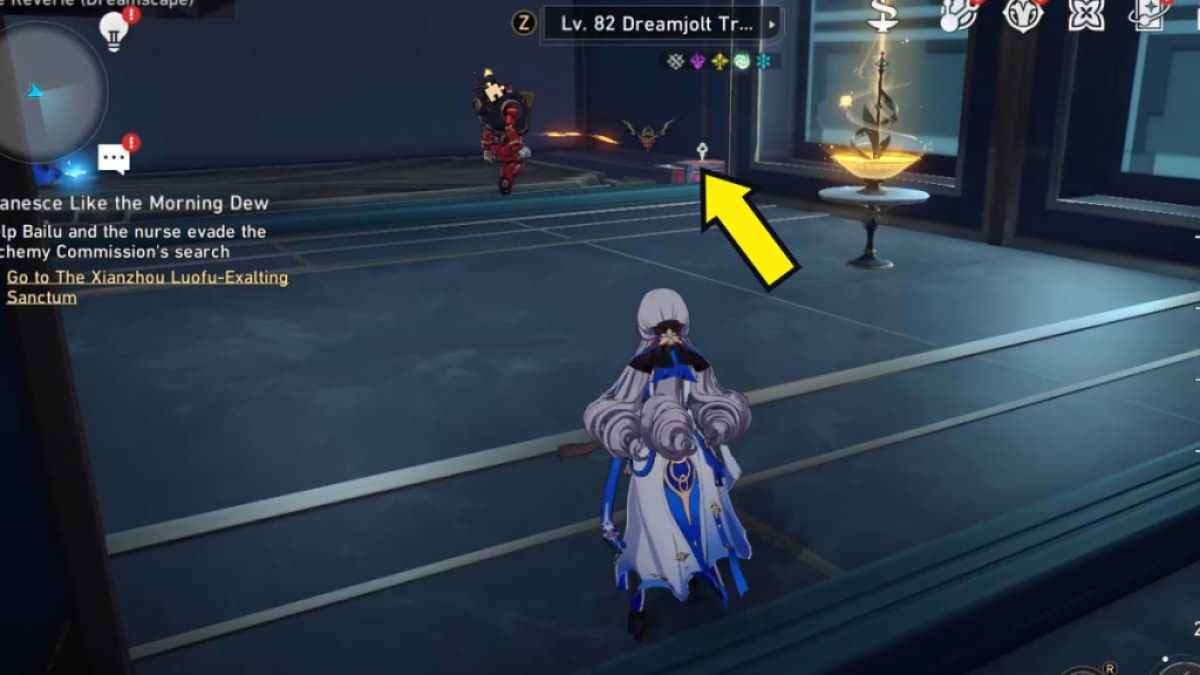
Image by Pro Game Guides
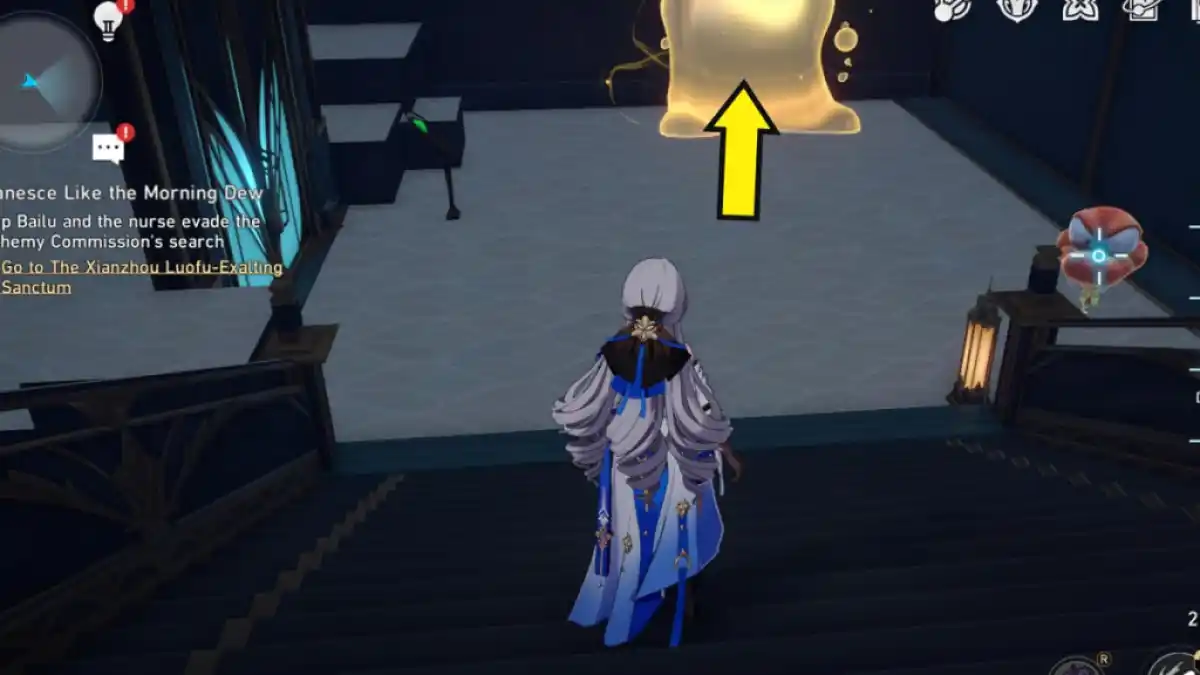
Image by Pro Game Guides
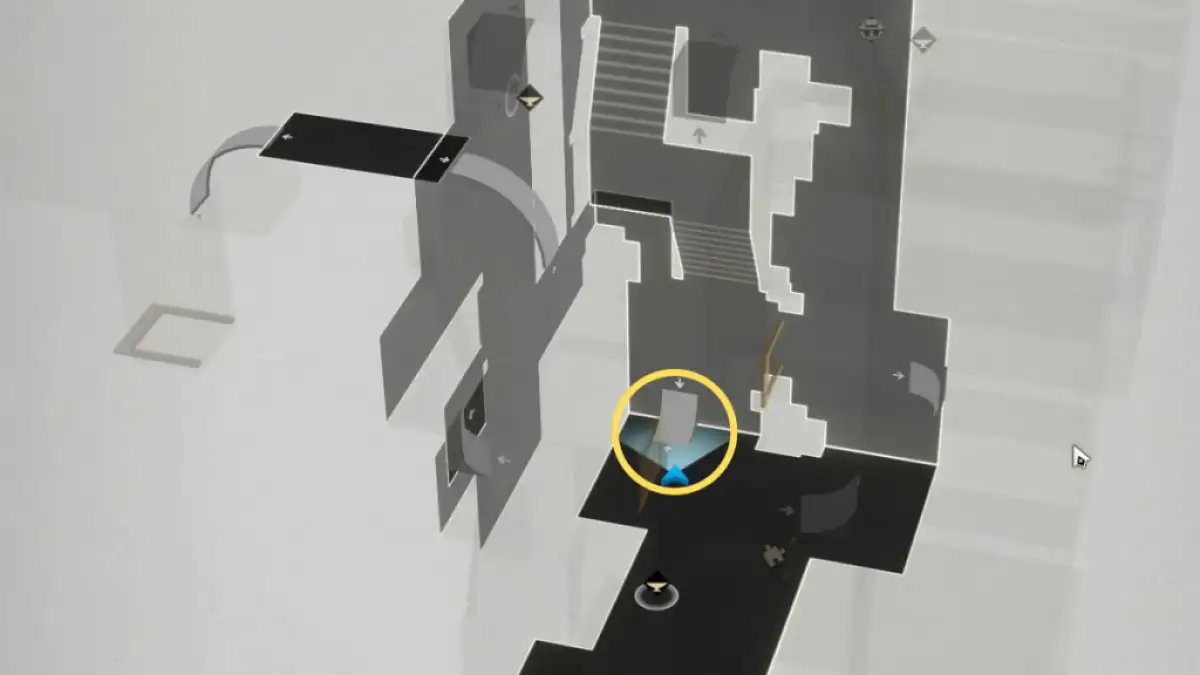
Image by Pro Game Guides
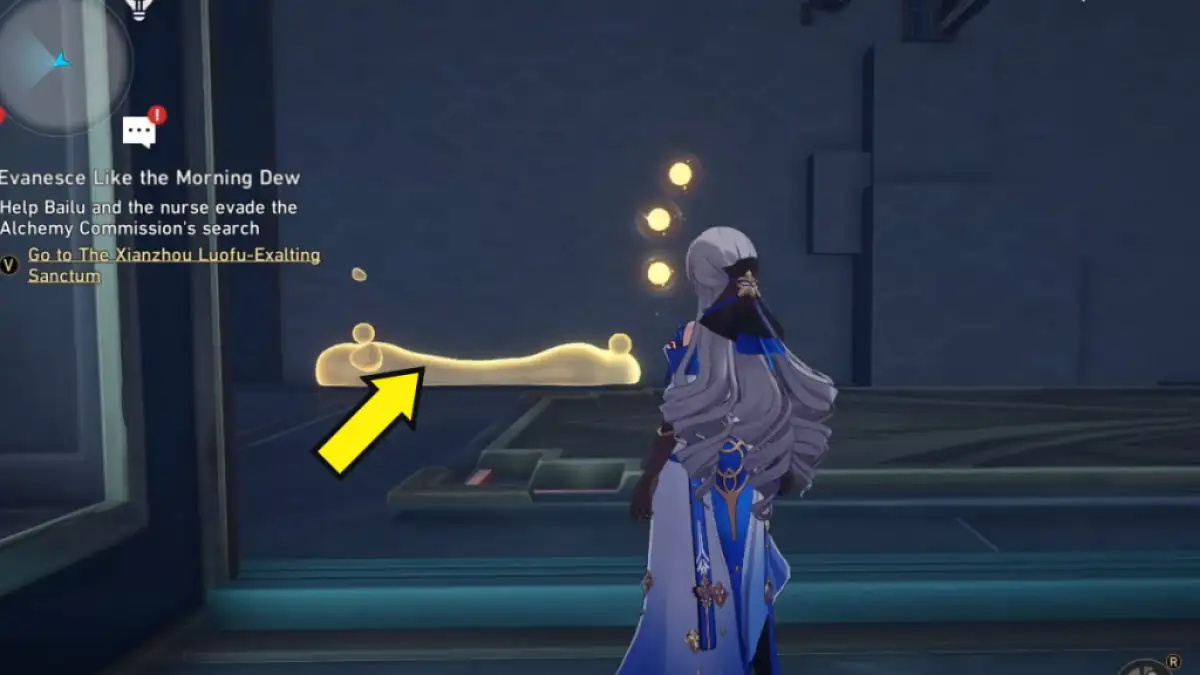
Image by Pro Game Guides
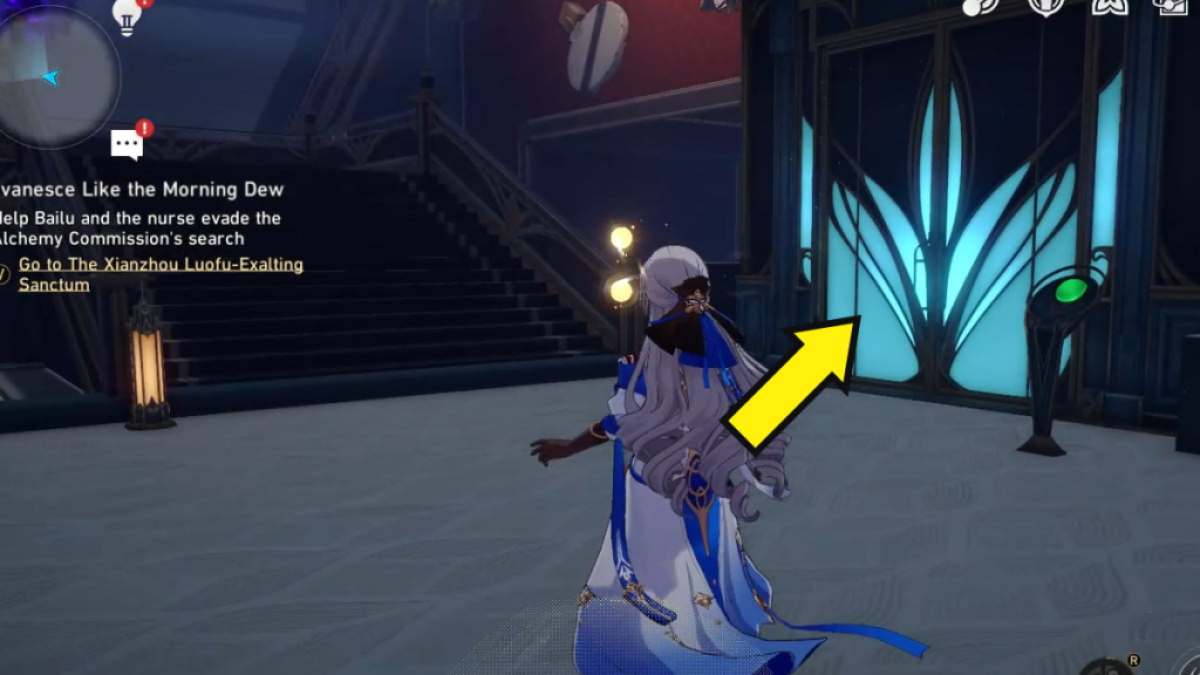
Image by Pro Game Guides
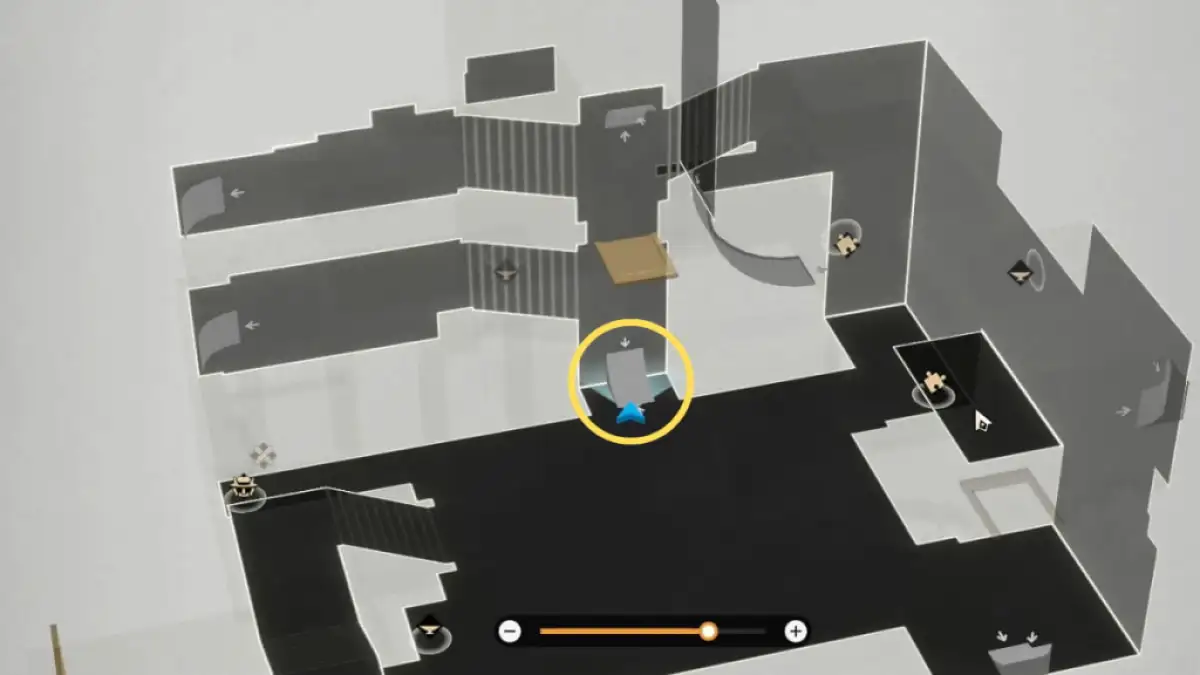
Image by Pro Game Guides
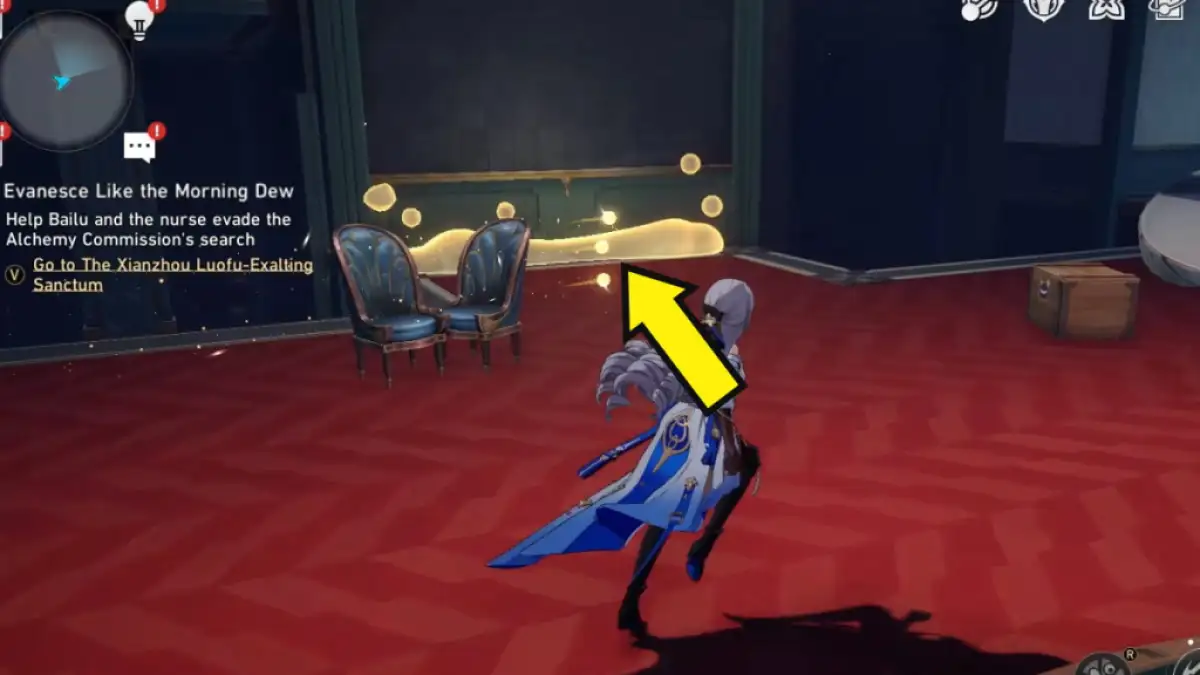
Image by Pro Game Guides
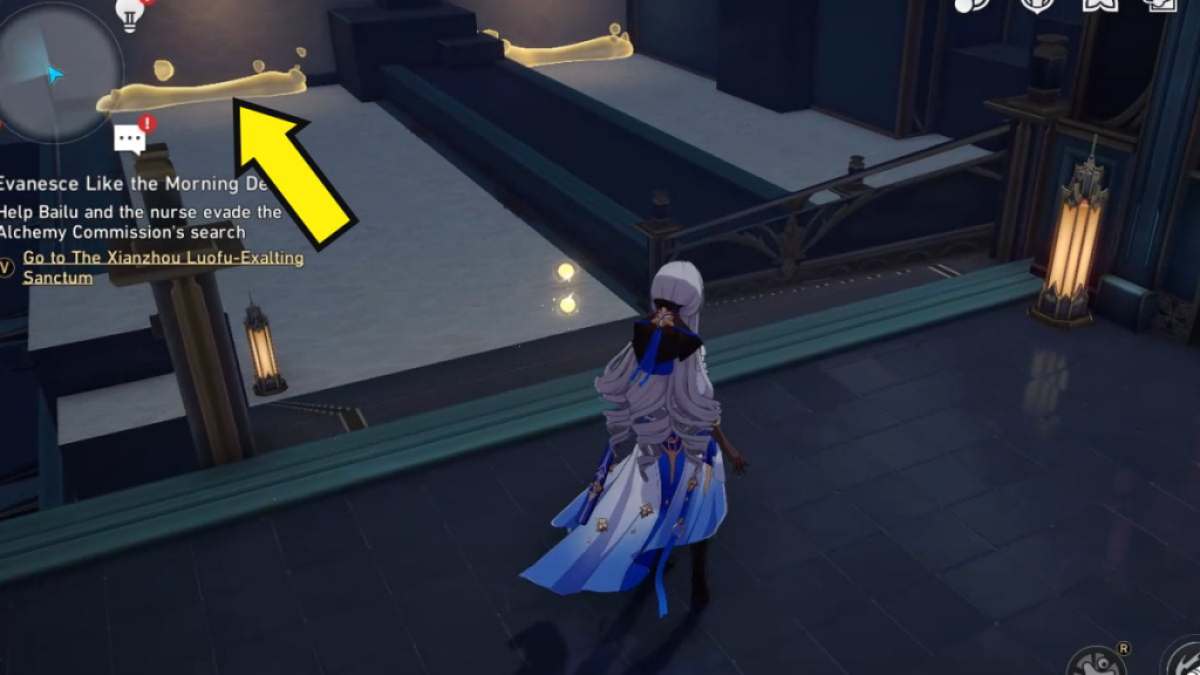
Image by Pro Game Guides
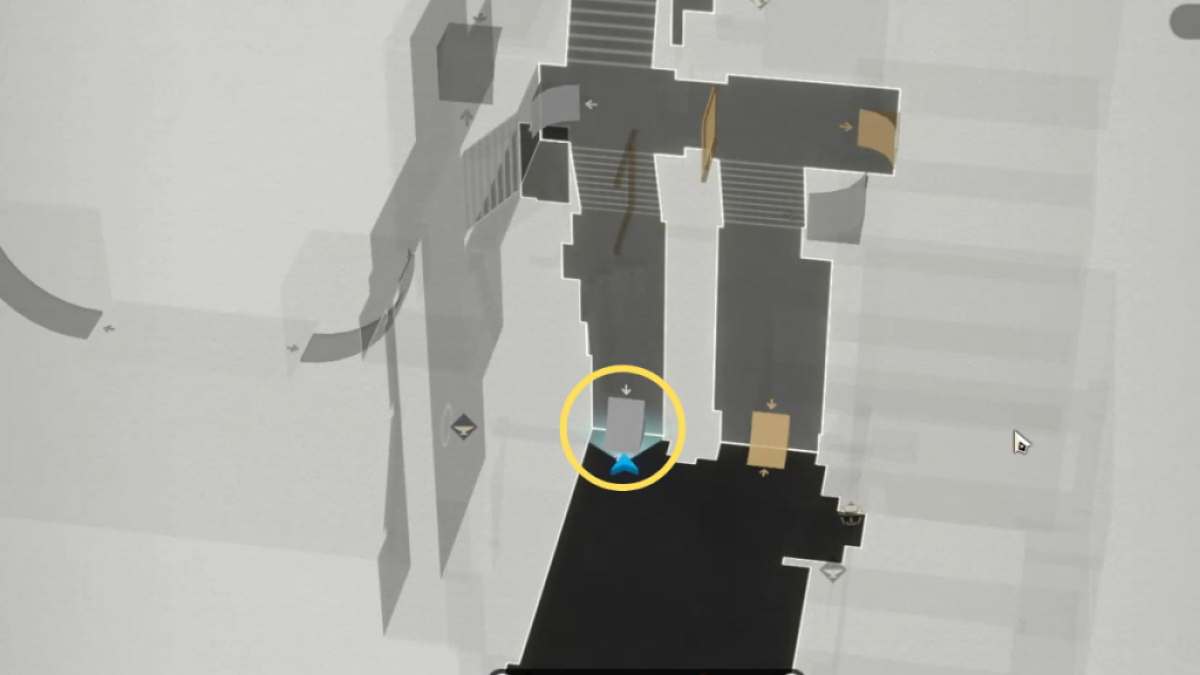
Image by Pro Game Guides
Screenshot by Pro Game Guides
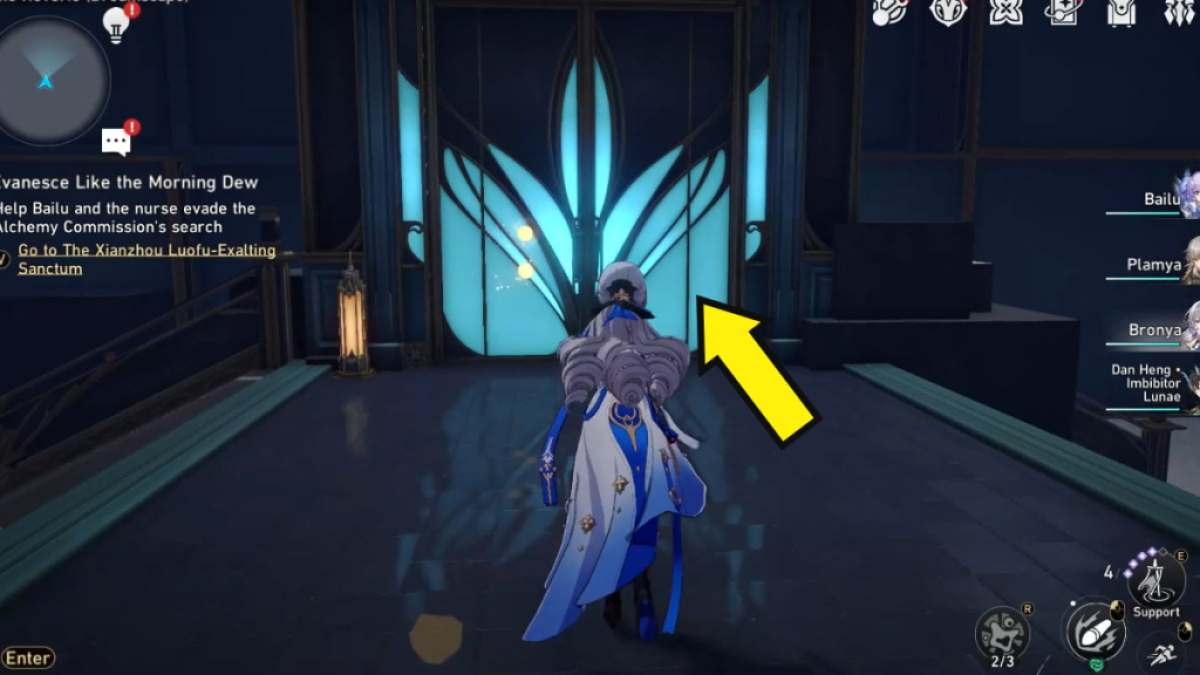
Image by Pro Game Guides
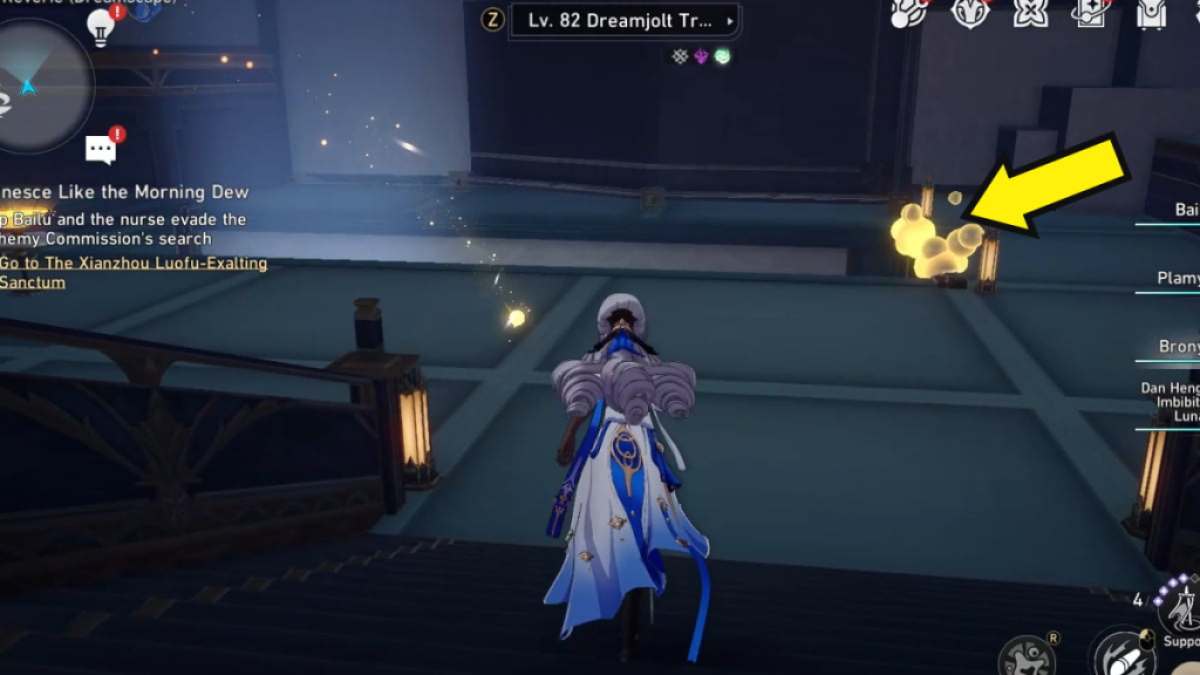
Image by Pro Game Guides
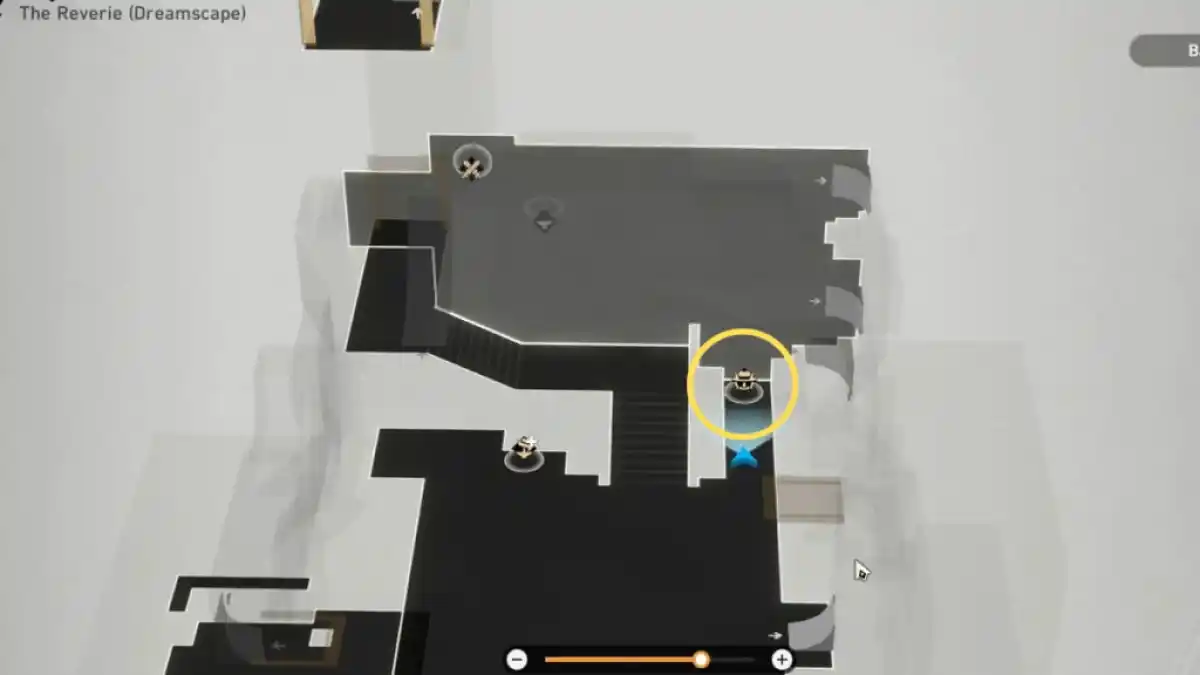
Image by Pro Game Guides
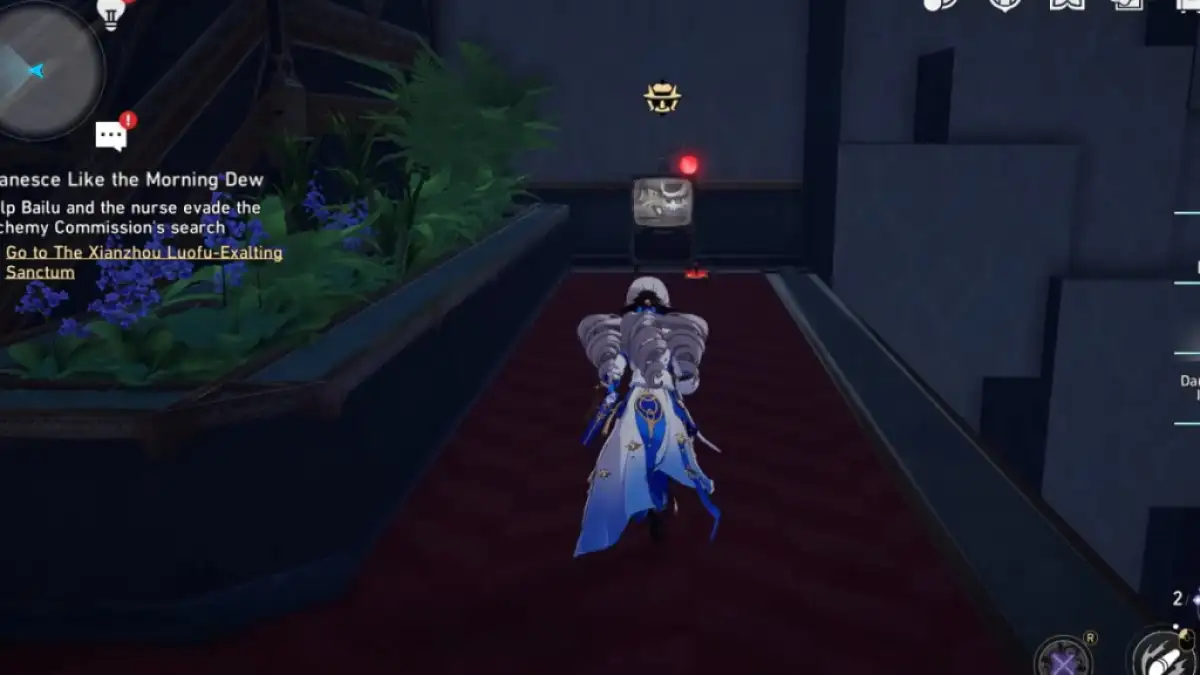
Image by Pro Game Guides
