Get all the collectibles !
If you play through the first secret plan , then the Lorestones ( or Lorestangir ) will be conversant to you . Check out all Lorestone locations in Senua ’s Saga Hellblade II and unlock the Tales of Midgard accomplishment .
All Lorestangir collectible locations in Senua’s Saga: Hellblade II
Once you get all Lorestangir collectable inSenua ’s Saga , you ’ll unlock an Extras choice to listen to the Lorestangir stories as well as Druth as a narrator . Here are all Lorestangir payable location in Hellblade II so you could unlock all of these reward .
Chapter 1 Reykjanesta
There is only one Lorestone in the first chapter , and it is essentially used to teach you the machinist of this collectable . It is found in the Landfall section . You ’ll run away into it on the way of life toward the shores on the right . You ca n’t drop it .
Chapter 2 Freyslaug
The Freyslaug chapter hasfour Lorestoneswhich you could witness throughout various section .
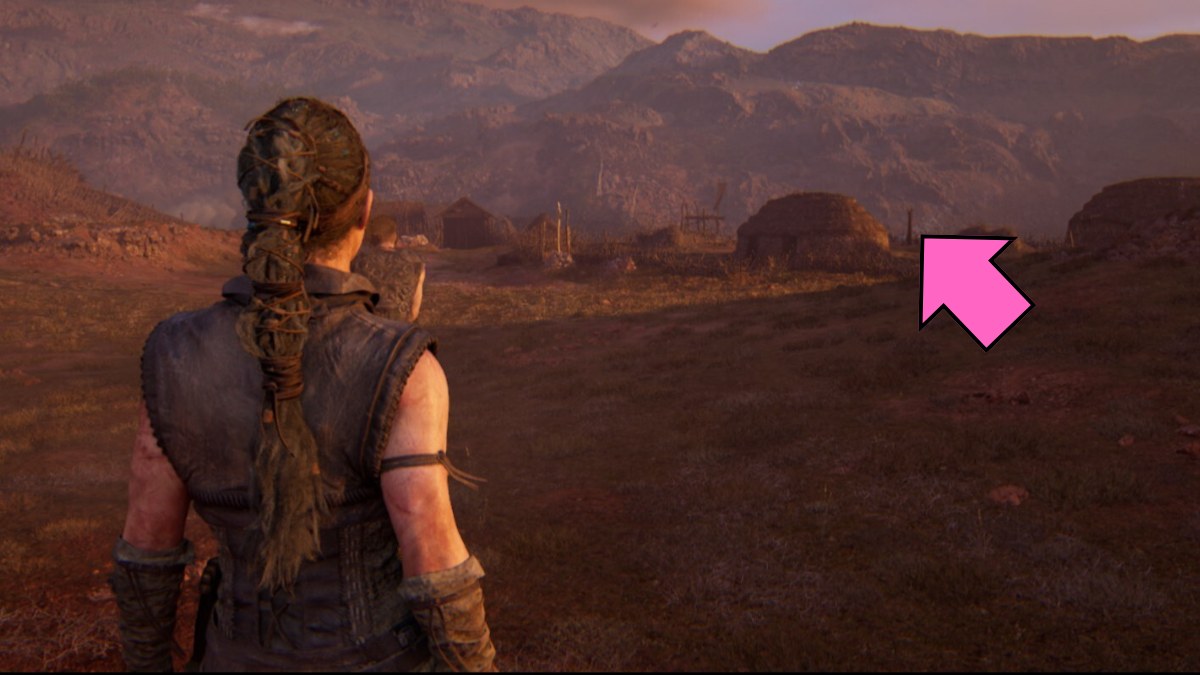
As you are walking with the Slaver past the hut , you ’ll notice a Lorestone in the distance . Go into the thousand andbehind the hutsto collect the 2d Lorestangir of the biz .
Once you are back in Freyslaug , make your way through the heavy house right across the span . When you exit it , go immediately to the leftfield and into thebackyard . You ’ll find a crawl space underneath a lot of branch . Go underneath , and the Lodestone will be to yourright .

Once you see the man in the middle , drop down closer to the ceremony . Stay on the way of life until you reach asqueeze spacebetween a wooden bodily structure . Look around , and you ’ll finda ladder . Climb up and follow the path to turn over the Lorestone .
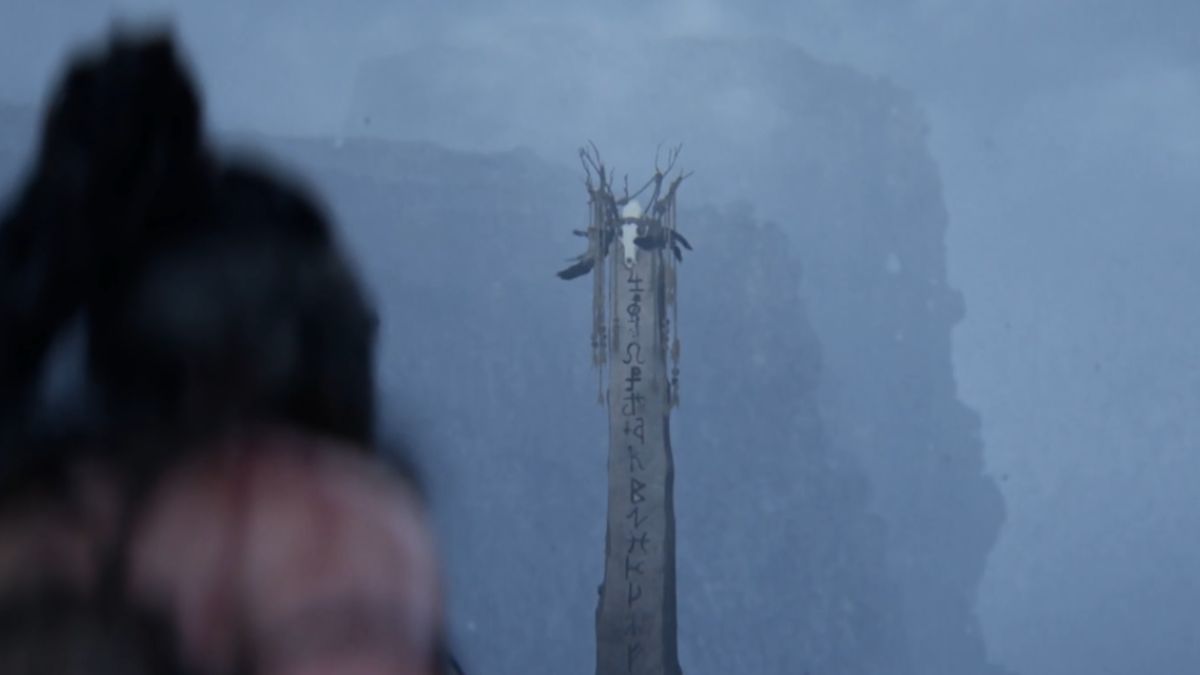
When you see astick with black fabrictied around it and held up by a bunch of rocks , channelise down theleft pathfirst . You ’ll detect the last Lorestone of chapter two at the end of it .
Chapter 3 Raudholar
Chapter three of Senua ’s Saga has a entire ofsix Lorestonesthat you ask to collect . This is the most you ’ll get in one chapter , so keep your eyes flake .
When you attain the discussion section with the tornado in the ground , go left following it . Keep going along this path until you contact a clearing . To the right , you will find the Lorestangir .
The first Lorestone of this section is right on top of the mound . Go past the jam you climbed up and head up until you heartwo voices talkingabout you . The Lorestone is right next to the home .
Screenshot by Pro Game Guides
After you complete the first Hiddenfolk project , keep going down the path . Once you see astone stepwith white paint to your left , climb up . Pass through the crack in the stone , and you ’ll find the Lorestoneto the rightfield .
After complete the second Hiddenfolk task , keep goingdown the path . You ’ll encounter a hide face . Across the way to the left hand , you ’ll also see a Lorestone on top of a James Jerome Hill . Keep go by thepuddleuntil you notice apath to the leftthat leads to the Lorestone . Just gouge between the stones , and you ’ll make your mode there .
On the same path , you ’ll meet a crawl blank underneath asmall stone arch to the right field . Crouch through and come after the path down until you find the Lorestone .
Screenshot by Pro Game Guides
As you are looking for the third offer for thethird Hiddenfolk task , you will find the Lorestone top side downon the ceiling . Make trusted not to neglect it , as it ’s the final one of the chapter .
Chapter 4 Huldufolk
There are a entire ofthree Lorestonesin the Huldufolk chapter Senua ’s Saga : Hellblade 2 .
When you swing into a pool in a new cave section , look around . If you seea shieldto your rightfulness , there is a path behind that bulwark . Head over there and rise up until you reach out the Lorestone .
Once you light the first torch , keep going through the caves . You ’ll notice the Lorestone on theledgeacross from you . There is abridgethat connects the two shelf ; all you have to do is interact to drop down , and you could pile up it .

Screenshot by Pro Game Guide
Once yougo to the lightand into the next section , keep going down the path . You ’ll encounter a crawl place to the left with a blue light glowing in the distance . Do n’t go that means just yet ! Instead , headto the rightfirst , where you will regain a path towards the last Lorestone of the chapter .
Chapter 5 Bardarvik
When you reach alittle waterfall , you ’ll see a Lorestone above it . Keep conk out down the itinerary until you may make your wayto the right . You ’ll find a Lorestone at the destruction of it .
Once you reacha clearingwhen fall out Astridr , you’re able to see a Lorestone in the space . You have to hear down thepath to the rightand crawling through a gob in the stone to reach it .
This Lorestone is located in the area where you are solve therune door puzzleat the beach . Once you get thesecond rune pattern , you will open up up anothersection of the shoring . There is aglittering paththat disclose up the political platform ahead of you . When you draw close it , you ’ll find asqueezed spaceand a mystical route toward the Lorestone .

Screenshot by Pro Game Guifes
When you are back at thesettlement , head down themain pathtowards Astridr ’s firm . However , instead of going up the wooden path to the right hand , goto the left . You ’ll detect the Lorestone in theyardof one of the houses .
There are no Lorestones or secret faces in the last chapter , so you do n’t have to worry about accumulate anymore . If you have find all of the Lorestones , you could go and enjoy the write up in the Extras menu .
If you want to make love what choices to make , check out outShould you choose Astrior or Fargrimr in Jarnvior Forest ? – Hellblade 2on Pro Game Guides .

Screenshot by Pro Game Guides

Screenshot by Pro Game Guides

Screenshot by Pro Game Guides

Screenshot by Pro Game Guides

Screenshot by Pro Game Guides

Screenshot by Pro Game Guides

Screenshot by Pro Game Guides

Screenshot by Pro Game Guides

Screenshot by Pro Game Guides

Screenshot by Pro Game Guides

Screenshot by Pro Game Guides

Screenshot by Pro Game Guides

Screenshot by Pro Game Guides

Screenshot by Pro Game Guides

Screenshot by Pro Game Guides

Screenshot by Pro Game Guides

Screenshot by Pro Game Guides

Screenshot by Pro Game Guides

Screenshot by Pro Game Guides

Screenshot by Pro Game Guides

Screenshot by Pro Game Guides

Screenshot by Pro Game Guides

Screenshot by Pro Game Guides

Screenshot by Pro Game Guides

Screenshot by Pro Game Guides

Screenshot by Pro Game Guides

Screenshot by Pro Game Guides

Screenshot by Pro Game Guides

Screenshot by Pro Game Guides
