I never want to play Tetris again .
Energy Matrix puzzles are a feature of speech of Wuthering Waves that allow you to play a strange variation of Tetris so you’re able to be rewarded with a supply chest . For players who enjoy exploring the function , knowing where all of these puzzles are in Huanglong and figuring out how to complete them is useful selective information .
All Energy Matrix Puzzle locations and solutions in Wuthering Waves
If you ’re in the market for a guide that shows you where every Wuthering Waves Energy Matrix mystifier is in Huanglong and assure you how to complete it with images of every step , you ’re utterly in the right place ! This was a labor of love and tardy night because I game when I ca n’t log Z’s .
There are 11 Energy Matrix mystifier in Huanglong that I ’m aware of after hr of search the map by foot and sailplane .
Start inGubei Pass , and make your way around the single-valued function counterclockwise to polish off every puzzle and find your own adventures along the way of life . When you ’re almost finished , you ’ll end up south ofFallen Grave . You should then teleport back up toDesorock Highlandto discharge the electrical circuit .

By doing this , you ’ll end up with a lot more EXP than you started with because of all the monster and enemies you ’ll hit as you go . You ’ll also see the puzzles more — which will help you when you get to the last one in Desorock Highland . Like other mystifier , you will take touse your Levitatorfor every Energy Matrix puzzle .
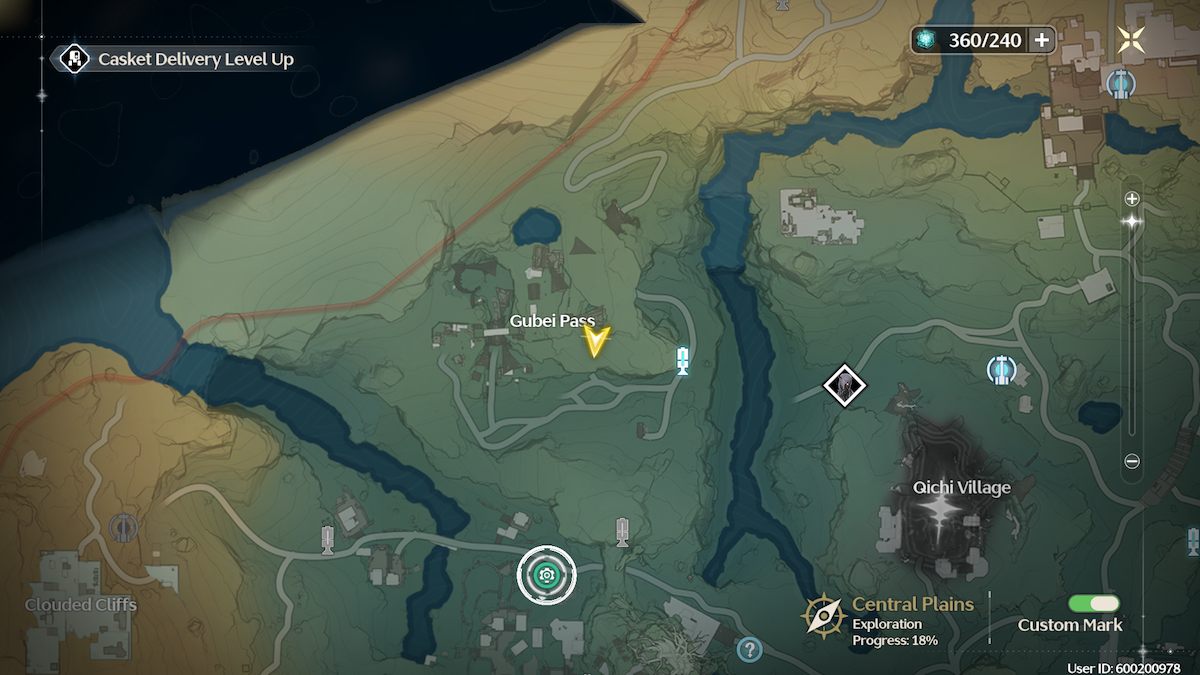
Gubei Pass
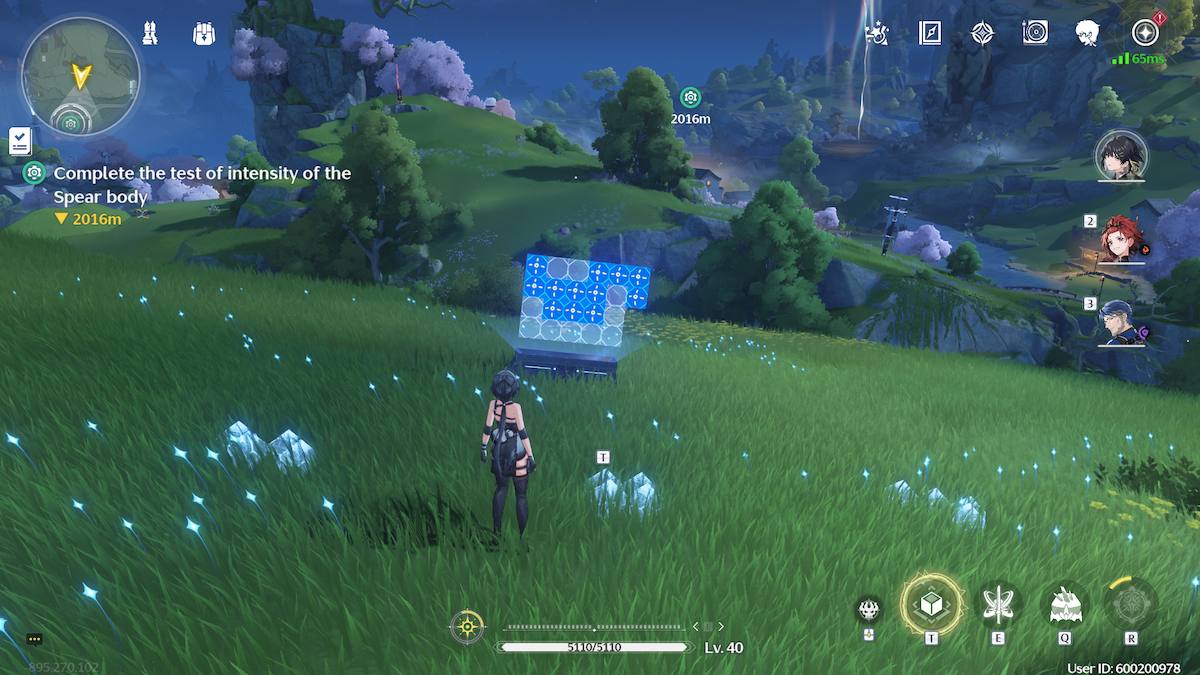
The Energy Matrix puzzle near Gubei Pass is probably one of the easiest puzzles in the plot . It has just three piece and is place to the west of the local Resonance Beacon .
You ’ll find the teaser on a hillside , not too far from an exile camp .
Put the straight slice in first , and it goes in the eye of the puzzle . Next , pick up the Z - shaped art object for the top left nook , surveil by the L - determine piece for the top right corner . Done ! Claim your prize on the other side of the puzzle .

Screenshot by Pro Game Guides
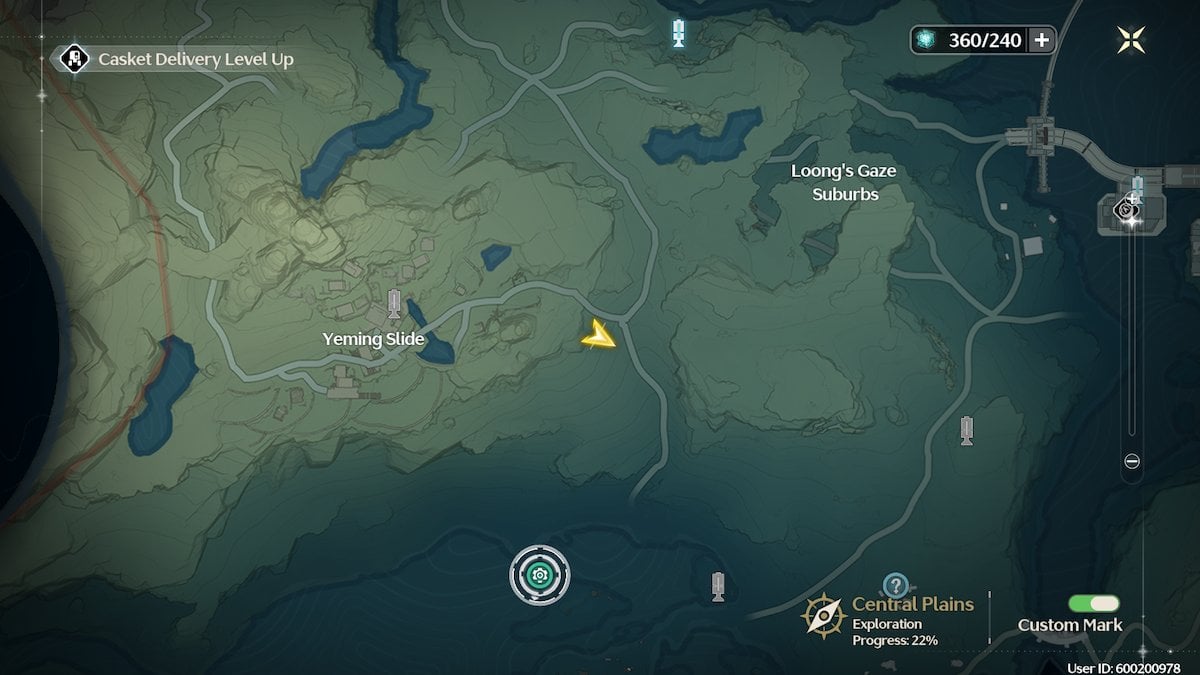
East of Yeming Slide
East of Yeming Slide and southwestward of Loong ’s Gaze Suburbs , you ’ll find an Energy Matrix Puzzle near the course . It neglect the southern way of life , so it can be well-to-do to overlook if you are n’t traveling via glider much .
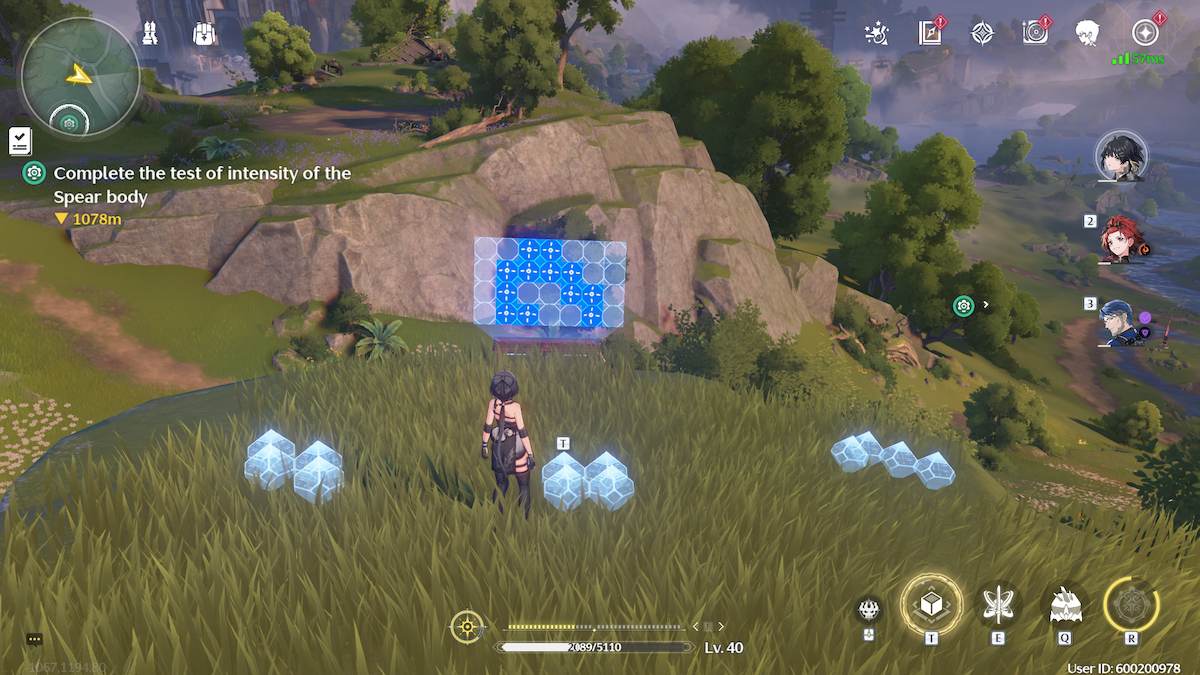
The puzzle has just three portion and is moderately easy once you have the middle square man in place .
Put the square piece in first , then find free to select between the zed - shape and the large L - shape . It does n’t make much of a dispute .
Screenshot by Pro Game Guides
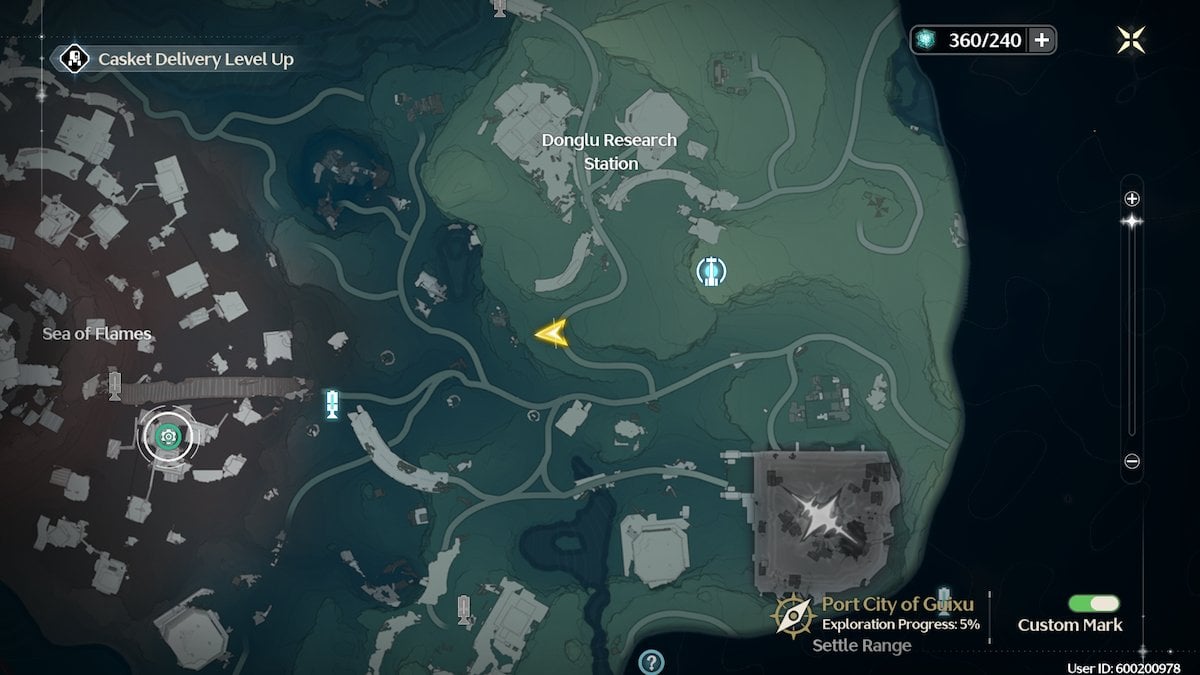
South of Donglu Research Station
During your traveling , you ’ll arrive across an Energy Matrix puzzlesouth of Donglu Research Station , eastern United States of the course that leads you into the Sea of Flames . Where my pointer is on the map is the exact location of the puzzle .
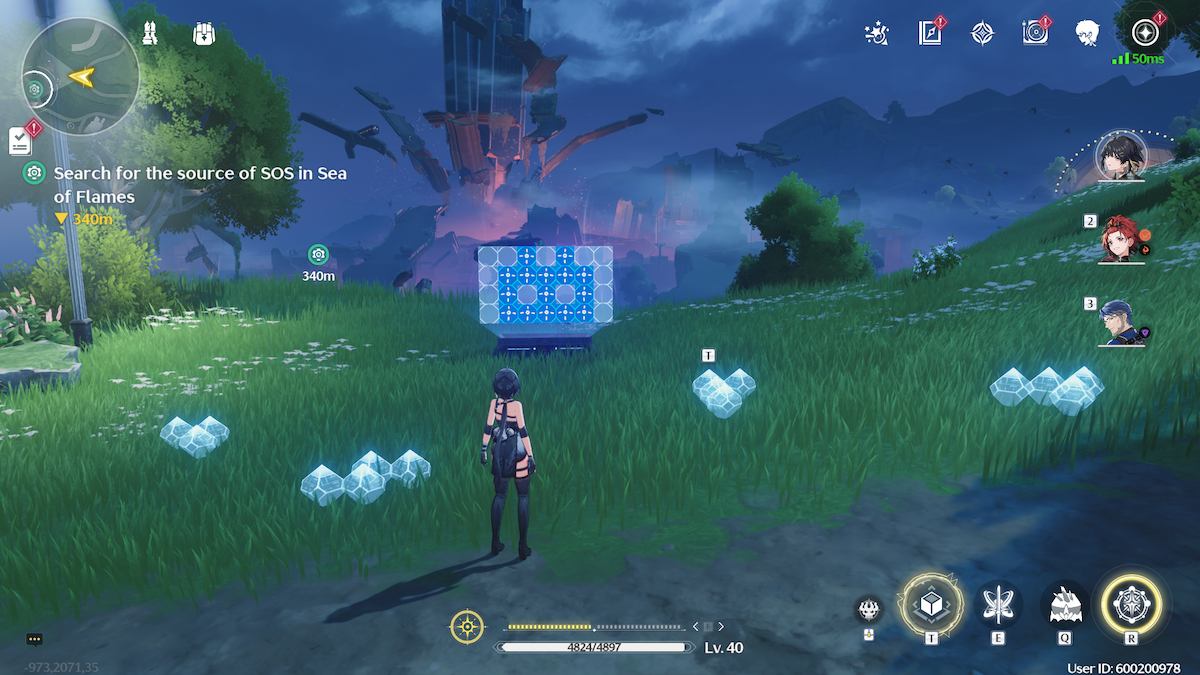
There are four pieces to this teaser .
I recommend that you grab the T - mould one first and fit it into the top left discussion section of the puzzle . From there , the other three pieces diminish into spot nicely . In guild , use the T - shape , then the omega - shape , then the minuscule lambert - shape , followed by the magnanimous L - shape . Remember to rotate the pieces so they fit in the right place .
Screenshot by Pro Game Guides
Once you ’re done , skip over the program and grab your supply chest prize .
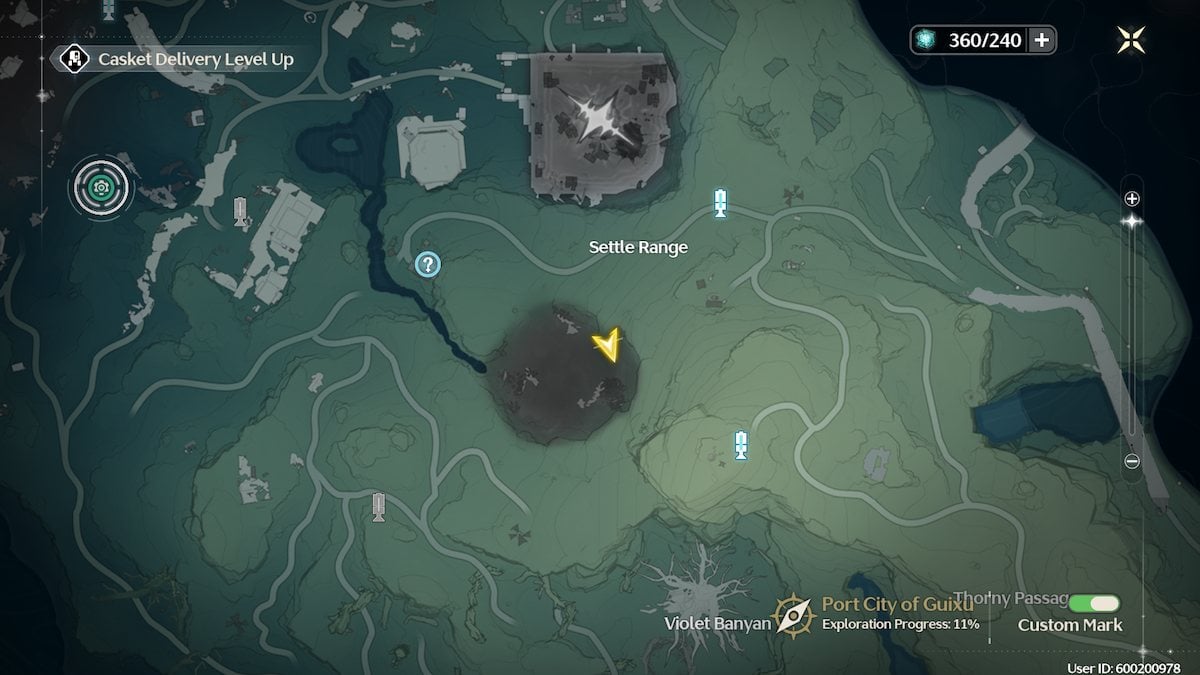
Settle Range: Tempest Mephis challenge area
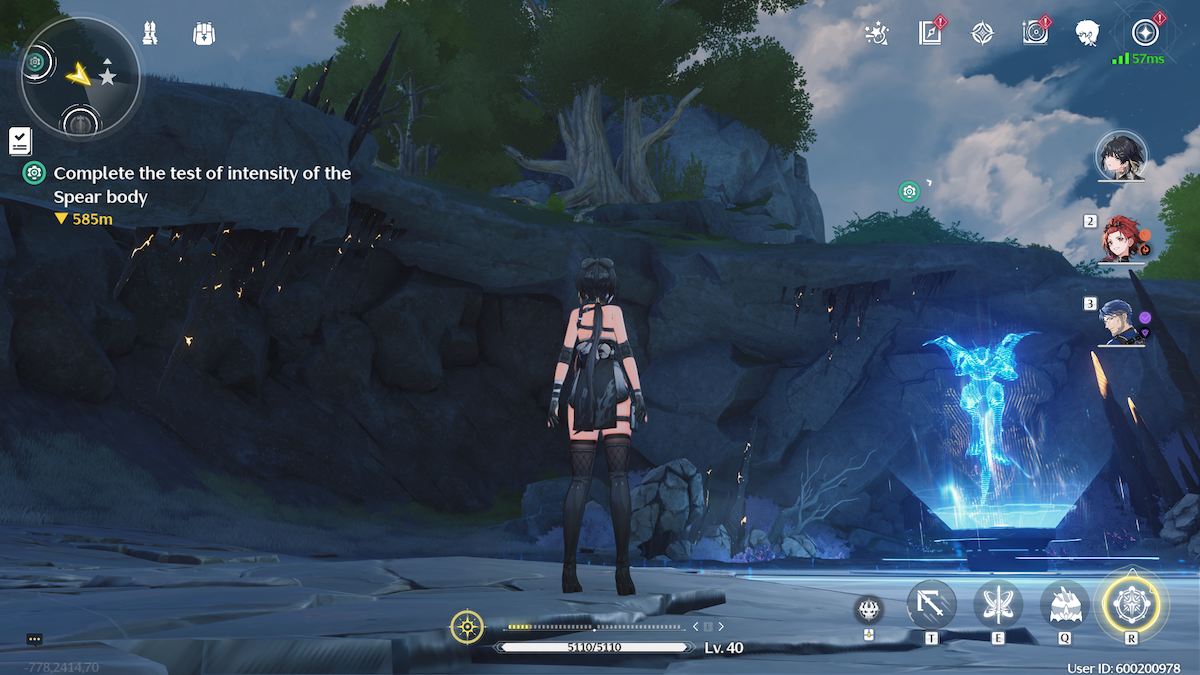
Above the challenge area for Tempest Mephis , Dixieland of Settle Range , you ’ll come up a pointy cliff that overlooks the hologram of the brute to the left ( if you ’re on the story looking straight at the hologram ) .
you’re able to see in the shot above that there ’s an overhang cliff with pointy bits cohere up . On that cliff , there ’s a puzzle . Somehow , despite not having the Resonance Nexus unlocked for this area — and , therefore , not hold a visible function — this was my first Energy Matrix puzzle .
It took my brother and I — play our own game at the same time — an HOUR to find it again because I could n’t remember where it was . Hence , delight my crony ’s masc Rover for these screenshots .

Screenshot by Pro Game Guides
This is a four - part teaser with two Z - shapes and two big L - material body . It ’s pretty straight , just lots of rotate pieces . Put both of the zed - shapes in the top nook first , then pop the L - figure in . Sorted !
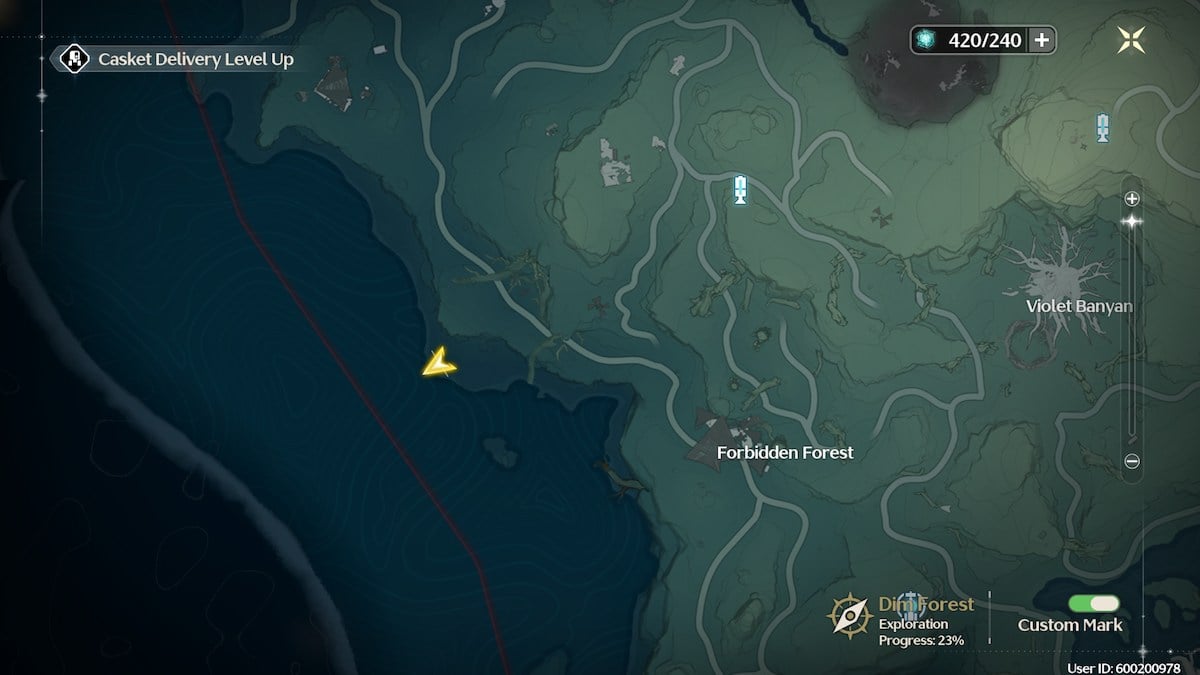
Southwest Forbidden Forest
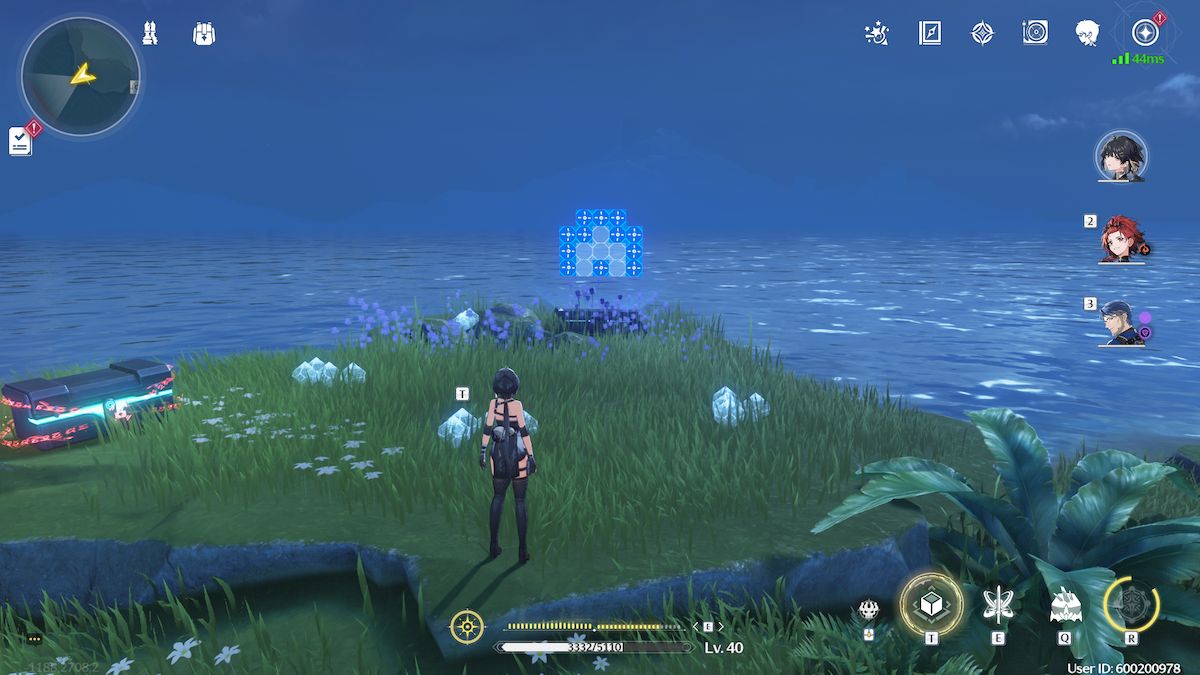
Southwest of the Forbidden Forest , right by the coastline , you ’ll bump another puzzle . It ’s a beautiful view , so experience free to chill out for a chip during your puzzle - run journeying .
This Energy Matrix puzzle has four pieces , and it looks a bit puzzling at first . recollect that some of these puzzles ca n’t be completed unless you use the blank blank as well as the puritanical ones .
When you ’re done , catch your reward from the chest on the left and head over to the Confederate States of Violet Banyan for the next puzzle .

Screenshot by Pro Game Guides
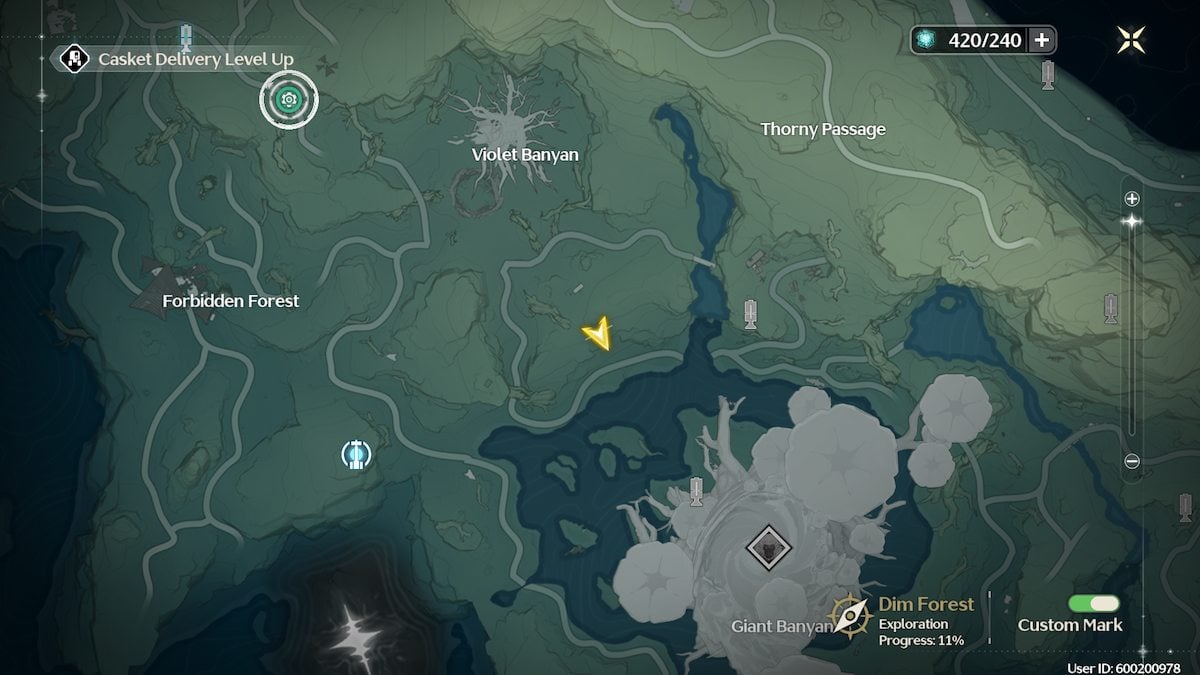
Dim Forest: Violet Banyan
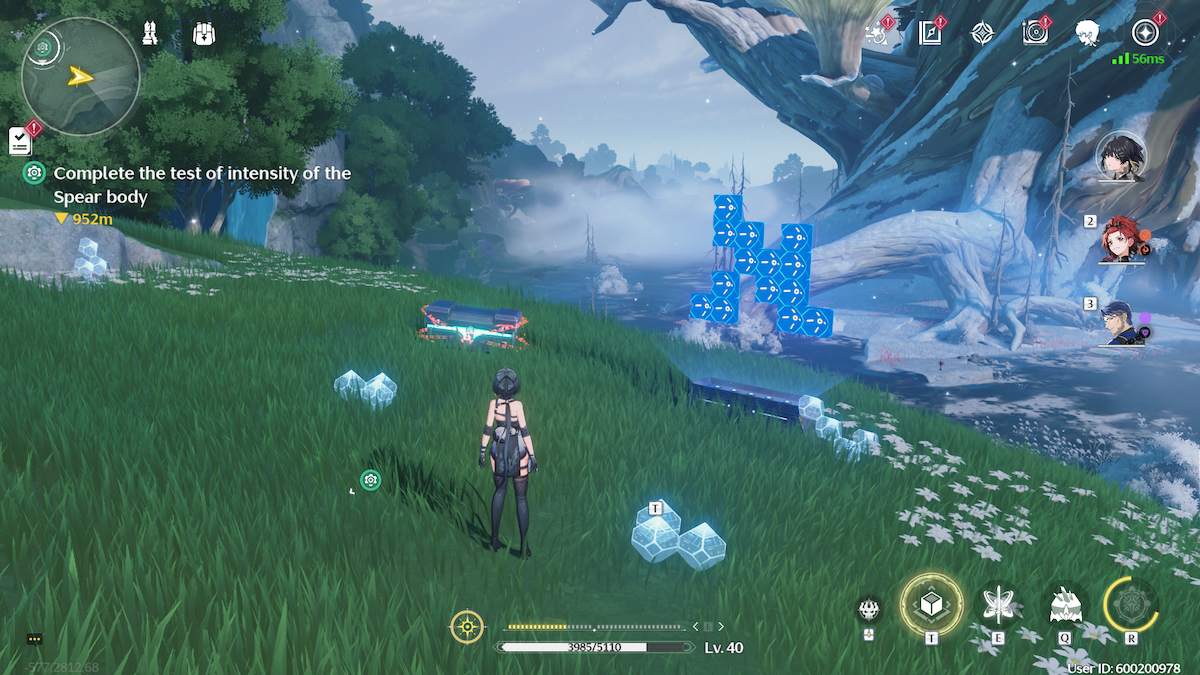
At the lower end of the Dim Forest , facing the coke - cover Giant Banyan Sir Herbert Beerbohm Tree , you ’ll find another Energy Matrix puzzle . This puzzle overleap one of the most beautiful winter scene in the plot .
This is a sneakier puzzle . When I first found it , I did n’t notice the fourth puzzle man blot out on the far left over .
Start with the easiest composition and put one of the lowly L - work pieces in the bottom left-hand box . Next , grab the other small L - shaped part and place it in the top left corner . The enceinte L - regulate while is up next , float it over to the top right field of the puzzler so the L is lying down with the conclusion up . Finally , the Z - shape piece kick the bucket in the bottom right corner .

Screenshot by Pro Game Guides
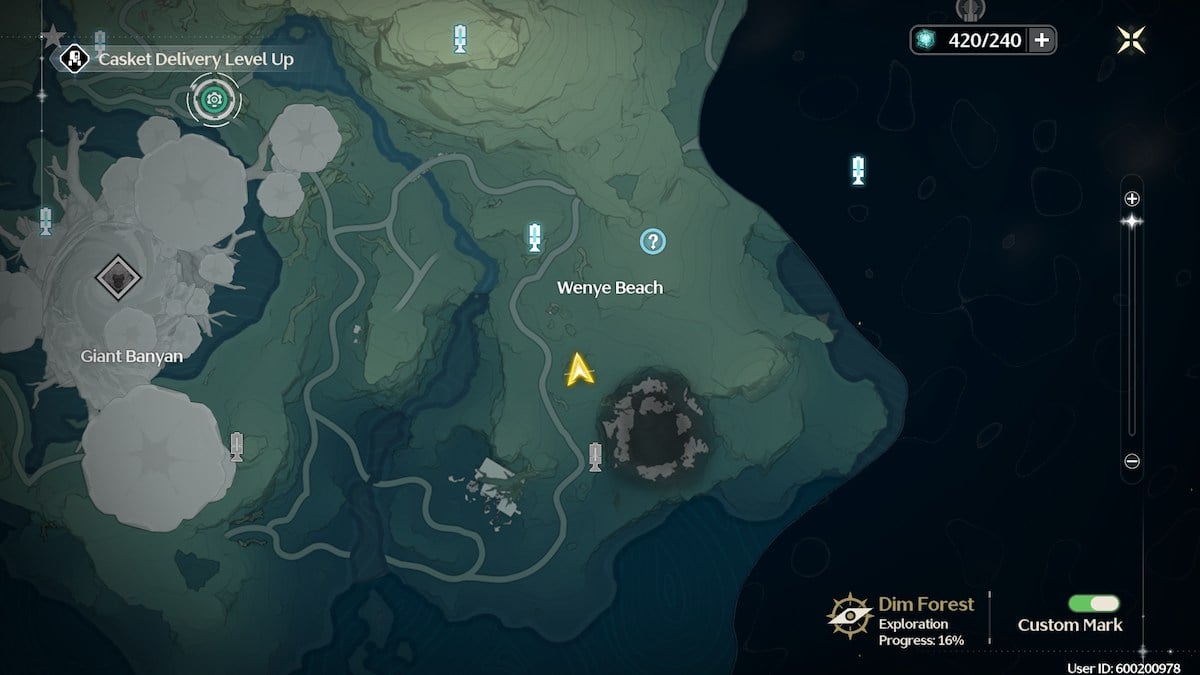
Southwest Wenye Beach
Skip over to the other side of the Giant Banyan tree diagram until you make Wenye Beach . southward of the placename on the function , as seen above , you ’ll incur your next Energy Matrix puzzle .
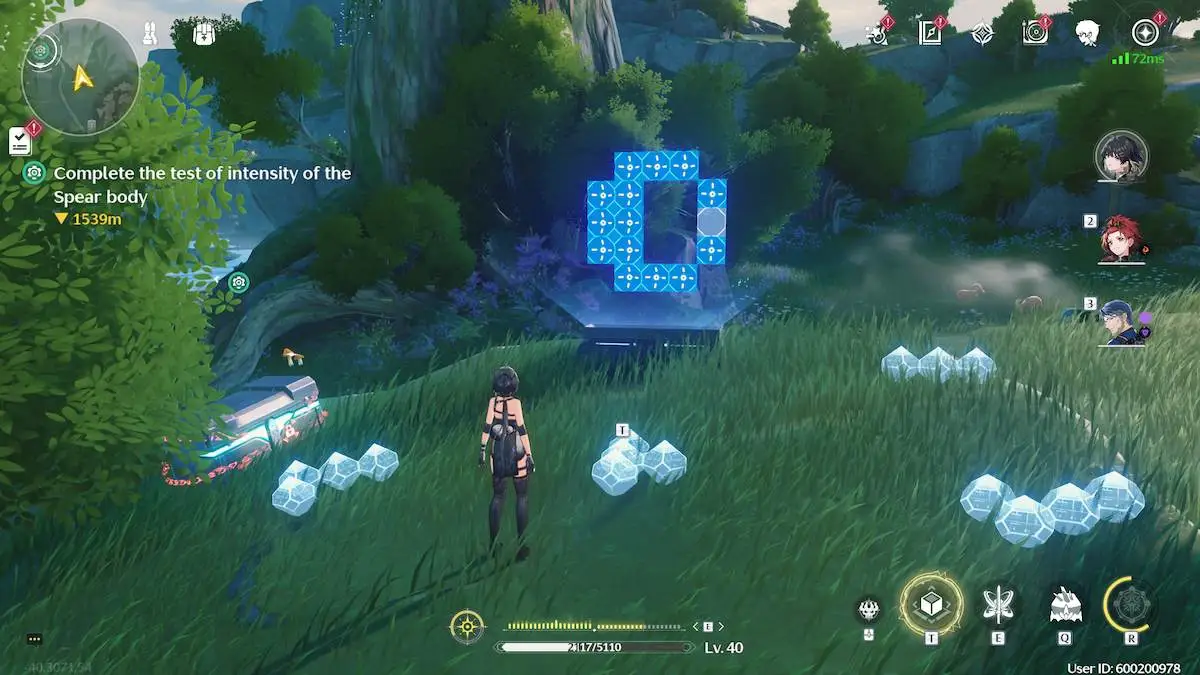
This puzzler is on a cliff to the right hand of the course , obliterate by some trees . you’re able to see that it has a strange soma , and is missing a square in the design .
Pick up the first L - condition and put it at the top of the approach pattern , then take the 2d L - condition and put it at the bottom . Next , pick up the Z - shape and throw it into the space in between the two L - shapes on the left side of the puzzle . The final piece is an I - shape , which equip across the right-hand side of the puzzle where there ’s a gap .
Screenshot by Pro Game Guides
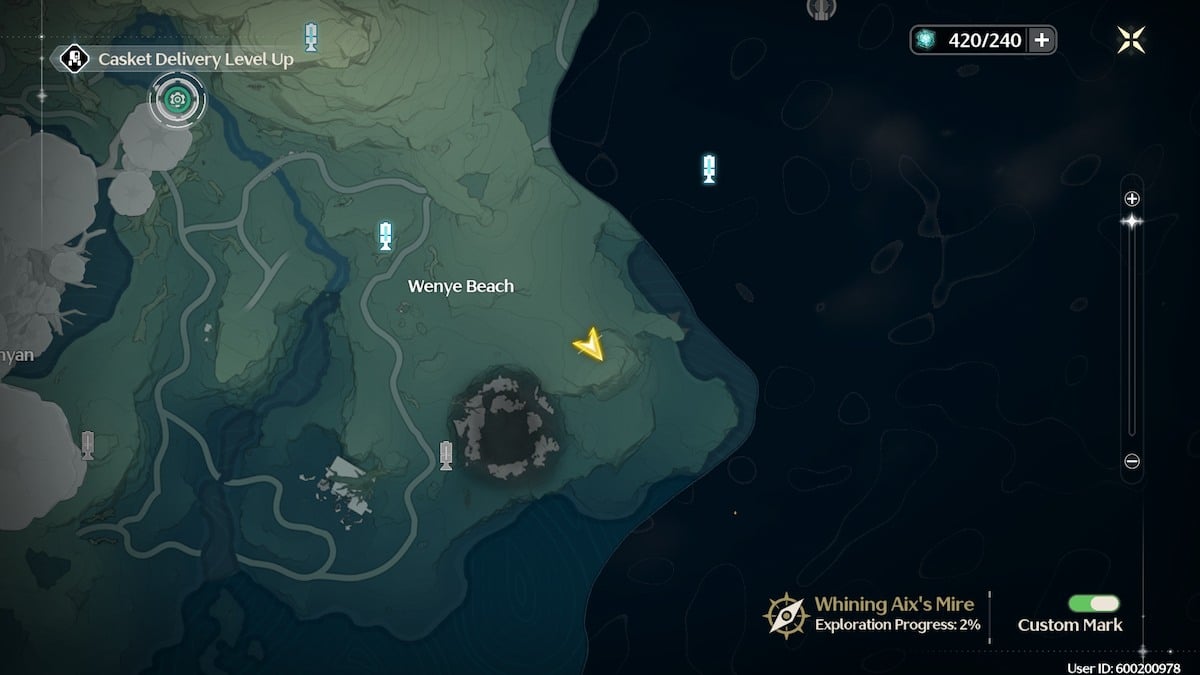
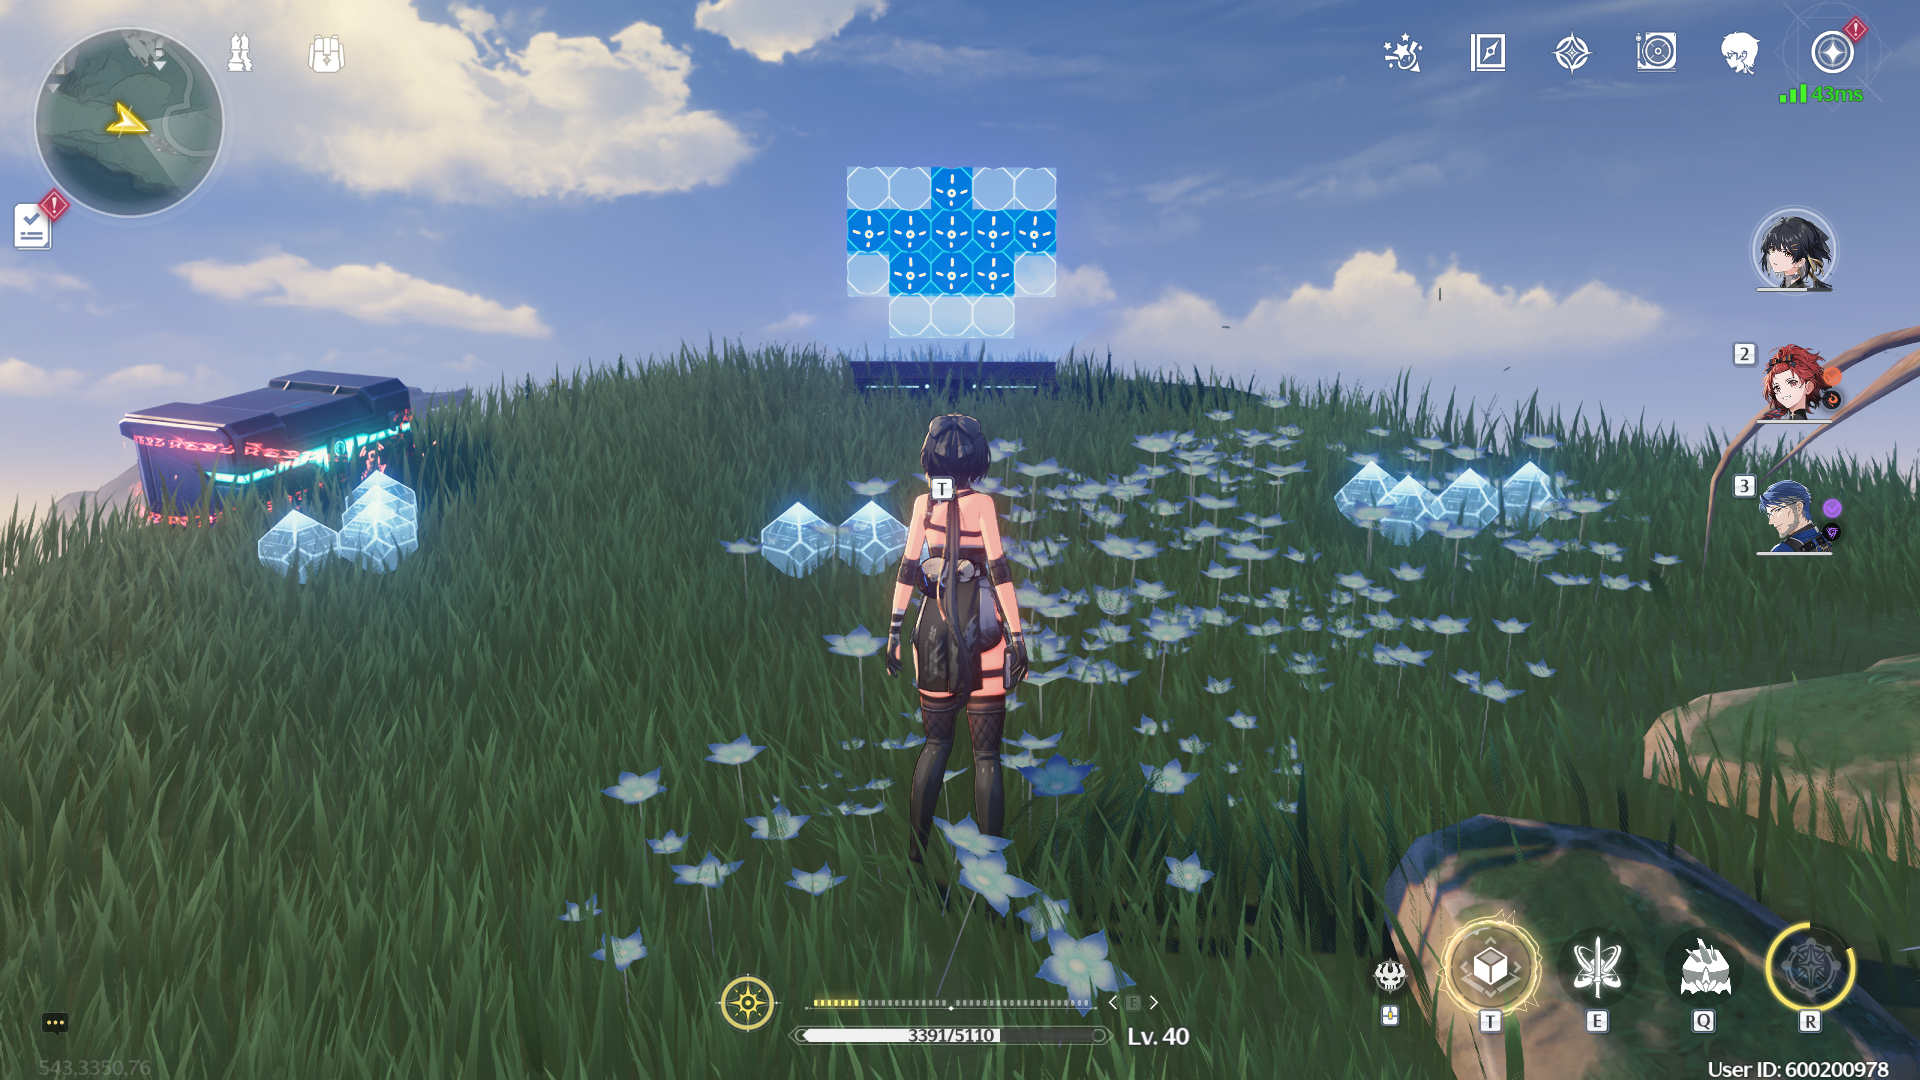
Southeast Wenye Beach
surprisal ! You ’re not done in this area . Wenye Beach has TWO Energy Matrix Puzzles . Shimmy over to the over to the southeast field marked by my Rover ’s position on the function above .
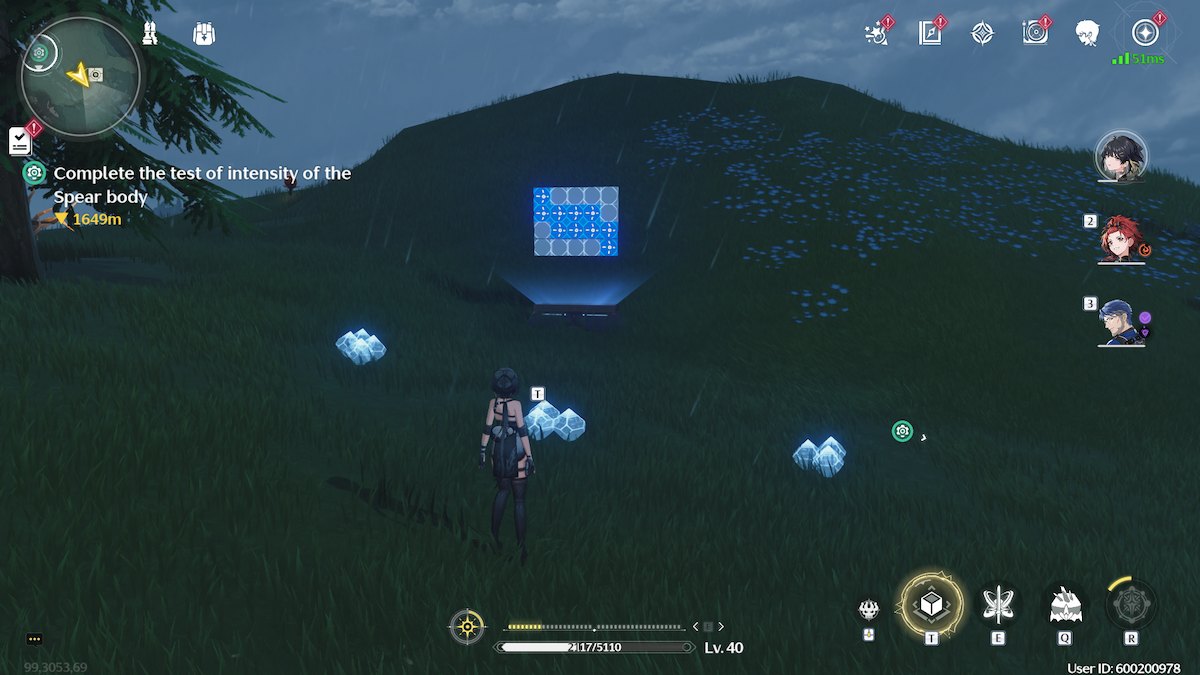
This puzzler is right next to a Sonance Casket that is trapped by spikey vine , so it ’s easy to get hold than some of the others because there ’s technically a mark on the map for it .
Take the Z - shaped piece and put it right in the center of the puzzle . All you need to do then is put one small cubic decimeter - shaped piece on each side of the Z - shape . Remember to rotate the piece to get them to fit !
Screenshot by Pro Game Guides
East of the Court of Savantae Ruins
TheCourt of Savantae Ruins Energy Matrix puzzleis a bit of a hassle . Not only are there Exiles dot around that you ’ll need to solve out , part of the mystifier is entrap by thorn .
you may see everything you need to complete this mystifier in the image above . The firebomb prime is on the far right , the trapped puzzler part is on the far left .
The first thing you ’ll need to do isgrab the blast flower with your Levitatorand cast off it at the prickle on the opposite side of the building to where the puzzle piece is . The thorns will burn off down and the bit will be freed .

Screenshot by Pro Game Guides
There ’s another piece of the puzzle that is directly behind you . Literally , tolerate in front of the puzzler and turn around . It ’s correctly there .
Now , it ’s time to solve the puzzle . Start with the Z - shape musical composition ( the one from the irritant ) and put it in the top ripe quoin . Next , grab the lambert - shape that was behind you and put it at the very top of the puzzle . Pick up the lambert - shape from in front of the puzzler and pop it into the bottom right of the puzzler . lastly , lay out the square - shaped firearm in billet on the left .
Once you complete the puzzle , the threshold in front of you will open up . indoors , you ’ll find aGuide Crystal , your reward chest , and newspaper on the tabular array to the left that tattle about the Crystal .

Screenshot by Pro Game Guides
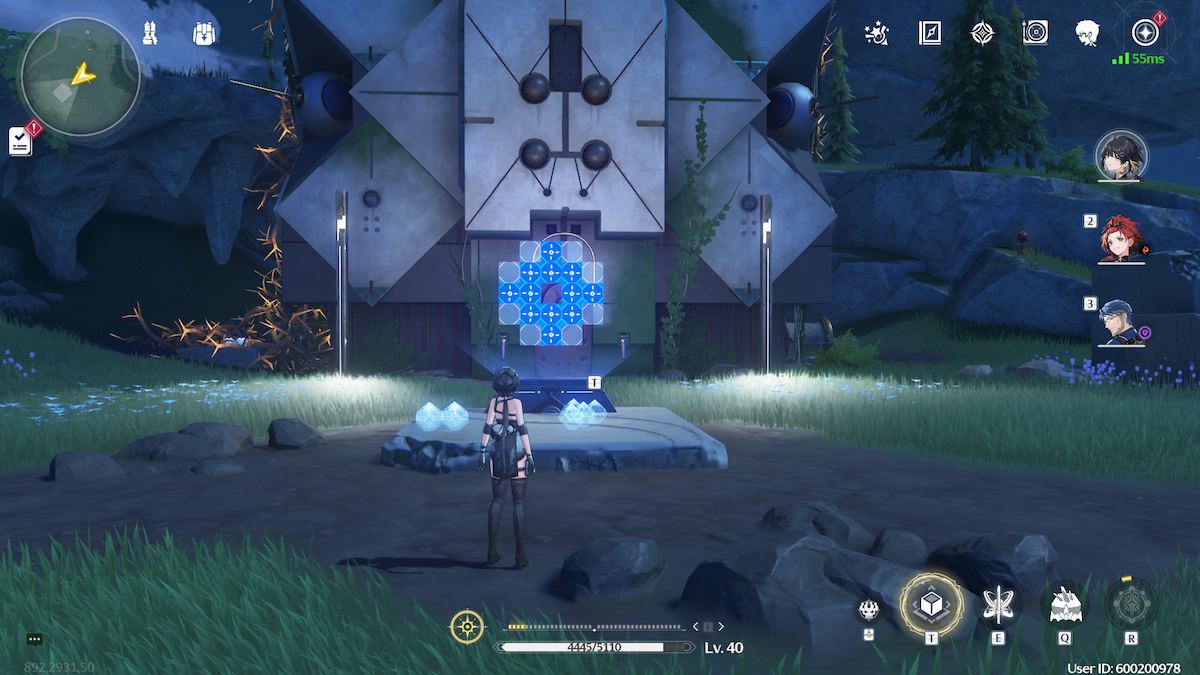
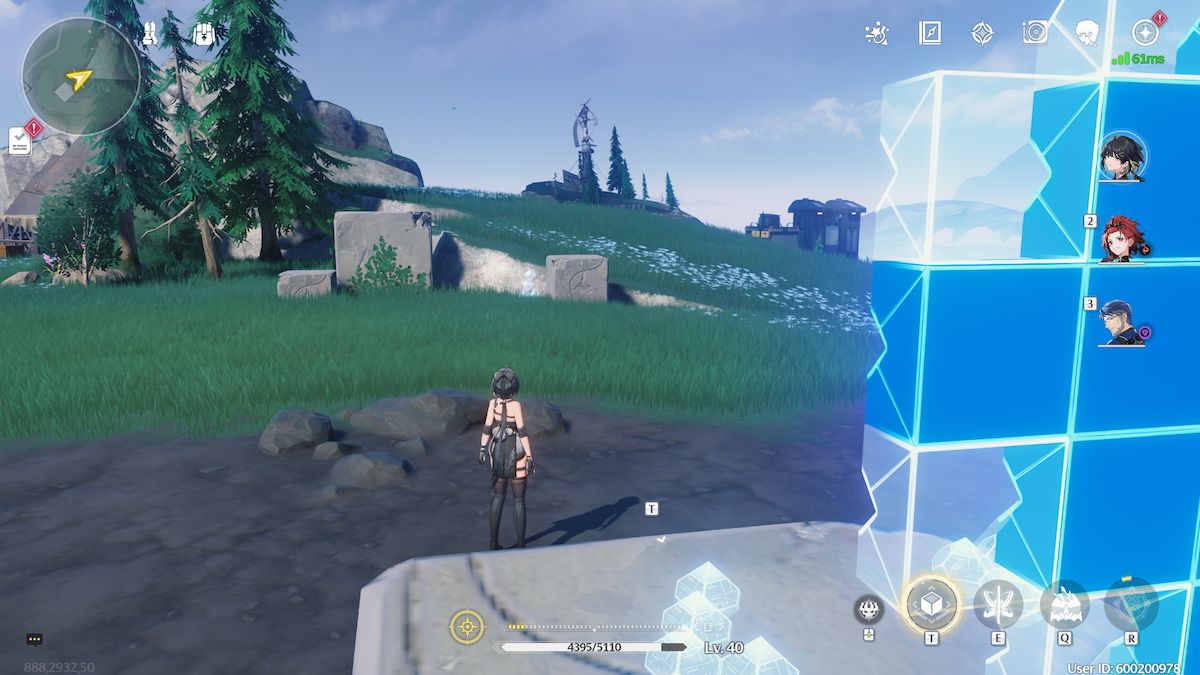
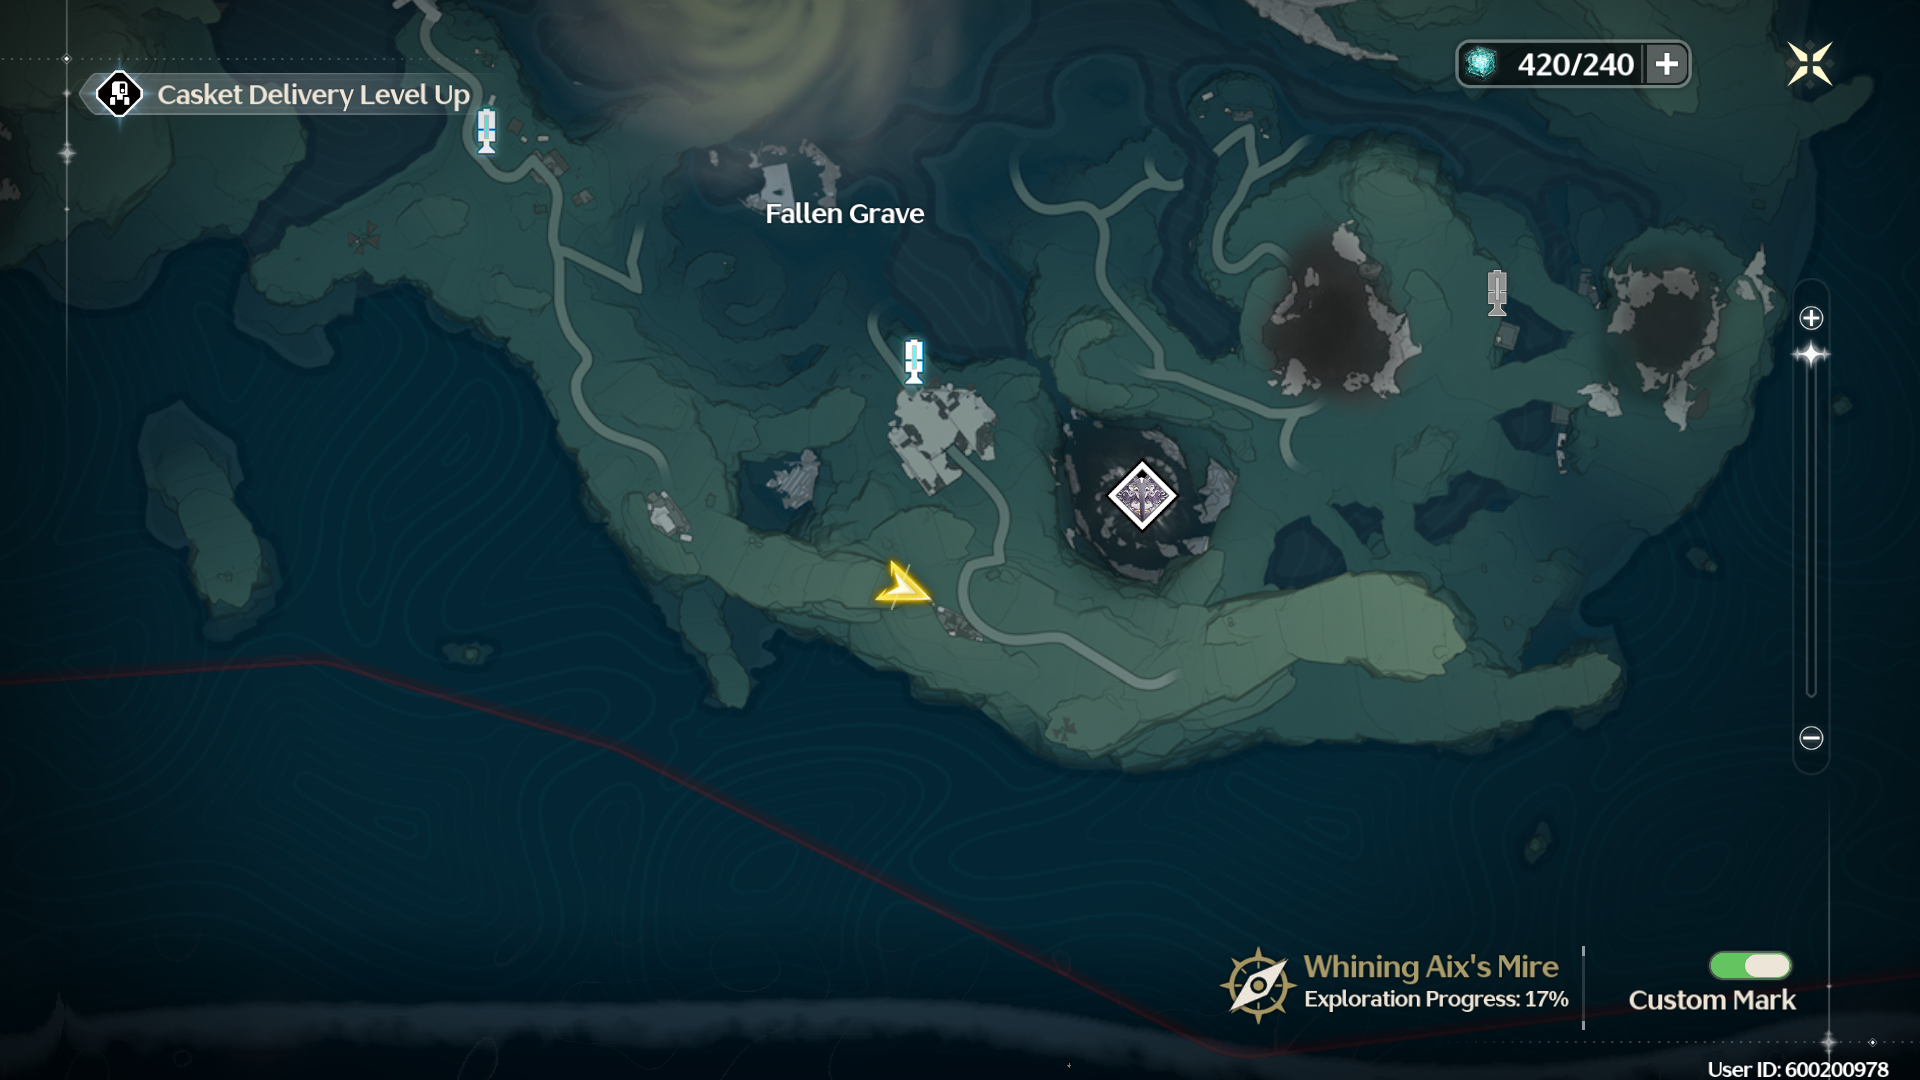
South of Fallen Grave
To the Confederacy of the Fallen Grave placename on the function , where the route curves , there ’s a drop that overlooks the course . There , you ’ll feel this teaser and be able to attack some Fractsidus cultist on the path below when you ’re done .
You get three large L - shape piece of music for this puzzle , and it can take a second to figure out the best way to put them in .
Take the middle L - mold piece of music and put it in the top right of the puzzler , then pick up the litre on the right and change state it upside - down so it fits in the top left of the puzzle . Take the net L - shaped composition , rotate it , and fill up in the remaining blocks in the center of the puzzle .

Screenshot by Pro Game Guides
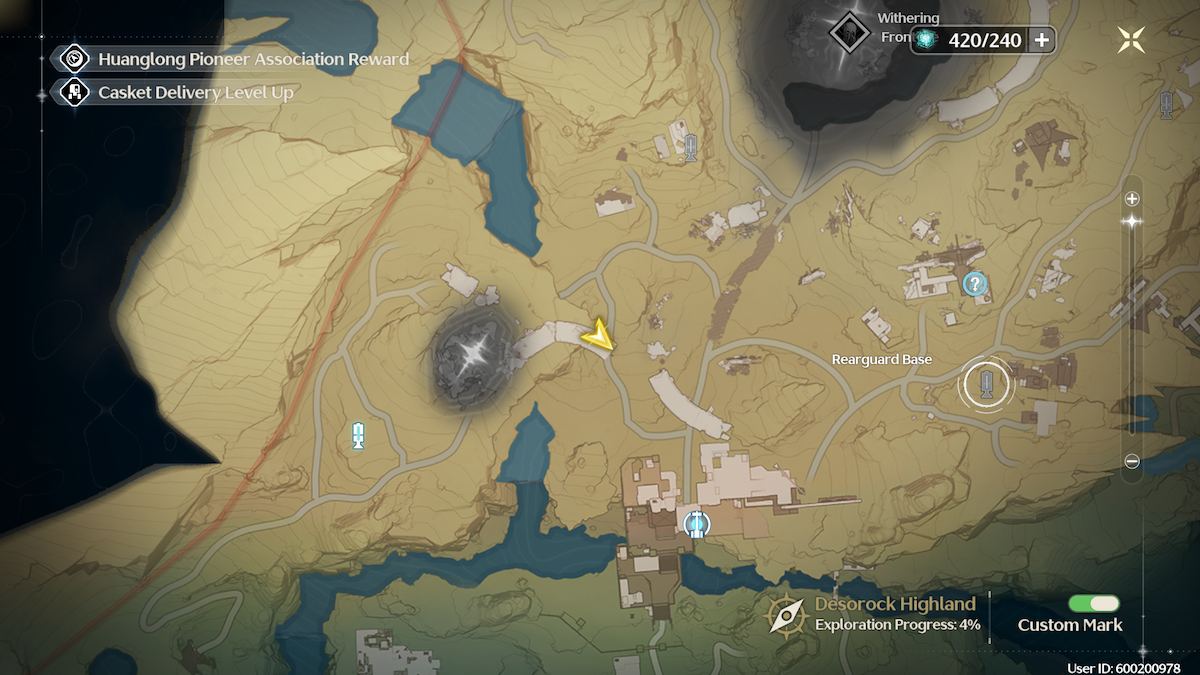
Desorock Highland
Although it might have made more good sense to put this one first , the Energy Matrix puzzle at Desorock Highland is the most ( apparently ) complicated of the 11 puzzles on the map . Teleport to the Resonance Nexus at the commencement of the area and head north . You ’re look for a broken route that towers over the path .
Nothing quite organize you to see six puzzle pieces for such a small puzzle — especially when every other puzzle has had three to four pieces . The key here is to quickly realize that all of those pieces are n’t fitting in this modest puzzle . In fact , only three of them are .
Your last breast will appear on the right field .
Screenshot by Pro Game Guides
That ’s all the Energy Matrix puzzler presently available in Wuthering Waves ! I hope you enjoyed your cross - country running as much as I did .
Want to read more Wuthering Waves puzzle template at Pro Game Guides ? TryHow to solve Magnetic Cube puzzle in Wuthering WavesorHow to solve the Gubei Pass Treasure Chest Puzzle in Wuthering Waves .
Screenshot by Pro Game Guides

Screenshot by Pro Game Guides

Screenshot by Pro Game Guides

Screenshot by Pro Game Guides

Screenshot by Pro Game Guides
Screenshot by Pro Game Guides
Screenshot by Pro Game Guides

Screenshot by Pro Game Guides

Screenshot by Pro Game Guides

Screenshot by Pro Game Guides

Screenshot by Pro Game Guides

Screenshot by Pro Game Guides
Screenshot by Pro Game Guides
Screenshot by Pro Game Guides

Screenshot by Pro Game Guides

Screenshot by Pro Game Guides

Screenshot by Pro Game Guides

Screenshot by Pro Game Guides
Screenshot by Pro Game Guides
Screenshot by Pro Game Guides

Screenshot by Pro Game Guides

Screenshot by Pro Game Guides

Screenshot by Pro Game Guides

Screenshot by Pro Game Guides
Screenshot by Pro Game Guides
Screenshot by Pro Game Guides

Screenshot by Pro Game Guides

Screenshot by Pro Game Guides

Screenshot by Pro Game Guides

Screenshot by Pro Game Guides
Screenshot by Pro Game Guides
Screenshot by Pro Game Guides

Screenshot by Pro Game Guides

Screenshot by Pro Game Guides

Screenshot by Pro Game Guides

Screenshot by Pro Game Guides
Screenshot by Pro Game Guides

Screenshot by Pro Game Guides

Screenshot by Pro Game Guides

Screenshot by Pro Game Guides

Screenshot by Pro Game Guides

Screenshot by Pro Game Guides
Screenshot by Pro Game Guides

Screenshot by Pro Game Guides

Screenshot by Pro Game Guides

Screenshot by Pro Game Guides

Screenshot by Pro Game Guides

Screenshot by Pro Game Guides

Screenshot by Pro Game Guides

Screenshot by Pro Game Guides
Screenshot by Pro Game Guides
Screenshot by Pro Game Guides

Screenshot by Pro Game Guides

Screenshot by Pro Game Guides

Screenshot by Pro Game Guides
Screenshot by Pro Game Guides

Screenshot by Pro Game Guides

Screenshot by Pro Game Guides

Screenshot by Pro Game Guides

Screenshot by Pro Game Guides
