A coin for every victory .
All 26 dungeons in dungeon of Hinterberg have a hidden chest containing a commemorative coin . I ’ll show you where to happen the coin for each Dungeons of Hinterberg dungeon so you could collect them all with rest .
Where to find every Commemorative Coin in Dungeons of Hinterberg
All of the dungeons in this leaning are sorted by the regions they are establish in and their difficulty . The only exception are the Beginner ’s Dungeon and the Toxic Archipelago Dungeon because they are find in their own area .
Beginner’s Dungeon
After speaking with Klaus the first time , you ’ll be in front of an orbit with a large statue . channelise to the shelf on the veracious side . Climb up it to find and spread a downcast chest containing the commemorating coin for the Beginner ’s Dungeon .
Doberkogel Dungeon Coins
Doberkogel is a picturesque mountain contain seven dungeons .
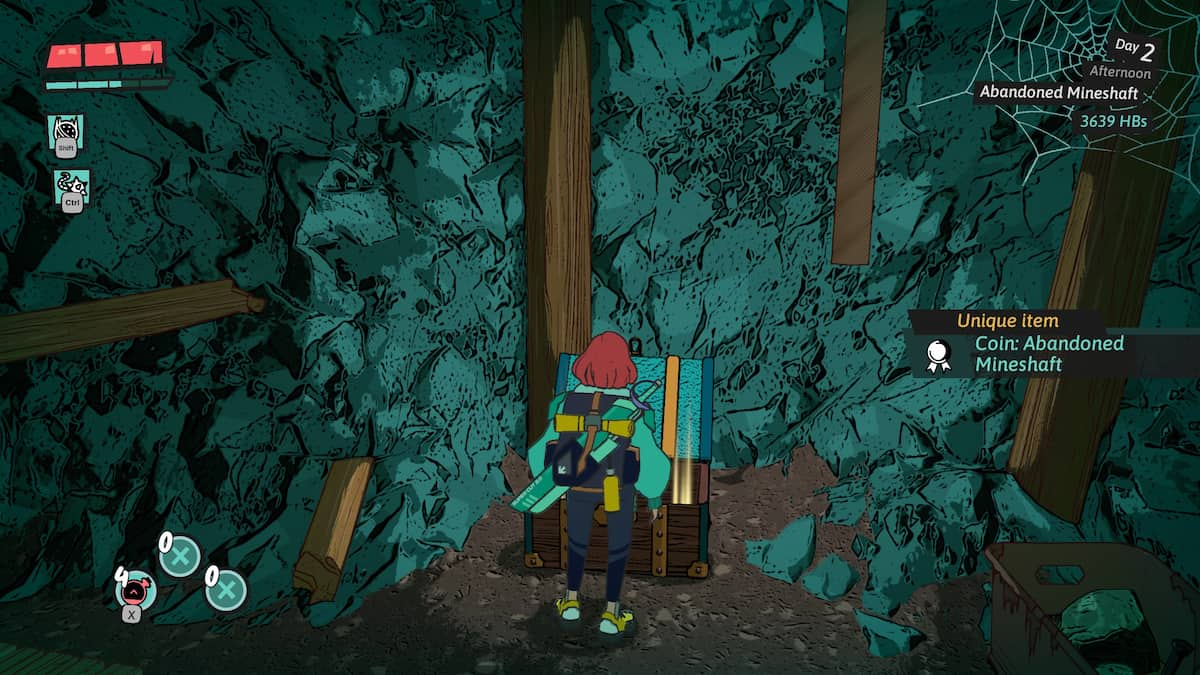
You ’ll need to turn back a little to get the commemorating coin in the Abandoned Mineshaft donjon . While exploring the dungeon , you ’ll get a pa - up explaining armoured foeman . You ’ll then be thrown into a fight with a long - make out enemy . After vote out him , wax the ladder on the left side of the elbow room and take the minecart in front of you ( A1 ) . Do not continue forward . rather , take the minecart back towards the first elbow room ( A2 ) , making sure to lean to the right while riding it ( A3 ) . This brings you to a secret room with a dresser containing the coin . After grab it , ride the minecart one last time and continue explore the Abandoned Mineshaft .
The Jelly Tunnels coin is hidden in a large elbow room in the middle of the dungeon with luck of jelly blocks ( A1 ) . To start , you ’ll need to walk around the pillar until you find a side path with white mark on the ground ( A2 ) . Climb up that path to reach the upper ledge ( A3 ) , then jump along the snowy ledges to attain the area on the left . This area has a slanted wooden platform and two of the Jelly - like block ( A4 ) . Place the Wrecking Ball spell out onto the wooden platform ( A5 ) , then apply the Ball and Chain magical spell to take out the blue jelly block out ( A6 ) . This launches the wrecking ball , causing it to destroy a vine block a ravel lead to a platform at the top of the room ( A7 ) . wax this ladder to reach the highest layer of the elbow room . A small elbow room containing a breast is on the right side of this sphere ( A8 ) . The chest hold the coin for the Jelly Tunnels dungeon .

The Minecart Workshop chest is out in the open on the platform move puzzle toward the oddment of the dungeon . All you need to do is move the platforms around so you’re able to cross to the left side and enter the pectus .
The Tatzelwurm ’s Lair coin is find after defeating the Tatzelwurm . Once you defeat it , head through the hall and turn to the rightfield . The chest hold the coin is out in the open surrounded by boxes and lights .
The largest room in the Old Quarry ( A1 ) has the coin chest obliterate within it . You ’ll want to start by fuck off to the other side of the room and looking at the goo blocks leading up the stair ( A2 ) . expend your ball - and - chain magic spell to climb up to the top of the ledge above them ( A3 ) . after , look to the left to see another goo blocking occlude the path . Walk to it and use the col in the fence to hook the ball - and - range of mountains into the racy goo below you ( A4 ) . Pull to shrivel the goo in front of you , revealing the coin chest .

Image by Pro Game Guides
The Shredding Facility coin is in the first chopine after the first tight - moving conveyor rap . When you step off the belt , there will be a suspicious raft of Rock against the right paries . Blow them up with your Wrecking Ball to unveil a minor underground room containing the coin pectus .
Hinterwald Dungeon Coins
Hinterwald is a sunset - colored forest fill with trees , vines , and more . It contains seven dungeons for Slayers to explore .
The coin for the Ancient Tree dungeon is hidden in the big way covered in vines ( A1 ) . set down down from the shelf by the doorway and look to the right to see a pile of rocks on the far side of the room ( A2 ) . utilize the Whirlwind turn to hybridize the vines to the correct ( A3 ) . You ’ll want to bring on the fleck of rock on the far right side of the room . After land there , turn to the left to rule an alcove with a chest arrest the Ancient Tree coin hide in the wall ( A4 ) .
Waterlily River has a unequaled playing perspective and a lot of similar environments , so you ask to pay close attention to your surroundings to find this coin . After traversing the bridge in the first photograph ( A1 ) and climb down the ledge , headway left to the river and cross the bridge and lilypads . On the other side , take the air down and to the right ( A2 ) to see the coin chest .

Screenshot by Pro Game Guides
The Overgrown Caves coin is in the field immediately following the two - platform mystifier room ( A1 ) . To decease this room , practice your spells to put all four formal onto the left political program ( A2 ) . Stand on it after it is lower , then throw all of the balls onto the right weapons platform ( A3 ) . Exit the room ( A4 ) , then become around . The chest containing the Overgrown Cave coin is on a lower shelf to the right of the door you exited ( A5 ) .
To get to the Mushroom Isles donjon , you ’ll want tobefriendHinterberg ’s frank first . The chest arrest the Mushroom Isles coin is in reality in the first large room after enter the Dungeon ( A1 ) . To get at it , you ’ll need to move to the left into the next elbow room . Blow the horn to purify parts of the water in the keep ( A2 ) , then return to the first way to find that the water is blank . you could now safely walk to and climb up the run to get the coin ( A3 ) .
The coin in Windsbraut ’s Treetop is found after the legal tender station . You ’ll need to take the air up the enceinte offshoot on the other side of the tree . After climbing up it , you ’ll reach a platform holding the chest contain the coin .

Screenshot by Pro Game Guides
The Everchanging Glades keep coin is in the main room of the dungeon ( A1 ) . take the air to the rightfield to the run - down house next to the tower with a ladder ( A2 ) . wax up the ladder to find the coin chest resting on the wooden platform .
The Bizarre Towers coin is hidden in the rotating course puzzle toward the starting of the keep . Rotate the way to tie in it to the ripe tract ( A1 ) , then climb up . Skip past the top for now and uphold head ripe ( A2 ) , then follow the path down ( A3 ) . The chest of drawers containing the Bizarre Towers coin is at the end of this way .
Kolmstein Dungeon Coins
Kolmstein is a snowy , wintry glacier with five every bit frozen dungeons .
The coin hidden in the Glacial Galaxy donjon is found in the expectant undecided - melodic line elbow room with the optical maser maze puzzler . Make your agency to the right wall of the room , then turn and confront toward the entrance ( A1 ) . take the snowflake - shaped switch on your left over ( A2 ) . This will lower the snowy floor , revealing a secret elbow room at the edge of the room ( A3 ) . Enter this room to notice the bureau arrest the Glacial Galaxy Coin ( A4 ) .
After opening the first giant gate , you ’ll enter another Brobdingnagian elbow room with a tall logic gate with three ignition lock ( A1 ) . In this room , you ’ll want to find the frozen waterfall with two rails and look to the alleyway near it ( A2 ) . The dresser contain the Snowflake Slalom coin is hidden in the back of this alley ( A3 ) .

Screenshot by Pro Game Guides
The Snowy Summit coin is hidden on one of the snowflake platforms within the snowy pile . Start by ride the rail onto the first platform ( A1 ) , then tease that platform ’s rail onto the 2d ( A2 ) . The third platform has two rails , one expire to the left and one going to the rightfulness . Take the rail heading to the remaining ( A3 ) . Ride the track down to the 4th platform and skip down to the fifth , which has two rail as well ( A4 ) . Take the rail on the right and observe the path down to witness the platform with the Snowy Summit coin ( A5 ) .
The Icicle Trail coin is determine in the laser mystifier room with two go platforms ( A1 ) . You ’ll want to move the platforms so that the far left one is raised while the middle one is not . Move around to the back remaining corner where the snowbird electric switch is and depend at the produce chopine ( A2 ) . A small bay will be slightly visible on the side of the raised platform . Walk towards it to encounter the hidden chest containing the Icicle Trail coin ( A3 ) .
Brünnelsumpf Dungeon Coins
Brünnelsumpf is the swamp - inspire area near Hinterberg . It has five aquatic dungeons to explore , each feature its own take on castle ruins .
The Prisonkeep Island coin is find in the area right before the sauceboat puzzler ( A1 ) . When you see this puzzler , release left and head up down the hallway ( A2 ) . The chest at the end of the path bear the Prisonkeep Island coin ( A3 ) .
The Desolate Castle coin chest is located on the palace ’s veracious side , beyond the gate elbow room with two lightbulbs . After lighting both , you ’ll exit into this area face the ocean ( A1 ) . There is a chest on the rightfield that can be grabbed , but the rest of the castle and the coin chest are in the tower on the left ( A2 ) . figure through it and wax the step up to the wooden platform . Turn to the left side of the platform to consider a staircase that is just out of reach ( A3 ) . Summon a gook block next to this ledge to climb the staircase ( A4 ) . Climbing these stairs to strive a 2nd platform holding the coin ’s chest ( A5 ) .
Screenshot by Pro Game Guides
The Lighthouse Reef coin is available at the kickoff of the dungeon ( A1 ) . You ’ll require to take the air alongside the left paries to see a small expanse with a ledge ( A2 ) . employ your go to produce a block of goo , then wax onto it to get on the ledge ( A3 ) . Walking directly toward the entrance will bring you to the area ’s coin chest ( A4 ) .
The Tower of Trials commemorative coin is found after battle through one of the two - path rooms ( A1 ) . Choose whichever course you ’d care as both will exit to the same area . In that area , you ’ll see a hole in a fence bulwark next to a statue ( A2 ) . Summon a block of sludge and climb over it to skip into that domain ( A3 ) . bid the star button next to the door to open up it , revealing a stairway ( A4 ) . At the next gate , press the buttons on either side of it to open it ( A5 ) . This takes you to a big elbow room filled with locked logic gate . The one direct in front of you contains the coin dresser while the rest have monsters . employ the star button in the plaza of the room to unlock every gate ( A6 ) . Defeat all of the foe to take the Tower of Trials coin as your prize .
After get the better of the first form of Wassermann , you ’ll have to follow the provided path to give his second phase . Part of this path has you walk through an underground tunnel . When you exit this tunnel , turn left instead of turning right ( A1 ) . You ’ll see a ledge that is just out of reach ( A2 ) . apply your goo block spell to climb the shelf , then take the air along it to regain the chest containing the Wassermann Arena coin ( A3 ) .
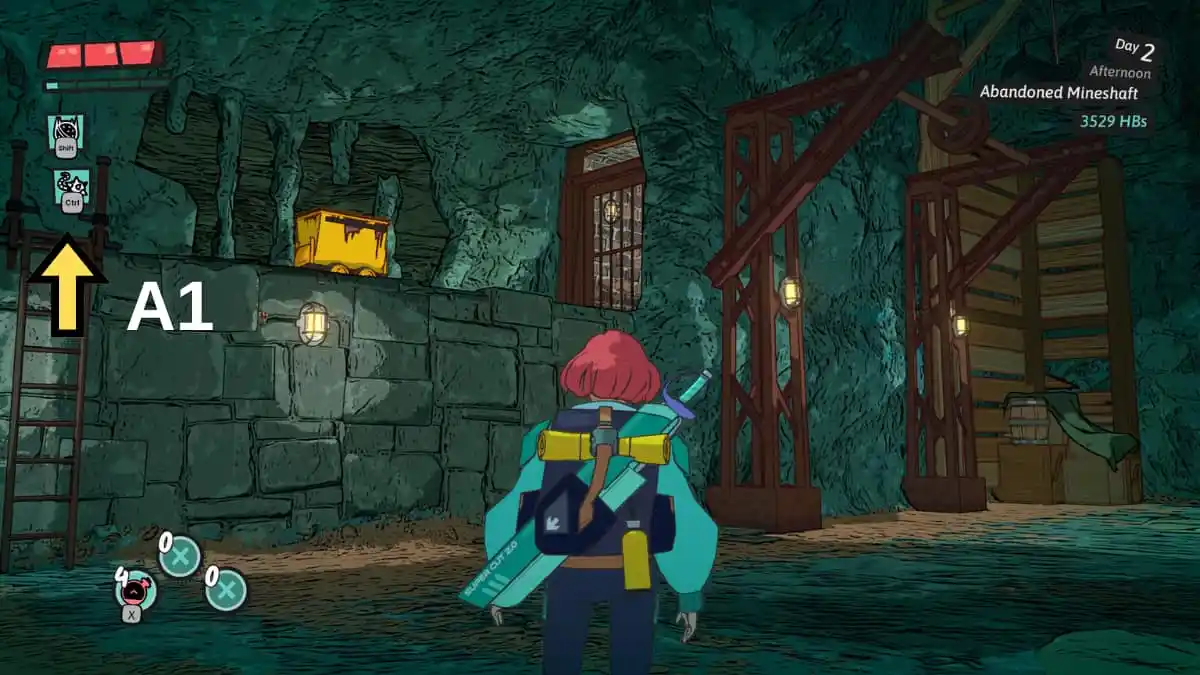
Image by Pro Game Guides
Toxic Archipelago
While the Toxic Archipelago is a secret dungeon , it still has a coin to uncover . The chest stop the coin is found in the field before the expiration portal in what looks like the corpse of a tower ( A1 ) . Lower the water supply and use the Whirlwind spell to foil the pee to the right between two stony ramps ( A2 ) . You ’ll want to end up on the political platform to the right of the ruin . Afterward , employ the spell again to put yourself onto the ruin ( A3 ) . The chest of drawers containing the Toxic Archipelago coin is on top of these ruination ( A4 ) .
need to take on all of the dungeons , but are n’t certain what skills to use ? Check out ourDungeons of Hinterberg Attack Conduit Tier Listhere on Pro Game Guides .
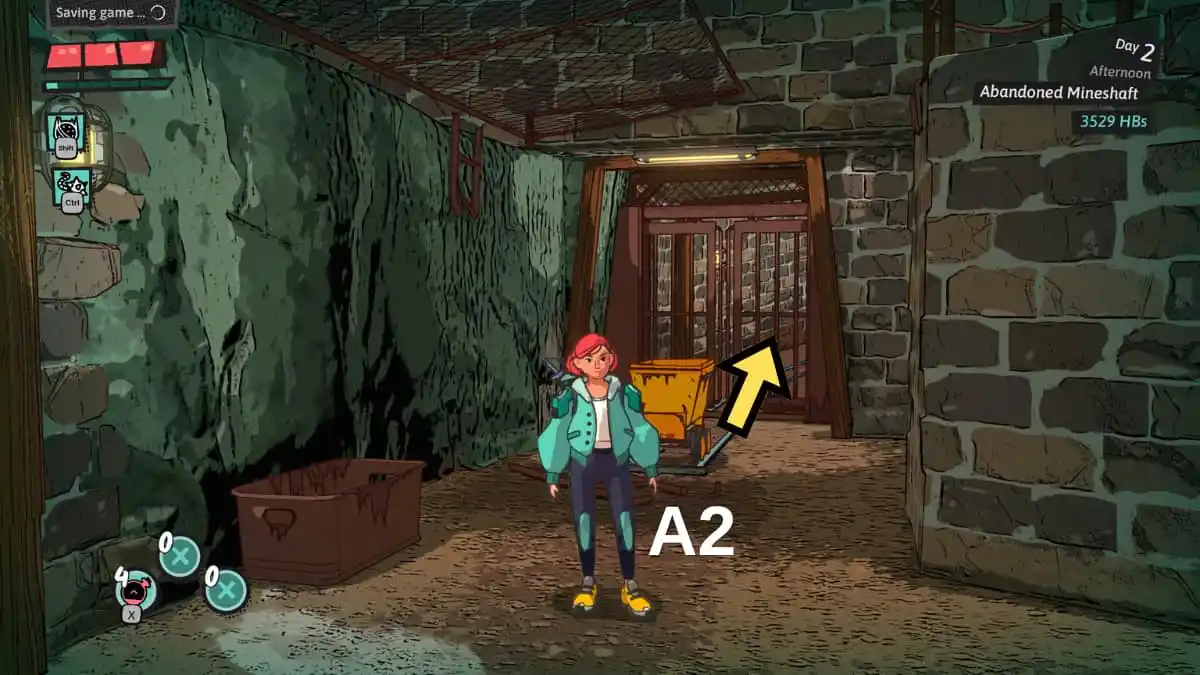
Image by Pro Game Guides
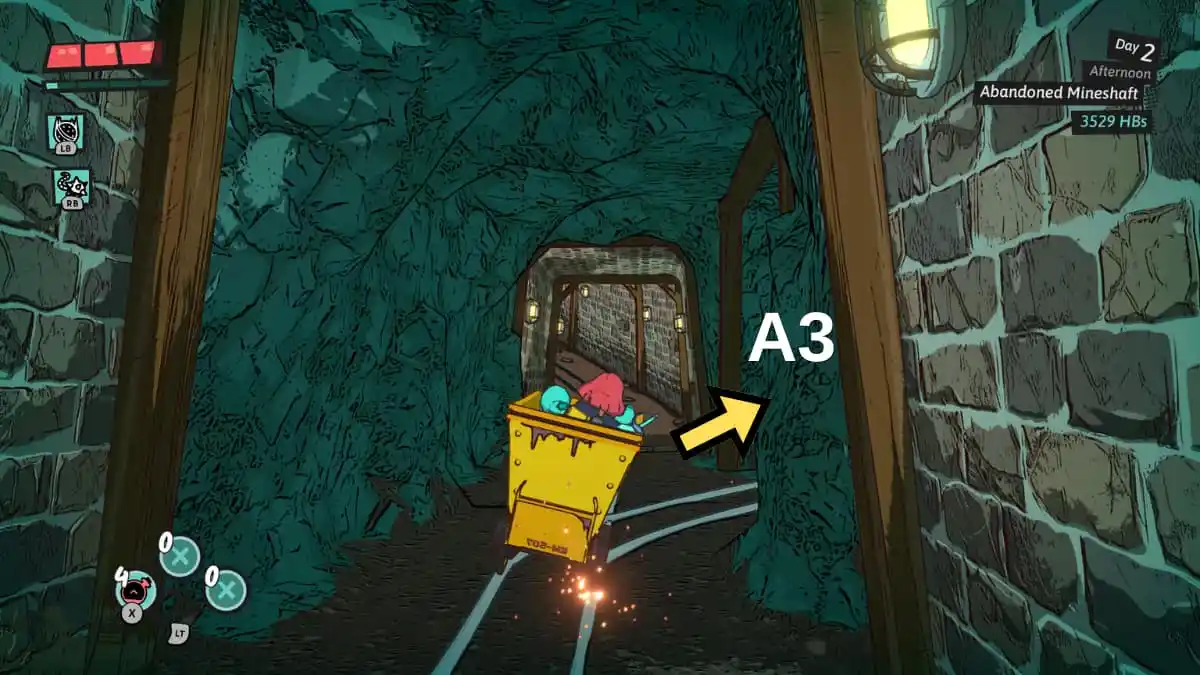
Image by Pro Game Guides
Screenshot by Pro Game Guides

Screenshot by Pro Game Guides

Image by Pro Game Guides

Screenshot by Pro Game Guides

Screenshot by Pro Game Guides

Image by Pro Game Guides

Image by Pro Game Guides

Image by Pro Game Guides

Image by Pro Game Guides

Image by Pro Game Guides

Image by Pro Game Guides

Image by Pro Game Guides

Image by Pro Game Guides

Screenshot by Pro Game Guides

Screenshot by Pro Game Guides

Screenshot by Pro Game Guides

Screenshot by Pro Game Guides

Screenshot by Pro Game Guides

Screenshot by Pro Game Guides

Image by Pro Game Guides

Image by Pro Game Guides

Image by Pro Game Guides

Image by Pro Game Guides

Screenshot by Pro Game Guides

Screenshot by Pro Game Guides

Screenshot by Pro Game Guides

Screenshot by Pro Game Guides

Screenshot by Pro Game Guides

Image by Pro Game Guides

Image by Pro Game Guides

Image by Pro Game Guides

Image by Pro Game Guides

Screenshot by Pro Game Guides

Image by Pro Game Guides

Image by Pro Game Guides

Screenshot by Pro Game Guides

Screenshot by Pro Game Guides

Image by Pro Game Guides

Image by Pro Game Guides

Image by Pro Game Guides

Image by Pro Game Guides

Image by Pro Game Guides

Screenshot by Pro Game Guides

Image by Pro Game Guides

Image by Pro Game Guides

Image by Pro Game Guides

Screenshot by Pro Game Guides

Image by Pro Game Guides

Screenshot by Pro Game Guides

Screenshot by Pro Game Guides

Image by Pro Game Guides

Image by Pro Game Guides

Screenshot by Pro Game Guides

Screenshot by Pro Game Guides

Image by Pro Game Guides

Image by Pro Game Guides

Image by Pro Game Guides

Screenshot by Pro Game Guides

Image by Pro Game Guides

Image by Pro Game Guides

Image by Pro Game Guides

Image by Pro Game Guides

Screenshot by Pro Game Guides

Image by Pro Game Guides

Image by Pro Game Guides

Image by Pro Game Guides

Screenshot by Pro Game Guides

Image by Pro Game Guides

Image by Pro Game Guides

Image by Pro Game Guides

Image by Pro Game Guides

Image by Pro Game Guides

Screenshot by Pro Game Guides

Image by Pro Game Guides

Image by Pro Game Guides

Screenshot by Pro Game Guides

Screenshot by Pro Game Guides

Image by Pro Game Guides

Image by Pro Game Guides

Image by Pro Game Guides

Screenshot by Pro Game Guides

Image by Pro Game Guides

Image by Pro Game Guides

Image by Pro Game Guides

Screenshot by Pro Game Guides

Image by Pro Game Guides


Image by Pro Game Guides

Image by Pro Game Guides

Image by Pro Game Guides

Screenshot by Pro Game Guides

Image by Pro Game Guides

Image by Pro Game Guides

Image by Pro Game Guides

Image by Pro Game Guides

Screenshot by Pro Game Guides

Image by Pro Game Guides

Image by Pro Game Guides

Image by Pro Game Guides

Image by Pro Game Guides

Images by Pro Game Guides

Image by Pro Game Guides

Screenshot by Pro Game Guides

Image by Pro Game Guides

Image by Pro Game Guides

Image by Pro Game Guides

Screenshot by Pro Game Guides

Image by Pro Game Guides

Image by Pro Game Guides

Image by Pro Game Guides

Image by Pro Game Guides

Screenshot by Pro Game Guides
