The Abandoned series are tip - and - click mystery games found on the internet site Cool Math Games that task you with jeopardize into unlike dimensions to find your brother . Inthe first Abandoned game , you make your way to Tibet and record an exotic globe uninhabited by animation of any kind , solving puzzle and gathering short letter to get to the bottom of your chum ’s disappearance . The second game has you travelling to another new attribute , this meter in a woodland , but once again there will be plenty of puzzles for you to clear along the way .
How to solve every puzzle in Abandoned 2 - Walkthrough (The Forest)
The starting area and the temple puzzle
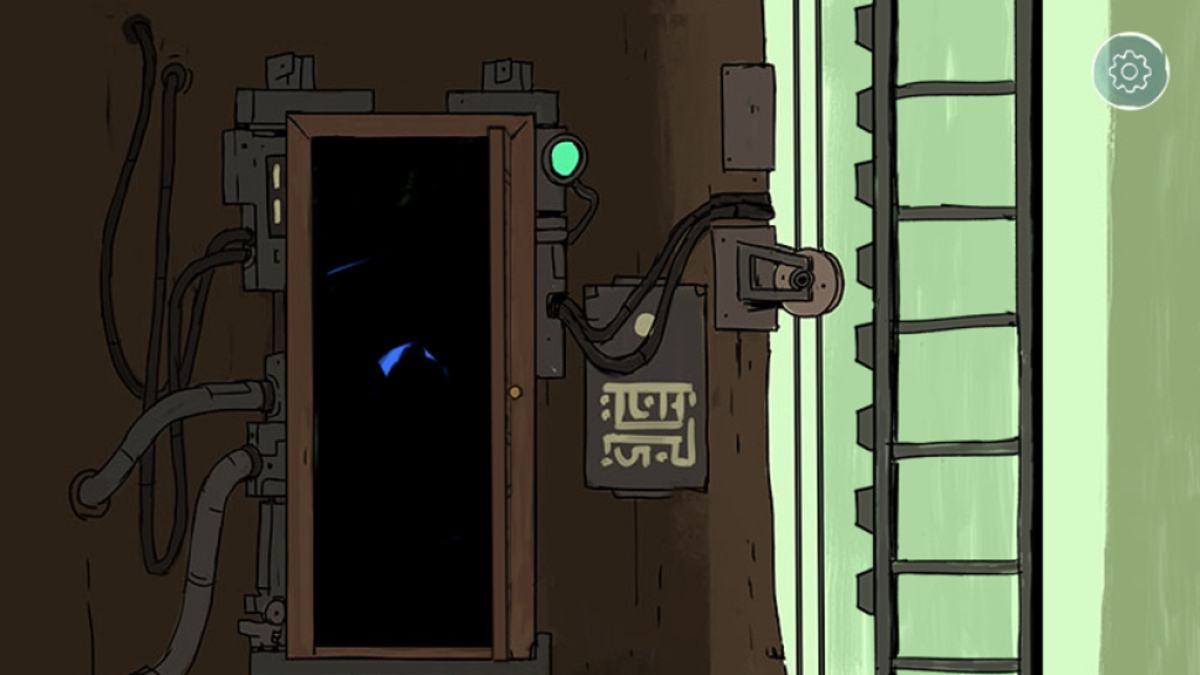
First off , head through the door at the beginning of the game to enter the new woods dimension . Head left until you hit the ladder build into the tree , then lead all the way down to the bottom . On the way down you ’ll notice acircular switchon the right side of the tree diagram trunk that you’re able to gyrate . Spin the electrical switch until the line in the middle isvertical . Move one elbow room to the left and pick up thehand sawin the bushes , then make your way of life back up the run .
channelize decently until you notice thehanging tree vinesand press them . They will fall down , countenance you to mount them . Head all the way up the vines , then oral sex left . Use thehand sawto cut thewooden stickand blame it up .
Head back down the vine and headland left until you see the strange contraption on the ground . This is aladder systemthat requires thewooden stickto single-valued function . Attach the stick to the left over side of the system to activate the ravel , thenpick the stick back upas you ’ll want it later . Climb down the ladder until you attain the bottom .
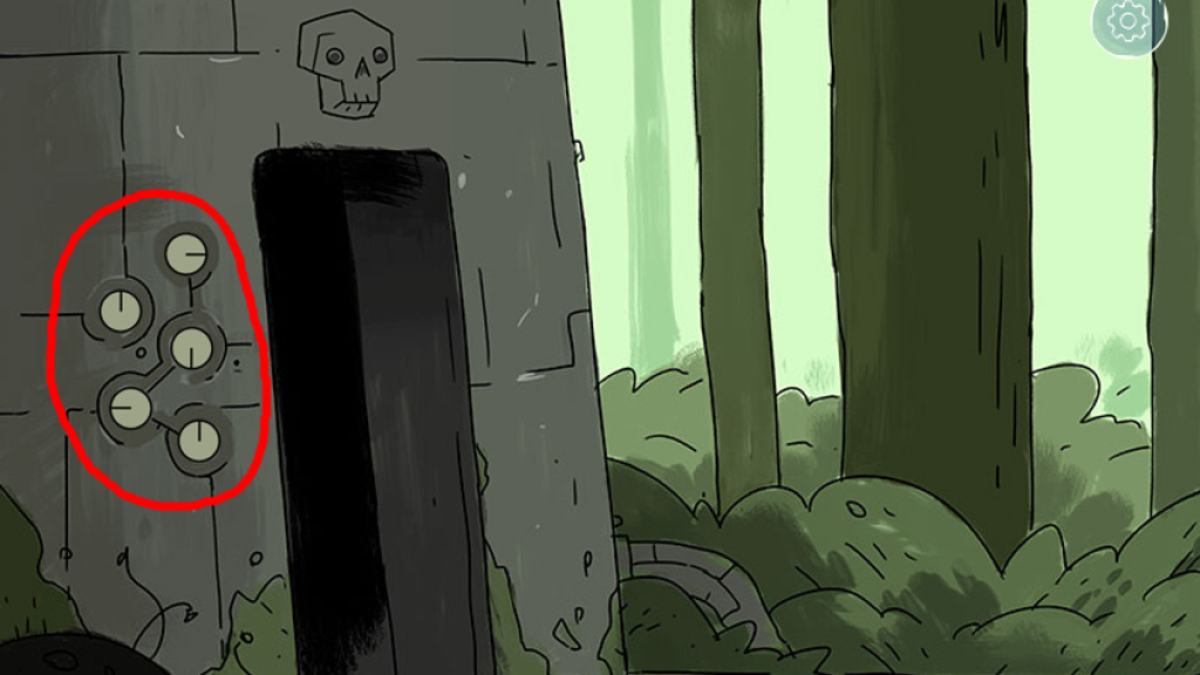
From here , mind left and read the message from your crony on the tree diagram , as this one gives a hint about direct to a temple next . Head up the ravel next to the note and snap theshovel , then turn thecircular switchnext to it until it ishorizontal . Then , maneuver back down before going right .
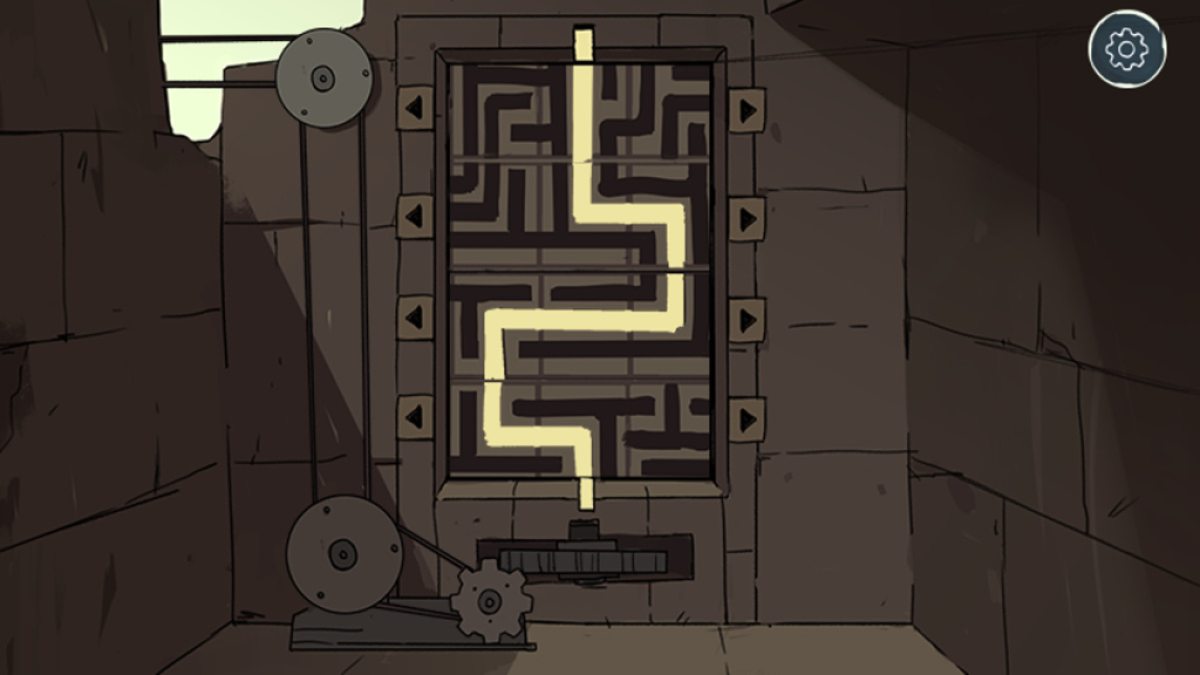
Keep pass right until you reach thetemple door . The entrance to the tabernacle is the room access all the way to the rightfulness that is surrounded with symbols , not the hole in the ground before it . Head inside the temple and pick up theold keyhanging within before going upstairs . Here you ’ll find the puzzle your brother referenced . Though at first it await complicated , the root is tohit the first three arrow once to the right . Doing this will immediately figure out the puzzle . Once nail , the puzzle will glow like this :
From here , head all the way back to the first doorway . You ’ll get a ravel has descend from above that you need to climb up up . When you get to the top , use the switch toraise the ladderso that you ca n’t climb back down . Then , head up the ravel built into the tree diagram and head right past the shanty . You ’ll find out anothercontraptionthat you need to bind thestickto . trip it to produce a bridge circuit that you’re able to take to the right , allowing you todescend using the vines you pull in earlier .
Screenshot by Pro Game Guides
Head all the path back to thetemple puzzleyou solved antecedently to find it has been interchange with climbable alcoves . Head up and grab theskinny keyyou rule there , then take the ladder on your left . manoeuvre all the way up the tree to the very top . You ’ll lie with it ’s the top because there will be a small cube space with a skull carving next to it . From here , head left and tap thehanging keyin the branches . This will cause it to precipitate down a level , so you require to head down the ladder and all the way left to pick it up .
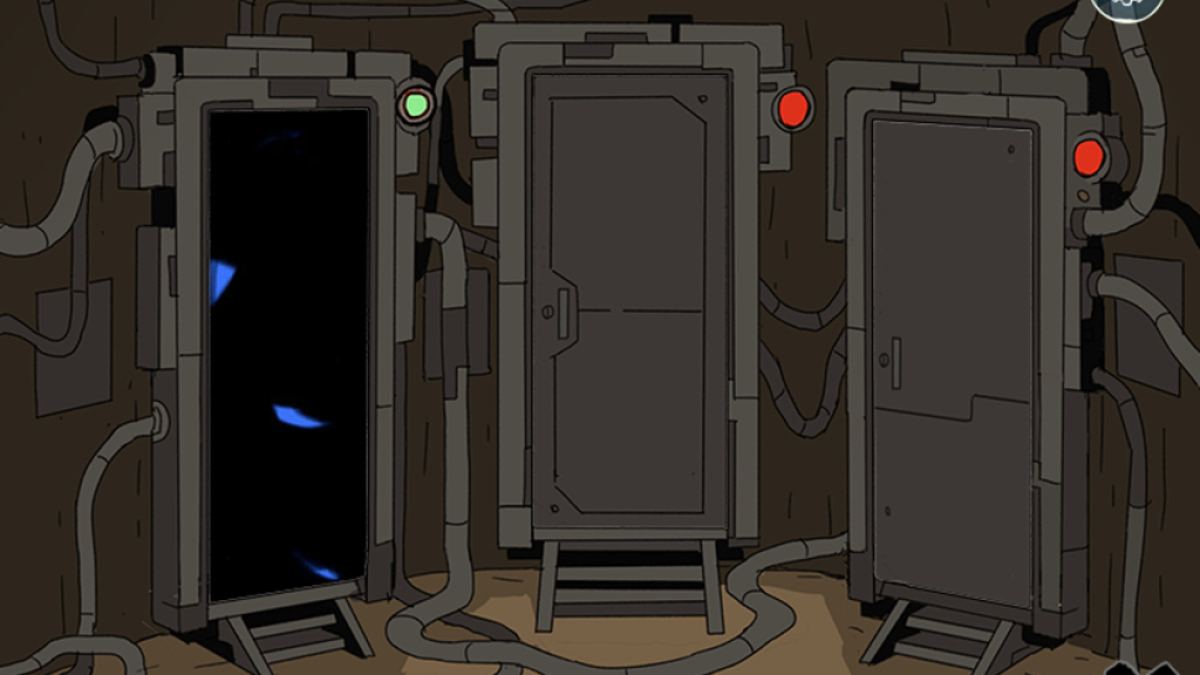
After picking up the primal , header back down to the level where thehovel doorwas in the first place . It will be the room to the left of thecontraptionyou leave the joint in . You ’ll know it ’s the right elbow room due to thethree doorswithin it :
Pick up theskull room slicker sheeton the ground , then use thehanging keyon the leftmost door before heading through it .
Screenshot by Pro Game Guides
Related : Best Games on Cool Math Games in 2023
The desert world and the skull room puzzle
Through the door you ’ll find thedesert world , a world wholly separated from the forest one you were in before . Head left until you see someuneven dirton the basis , then use theshovelon it to give away a hidden elbow room . Go into it and try pressing the two clitoris and switch within . steer back out and one room right to find astrange pillarcoming out of the ground . You may detect a piece of it is lack . Head back left and afloating elevatorwill descend from the sky that you’re able to accede and ascend .
Exit the drift elevator and head right . There will be a banknote on the bulwark from your brother explaining theskull way . There is nothing of bank note to the right in the room . From here , head back to the underground way below the floating elevator and pick up thegreen cylinderand thespare parton the shelves below the substitution .
direct up to thestrange pillarand attach thespare partto the trap in it , then guide back down into the secret room . sky the switch , then manoeuvre back to the strange tower again and it will start firing a laser into the sky . From here , take the elevator back up and manoeuver all the style right into the room past the tone about the skull way . Within , the electronics will be lit up . You ’ll point out atrapezoid keyto the right that you may now access thanks to the electricity . open up the door and pick it up , then make your direction out of the desert humankind .
Screenshot by Pro Game Guides
Head out of the three doors way and descend a level to thearea with the replacement and ladder . head up to the left and apply theold keyon the door there . Head deep down and then head into the room within . You ’ll see what looks like a torture gadget and chair within . In the straining machine there will be anothergreen cylinderthat you require to take .
From there , point back to the arena you originally found thehand sawin to the unexpended and below of thefirst door . Head all the way left until you reach theskull door . Here , there will be a puzzle identical to theskull elbow room cheat sheetyou find earlier . To solve the puzzle , rotate the dial until they twin the cheat sheet , and the door will spread out . If you ’re having trouble the goal result will look like this :
Head inside and you ’ll find a structure in the middle of the elbow room with two holes in the top . First , pick up thesymbol machineon the wall behind it . Then , take your twogreen cylindersand insert them into the holes . Doing so will unlock a shaft of light that lead down into a room with astrange patrician machinetaking up most of it . push aside it for now .
Screenshot by Pro Game Guides
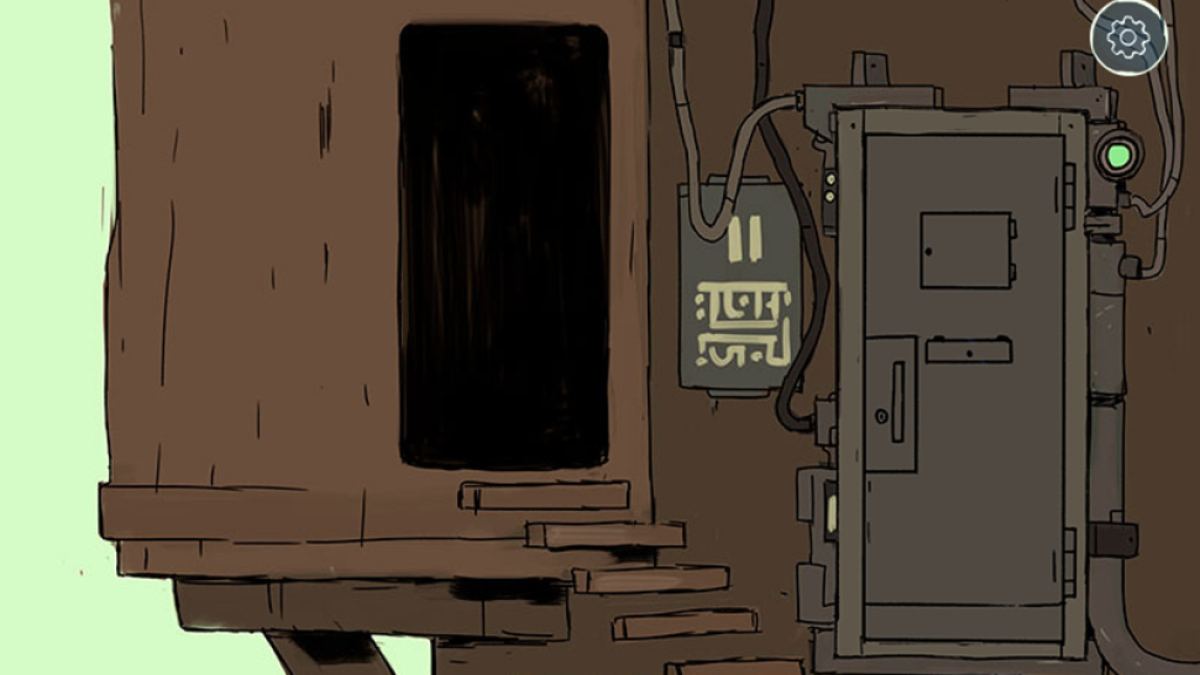
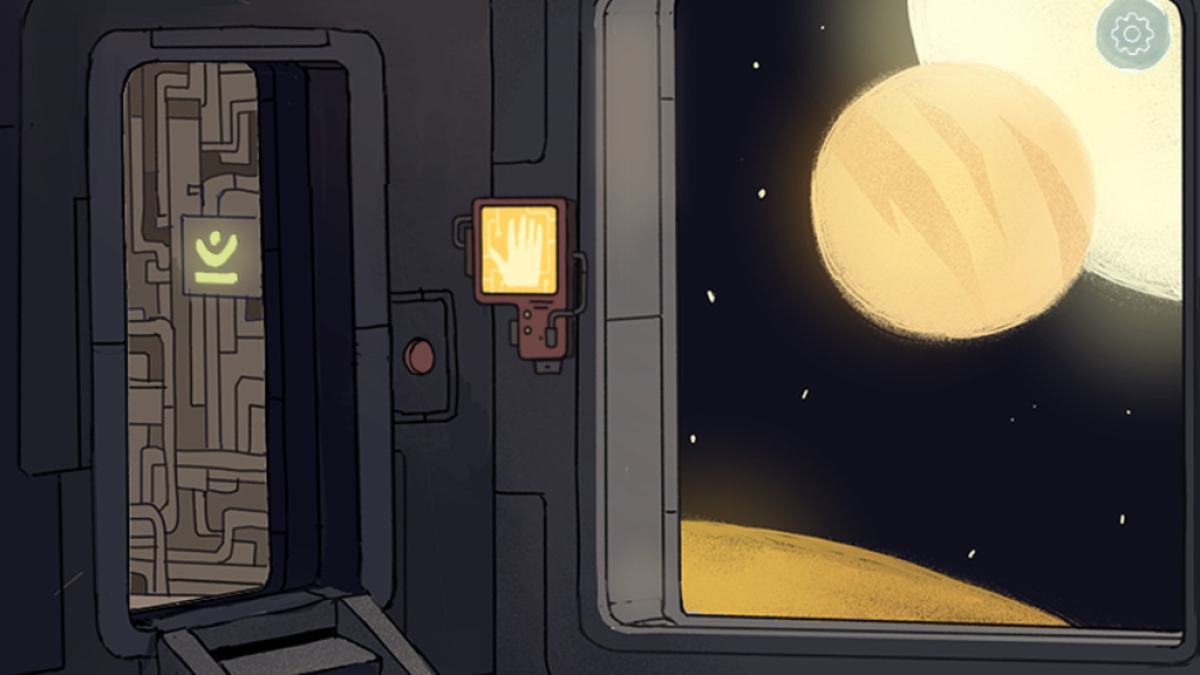
Head all the mode back to thehovel with three doorsand use thetrapezoid keyon the right threshold . This will allow you to step through into what looks like aspace place . Head allow and clean up thebrown keyin the alcove , then immediately guide back out of the space post .
From here , point out of the hovel and up the ladder next to it , then head left to thehovel with step in it . mount up the stairs then find the door next to the shanty ’s exit :
open up the door using thebrown keyand you ’ll step into a elbow room with a ladder . Head up the run and grab thepyramidout of the wall on the leftfield . From here , you require to head to thehole in the ground that you buy the farm before the temple puzzlein the wood . Use thepyramidin your inventory on the magnanimous pyramid in the hole and a secret musical passage will open . Descend below until you find theroom with a humanoidsuspended in a corner . There will be aspare partto the left of the android that you call for to pick up .

Screenshot by Pro Game Guides
After break up up this spare part , you need to head to thehovel entryway that contains the steps inwardly . Next to it is a threshold . It will look like this :
You take to employ theskinny keyon this door to open up it . Step through and you ’ll find yourself in a cerise stairway . Descend one level and apply thesymbol machineon the wall in front of you . Doing so will let out handprints on sealed blocks . Click these blocks in parliamentary procedure and the wall will shift , revealing a room behind it .
Related : How to beat Trace Escape Room – Walkthrough and Answers
Screenshot by Pro Game Guides
The glowing symbol box puzzle and the combination lock puzzle
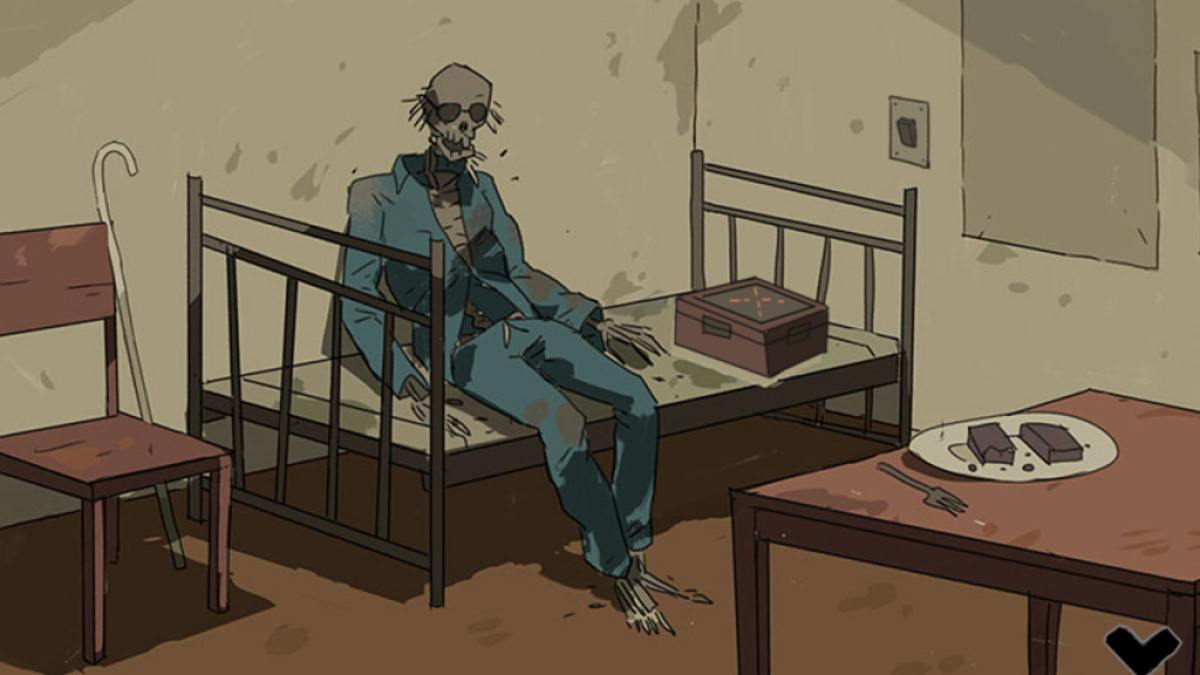
Within this room there will be an adjoining way with a skeletal system and abox with symbol . Before going to the adjoining elbow room , pick up there d buttonon the ground . This red-faced button take to be used on the broken door in the Space Station to reveal a occult symbol . Do not utilize it on the Elevator in the Desert . Then , when you go to the adjoining room , turn off the lights in the elbow room and use the box’son switchto start the teaser . To figure out this puzzle , you need to sort the shine green symbol free-base on the black symbolisation at the goal of the box ’s row . For example , thex squaresneed to be in thex column . The symbols can be move a distance equivalent to two distance by as long as it is open . Once you get all of the symbol in the correct spaces , the boxful will spread and expose areverse trapezoid paint .
Head back to thehovel with three doorsand consumption thetrapezoid keyon the centre room access . This will take you to an area with nothing but acombination lockpuzzle in it . Between the last mystifier and this one , the biz serves up two of its hard puzzles back - to - back , so be quick for another tough one . Here , you need to clear all four lock out so that the space they worry is empty . The way the arrow work are as take after :
Patience is a virtue here , as this puzzler is a doozy , but once you finish it , you ’ll be honour with themagnifying lens of the eye . With this , you’re able to manoeuvre back to thedesert world . Once there , head to thefloating elevatorand then right until you find thefocusing machinethat the optical maser is hitting . You need to bind thespare partand the lens to it and then lead right to the room with the switch . chatter the switch and the optical maser will be shot up to thespace station .
Screenshot by Pro Game Guides
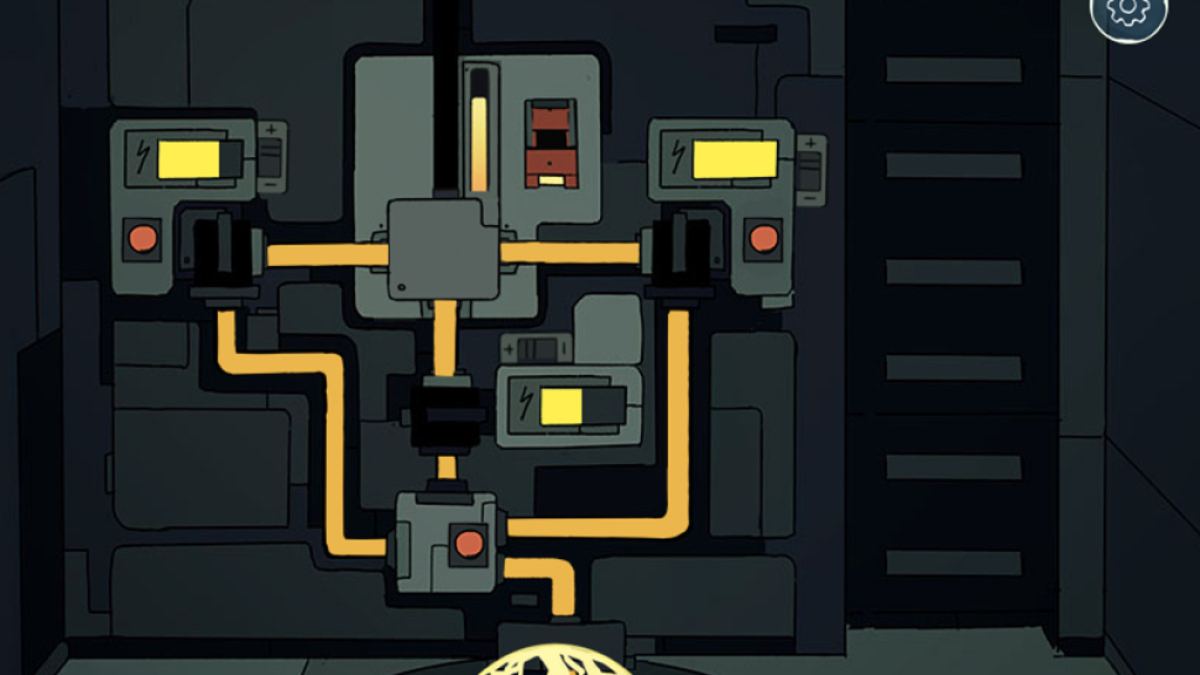
The space station power puzzle
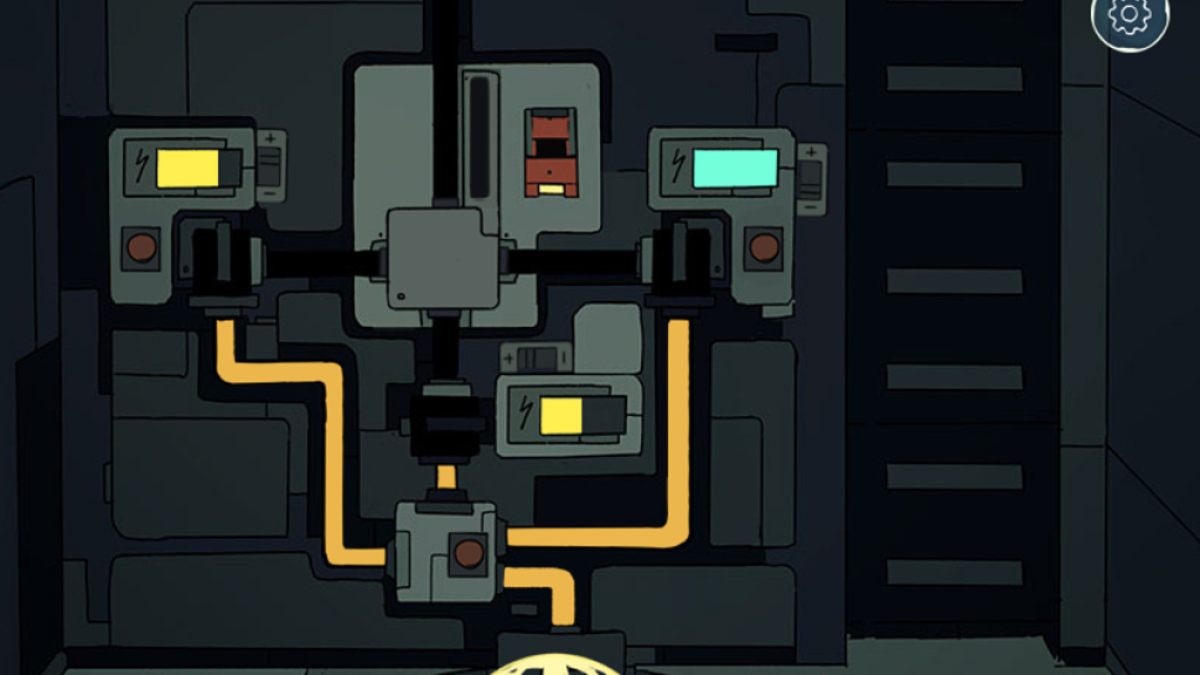
maneuver back to the space station and descend the ravel below . Here , you ’ll find another intriguing puzzle involving thewheelabove and thepower machinesbelow , of which there are three . By default , thewheelwill have theline symbolfacing down , and for this symbolisation you call for toarray the power simple machine in the colouration aboveandpress the red button on each of thembeforeclicking the switch . This will light up the wheel above .
Click theleft arrowon the roulette wheel to spin it to thethree linessymbol , then head back down to the power machines . Array the power automobile as keep an eye on , then repeat the operation from the first meter :
Head back up and come to theleft arrowon thewheelto place it to thesegmented linebefore heading back down for the last time . To cease the third symbol , array the automobile as follows before reprise the step from the first and 2d symbolization :
Screenshot by Pro Game Guides
Once all three symbols on thewheelare lit up , click there d buttonnext to it and it will give you access to thesealed doornext to it on the wall . open up the door and break up up theskull cupwithin .
From here , head all the path back to theskull roomwhere you lick thedial puzzlepreviously . When you get there , descend into thestrange low machine roomand place the skull inside thecube alcovebefore bid there 500 button . A racy liquid state will replete the skull cup , and once it is done you involve to pick it back up .
manoeuver all the agency to the top of the tree and insert theskull cupinto thecube alcovethere . push there d buttonand theblue liquidwill filter out of the skull cup , melting themetal sealon the tree diagram aright below it .

Screenshot by Pro Game Guides
relate : Best websites for Unblocked Games
The blue wall cube puzzles
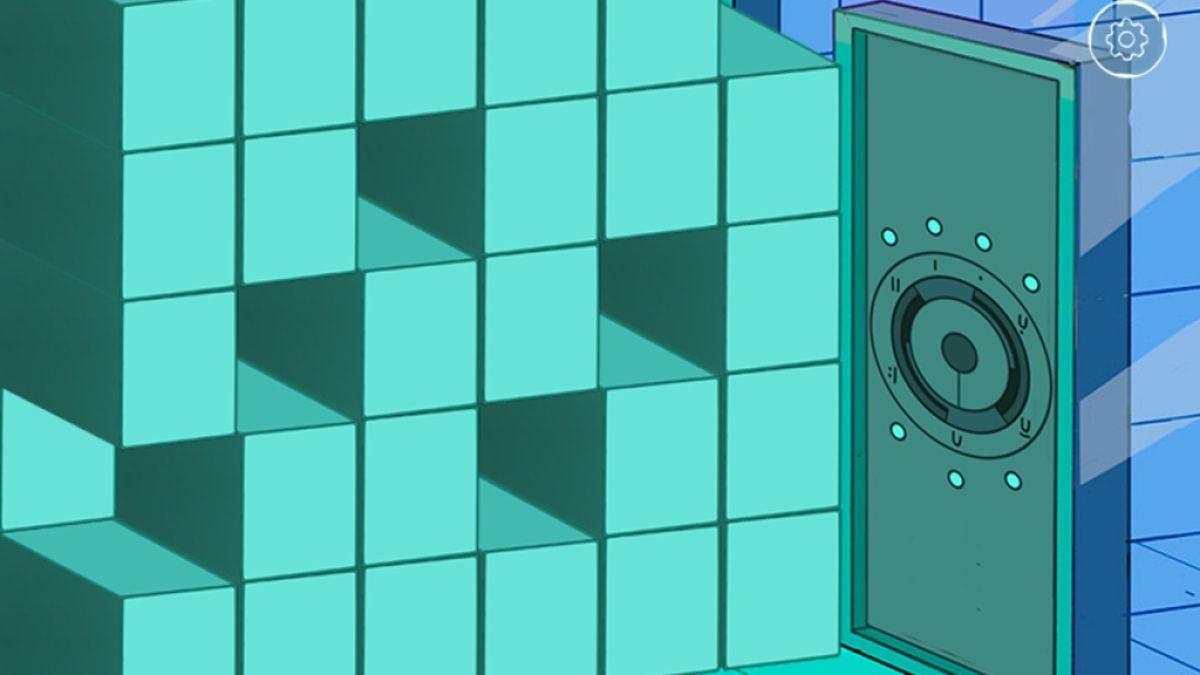
Head into the hole where the metallic element seal was and descend until you find theblue dooron your left . Inside you ’ll find a wall of cube you may sink in on to move . This is actually a puzzle , and the solution is quite complicated . Each dustup needs to be align in just this way frombottom to top and right to left :
you may consult the image above for the finished puzzle , but you will know you have finished it when you may get out the room and descend further into the tree . However , first you involve to thenreset the puzzleand rearrange it into adifferent pattern . The new pattern will help solve another mystifier subsequently , so rearrange the paries like so :
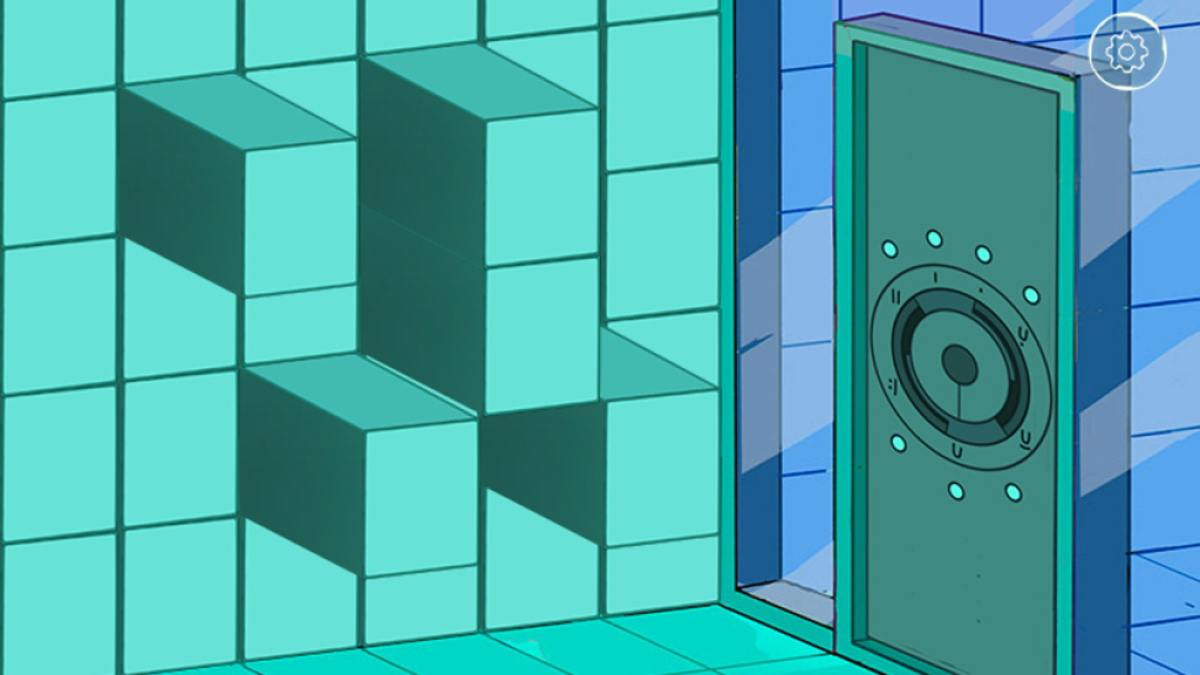
From here , head back to the upper fix in the tree trunk and take the ladder down on your right hand . You will come up a door there and deep down will be another blue rampart blockage puzzle . This time , the root is much simpler and will only take a few seconds . However , be sure you set up the teaser above correctly , otherwise resolve this teaser will have no effect . The solution can be found below :
Screenshot by Pro Game Guides
As control above , when you finish this puzzle ametal boxwill arise out of the floor . The corner has a symbol on the front that looks like a key . This is to prompt you to give allseven keysyou have to the box seat . After doing so , adisc traywill pop out of the right side of the box and will havestrange disksin it . Be sure to sink in it multiple time to pick up all of the disk .
From here , you could head to thebottom curtain raising melted into the treeand inside the trunk you could head left to get anormal room access . This door will lead to an area withfloating symbol messagesthat correspond tosecret symbols . These are not integral to completing the game , but if you like to find them all you could take the counselling below .
For those who desire to finish the game , there is acaveto the leftover and past the threshold . steer up and into it and you ’ll find alarge round door . Use thestrange diskson the door to view a series of messages , then mistreat through to make out the game !
Screenshot by Pro Game Guides
All of the secret symbol puzzles
If you used there d buttonearlier in thespace station , you have already set up one of the foursecret symbolswithin the plot . However , there are still three left to uncover , and each of them is put away behind their own mystifier . Uncovering these symbol unlocks specialnotes from the developersthat can be found to the right of the door that leads to thefinal cave areaand the death of the secret plan .
Let ’s start with the easiest as you have already solved its puzzler previously by set thecircular switcheson the tree diagram bole near thehand sawandshovel . forefront inside the tree trunk through one of the burnt - out holes you made , then descend all the way to the bottom . You will find a room with twocircular switchesthat will be get down up in dreary light . To the left hand there will be a hole in the level you may descend , and within the maw will be one of thesecret symbols .
The next symbolization can be find within theroom with a ladderwhere you found thebrown keypreviously . You need to head back there and walk into the adjoining room . Within you will obtain a seemingly endless series of room to the left and right hand . These rooms are in reality a puzzle tied to thekey padnext to the entrance . This puzzle ’s resolution actually disagree for each unique playthrough , but the answer is dewy-eyed . Within the way there are Light on the rampart in front of you that can be switched to red or white . get going through the rooms and turn all of the brightness level tored . commence cycling through the rooms to verify all of the light source are red . Note that you will haveless than thirtyrooms entire , so once you hit thirty clicks you ’re dear to go . From here , changeone room light back to whiteand walk back through the rooms , count as you go . The white igniter will serve as your end mark , telling you exactly how many rooms there are in total . Once you have the turn , point back to thekey padand enter it . If done correctly , a slot will open in the floor near the entry that has one of thesecret symbolswithin .
Screenshot by Pro Game Guides
The last symbol can be found back in the tree tree trunk in one of the doors , but first we are going back to theroom carry the torture hot seat and devicefrom earlier where we first pile up thegreen cylinder . Within you may have seen thecode letterson the wall under the glass window glass . These code letters are actually the solution to the next puzzle :
Memorize the codification or consult the image above , then head back into the tree trunk . You need to detect the door that is like a shot below and to the right hand of thefirst cube bulwark mystifier . You ’ll sleep with it ’s the right way because you may see the torture room through its window . Here , there will be acombination codeon the wall next to the ledger entry door . Use thecode lettersabove to solve it and you ’ll see a hugger-mugger compartment open back in the torture elbow room . Head back there to get the last of thesecret symbols .
Looking for more data on free games ? check up on out theBest Mobile IO GamesandHow to shift your name in Fall Guysfrom Pro Game Guides !

Screenshot by Pro Game Guides
Screenshot by Pro Game Guides

Screenshot by Pro Game Guides
