This DLC is out of this world and our Seeing Stars walkthrough can help you complete it .
issue on June 25 , 2024 , Seeing Stars is a inadequate little DLC plus to A Little to the Left that add almost 40 new challenging spirit level to ponder over . Keep read our image Stars walkthrough if you require help with any of the levels !
A Little to the Left: Seeing Stars Walkthrough (All Solutions)
so as to unlock all the level of thegame , you will need to not only fill in each point , but also figure out all the different possible answer too . Here is a full walkthrough of every single stratum and all of its different solutions .
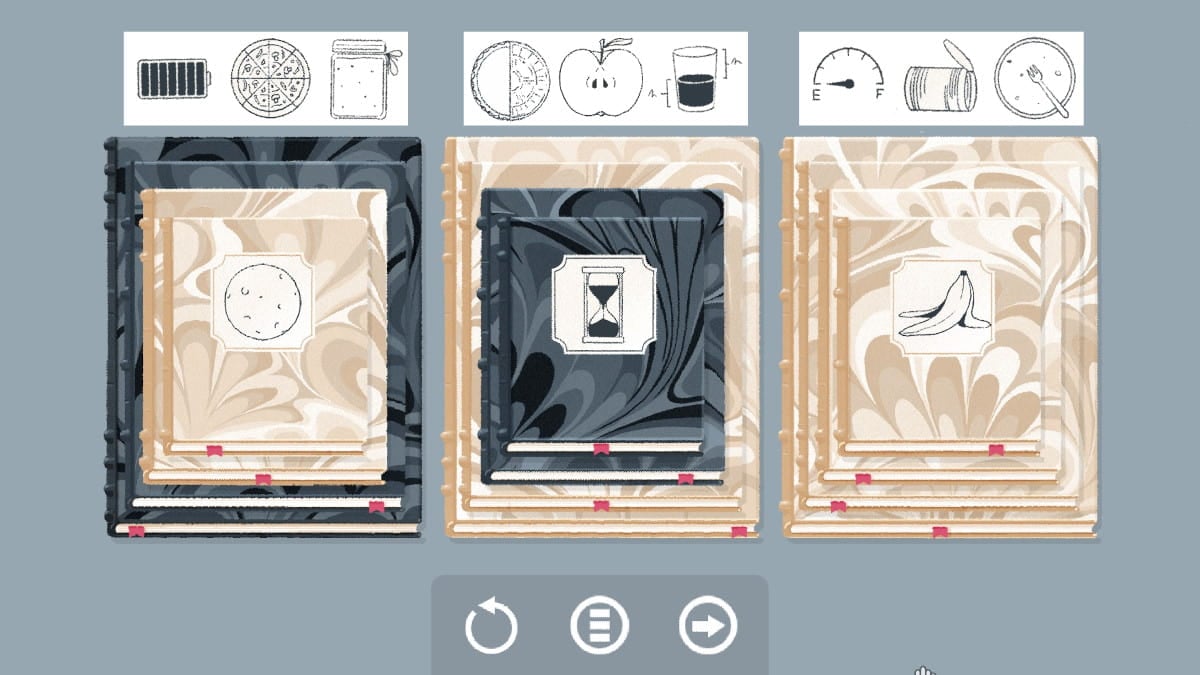
Level 1 hints
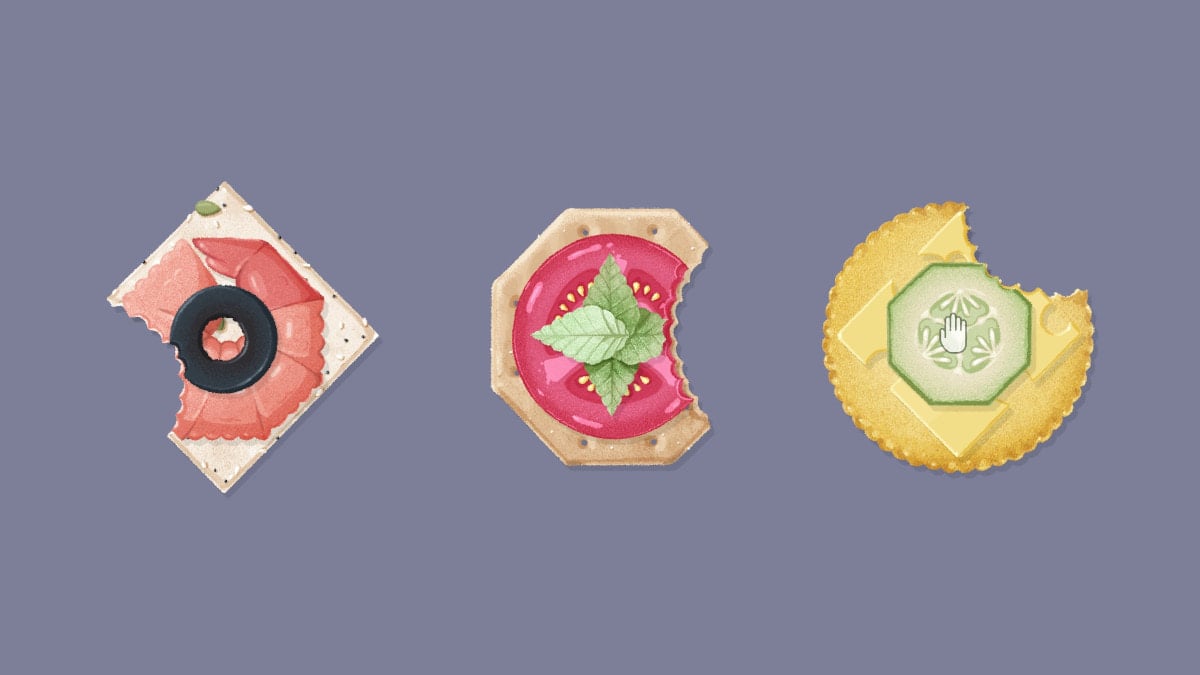
Level 1 contain three crackers along with toppings that have been sprinkle across a background . This puzzle has three different solutions , but you only need one to move on . Here are some hints to facilitate you get closer to the resolution .
Level 1 answers
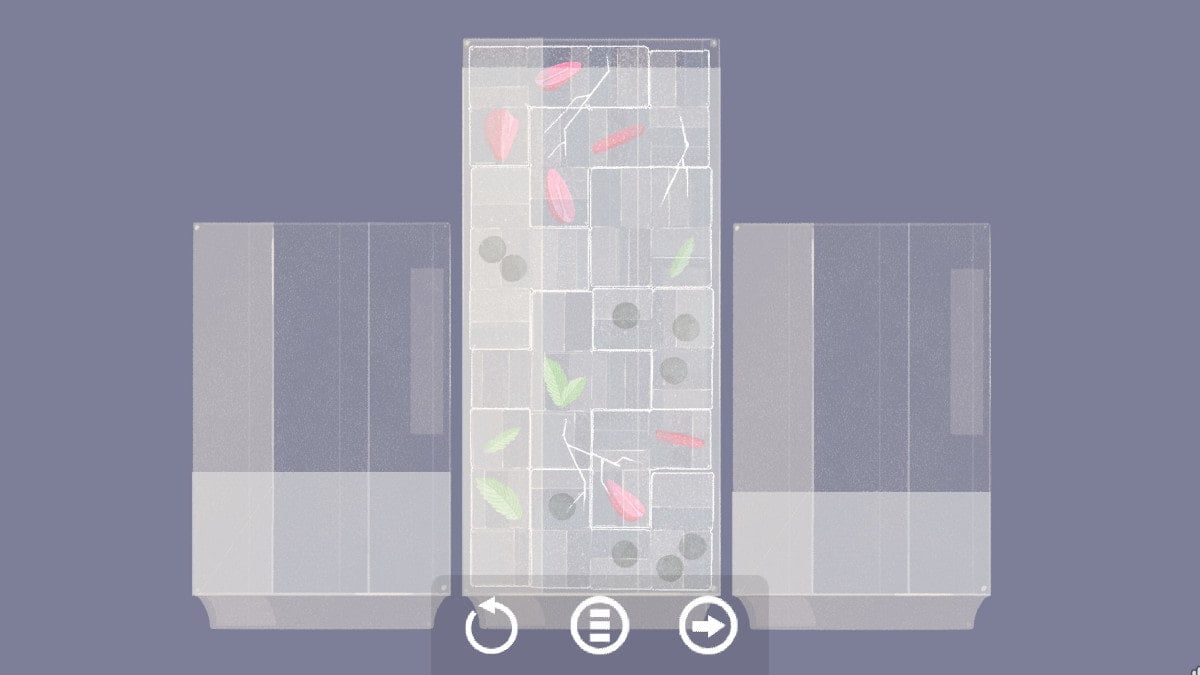
The first solution to level one is to draw up all the bite German mark on each of the objects . When you have all the intellectual nourishment stacked properly , it will look like it does below .
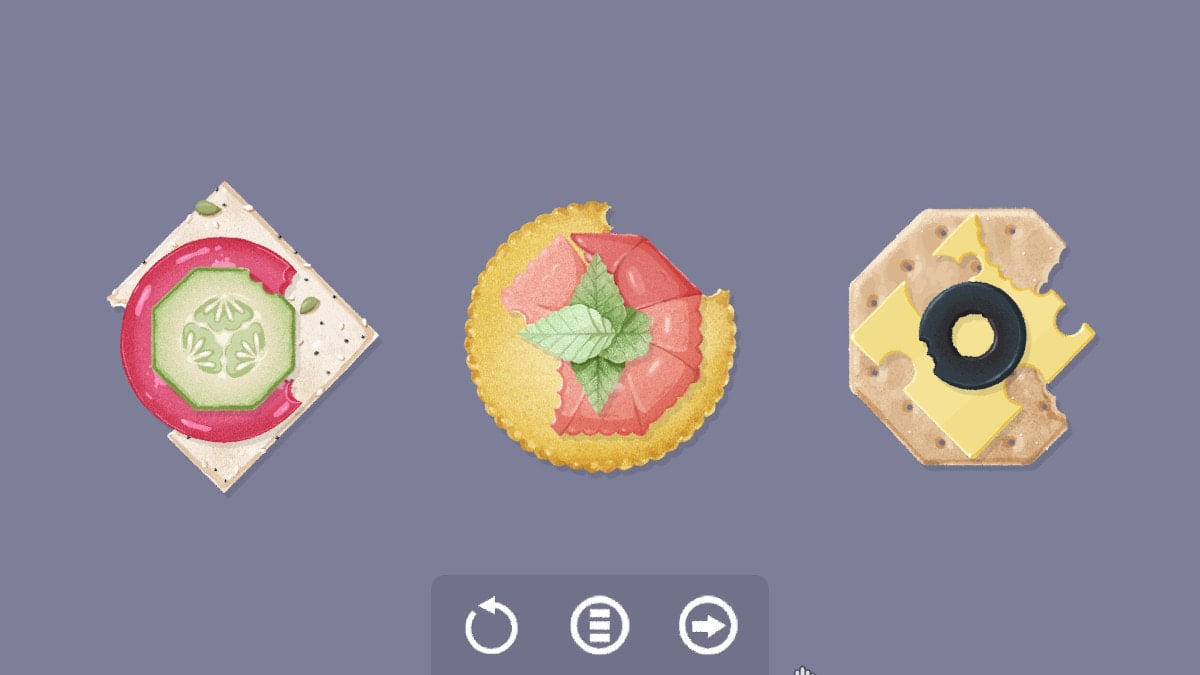
The 2d solvent require that you bet at the patterns on each of the items . The square snapper has little seeds and dots on it , so we need to stack the seedy tomato and cuke slice on top of it . The shrimp , the round cracker , and the folio all have the same bumpy outline . And then pile the remaining detail with holes in them to get the final push-down list .
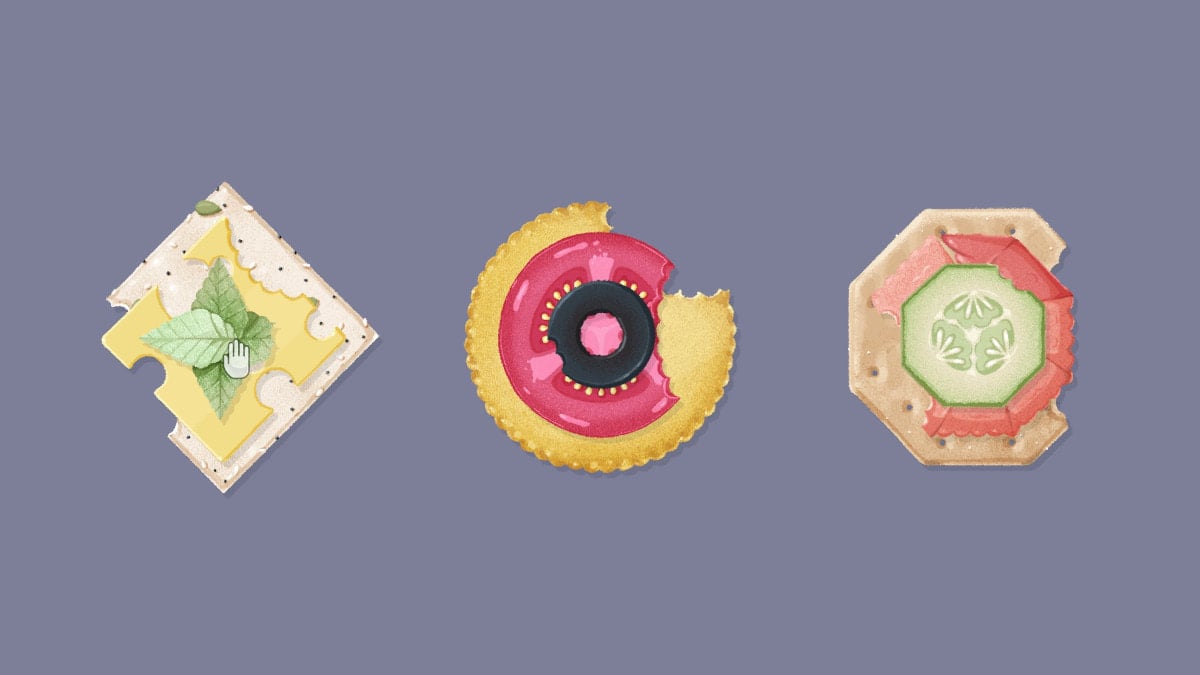
Last , but not least , you will need to stack up item based on the shape they make . The hearty firecracker gets the straight composition of cheese and the square leaf . The round cracker bonbon gets the love apple slice and the olive . The octagonal firecracker gets the octagonal shrimp and cucumber vine on top of it .
Level 2 hints
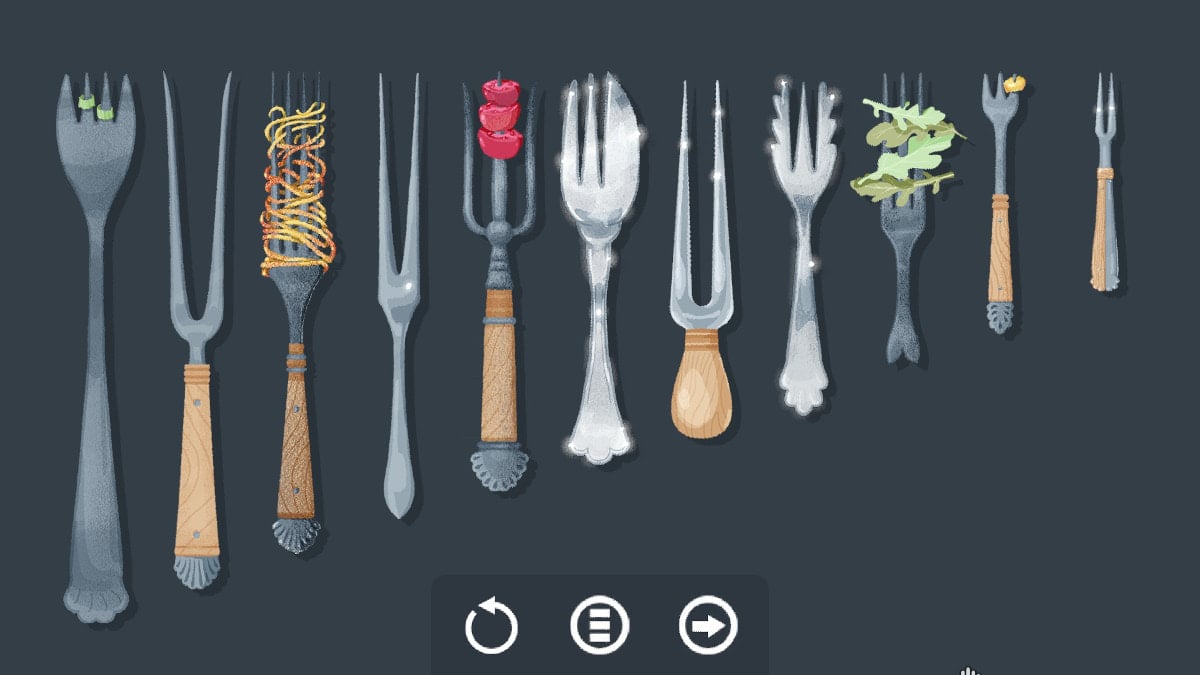
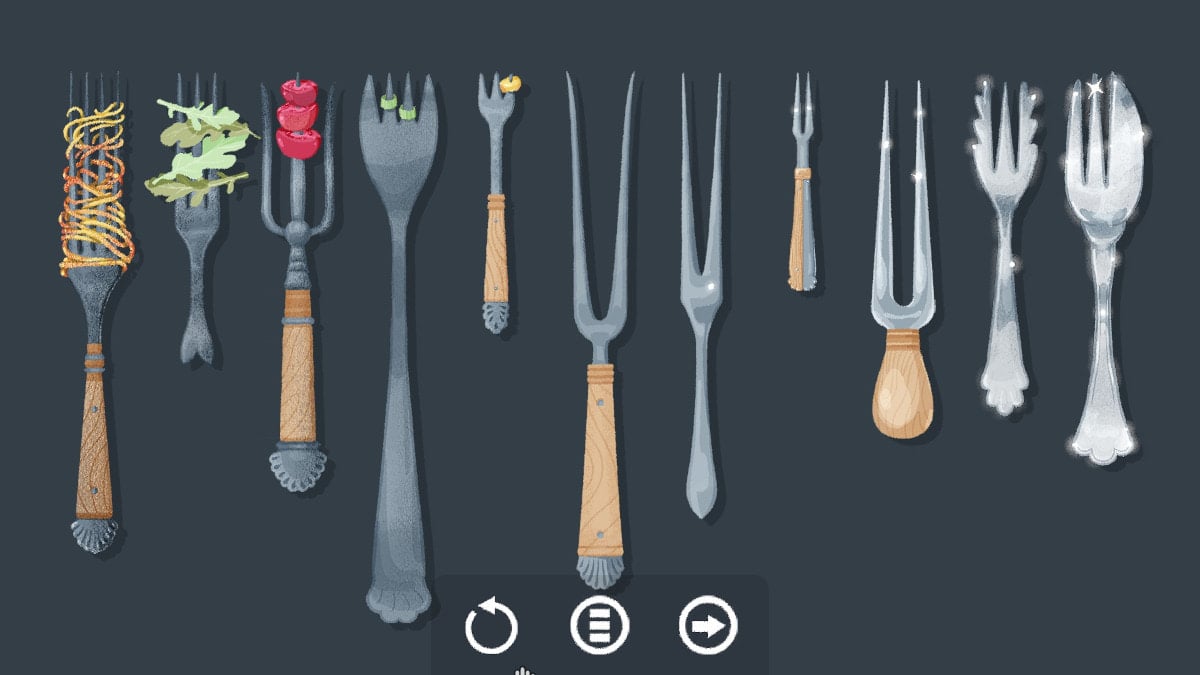
Level 2 gives you a excerpt of forking to assort . There are five solutions for this intriguing level , and only one of them is visceral . If you are stuck on this intriguing level , here are a few confidential information to avail you out .
Level 2 answers
The first resolution for level 2 is probably the most obvious : they need to be put in ascending or condescend order by duration . It does n’t weigh if you put the foresightful one first or the short , but here is screenshot of what it looks like in Holy Order :
Next up , you will need to put the distance of the tines in climb up or descending order base on length . you’re able to see that the longest tines are on the two - forficate forking with the wooden handgrip on the leftfield , while the shortest is the small three - bifurcate fork with the corn gist on it .
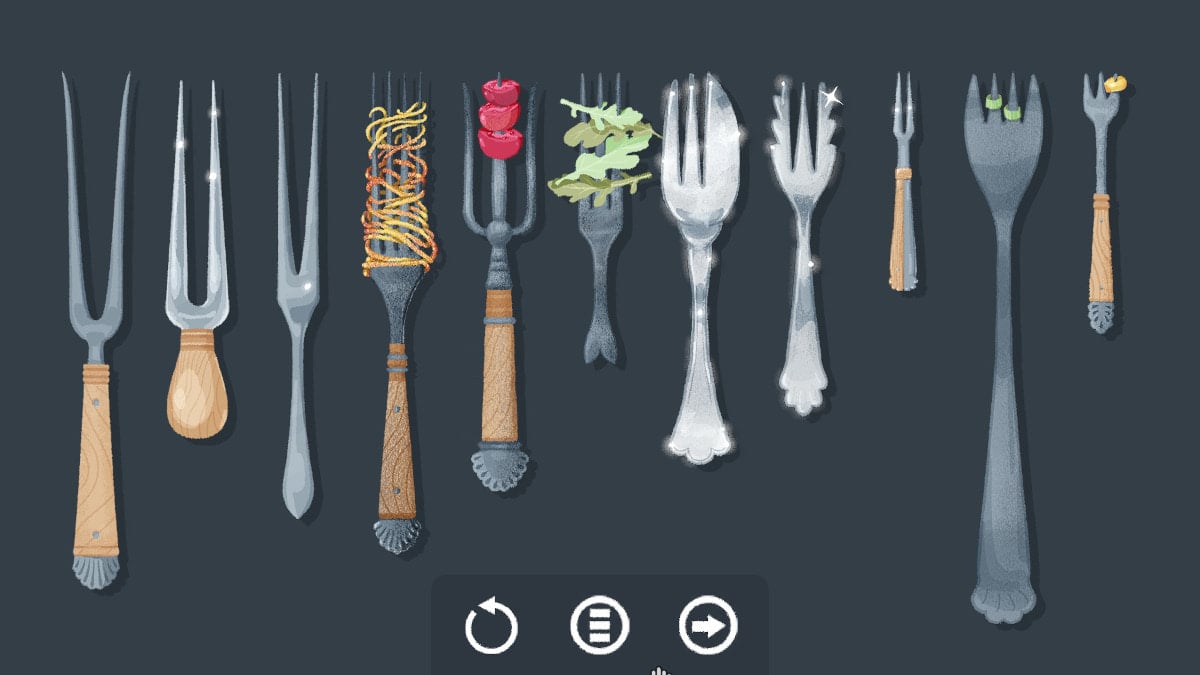
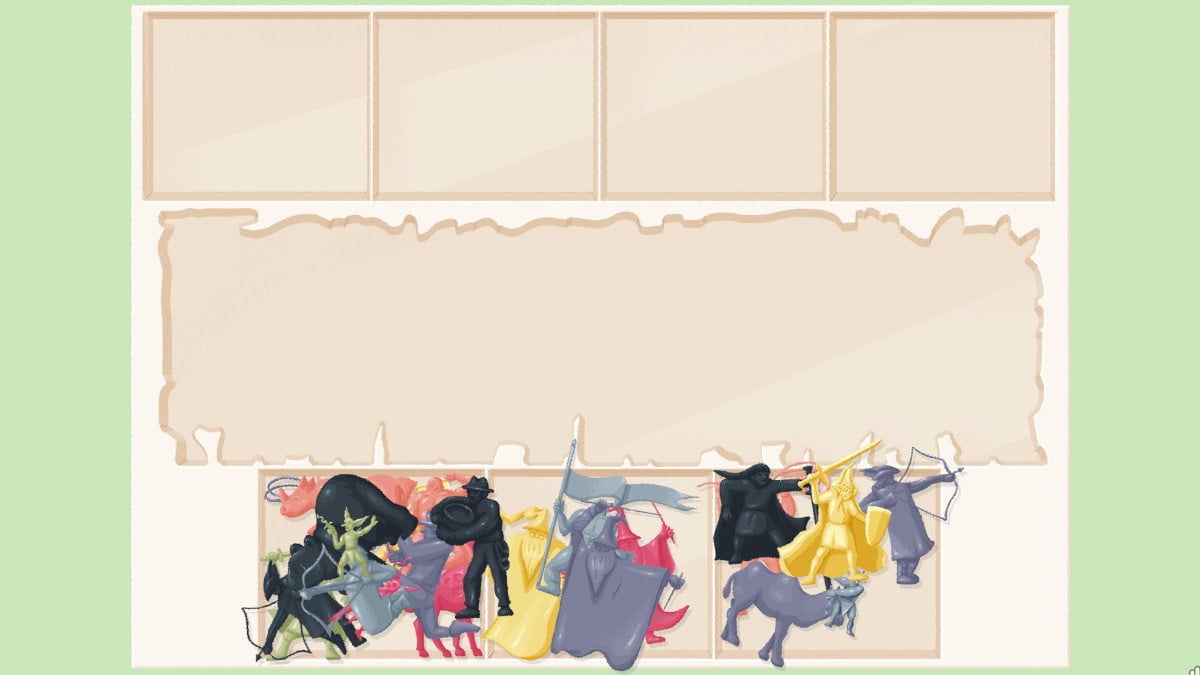
These forks are put in order of the bumps on the bottoms of each one . The first one has no bumps , the 2nd comes to one percentage point , then the third has two points . This is what it look like when they are all in the right order .
Screenshot by Pro Game Guides
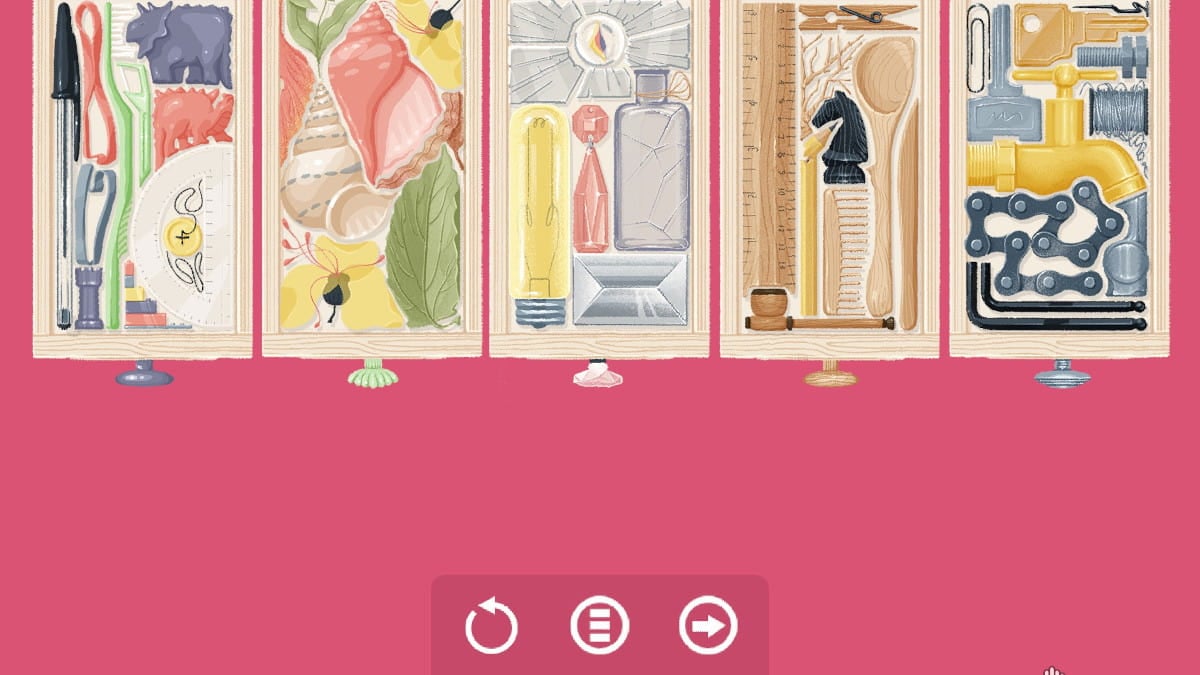
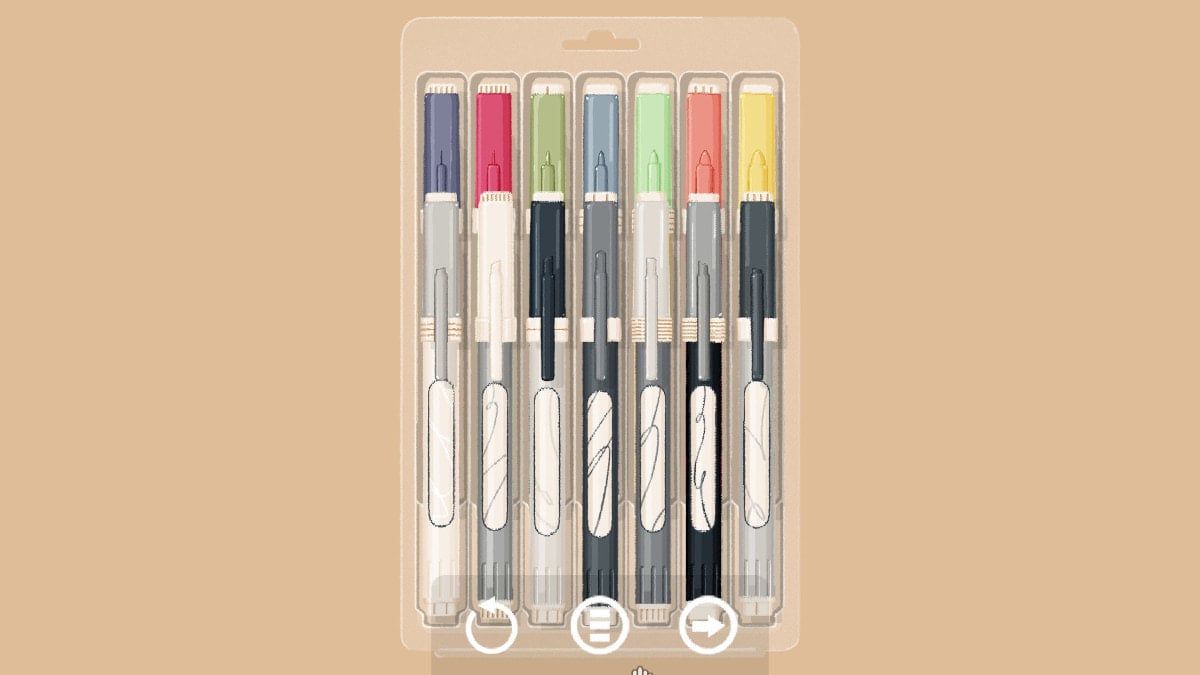
The fourth solution has you lining up all the forks by distance establish on what the ramification ’s handle is made of . All the wooden forks , longest to shortsighted have to be on the left . The center fork is the one that has a hold made half of wood and half of metal , then the alloy fork go from little to prospicient on the ripe side .
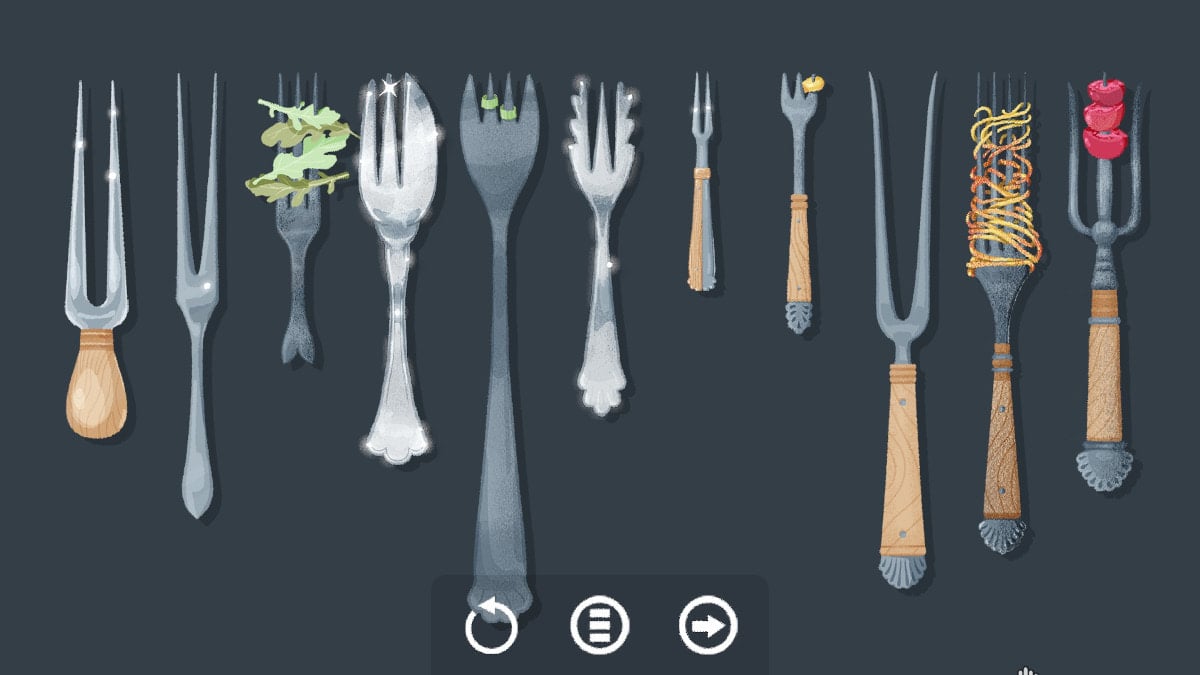
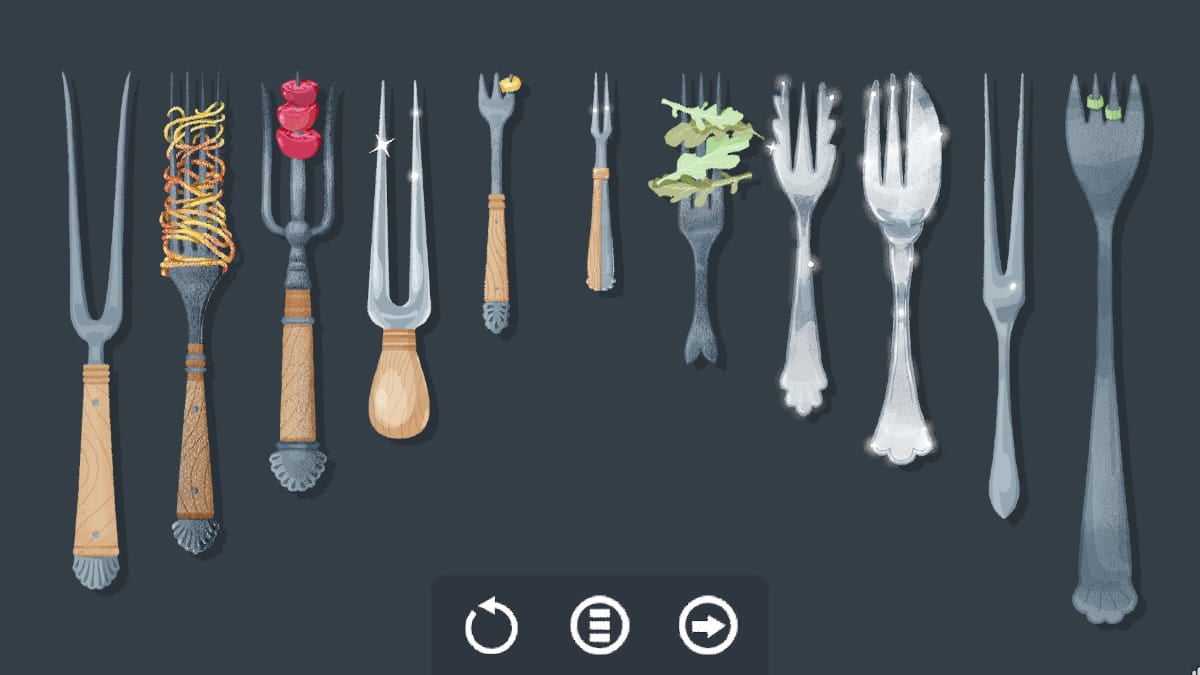
Last but not least , you have the uncanny of the solutions . Each of these forks has item on it ; some have food , but others have glister on them . So you need to put the most amount of food on the left which is the dome , then the four leaves , then the three tomato , the two green onions , then the maize pith . Then in the center you have the fork that has neither food nor sparkles . Next , you enumerate the routine of light , which are one through five .
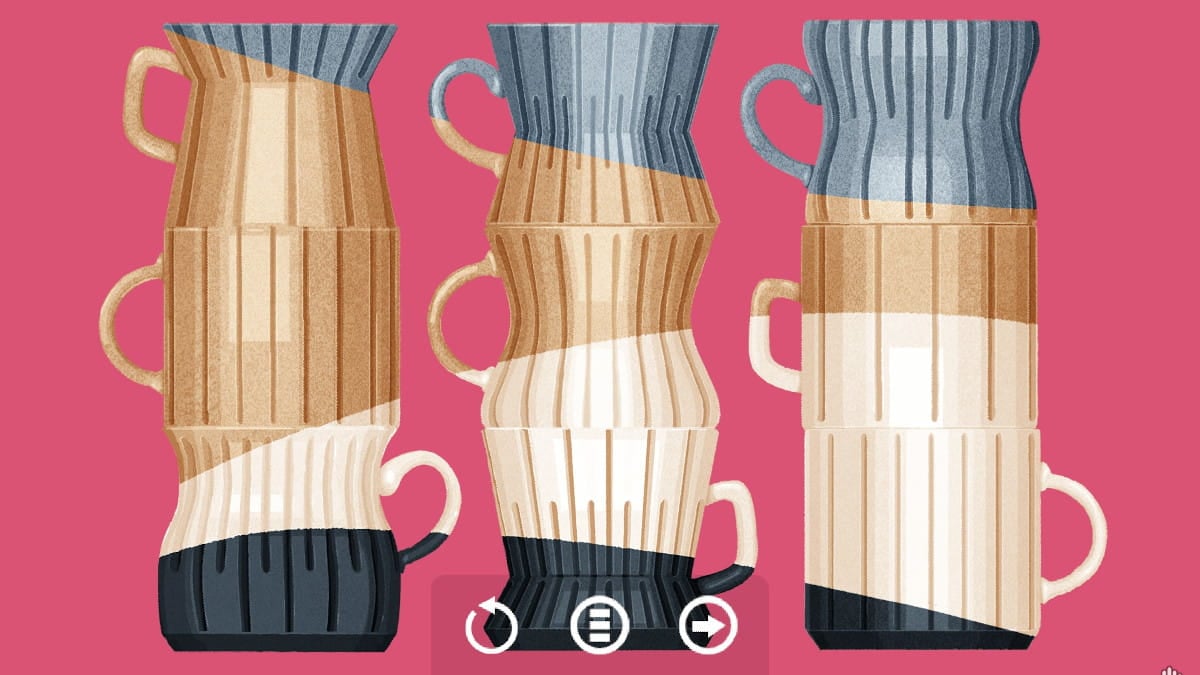
Level 3 hints
floor 3 contains a selection of miss - match visage that you need to line up . There are four potential solvent to this one ; here are some hints to get all of them yourself .
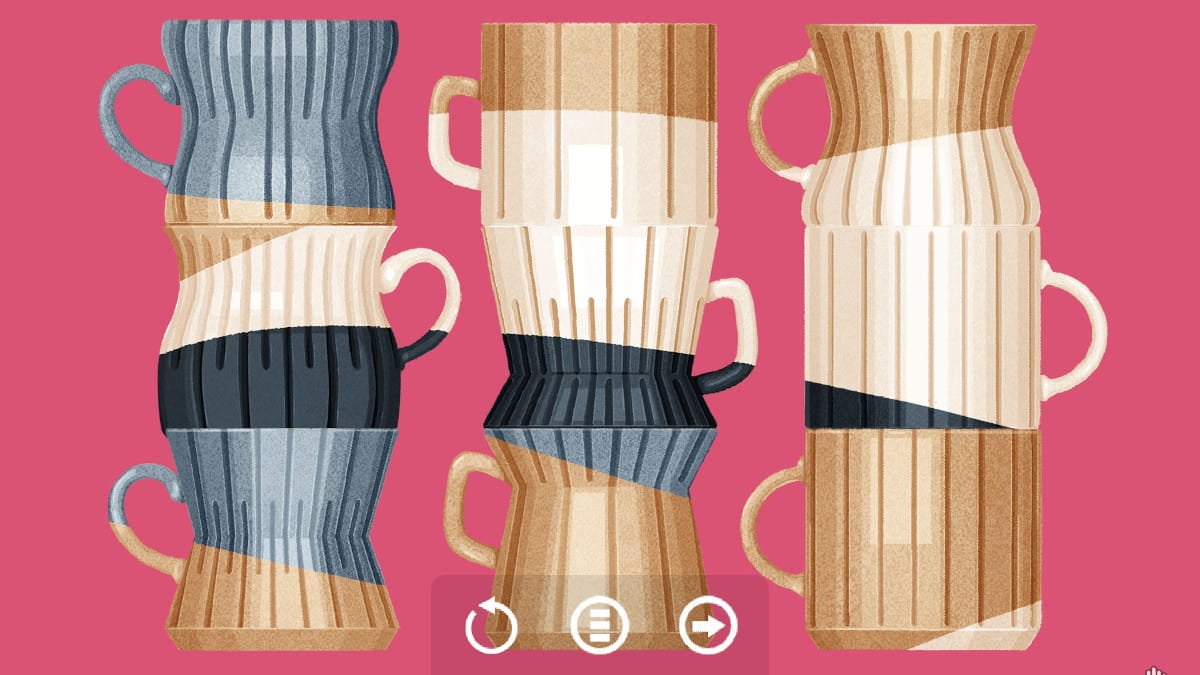
Level 3 answers
The first solvent you probably do up with on your own is lining up the colors across the nine countenance . There is a slope of gray along the top , then dark brown , clean brown , then mordant along the bottom . When you have the all line up , they will wait like this :
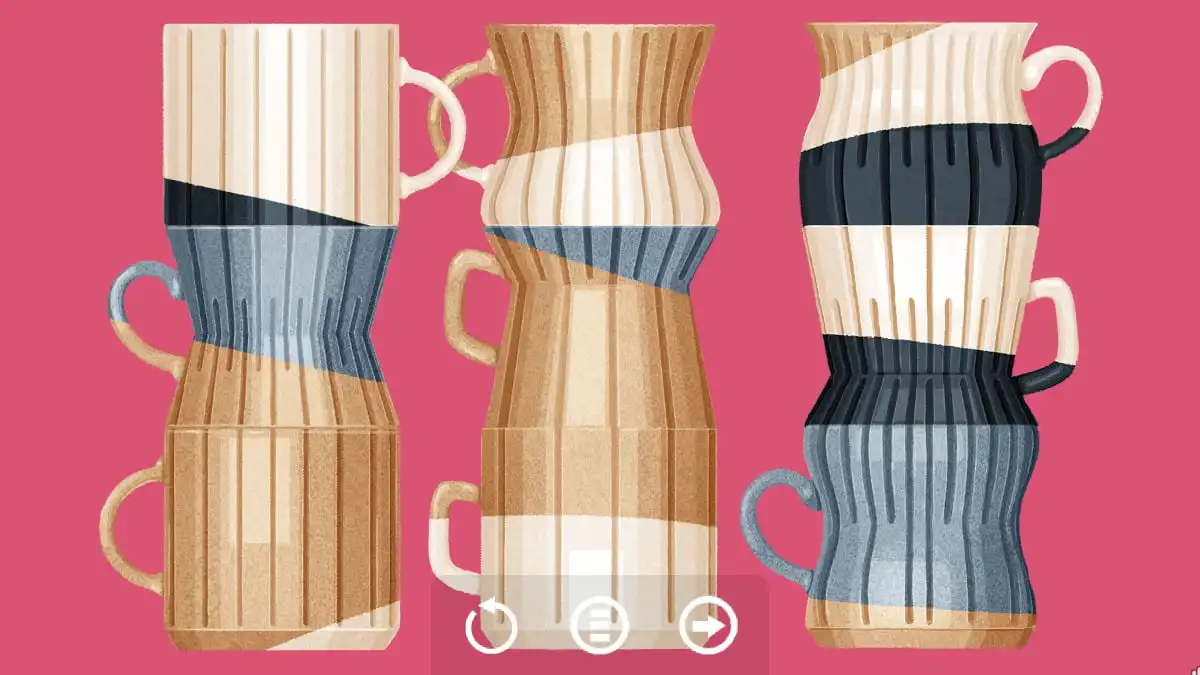
Next , here is the answer were the vertical lines on the mugs all line up . you’re able to put the columns of patsy in any parliamentary procedure , just so long as the vertical lines conk out down the mugs fit up like this :
This one requires you to heap mugs that are the same shape on top of one another . There are full-strength soft touch , curved mug , and patsy with shrewd Angle . Put these three types on top of one another in any order to complete this headliner .
Screenshot by Pro Game Guides
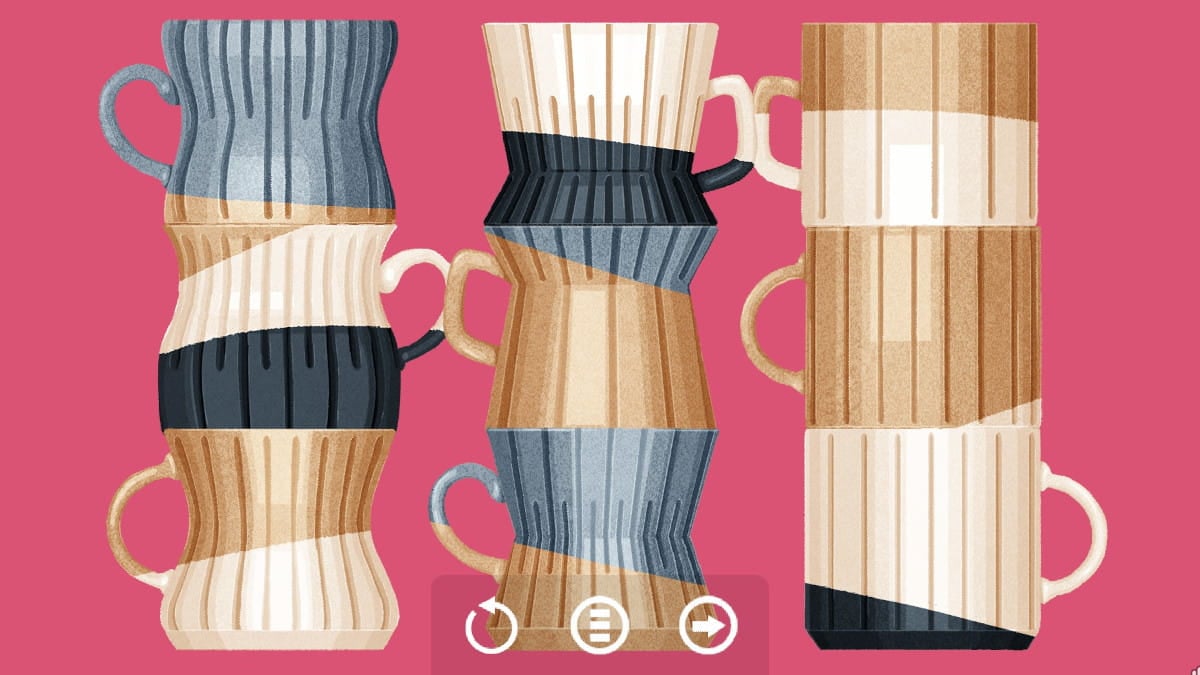
The last of the mug level requires you to delineate up cups so that the handles tally . There are three dissimilar styles of mug handles , a square - similar one , a rounded one , and one that is sort of forge like an capitulum . You need to alternate the way the fall guy ' handles are facing so none of them overlap .
Level 4 hints
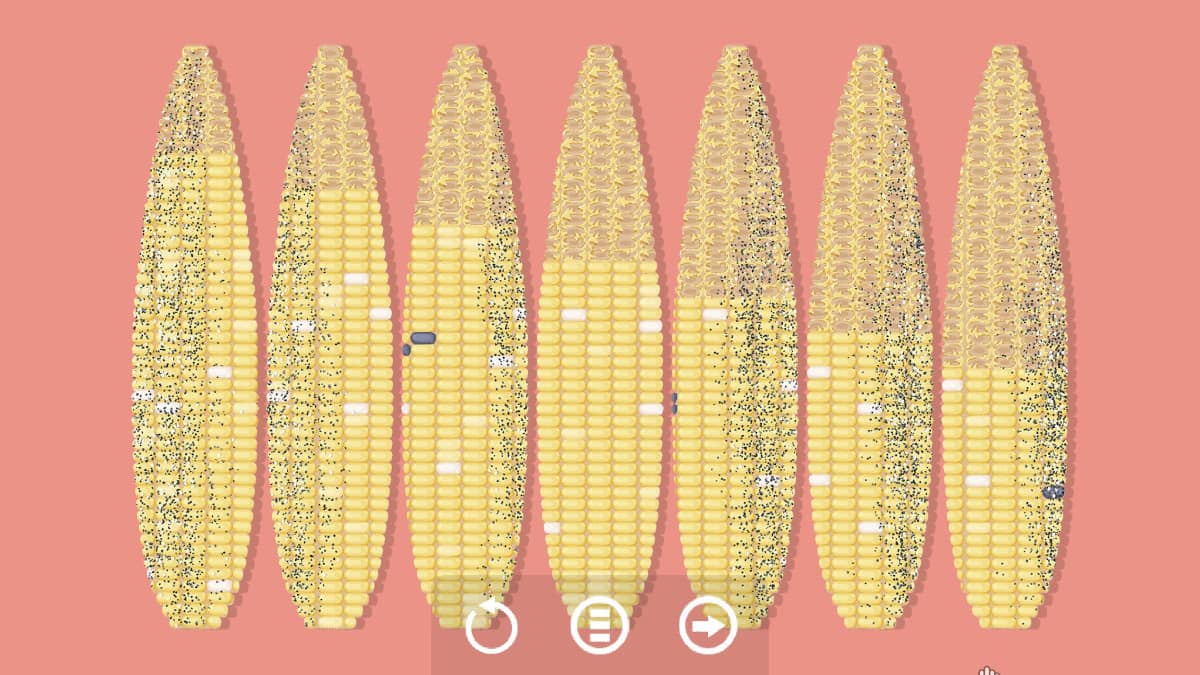
layer 4 has four unlike answers that are all different ways to turn each of the corncobs to decent line them up . If you are stupefy , but you want a clue that wo n’t give it aside , here are a couple of cue for you .
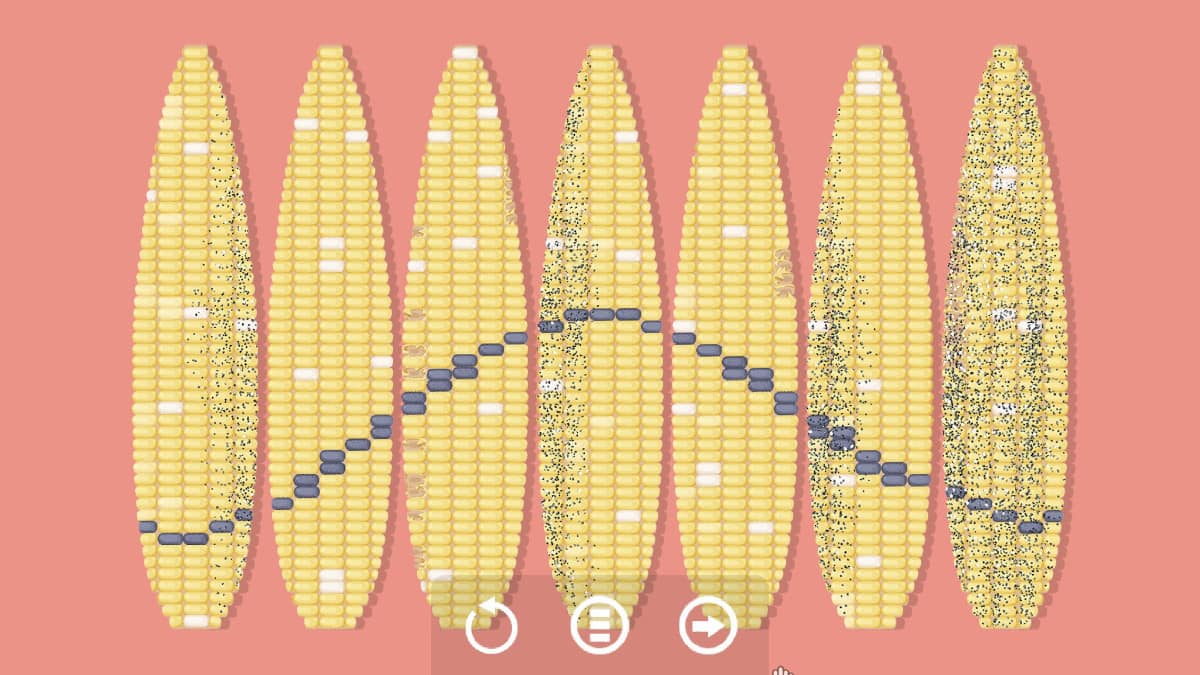
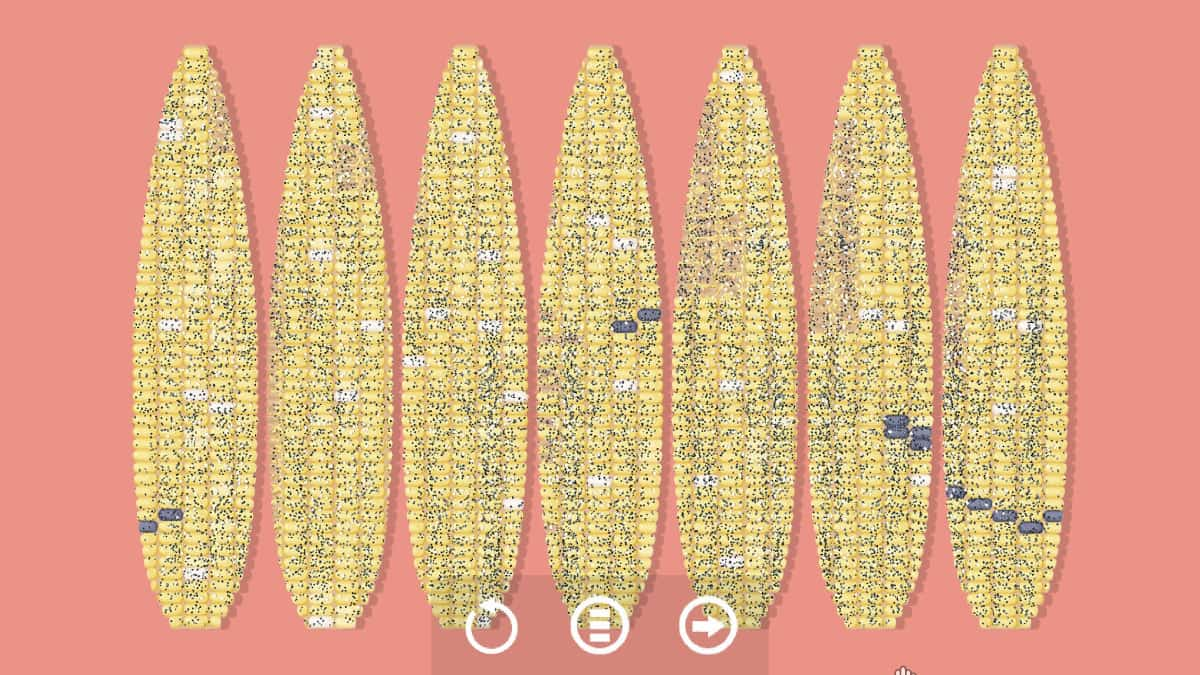
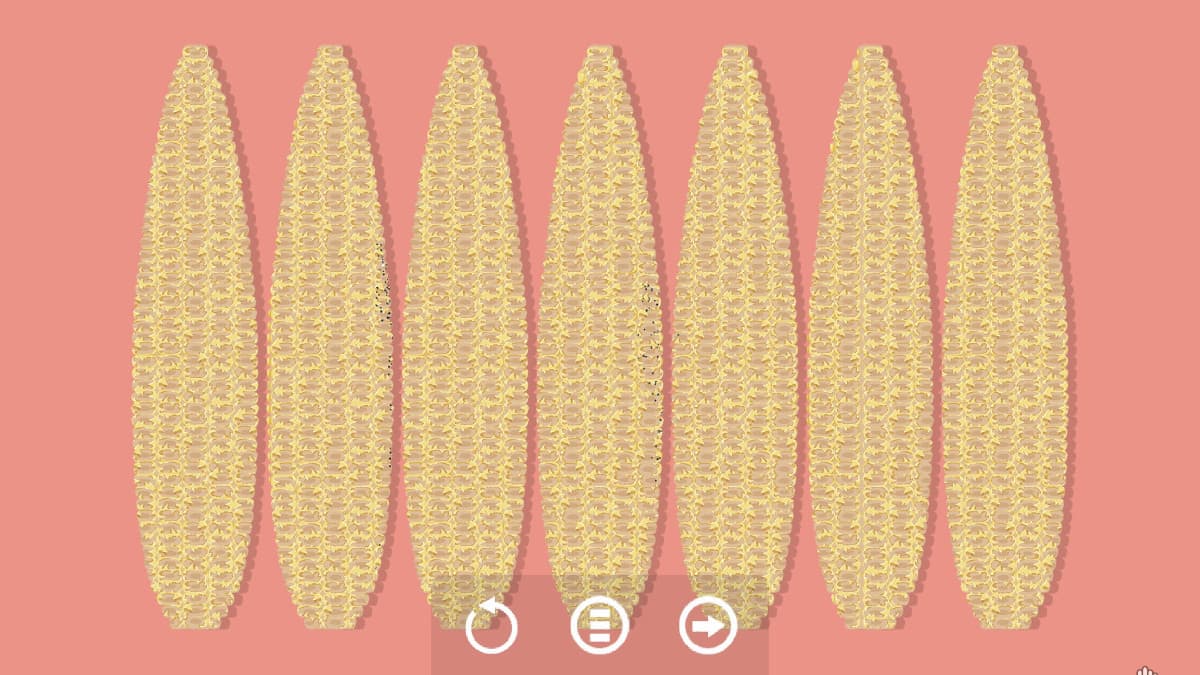
Level 4 answers
The well-situated of the four edible corn answers for level 4 is in all likelihood the pattern of smuggled kernels across all the corn cob . You call for to rotate each of the cobs until the black pith line up like a moving ridge .
On one side of the corn , the marrow are covered in peppercorn . If you revolve all the cobs so only the veteran side of the cobs show up , you will complete this star on level 4 .
Next up is the great black-backed gull slope that are all chew up . Each cob has a side that is full empty of kernels . So you just want to rotate the cob until each one has only empty core slots facing up . When it ’s done , it will look like this screenshot below :
Screenshot by Pro Game Guides
And the last line up is a stairstep look on the gnawed off nub . Each cob has a portion of the cobs that have been only partly eaten , and those will make a formula that move down the cobs diagonally .
Level 5 hints
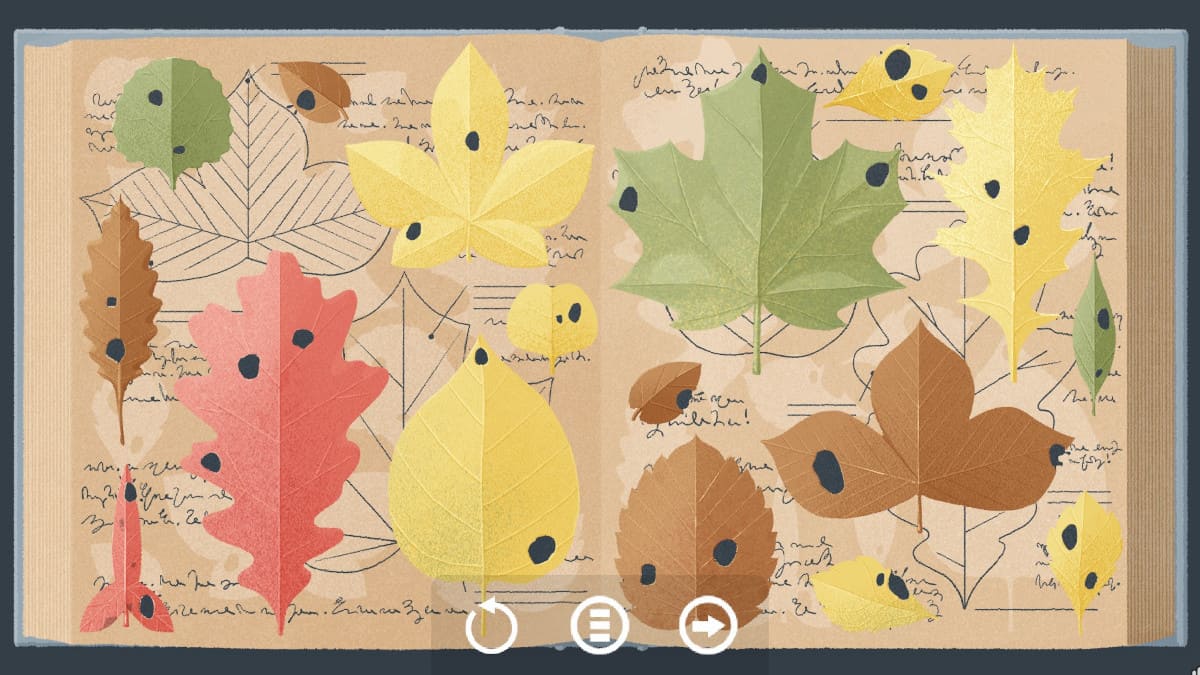
The fifth level has a pick of leaves in a book . There are three solutions for how to move and heap the leave of absence , and you may get some hints for each of these below .
Level 5 answers
The first answer is to take each of the leaves and run along them up with the wan outline of each of them on the Sir Frederick Handley Page . Each leaf has its own quad , and it will look like the following screenshot when complete :
The second solution is to run along up all the holes in the leafage with the ink blots on the page . Each leaf only has one place it can go , so your answer should calculate just like the one below .
The third potential solution is to pile each of the leaves by shape . If you calculate at the page , there are four abstract in ink for the big farewell . If you put them down , you’re able to stack the little foliage on top from bragging on the bottom to smallest on the top .
Screenshot by Pro Game Guides
Level 6 hints
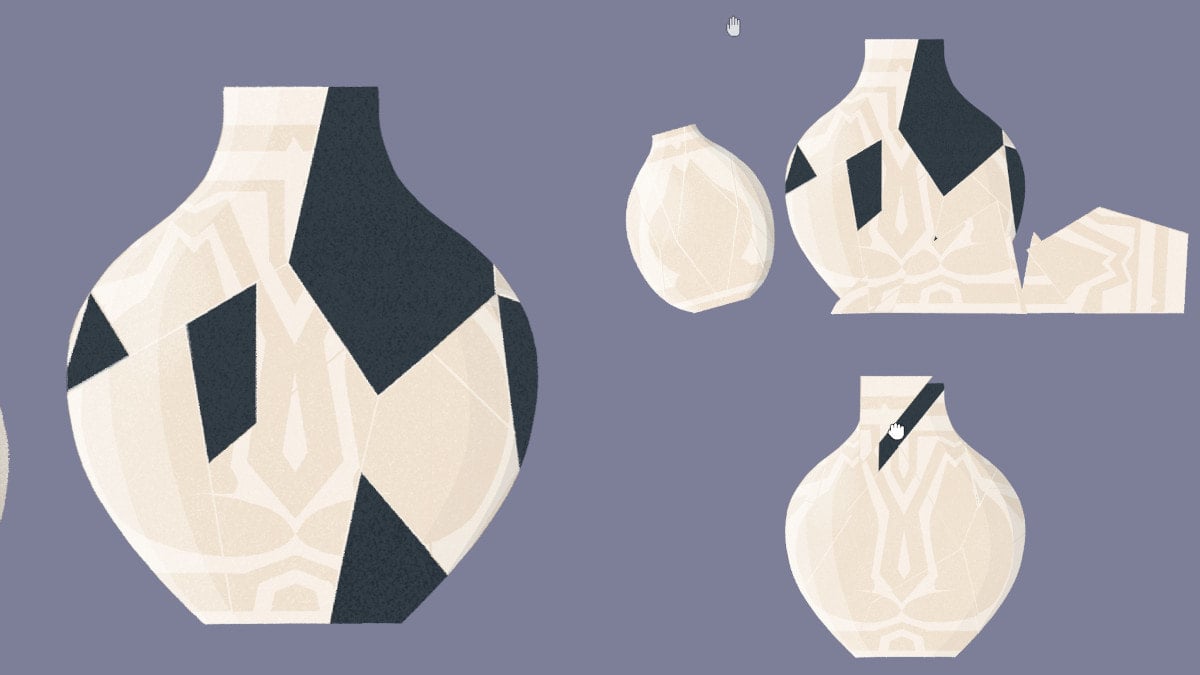
Level 6 only has one solution , but it ’s a weird one . If you are stuck on this grade , you could regain a handful of hints below .
Level 6 answer
The resolution to this puzzle is to pick up the two vases on either side of the grown vase and dismiss them . If you drop them from high enough , each will shatter into pieces that will match perfectly into the black portions of the larger vase .
Level 7 hints
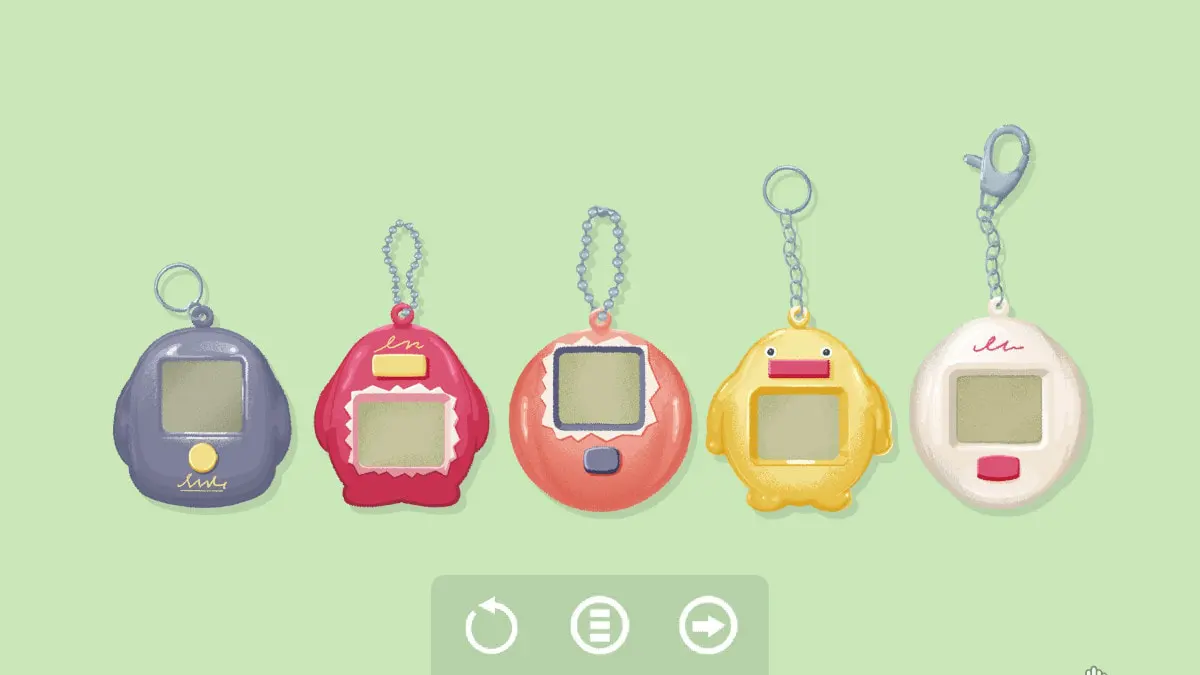
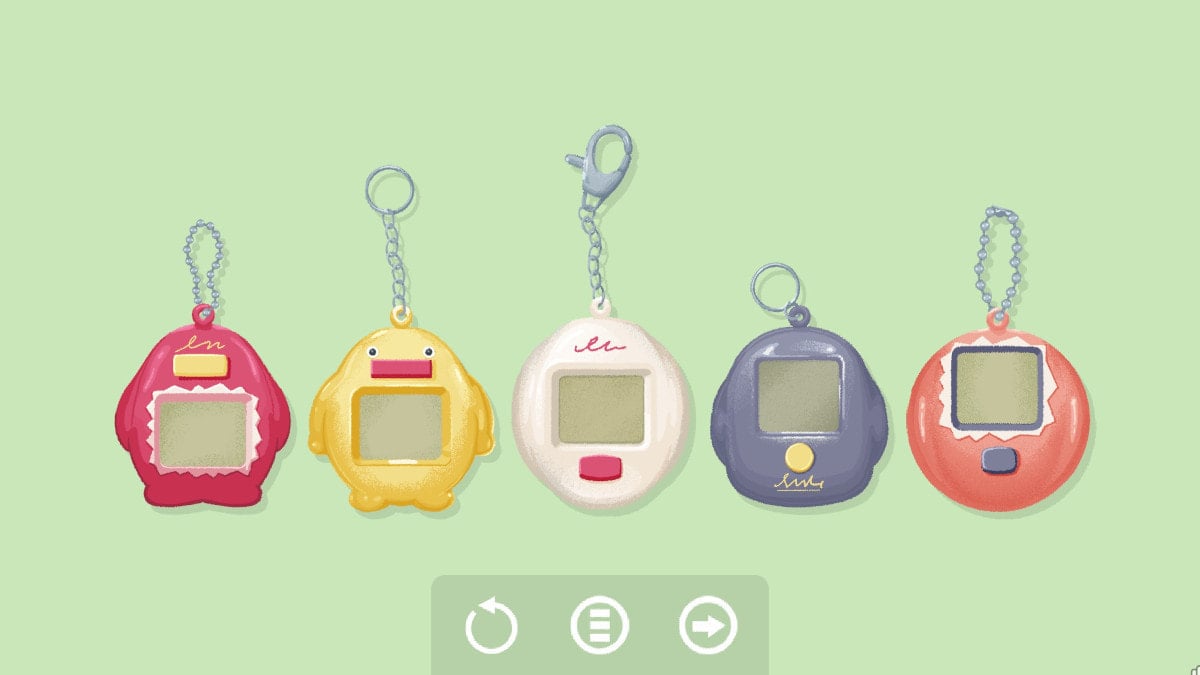
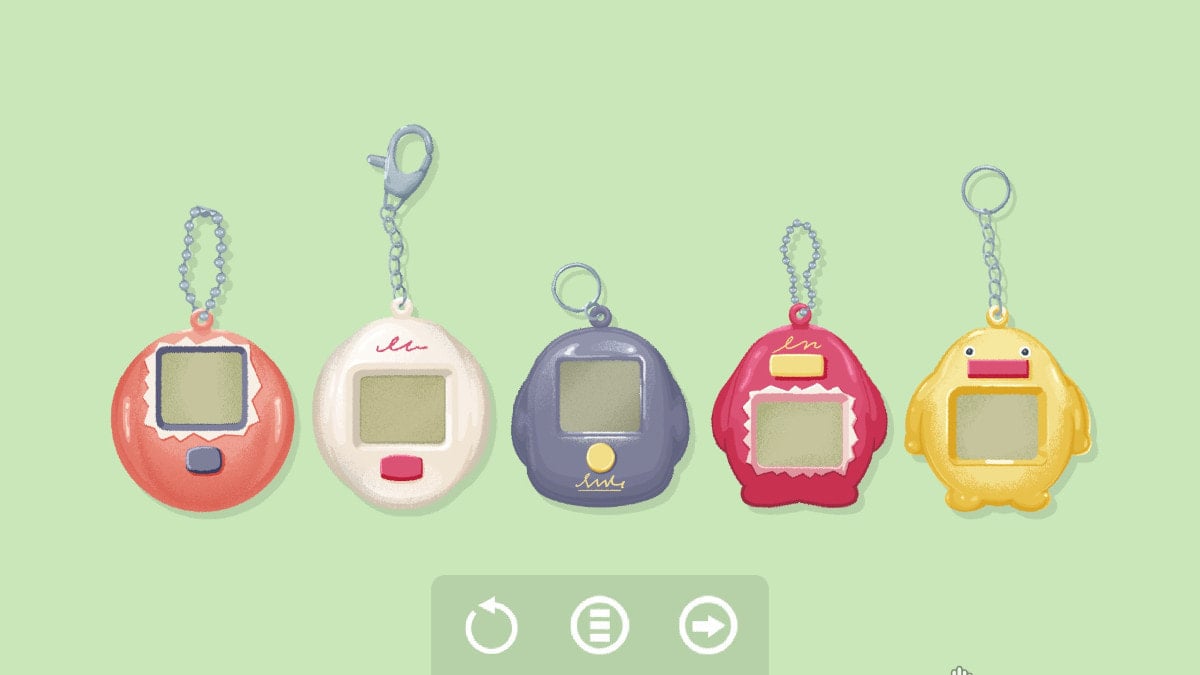
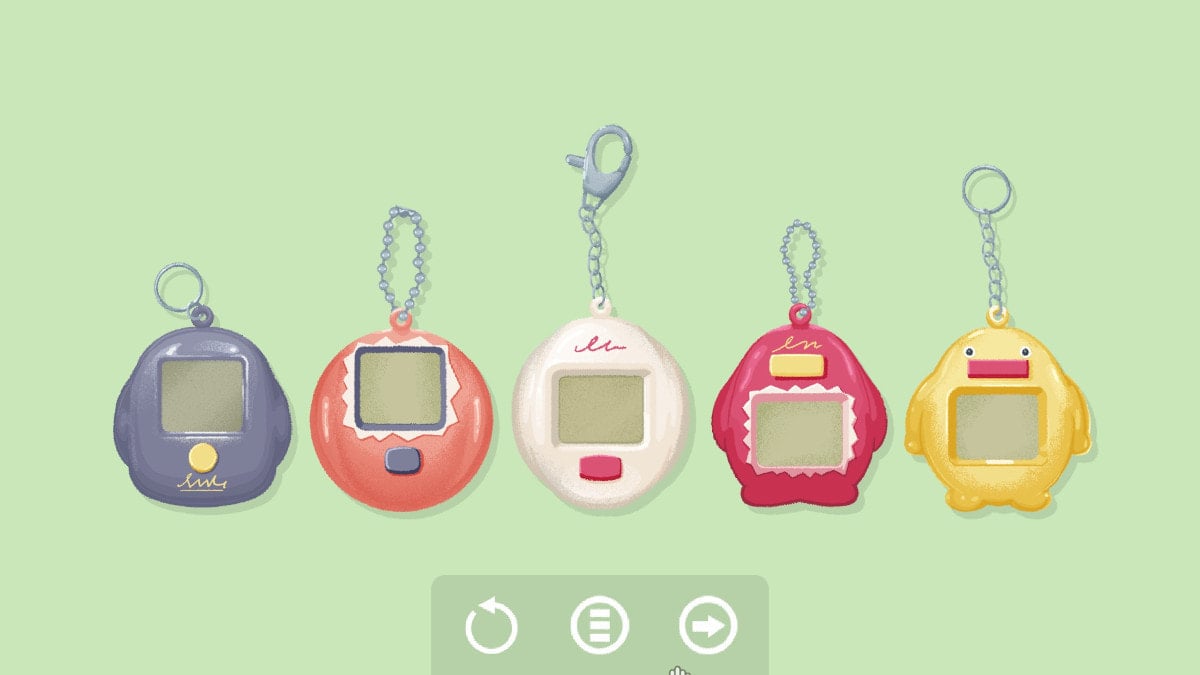
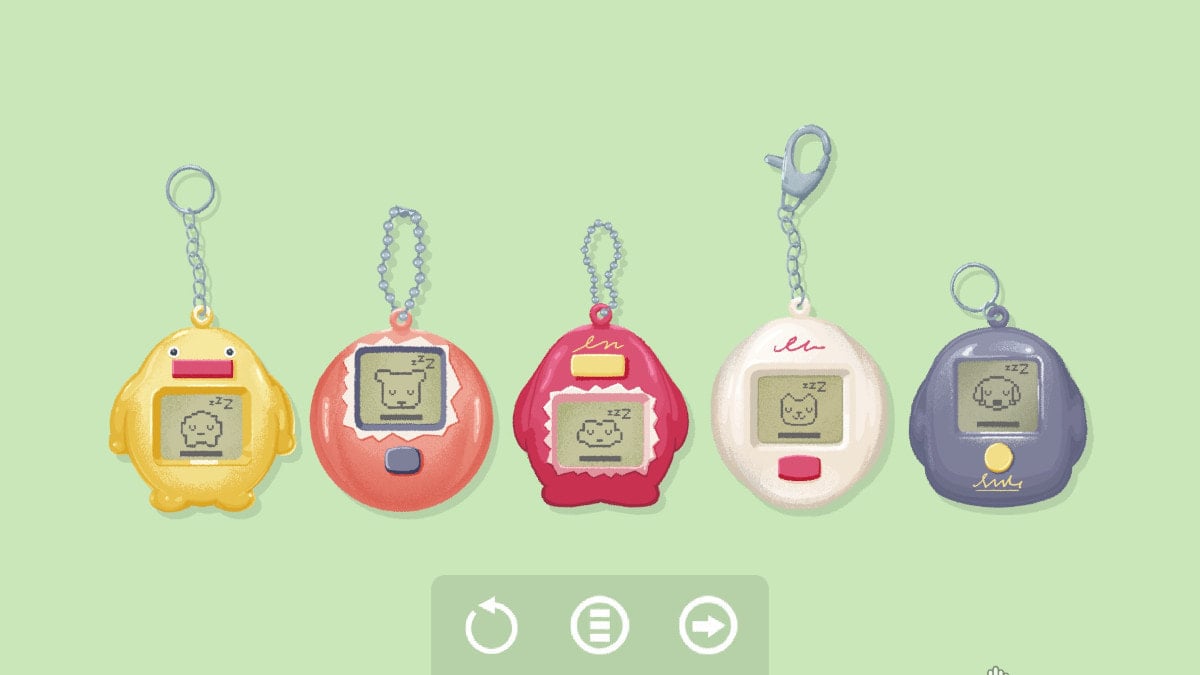
The Tamagotchi level has five different solutions . I found this puzzle to be one of the hardest to fill in , and I think a lot of people will consort . gratefully , I have plenty of hints here to help you get all five result .
Level 7 answers
The bare answer for storey 7 is probably this one ; you just involve to line these small digital friends up by the distance of their keychains . you’re able to have them go biggest to unforesightful , or you’re able to do curt to biggest like I have them below .
Next up , you need to make the screen go from short to tallest or vice versa . If you look at just the screen in the screenshot below , they will form a stair rule , get going up from left to right .
The third answer requires a little more thought . These are arranged in the order that the shapes would immix from one to the next . So you start with the rotund one , then get the next is a piffling more duck shaped . It keeps generate progressively more duck - work until the yellow Tamagotchi , which looks just like a duck’s egg .
Screenshot by Pro Game Guides
After that , you postulate to do the same matter but with the buttons . On the left in the screenshot below , the button on the Tamagotchi is orotund . As you move right , the release become less round and more square , until the final clit which is perfectly orthogonal .
The final reply is to run along the Tamagotchi up by how many times you need to press the button to occupy up their cake and make them happy . The yellow one only necessitate you to press the clit once , but you ’ll need to press the button five times to make the frump on the ripe completely happy and sleepy . you’re able to also do this one in inverse ordering .
Level 8 hints
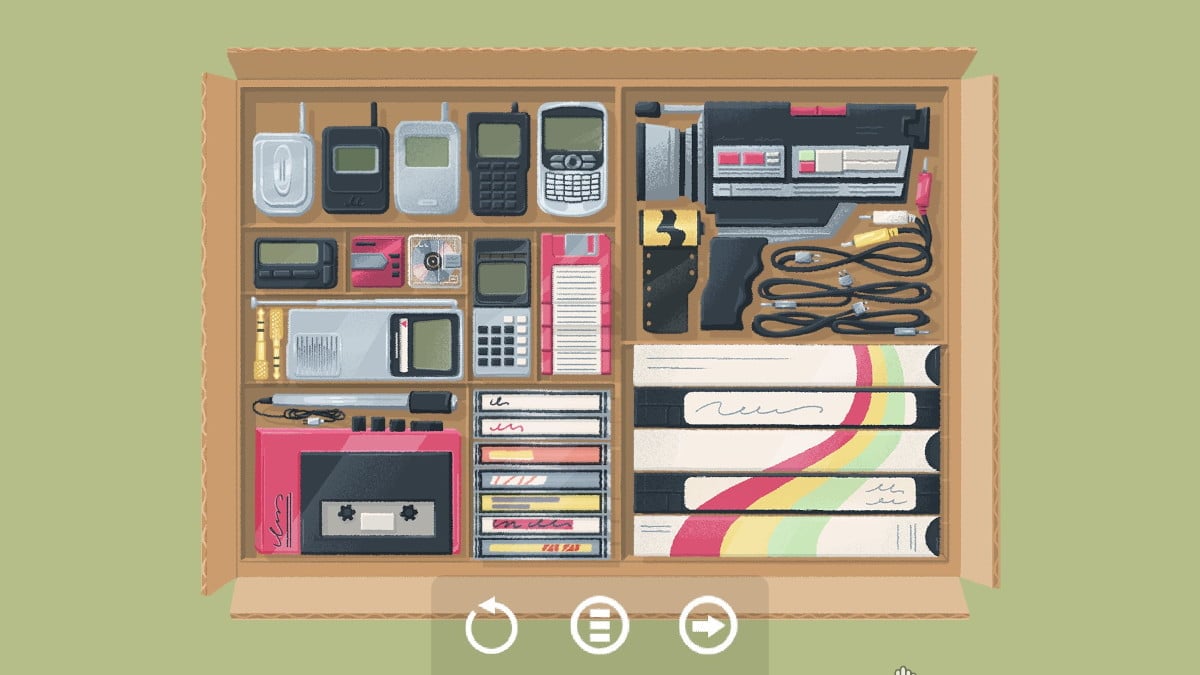
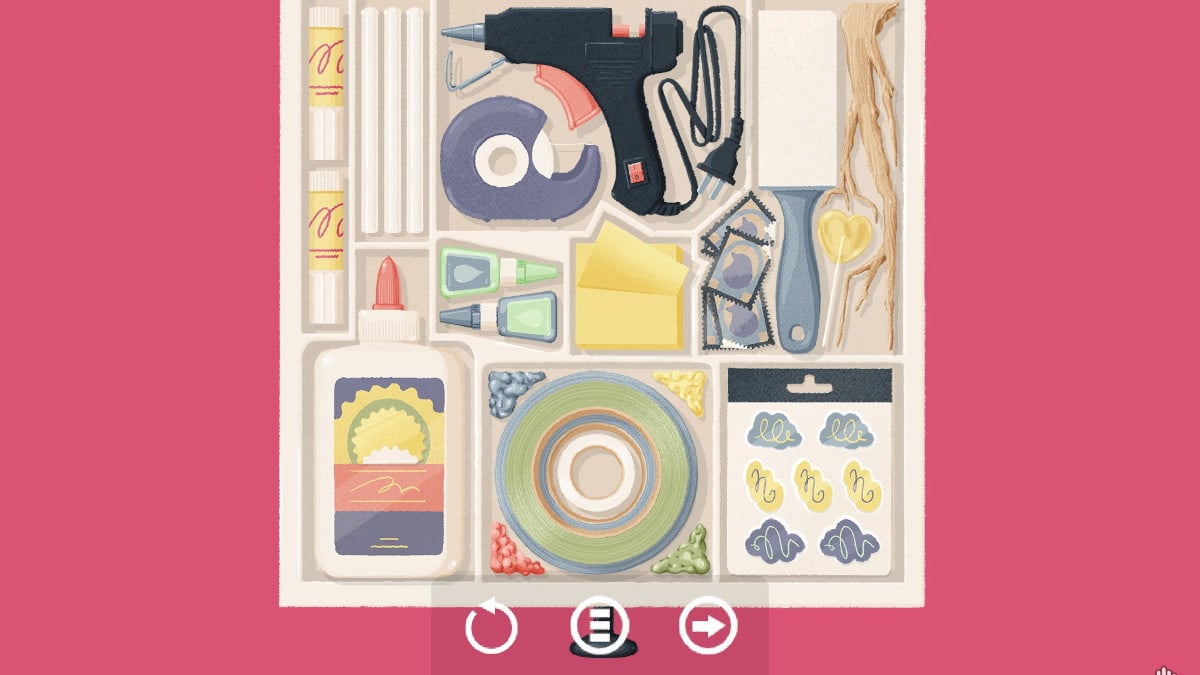
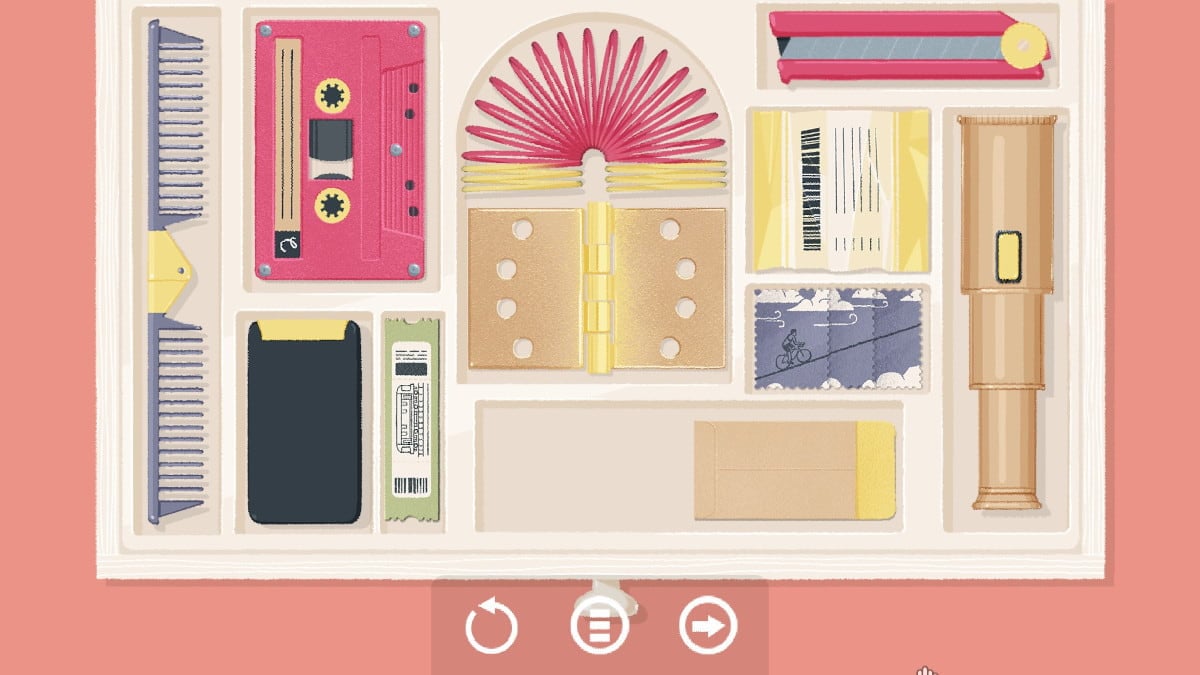
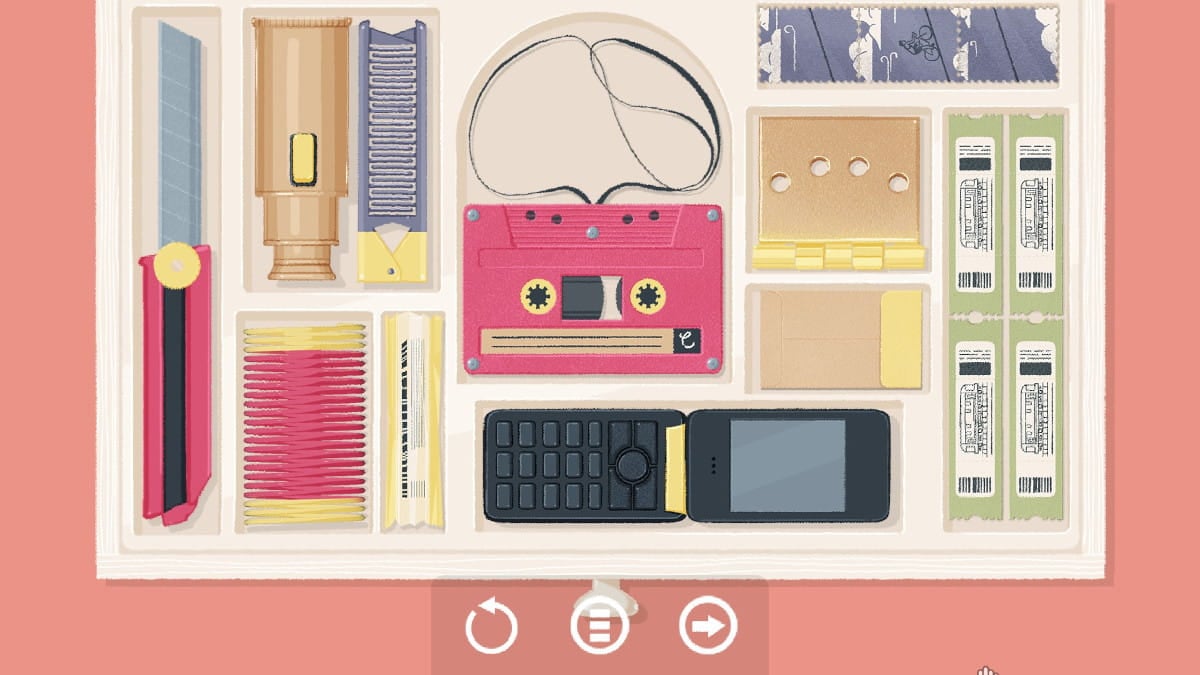
Level 8 requires you to put a cluster of old electronics into a box . so as to get everything just right , you ’ll need to pay close attending to details . Each token must be in the right spot in ordination to complete this level properly .
Level 8 answer
Here is the result to the puzzler . for fill out it , the VHS tape necessitate to have the red , yellow , and gullible strips rail line up . The cassette tapes have to be put in come order by the length of the title printed on the side . Also , ensure the cell phones are sorted from shortest to tallest .
Level 9 hints
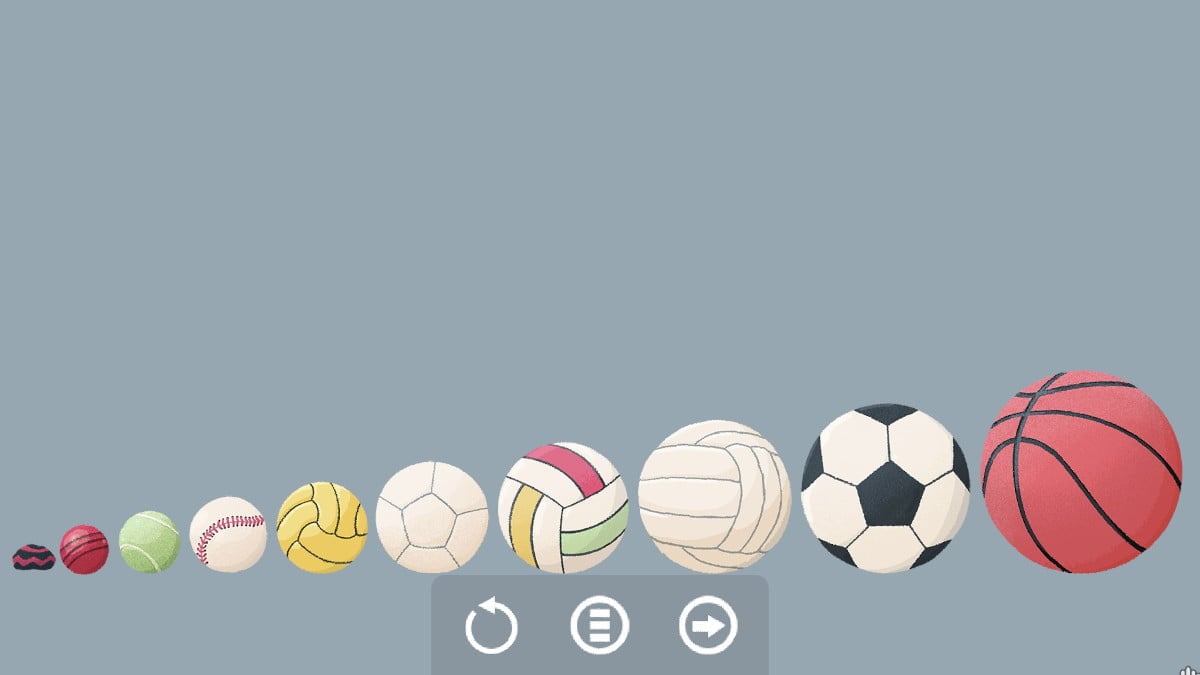
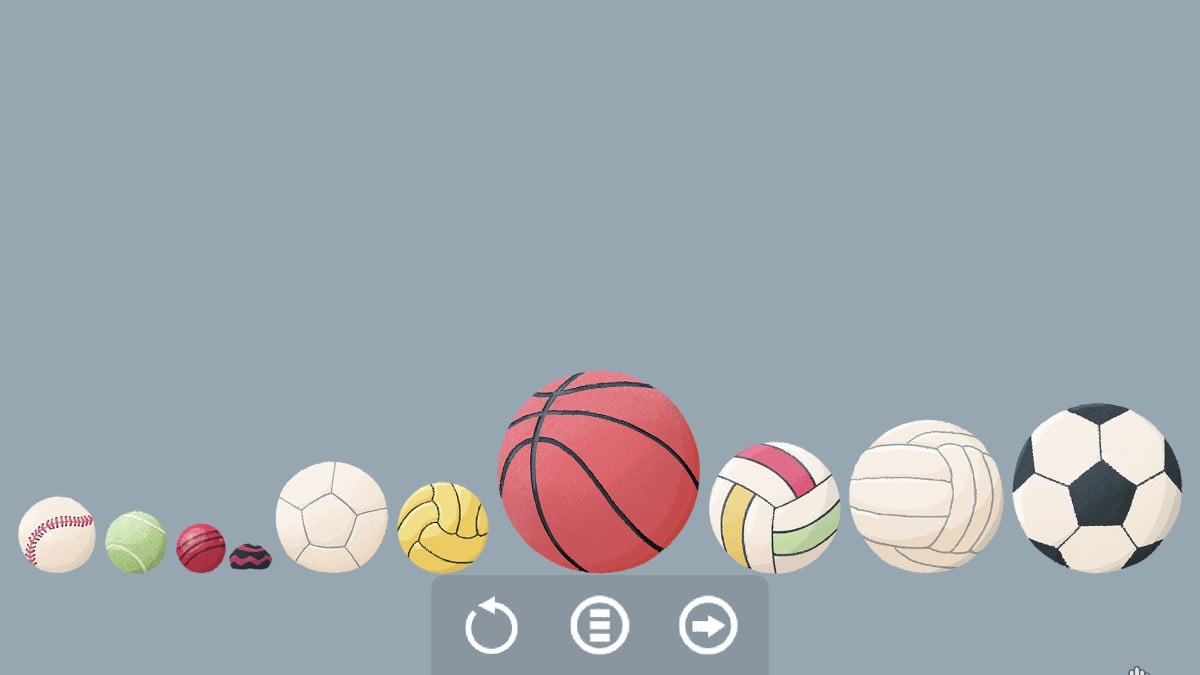
There are three full solution to rase 9 , and each one requires you to think on your feet . There is one well-off result , and the other two are a little more obtuse .
Level 9 answers
The first is reasonably bare : you just need to sort each of the balls by elevation . you could sort them smallest to gravid as I did in the screenshot below , or you could startle with the biggest and go to the smallest .
This solution require you to sort the balls by how many lines / sections they have showing . For example , the baseball game has one line on it ( the sewing ) , break up it into two parts . The lawn tennis ball has two white lines , splitting it into three surgical incision . Sort them in parliamentary law until you get to the association football ball , which is reduce into 11 sections .
This final solution requires that you pick up each testicle and count how many times it bounces . The hacky sack ball does n’t ricochet at all , then the yellow orchis only bounces once . The basketball game bounces a whole bunch of times . Once you sort them , they will look like the 2d line of balls here :
Screenshot by Pro Game Guides
Level 10 hints
Level 10 is the first level with an achievement you’re able to get in it . So this one has four solutions , plus an additional screenshot below for the achievement . Here are some hints for both the accomplishment and the answers :
Level 10 answers and achievement
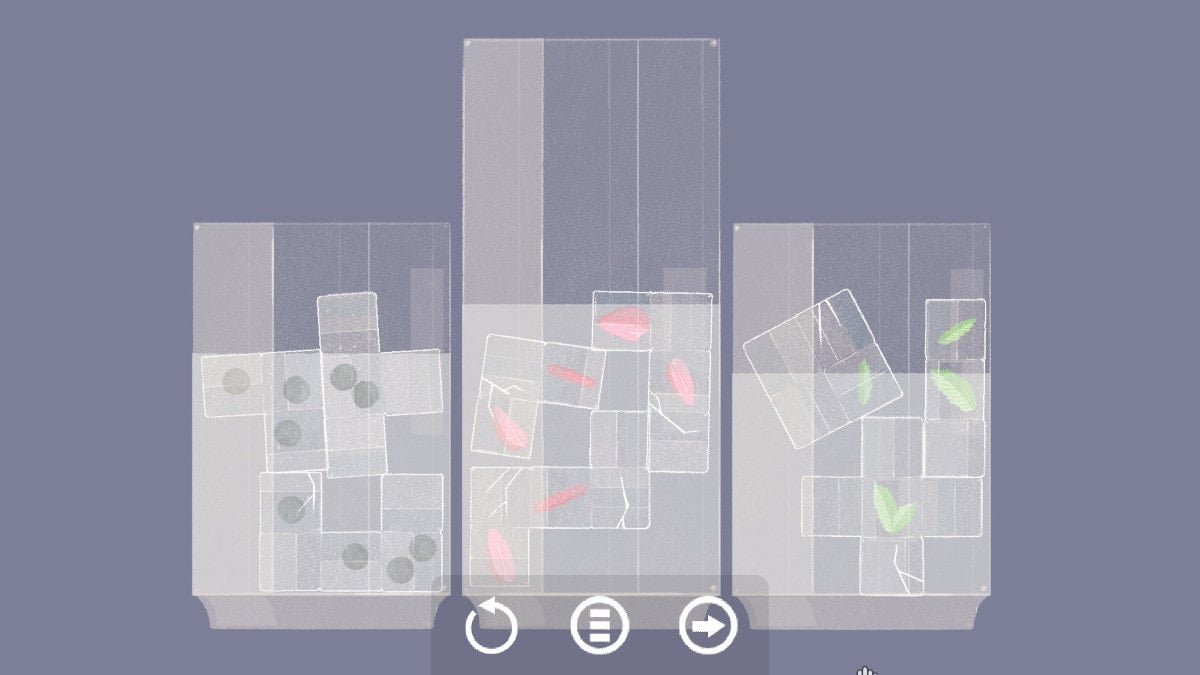
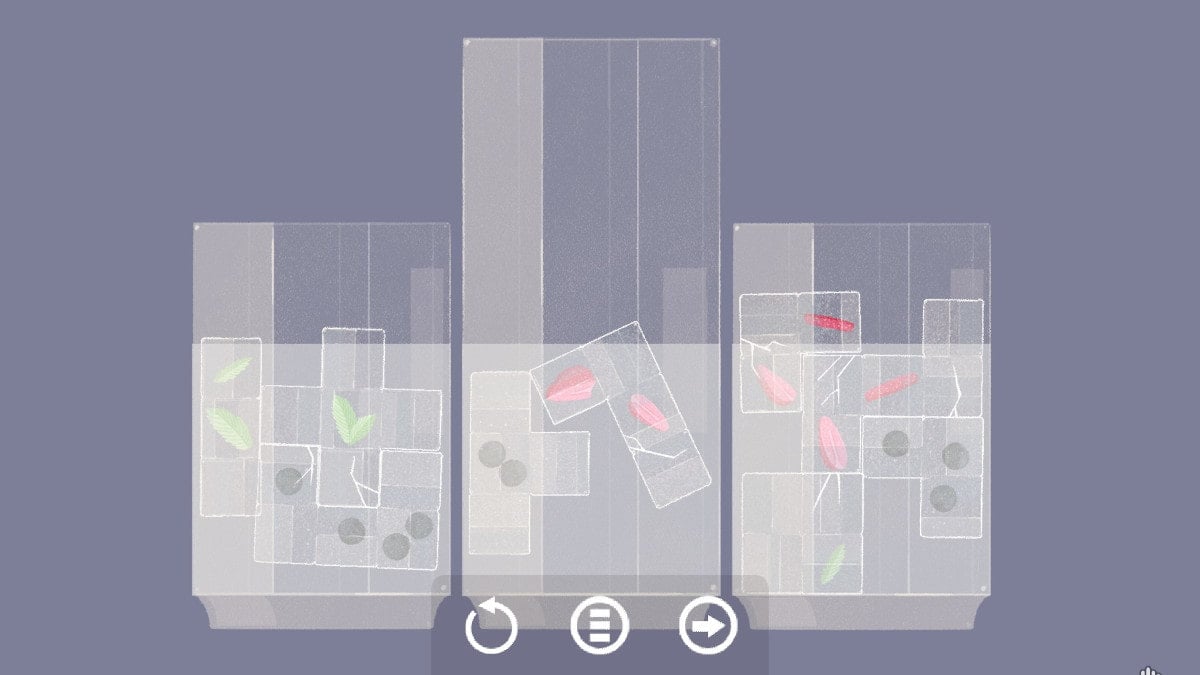
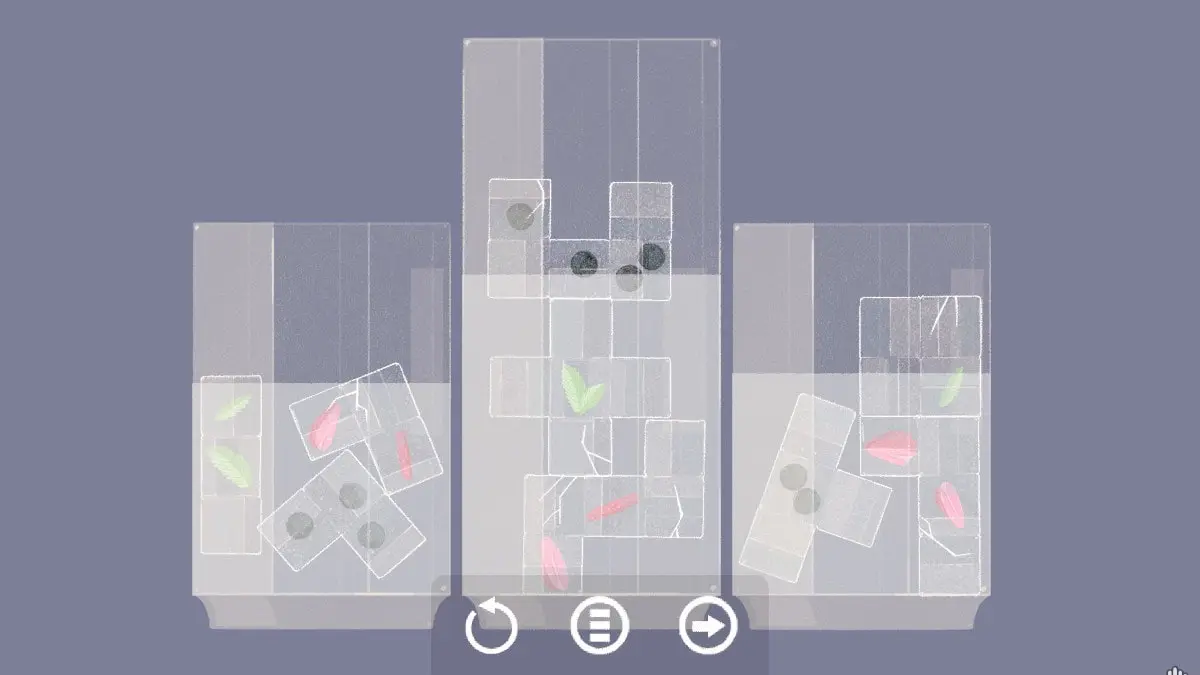
The first answer for this teaser is to separate the internal-combustion engine cubes by their contents . One Seth has blueberry frozen inside , the next has pick petals or seeds , and the third dark-green leaves that are probably mint . Put the unity of each colouration inside one of each of the glasses in any decree .
For this solution , you call for to move the Methedrine cubes around until the water supply line in each ice is even . I could only find one result to this one ; I do n’t think any other compounding of ice block will work , so here is a projection screen gaining control of what I did to get it :
In this solution , you need to break the ice cubes by size . The first spyglass take to get all the ice rink cubes that are made of three block . The midway glass has all the frappe cube made of five - blocking sparkler square block , and I put all the four - blocking cubes in the last spyglass .
Screenshot by Pro Game Guides
Last , but not least , you demand to Tetris all the block together into the one glass . This requires you to line them up absolutely ; make certain the crack in the ice cube line up with one another to make a perfect rectangle of ice .
for get the accomplishment for this level , you need to take all the ice out of all the glass and put them to either side of the glasses . Once all the ice is out , you ’ll get your prize for this level .
Level 11 hints
Level 11 is a pizza pie Proto-Indo European , and it has four solution . This degree also contains one trophy that you could get to help you 100 % this DLC . Here are some hint for the solutions as well as the achievement .
Level 11 answers
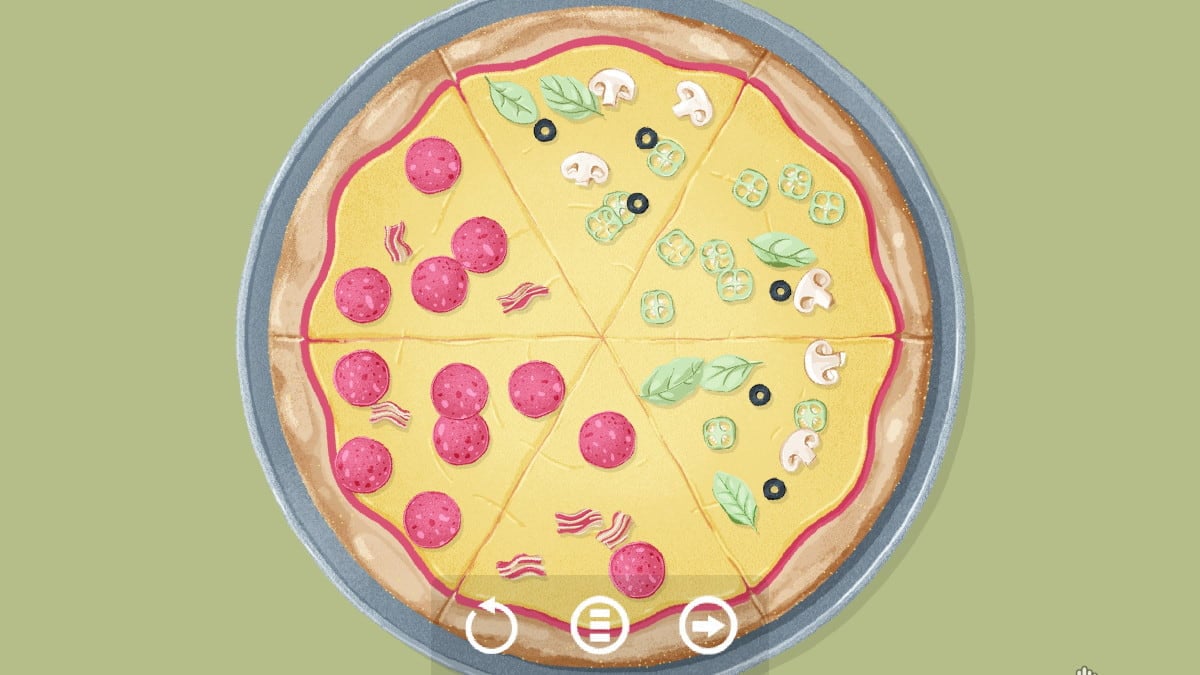
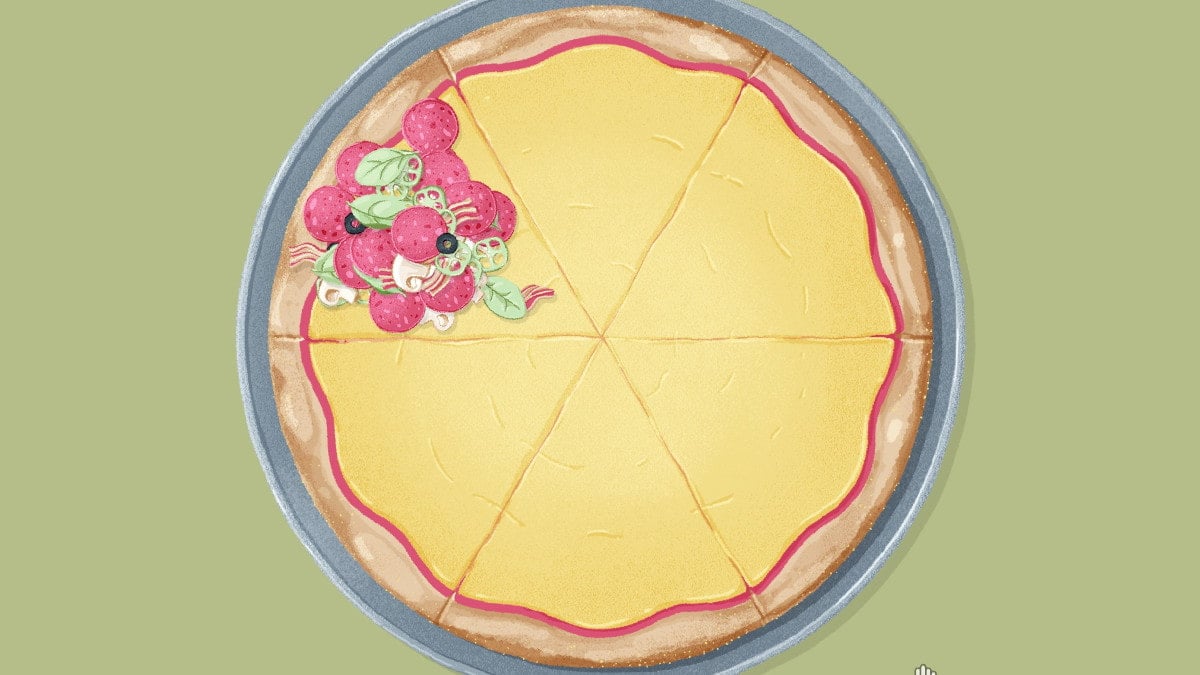
The first solution to the puzzle is to put an even number of toppings on each fade of pizza . Most of the toppings only have enough to put one on each slice , but you’re able to put two pepper and two pepperoni on each piece .
Next up , you take to split up the meats and the veggie . It does n’t matter how you cut the pizza in one-half , just check that that one half has only meat and the other only has vegetables on it .
Next up , you need to separate each topping by slice . Each of the six slices of pizza pie will have a unlike one of the six topping only on it to complete this puzzle . It does n’t matter the rules of order you do it , but this is how mine turned out :
Screenshot by Pro Game Guides
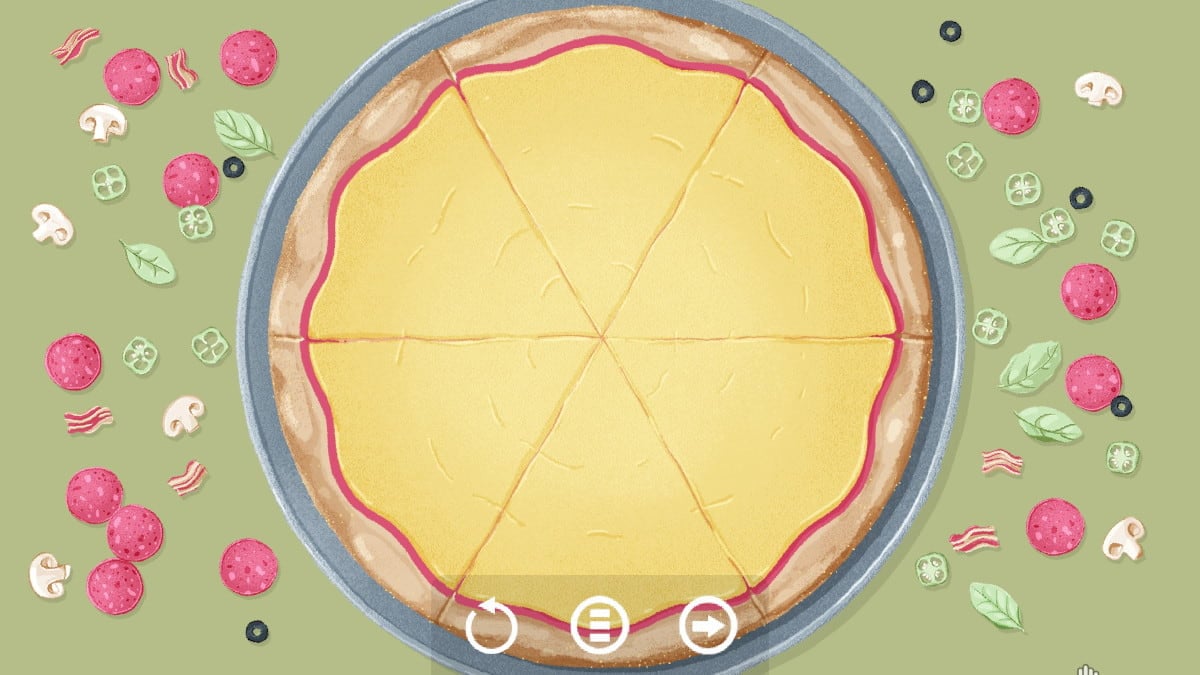
Last , you have to take all the topping off of the pizza pie and make it a cheeseflower pizza pie . Some do n’t like toppings , so this is a great final answer to this puzzler .
for get the achievement , you will need to stack all the topping on one slice . This achievement is called the Top clayey cut , and this is the only spirit level you may do this in .
Level 12 hints
degree 12 is emphatically up there as one of the more intriguing levels to get all the solutions . There are five sum to get to , and you will desire all of them to unlock the bonus stages and dispatch the DLC 100 % .
Level 12 answers
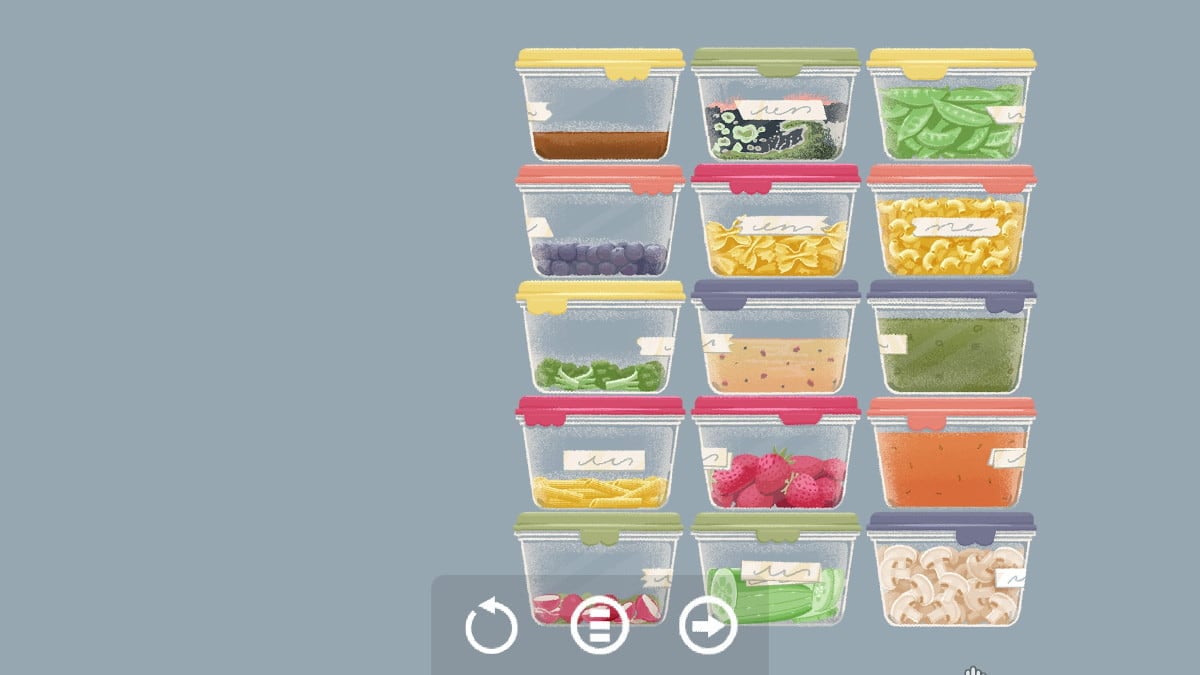
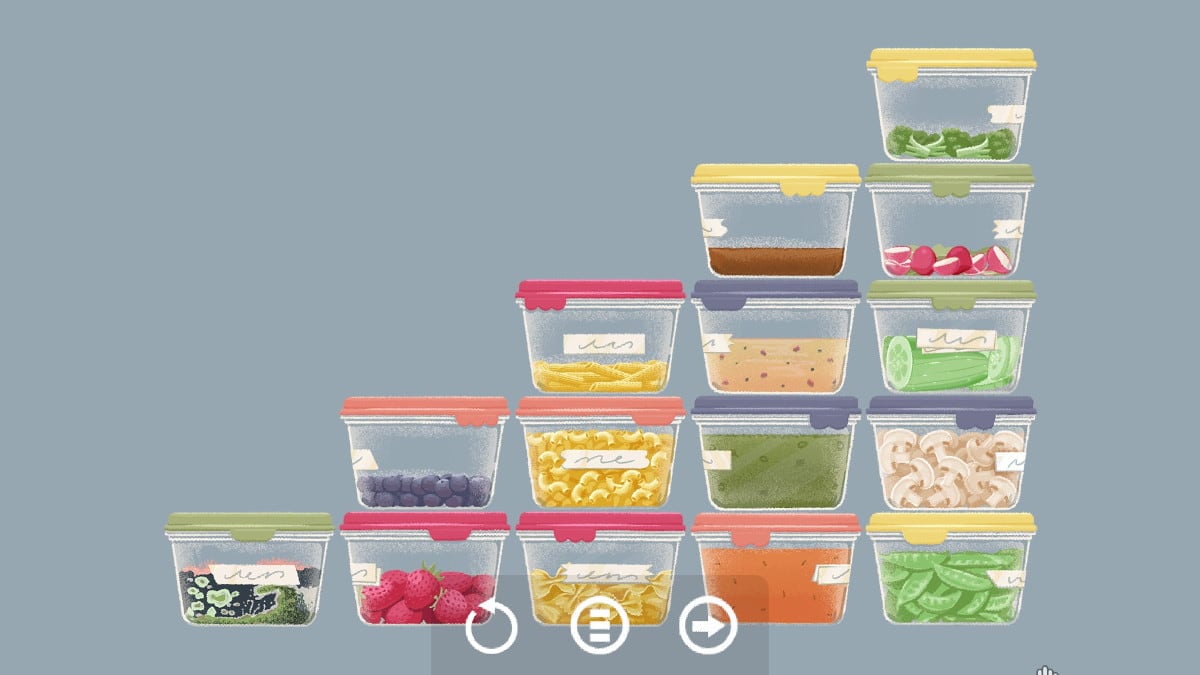
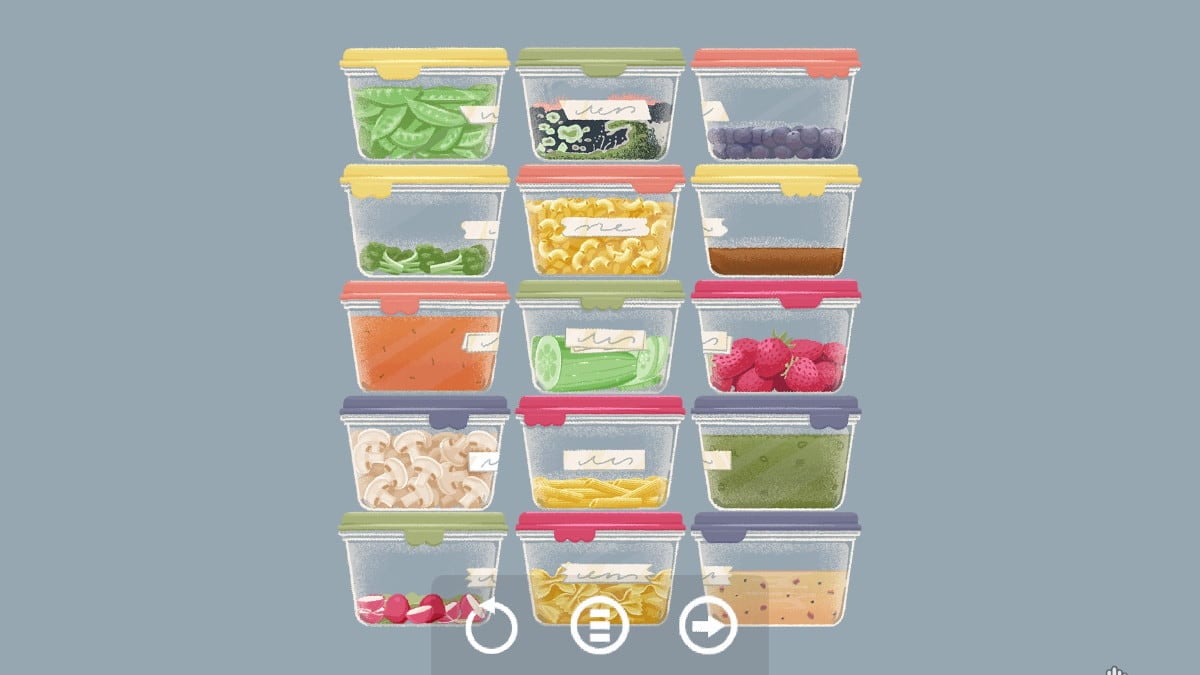
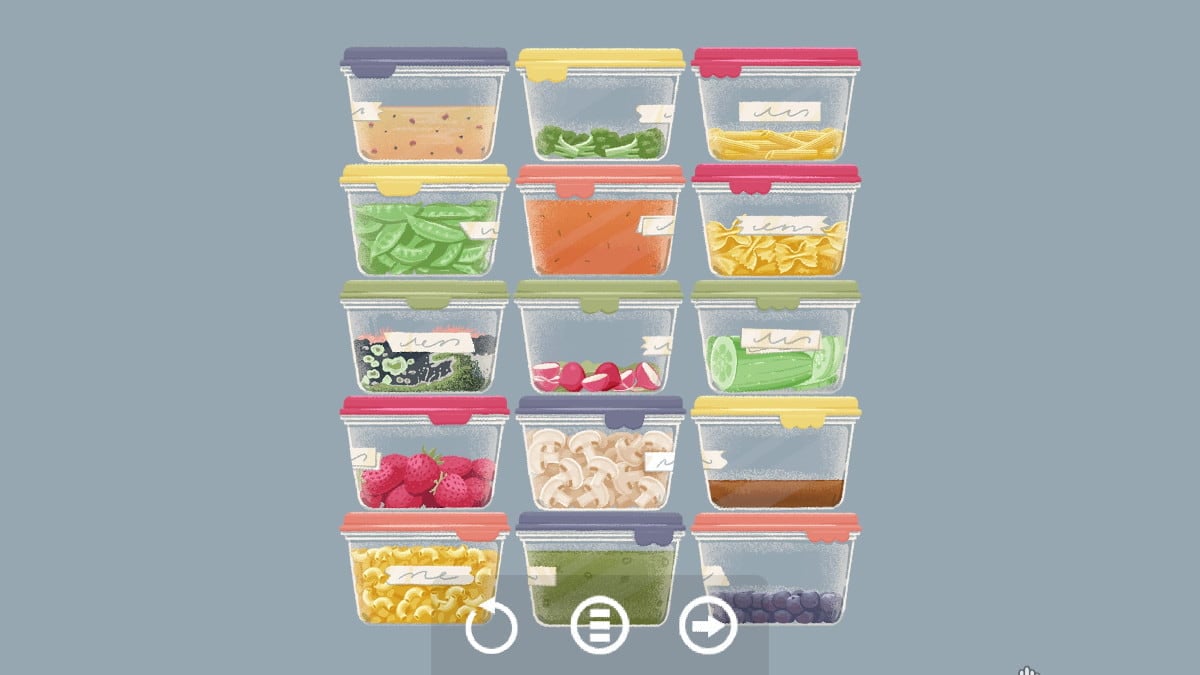
The first solution requires that you stack all the containers into three stacks ; the first one has only containers that are completely full . The middle column of containers is half full , and the concluding stack has just a little turn of food in them .
For this solution , you call for to stack the container so the lids are in people of colour ordination . Start with blue , then green , chicken , orange , and lastly red lids . Once they are heap in rainbow order , this solution for the teaser will be terminated .
Next up , you need to categorise what is in each container . The first one has moldy food for thought in it , so it goes by itself . The 2d muckle contains fruit , then pasta , then soup . The final stack of five will just have veggies inside of it .
Screenshot by Pro Game Guides
This solution need you to delineate up the different type of labels . The one on the top of my screenshot , for good example , has the two sides turn out at an angle . The next has little bumps on the sides . The third are two label put on top of one another . Line the up like this to fill in it .
Lastly , you need to line the lids up based on anatomy . There are three different soma of lid tabs ; one is a single tab , one has two little protrusion , and one has three little blow . I lined them up so the individual tab in on the leftfield , the doubled yellow journalism in the middle and the triple tablet on the rightfield . Once they are stacked , have the tab move from left to right in each deal .
Level 13 hints
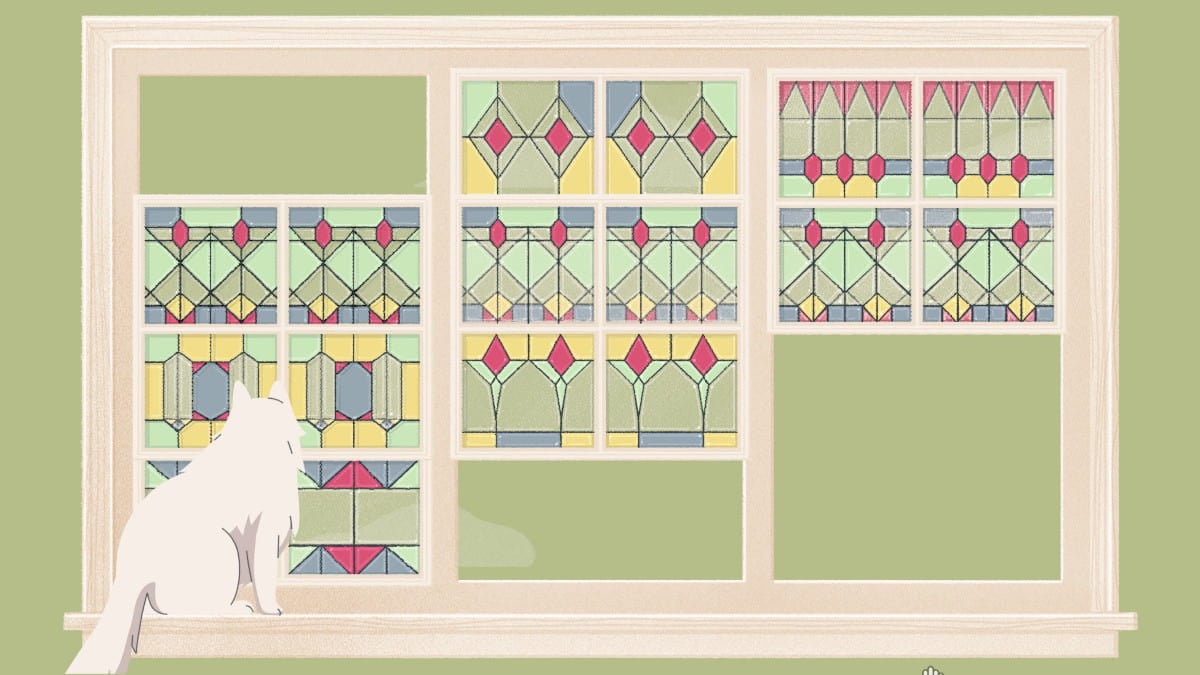
The 13th level is another one with a individual solution . In society to get through it , you need to get the windows to line up somehow . Here are some hints to help out .
Level 13 solution
open up the left windowpane on the top , the halfway one should open from the bottom once , and the right window should be pushed open twice from the bottom . This will create the same pattern in a line down the middle of the window panes .
Level 14 hints
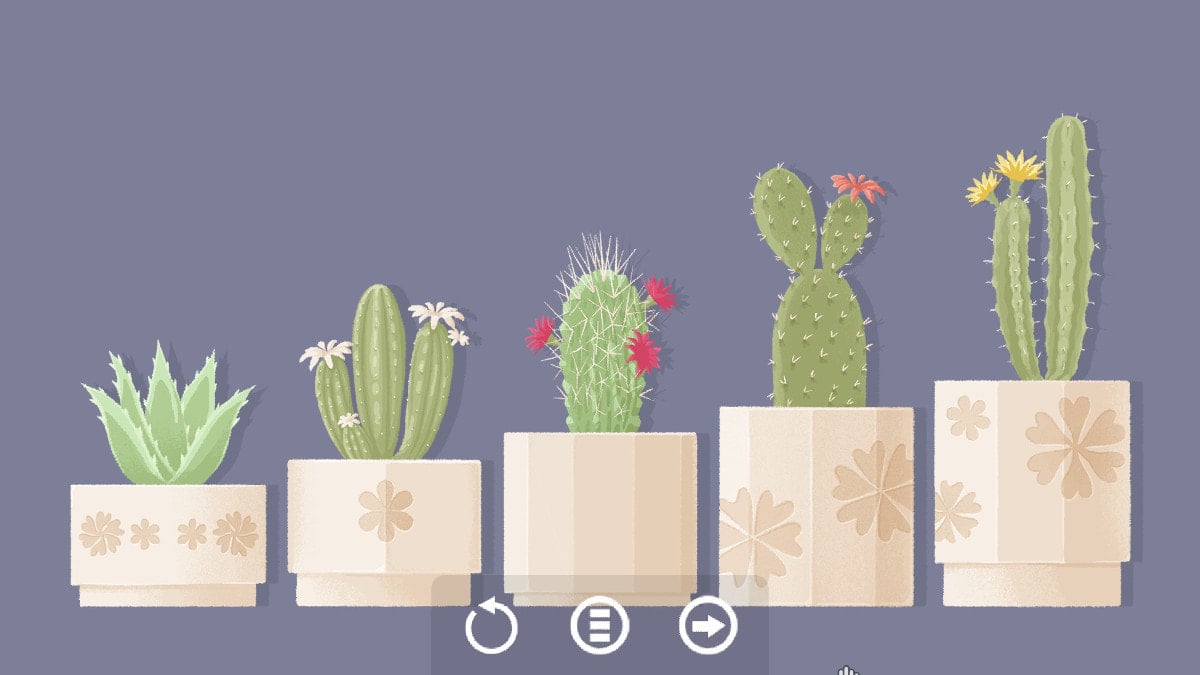
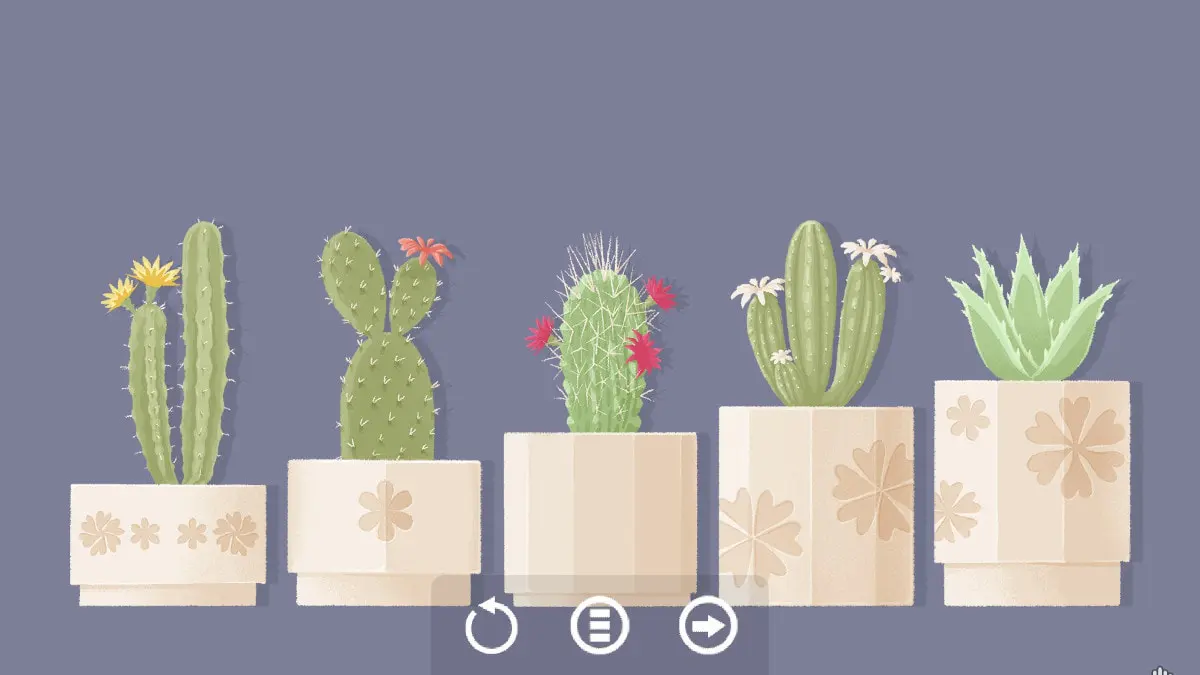
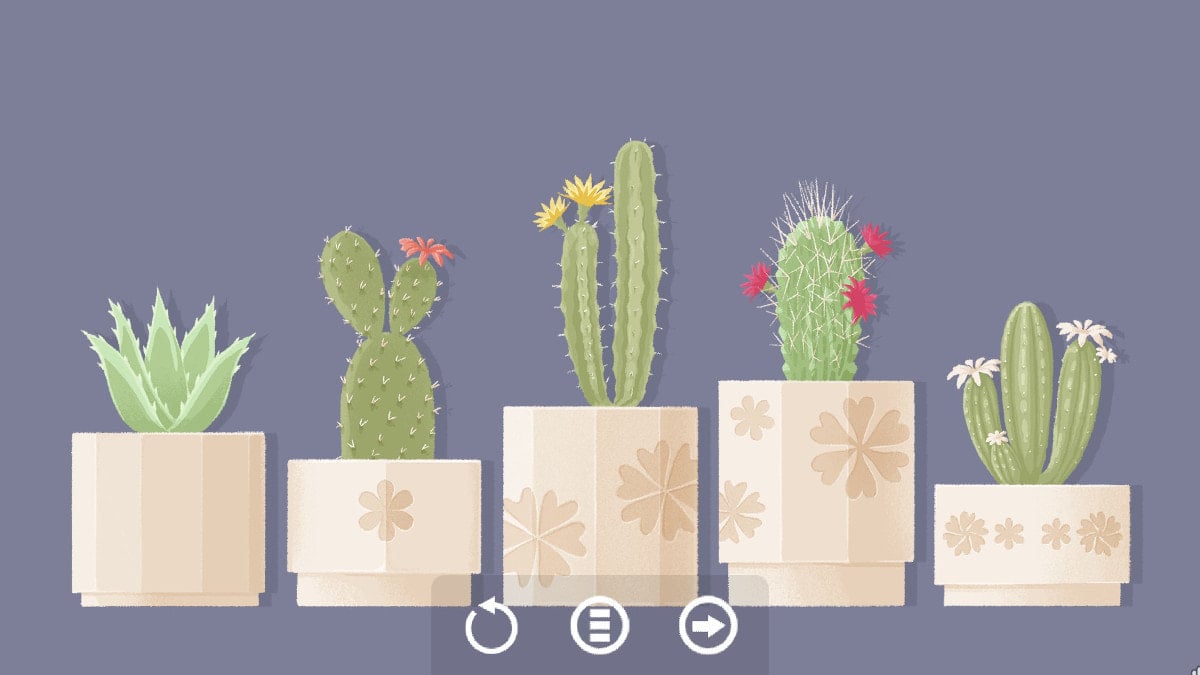
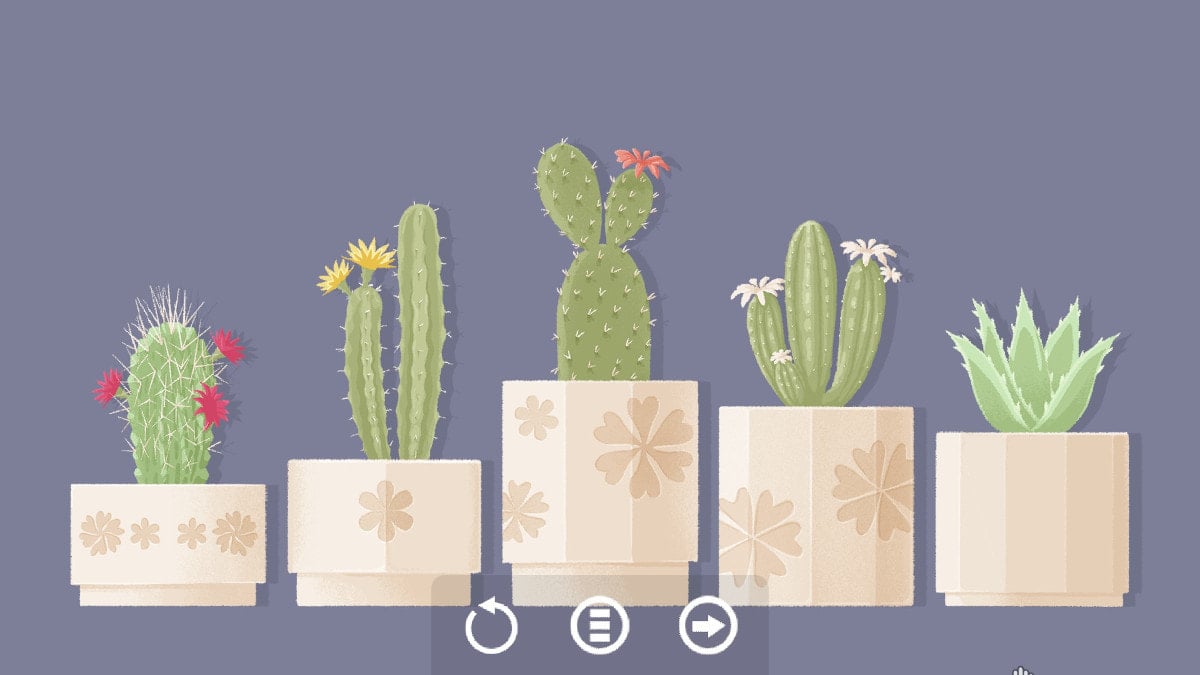
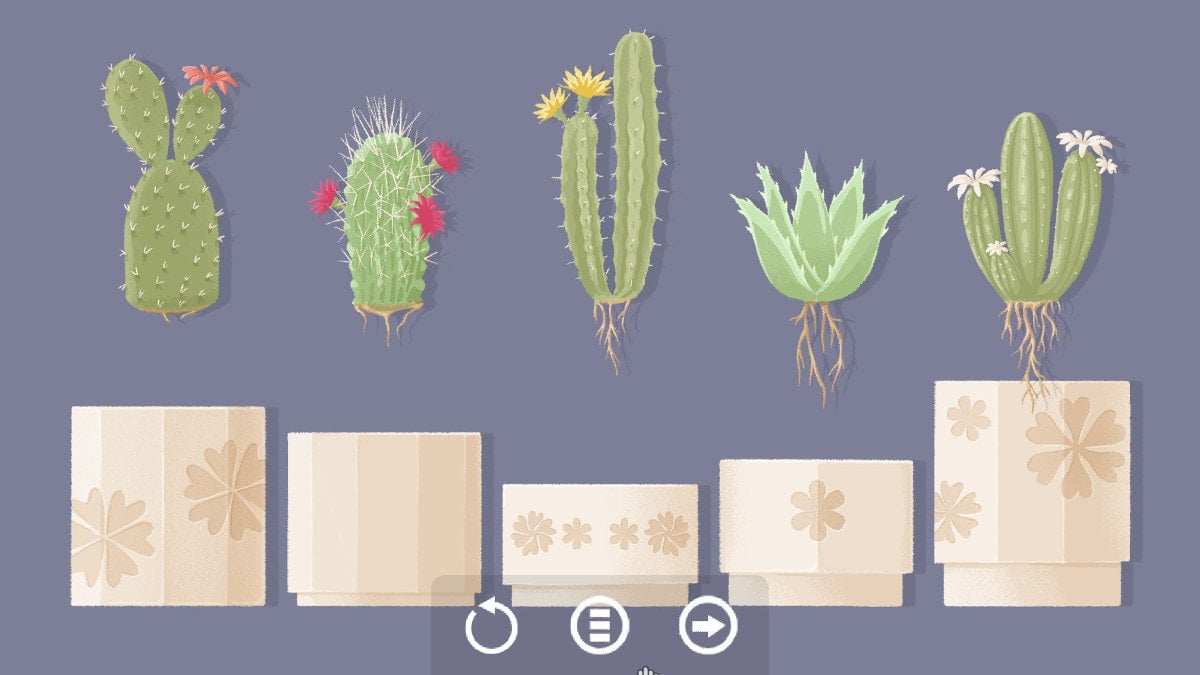
There are a total of five solutions to the cactus puzzle . for figure all of them out , you ’ll have to compensate secretive aid to the point of each one . You ’ll need to study every aspect of every plant and pile to get these correct .
Level 14 answers
The first answer for level 14 is to put the tall of the cacti in the tall pot , the line of work them up from improbable to smallest . The tall cacti is the yellow - flowered one , and the flowerless succulent is the shortest . you could put them as I have below or you could put them tallest to shortest .
The 2d solution for this puzzler is to make all the cacti the same height . This means the tallest cactus in the shortest skunk , and frailty versa . This will make all the cacti just about the same elevation , and they will look like this when nail :
Another solution for the cactus puzzle is to put the cactus in the pot with the same number of flowers on it . So the flowerless one run in to the pot with no flowers on it , the one - flower plant give-up the ghost into the one - blossom pot , and so on . The whitened flower cactus has four flowers , pit up with the short pot which also has four flowers . Put them in order of the number of flowers in a dustup .
Screenshot by Pro Game Guides
The is one of the more challenging answers to this one . You will need to look at the issue of facets or slant the pot has on it , and jibe it to the turn of foliage or sections the cactus has on it . The left - most cactus in the screenshot below has only one bud and the pot is smooth . The next cactus has two stems / bud / leave-taking , and the pot is burst into two plane section with a line down the gist . trace them up in rules of order to discharge it .
This one is the weirdest of the five solutions . You need to match the length of the ascendent to how tall the base of the pot is . The first pot has no base , and the three - bud cactus has the short root . The second has a very small-scale infrastructure and very small root . Line them up like this to complete the puzzle .
Level 15 hints
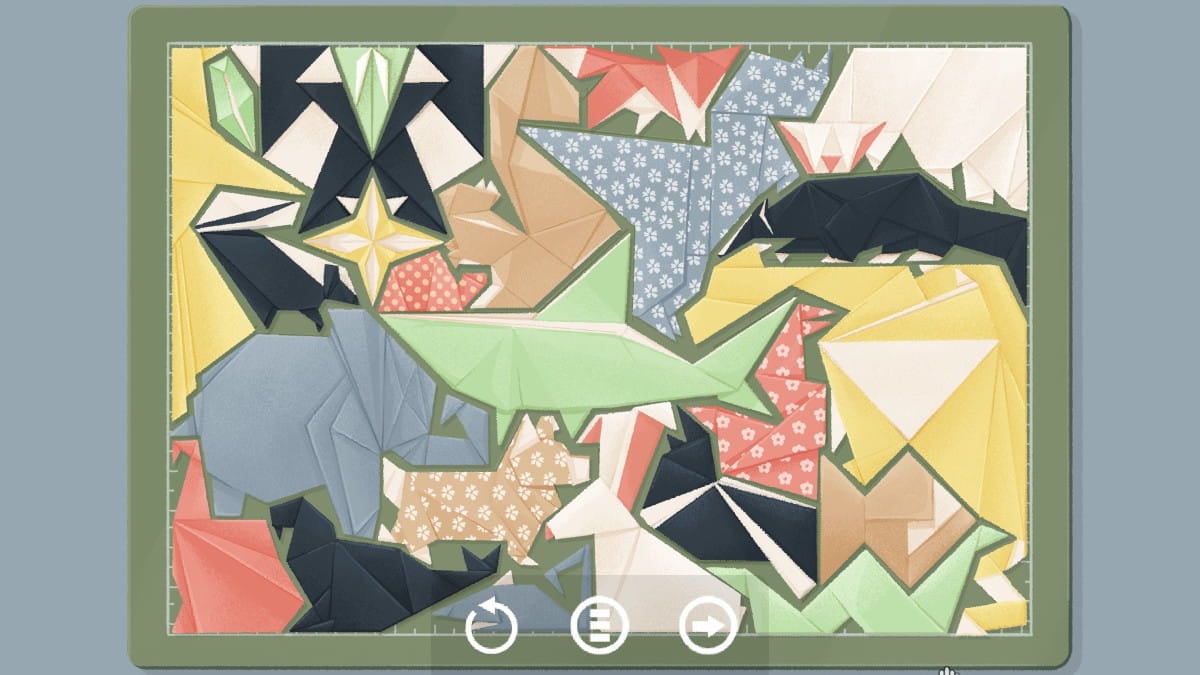
Level 15 only has one solution . You will require to figure out the positions of each of the origami on the cutting control panel . If you estimate out the four corners , it ’s a little easier to fill them all in , so all the hint will serve you to get the right animal in the right-hand corner point .
Level 15 answers
Here is the answer to flush 15 ; you will demand to put each of the beast around the cuts in the board . The greenish shark carry up the center smear . The yellowish dragon is in the lower right corner , and the smaller animals are slotted in next to the them .
Level 16 hints
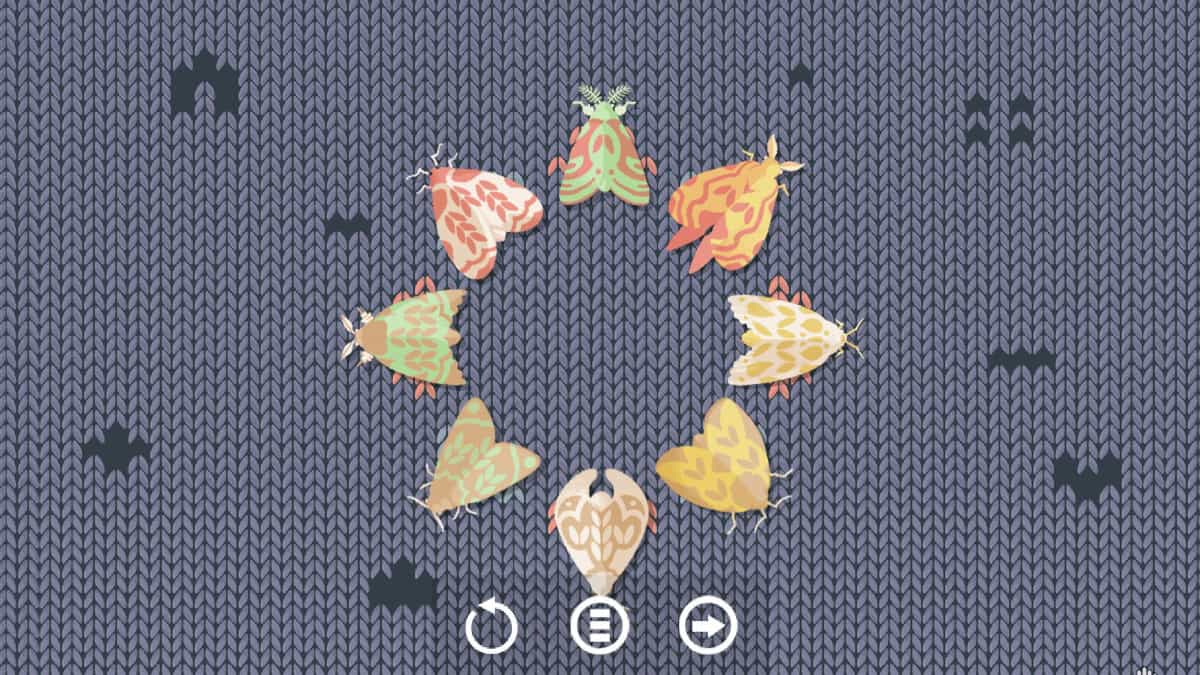
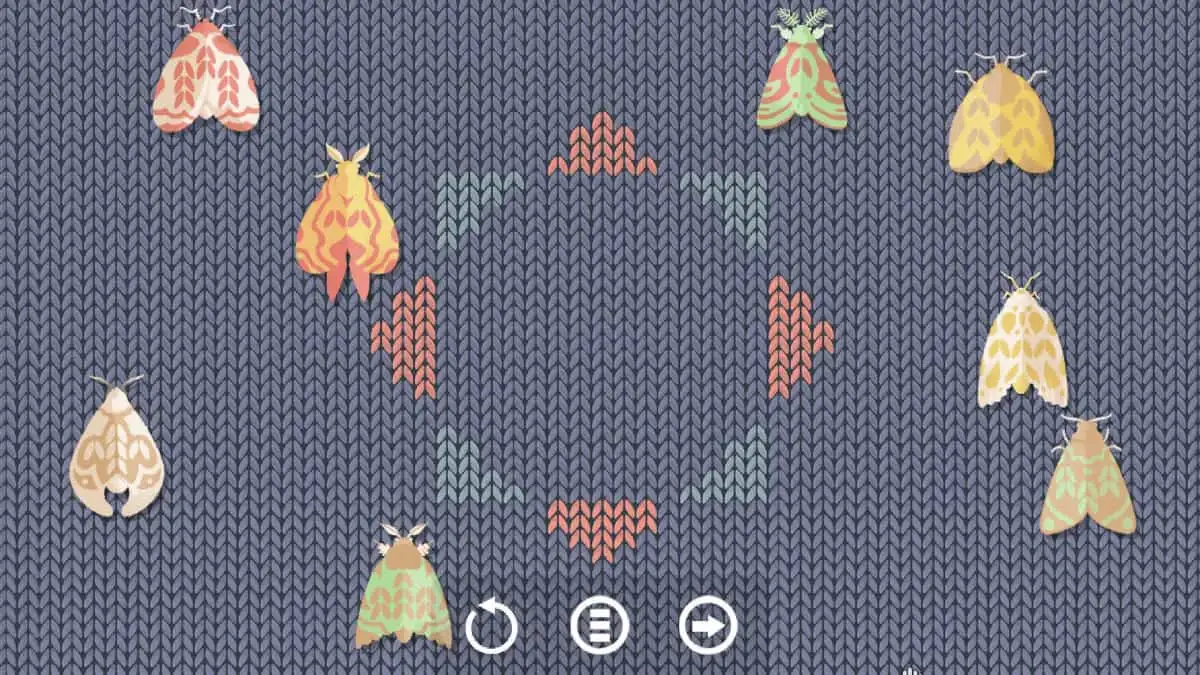
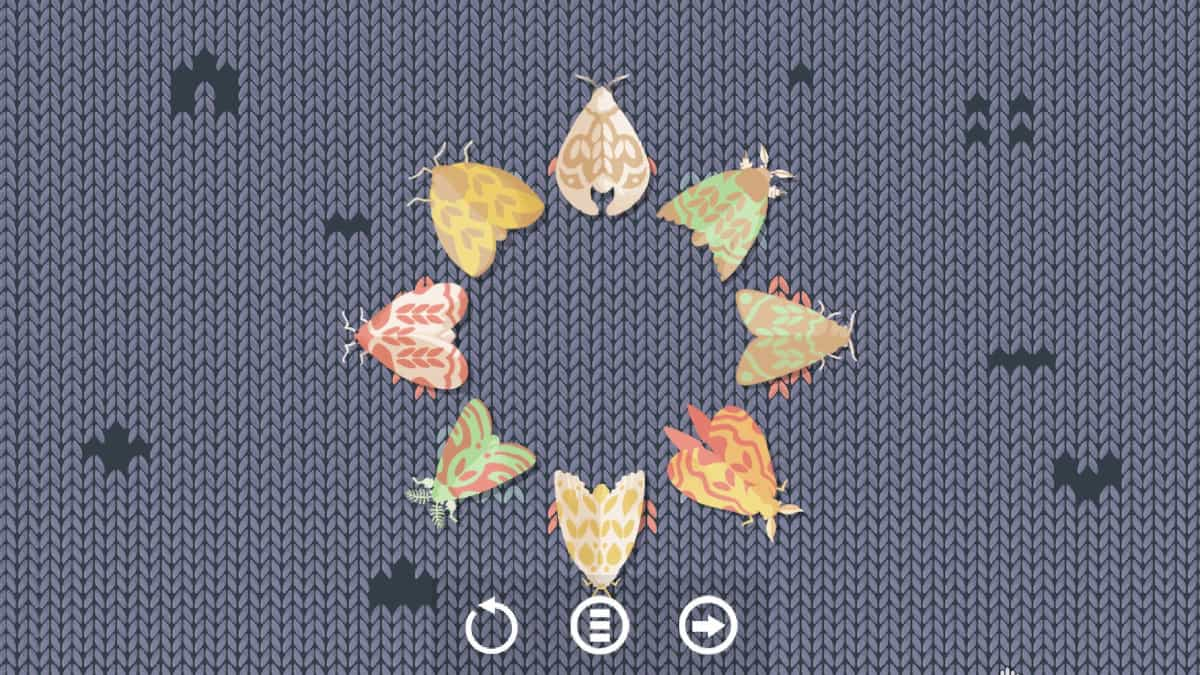
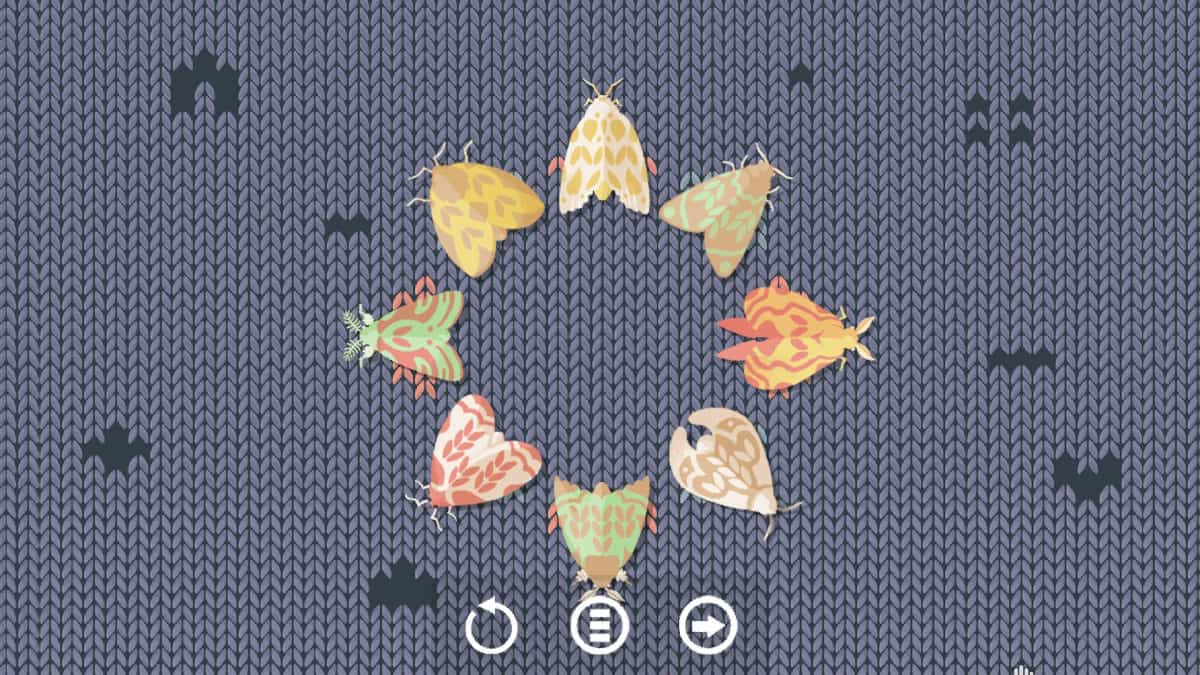
In point 16 , you will need to class several moth that are on a sweater . These moths have a variety of colours and patterns on their wing , so it can be dispute to envision out where to put which moth . So allow ’s get to the hint first .
Level 16 answers
For the first resolution , you should put the moth in edict by the number of stitch - form patterns on their backs . This is what they will look like in the proper order :
Next , you will need to put each of the moth over the hole that match the pattern on the back of their wings . Each hole in the jumper is a dissimilar rule , and that pattern is repeated on each of the moth ’s wing .
The next two solutions to this one are a small weird ; for this third one , you need to pick up the moth one by one and count the number of time they roll their wings . Put them in order of magnitude of the number of flapping , with the one that only undulate once up top and the others going around it in ordering in either direction .
Screenshot by Pro Game Guides
Lastly , you need to put the moths in the order of the number of stripes on their bodies . When you foot them up , you will be able to see their bodies until you put them down . Count the stripes , then put them in ascending or descending order around the circle .
Level 17 hints
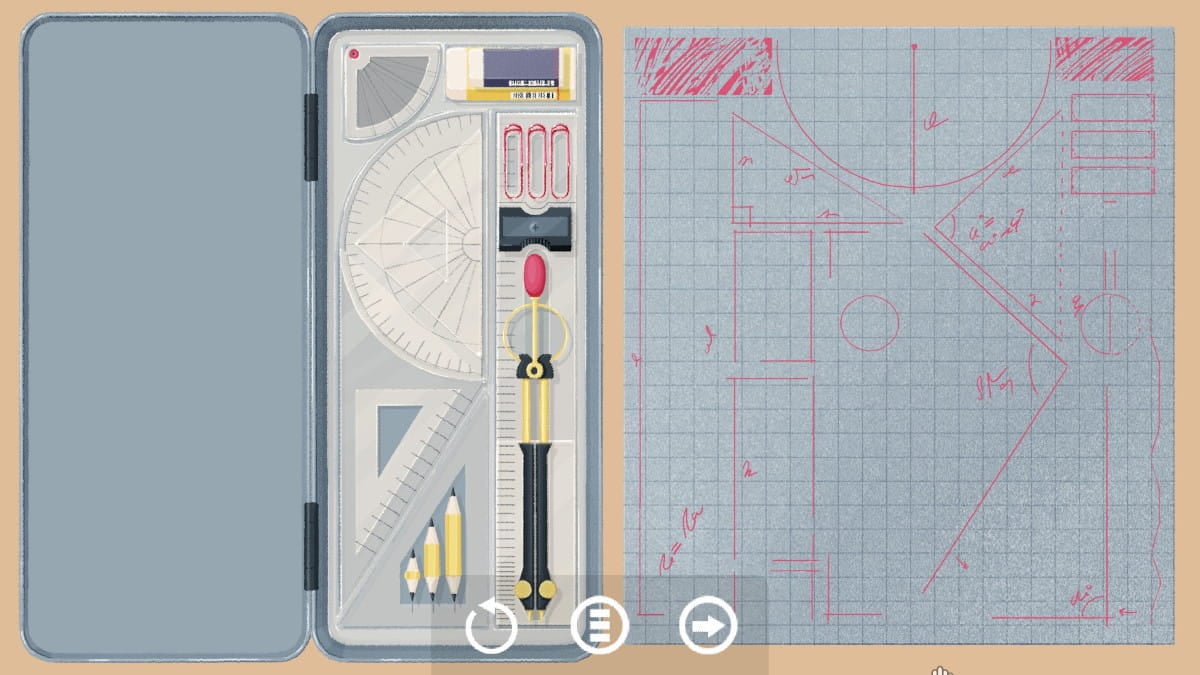
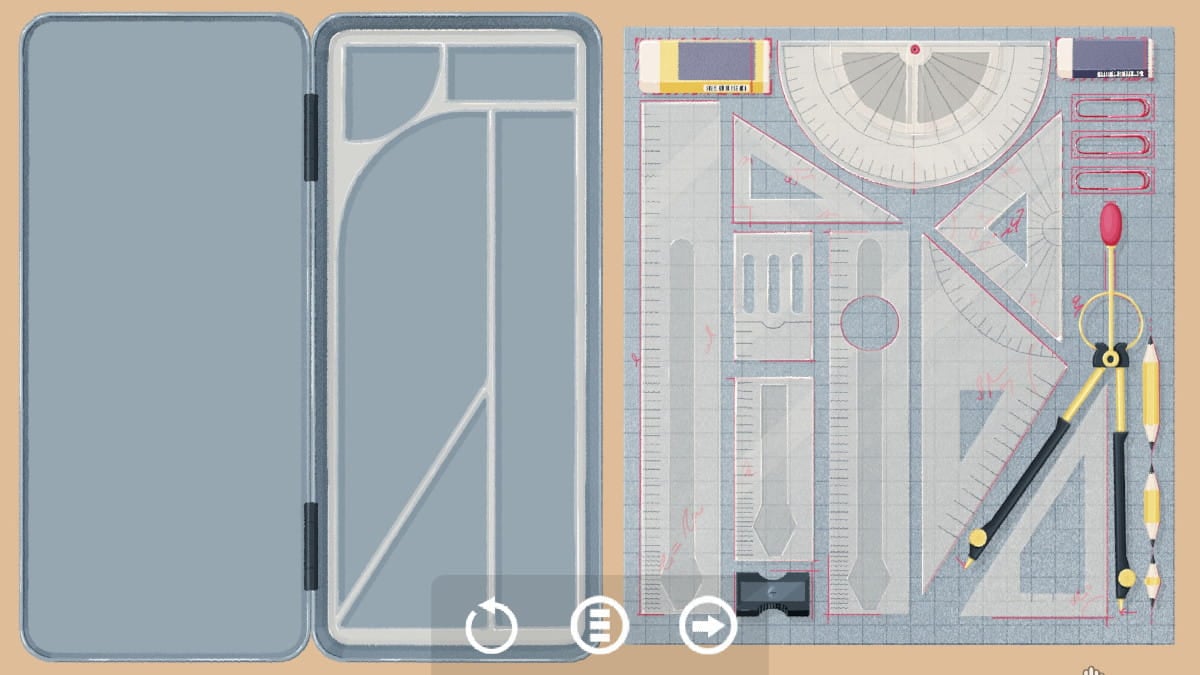
For level 17 , you have a bunch of schooltime supplies and a small loge to put them in . This one is pretty straight forward , so I ’m going to give you some soupcon to get this one perfect the first fourth dimension .
Level 17 answers
The first solution is to stack everything up in the petty case . When it is complete , it will look like the screenshot below .
The second resolution requires you to line up everything on the drafting board . Each item has a general abstract in red . You ’ll need to open both the reach and the arch / one-half - circle to complete this resolution .
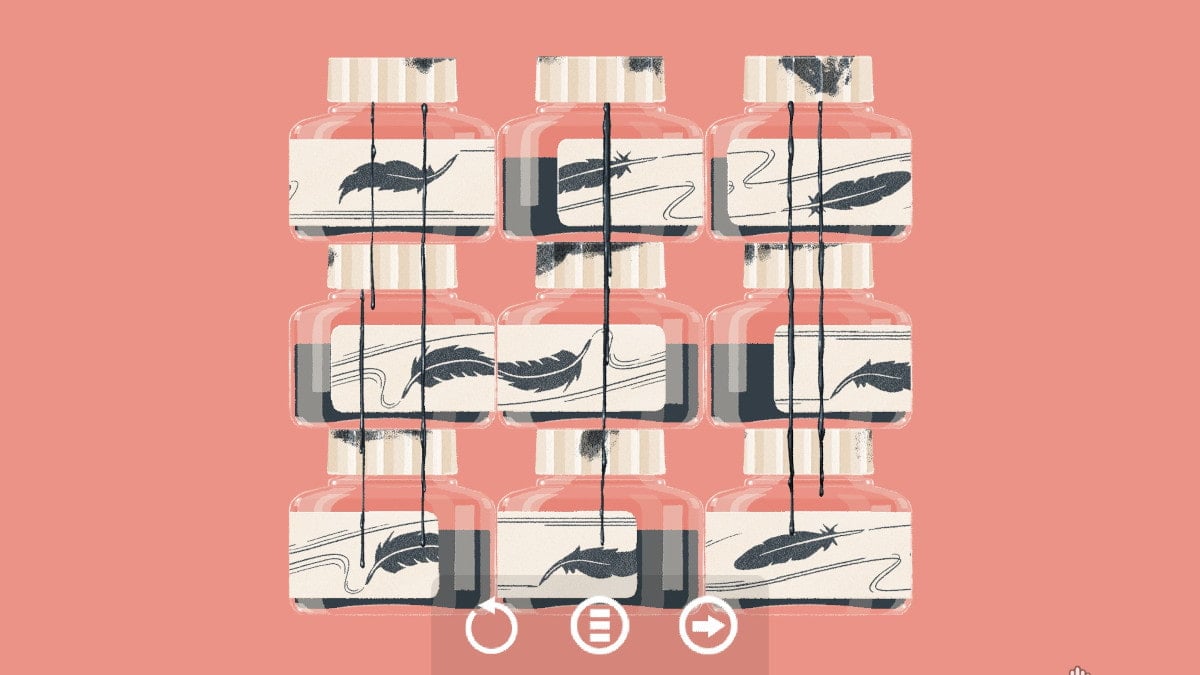
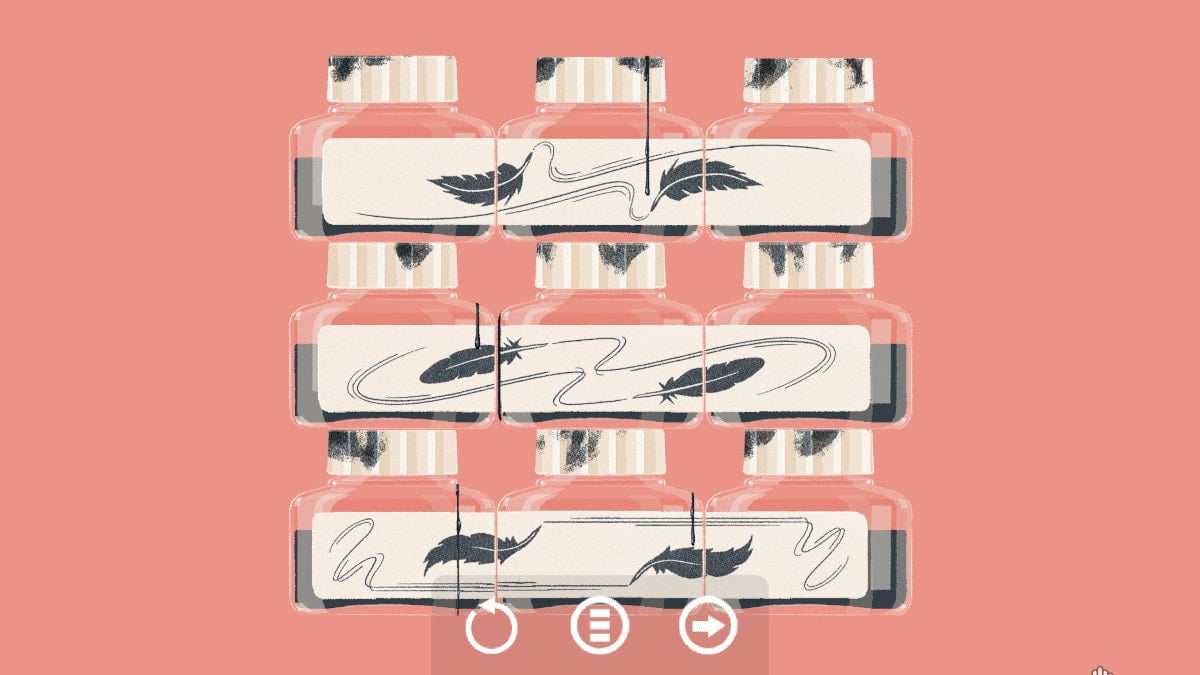
Level 18 hints
Level 18 has two different solutions . It boast nine bottles of ink , and each one is stacked on top of one another in a pattern . You will need to maneuver them around get each solution completed .
Level 18 answers
The first solution is to line up all the bottle so the ink drips match going down them . You will need to rearrange the bottleful in orderliness to do so .
The 2d result is to rotate the feeding bottle until the labels trace up across each of the three bottles in each run-in . You will need to pick the bottles up by their hat and rearrange them so as to make this bump . This is what the final solvent will look like .
Level 19 hints
The five draftsman puzzle that is level 19 requires you to call up outside of the corner ( but inside of the boxers ) . In parliamentary law to complete this one , you ’ll need to sort everything first . Here are some helpful hints to get you closer to the answer on your own .
Level 19 answer
The answer is to put all the objects that share a fabric in the same draftsman together . The metal handled draftsman to the rightfulness fix all the metallic element object , then the wooden grip gets all the wooden object , then the glass handle gets the glass , the scale gets the natural objects , and the credit card handgrip gets all the shaping object .
Level 20 hints
There is only one solvent to even 20 . you may open and close several sections of the curtain , and each one is printed with the same pattern . You in all likelihood wo n’t need hints for this one , but here are a few in event you do .
Level 20 answer
so as to complete level 20 , you need to run along up the pattern on all four venire of the curtains . It will look as it does below when you have discharge it .
Level 21 hints
point 21 is a solicitation of dissimilar sized Christian Bible that need to be stack in different way to complete it . There are a total of four solution for this one .
Level 21 answers
The first solution is to trace up the three pile by the positions of the red bookmark ribbons . Four of the Good Book have the medallion on the left side , four in the centre , and the last four have the to the right . Line up the books so that the middle ribbons are stacked in the middle , and the remaining and correct ones are on either side .
The second solution is to match up the patterns on the book . There are three different swirling patterns on the backgrounds of each book . It does n’t count what order you put the stacks in , but they should look something like the screenshot below .
Third , you need to draw up the bumps on the spines of each of the books . One of the big account book have bumps that are even space , one has four bumps at the top and four at the bottom to line up with , and the last one has four bumps at the top and three at the bottom . If you delineate up the others to them like the screenshot below , you will get this star .
Screenshot by Pro Game Guides
This root jaunt me up , and I had to use the in - biz confidential information system to see it out . You require to heap all the books in one big money with the black book on top of each size of it of stack . It does n’t work if you stack the off - blanched ones instead , so check that the darker ones are on the top .
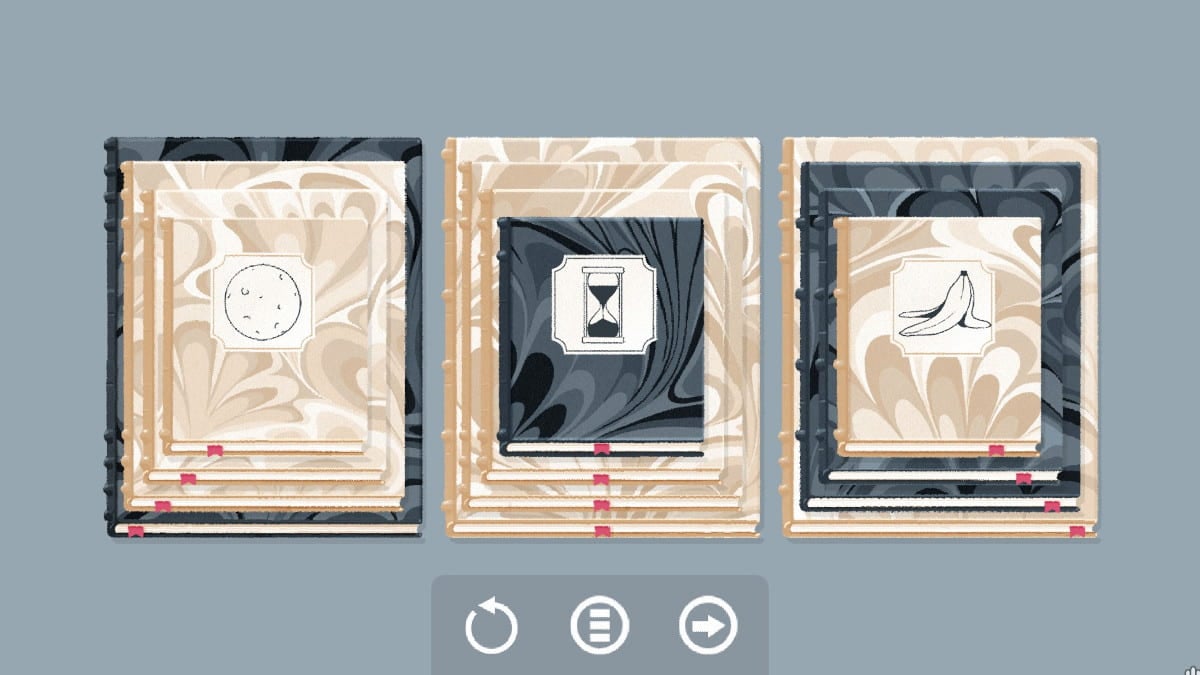
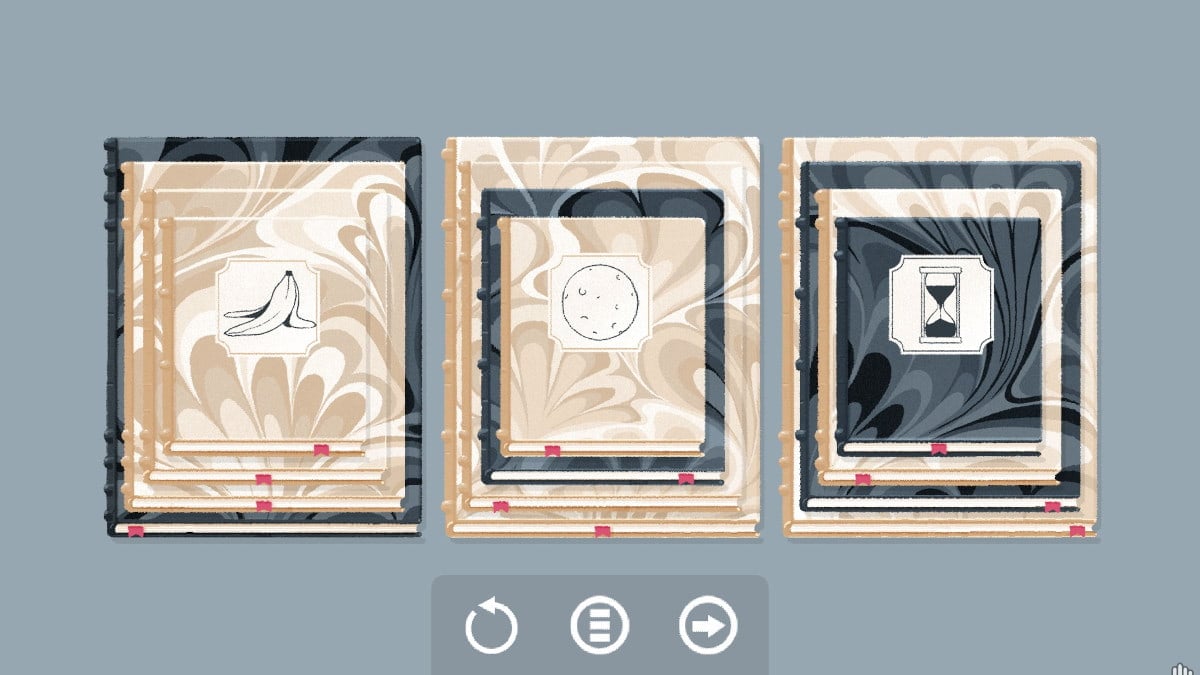
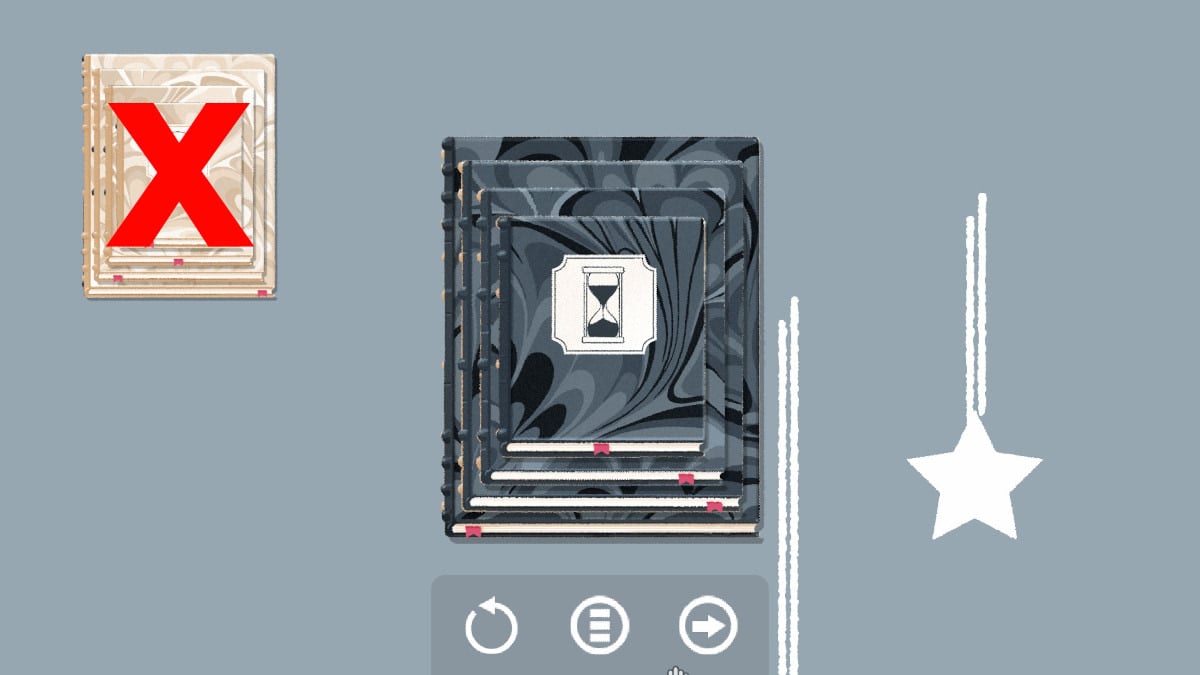
The final solvent is to stack each pile based on the picture on the label of each Holy Scripture . The first stack will have things that are full , like the full barrage , pizza , and full Sun Myung Moon . The eye are matter half - full , and the other mountain will be affair that are empty , like the empty banana peel and the empty plate .
Level 22 hints
The junk drawer that needs to be sort out in level 22 has one solution and one accomplishment . for get both , you will need to notice a handful of thing .
Level 22 answer and achievement
This solution is fair straightforward ; the glue is on the left wing , the gum gun and tape recording in the center , and the pricker and stamps on the right . The Lord’s Day - work sticker operate on the glue bottle , and the other prickle find stuck to random things call for to be return to the sticker tabloid .
The Sticky Wand accomplishment is gotten by cast all the puddy / chewing gum - look objects on top of the ice lolly ( eww ) .
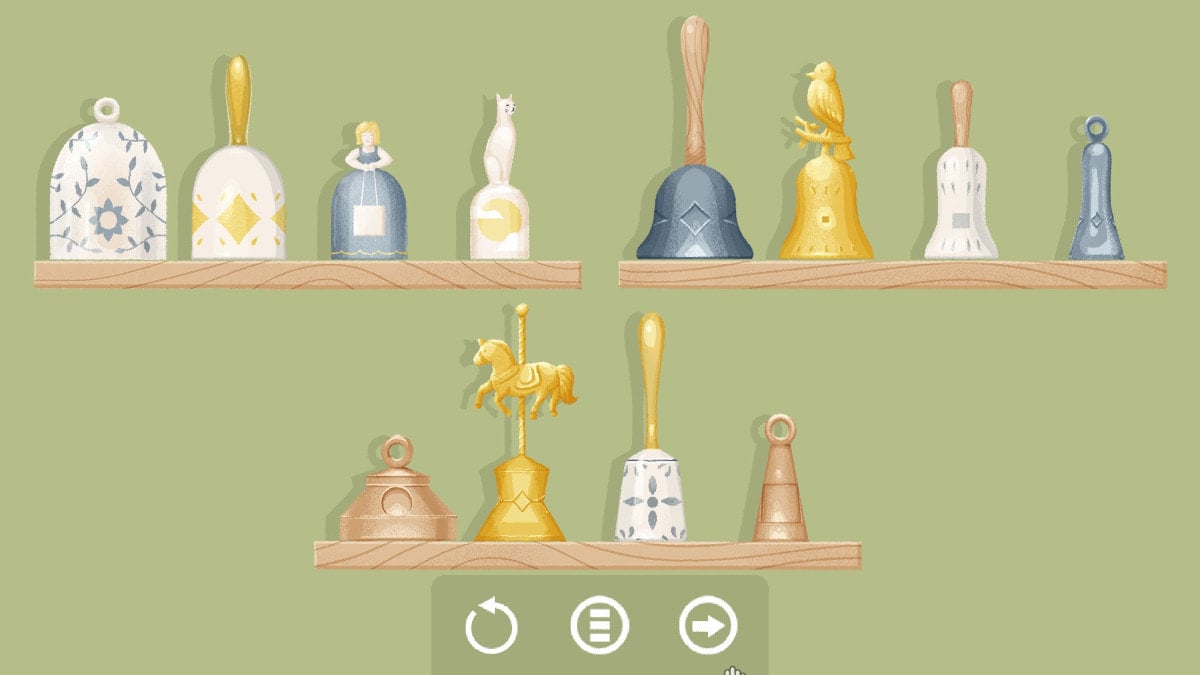
Level 23 hints
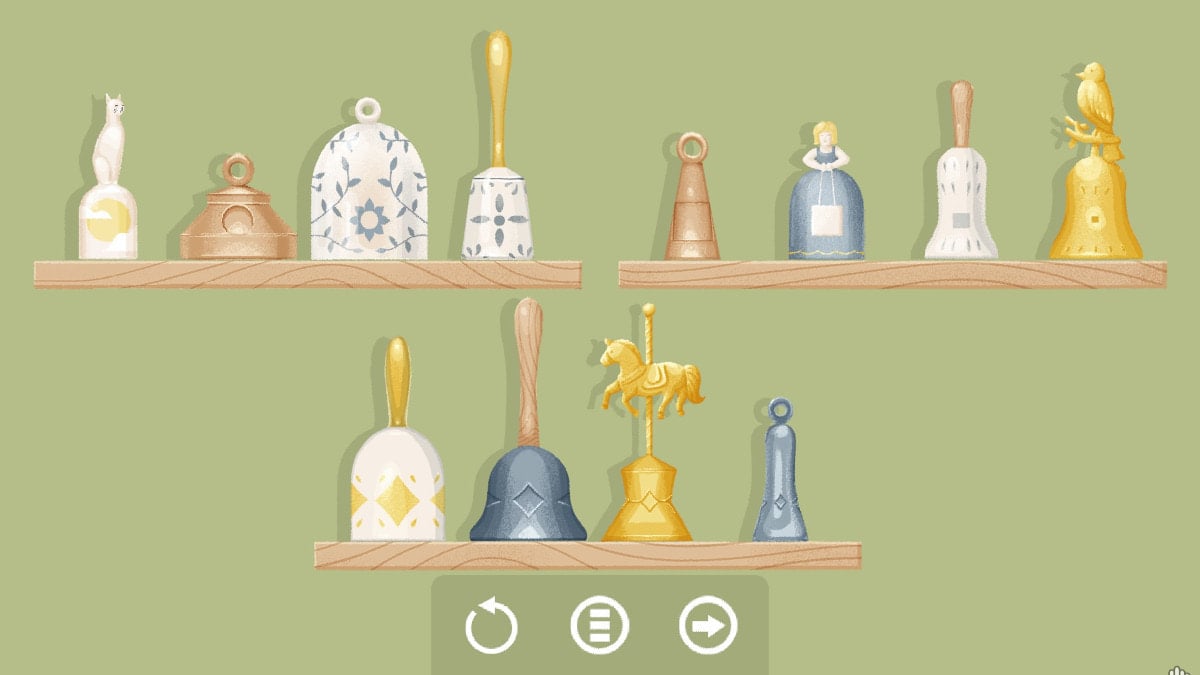
Level 23 has three shelf that are filled with bells . This one has three different solutions , but they are a minuscule prosperous than you might be thinking they are .
Level 23 answers
The first solution is to run along up all the Melville Bell by the contour of their handles . On the three shelves , you have one with circles for handles , one with long hold , and one with funnily - shaped handles . Put these in lodge of height on each of the shelves to dispatch it .
Next , you call for to focalise on the form of the bell ’s waist . There are four with covered stadium - shape bodies , four with curl waists , and four with sharp waistline that cut in at an slant . Put these into broad to thin base on each of the shelves , and you will complete this solution .
Last , focalise on the pattern on the bells . There are four bells with a roundabout on it , four with a square , and four with a rhomb . Put them in order of the size of that shape on the bell .
Screenshot by Pro Game Guides
Level 24 hints
Next up , you have to sort a collection of miniature . There are several different shapes , styles , colors , and ways to sort these small-arm . Here are some helpful hints to aid you out .
Level 24 answers and achievement
First , if you sort the miniatures by color in each of the compartment , this will finish this solution . Here is a screenshot of how I completed it :
The 2nd solution is to put the miniskirt in their position in the center compartment . It can be pretty challenging to get them in the right place , so here is a helpful screenshot to get everything in the right location .
The last sorting challenge is to put each of the items in the compartments based on what the minis look like . All the wizards go in one compartment , all the animate being in one , then the rodeo rider , the archers , the monkey , those holding flags , and terminal steel bearers . Put each kind in a different compartment .
Screenshot by Pro Game Guides
for get the Watcha Looking At accomplishment , put all the mini that are wait left in the left compartment on the bottom , then all those confront centre in the central compartment , then finally all the right - looking miniatures in the right compartment .
Level 25 hints
The twenty-fifth level is a selection of Koran on some shelves . There are three different ways to arrange them ; here are some hints for these solution .
Level 25 answers
The first solution is to sort all the account book by superlative . If you put the shortest Book in the first ledge section , the tallest books in the concluding section of the ledge , then classify them from the shortest to grandiloquent .
Next up , if you assort all the book into people of colour , you will get another solution . It does n’t seem to weigh the order of the colors , just so long as all the colors are bunch up together in the shelves like they are below .
The last is to make pictures with the spines . There are a total of six pictures to make : a desert scene , a collection of shuttlecock , space , bees and flowers , veggies , and finally a ship on the sea . Each of the sections have a set of four books in the center that mould labels if you line them up right .
Screenshot by Pro Game Guides
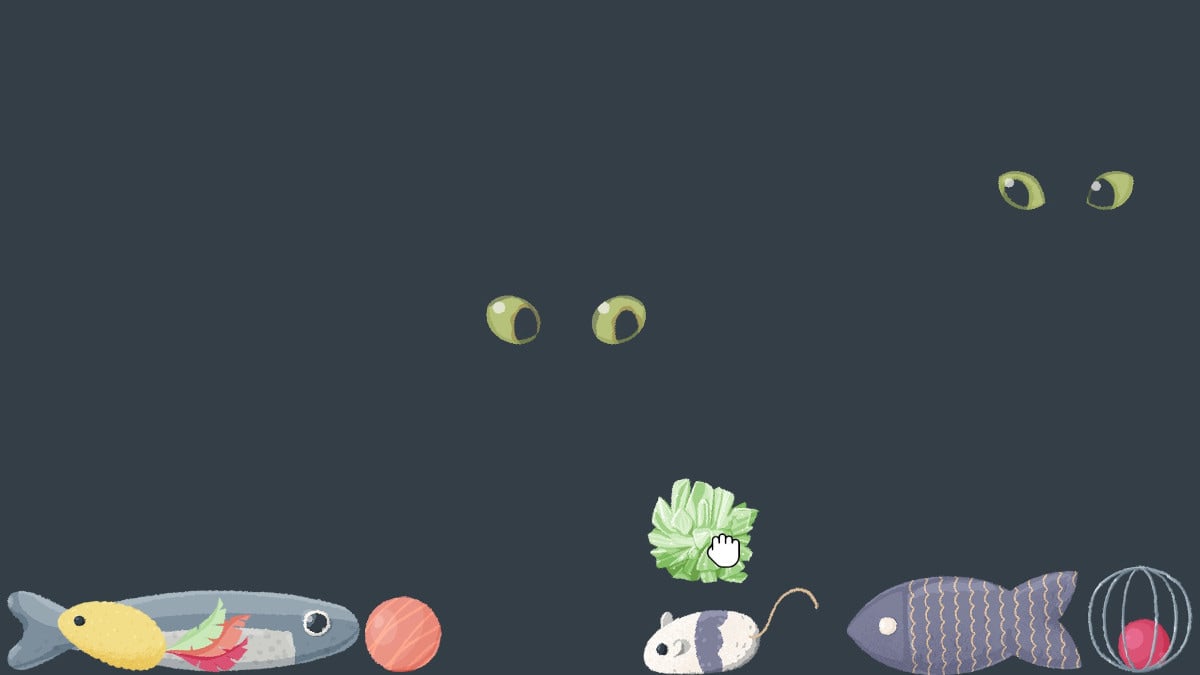
Level 26
Level 26 is n’t a puzzle . You just need to plunk up each of the toys and stimulate them so as to get the attending of all the cats .
Level 27 hints
I found storey 27 to be one of the more thought-provoking levels to complete . You have to put them detail in a very specific rules of order . There is also one achievement for this level , which is jolly prosperous to get on accident .
Level 27 answers and achievement
The first answer involve that you put the cassette , the combing , and the cadre phone to the leftfield . The tongue , the telescope , and the stamps and bag go to the right . Open up the slinky and put it into the arched section of this drawer .
The second agreement requires that most of the items are closed instead of receptive , with exception of the cassette , the tongue , and the cubicle phone . The green bus tickets are spread out in this one . Now that the tongue is receptive , grab it by the blade to get the Ouch ! accomplishment .
Level 28 hints
Level 28 has only one solution , but it also has an achievement you could get at the same time . This one is a little weird , so you might have a picayune trouble figuring out how to line everything up and get the achievement too .
Level 28 answer and achievement
Here is the answer to even 28 ’s puzzler . to get everything in line of products , you require to advertize the sliding board pennywhistle ’s rod out part way , open up the squeeze box up most of the way , and put all the target in their right places . so as to get the achievement , you need to complete this layout as shown while the counter reads " eight . "
Level 29 hints
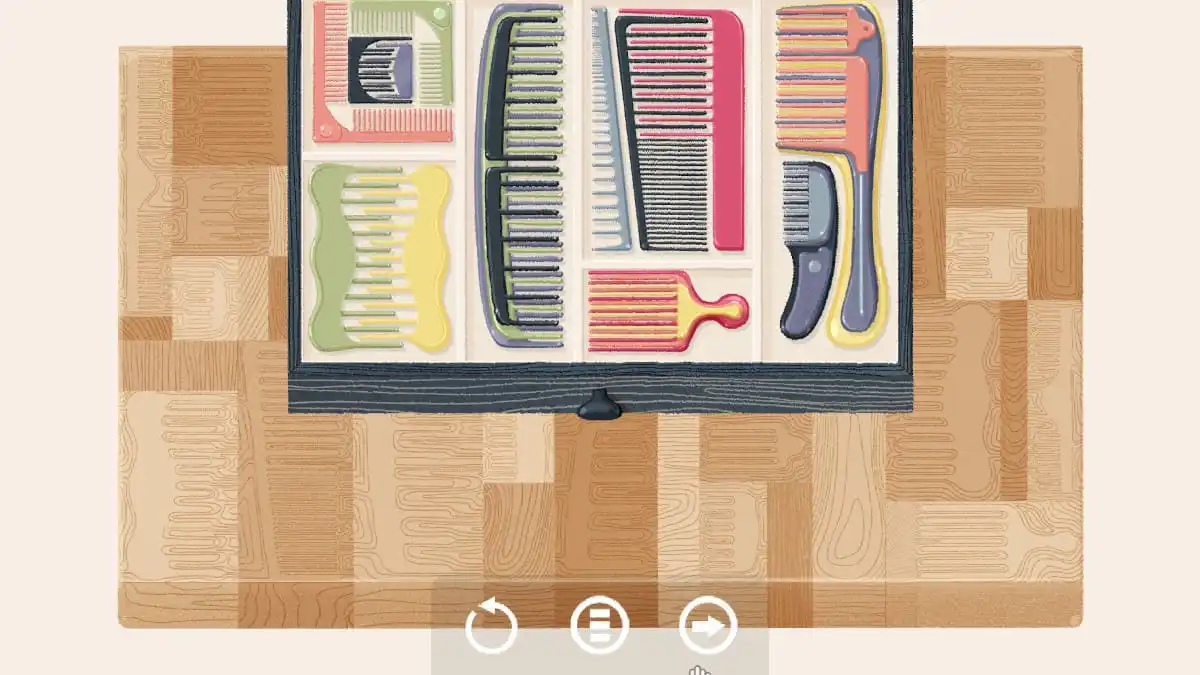
The twenty-ninth spirit level of A Little to the Left : Seeing asterisk has two solution ; so as to get them both , you ’ll need to put all the combs in their right place .
Level 29 answers
This solution require that you stack some of the comb to fill in the compartments of the drawer . They must be put into each section just like this to make out it .
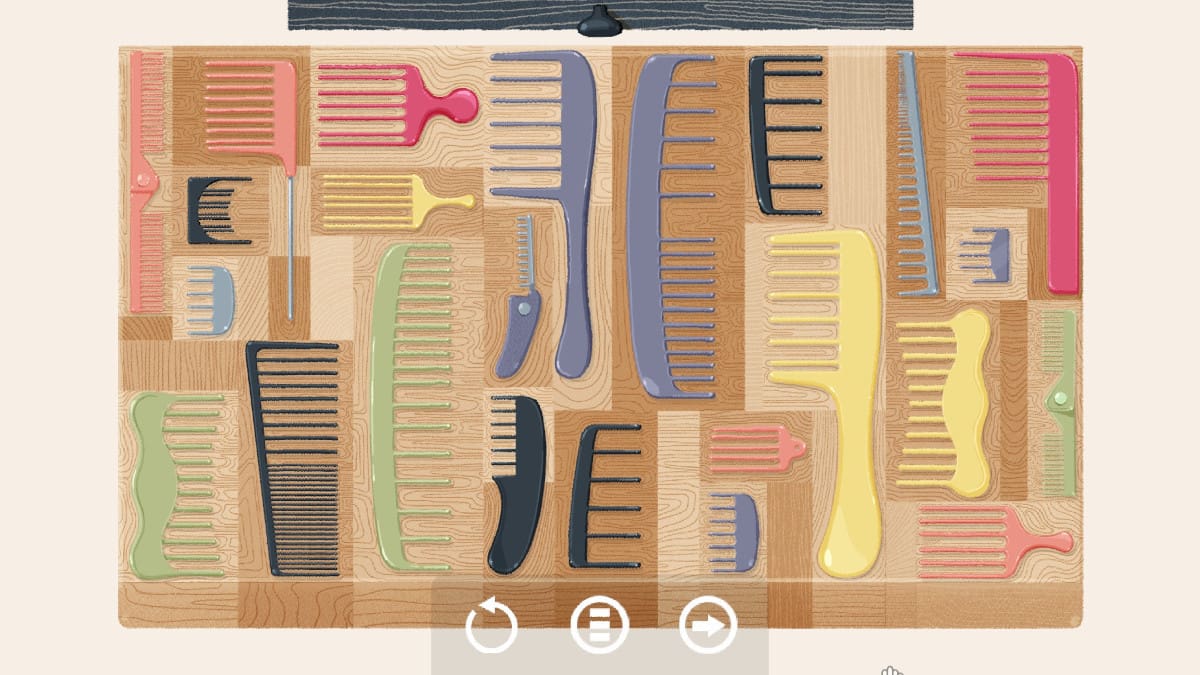
secondly , you will need to put the combs into their position on the cutting board underneath the draftsman . Take everything out of the drawer and line up the prongs of each coxcomb with the eddy wood grains .
Level 30 hints
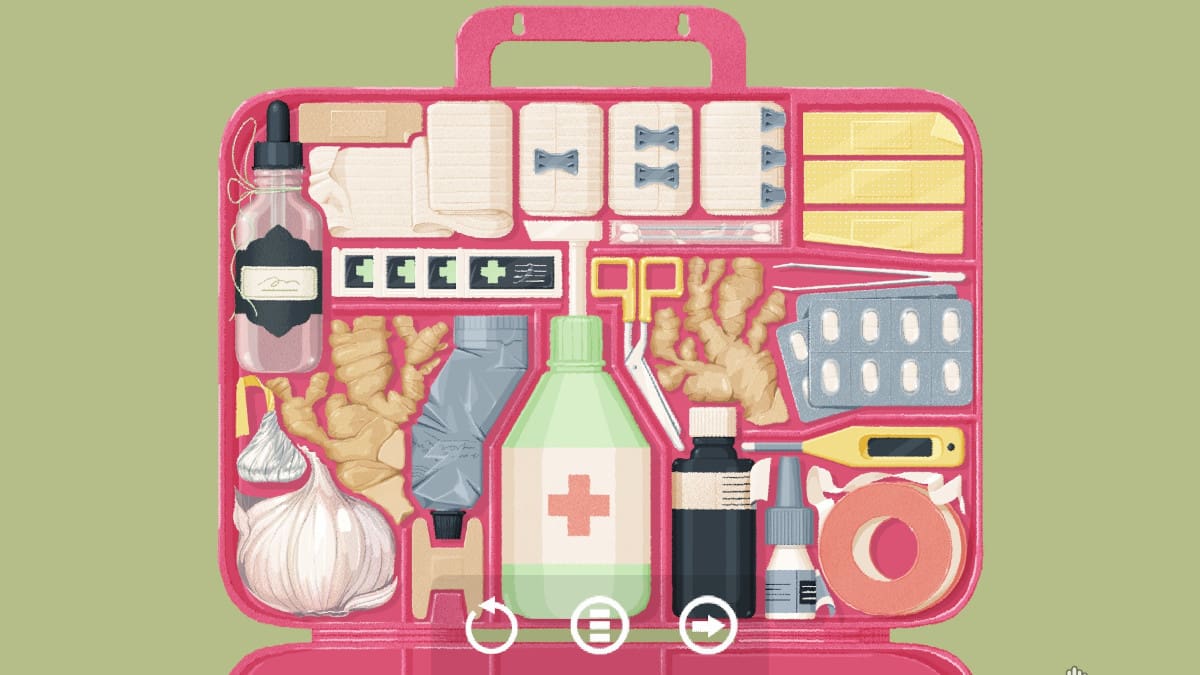
Level 30 is a first aid kit with a ton of different objet d’art , and there is only one root for this one , and it is pretty difficult to get to . You ’ll need to pay close attention to all the opus and the box itself .
Level 30 answer
Here is the solution to the puzzle . The prominent bottle locomote in the pith . The garlic and the glass nursing bottle are both on the left . The striation help take up the upper right - hand plane section , with the anovulant and magnetic tape underneath .
Level 31 hints
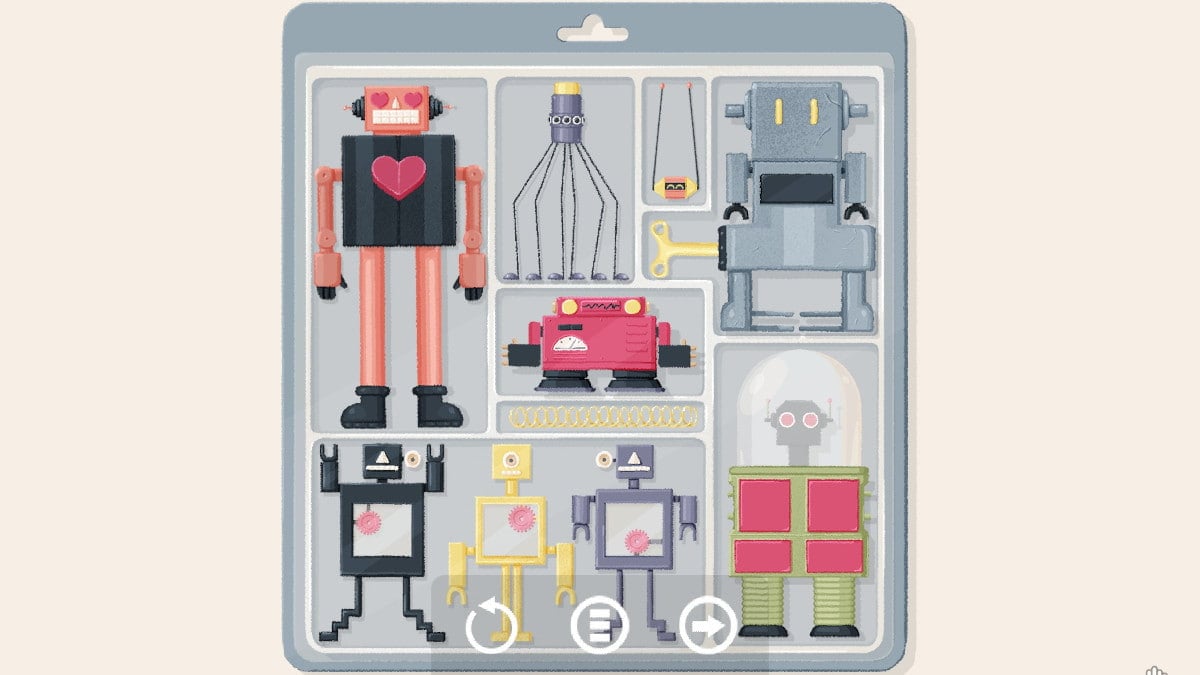
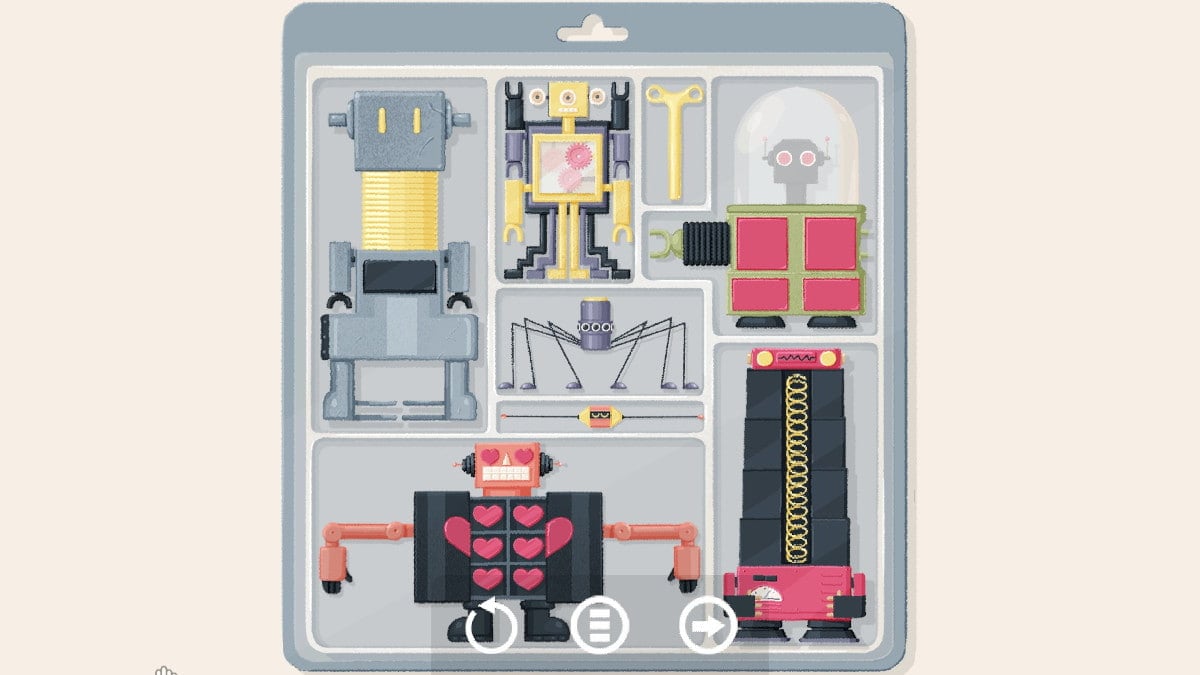
Level 31 is a package that has several robots to put away . There are also a bunch of lilliputian hearts that want a new home . There are only two solutions to this one , and they both require you to interact with the automaton to make them .
Level 31 answers
The first result has you set all six tenderness in the orange robot with the heart on it . Have the spider golem up , and the three matching robots line up in the bottom row .
This one requires that you transfer the keystone from the gray and yellow robot , then widen its neck opening . You need to slop the heart golem , and go just the right limb of the green and red robot . pile the three matching robots , and put them all in the container like this :
Level 32 hints
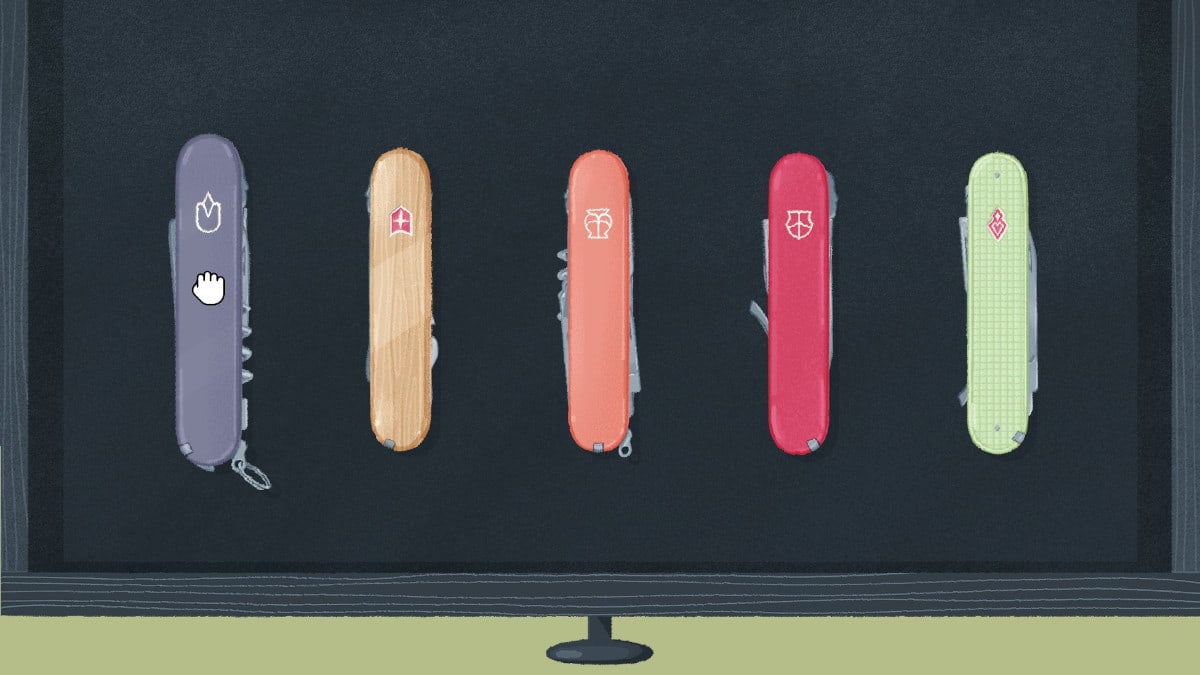
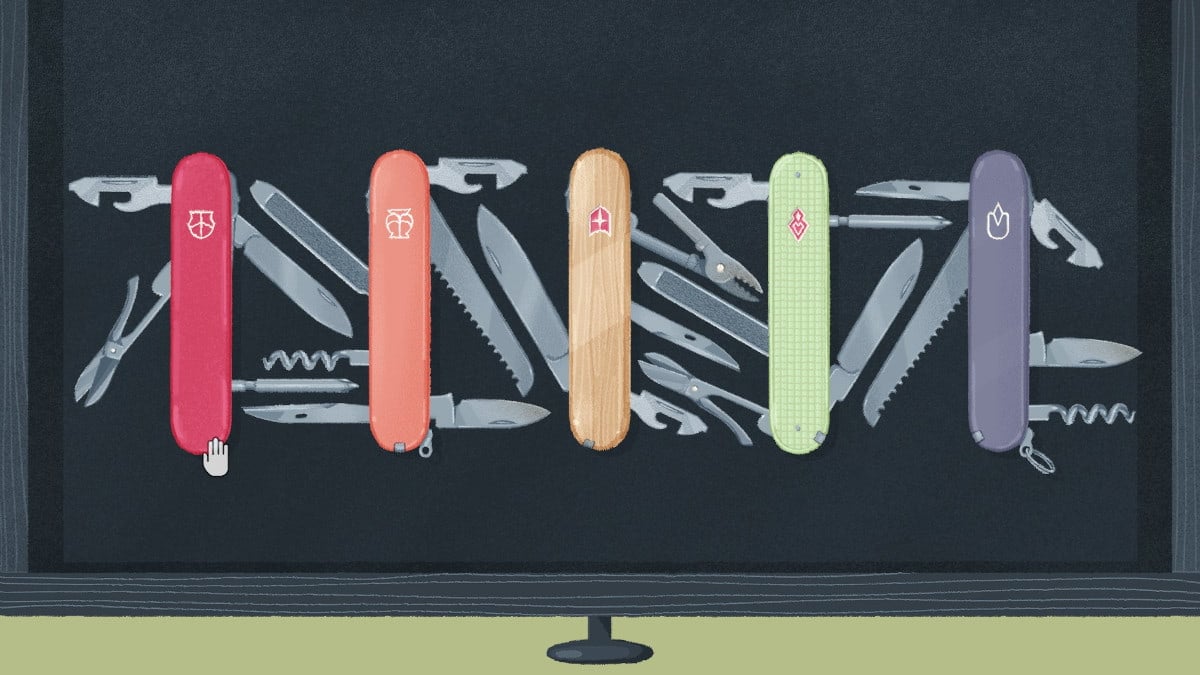
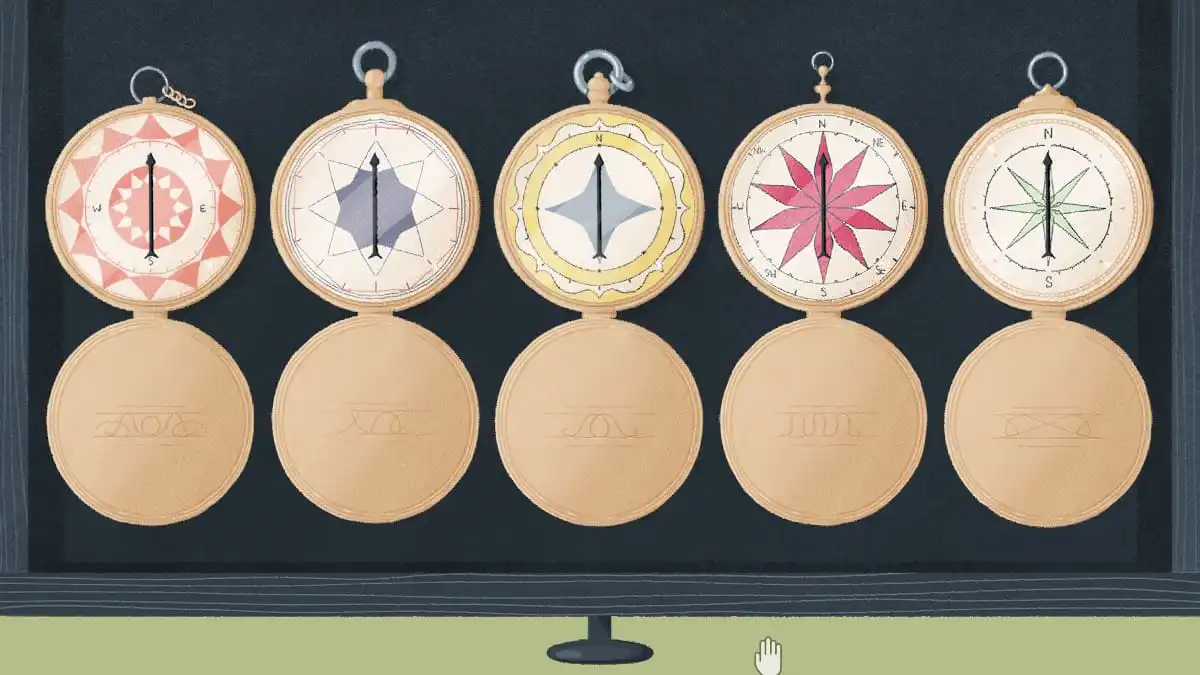
Level 32 is a weird one , as you require to fill out all three solutions in a rowing . The first root is the pocket tongue answer , then the compass , and then the padlocks . You will necessitate to figure out all of these right in a row , or you wo n’t be able-bodied to eat up this level .
Level 32 answers
Since you need to dispatch three dissimilar " chapters " in this level , I have them split up in a way that should make putting all the solution a small easy .
First up , we ’ll make on the pocket knife solution . for make the pocket knife , you require to put the small , pink Triangulum and the minuscule fleeceable trilateral across one another in the midsection . Then line up the two rounded , long piece next to them . It will end up looking like this :
This will spread out up the pocket tongue draftsman . The first tongue puzzler call for you pay attention to the piffling square the bottom of each knife . This is where the toothpick is usually stored in a knife , and one is far to the right , one is a little to the right , one is in the center , and the other two are a little or a lot to the left . Put them in the order below to complete this incision .
Screenshot by Pro Game Guides
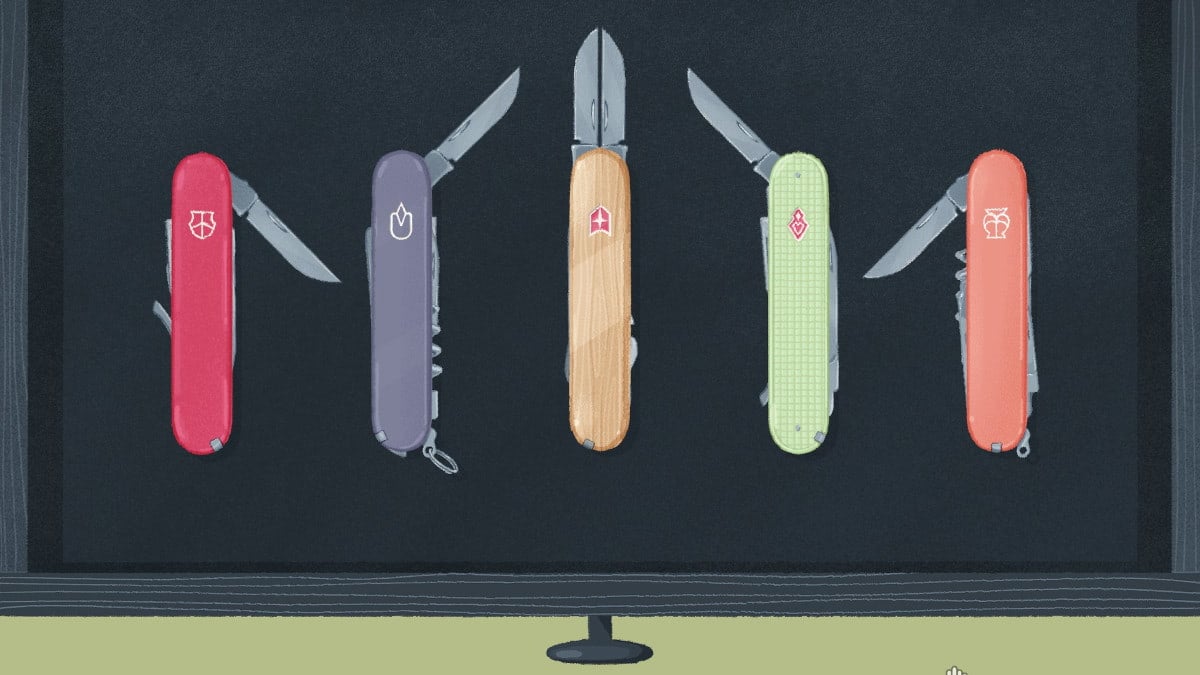
The blades will pop out after you delineate the knives in the previous puzzle . Have all the blade item towards the center to complete this discussion section .
Even more vane will pop out as soon as you finish the puzzle above . These need to be put in an club to that none of the blades overlap . All you have to do is trade the regal and orange knives to complete it .
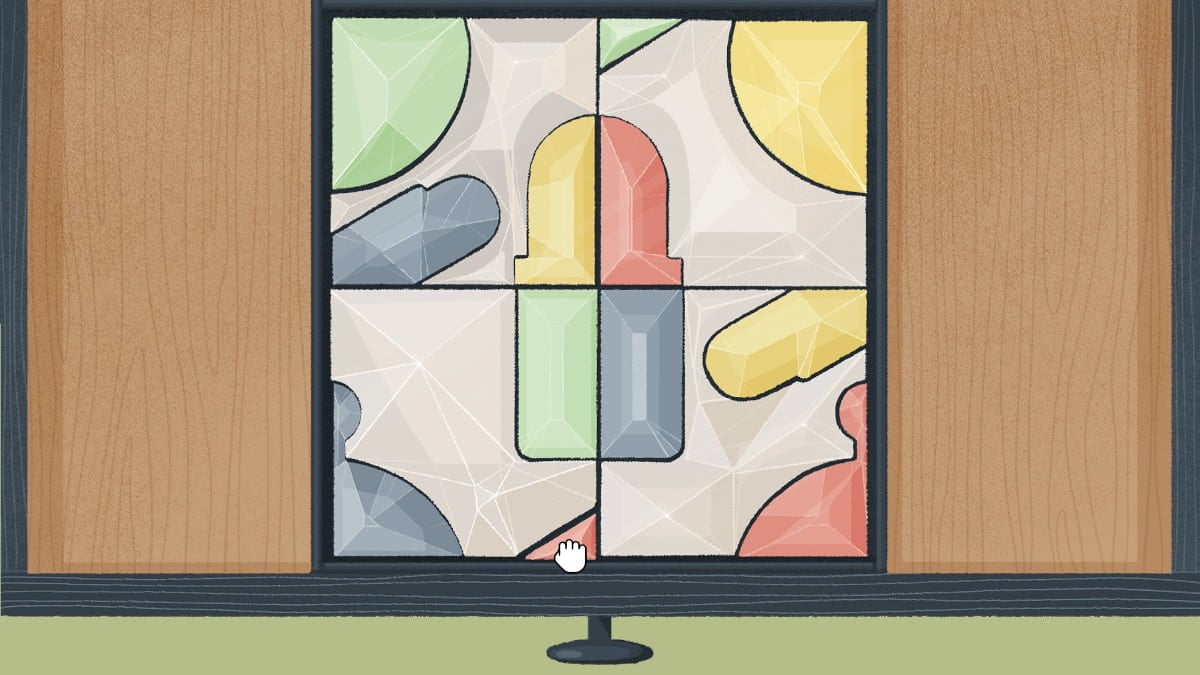
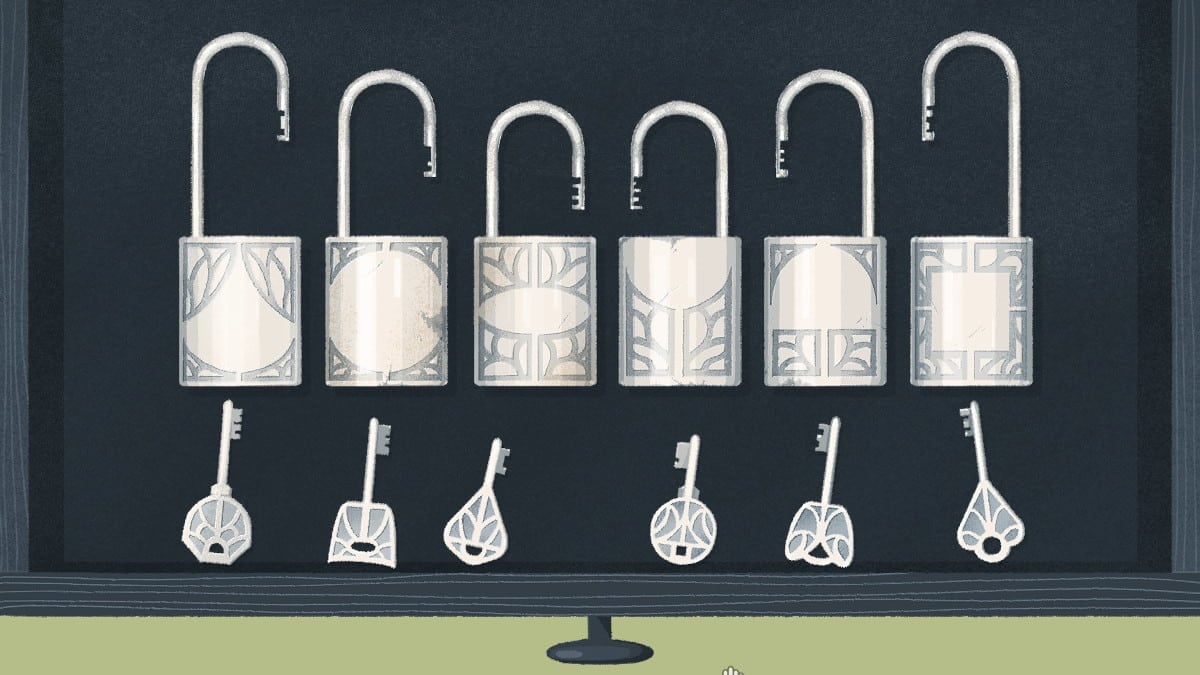
This will reset everything to the original puzzle . Now , make a padlock form in the eye ; it will look like this when fill in :

Screenshot by Pro Game Guides
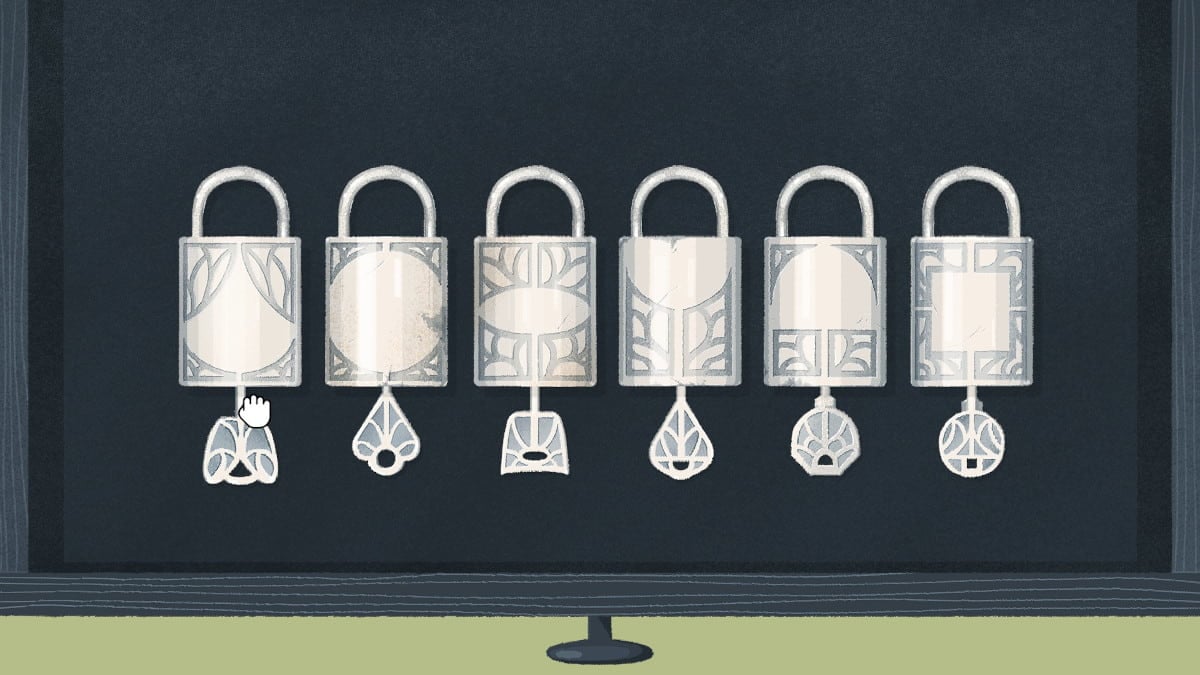
This will launch the padlock draftsman . Each of the keys has a small gob in it ; match the shape of the hole to the shape on the padlock that the negative blank space around the formula makes . The keys go in this order :
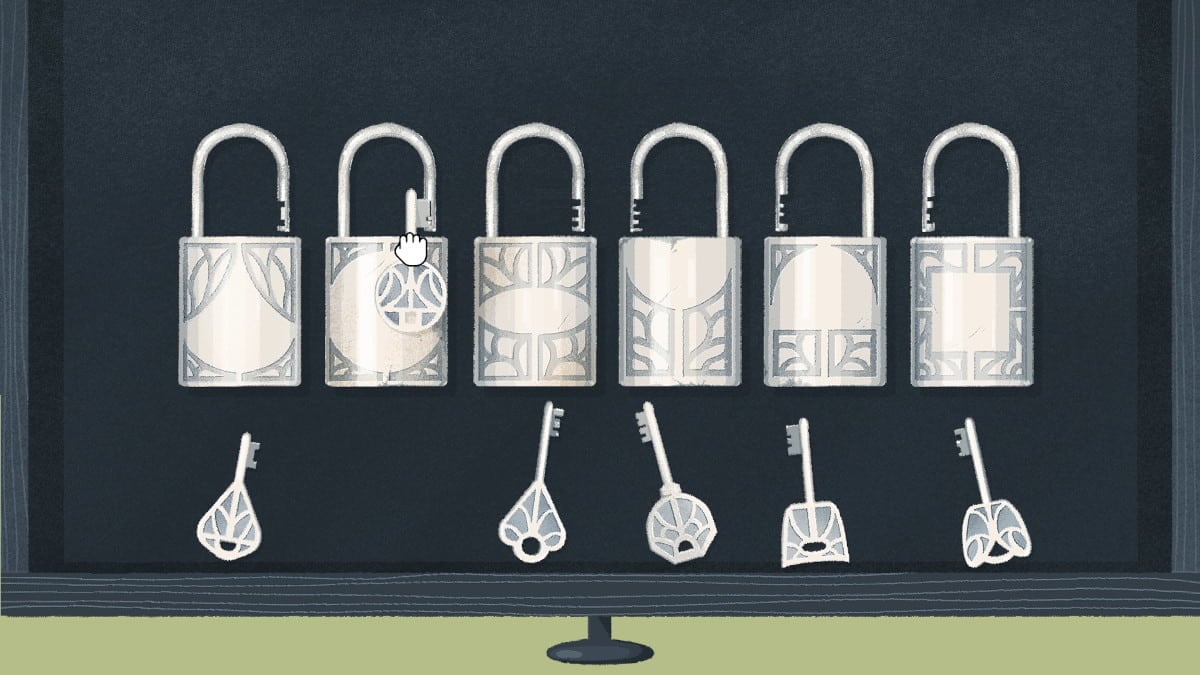
Now that the padlock are subject a little , we can see the pattern that the padlocks have on their bond . mate the pattern on the end of each of the key to the rule on the stem of each padlock .
This will give up the padlock even more . If you look at the padlocks , you ’ll see that the single in the middle have a scant cannon than the ones on either end . Put the inadequate keys in the center , and the long keys on the boundary to equalize up with the long shanks . verify the teeth of the keys are facing the same direction as the orifice in the shank .
Screenshot by Pro Game Guides
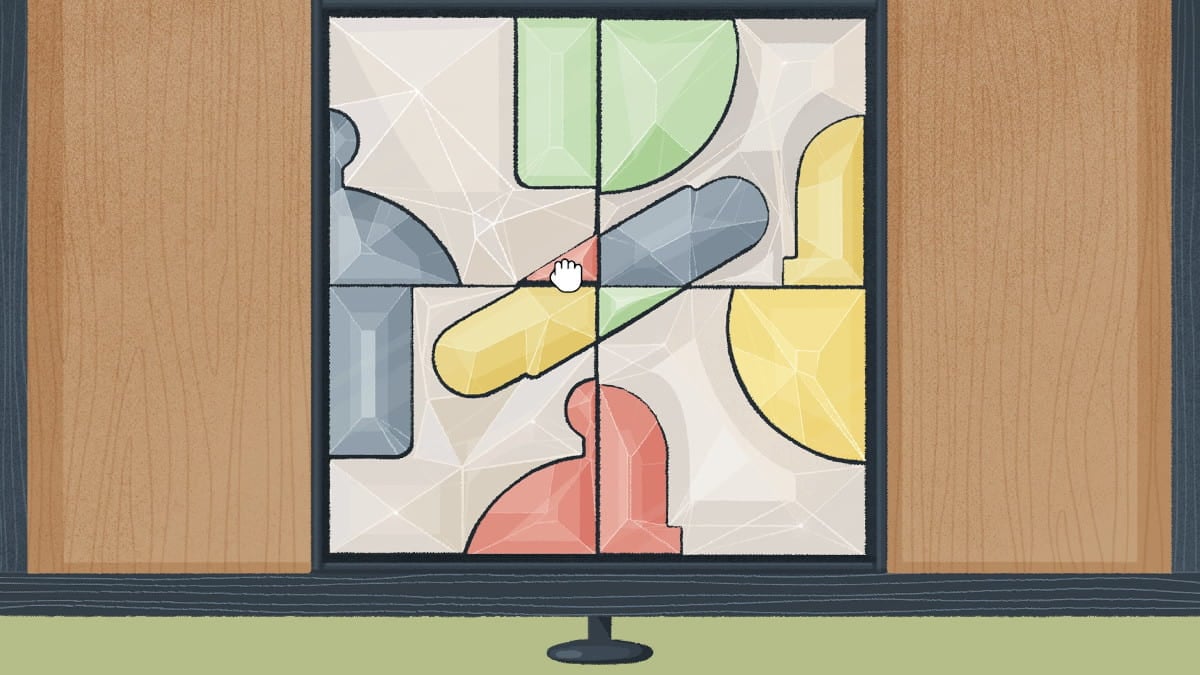
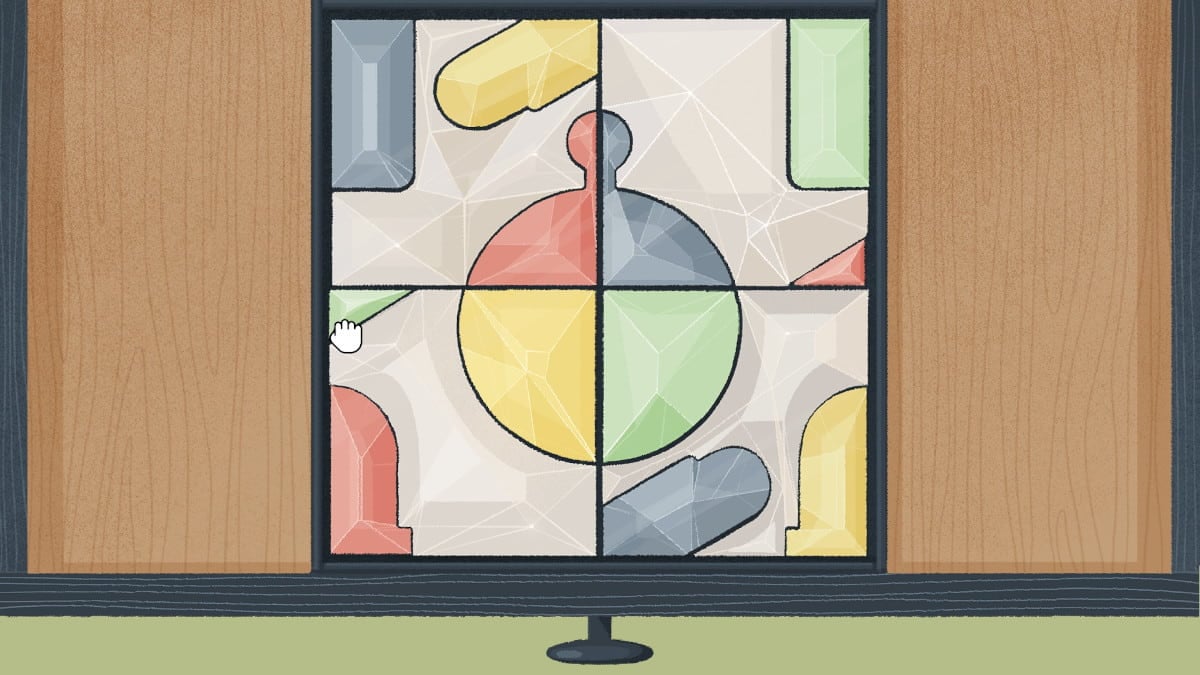
This will open up the glass draftsman again , and you require to put all the rounded pieces of glass in the centre of attention . This will form a compass shape in the centre .
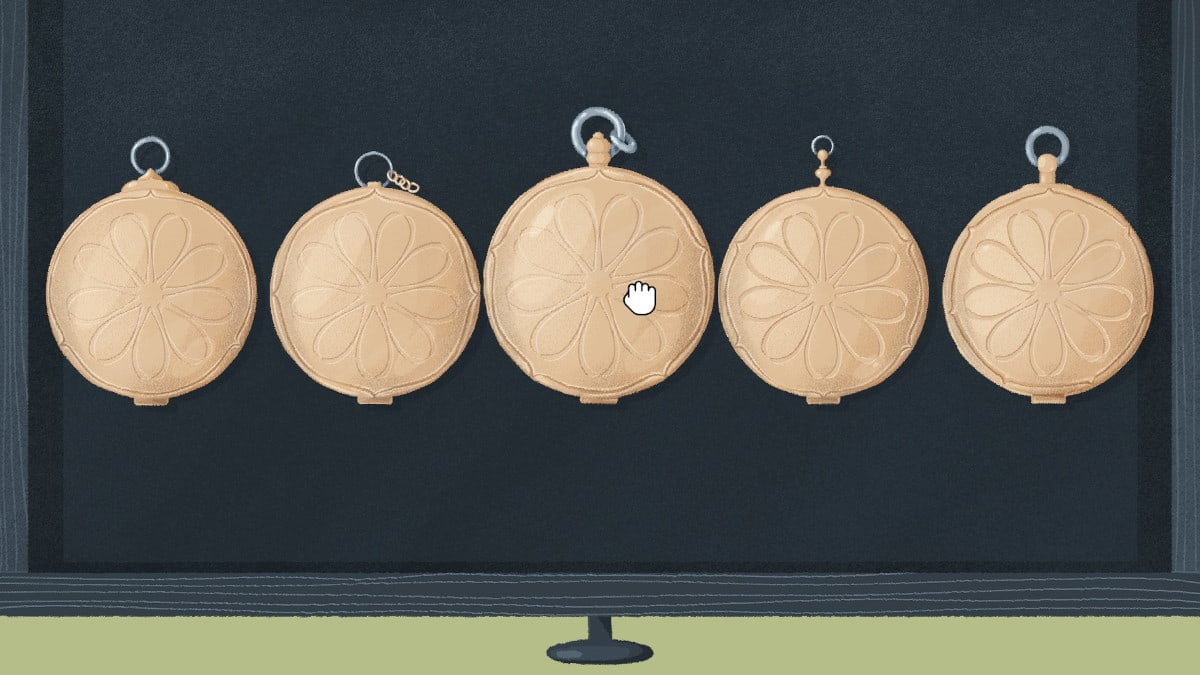
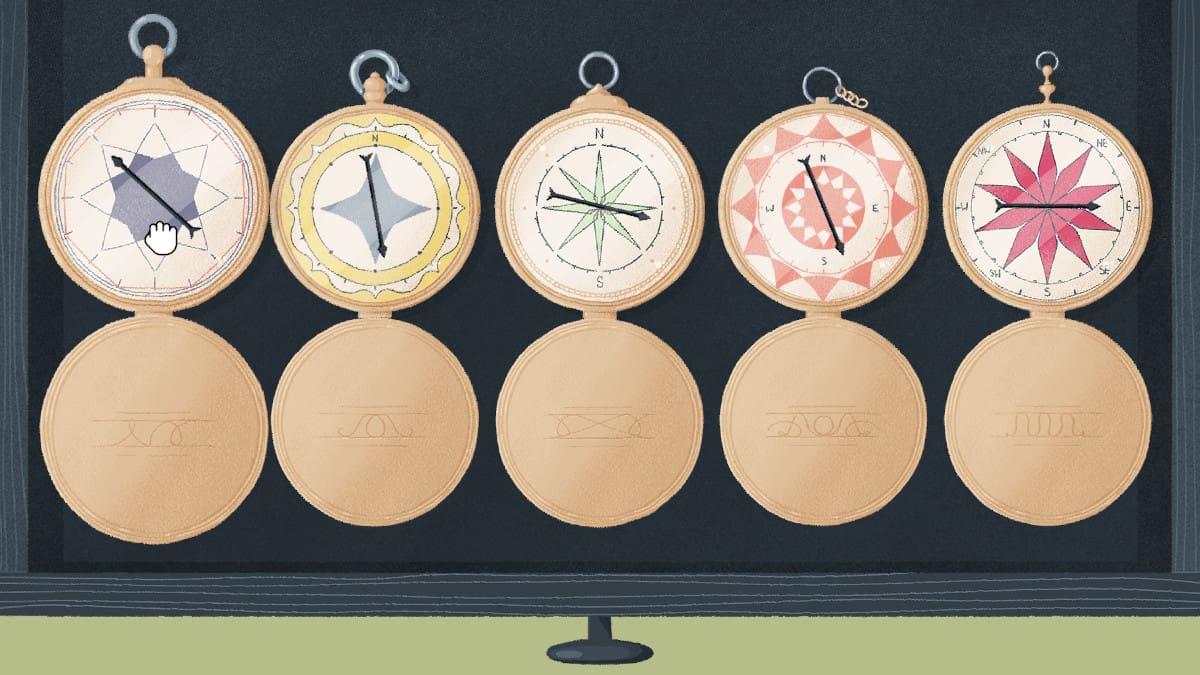
Once the compass figure is made , it will start the range draftsman . Look at the desired edge just inside the edges of the compasses . The first one on the left has three points on the circle . The 2nd has four . Put them in decree of the number of points , as it does in the screenshot below .
After the compass unfold up , put them in parliamentary law of the amount of letters on each of them . The one with no letters goes first , then the one with just an N for magnetic north is 2nd . The middle compass has both an S and an N for North and South , and then the next has all four primal directions . The last ambit on the right has all the cardinal directions and the junior-grade direction as well .
Screenshot by Pro Game Guides
This will start up the phonograph needle spinning in circles . More the compass until the needle are no longer spinning . It will be in this guild :
To get the achievement for this one , called the Dead End Boss Gems achievement , make a nonsensicality combination of the glass . It does n’t matter how ; just put them together in a way that does n’t make anything in the center .
Level 33 hints
This is a reasonably unproblematic puzzle , and it only has one solution . In club to fill in it , you will need to get through three stages , and the cat wo n’t be much help in getting it done .
Level 33 answers
To complete this one , first line the star up in the center where the outline of the star is . Then , when the big cat ’s paw pulls the hotshot out again , pull it back into the center . Then , the true cat paw will wear out the adept ; you will need to put the musical composition back together and move it to the meat .
Bonus Level 1 hints
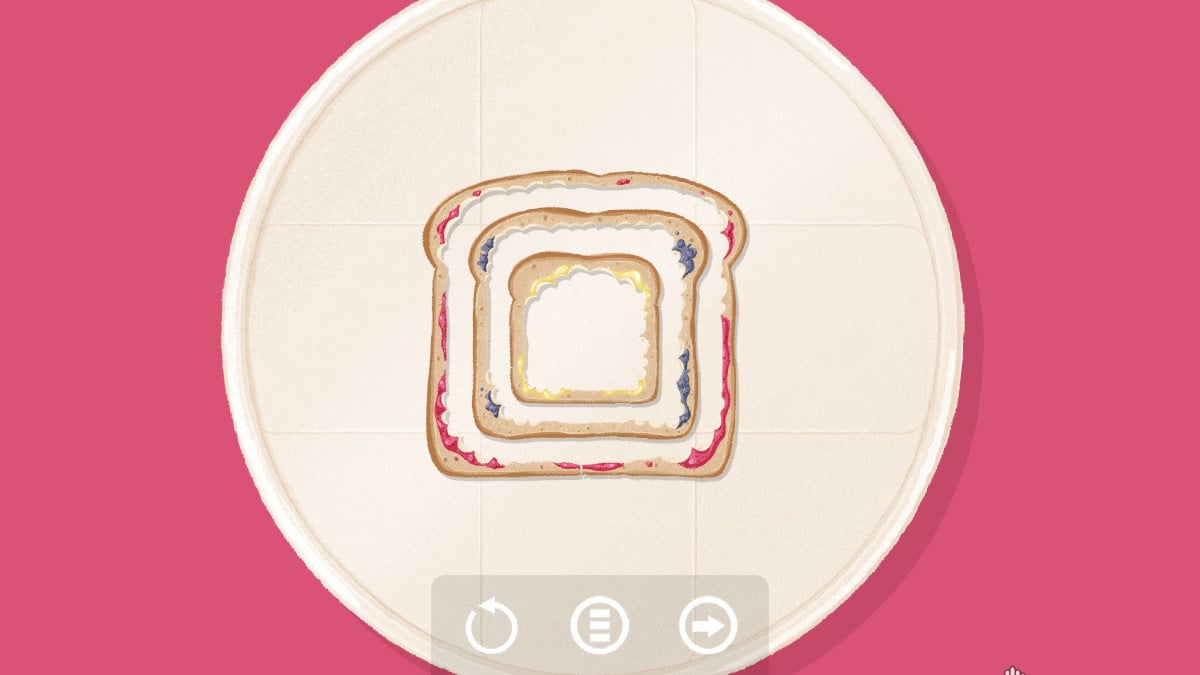
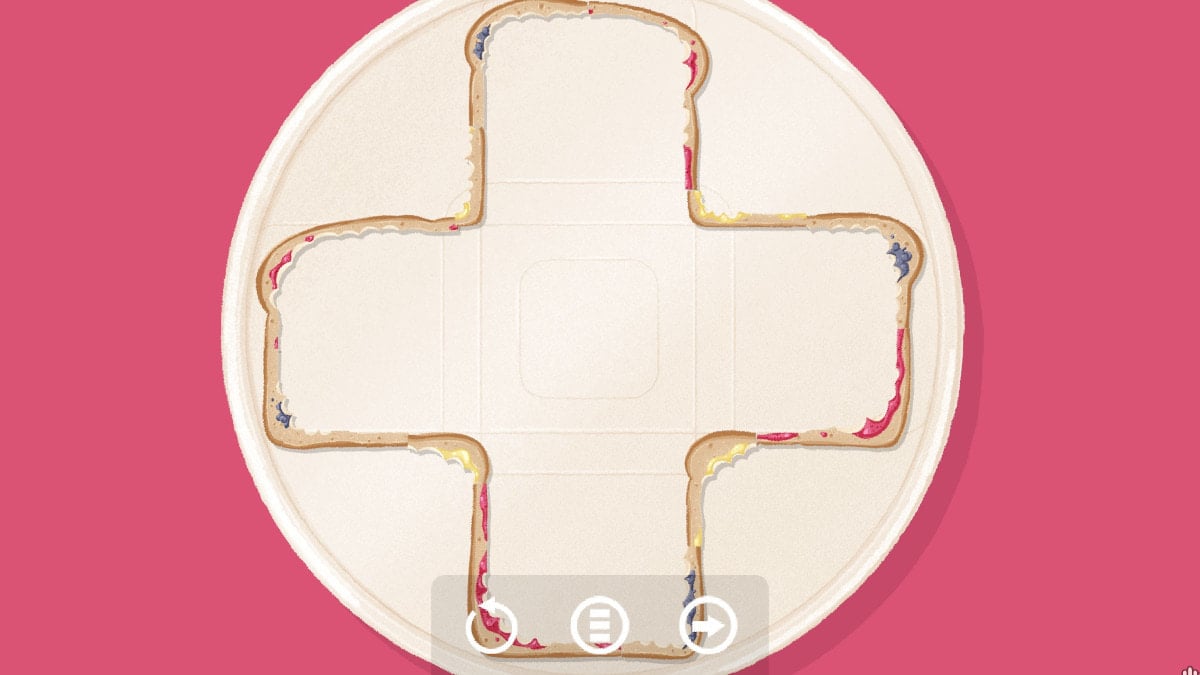
for unlock this bonus storey , you will require to have 50 stars . Once you have completed enough solutions to other puzzles , you will be capable to unlock this one . It gives you several impertinence from some toast , you will need to arrange them in two dissimilar ways to get ahead it .
Bonus Level 1 answers
This one is the easier one ; just line the same size and color toast Earth’s crust with the small , butter goner on the interior , the medium blueberry bush - and - butter toast in the middle , and the large strawberry - and - butter pledge on the outside .
This solution needs you to make a cross on the crustal plate , correspond the line on the home base . It will look like this when completed :
Bonus Level 2 hints
Once you have a total of 60 stars , you’re able to unlock the cupcake level . It has three different solution to finish , and you will call for to think critically about all the objects in the puzzler .
Bonus Level 2 answers
The first solution is all about height . Start with the brusque candle , the shortest icing , and the short melody on the composition . Then go up progressively to the tallest taper , the marvellous icing , and the newspaper without a air on it . Here is the fill in puzzler :
This one is all about match patterns . The first theme on the leftfield has only a few creases in it , the candle has no stripes , and the icing has no extrusion in it . The 2nd to the left wing has a few more crease in the paper , a couple of stripes on the candle , and a few ornamental ridges in the frosting . This goes to the right hand , where the candle has tons of stripes , the paper is filled with creases , and the icing is very bumpy .
The last one is colour matching . Put the orangish candela with the orange paper and the cupcake with the orange sprinkles . The red - and - orange candle goes with the orange - and - red theme and the cupcake with the orangish and red sprinkles . For the two cupcakes that do n’t have sprinkles on them , they have sprinkling inside them , which can be seen if you take the cupcake out of the paper and lift it up .
Screenshot by Pro Game Guides
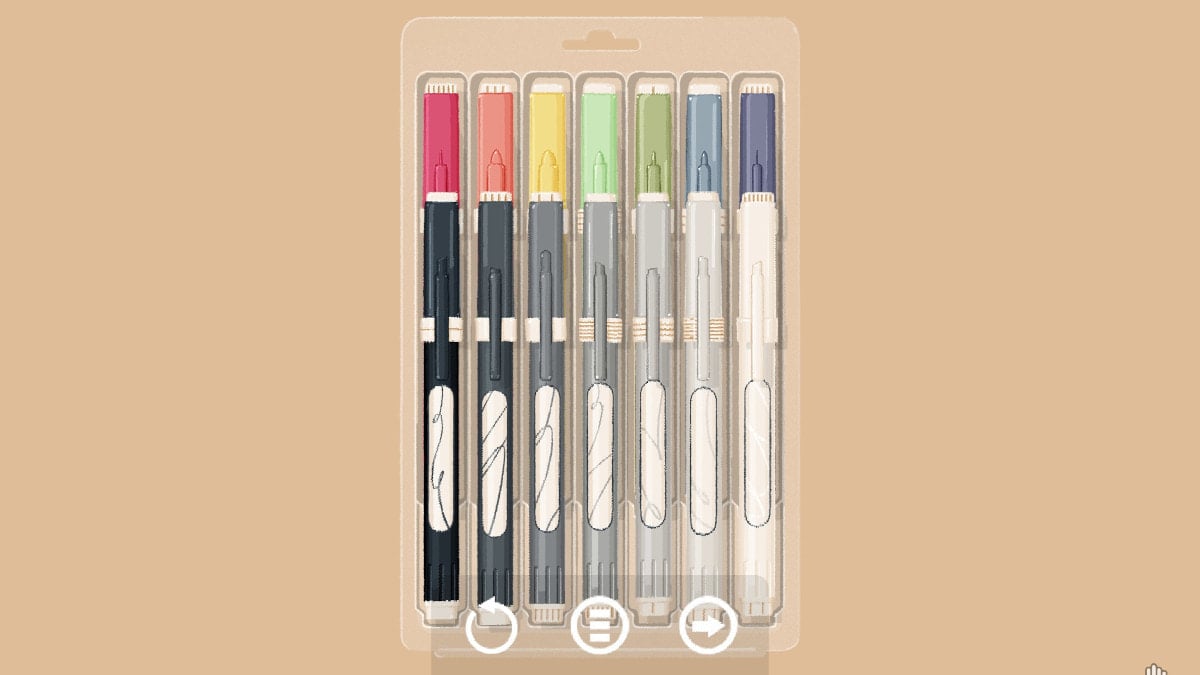
Bonus Level 3 hints
This stratum requires that you have a total of 70 stars . It is filled with markers and marker circus tent , and you need to put them back in their packaging . There are three dissimilar solutions .
Bonus Level 3 answers
To solve this one , you just need to match the colouring material of the lid to the bottom , then put them in rainbow order . For the gray unity , put them in order from clean to darkest .
check the nicks in the top to the nick on the bottom , then match the transmission line on the caps to the lines on the body of the markers . Put them in order of numeral of telephone line or nicks .
Match the condition of the crest or the markers with the oppose picture of the wind on the cap . Put them in order of thinnest to thickest on the top dustup , and then make a pyramid of the angled peak on the bottom .
Screenshot by Pro Game Guides
Bonus Level 4 hints
The 2nd - to - last bonus grade can be unlocked with 90 headliner . This one is replete with all form of whistles in a variety of shapes and color . There are four answers to this one .
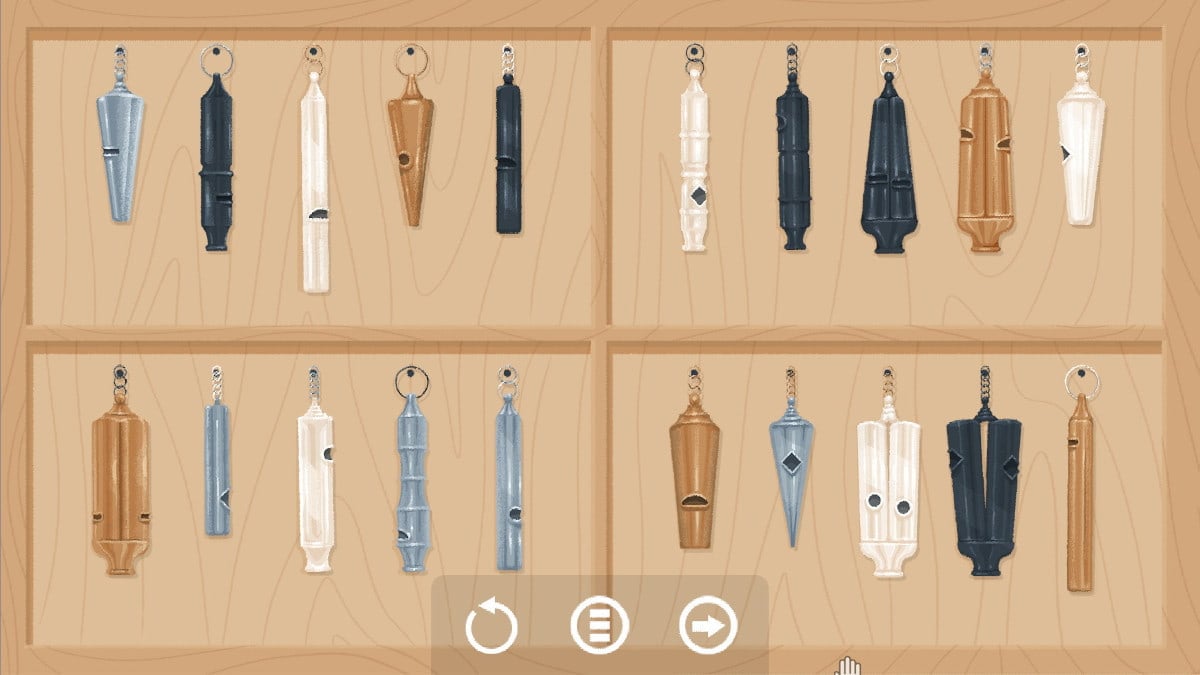
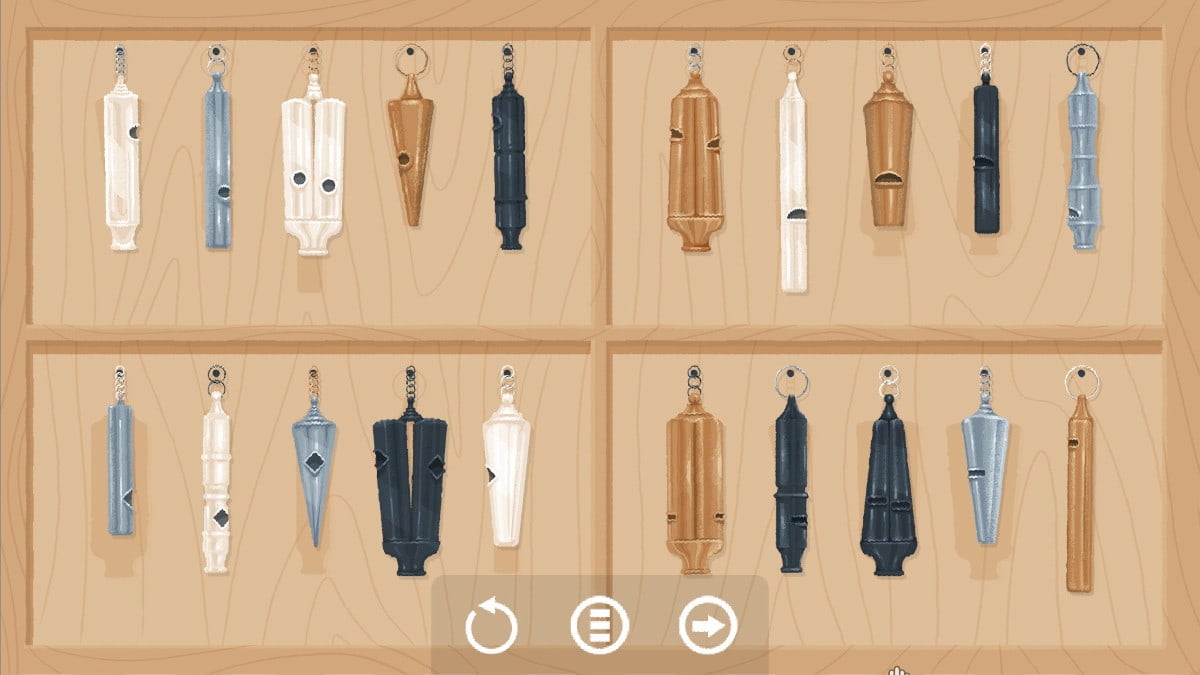
Bonus Level 4 answers
Match the shadows on the back of the boxful to get these in the right order . The wood around each phantasma will be light enough to see if you have put the whistle in the right position .
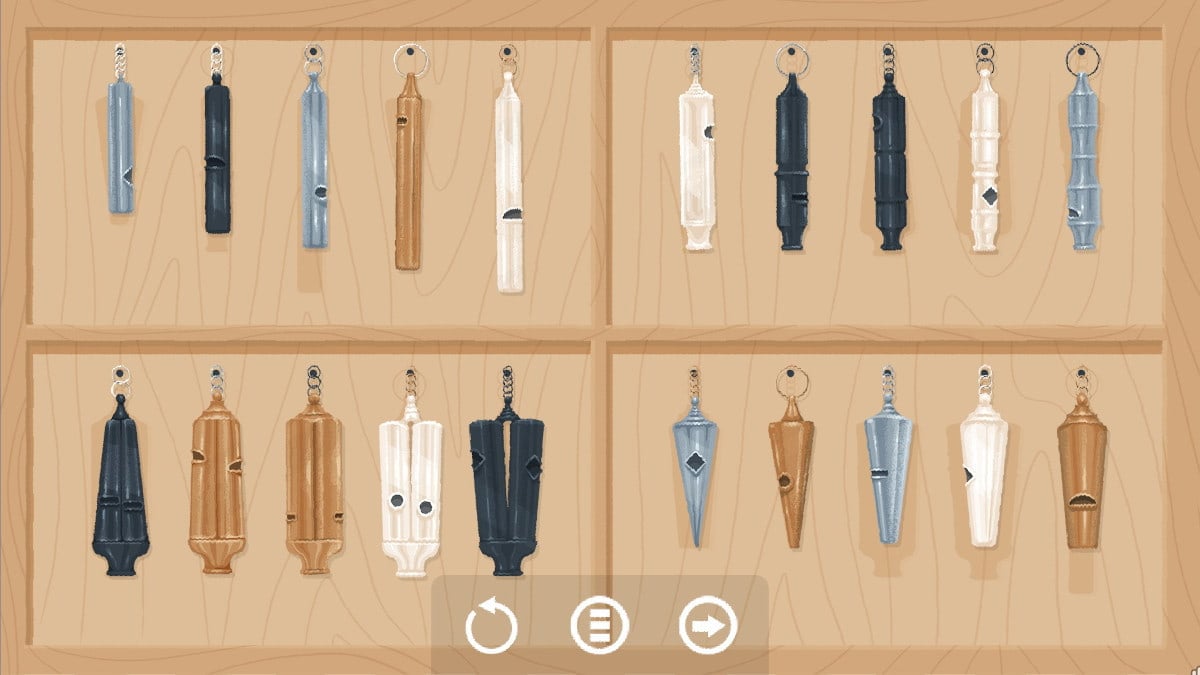
This solution requires you put the whistles in orders of the number of band each has attached to them . Each whistle has either one , two , three , four , or five gang confiscate to it ; put each of the one pack first in each section of the box , then the twos , then threes , then fours , and lastly fives .
This one is a little pickier about where you put the different whistles . verify you put them in this specific Holy Order to complete the colour version of this puzzle :
Screenshot by Pro Game Guides
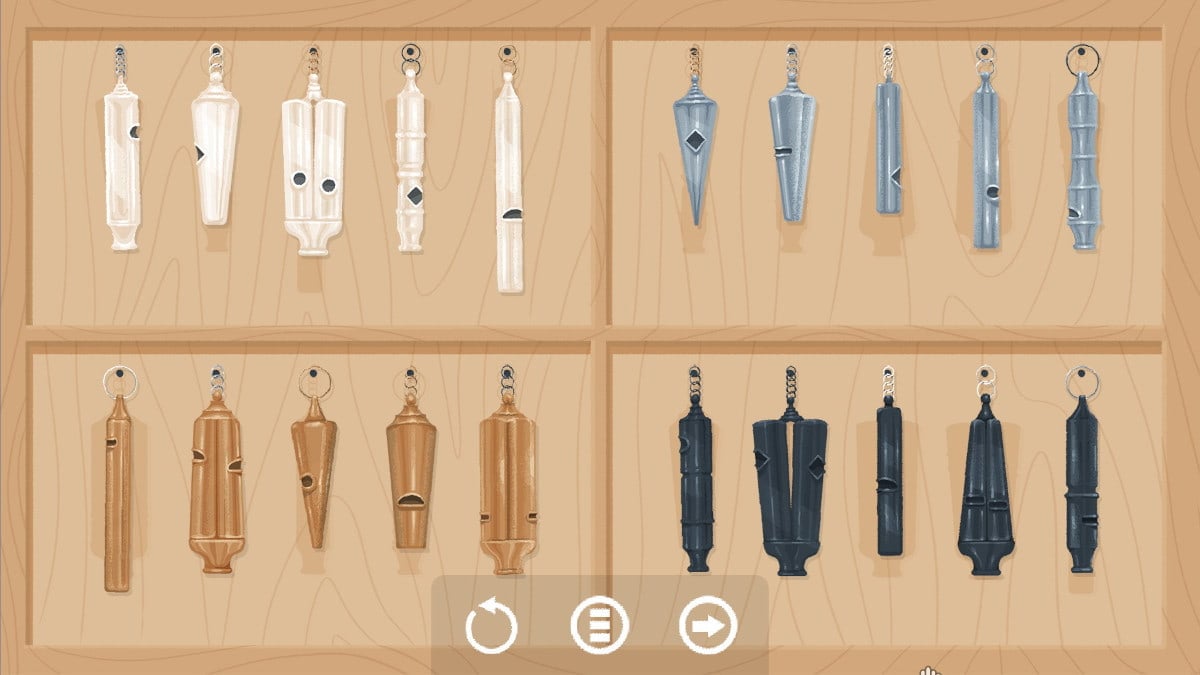
Lastly , line them up in purchase order by shape . The long cylindrical ones go from shortest to tallest . The cylinders with the bumps on them get put in order of the routine of extrusion . The triangular single go from pointiest to least taper , and the two - part pennywhistle go from narrow to widest .
The chassis of the holes is how these are trace up . The first set has a round set of holes , the second has a mouth - shaped set of holes , then diamond form , then orthogonal . Go from rotated to the right , then centered , then rotated to the left in each section .
Bonus Level 5 hints
This is the final unlockable incentive leg , and you postulate 90 total stars to get it . To complete this one , you want to get hold all nine cats in order . Each cat is hidden in an aim in the room , and once the qat join the previous cats , you will move onto the next room .
Bonus Level 5 answers
The first computed axial tomography will be chance in the laundry . Click the laundry basket , and a clean cat will hop out . In the kitchen , click the grocery bags in the lower ripe - hand street corner of the screen . When the quat pops out and you get to the next room , tap the jars on the top ledge to get the third kat . The fourth cat will be in the book on the bookshelf in front of the mirror .
Our 5th cat will be hiding behind the pictorial matter frame of reference of the African tea . phone number six is discover in the basket full of thread . The 7th can be establish behind the lamp shade , and the 8th will be inside the black book on the right side of the screen .
The last of the nine cats will be hide inside the yellow umbrella in the right part of the screen that is hanging on the coating rack . snap the umbrella to finish the level .
Screenshot by Pro Game Guides
A Little to the Left: Seeing Stars all achievements
for 100 % this game , you ’ll need to complete all the solutions to each of the levels . If you do this , you ’ll take care of the first three accomplishment below . All the others require a specific level , and you ’ll have to complete a specific thing to get it done .
For more indie game walkthroughs , check outBotany Manor Walkthrough ( All achievements)on Pro Game Guides .
Screenshot by Pro Game Guides
Screenshot by Pro Game Guides
Screenshot by Pro Game Guides
Screenshot by Pro Game Guides
Screenshot by Pro Game Guides
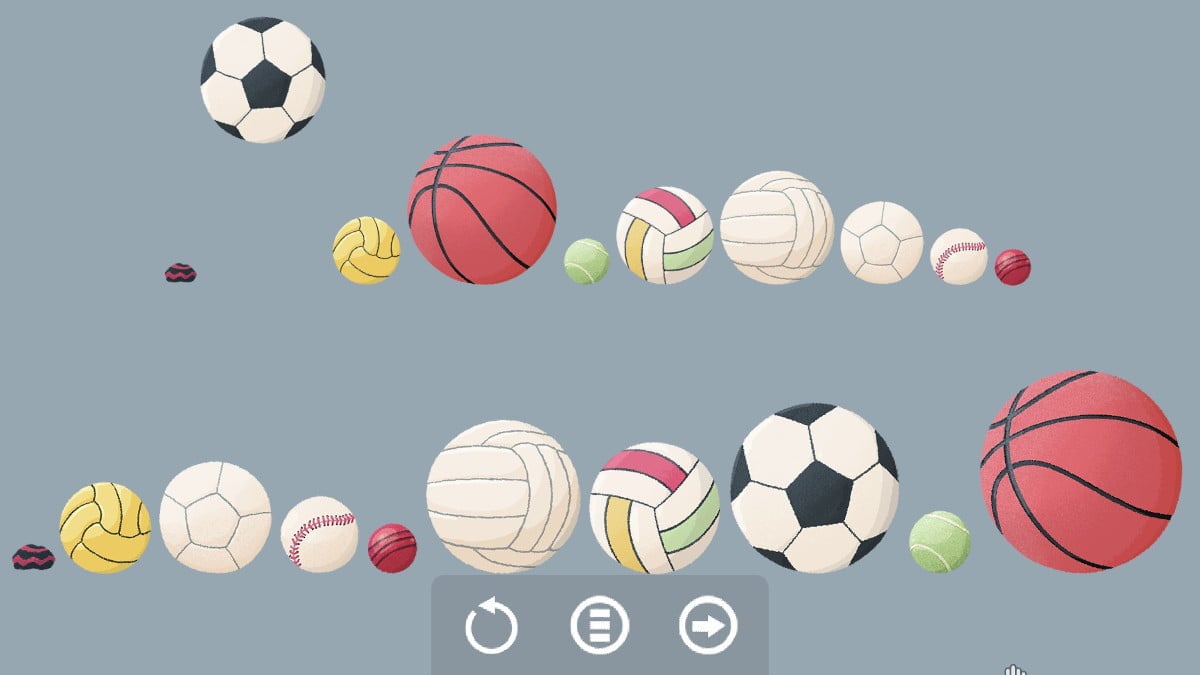
Image by Pro Game Guides
Screenshot by Pro Game Guides
Screenshot by Pro Game Guides
Screenshot by Pro Game Guides
Screenshot by Pro Game Guides
Screenshot by Pro Game Guides

Screenshot by Pro Game Guides
Screenshot by Pro Game Guides

Screenshot by Pro Game Guides
Screenshot by Pro Game Guides
Screenshot by Pro Game Guides
Screenshot by Pro Game Guides

Screenshot by Pro Game Guides
Screenshot by Pro Game Guides
Screenshot by Pro Game Guides
Screenshot by Pro Game Guides
Screenshot by Pro Game Guides
Screenshot by Pro Game Guides
Screenshot by Pro Game Guides
Screenshot by Pro Game Guides
Screenshot by Pro Game Guides
Screenshot by Pro Game Guides
Screenshot by Pro Game Guides
Screenshot by Pro Game Guides
Screenshot by Pro Game Guides
Screenshot by Pro Game Guides
Screenshot by Pro Game Guides
Screenshot by Pro Game Guides
Screenshot by Pro Game Guides
Screenshot by Pro Game Guides
Screenshot by Pro Game Guides
Screenshot by Pro Game Guides

Screenshot by Pro Game Guides
Screenshot by Pro Game Guides
Screenshot by Pro Game Guides

Screenshot by Pro Game Guides
Screenshot by Pro Game Guides
Screenshot by Pro Game Guides
Screenshot by Pro Game Guides
Screenshot by Pro Game Guides

Screenshot by Pro Game Guides
Screenshot by Pro Game Guides
Screenshot by Pro Game Guides
Screenshot by Pro Game Guides
Screenshot by Pro Game Guides
Screenshot by Pro Game Guides
Screenshot by Pro Game Guides
Screenshot by Pro Game Guides
Screenshot by Pro Game Guides
Screenshot by Pro Game Guides
Screenshot by Pro Game Guides
Screenshot by Pro Game Guides
Screenshot by Pro Game Guides
Screenshot by Pro Game Guides
Screenshot by Pro Game Guides
Screenshot by Pro Game Guides
Screenshot by Pro Game Guides
Screenshot by Pro Game Guides
Screenshot by Pro Game Guides
Screenshot by Pro Game Guides
Screenshot by Pro Game Guides
Screenshot by Pro Game Guides
Screenshot by Pro Game Guides
Screenshot by Pro Game Guides
Screenshot by Pro Game Guides
Screenshot by Pro Game Guides
Screenshot by Pro Game Guides
Screenshot by Pro Game Guides
Screenshot by Pro Game Guides
Screenshot by Pro Game Guides
Screenshot by Pro Game Guides

Screenshot by Pro Game Guides

Screenshot by Pro Game Guides
Screenshot by Pro Game Guides
Screenshot by Pro Game Guides

Screenshot by Pro Game Guides

Screenshot by Pro Game Guides

Screenshot by Pro Game Guides
Screenshot by Pro Game Guides

Screenshot by Pro Game Guides
Screenshot by Pro Game Guides
Screenshot by Pro Game Guides

Screenshot by Pro Game Guides
Screenshot by Pro Game Guides
Screenshot by Pro Game Guides
Screenshot by Pro Game Guides
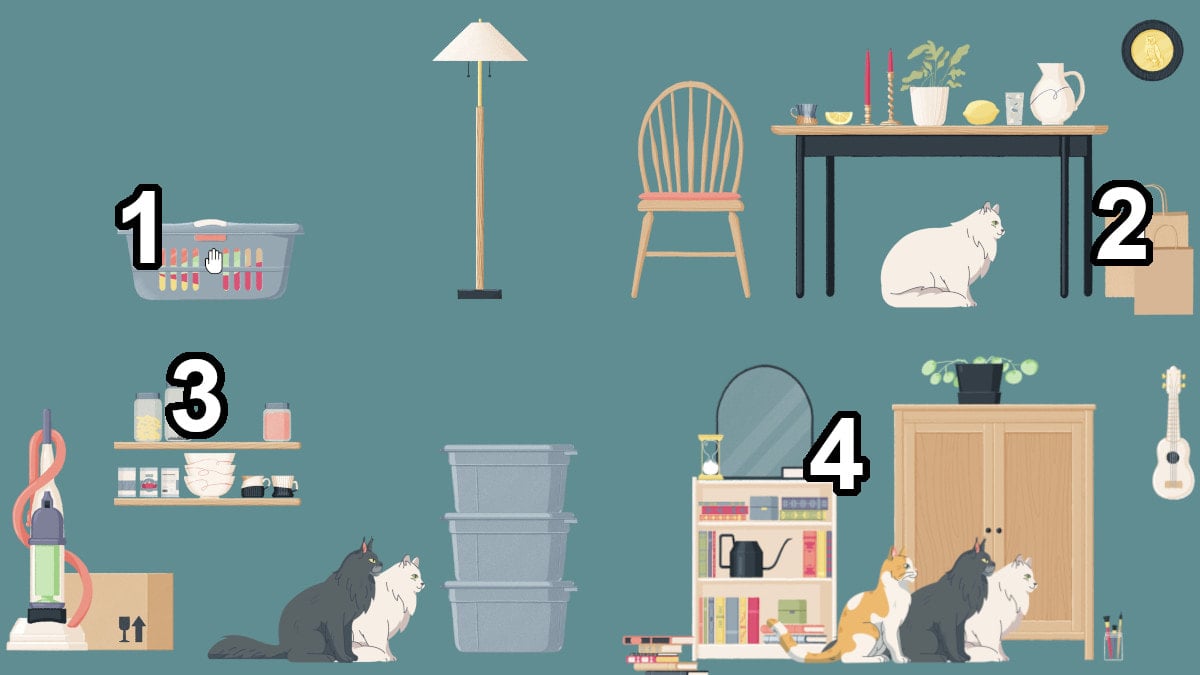
Image by Pro Game Guides
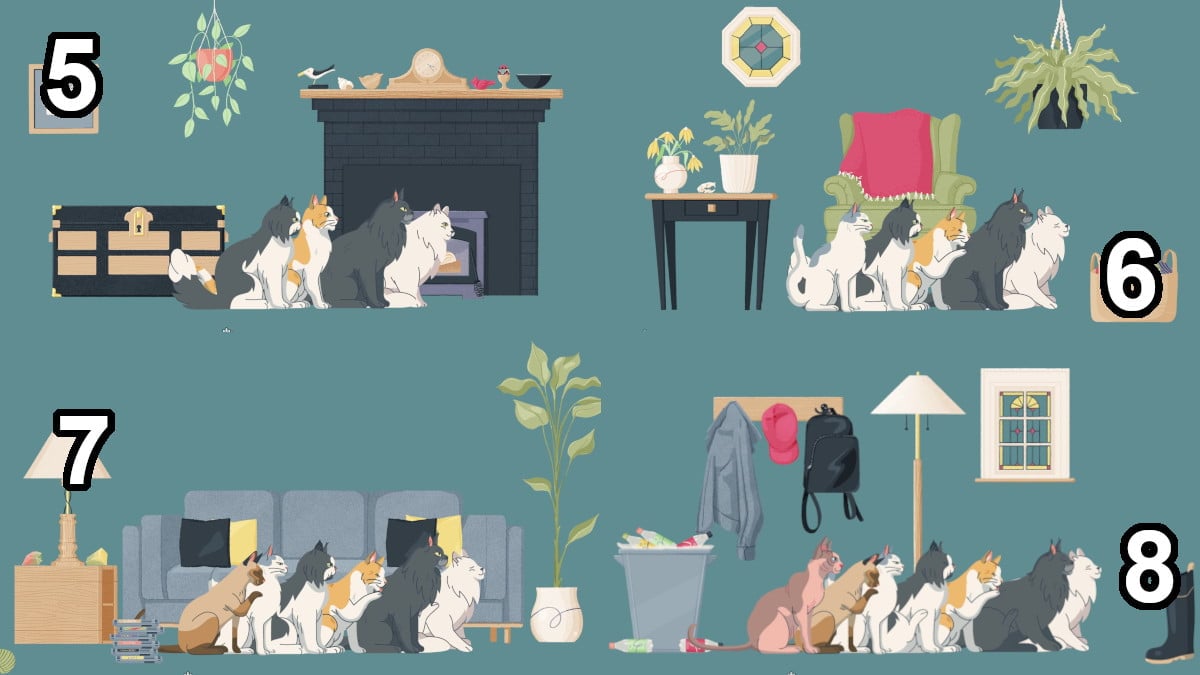
Image by Pro Game Guides
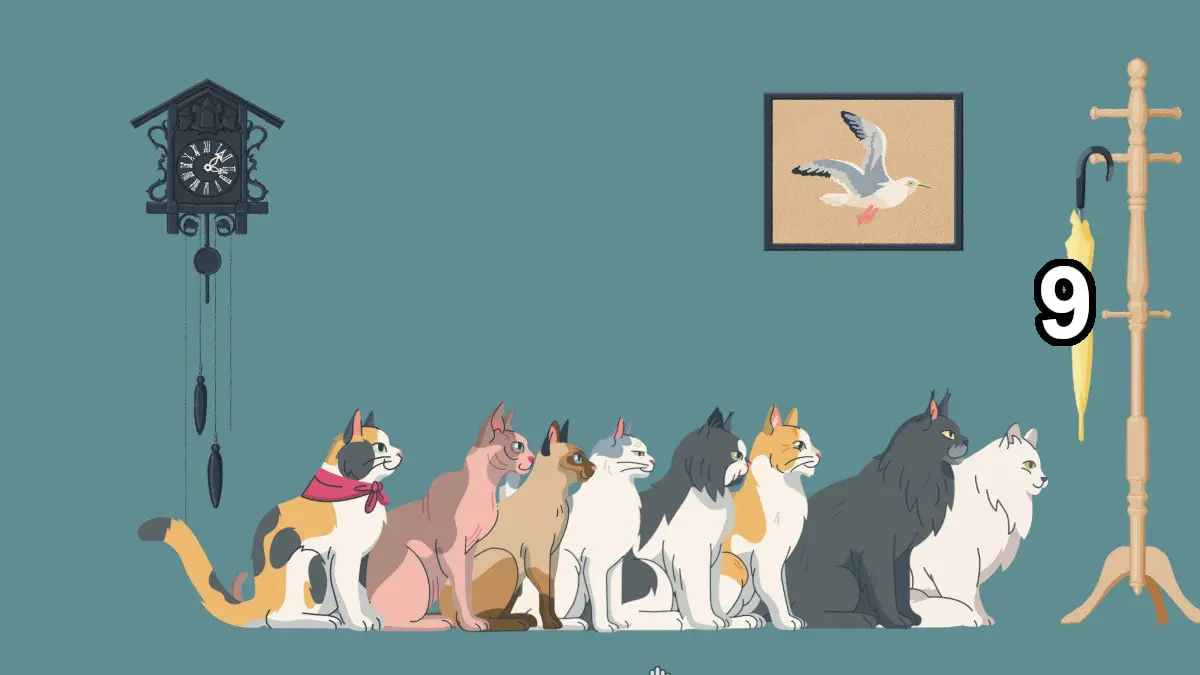
Image by Pro Game Guides
