Let ’s get Richard out of here !
If you fuck solving puzzle and digital escape rooms , 50 Tiny room is an excellent game to download . While the rooms may be tiny , some puzzles are diabolically tough , so read on for my full walkthrough of Act 3 below if you ask some hint .
50 Tiny Room Escape Walkthrough - Act 3
After helping Peter through the first 10 rooms in Act 1 , and Camilla through the next 10 in Act 2 , we ’re now tasked with helping Richard to lam in Act 3 . My walkthrough below will coverall the room from 21 - 30 . If you ’re seek to stupefy rooms in the beginning in the secret plan , or else check out :
Room Level 21: Midnight
collectable :
Click thebarrel(a1 ) to knock it over and once it has fallen over , dawn it again for a close - up . you’re able to now click the end of the bbl to make the liquid inside pour onto the floor . Pick up theKeythat come out with it .
Use the key on the glass case in the same finish - up ( a2 ) to open it . Take aGunfrom the righthand side of the storage locker . Now click the glassful door double to slide them to the polar side and take aRocketfrom the lefthand side .

Look at the whiteboard and work out the number that is missing in the sequence . The design here is that each number below is made up of add together each pair of numbers above it . This mean that we have to add 6 + 5 ( 11 ) and 6 + 2 ( 8) , meaning the escape number is118 .
Use this computer code to remove the padlock on the closet next to the barred gate ( b1 ) and then launch the cupboard doors to find asecond Rocketand a rifleMagazine . You ’ll get athird Rocketon the barred logic gate ( b2 ) .
Remove the curtain cover the threshold and take afourth Rocketfrom the box of grenade just to the right of the threshold ( b3 ) . face through the arm time slot to the right of this threshold ( above the reddened Out Of Order signboard , b4 ) and note the phone number on the mansion from front to back ( 90 , 20 , 60 , 20 , 20 ) .

Screenshot by Pro Game Guides
Select the wireless in the curtained elbow room ( c1 ) and penetrate the circular dial on either side to move the marker exit and good to those bit ( to do 20 the final time , just click the left telephone dial again ) . The top will open up up , allowing you to take afifth Rocket .
Add the mag to the gun in your inventory and use the load rifle on the gun slot opposite the out - of - order one ( it says postulate a Gun underneath it ) . trifle the miniskirt - plot ( it does n’t count how you do ) and then pile up asixth Rocketand twoMuseum Coinsfrom the drawer that opens underneath the gun slot ( c2 ) .
utilise one of the coins in the prize automobile in the elbow room behind the drape to get aseventh rocket salad , and then use the other coin on the binoculars ( a3 ) . If you try them now they ’ll tell you a organisation of missiles must be launched . Look at the map below the whiteboard ( a4 ) and click the sections to rearrange them and make a complete man mathematical function . You ’ll know it ’s thoroughgoing when the locations turn red ( c3 ) . Drag a skyrocket onto each ruddy dot on the mathematical function , and the mapping will open up . Take theDoor Handlefrom within .
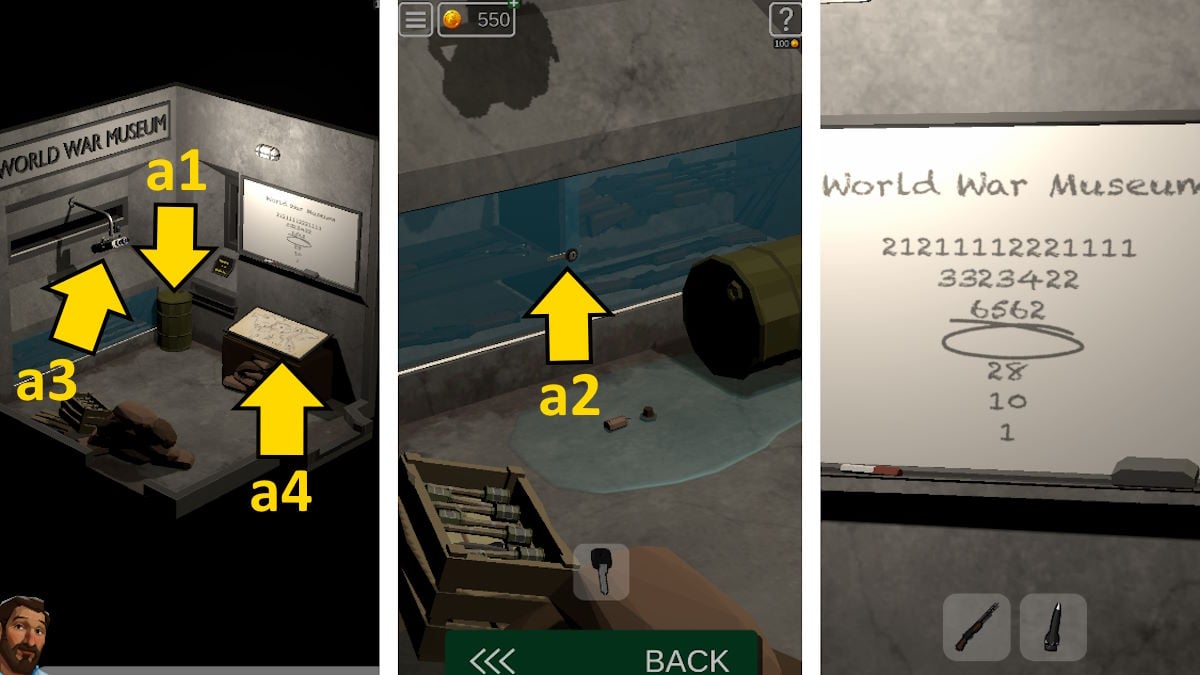
Image by Pro Game Guides
Look through the binoculars and you ’ll see a show showing the second world war ’s date , 1939 to 1945 . typewrite this into the keypad of the door ( b5 ) as a codification ( 19391945 ) , add the door whorl , and you ’ll have completed the level .
Room Level 22: Anvil
Take theLadlefrom the trading floor next to the furnace ( d1 ) and also pick apart over the shield next to it to see its pattern side . take hold of theTongsfrom the table ( d2 ) ; then select the corner on the ledge above ( d3 ) and click the claps in the following edict ( if the clasp on the left is 1 and the one on the right 5 ) to open up it:3 and then 4 . Take theMetal Ingotfrom inside .
cluck the boxful next to the door ( d4 ) for a closing - up and set the red levers as pictured above , matching the layout of items on the mesa where you got the pair of tongs . you could now open up the box and take aKey . Focus on the pulley next ( d5 ) , arranging them so that the height of each rope match the shield with the matching symbol ’s proportional position in the room . From highest to lowest :
This opens the mouth of the bod on the chimney ( e1 ) , allowing you to click its mouth and find aCrucible . you could also unfold the box next to the furnace ( d6 ) with the key and take theAxe Handlefrom inside .
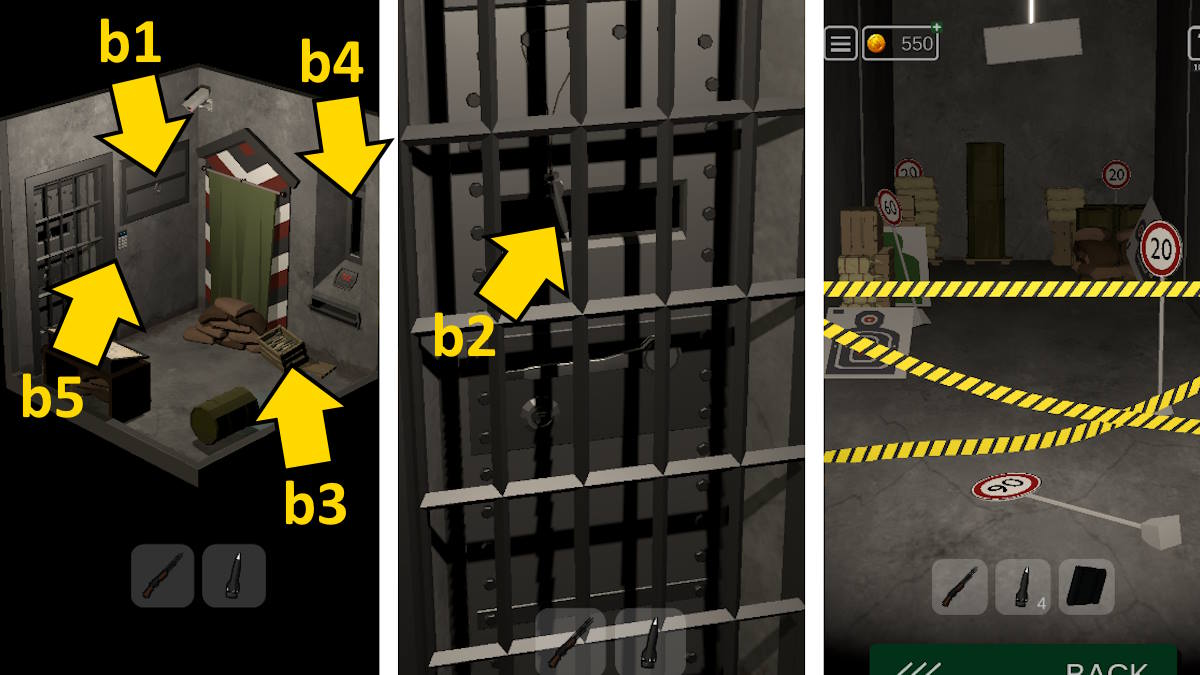
Image by Pro Game Guides
pick out the furnace and place the crucible on it ( e2 ) . Put the ingot into it and then use the bellows ( e3 ) to ignite the fervency and melt the ingot . Use the tongs to find fault up the melting pot to get theTongs with Crucible , and use that on the mold on the mesa ( d7 ) . Now use the ladle on the tub of water next to the furnace ( d8 ) to get aLadle with Waterand use that on the mold to chill it .
tick the cooled mould twice to pick up theAxe Bladeand blend it with the handgrip in your inventory to make anUnsharpened Axe . apply this on the sharpening cycle ( e4 ) to make anAxe , and use the axe on the wooden plank barring the room access to remove it . you could now fall into place the door to complete the level .
Room Level 23: Antiquity
Pick up theTorchfrom the tabular array ( f1 ) and take theShovelfrom the green box on the trading floor ( f2 ) . habituate the shovel on the sand the green box is sitting on to find aGizmo , and then apply it on the sand at the foundation of the burning brasier ( f3 ) to find oneself aPickaxe . Use the brasier to light the torch .
search at the wall of jars and take theCapfrom the only one that has a palpebra on it ( third row down on the right , f4 ) . Take asecond Gizmofrom inside the same jar . As you look for the jars , note which ones ( on the second and third rows ) have figure on them of burning torches .
illuminate the bowls on the board with your common mullein that matches this pattern ( top odd , top rightfulness , bottom leftfield - see above ) . A tablet will come out behind the bowls , along with athird Gizmo .
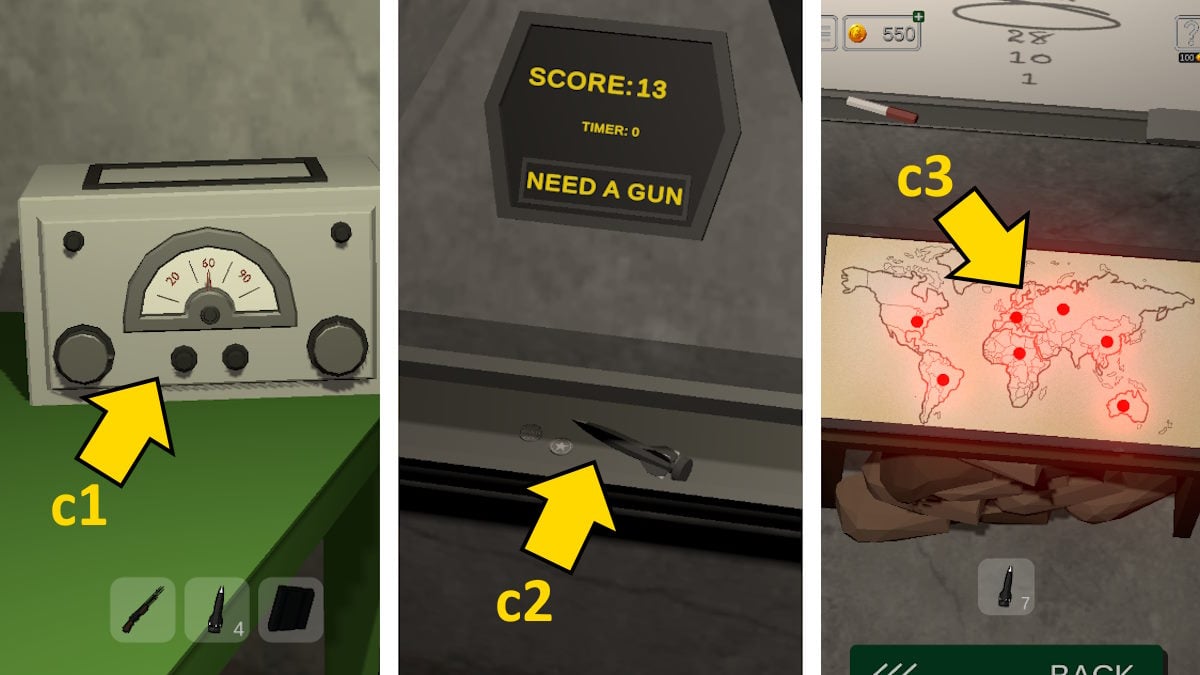
Image by Pro Game Guides
You ’ll observe the tablet that appeared catch the scratchy floorplan of the room , and ecstasy note the spot . Use the pickaxe on this floor roofing tile ( see above ) to reveal aScarab Partyou can pick up . you’re able to also twist the tablet around to find an picture ofa pyramid with numbered sectionson the back . This is an addition puzzle , where each number is the sum of the two below it . This means the number that would be at the top of the p[pyramid ( below the centre ) would be108 .
Look on the right side of the board ( pictured above ) to get hold the same eye symbol and go into 108 into the numbered box below it . If you look at the bottom of the pot in the top - right corner you ’ll find a similar addition teaser on the bottom ( see below ) , next to anankh symbol . Than answer to this one is126and you ’ll line up the place to input it at the opposite end of the table . Once both code are recruit right , the grill on the front of the board will open , allowing you to take afourth Gizmo .
Each of the contrivance has an image on it that twin one on the wall above the brasier . observe their comparative positions in terminal figure of top or bottom row , and left or right . Turn around and place the four whatsis into the door in those position :
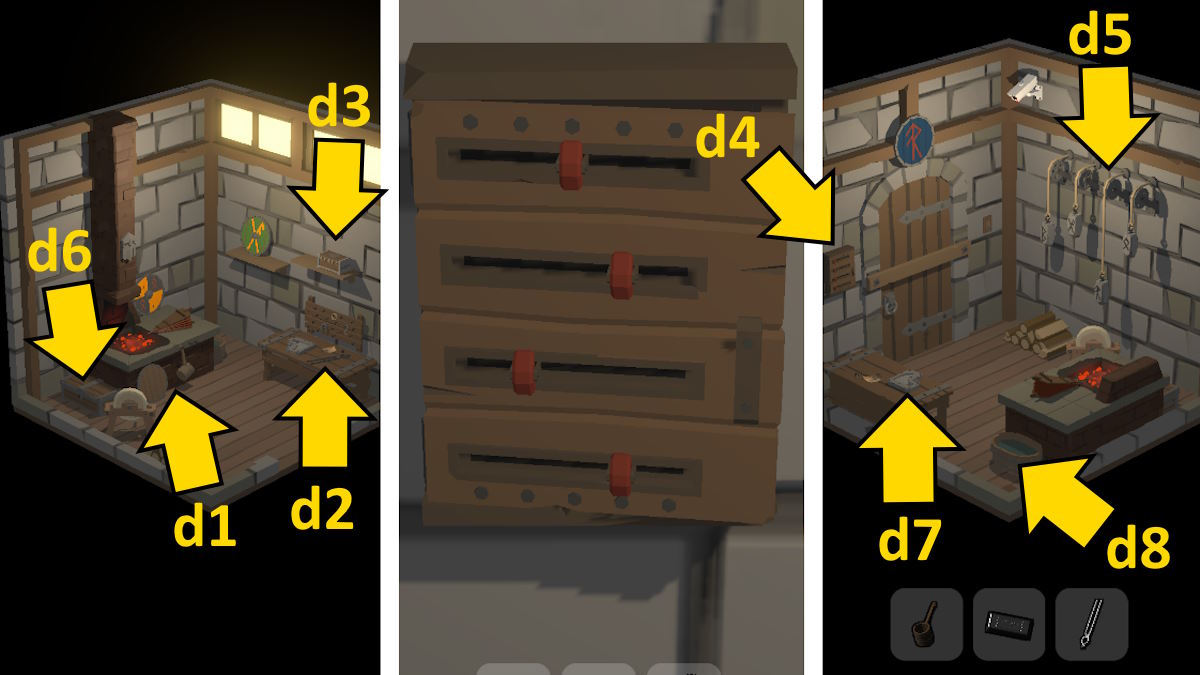
Image by Pro Game Guides
The central doorway rule is now unlocked , so click it for a closemouthed - up andrearrange the patternas you ’ll see fancy above . Once all over , add the scarab partto complete the spirit level .
Room Level 24: Outlaw
Start by selecting the desk and shelves ( g1 ) where you’re able to collect aRamrod , while also noting the route to the cristal on the gem map . Click the globe ( g2 ) next for a finis - up and click the rings until it all matches up ( see below for the solution ) . When you hear a click , open it to receive aCompass . you could also root for the stopple on the barrel to spill the oil .
Add the compass to the chest ( g3 ) and then enter the direction you saw on the single-valued function , which are : N , SE , E , NW , N. Take theKeyandLighterfrom the chest . Use the key to launch the closet ( g4 ) and take theKnifestuck in the inside of the door . Now sink in the buttons on the showing in the wardrobe to show the following : red bandana , bearded skull , cutlass , and telescope . This spread the drawer below , allowing you to take theHammer .
Use the pound to unlock the roulette wheel on the bandstand ( g5 ) and take theWheel . Add the steering wheel to the cannon ( g6 ) and then click it twice once it is erect to aim it at the door . This also locomote it off off a hatch in the earth which you’re able to now get at to discover aCannonballandGunpowder .
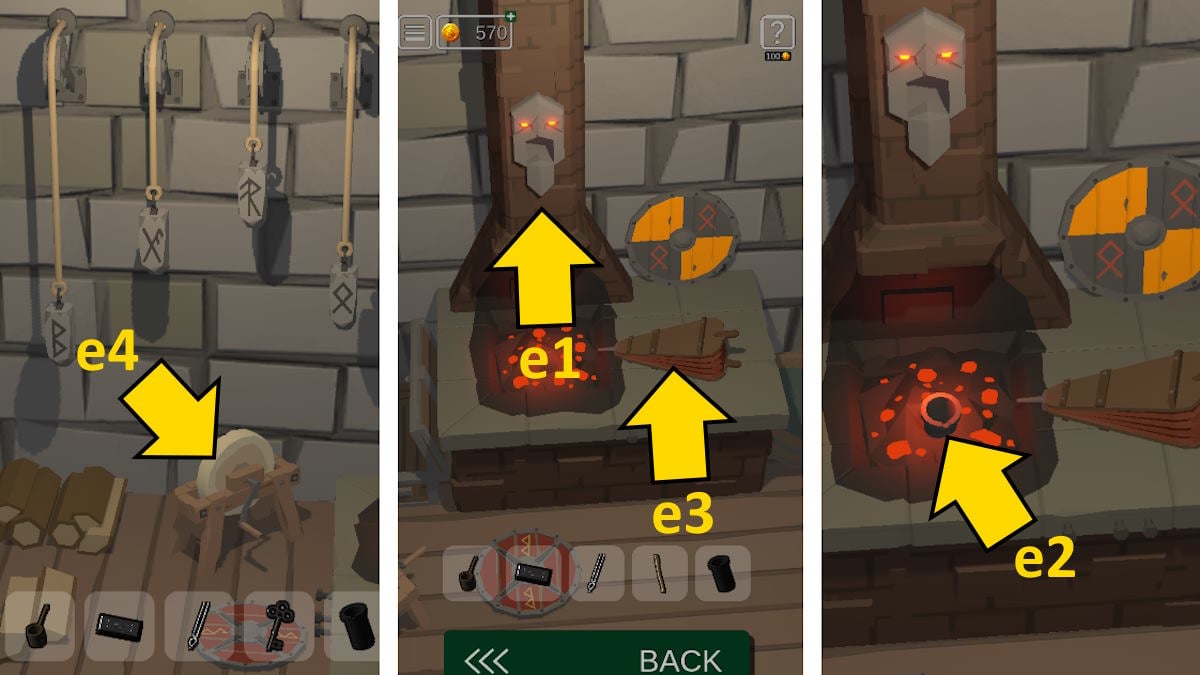
Image by Pro Game Guides
utilize the knife on the strand of the bell shape ( g7 ) to get someRope , and then use that on the oil slick to create aWick . Select the front of the carom for a finis - up and summate the powder , habituate the ramrod , and then add the cannonball . Now choose the back of the cannon , add the taper , light it with the lighter , and make your own exit from the level .
Room Level 25: Fright
turn back the bottom left draftsman of the desk ( h1 ) to chance the formulaA+B+C+D+E=25 . If you examine the ampule above the desk you ’ll find A contains 8 and atomic number 99 contains 3 , while an unnoted vial has 5 . you may also foot B up off the desk to find it contains 6 . Vial D is on the second draftsman on the right of the desk , but has spill . We can dare the overlooked vial is C and that the spilled vial had 3 , leaving us : A8 , B6 , C5 , D3 , E3 . This code ( 86533 ) opens the logic gate that ’s stopping you get to the coffin ( h2 ) .
Select the painting above the desk ( h3 ) next and conform the movable pieces of the shape until the eyes light up on the oral sex at the top ( see image below ) . you’re able to now spread out the frame and get hold a safe . You ’ll find the blueprint you need to figure out this by attend out of the window at the soma of the archway . When it open , take theCoffinfrom within .
start the plate cupboard ( h4 ) and arrange the plates so that the symbolic representation match those on the large coffin behind the locked gate and the modest one in our inventory . Once complete the bottom - right drawer will unlock , so take theGizmo . Add this to the modest coffin in your inventory and it will open , grant you to take aKey .
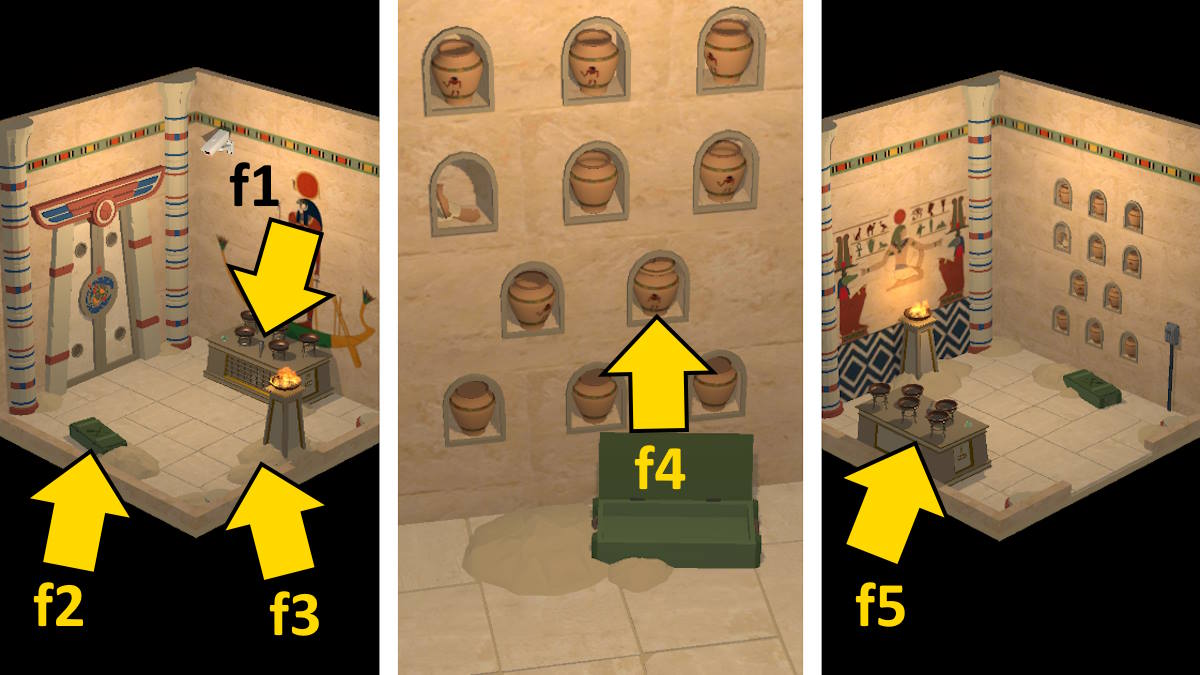
Image by Pro Game Guides
you may also open up the bottom - left draftsman of this storage locker ( punctuate below ) by noting the discussion section of pumpkin around the elbow room that are n’t lit up , starting with the one on the magnetic pole ( with the red-faced arrow on it ) and checking them clockwise around the way . The unlit section correspond to the four buttons just above the pumpkin under the cupboard . Press them in the next order :
you’re able to now enter the drawer next to the buttons and take aFlashlight . cull up the book on the floor by the toilet ( h5 ) on the right under the windowpane , open it , and utilize the flashlight on it to see a pattern . Now get a last - up of the feces on the left of the windowpane ( h6 ) . The six parts of its shock routine as buttons . iron out the sections in the rescript portray in the Good Book :
The shock will open up , allowing you to take aMallet . Use the key to spread out the chest between the two stools to find aStake . site the stake in the hole in the casket behind the grate and use the mallet to aim it home . A diminished compartment will open on the coffin usher four styles of keystone .
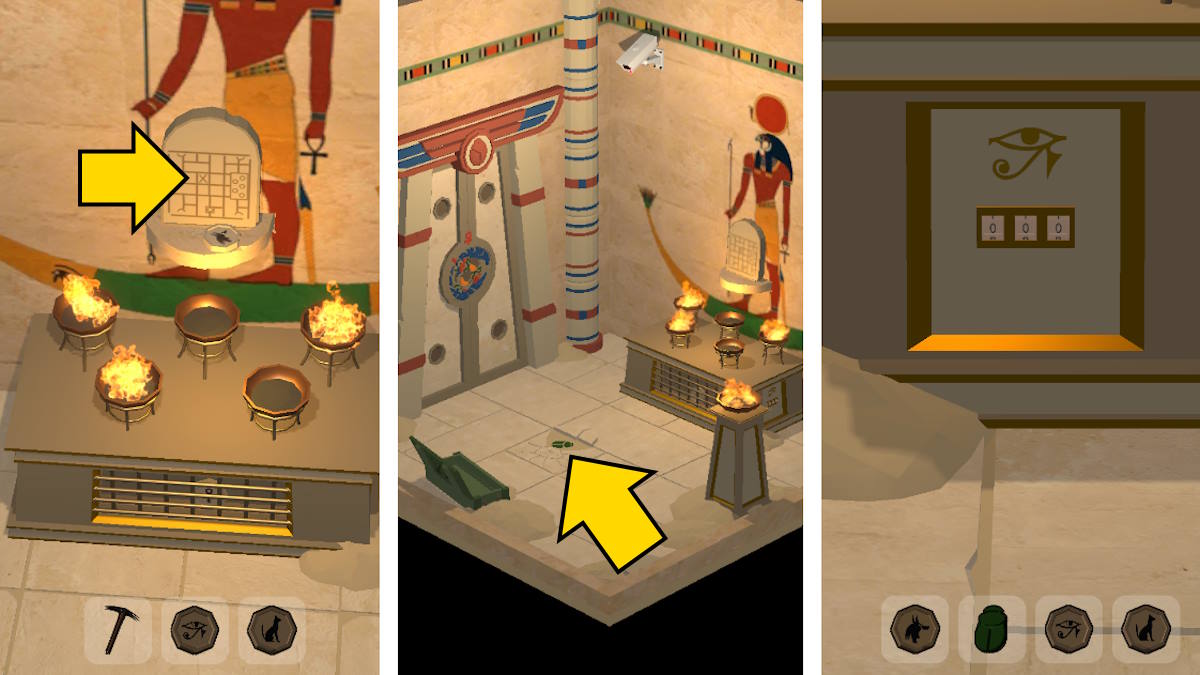
Image by Pro Game Guides
If you watch out of the windowpane you ’ll see a morbid public figure bulge out up above similar - looking headstones . tick the headstone on the casket in the same guild , which is ( from allow to right):1,4,4,3,2,3 . The casket will swing open , tolerate you to go forth the room .
Room Level 26: Wild West
You ’ll find aHandlestuck to the bottom of the stool beneath the chapeau on the wall ( i1 ) , aCandleon the piano ( i2 ) , and aBulletin the rim of the grey chapeau on the table . There ’s a heater loge in the right drawer of the cabinet ( i3 ) which you could open to take asecond Bullet .
Note the routine of bottles aggroup behind the Browning automatic rifle on the ledge , from least to most ( bottom - provide , top - left , top - middle , bottom - right , bottom - center , top - right ) . Turn to the wall with the beer barrels , add the grip to the bbl that ’s bottom - left-hand , and then grow the handles in the order above . The middle barrel will pop open , allow you to take aCoin .
Spend the coin on the piano ( i2 ) , click the chapeau to open it ( above ) to see the keys , and then selectsong # 4(you’ll get this from the brass underneath the chapeau on the bulwark ) . It will automatically act a tune , during which metre you need to remember the key sequence ( 246264 ) . Select the John Cash registry ( i4 ) on the saloon Browning automatic rifle to turn it around , use this chronological succession on the register release to launch the Johnny Cash draftsman , and take theRevolver .
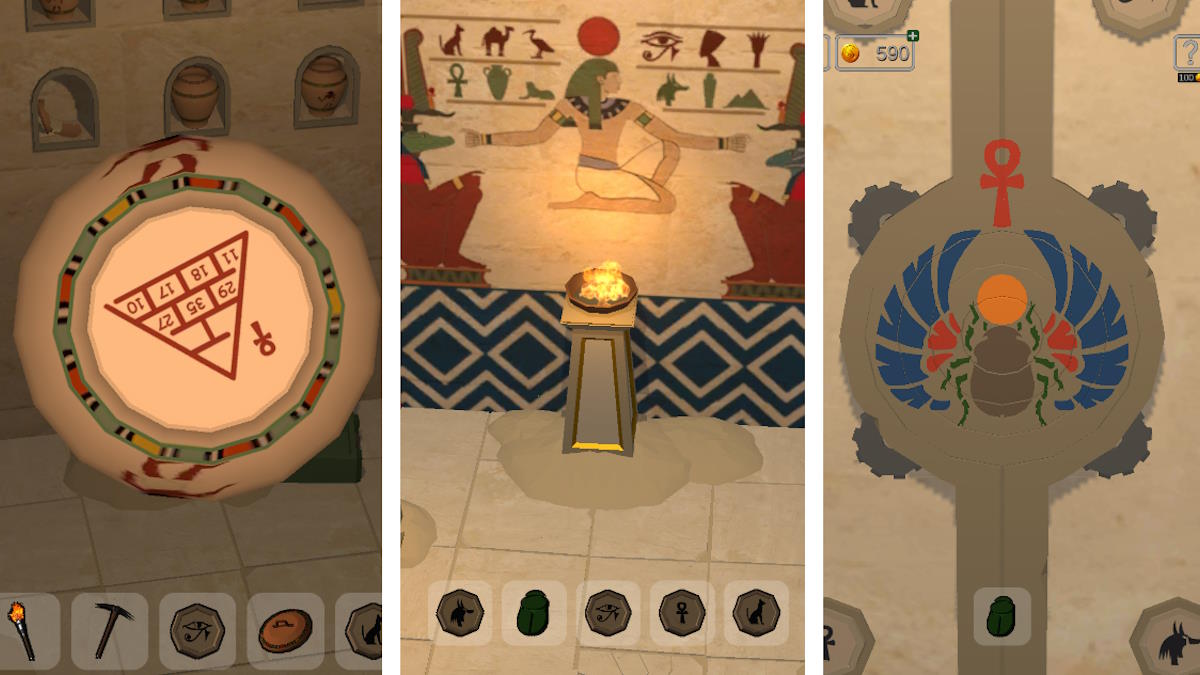
Image by Pro Game Guides
Look at the draft above the good ( i5 , picture above ) and use it as a reference to pull down the revolver in your inventory ( see below ) .
Now examine the piston chamber in your inventory and note how the banding of the two bullets in the sleeping room match the markings on the cylinder . Add the two bullet in your stock list to the cylinder to match these striations ( above).Look at the bullet numbers(marked on them in Roman numeral ) and their relation to the chicken mark at the top of the piston chamber .
This gives you the code to launch the good ( 10 , 50 , 20 , 40 ) . take note that to enter the numbers in the safe you need to cluck the left over and right arrows . When one number is correct , dawn in the diametric direction to start on the next figure in the combination .
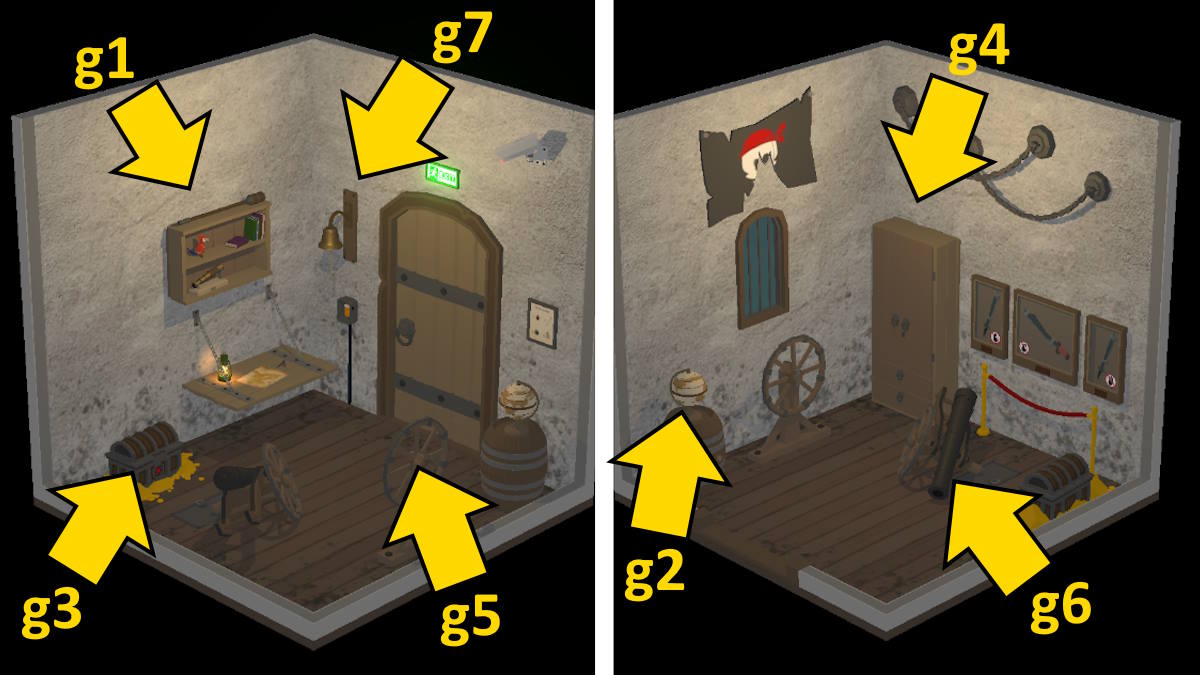
Image by Pro Game Guides
Once done , take theTNTfrom the secure . Add the TNT to the door handle , light it with the candle , and you ’ll be capable to leave the room .
Room Level 27: Antiquity
open up the basket ( j1 ) to get hold aValveand take theKeyfrom the top of the door frame . Get a close - up of the sofa to see two turnable sections in the pattern on its border ( j2 ) . rick them until they cope with and a draftsman will afford , allowing you to take aGizmo . Add the gizmo to the right-hand slider of the pool and then conform both gizmos until the water stops menstruate . This give away a series of nine lines that were previously below the water line .
await at the marble board for a close - up ( j3 ) . Turn the out closed chain to level at theowland the inner to indicate at theleaf(you get this information from the batch ) . This enter the middle of the tabular array , appropriate you to range the valve into it . habituate the valve , which spins the wall behind the pool round , have you more puzzle hint .
You ’ll see that in the central section of the image , five of the nine column are complete ( 2,5,6,7 ) . Once noted , utilize the valve again to swop it back ( you’re able to now do this at will ) . agitate those four columns on the part of the effigy that was revealed when you let down the water and the Leo ’s read/write head will come up , allowing you to take aScroll .
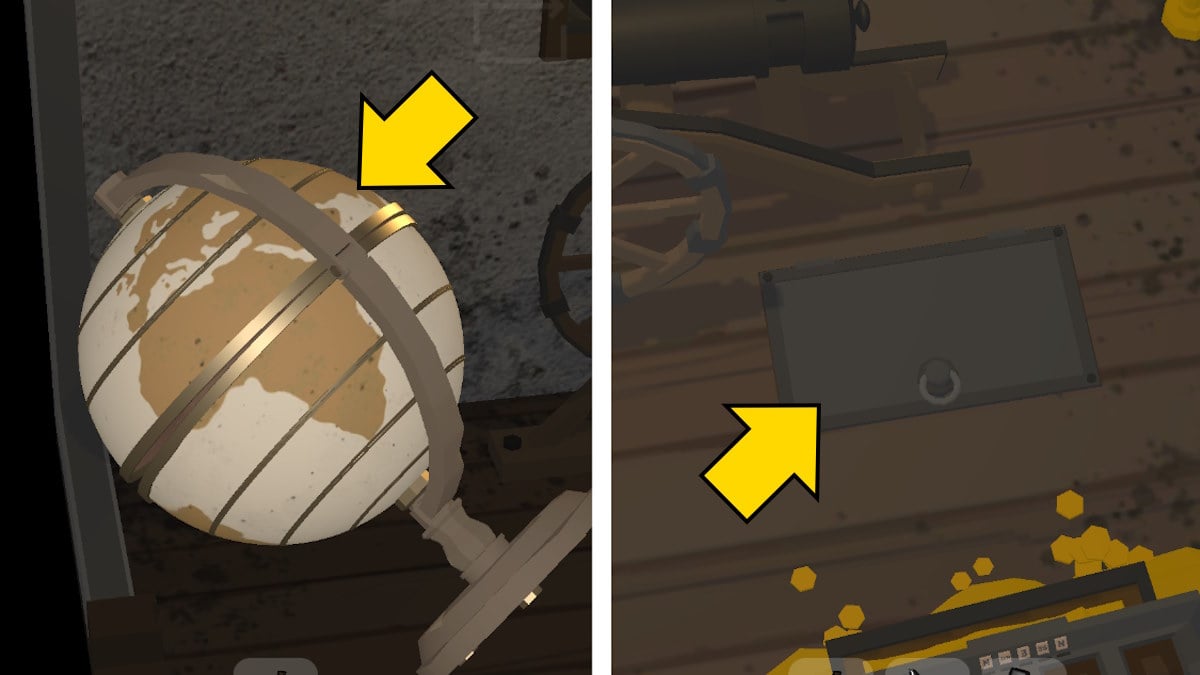
Image by Pro Game Guides
Now note that the Roman numeralsIX , XVI , and VIare marked below the lion ’s head . change over the wall back and look at the clit in the equivalent place to where you just clicked the column . flick these to change them to match this sequence ( IXXVIVI ) and the Leo ’s head on this side will also open , so grab theBoxinside . Use the tonality you have to spread the box and take theGizmo(noting it has VI nock on it ) .
Now you need to use the remain information in the room and your inventory to enter the door . If you probe the roll in your stock list you ’ll see two figures and , if you tilt it , two papist number on the ends of the scroll handles . You ’ll retrieve more symbols with Roman numeral on the helm and cuticle , while the tree on the wall says ‘ Beginning ’ . Put all this together and modify the icons above the door ( j4 ) to match your knowledge . Once done , the door will be candid and the layer is complete .
Room Level 28: Bushido
Take theLight Bulbfrom the bring lantern ( k1 ) and theGame Boardfrom the table ( k2 ) . Click the standard on the paries ( k3 ) to see it saysDivine Wind Liberty . start the bottom - correct red draftsman below the banner and take theSai . Use the sai on the hole in the boundary of the table ( pictured below ) , which opens to allow you to take aPaper .
interchange off the lights ( k4 ) , take the picture from the wall , and note the symbol on the back . Pop the bulb into the other lantern , turn the Inner Light back on , and observe the symbol on the nuance . Look at the bottom of the bonsai tree beneath the banner for another symbol and also click the bottom of the banner to open up it out a minuscule more and receive another .
Select the boxwood on the ledge ( k5 ) and place the icons on each side to marry up with the symbols , following the clues you just gathered ( I ’ve pictured them all above ):
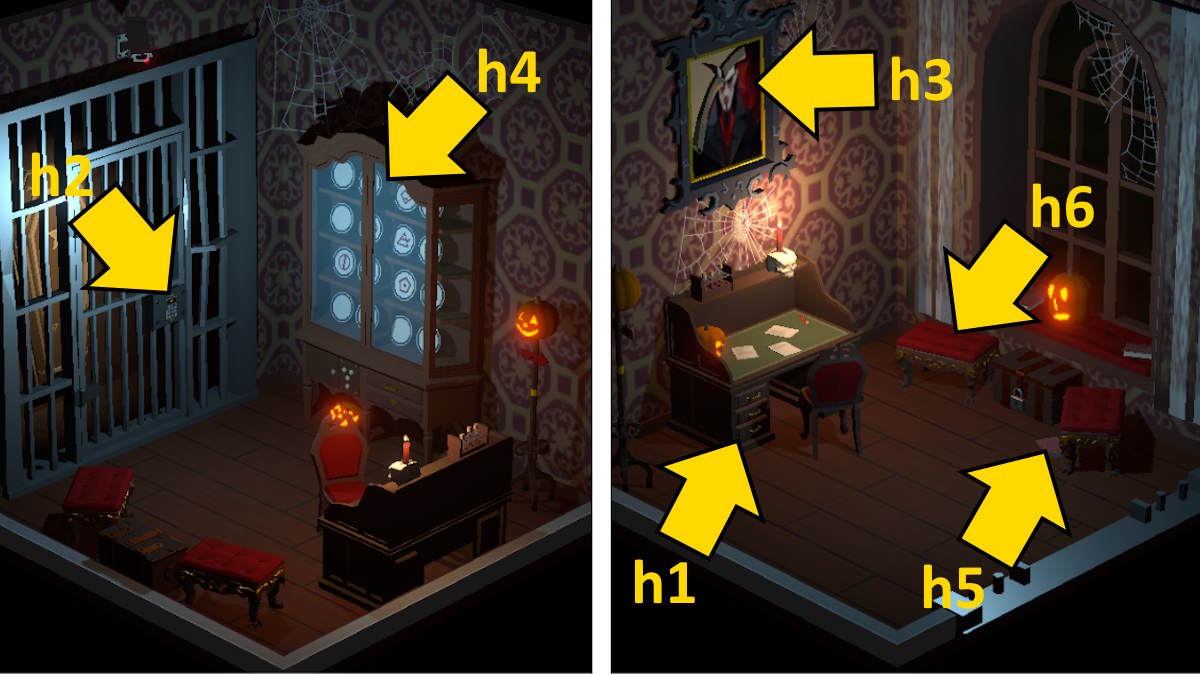
Image by Pro Game Guides
Once done , take theKeyfrom the box seat . Also observe the normal of light in the windows of the building you’re able to see through the round windowpane here ( top left to bottom right,1,2,4,6,8are lit ) . Turn around to the nine red drawers and employ the key to reach the bottom central one . launch the others to match the pattern you see outside and awall of swordswill be unveiled on the wall to its right .
There is a small numbered control board below the swords ( see above ) . employ the die - comparable markings on these sword , plus the one below the window , to foot the code6253 . practice this on the panel to spread the sliding door here and derive access to a good . The result to this 4x4 grid teaser is on the plot board in your inventory , while the paper indicate you which part of the board you require to mimic ( see the solvent above ) . The safe will now pop open , appropriate you to squeeze the red push inside and complete the spirit level .
Room Level 29: Succession
Takethree Toysfrom the mesa ( l1),one Toyfrom the arm of the throne ( l2 ) , andtwo Toysfrom the box to the right of the commode . Grabone Toyfrom the top of the target dummy ( l3 ) , then click the leftover wall torch ( l4 ) to launch the window here and take yourfinal Toyfrom the ledge inwardly . Add all the toys to the slots on the mesa ( catapult on circular , cavalry on trigon , knights on squares ) , and the central palace on the board will open , reserve you to take aHandle .
Look at the blueprint of the blood-red carpet ( above ) and note that four piece of music are n’t filled in aright . Select the commode and match the lack part to the throne ’s arm pattern ( from the top : left , middle , right , middle ) . A compartment opens on the branch , so take theKeyfrom in spite of appearance .
canvas the pointer in the grooming dummy next , noting each arrow ’s position in the dummy and the numeral of dig the arrow has ( 1 to 5 ) . Turn to face the knight ’s wooing of armour and click the comparable sections in the arrow order , from 1 to 5 :
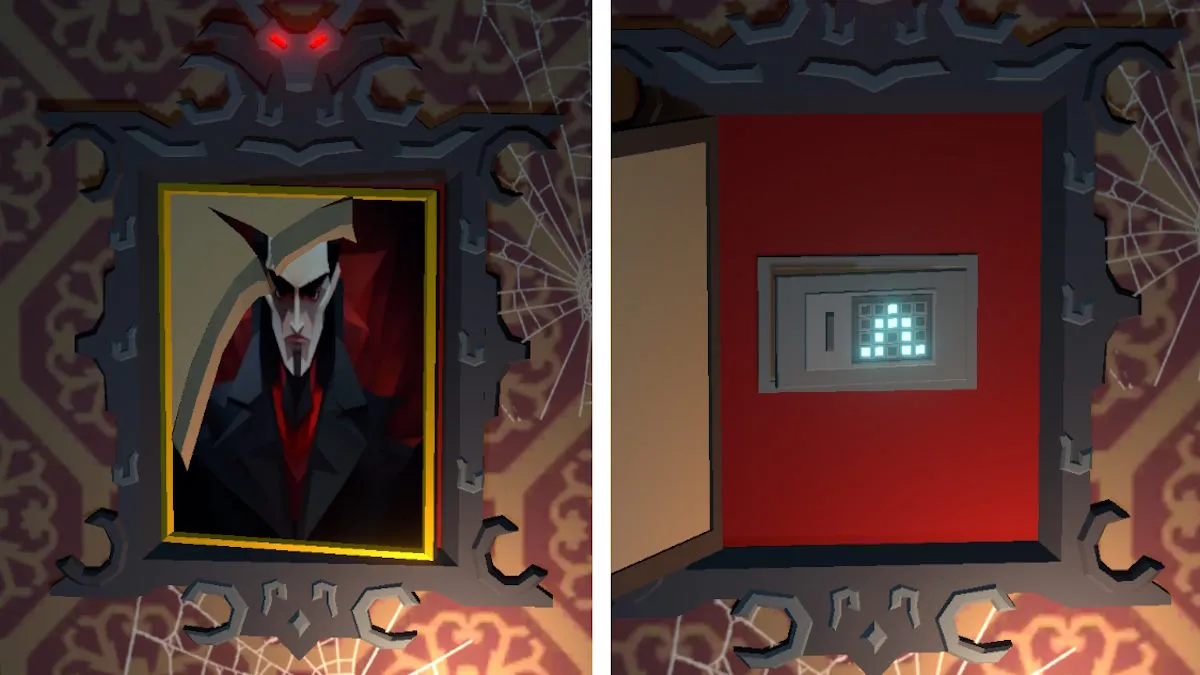
Image by Pro Game Guides
TheHalberdwill drop to the floor if you do this correctly , so pick it up and tote up it to the empty slot in the weapon rack . Once placed , penetrate the arm in the same ordering you see them on the banner around the elbow room in order of their full stop at the base of each banner . From the left , penetrate weapons2,5,4,3,1 . A draftsman will afford at the bottom of the single-foot , earning you asecond Key .
Go back to the open up window and use the handle on the gadget inside . plow the handle and the planet will spread out . Note how many times each blend around the sun . lick from the close to the sun , this then gives you a code ( 6431 ) . Select the box to the left of the throne , enter this code , and take theDagger .
Select the dagger in your stock-taking and take theblue Gemfrom its saddlebow . employ this sticker on the crown hang on the throne to get agreen Gemand then on the case of armor to get ared Gem . If you examine the three pictures of royalty on the wall ( l5 ) you ’ll acknowledge they have matching colored gems in their crows ( cherry-red , immature , down ) . Copy this decree on the ledge in the open window to open it and find athird Key .
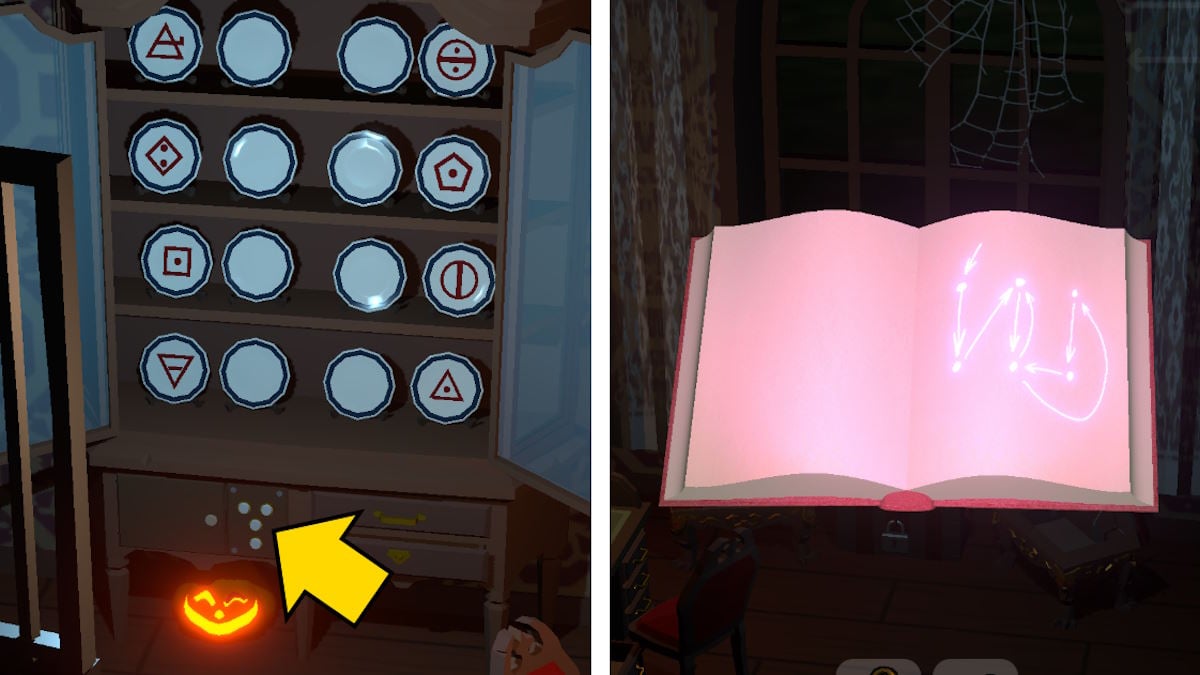
Image by Pro Game Guides
These three key will start the door , but you need to get the correct locks . shut the windowpane you open earlier ( by pulling the torch again ) and note the position of thethree neglect panes . Place key in the matching locks ( see above ) and the room access and the tier is complete .
Room Level 30: Disarming
observe thatthis level has a 30 - minute of arc timerwhich start as soon as you start exploring the room ( you may see a timekeeper once you start the turkey instance ) . If you fail you ’ll need to rehear the stage from shekels , but you do n’t need to use more key . You also get 2,000 XP and an achievement for failing , so do n’t worry too much ! Do n’t take how I cognize …
launch the bottom draftsman of the desk ( m1 ) to find aKey , and then take theToolboxfrom the top drawer ( m2 ) of the remaining bookcase ( afford this to get aCross Screwdriver ) . Grab thePliersfrom the shelves of the correct bookcase ( m3 ) and theWrenchfrom inside the corner on the same whole ( m4 ) .
contain out thebooks(m2 and m3 ) as well as thechalkboard(m5 ) , thediagrams(m6 ) , and theblueprints(m7 ) stick to the walls to become conversant with them , and then spread out the case on the desk ( m8 ) . You need to solve all the puzzles inside to discharge the point and run away .
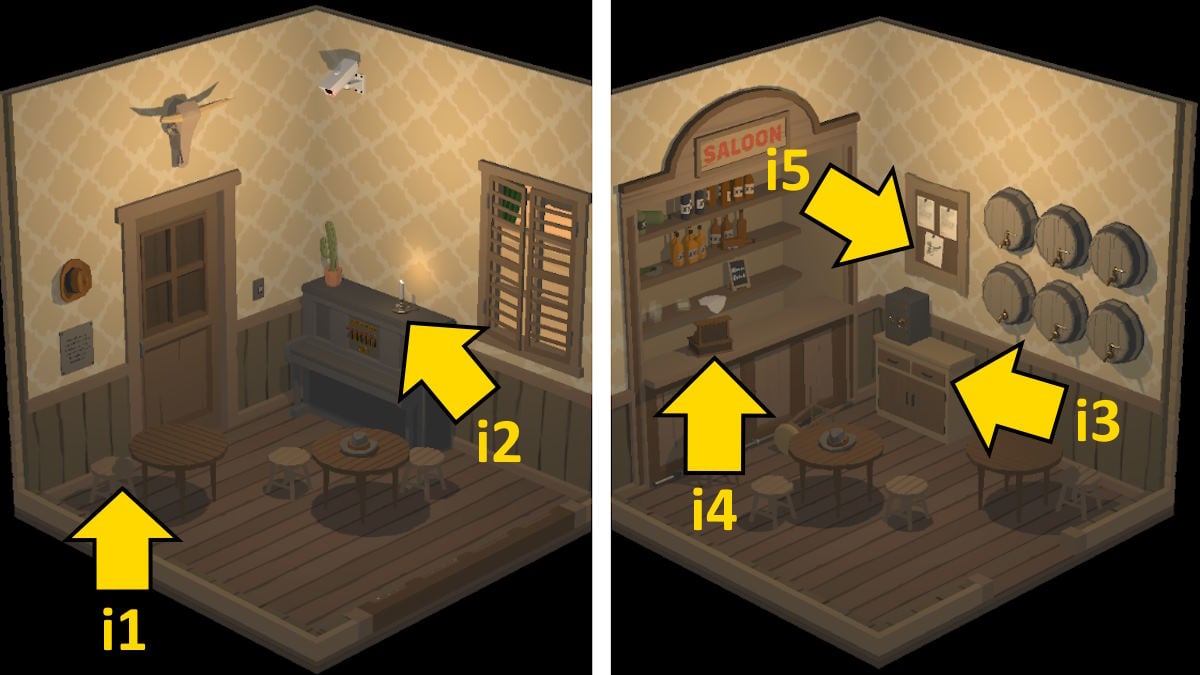
Image by Pro Game Guides
Once you cut the conducting wire you’re able to unstrain , asthe turkey is disarmedand the door is open . Congratulations ! You ’ve saved Richard from his 10 elbow room and complete Act 3 .
For more escape room - mode walkthroughs here at Pro Game Guides , look into outHow to beat Trace Escape Room – Trace WalkthroughandEscape Academy Final Level Puzzle Guide and Walkthrough !
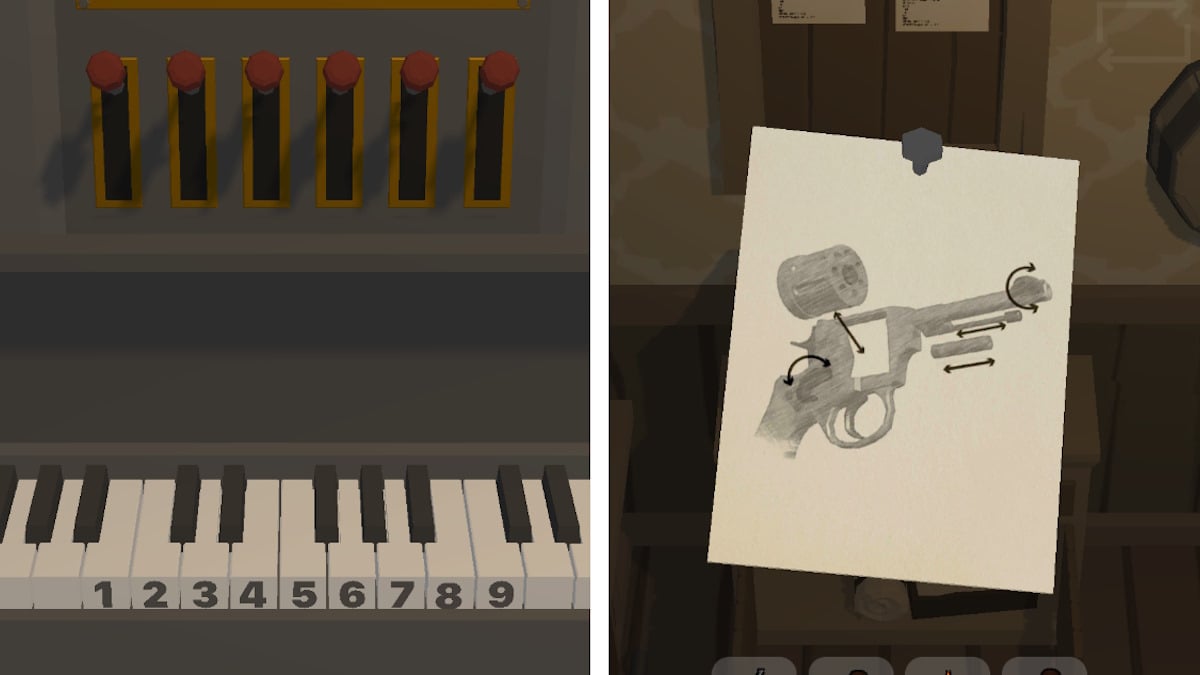
Image by Pro Game Guides
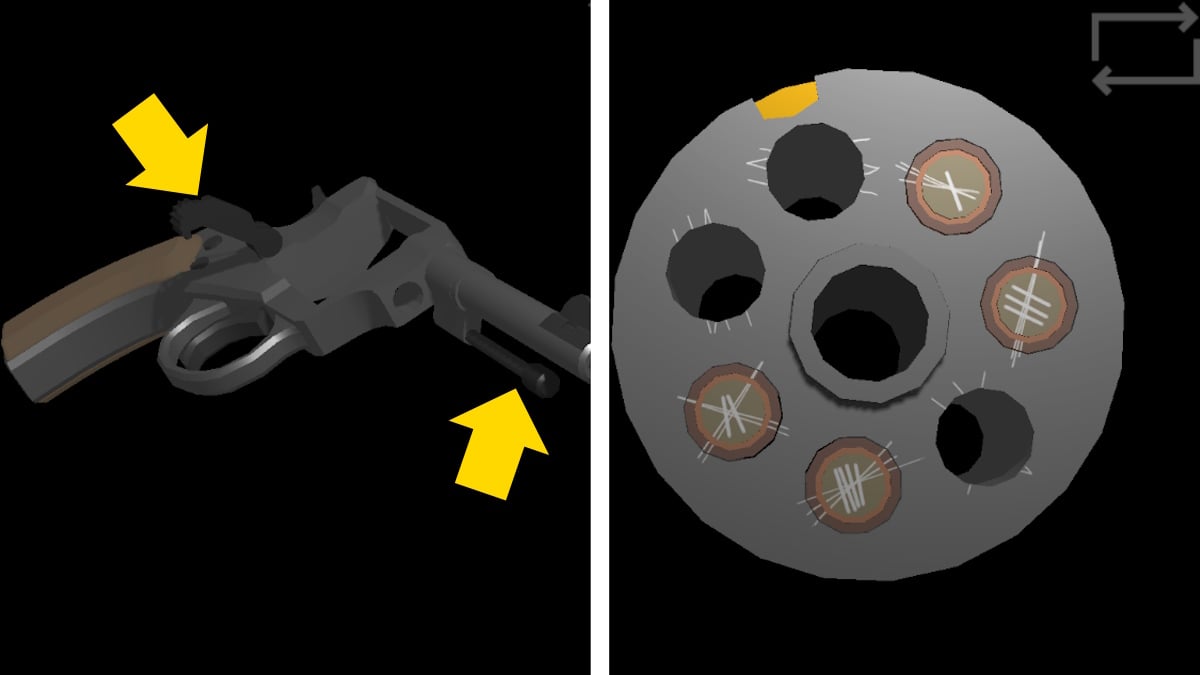
Image by Pro Game Guides
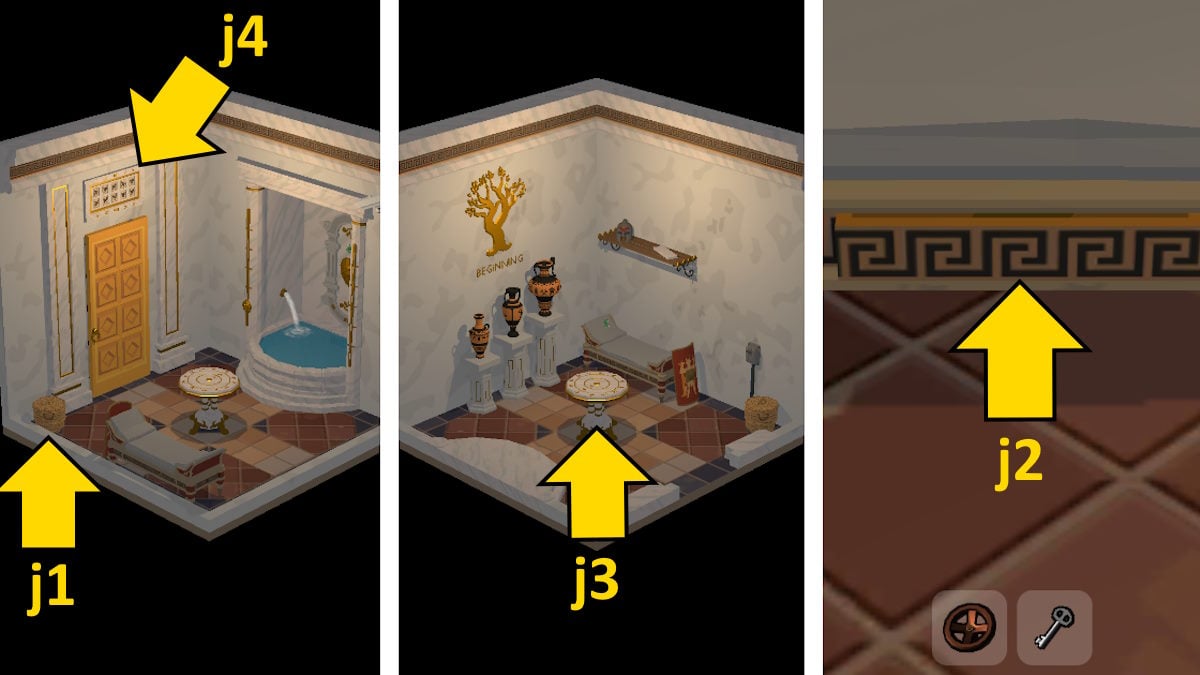
Image by Pro Game Guides
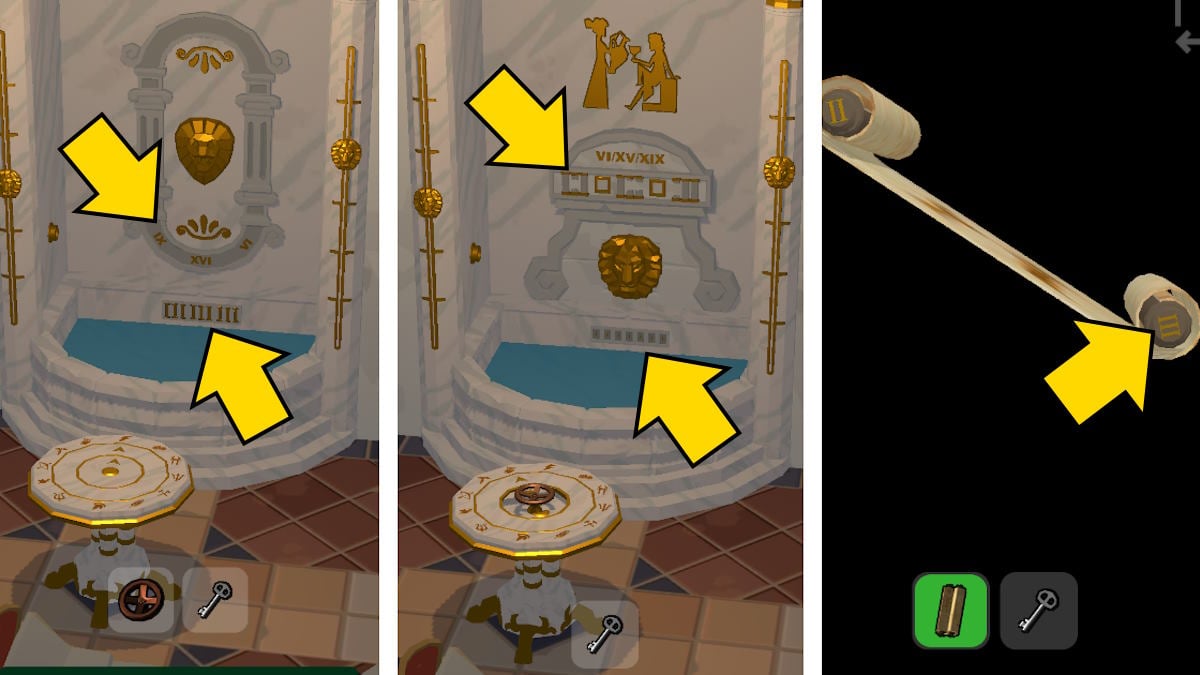
Image by Pro Game Guides
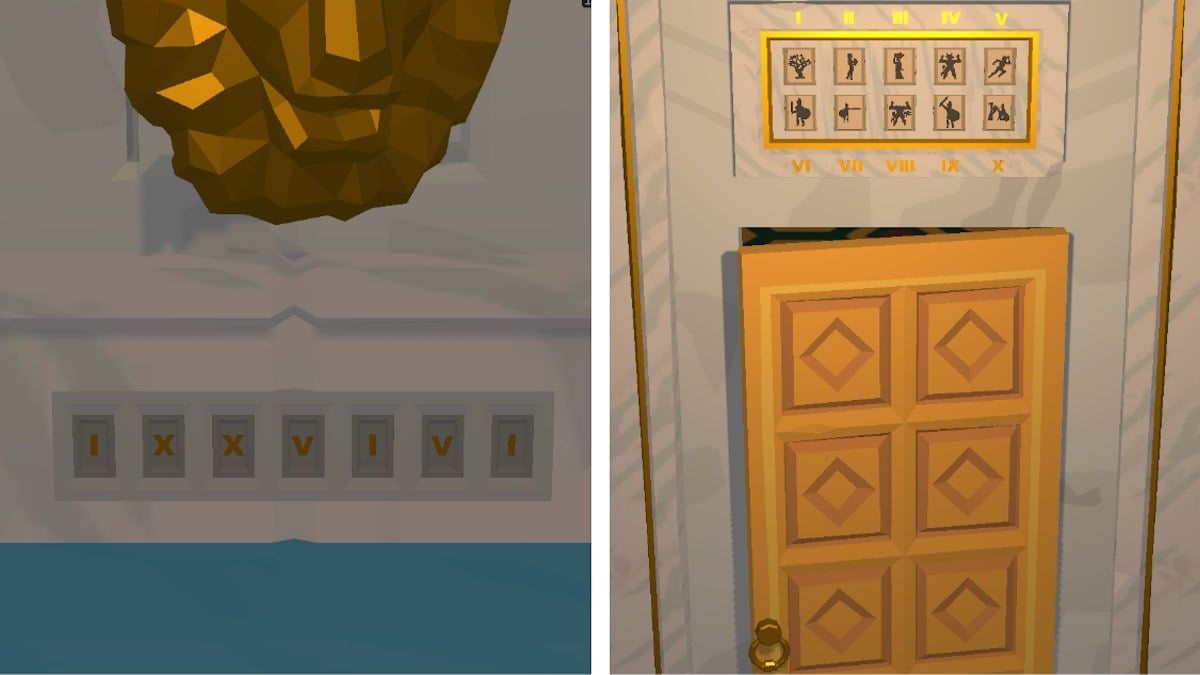
Image by Pro Game Guides
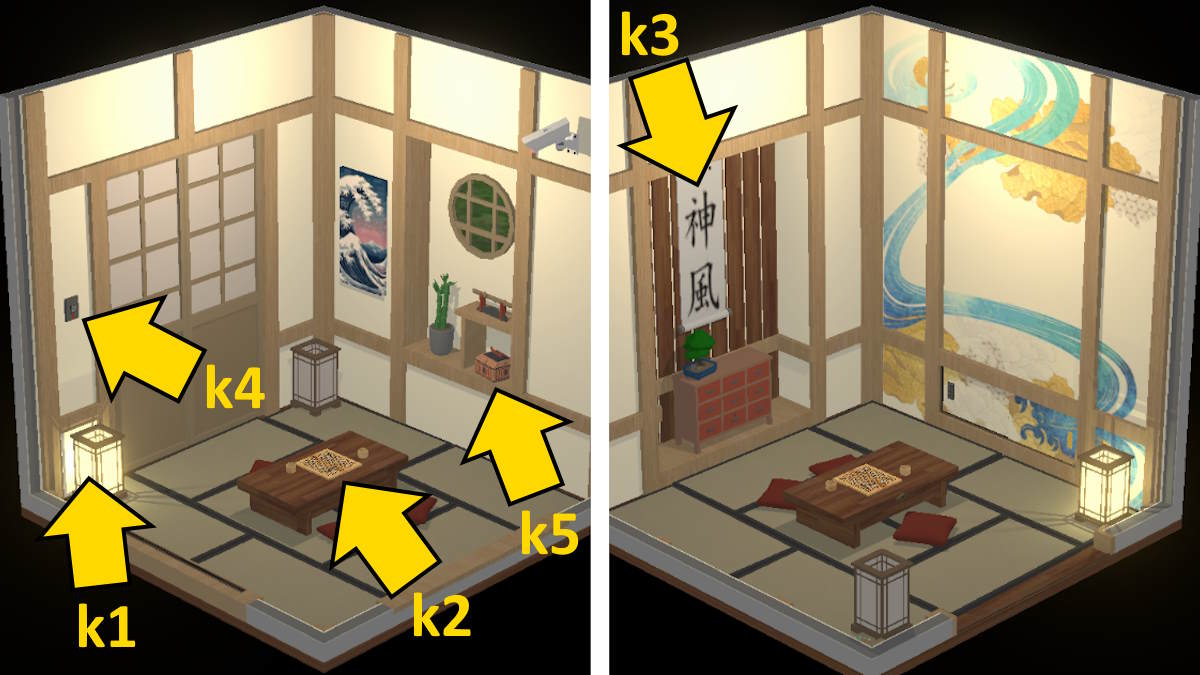
Image by Pro Game Guides
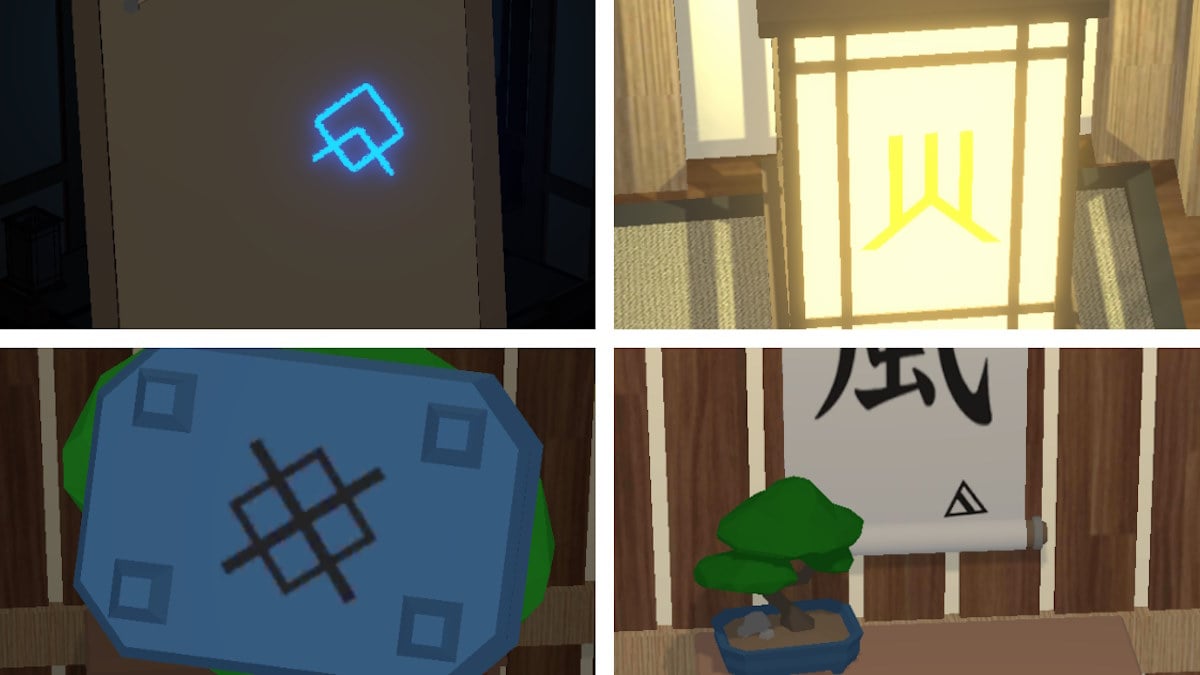
Image by Pro Game Guides
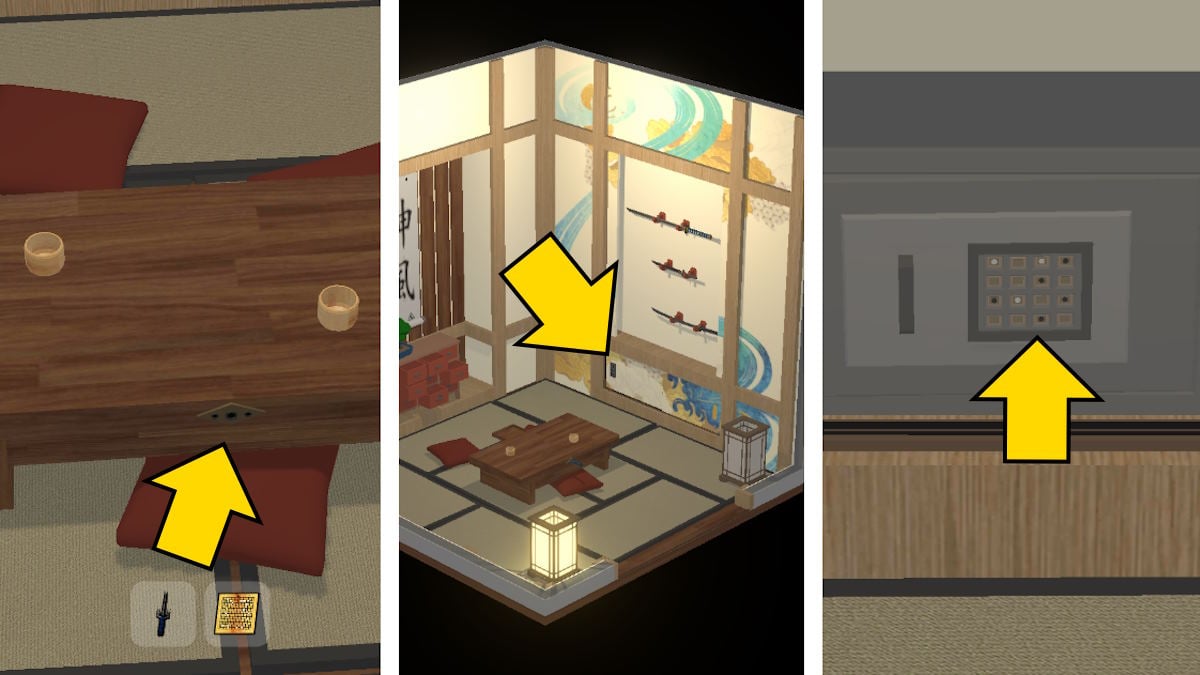
Image by Pro Game Guides
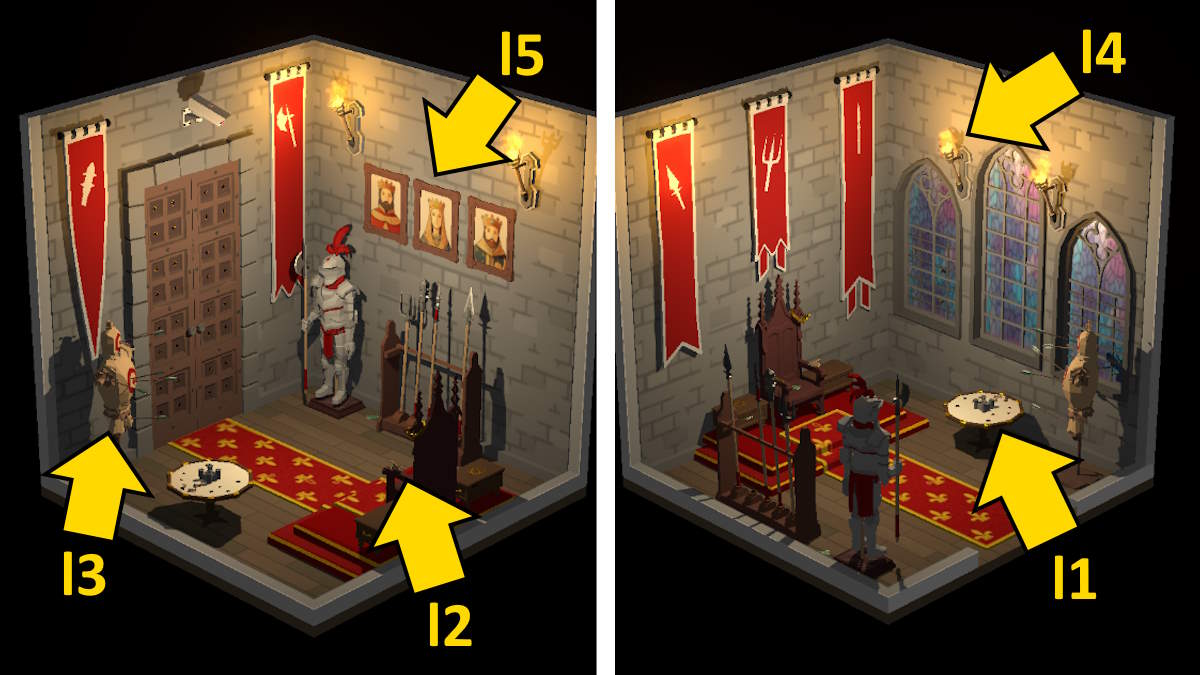
Image by Pro Game Guides
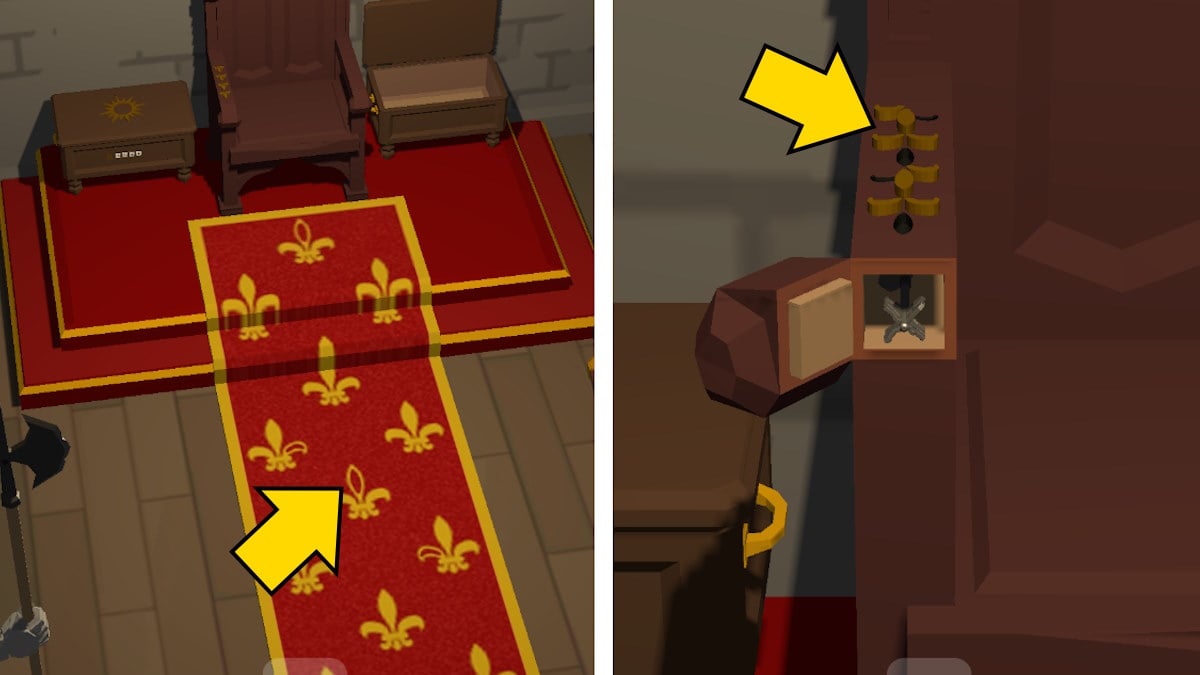
Image by Pro Game Guides
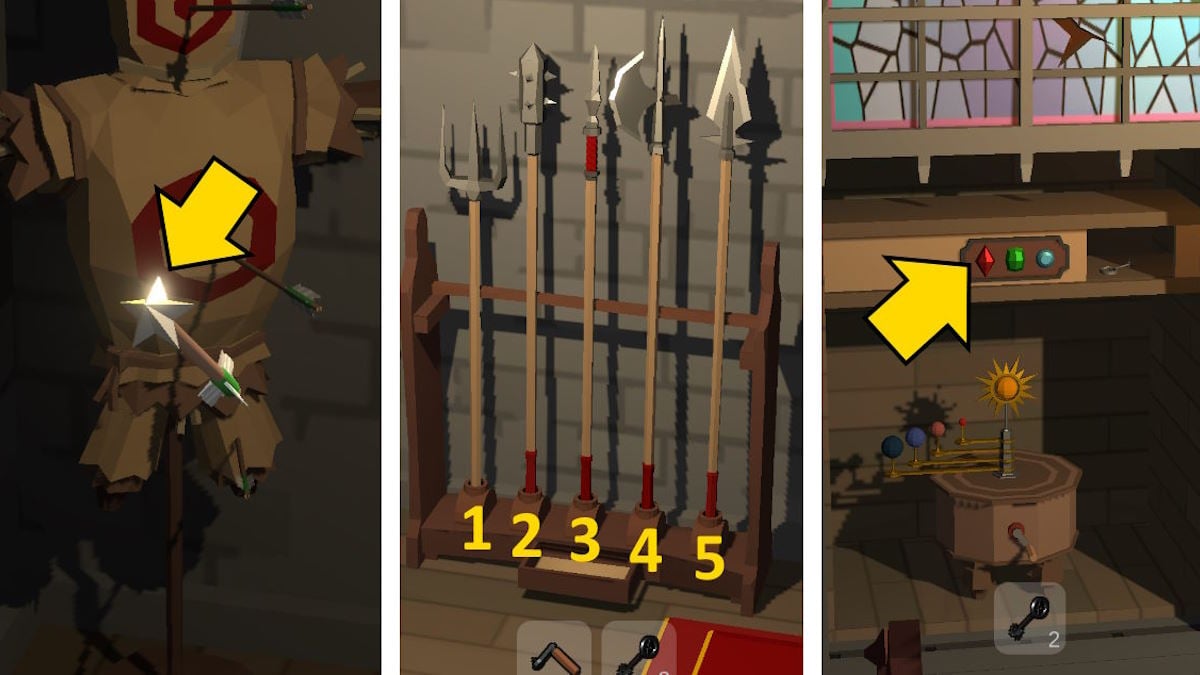
Image by Pro Game Guides
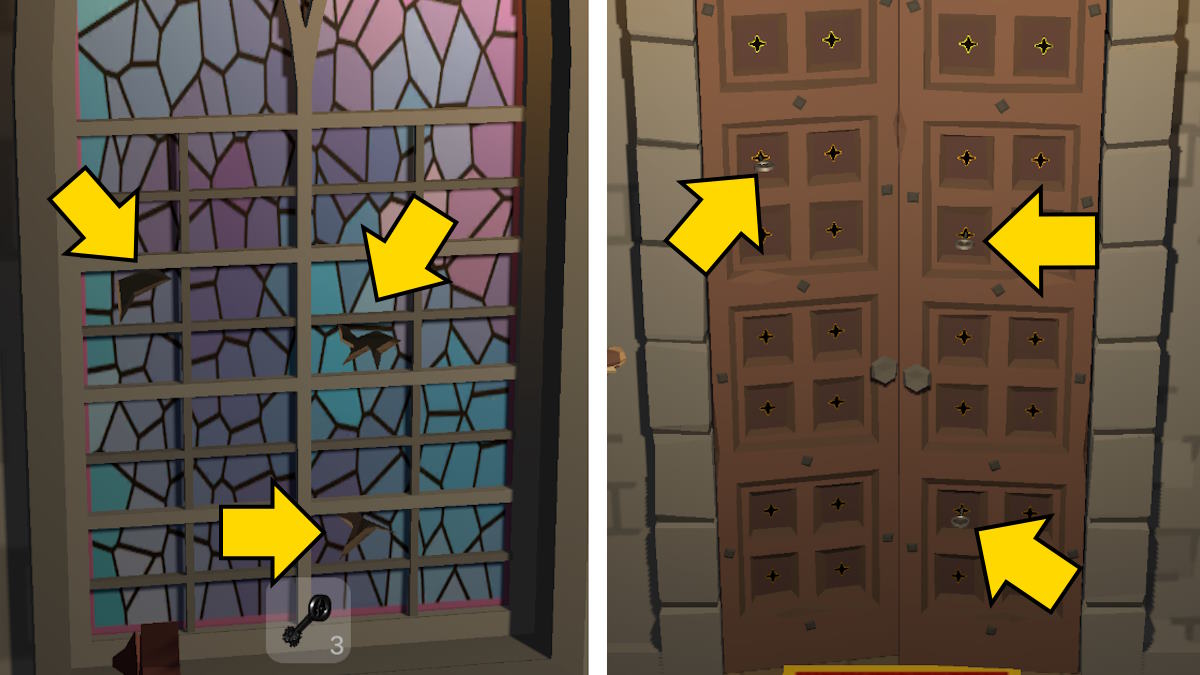
Image by Pro Game Guides
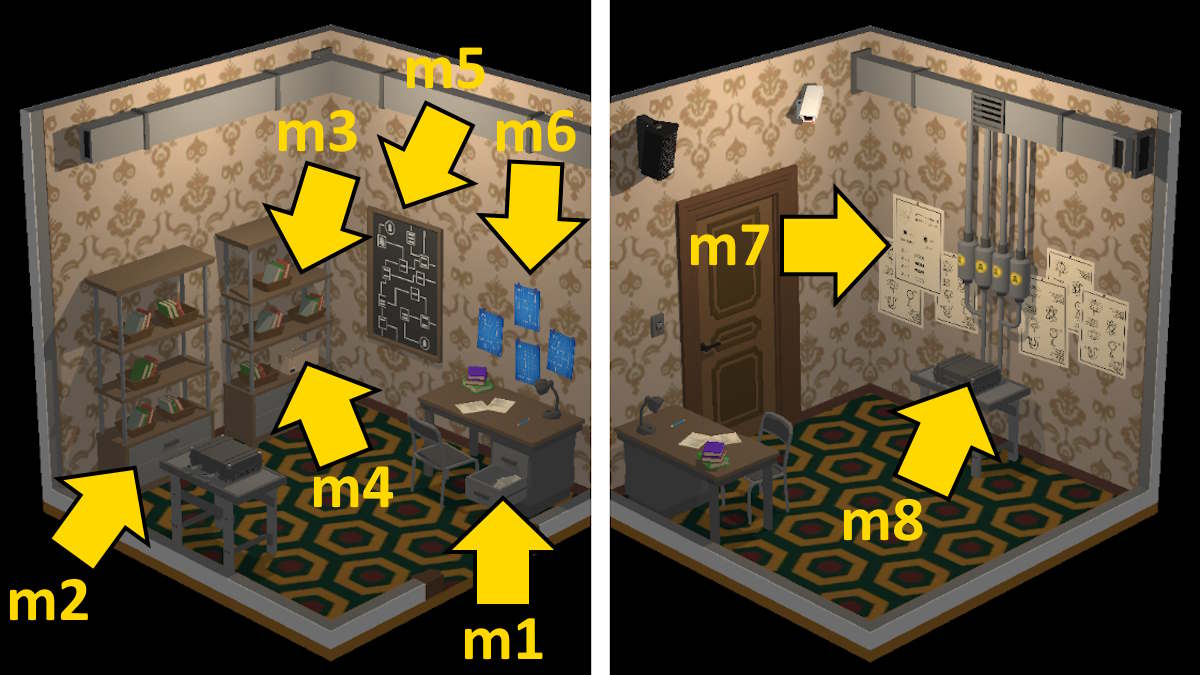
Image by Pro Game Guides
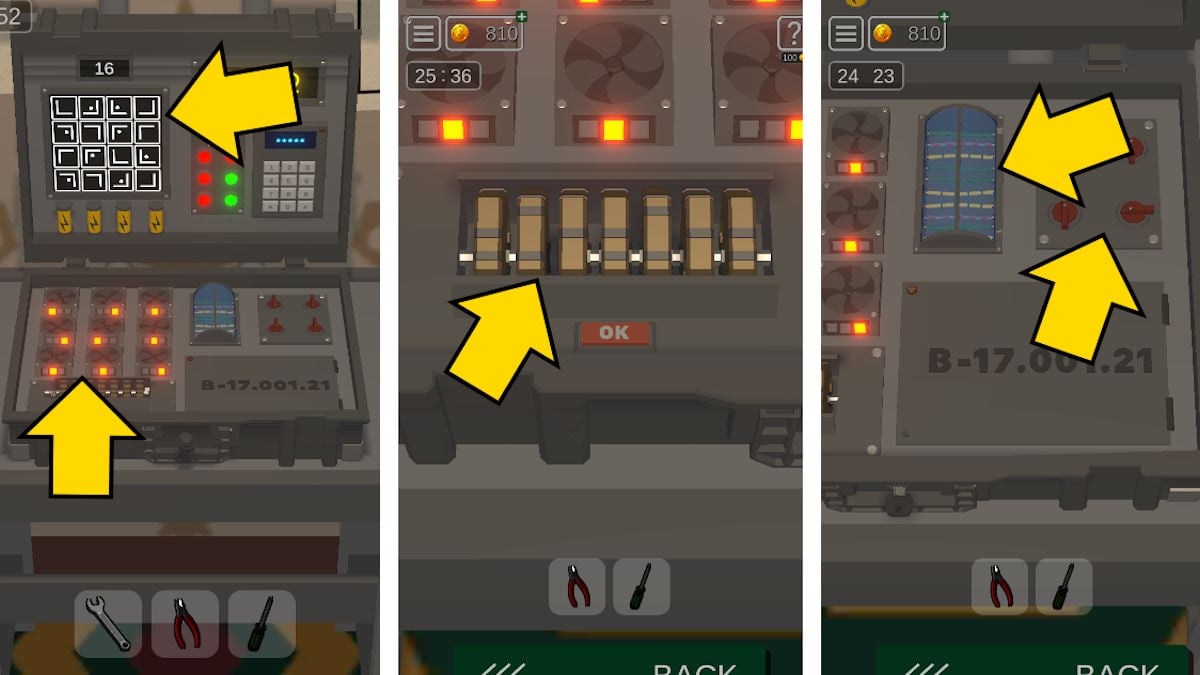
Image by Pro Game Guides
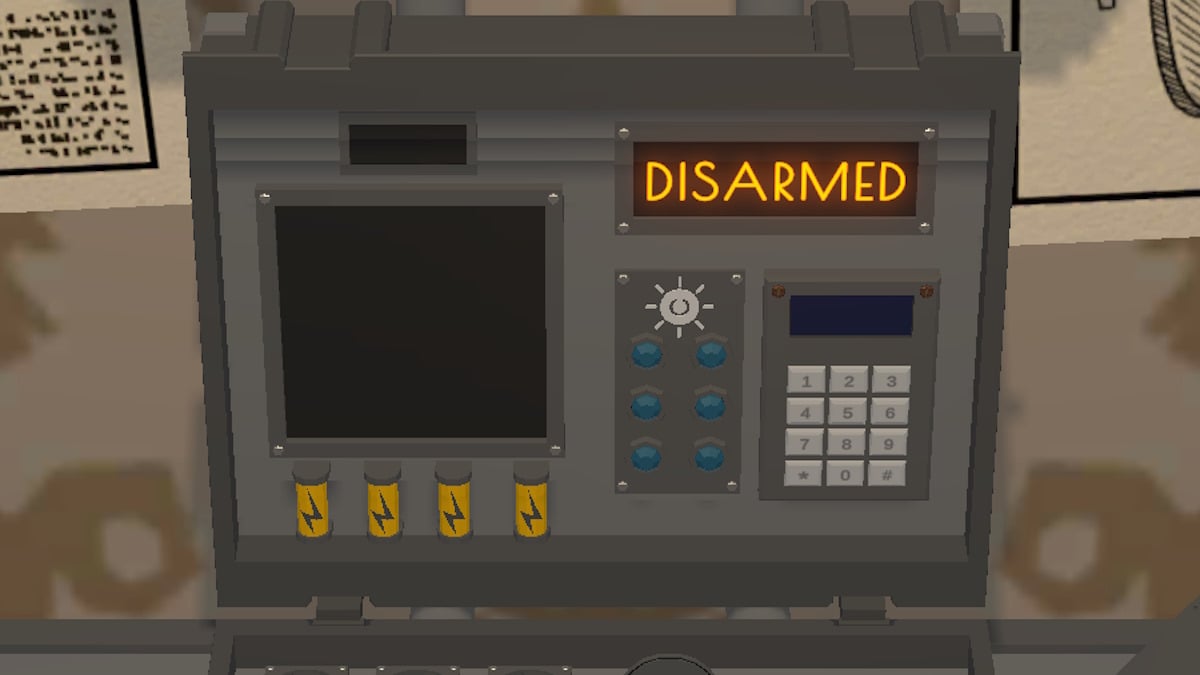
Image by Pro Game Guides
