Train your thinker to become the ultimate detective .
When it comes to point - and - click mystery game , 3D Escape Room Detective Story is an enjoyable case of the genre . In this walkthrough of Chapter 4 of 3D Escape Room Detective Story , I ’ll guide you through each puzzle cover within the train and the easy way to work them .
Due to the amount and complexity of the puzzles , each chapter of the game has been split into its own scout . If you ’ve not yet made it to Chapter 4 , or require helper with Chapter 5 , follow the liaison below to check out the other four guides .
Unlike the past three chapter , Chapter 4 begins with a mysterious call from an unnamed someone . They cite the employment you ’ve been doing and evidence you to get some eternal sleep , after which the screen fades to bootleg . When you wake up , you encounter a call from Sheriff Roden about the decease of the sheriff you had been working with . You ’ll have to hurry over to the train post to bring out what happened .
3D Escape Room Detective Story Chapter 4 guide
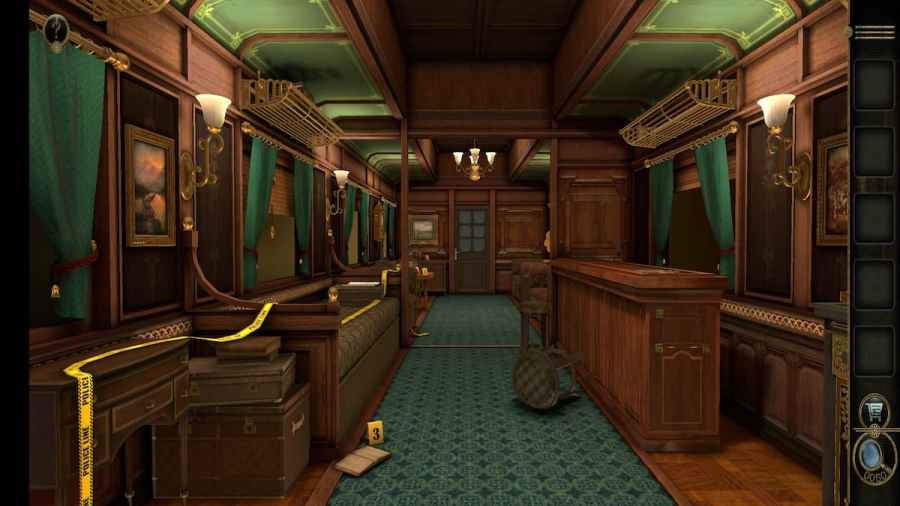
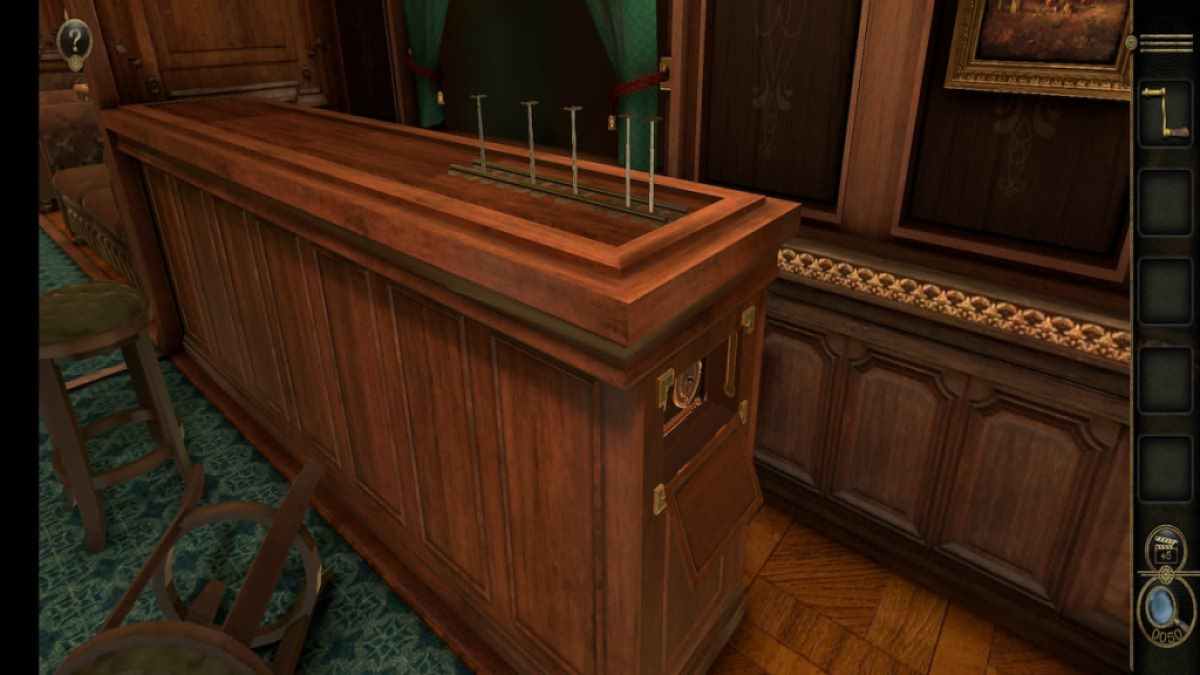
When you look on the scene , you ’ll be in the first room facing the second . There is a gray cabinet and a counter to your right .
Head towards the counter to see a phonograph record lie on top of it . catch it before move into the next way .
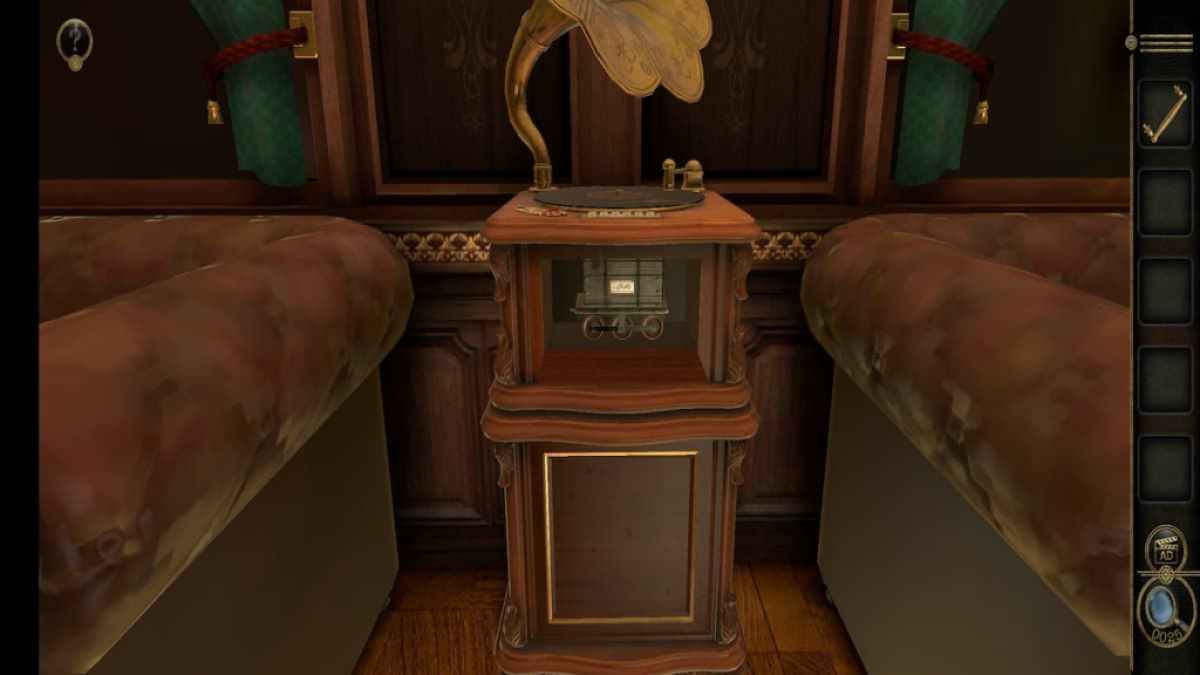
This room provide you with entree to a painting , a clock on the remaining wall , and a record player .

Screenshot by Pro Game Guides
Record player slide puzzle
Head over to the record thespian .
Place the Record onto the record instrumentalist . Take note of the pane and number on the Record , as you will necessitate them later .
Placing the Record will unlock a sliding mystifier on the front of the stand .

Screenshot by Pro Game Guides
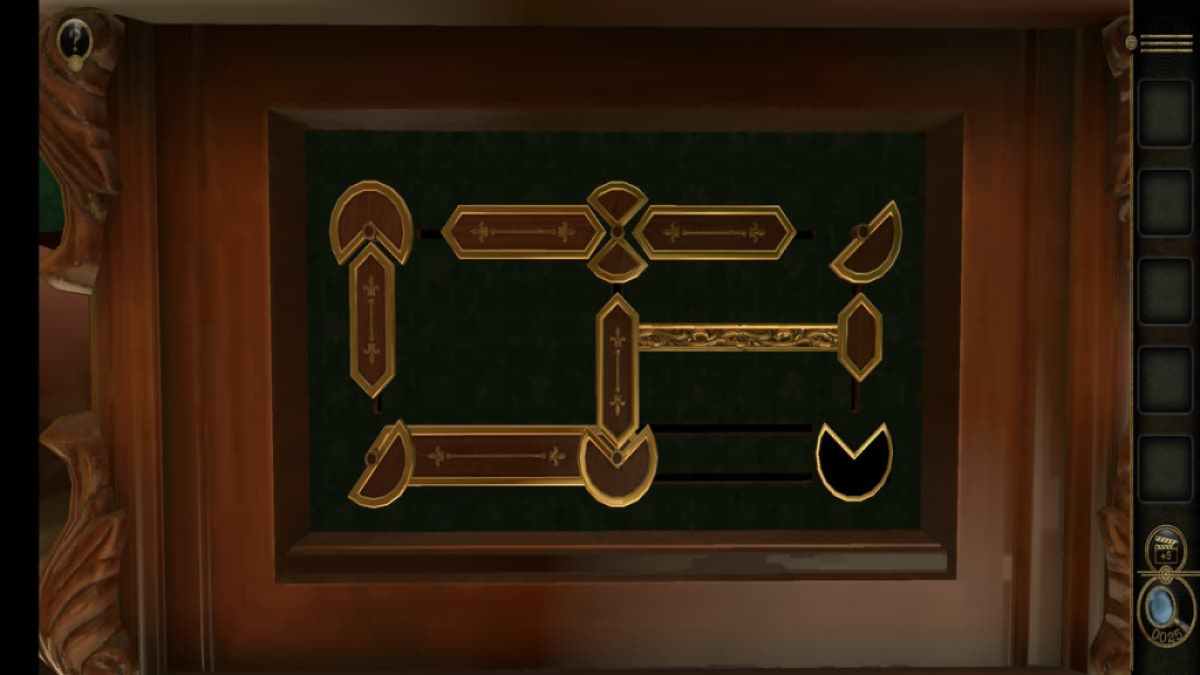
From leave to rightfulness , come out by lowering the longer diamond piece and spinning the top left recession piece so that the spread faces the right . In the right corner , whirl the half - circle so that its flat side faces the interior of the puzzle .
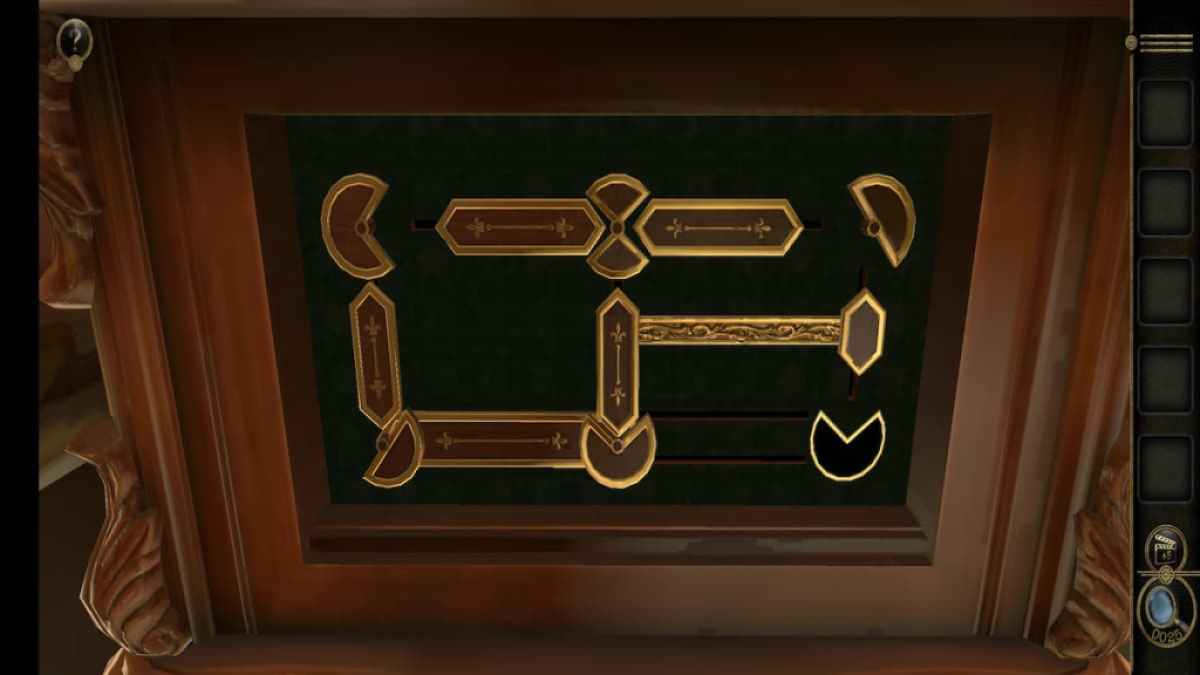
Then push the two long rhombus while from the top toward their several corners .
Rotate the top gist piece and slide the center diamond against it .

Screenshot by Pro Game Guides
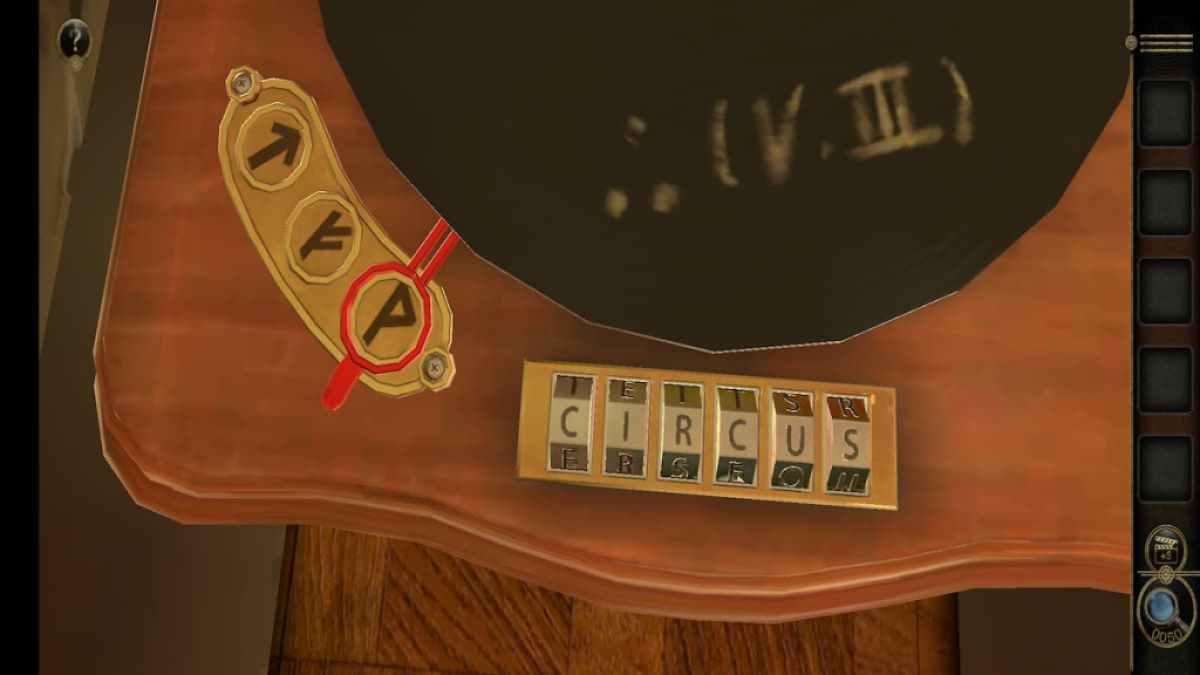
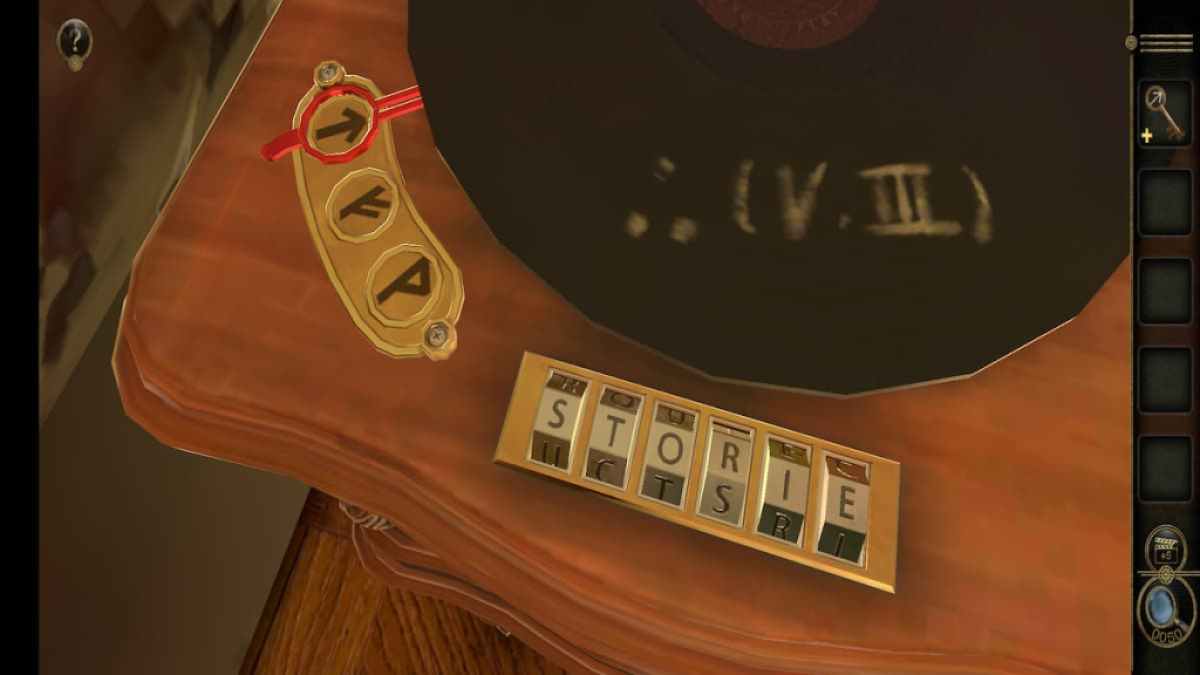
Completing this puzzle reveals a symbolic representation and word that can be used for the puzzle on the record player .
Use the red selector to take the " P " shaped symbol and spell the parole " Circus " in the number lock .
This will unlock a mystic door at the bottom of the stand . press it to infix a hidden compartment of the train .

Screenshot by Pro Game Guides
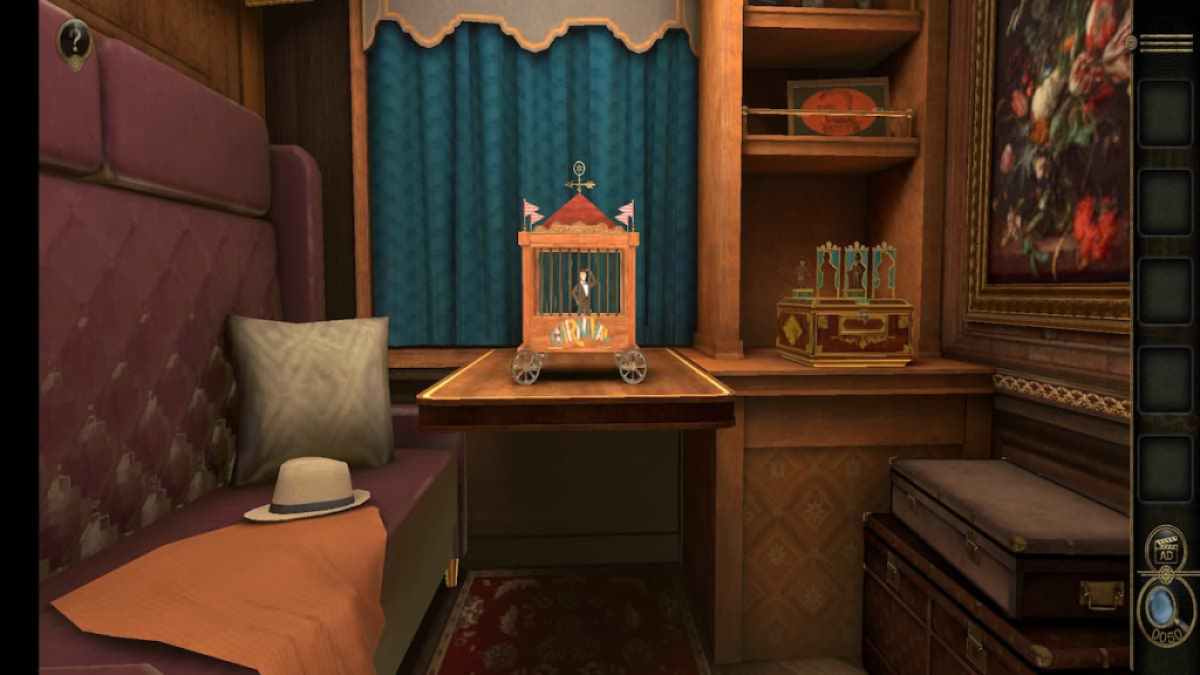
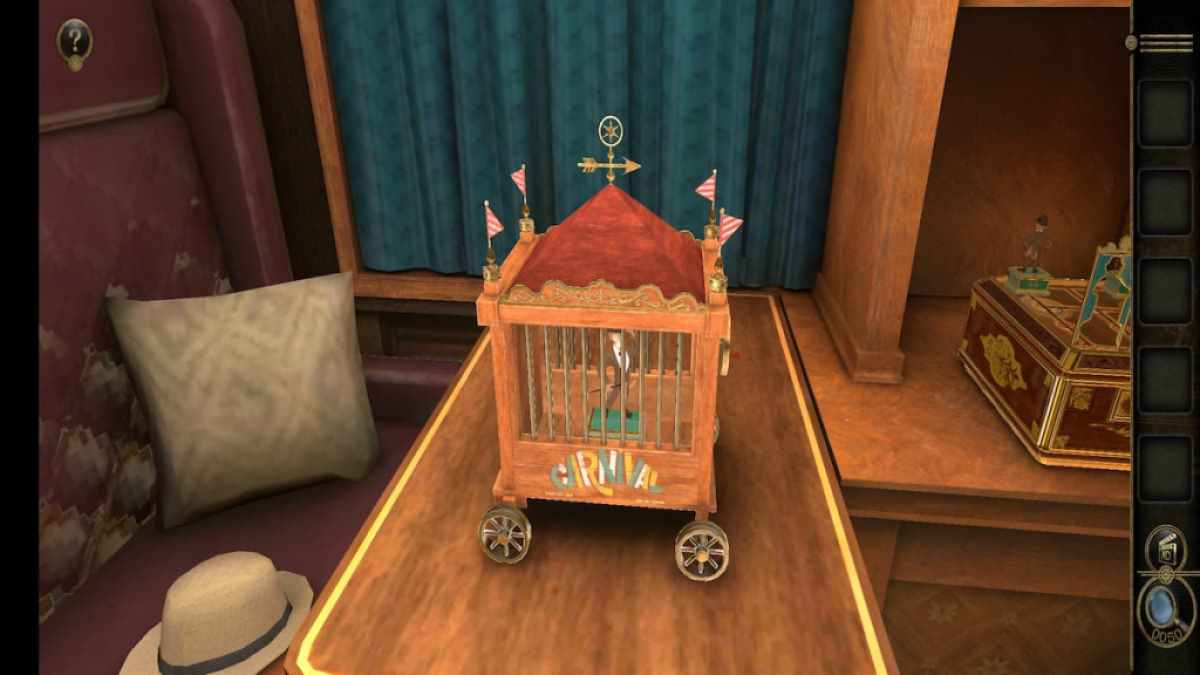
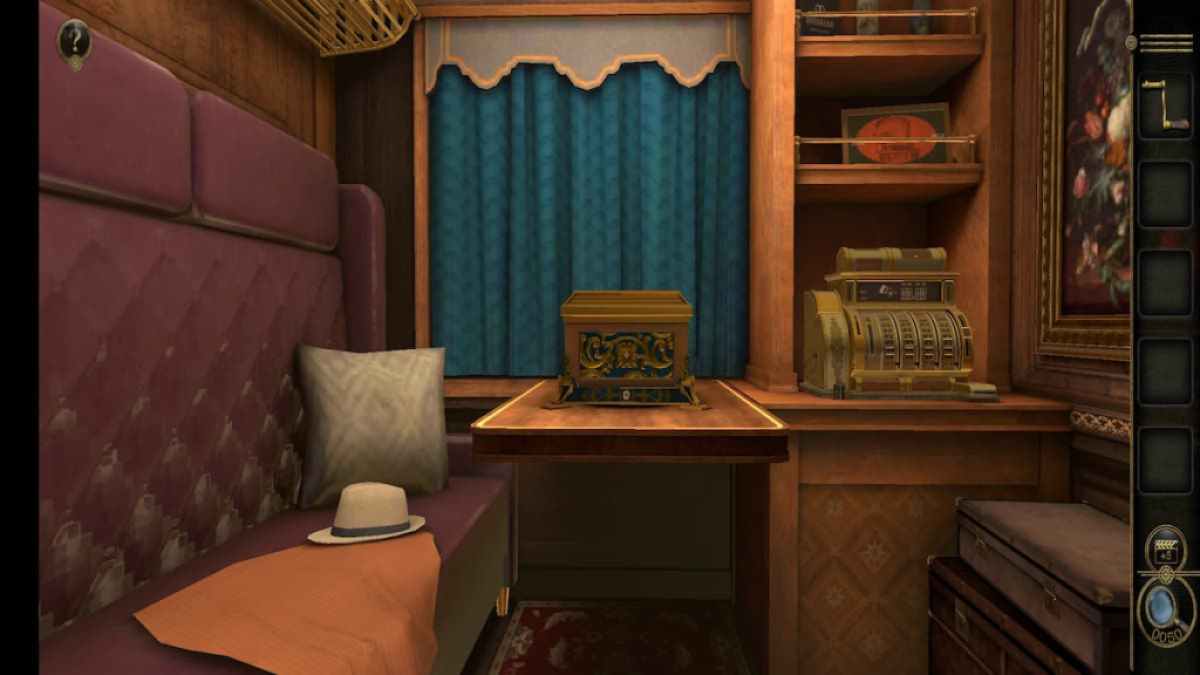
Circus room
The circus room looks like a normal sitting elbow room , except for a circus cart on the table in the shopping centre and a boxwood in the right corner .
First , go to the loge in the corner .
Rotate the lock to get to the draftsman and get a Wheel .

Screenshot by Pro Game Guides
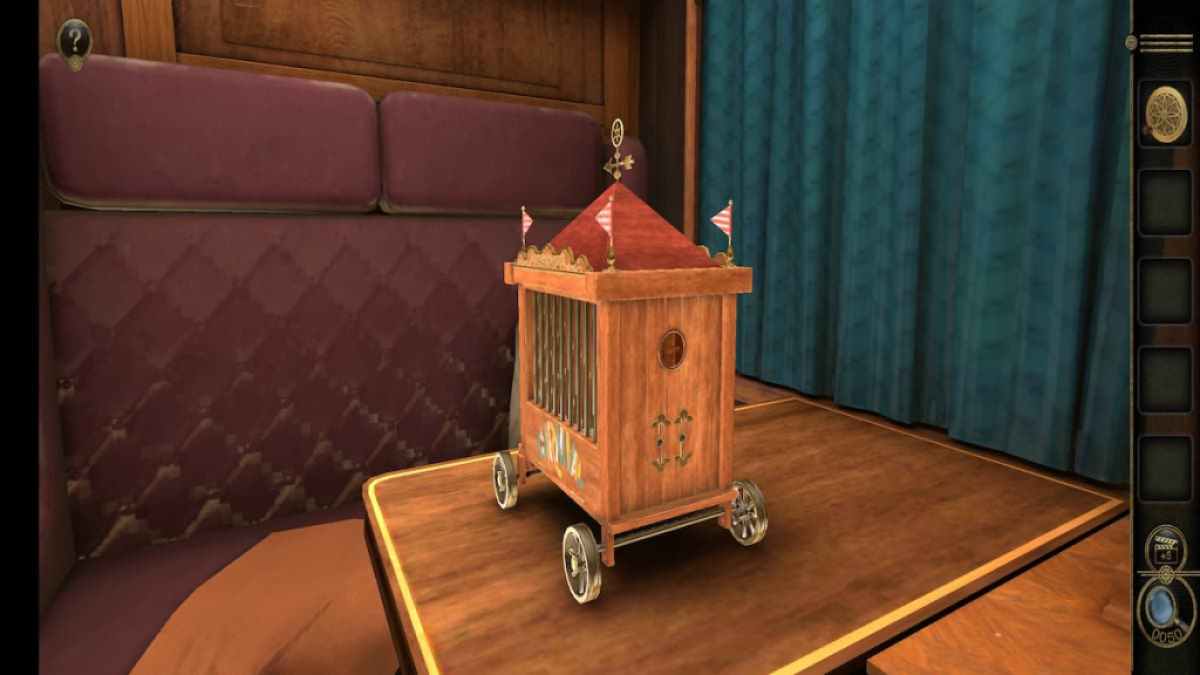
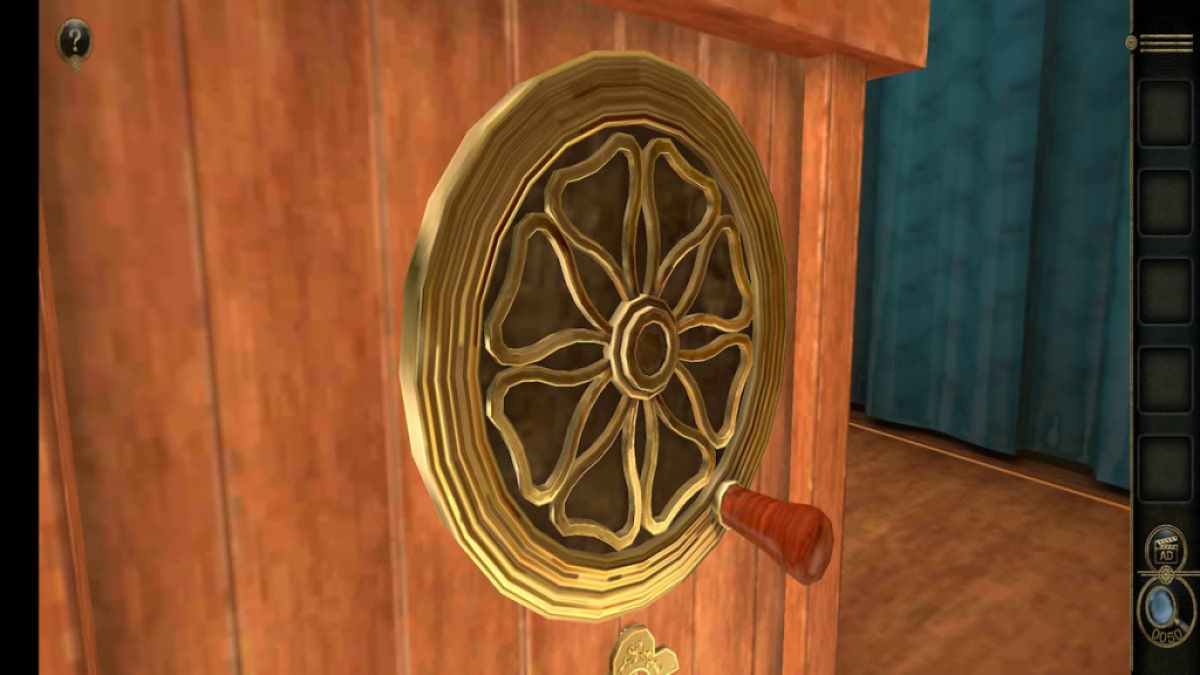
Then direct to the circus cart in the centre of attention . Looking at it from the right will reveal a round empty space .
Place the Wheel here .
turn out the Wheel clockwise , which will rotate the conditions vane at the top and take into account the flags to be rotated freely .
Screenshot by Pro Game Guides
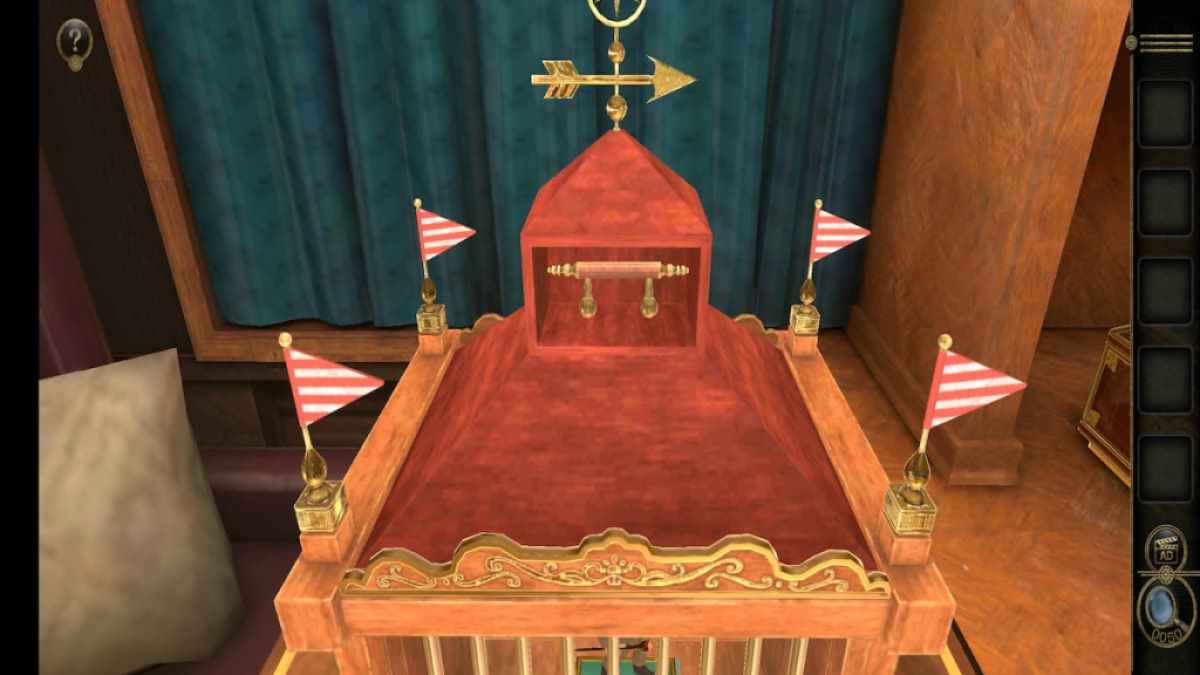
Rotate the flag so that they all front the direction of the pointer to unlock a Handle .
The Handle can be placed on the right side beneath the wheel . pull up it to reach the bars on the cart so that the monkey figure can be grab .
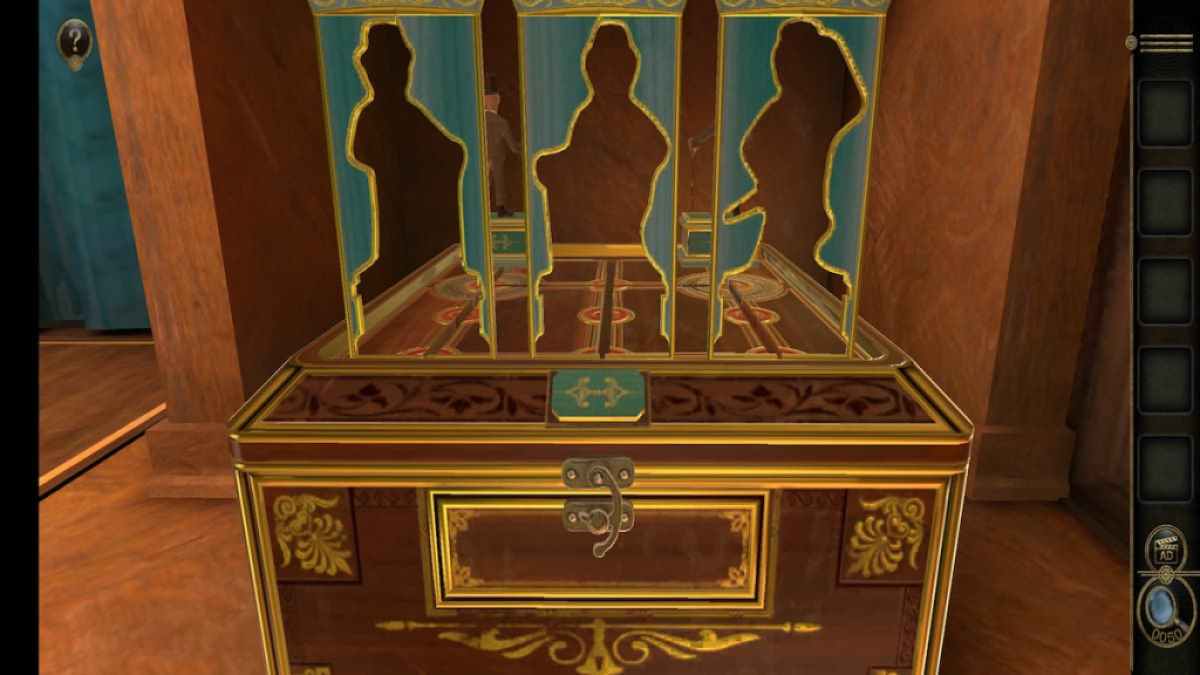
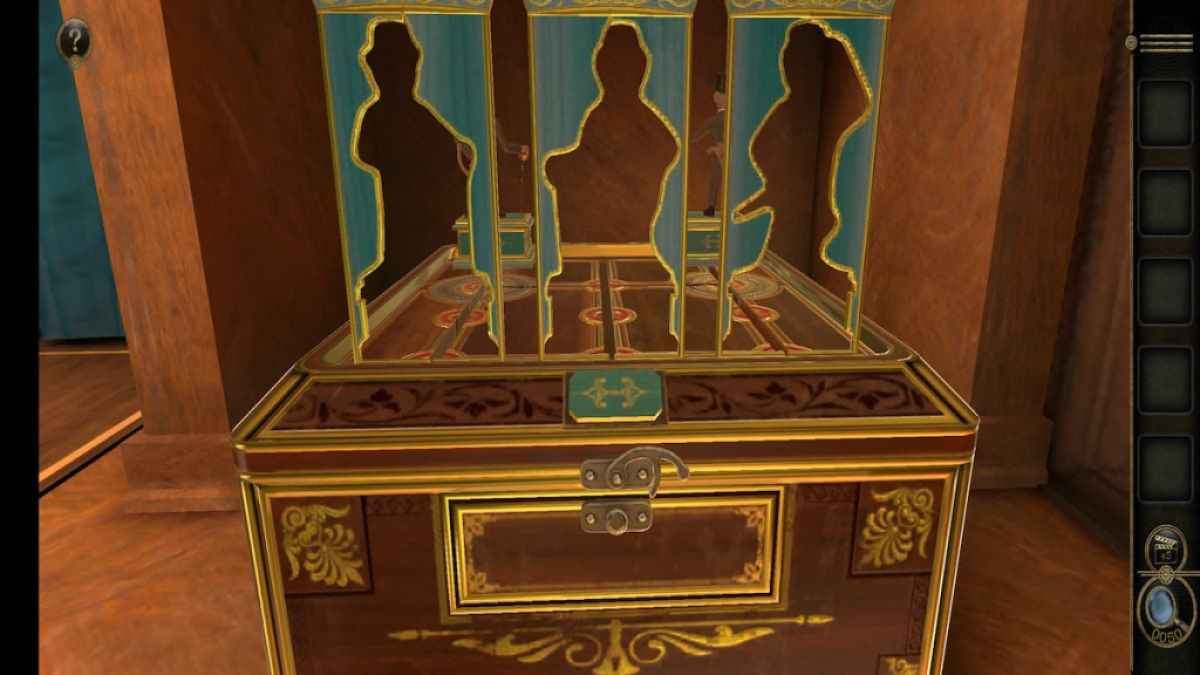
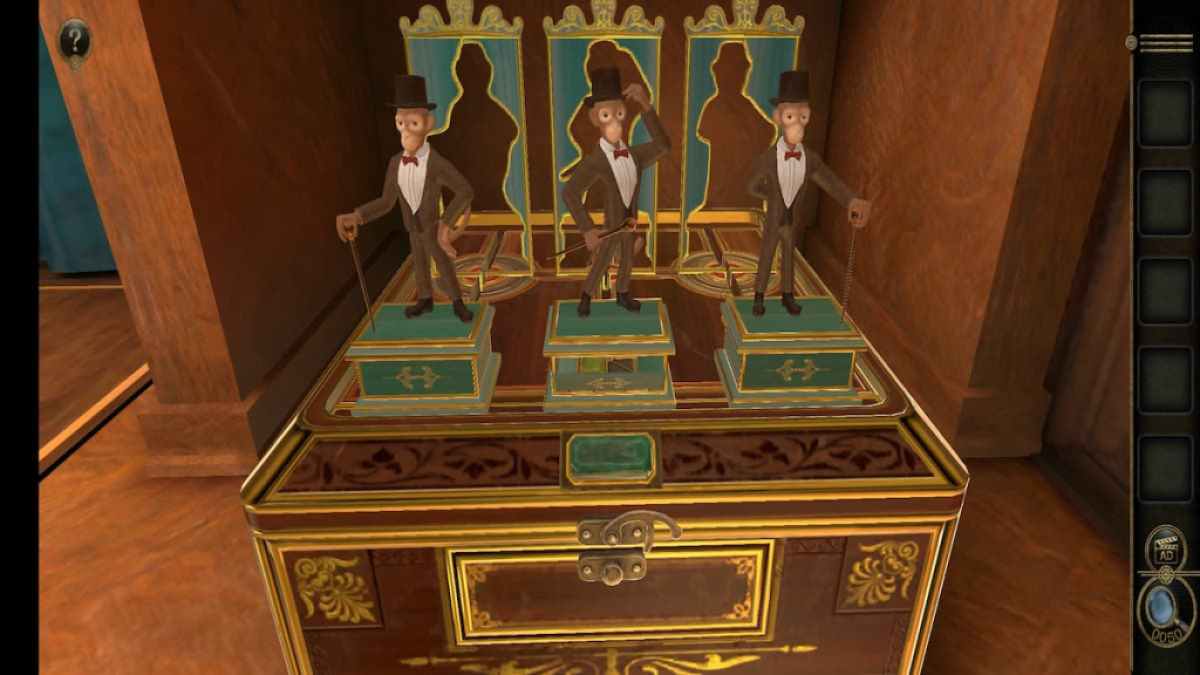
Then place the Monkey Figure in the empty plinth at the back of the corner .
Screenshot by Pro Game Guides
To solve the puzzle , you take to move the standees around so that they ’re in the third row of the tower of the number they touch . Standees can be moved into other column from the first and third rows , with the figures turning to face the front when a standee is directly in front of them . Solving this will give you a Square Carving and remove you from the circus room .
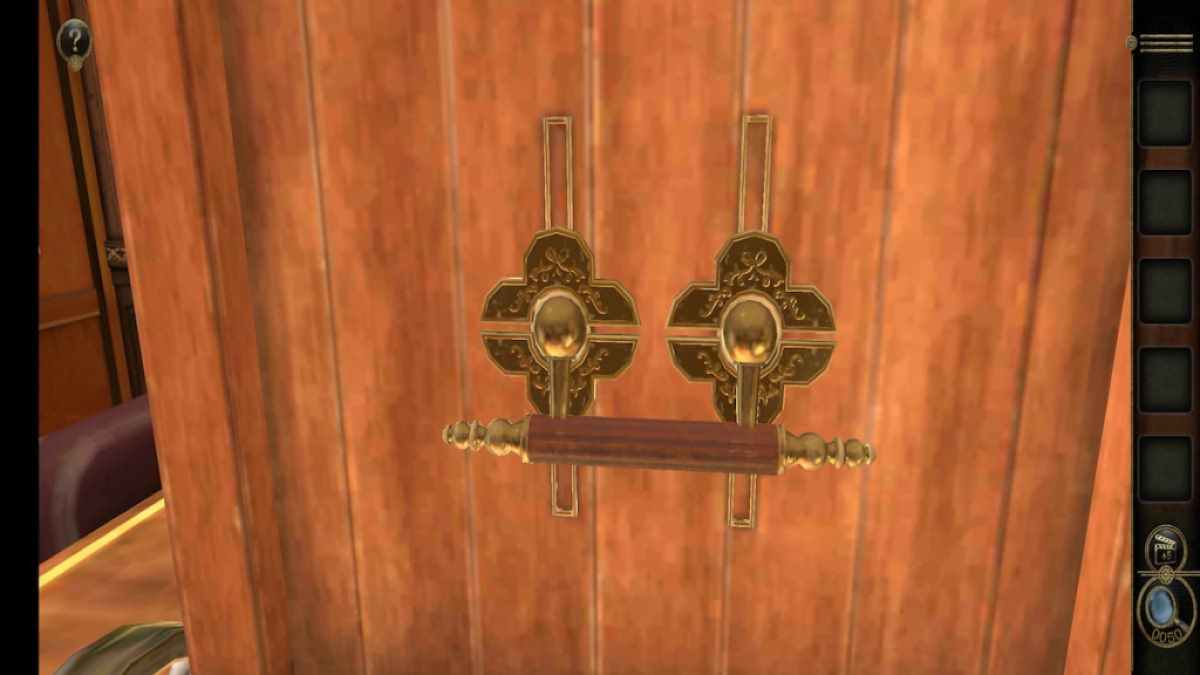
Bar puzzles
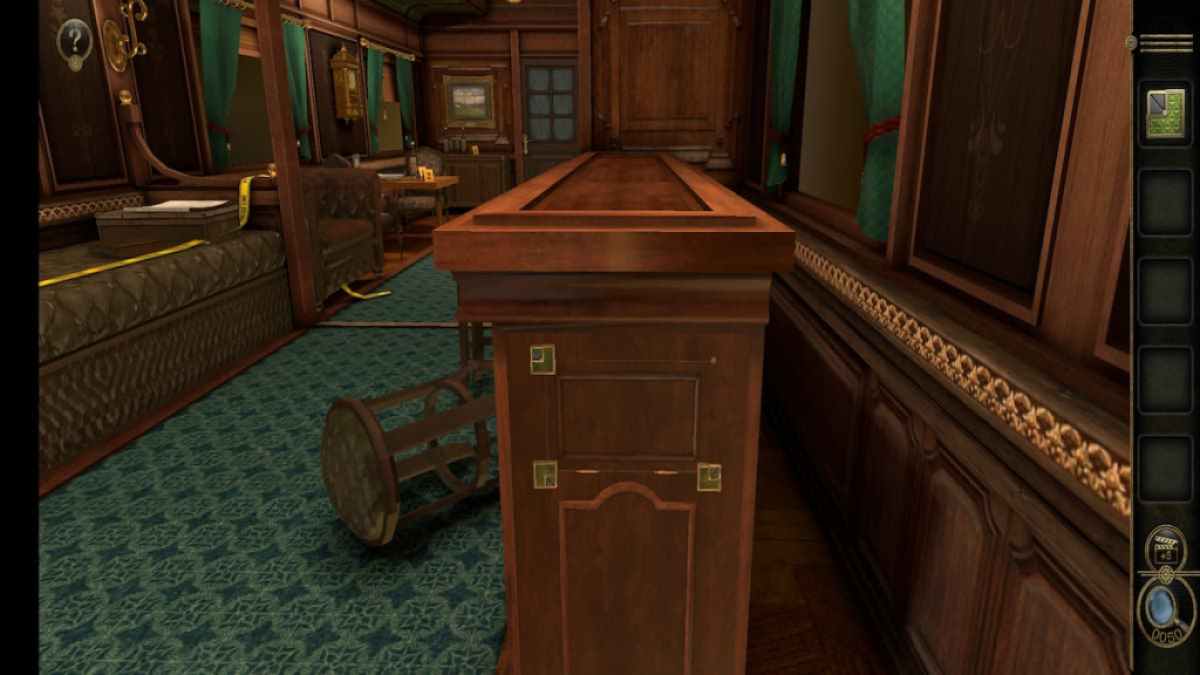
Return to the rejoinder where the Record was in the first place placed .
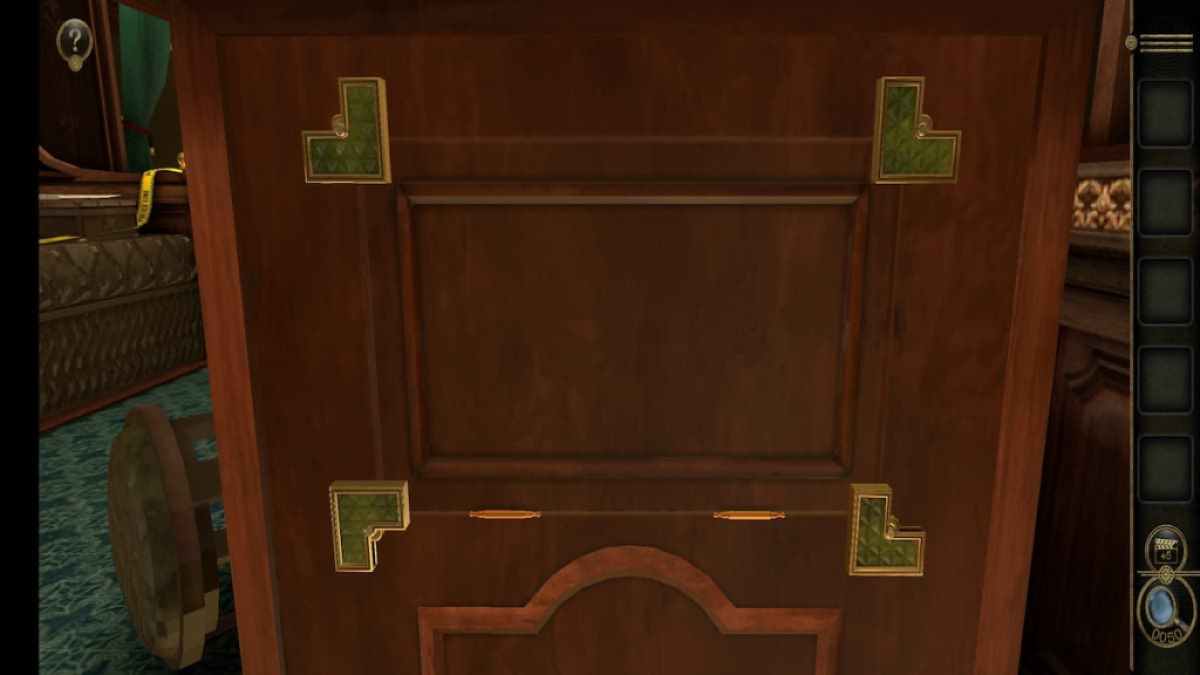
aim the Square Carving at the top right street corner of this hidden compartment .
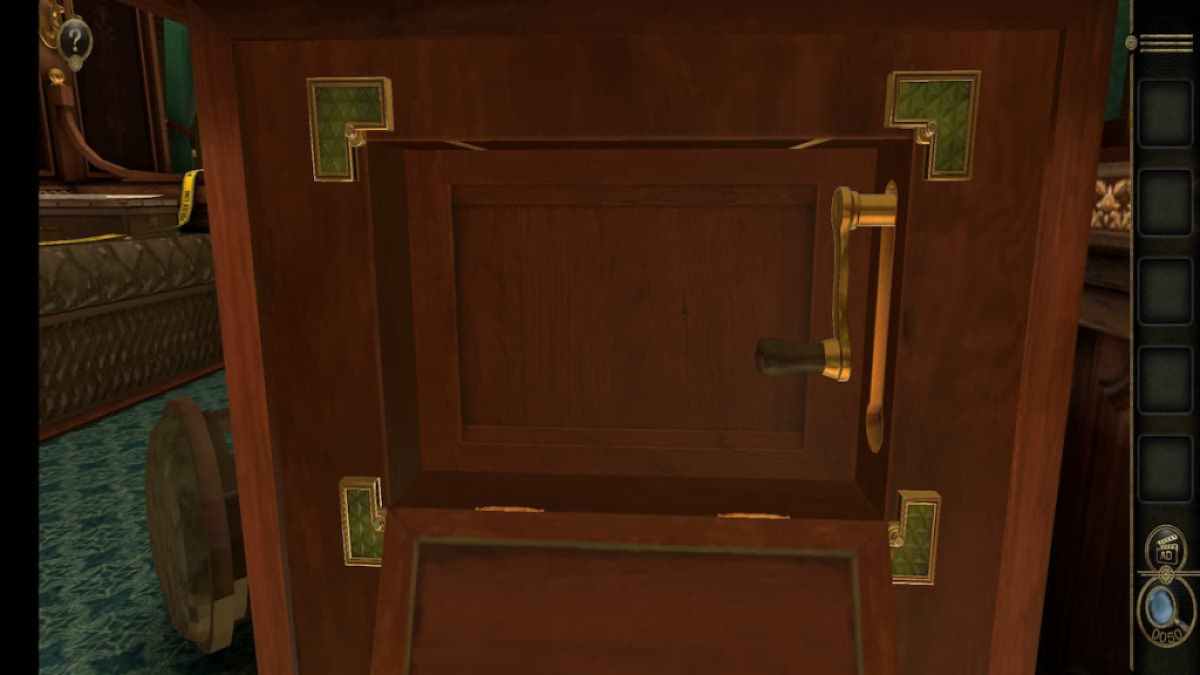
revolve the Square Carvings so that their empty spaces face the puzzle . This will unlock a Crank , which will be placed into your inventory after being used to open up the next puzzle .

Screenshot by Pro Game Guides
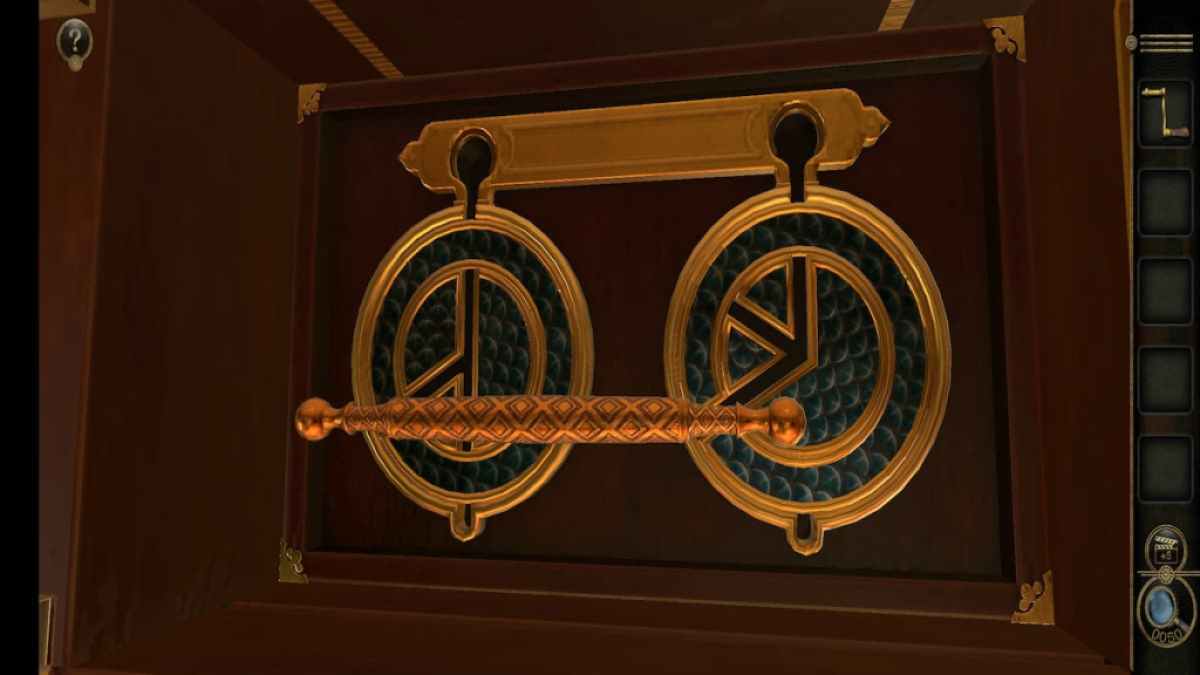
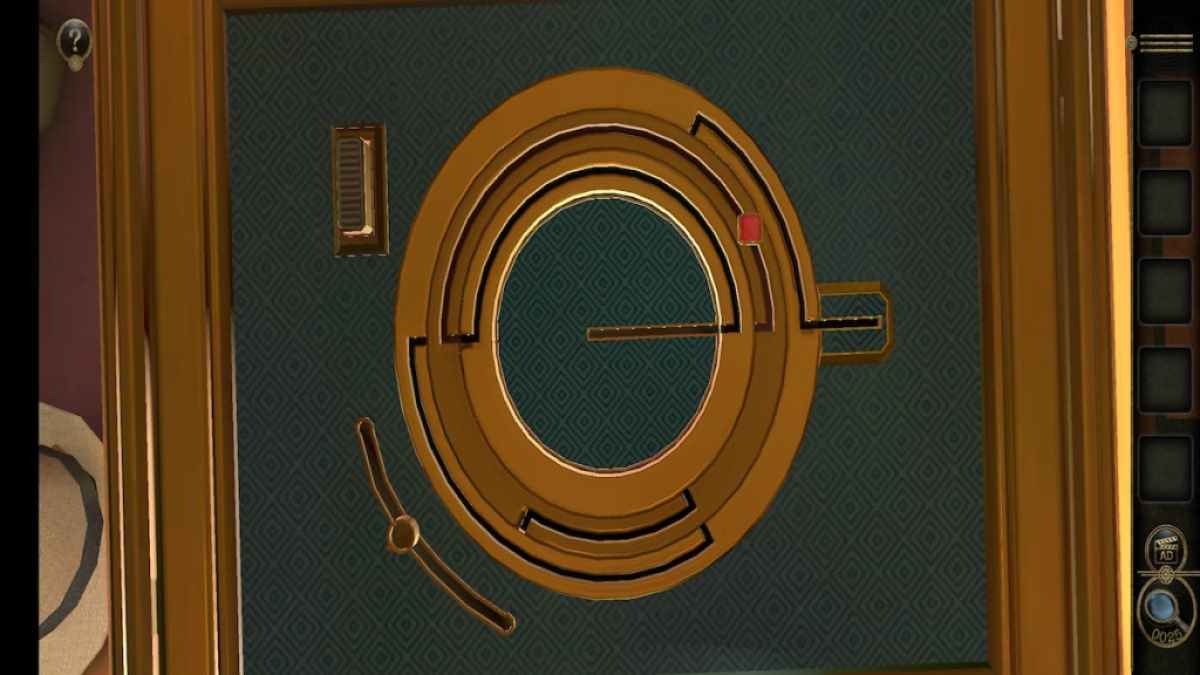
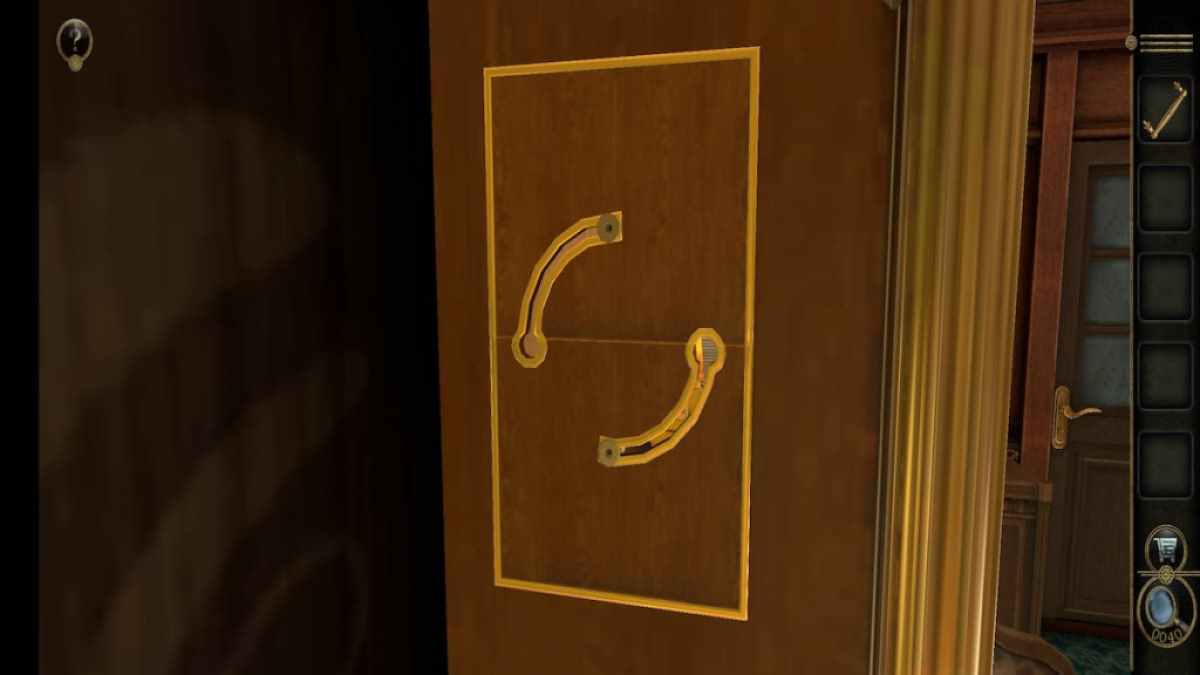
This puzzle requires you to get the golden handle from the top of the mystifier to the bottom by rotate the rings to create a path .
First , rotate the interior ring on both side of meat so that they have a pathway guide to the lower unexpended corner .
Slide the handle down to the end of this path .

Screenshot by Pro Game Guides
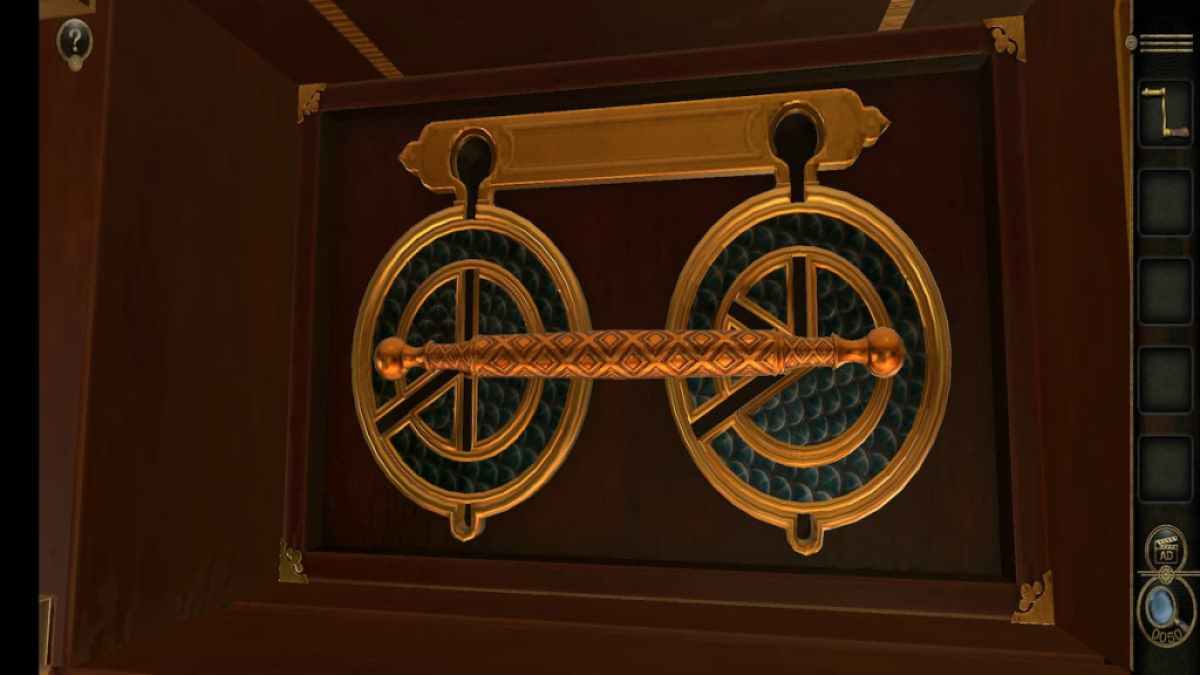
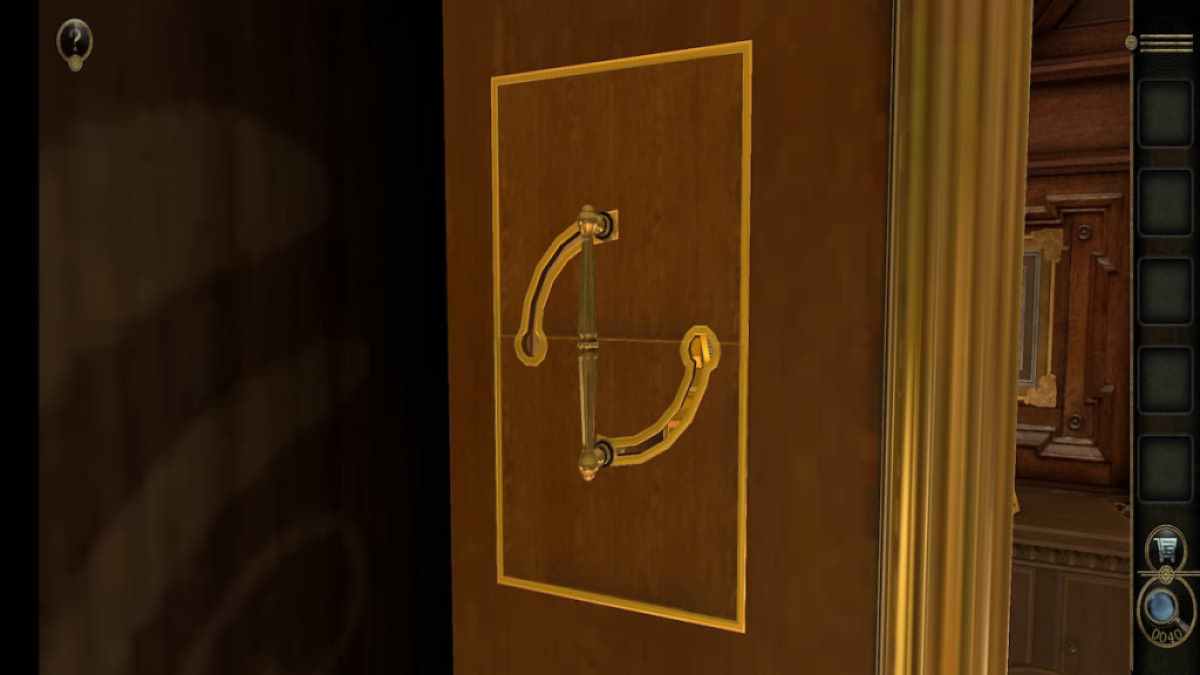
Then sprain the outer rings so they extend this path even further .
Pull the handle down into the outer rings .
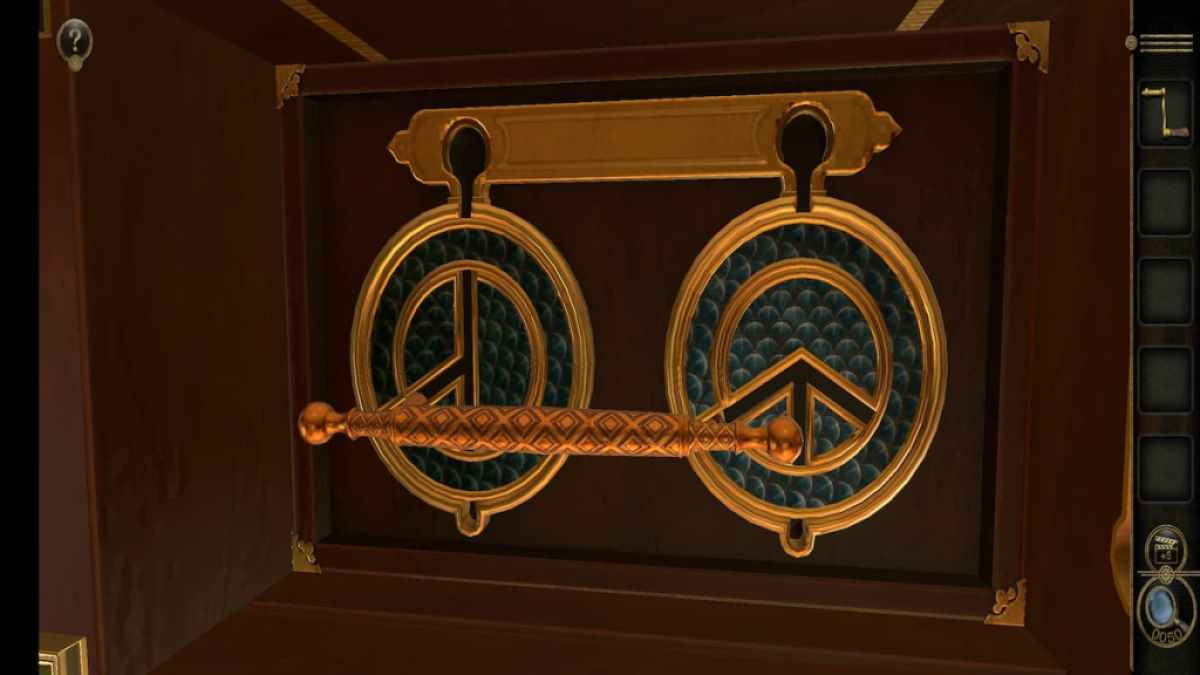
reel the inside tintinnabulation so that they form a track from the lower remaining corner toward the bottom of the mystifier .

Screenshot by Pro Game Guides
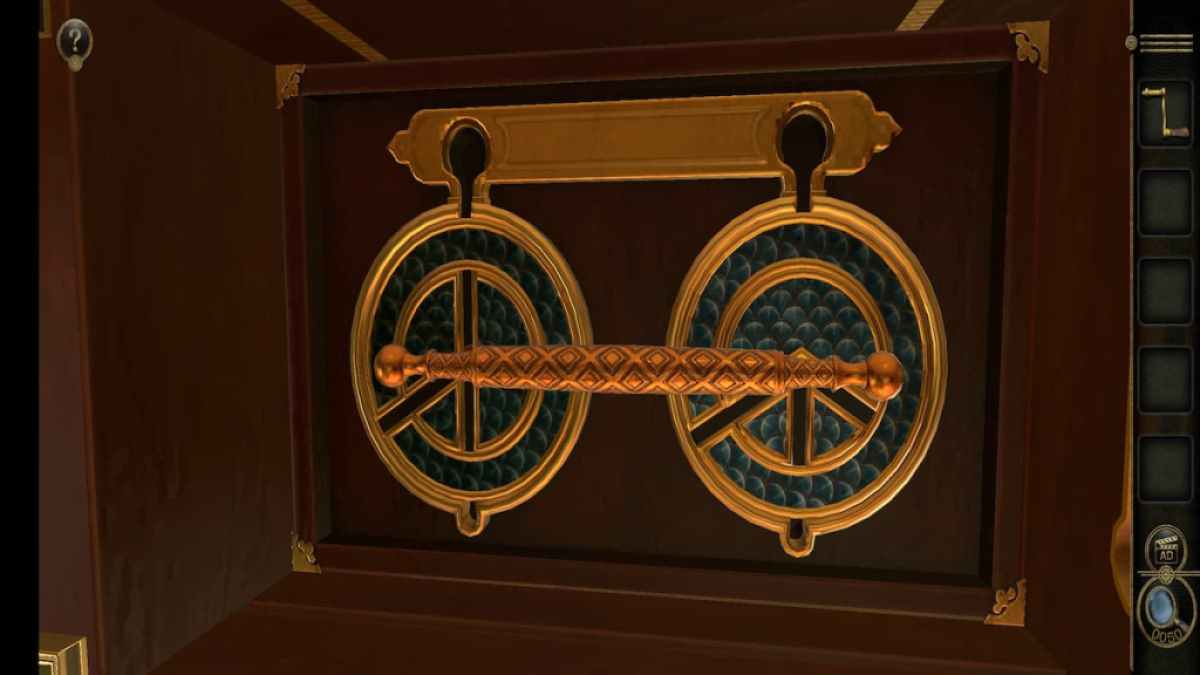
Complete the teaser by circumvolve the out ring to finish the path and dragging the handgrip down .
This will unveil a curing of wagon train raceway on the barroom , which will be ignored until subsequently .
Tresor room
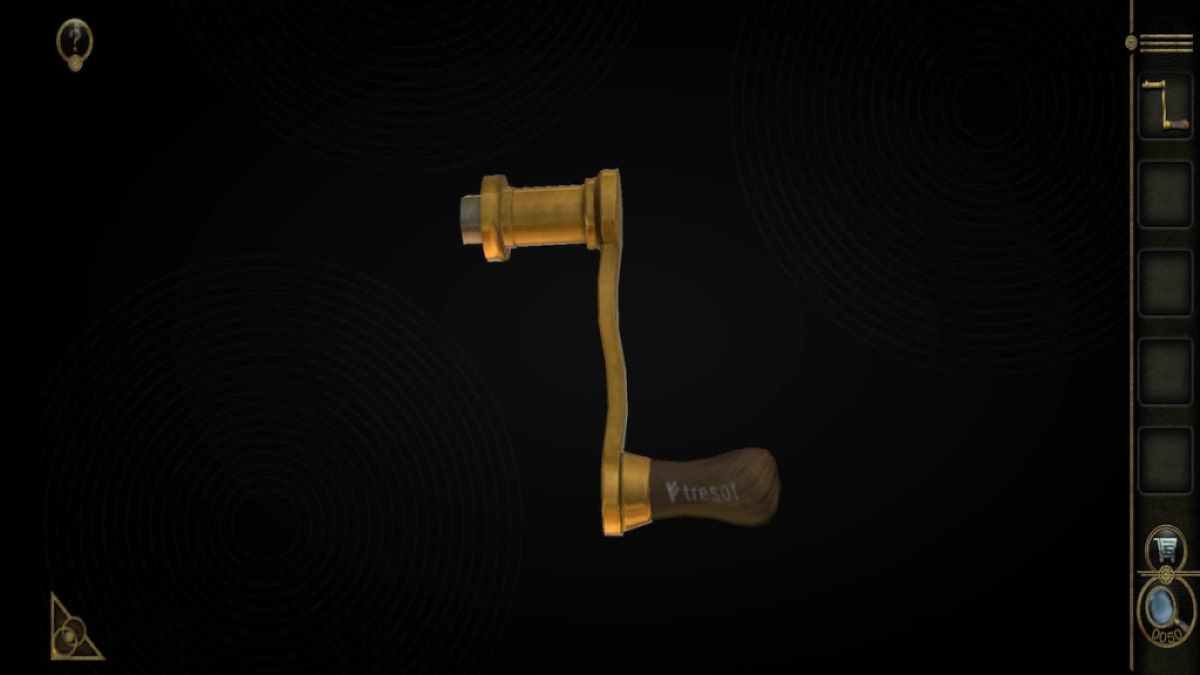
If you open up the Crank handle in your inventory , you ’ll notice that it has a symbol and a code that accommodate the mystifier on top of the record actor .
Head over to the record thespian to enter the code , which consists of the middle symbolisation and the word " Tresor " . This will unlock the door to another cloak-and-dagger way , which can be entered the same way as the circus room .
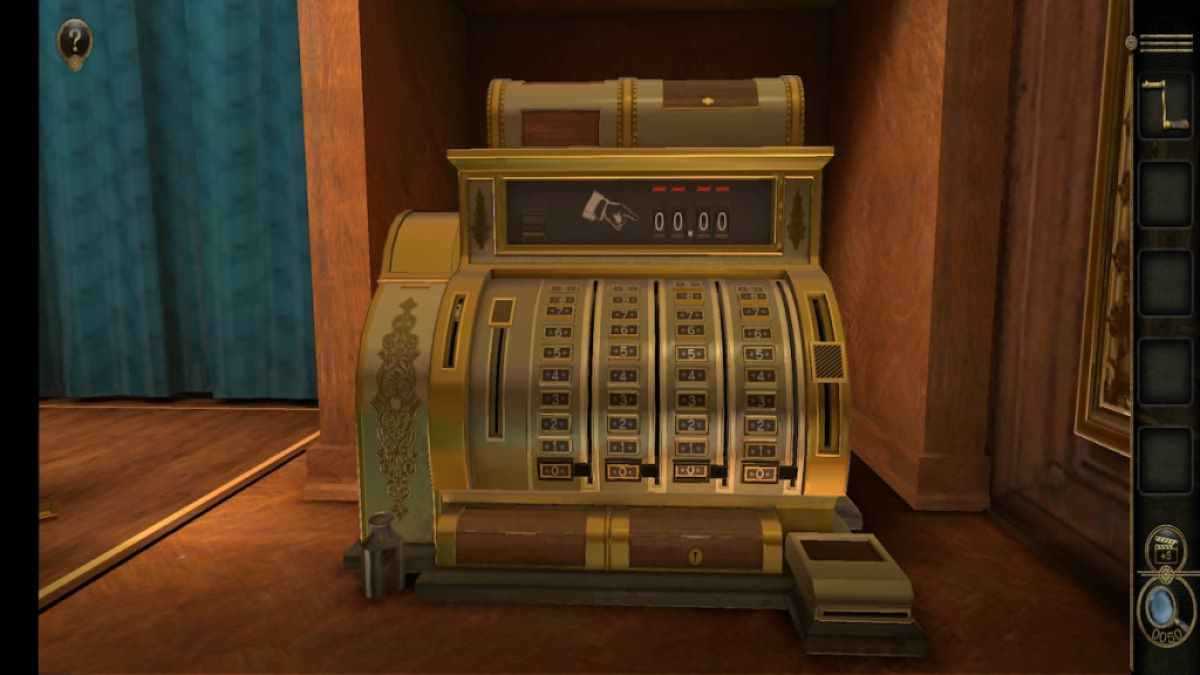
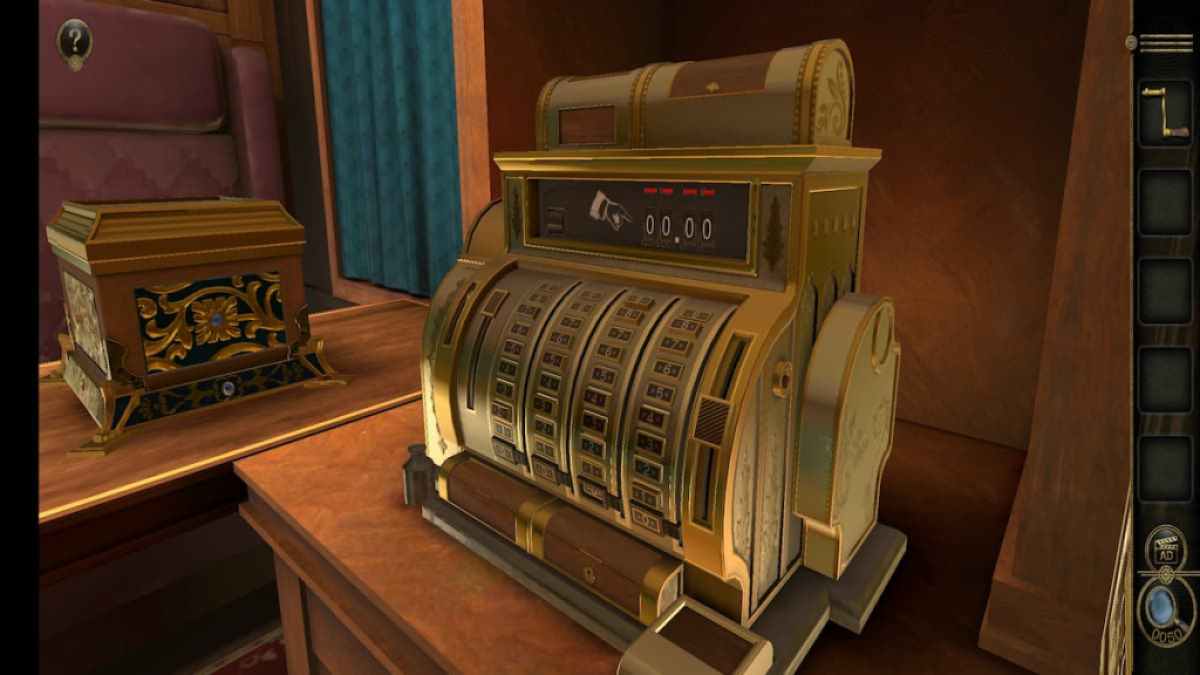
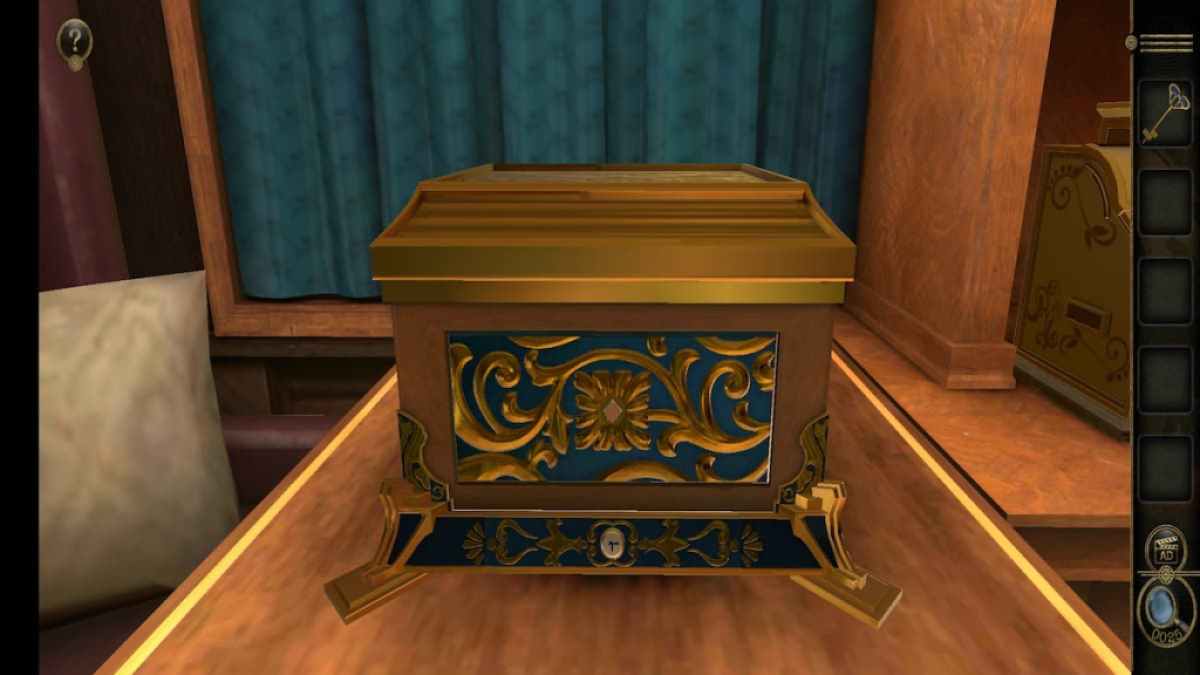
The Tresor elbow room has the same general layout but with an antique boxwood in the center and a Johnny Cash registry to the right .
Screenshot by Pro Game Guides
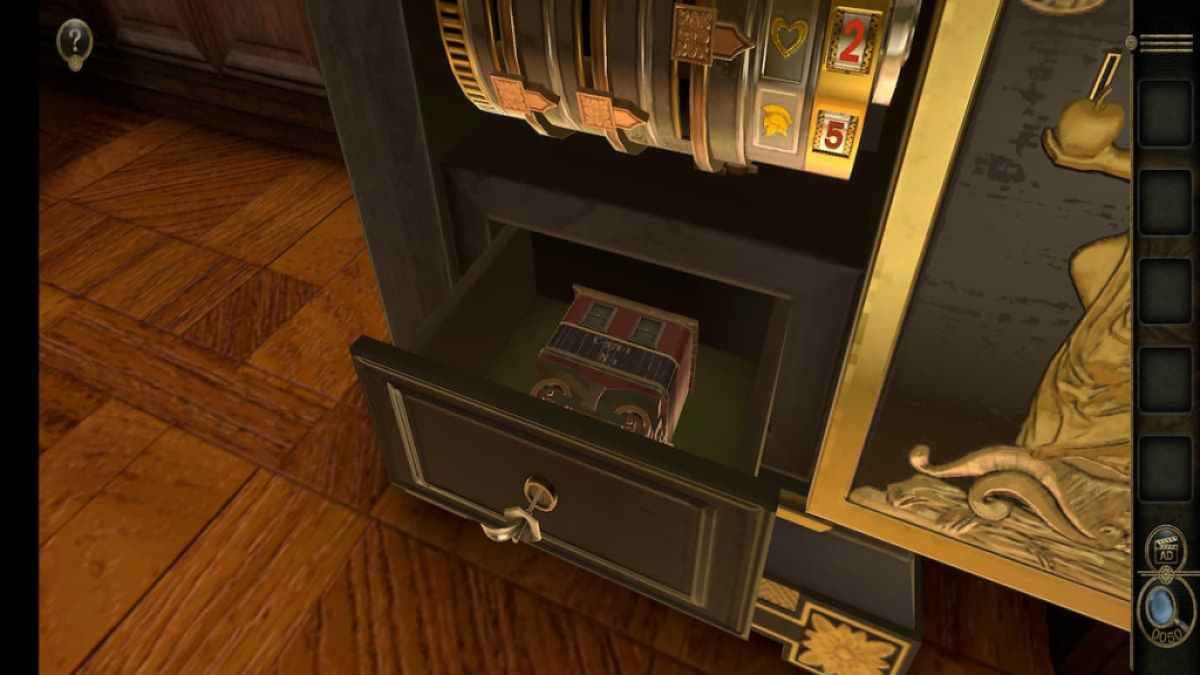
Start at the immediate payment register .
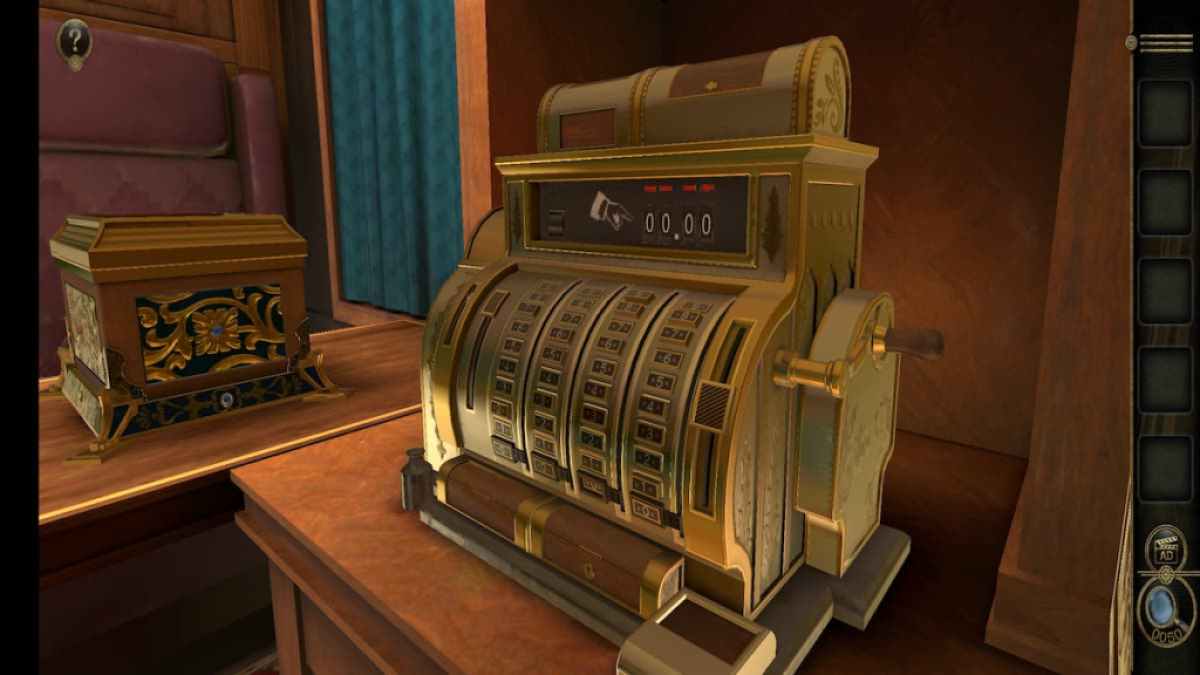
Rotate your tv camera to the right to see that the register is missing a while .
Place the Crank Handle into this fix .

Screenshot by Pro Game Guides
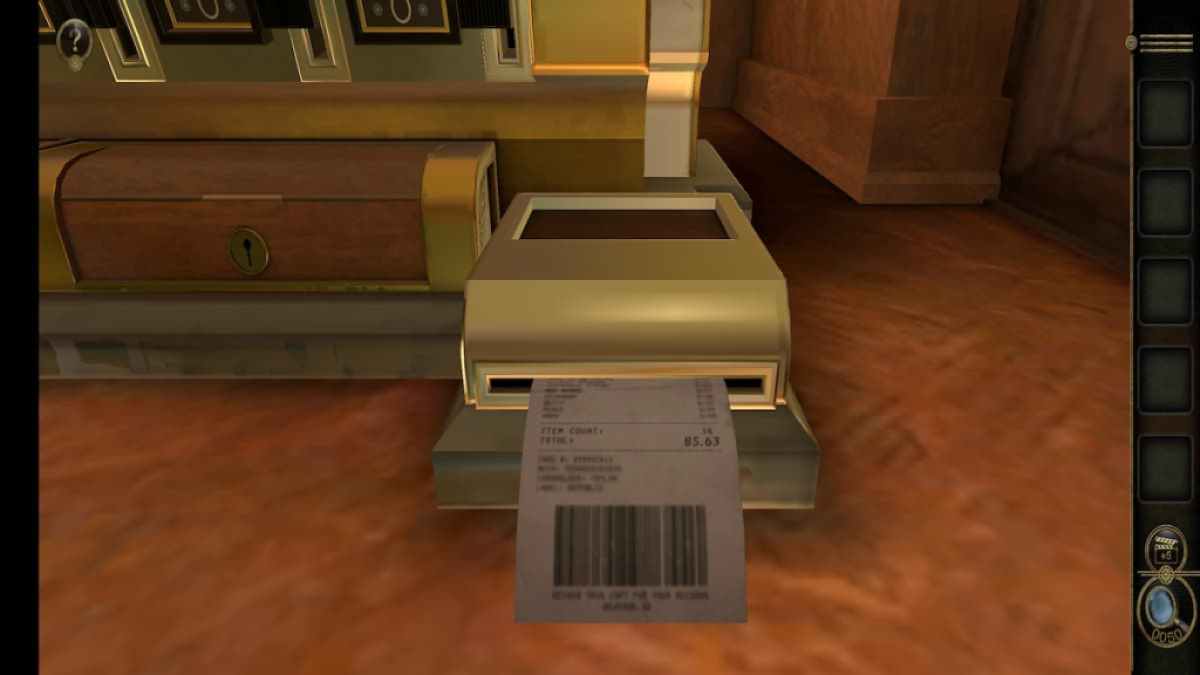
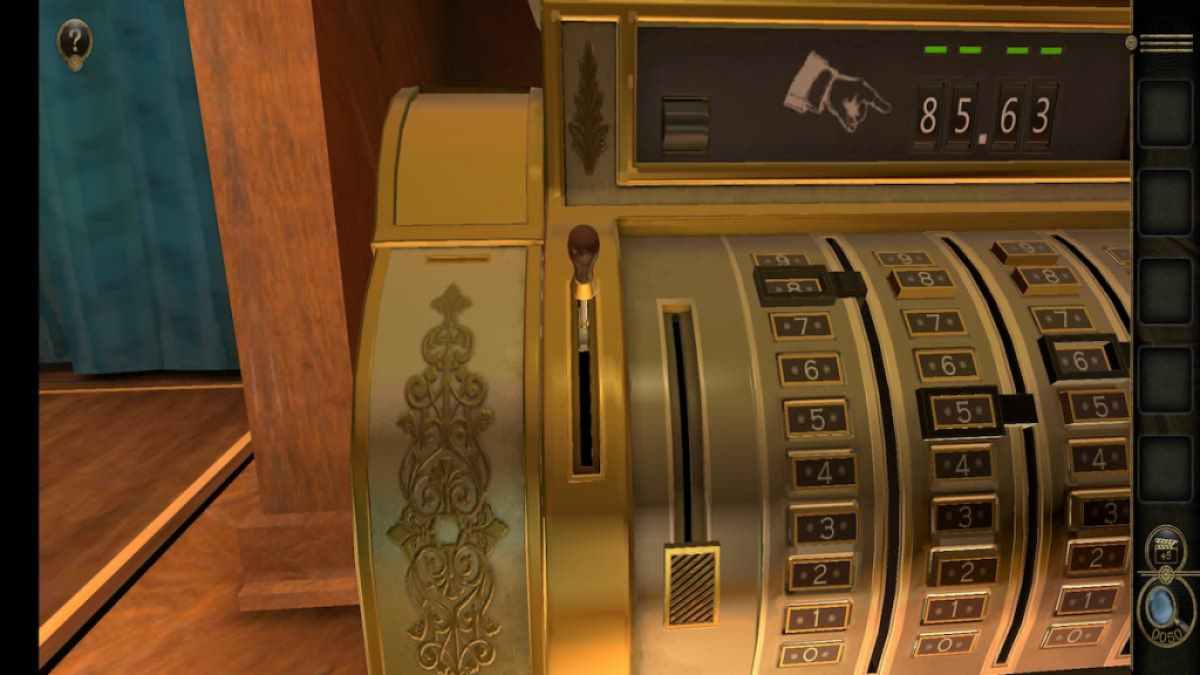
Crank the hold to get a receipt . Write the numbers down , as you ’ll need them now .
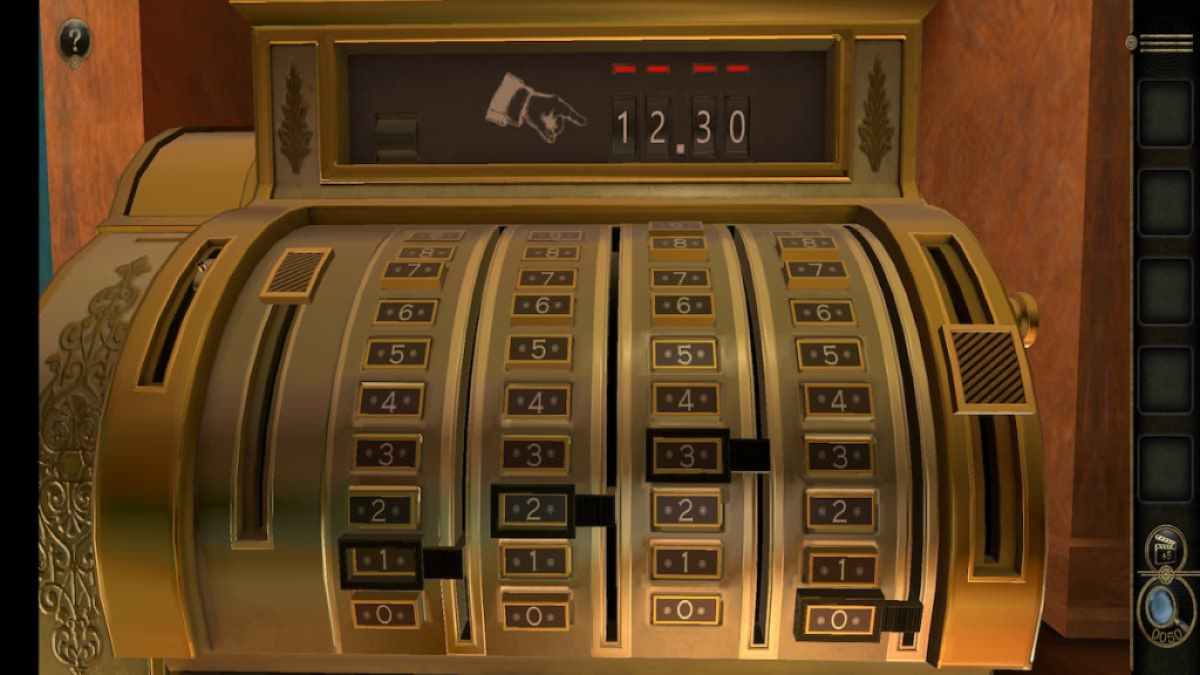
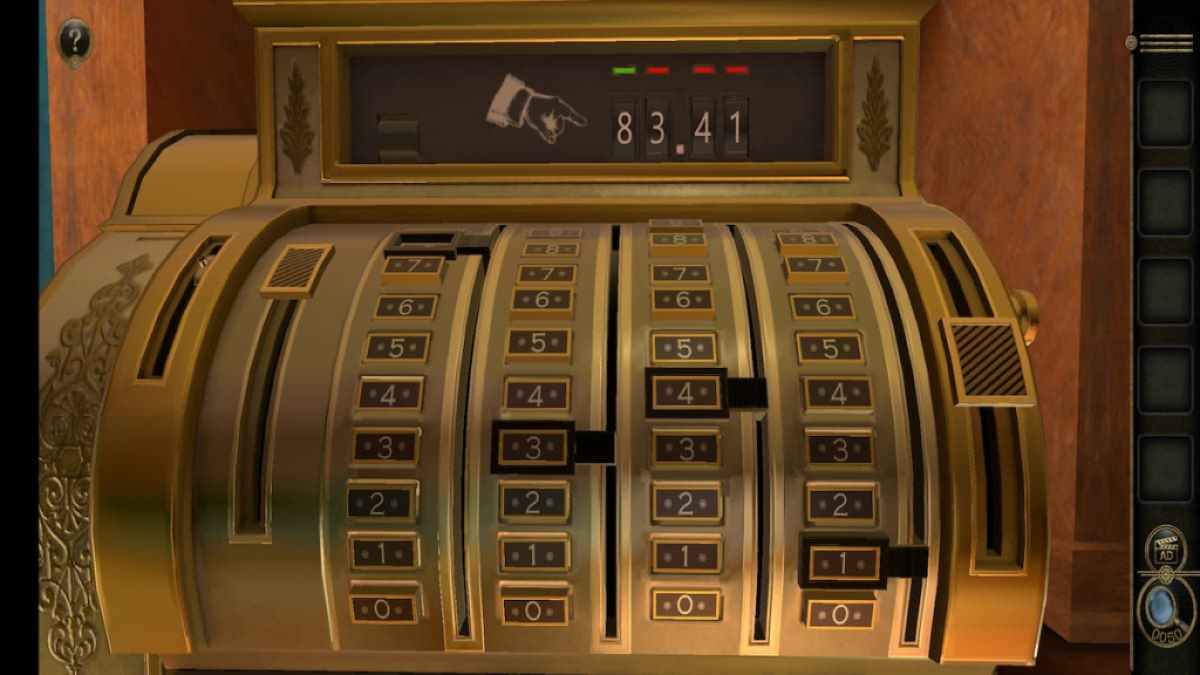
This puzzle involves moving the sliders on the cash register up and down to get the amount on the cash register ’s cover to twin the amount on the receipt . right numbers will have a green light above them , while the light above incorrect numbers will stay red .
The switch on the left pushes some of the switches into the air while lowering others into the base . resurrect switches play as barrier to the yellow-bellied terrapin , so expend them carefully to forbid numbers from go too gamey or too low . utilize the slider at the right to move the black slither mechanisms up and down and direct switch the numbers on the blind .
Screenshot by Pro Game Guides
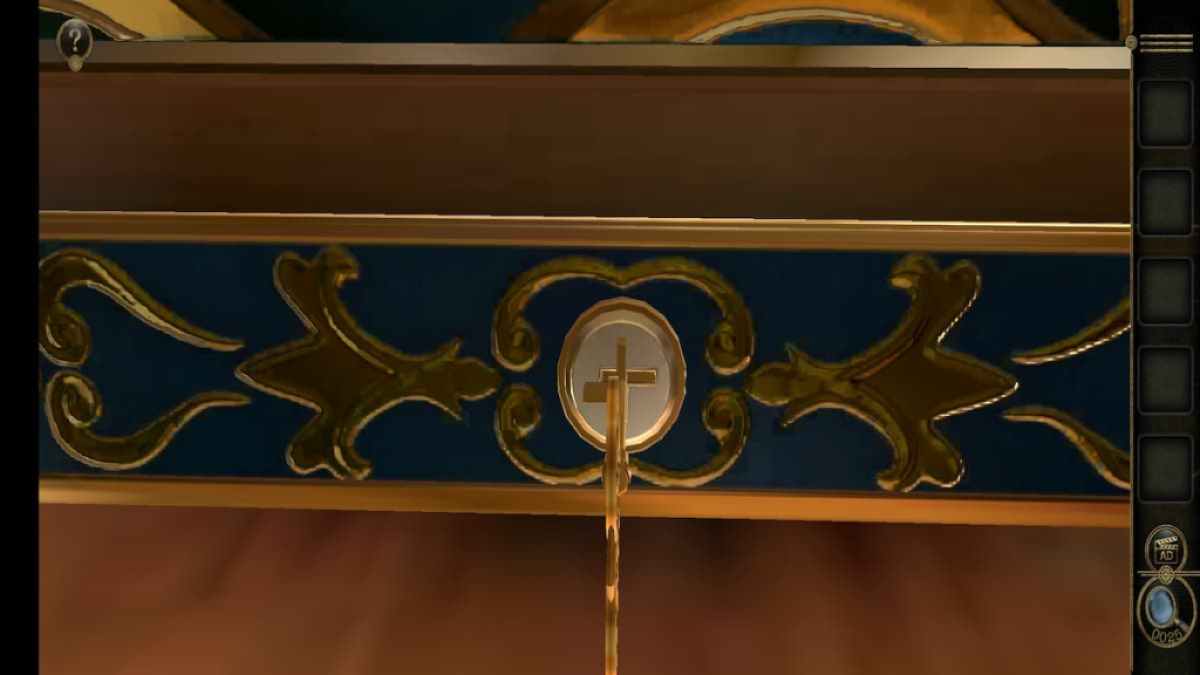
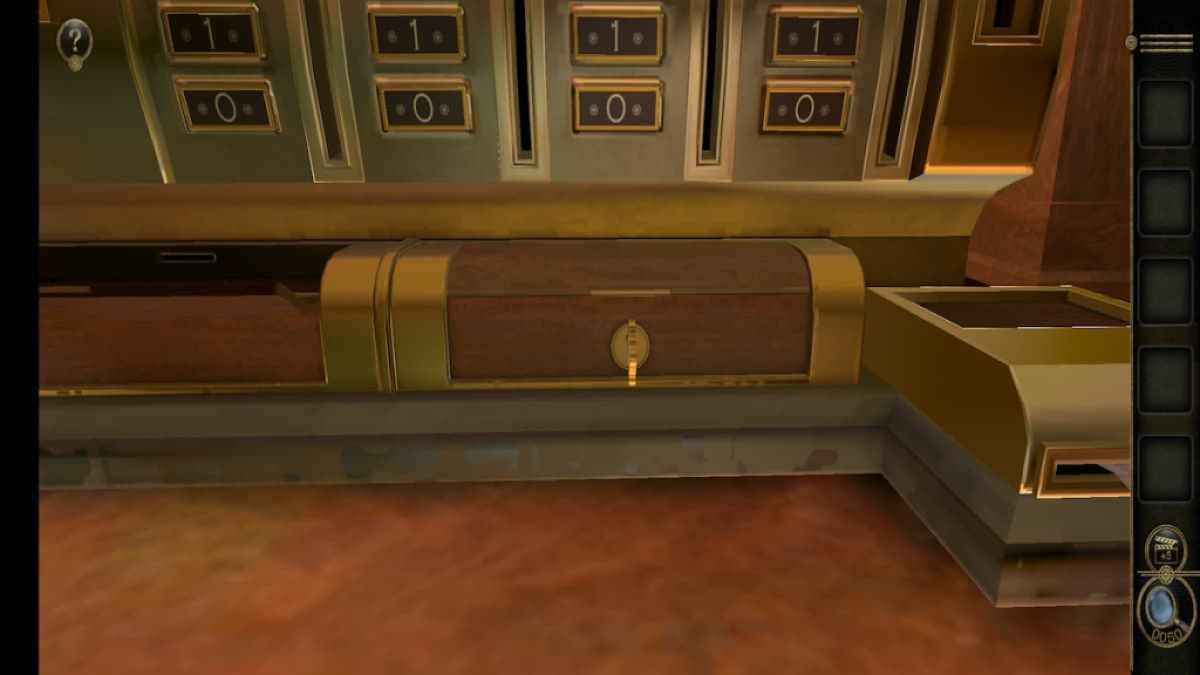
Completing the register ’s first puzzle give you a Key , which can be used in the keyhole at the base of the antique box .
Insert the Key into the hole , rotating each section until it fits . Successfully insert the Key will give you a Pull Handle .
Return to the cash register and inclose the Pull grip into the empty gap to the left of the slider .
Screenshot by Pro Game Guides
associate : Echo Bay Murders – Chapter 1 Walkthrough
Pull the handle down to get Double Locking Pliers , which can be used on the front of the antique box .
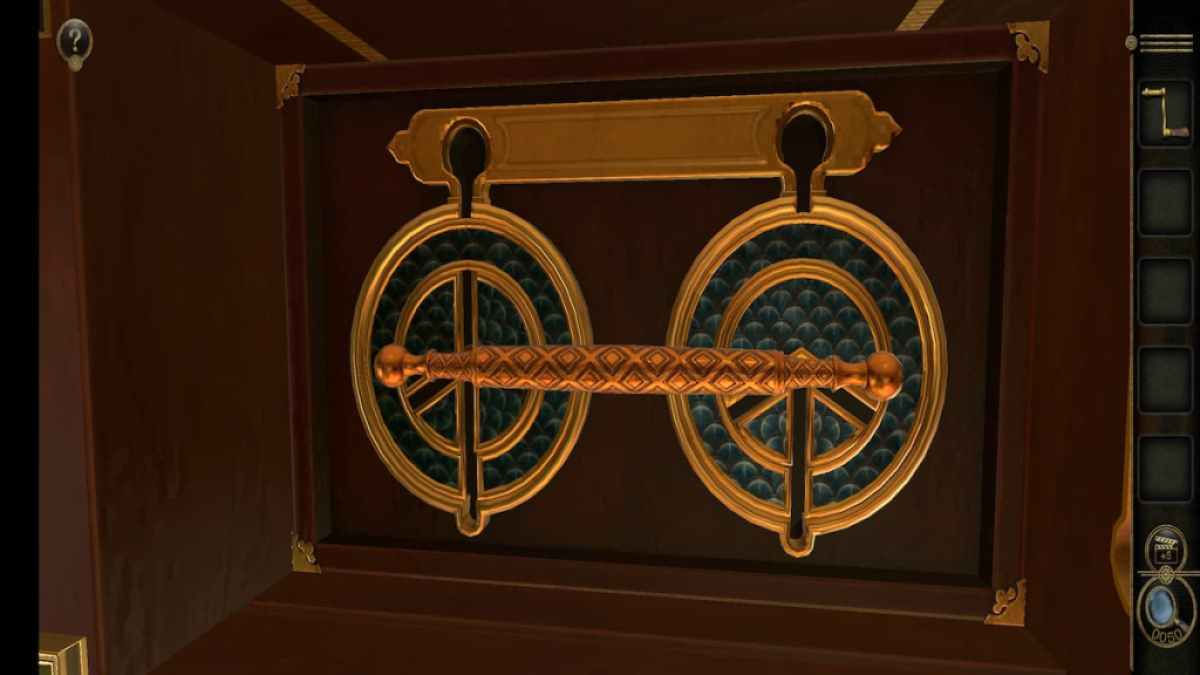
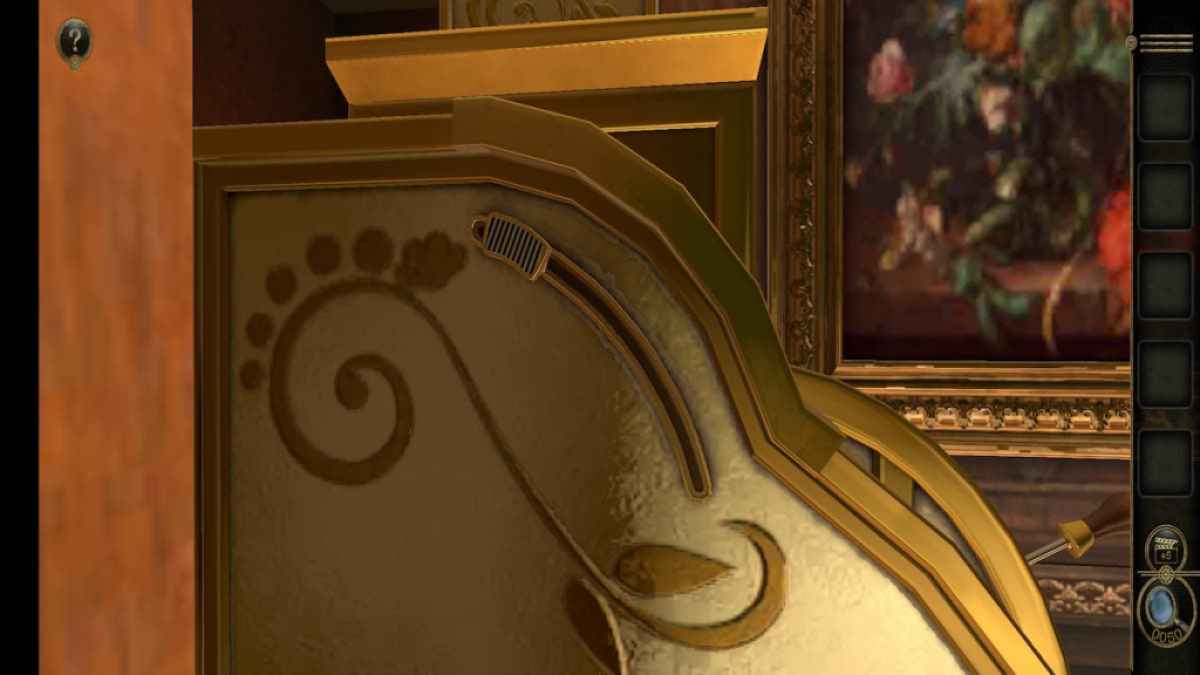
Rotating them unlock a rotating slider puzzle at the top of the boxful . The button on the remaining twitch the mystifier , while the slider on the odd rotates all of the anchor ring that the gem Pseudemys scripta is not presently on .
Screenshot by Pro Game Guides
The goal of the puzzle is to get the gemstone slider to the centre . The cognitive operation of nonplus to the plaza will vary , but it will involve this combination of middle and mall doughnut .
Getting the gemstone slipper to the center unlocks a Key , which can be used in the locked draftsman at the bottom of the cash registry . The locked drawer contains a Slider .
By rotate to view the left-hand side of the register , you could see a mechanism that is lack the actual slider slice .
Screenshot by Pro Game Guides
post the Slider at the top of this piece and slide it down to expel a colorful teaser .
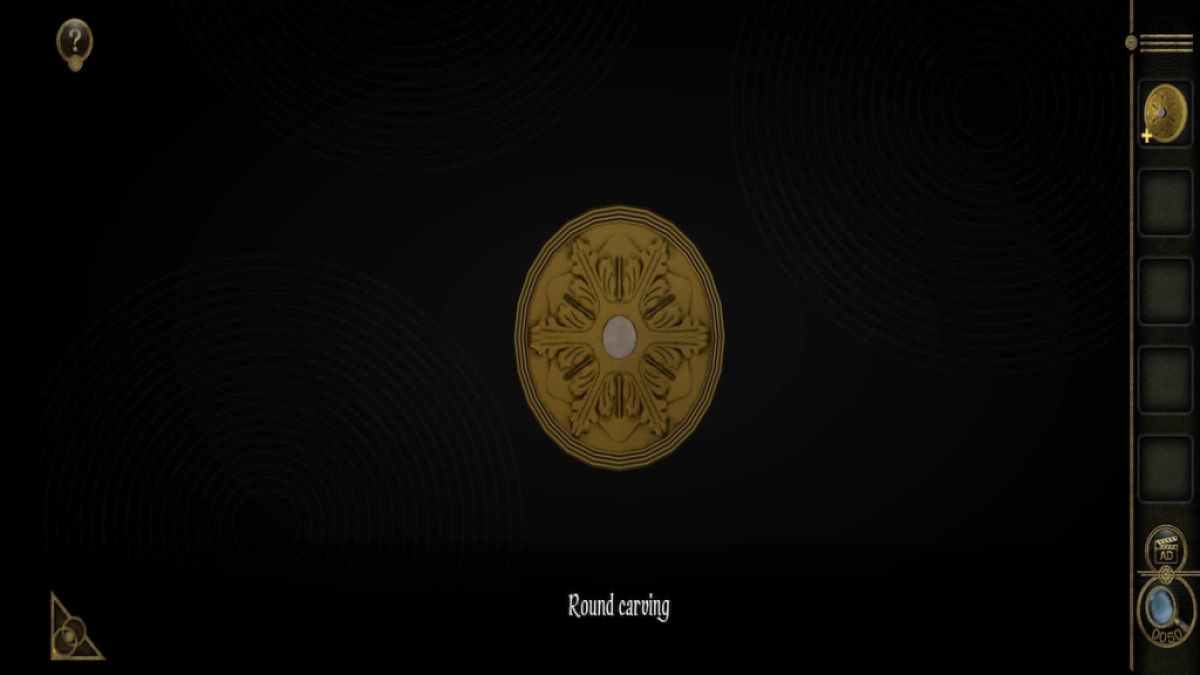
The goal of this teaser is to place each colored slider on the area in the puzzler with the matching semblance . The easy decree to do this in is the yellow slipper first , the immature slider second , the blood-red slider third , the empurpled yellow-bellied terrapin fourthly , and the blue slider fifth . Solving this will give you a Round Carving and kick you out of the Tresor room .
Gray cabinet puzzles
start the Round Carving and pull out the star - work piece on the back .
Now channelise over to the grey cabinet , which has an indention on the front indistinguishable to the shape on the Round Carving .
put in the Round Carving into this whole to unlock both a lever and a secret compartment on the storage locker ’s left side containing a Tetrahedron .
Screenshot by Pro Game Guides
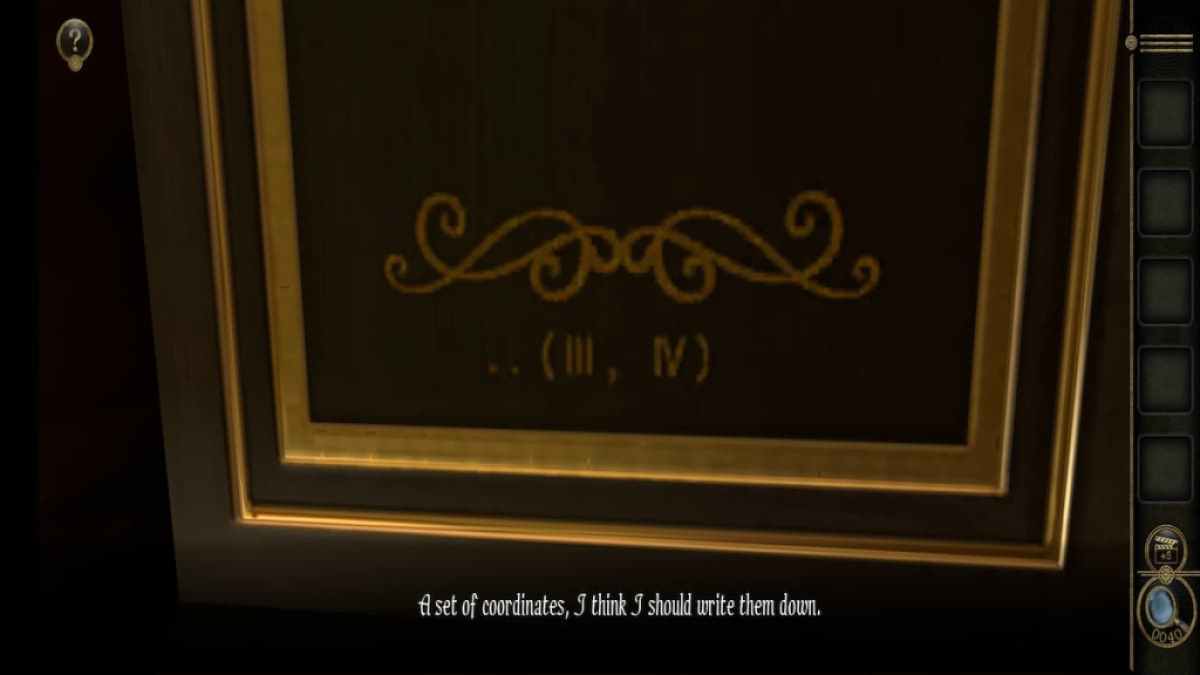
While on the remaining side of the locker , examine the side to find two pane preceding a set of coordinates . Take note of these for a next puzzle .
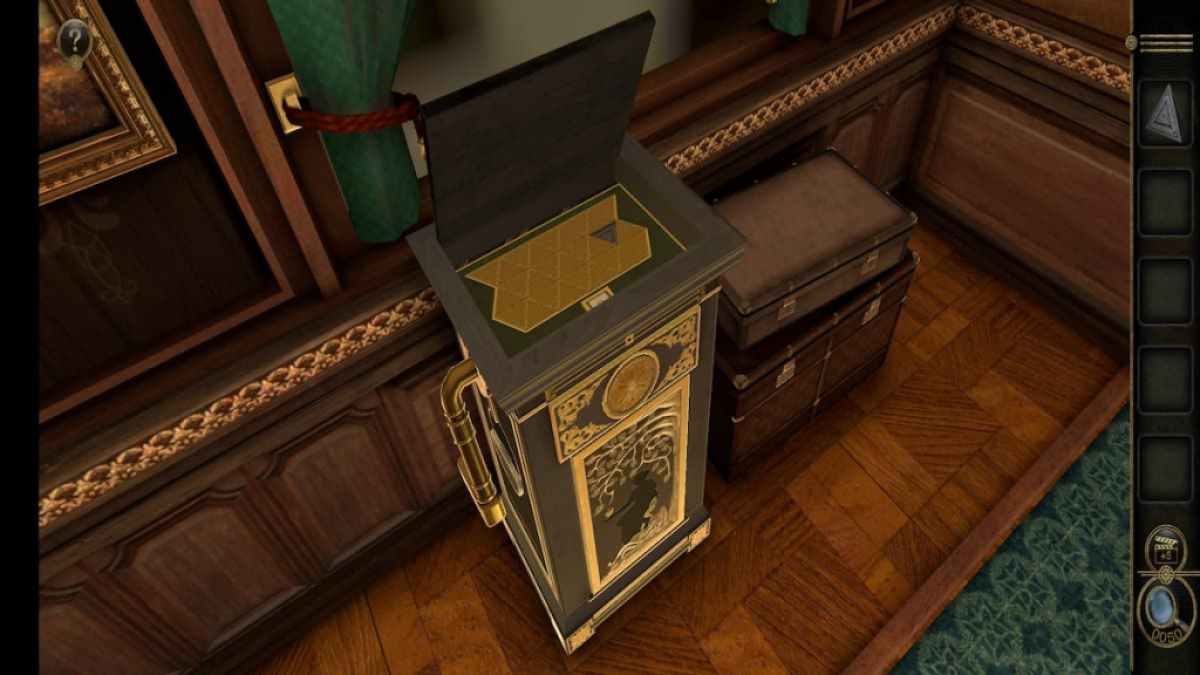
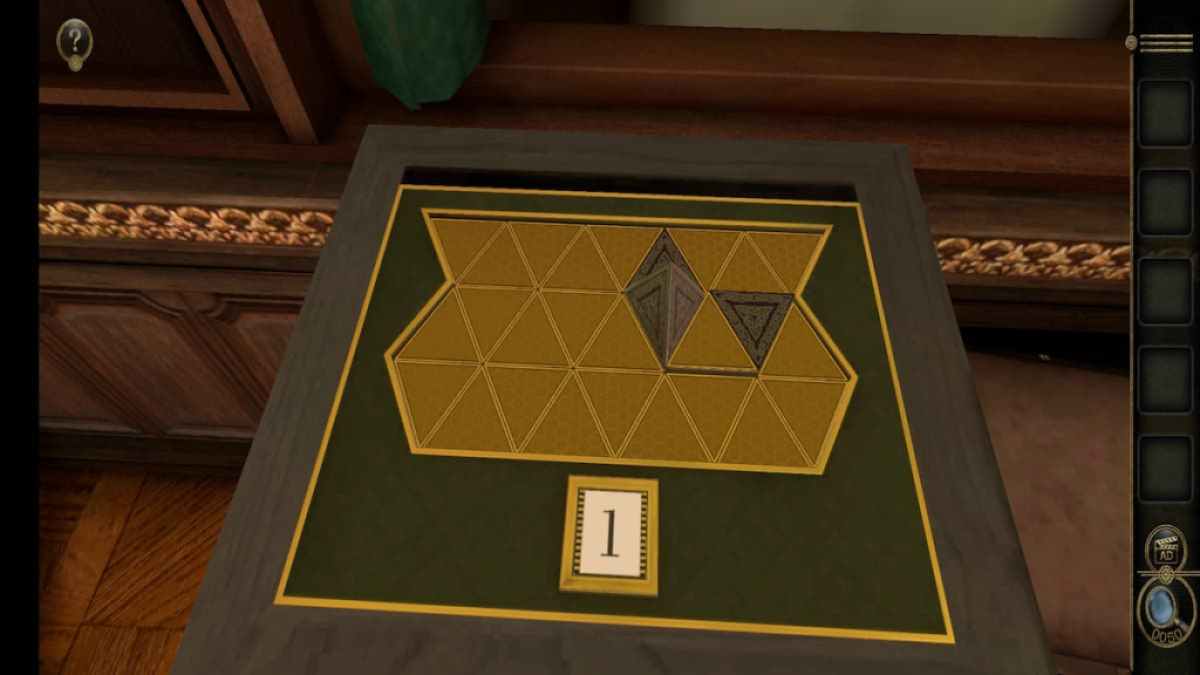
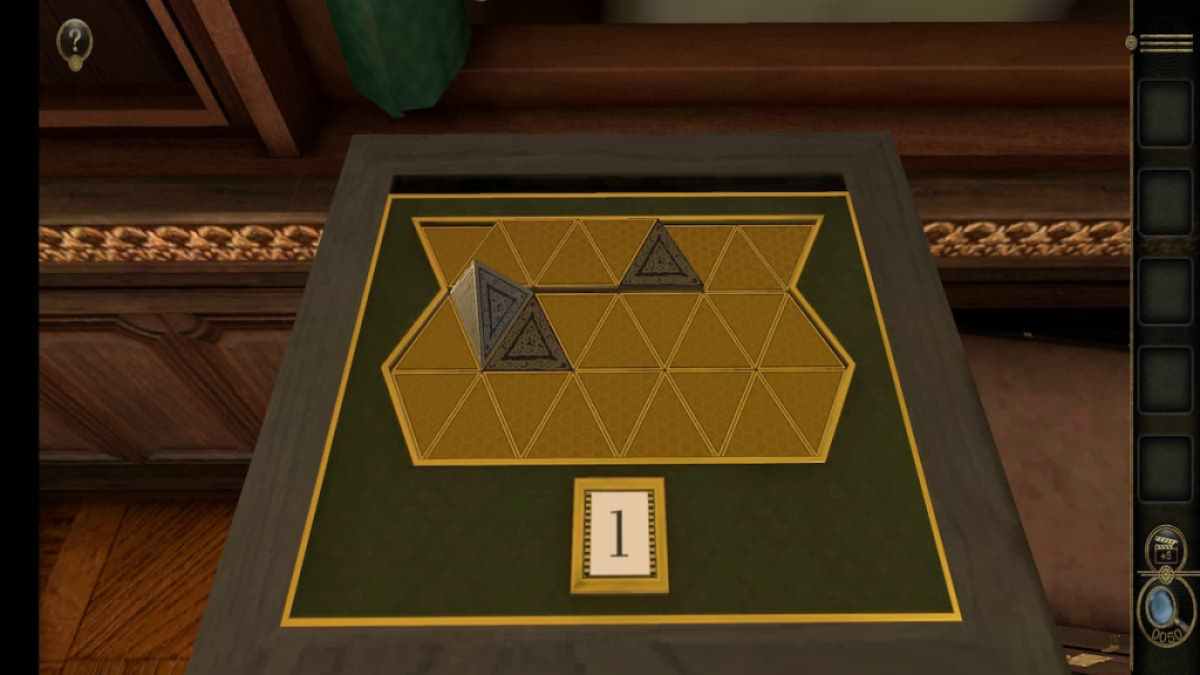
Now pull in the lever to unlock a board game on top of the cabinet . aim the Tetrahedron in the triangular crack to begin the biz . The objective of each round of this secret plan is to get the Tetrahedron from its starting position to the end lieu indicated on the board using the number of moves list on the bottom . If you make a fault , the number at the bottom can be tapped to undo the last move made .
The first round reach you three moves . Slide the Tetrahedron go away twice and up once to beat this round of the game .
Screenshot by Pro Game Guides
The 2d troll gives you six moves to get to the finish . Move the Tetrahedron left four times , down one clip , and mightily once to complete this round .
The third and final round gives you 11 moves to get to a nearby place . To action this , you ’ll call for to go down , right , right , up , leave , up , right , right , down , right , and then down to finish .
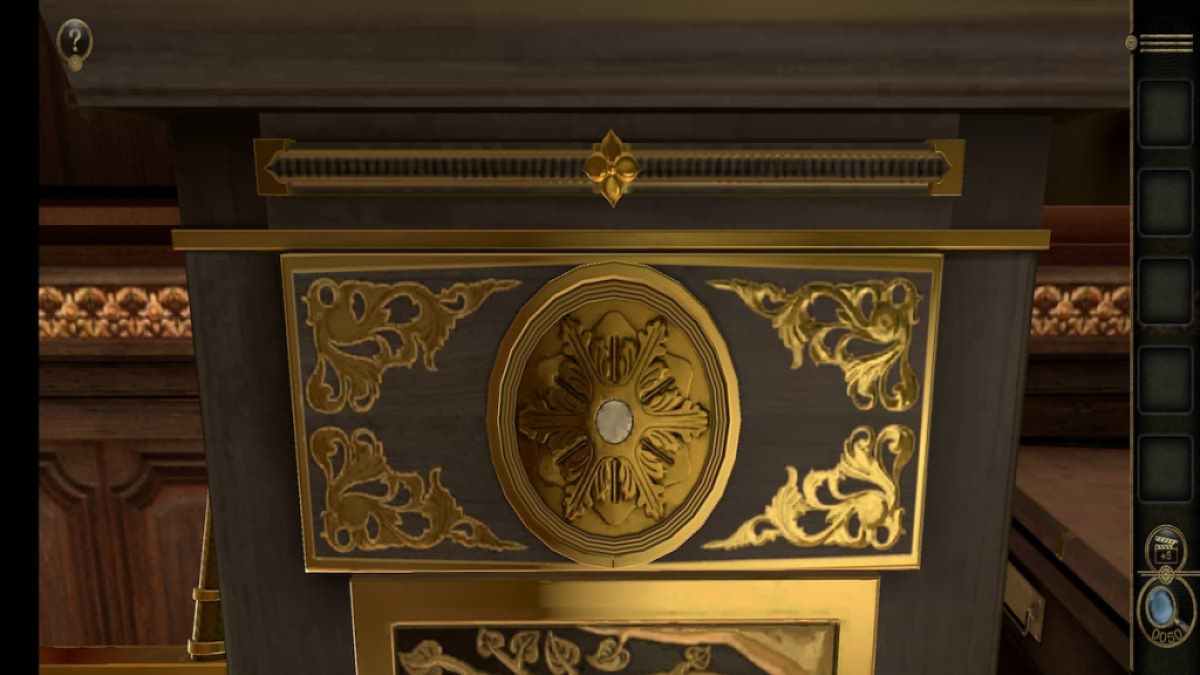
Beating all three level of the game will give you a Metal Carving , which can be placed on the yellow-bellied terrapin - like section on the front of the locker .
Screenshot by Pro Game Guides
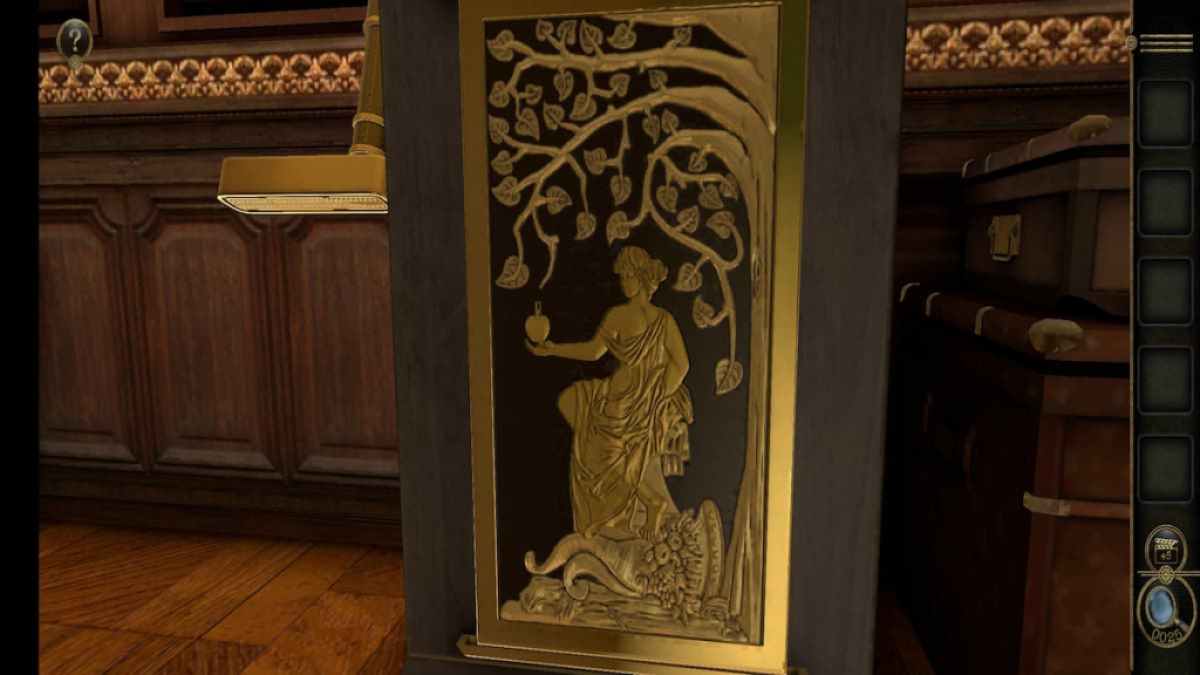
The two sliders on the leftfield and right of the section can be pushed against the Metal Carving , unlocking the Bas Relief of a Beauty item .
set the Bas Relief of a Beauty item into the front of the cabinet to unlock a unexampled puzzle .
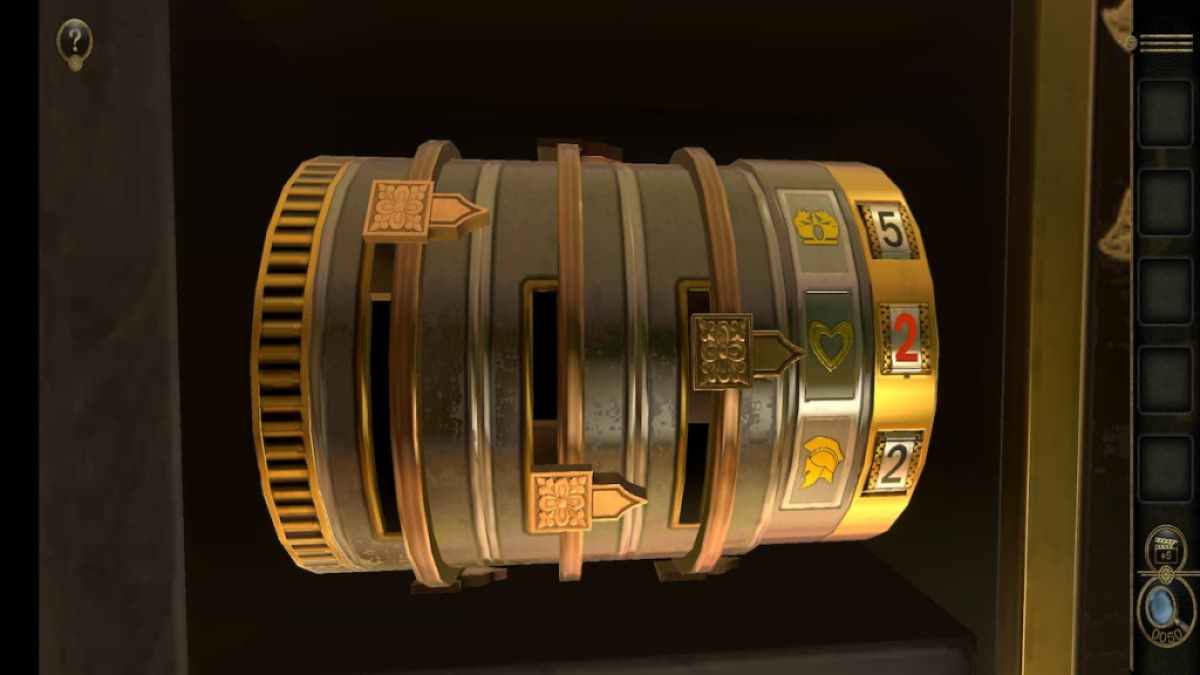
This alloy puzzler has a rotate gear on the remaining , three columns of sliders , and three symbols with numbers next to them . The goal is to move the sliders so that each image has a red-faced number next to it . Moving a slider off of an image let down its number while moving the slipper to point at an image increase its number .
Screenshot by Pro Game Guides
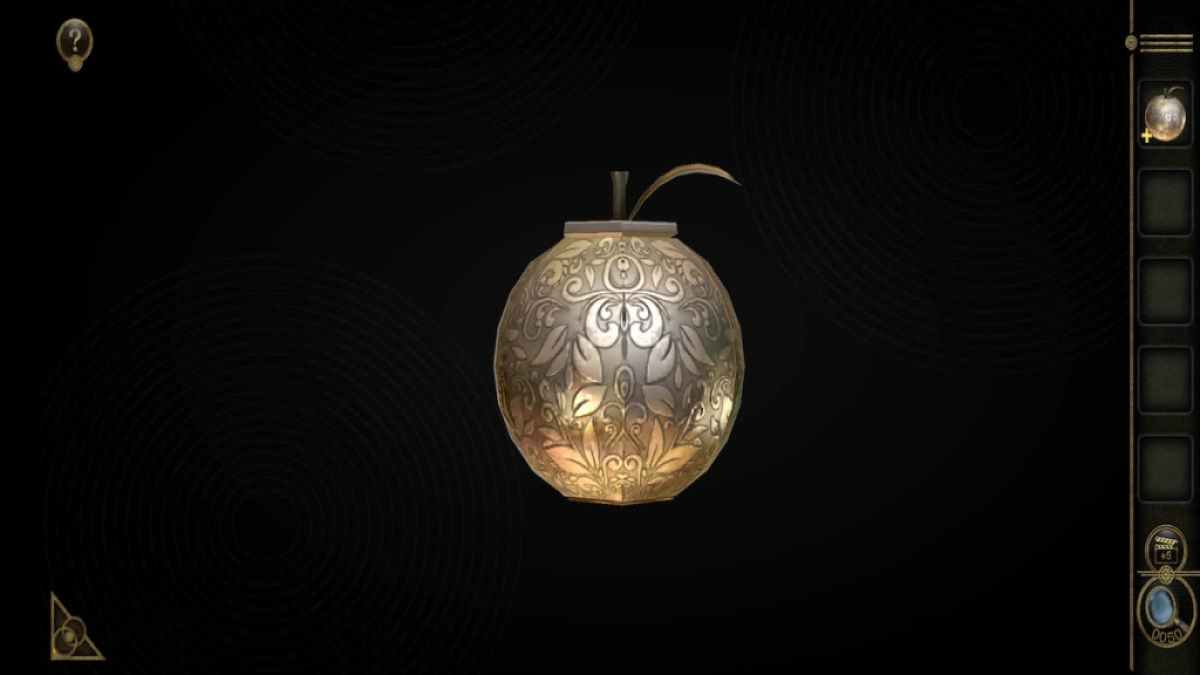
The pate - like look-alike should have a " 2 " next to it , the mettle should have a flushed " 2 " , and the helmet should have a violent " 5 " . complete the puzzle will give you a Metal Apple .
spread up the Metal Apple in your inventory and squirm the stem to open it .
It will wrench into an apple Congress of Racial Equality with the image of a Sir Herbert Beerbohm Tree surrounded by slices of apple with sliders on them . The bottom run-in is locked where it is , so make the tree from the bottom up . The final image of the apple and the positions of each slider will seem like the figure of speech below when sodding .

Screenshot by Pro Game Guides
Solving the metal orchard apple tree puzzle turns the core into a Francis Scott Key , which can be inserted into the keyhole beneath the late puzzle to obtain Train Part A.
Train Part A puzzle
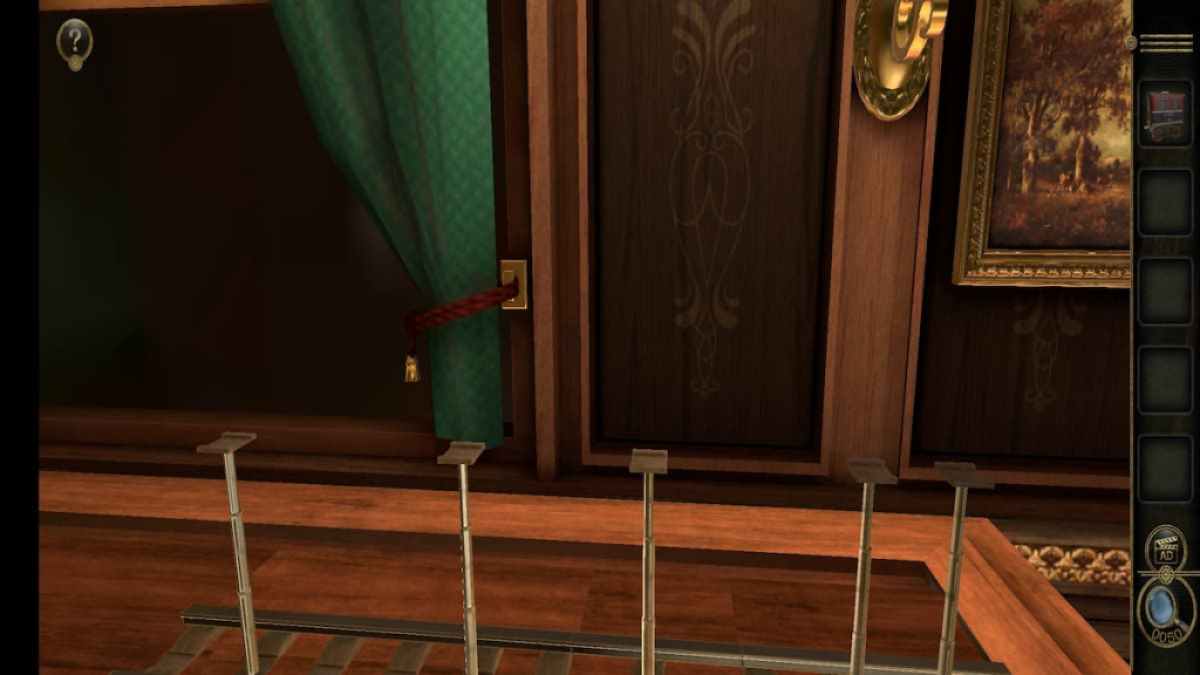
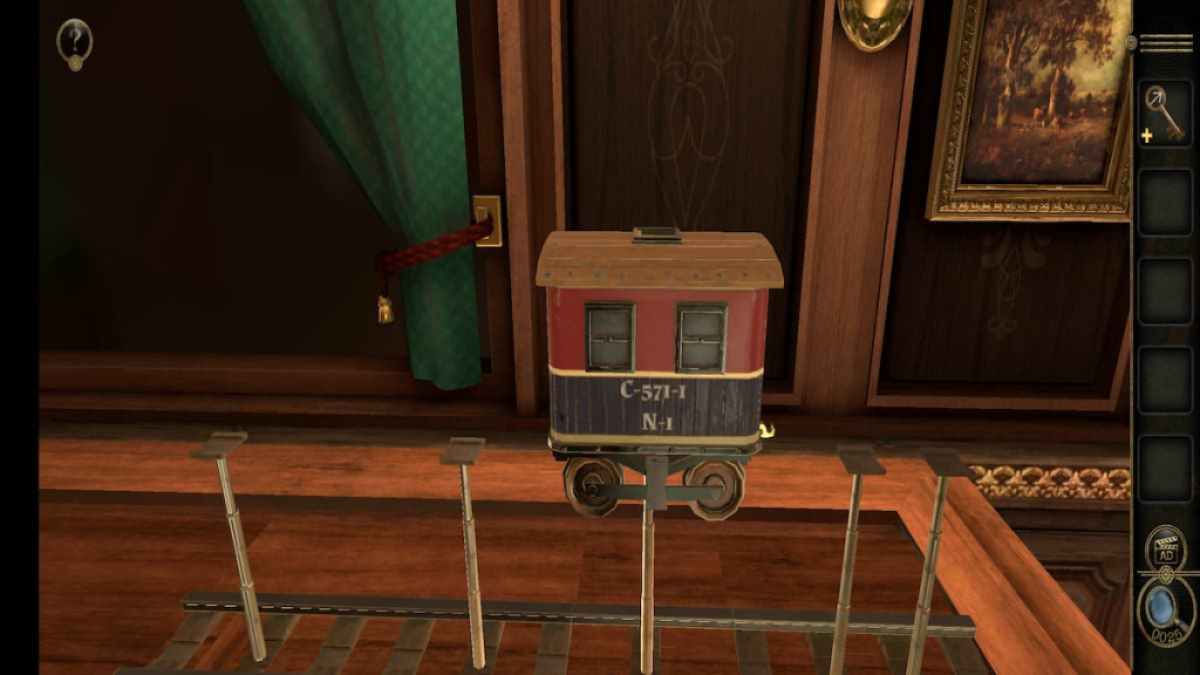
channelise over to the readiness of train tracks on the sideboard where the Record used to be .
Place the rain part on the third platform from the rightfulness to get the Transforming Key .
Storie room puzzles
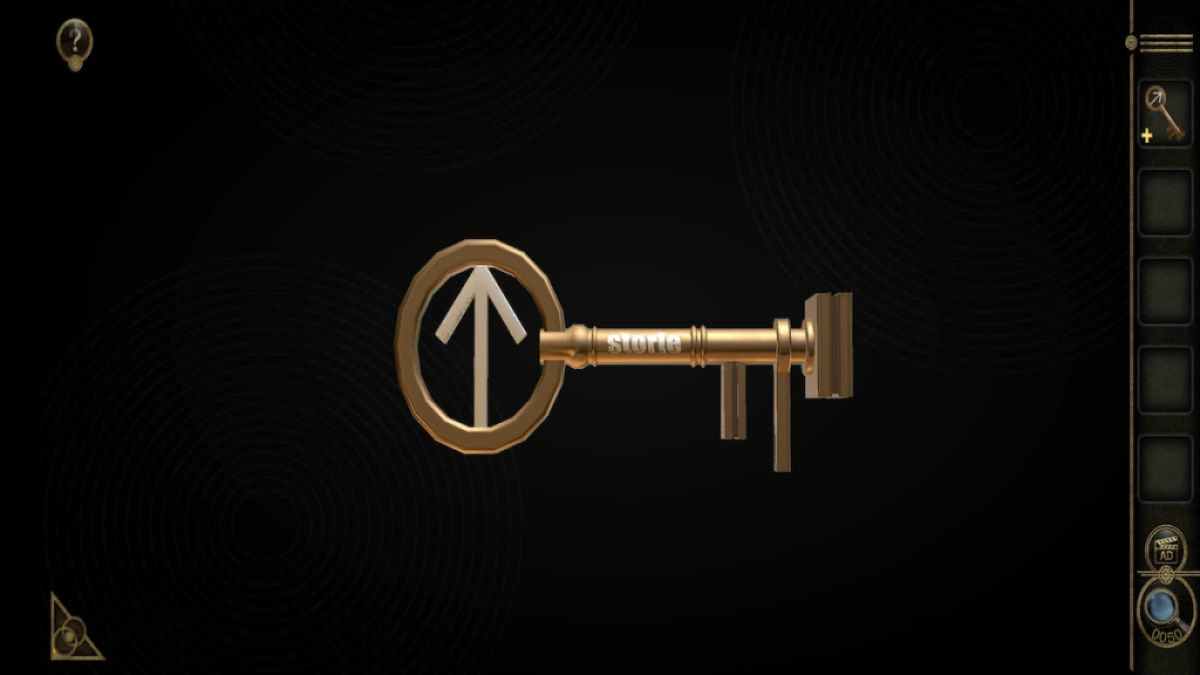
start the Transforming Key in your inventory to see the final computer code for the book player .
On the record player , slip the red skidder to the arrow symbol on the left wing and transfer the letter of the alphabet to write out " Storie " .
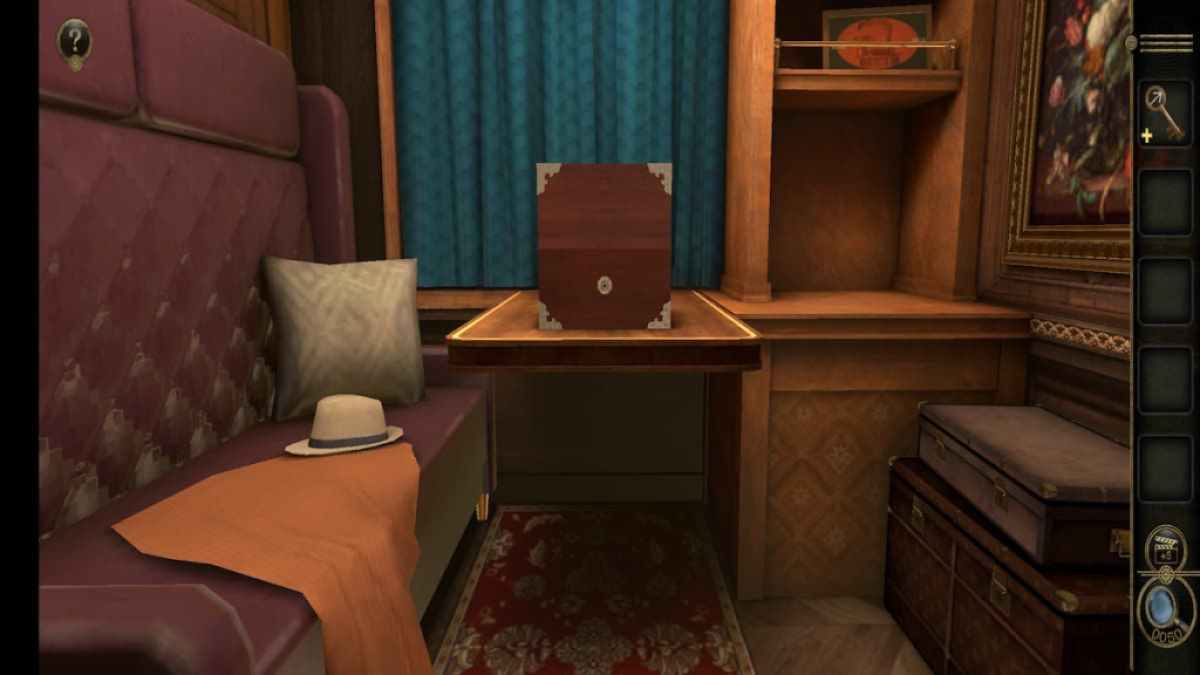
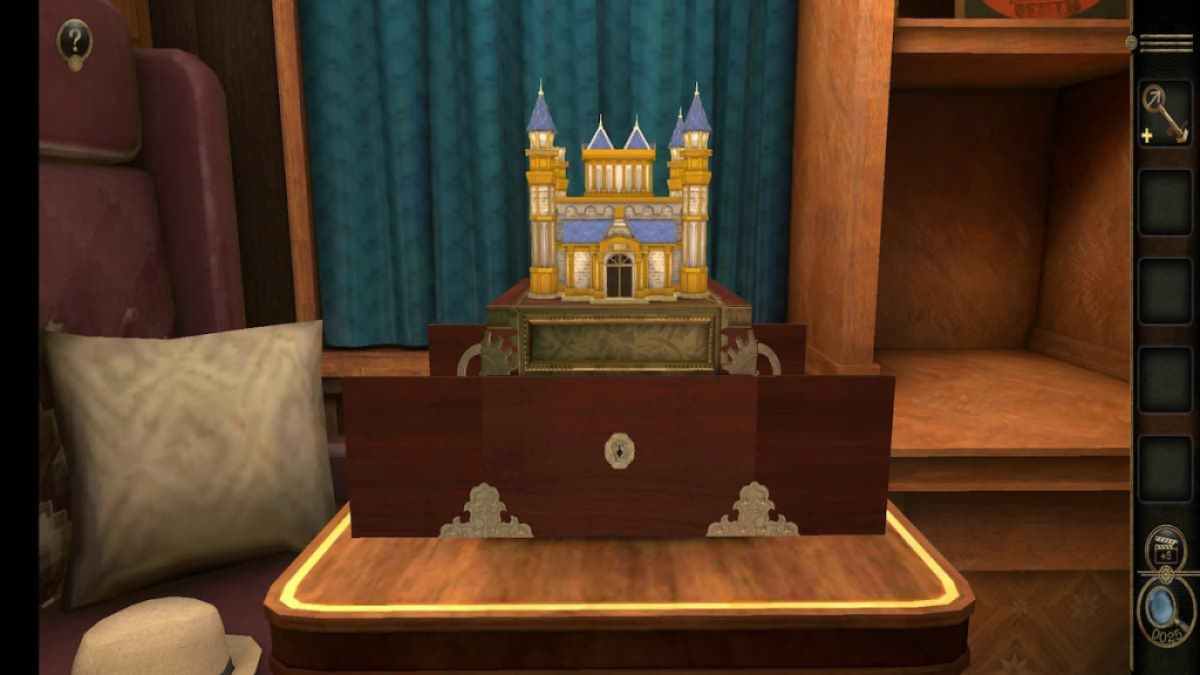
This will unfold the nerve tract to the " Storie Room " , which only contains a large wooden loge .
Screenshot by Pro Game Guides
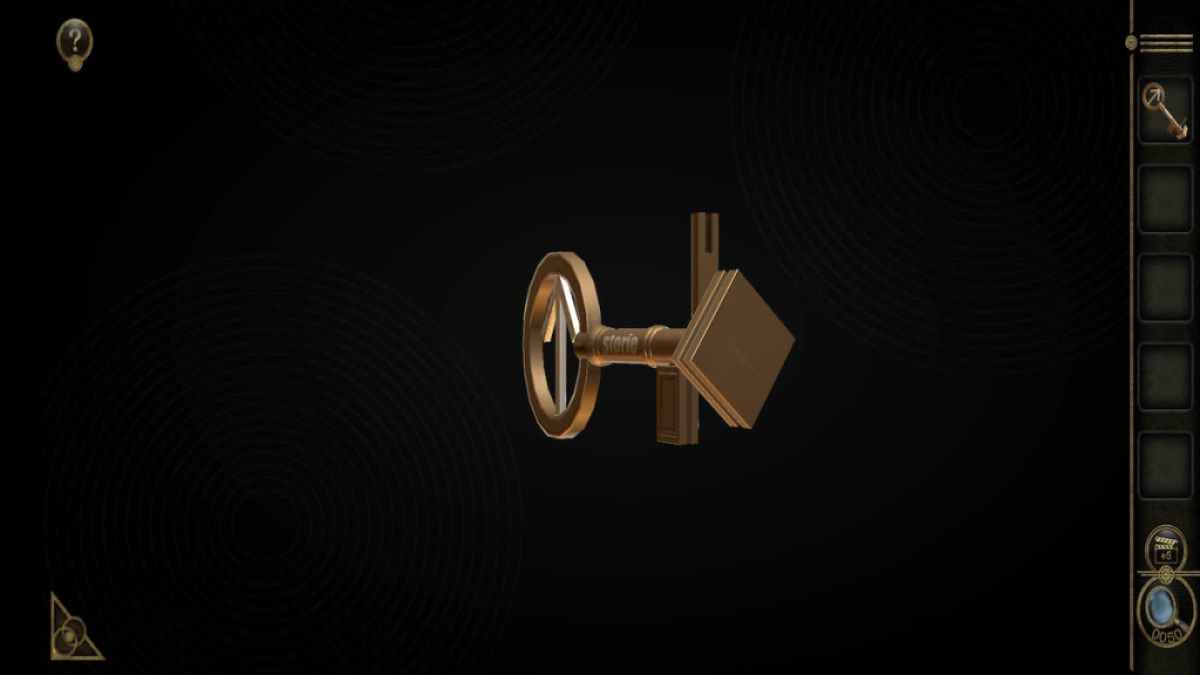
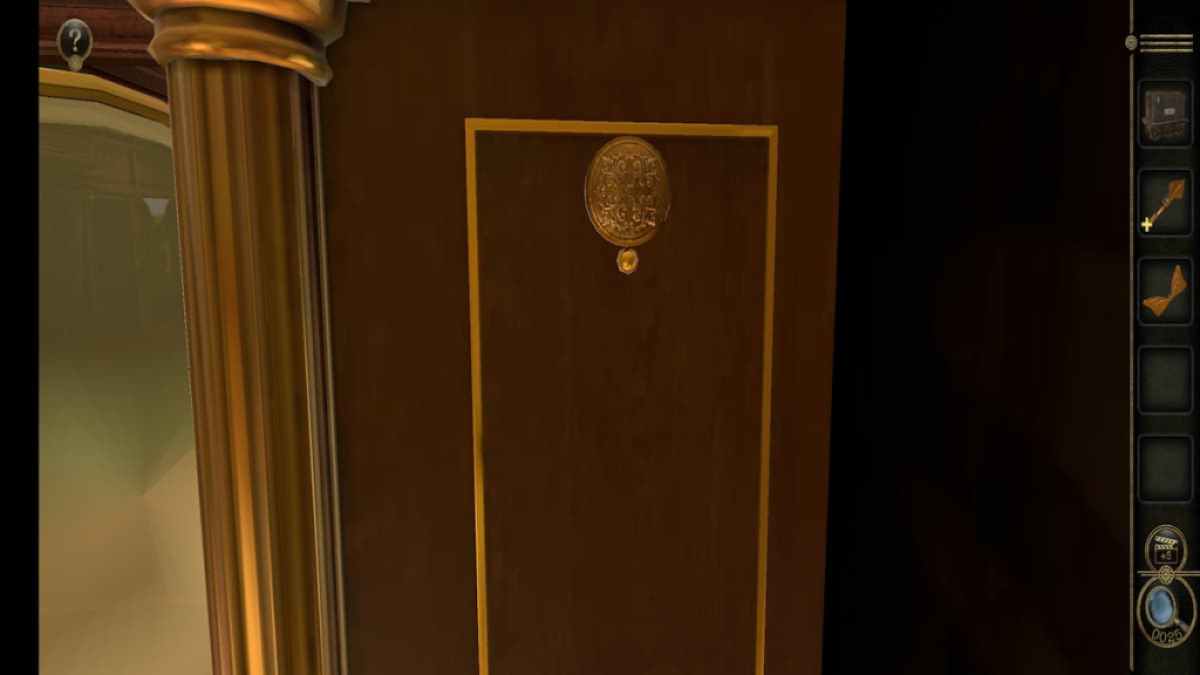
Look at the keyhole on the corner .
The three segments on the key can be rotate so that they check into the keyhole .
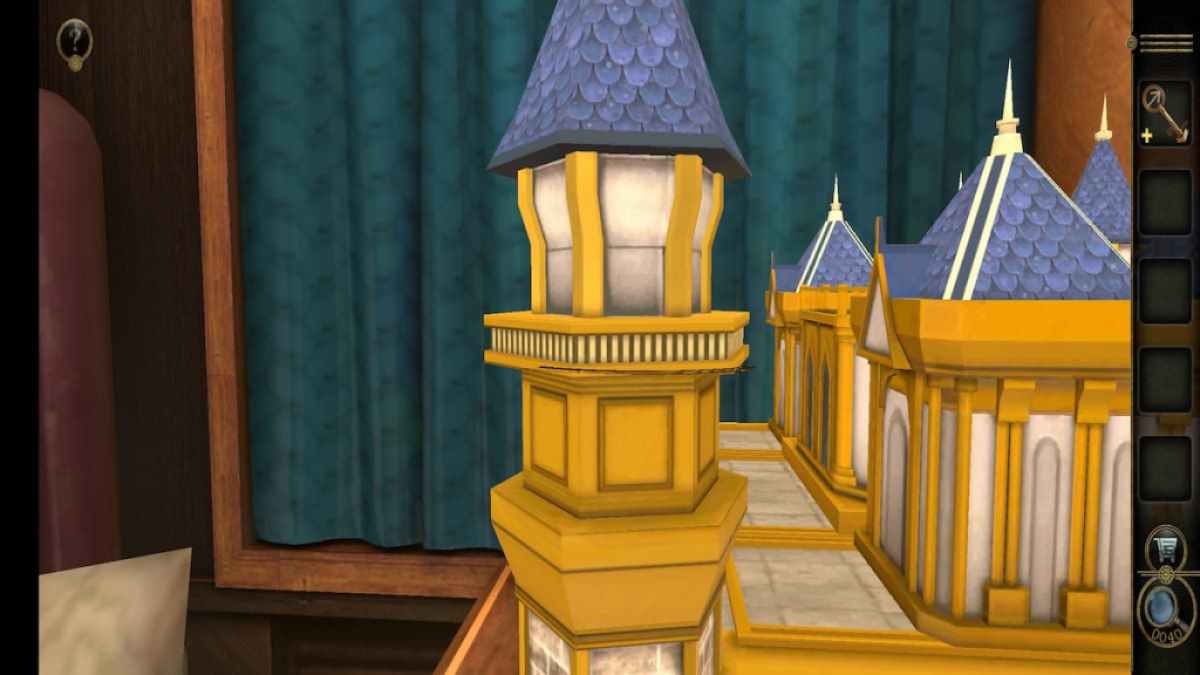
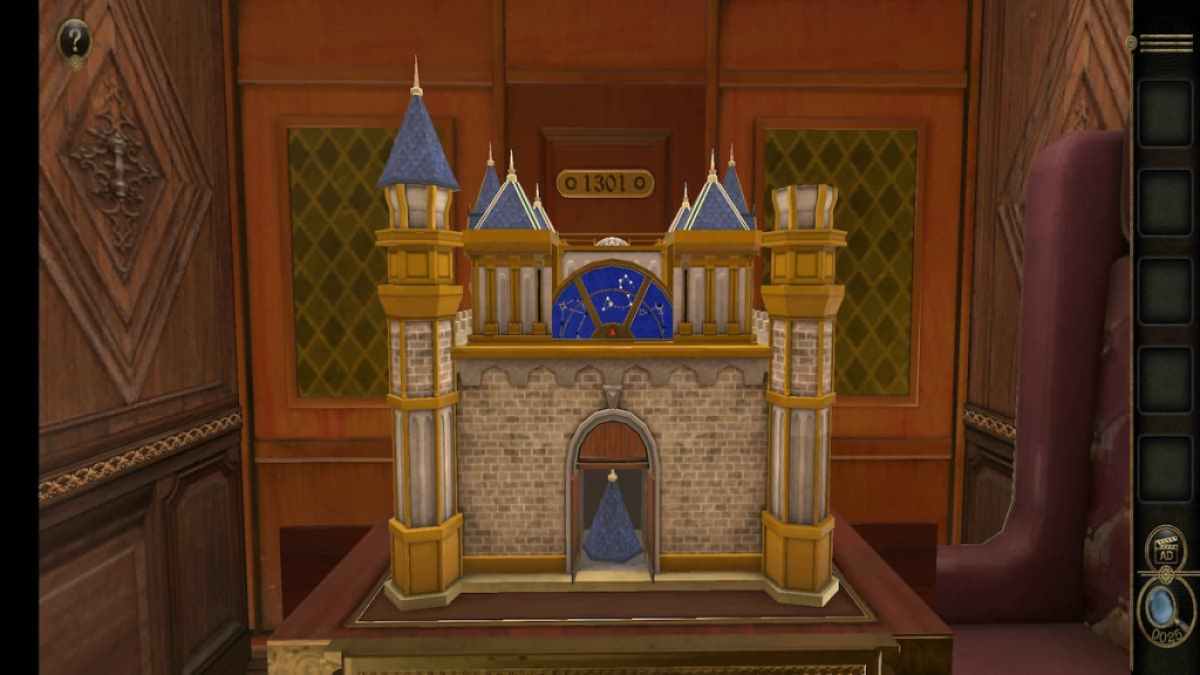
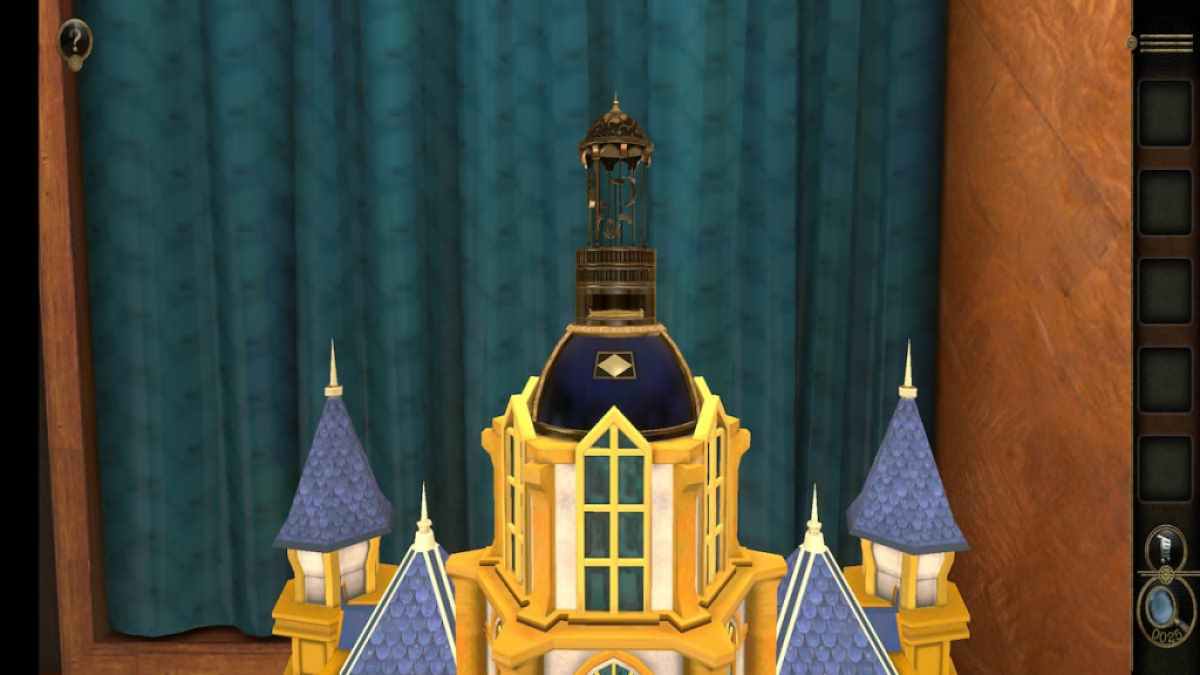
Twisting the key will reveal a large Medieval castling fill with puzzles .
Screenshot by Pro Game Guides
Looking at the tower on the left will reveal a gear wall it . Rotate it to open up a compartment at the bottom of the tower , which contain a Plaque .
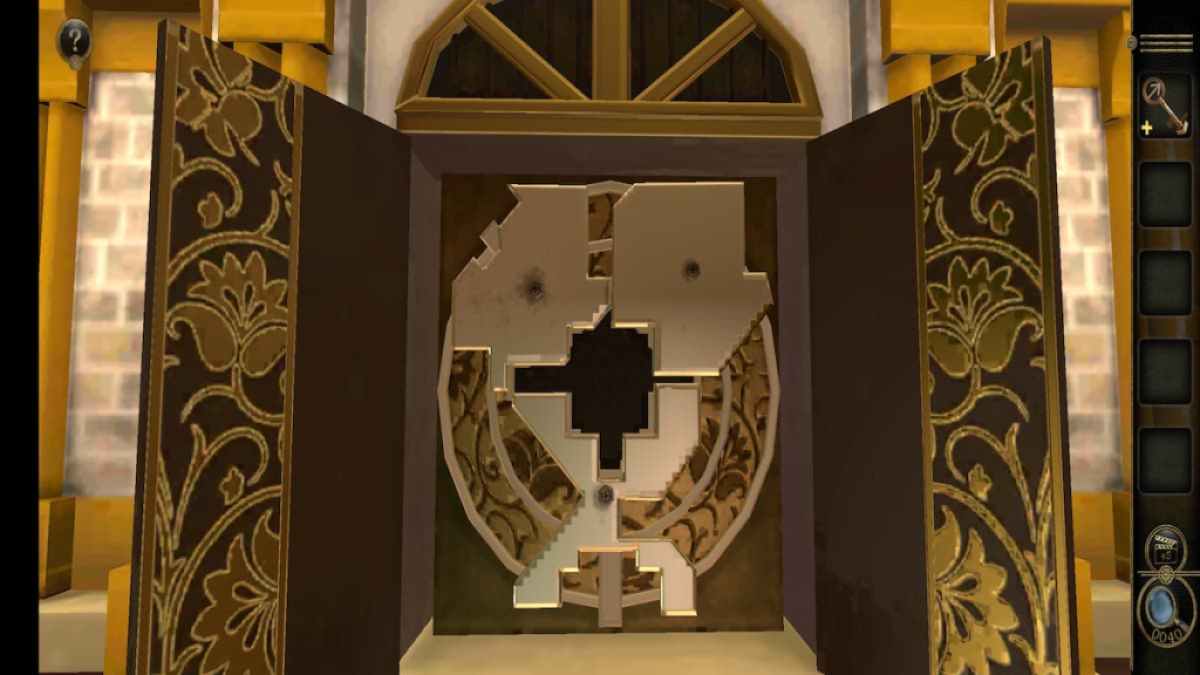
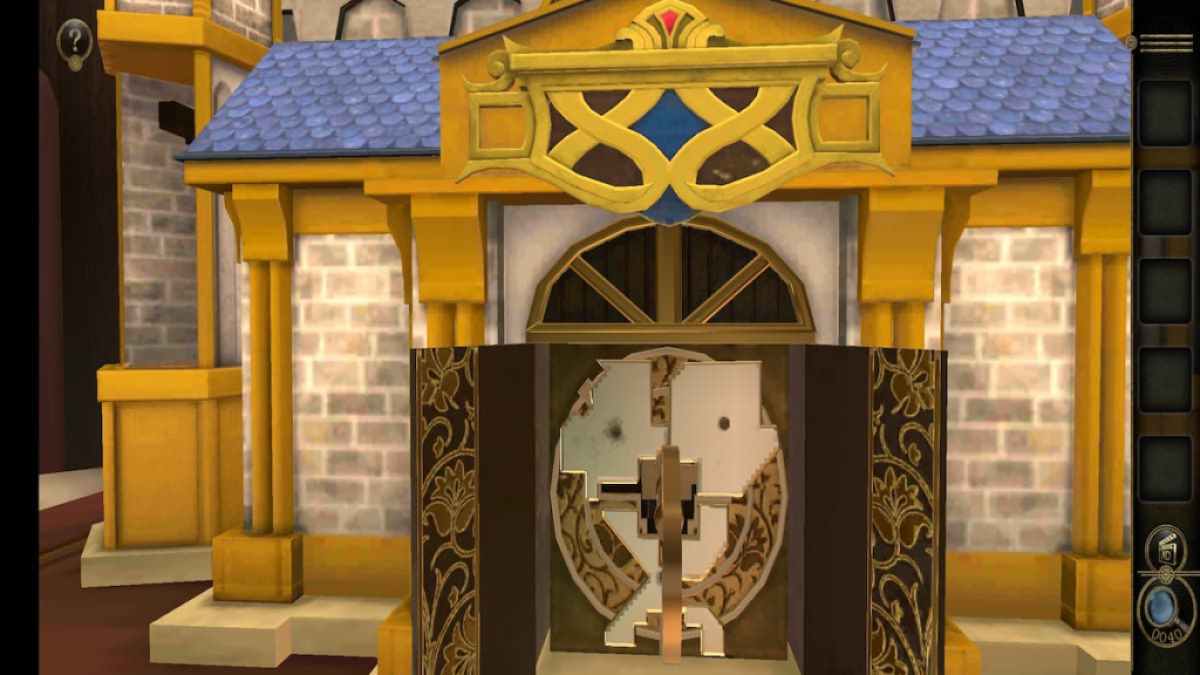
Place the Plaque above the front door to reveal a rotating puzzle within it .
Rotate the pieces until they form a square with rectangular offshoots on the odd and bottom .
Screenshot by Pro Game Guides
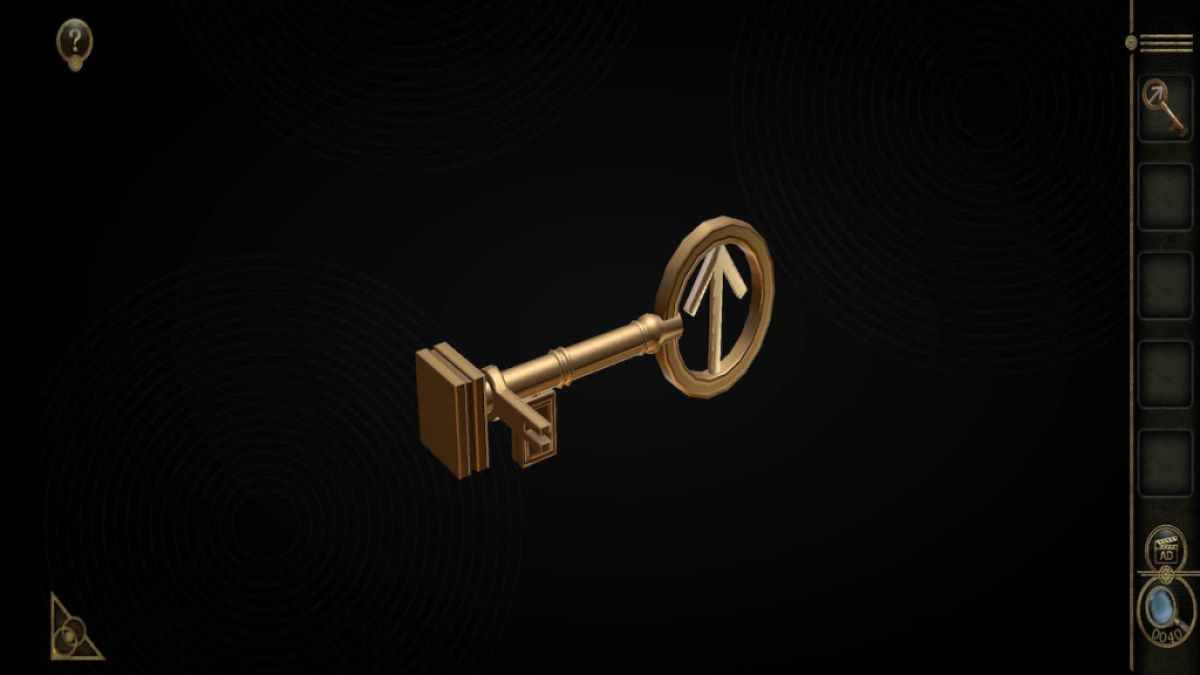
The Transforming Key in your inventory can be transformed one more time to equalize this new lock .
Placing it into the break to unlock part of the top of the castle . Keep in intellect that the new part of the castle has an empty spot for an point .
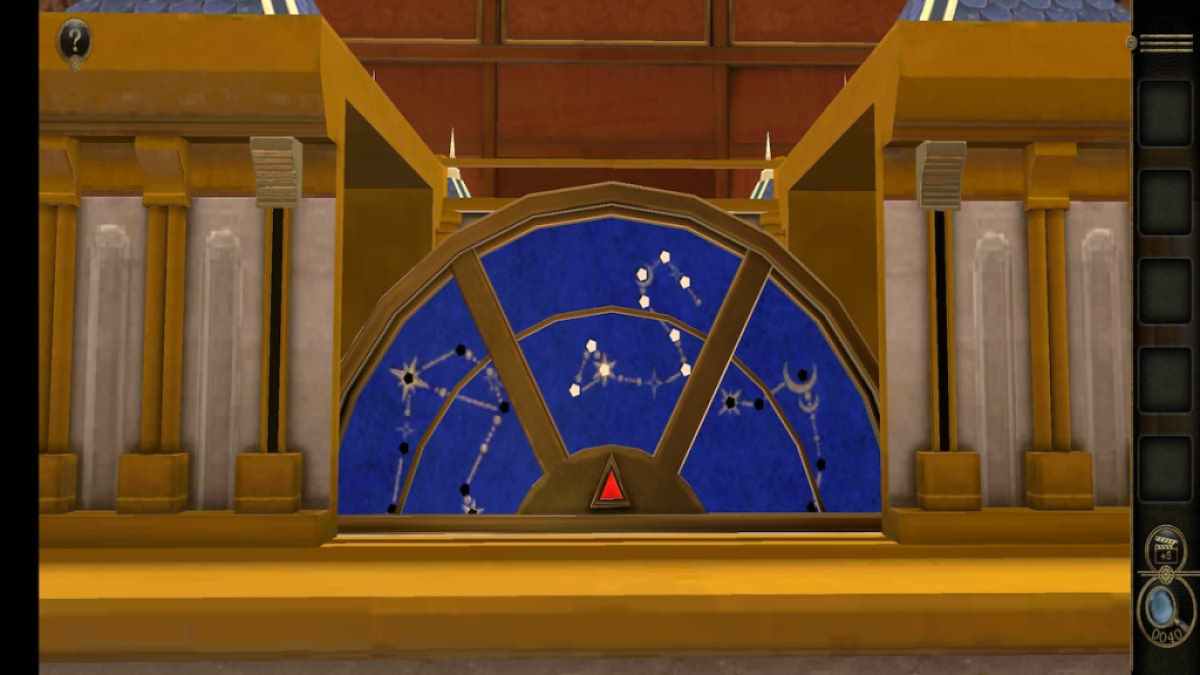
From here , head to the back of the puzzle to view a constellation - themed teaser .
Screenshot by Pro Game Guides
The end of the puzzle is to rotate the interior and outer halo until the configuration in the center completely lights up . Combining the outer while with four close genius on the right with the inner piece with four regular stars and one brighter star on the left will complete the mystifier . I pull the right slider once and the left luger three clock time to solve it .
This will unwrap an opening beneath the puzzle containing the top of a gun enclosure . This can be easy placed , as the tower miss its top can be seen to the right .
position the top onto the tugboat to unlock a metal puzzle at its radix .

Screenshot by Pro Game Guides
The gear on the base is used to turn out the metal pieces on the right side while the ruddy slider moves them up .
To work the mystifier , you ’ll need to go around the metallic element pipes so that they wo n’t pip the metal bars on the left when moved up . They ’ll necessitate to be rotate every time they move up to get passed each metal bar . Once the final metallic element pipe is at the top , the puzzler will complete itself and give you a Shield .
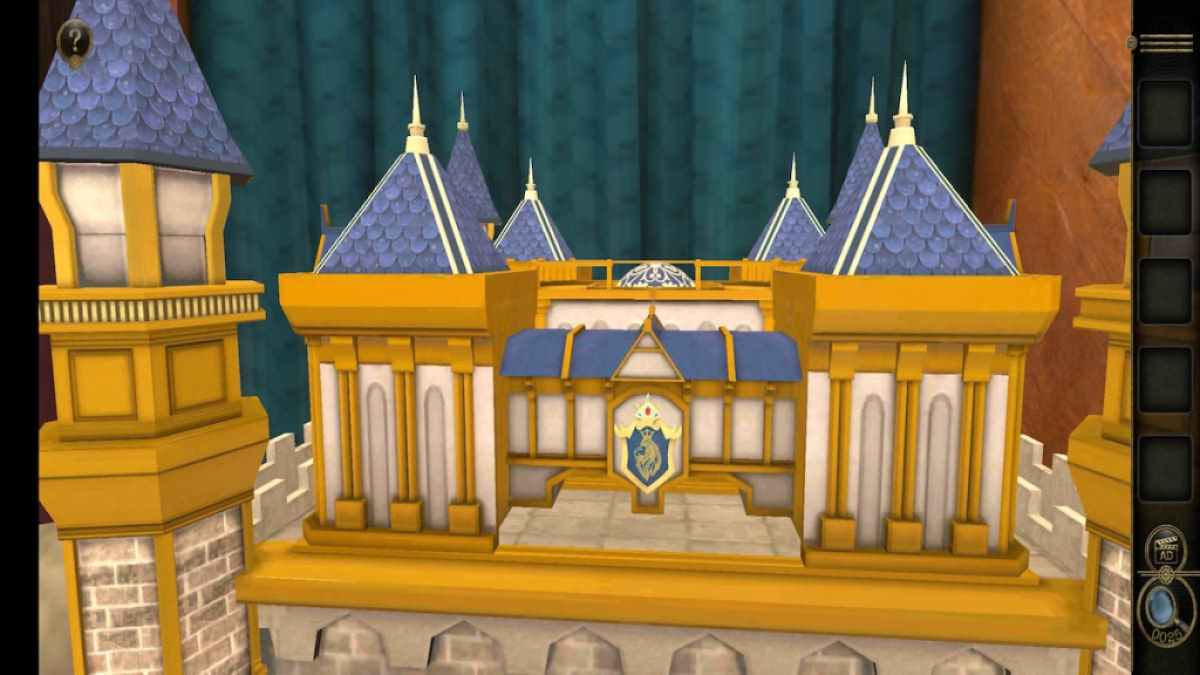
The Shield can be placed at the front of the castle on the empty blot we noticed earlier .

Screenshot by Pro Game Guides
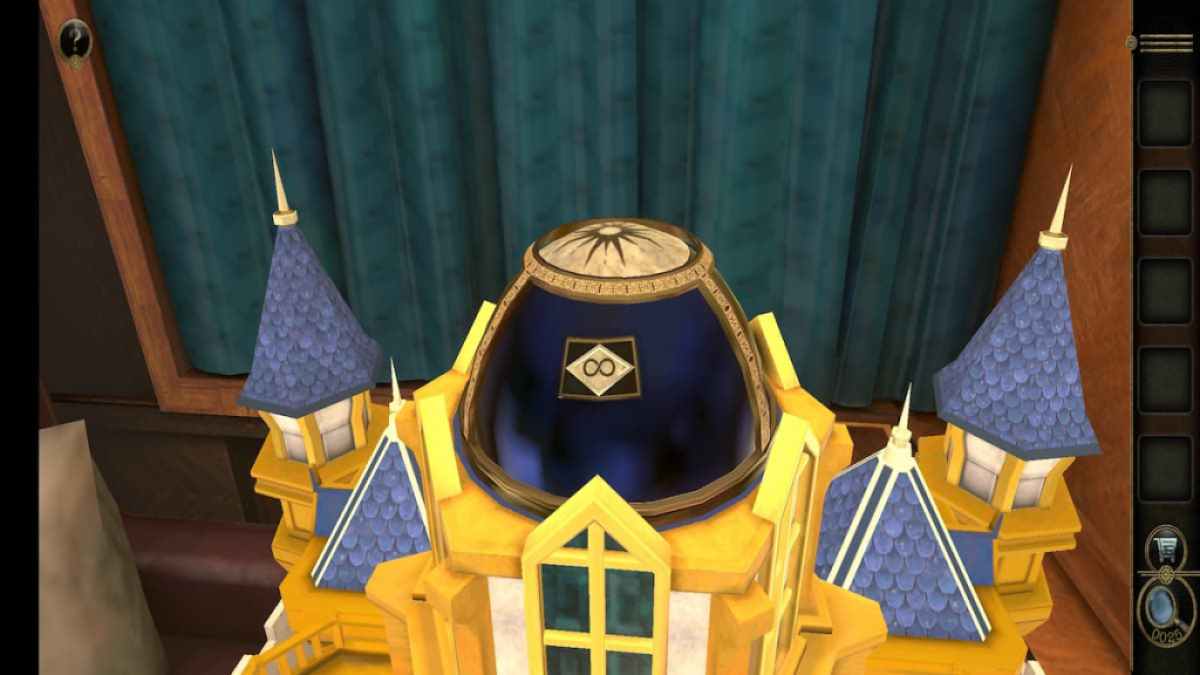
The placement of the Shield will make an globe appear on top of the rook .
Rotate the ball until there is a Sunday at the top and an eternity symbolic representation at the front .
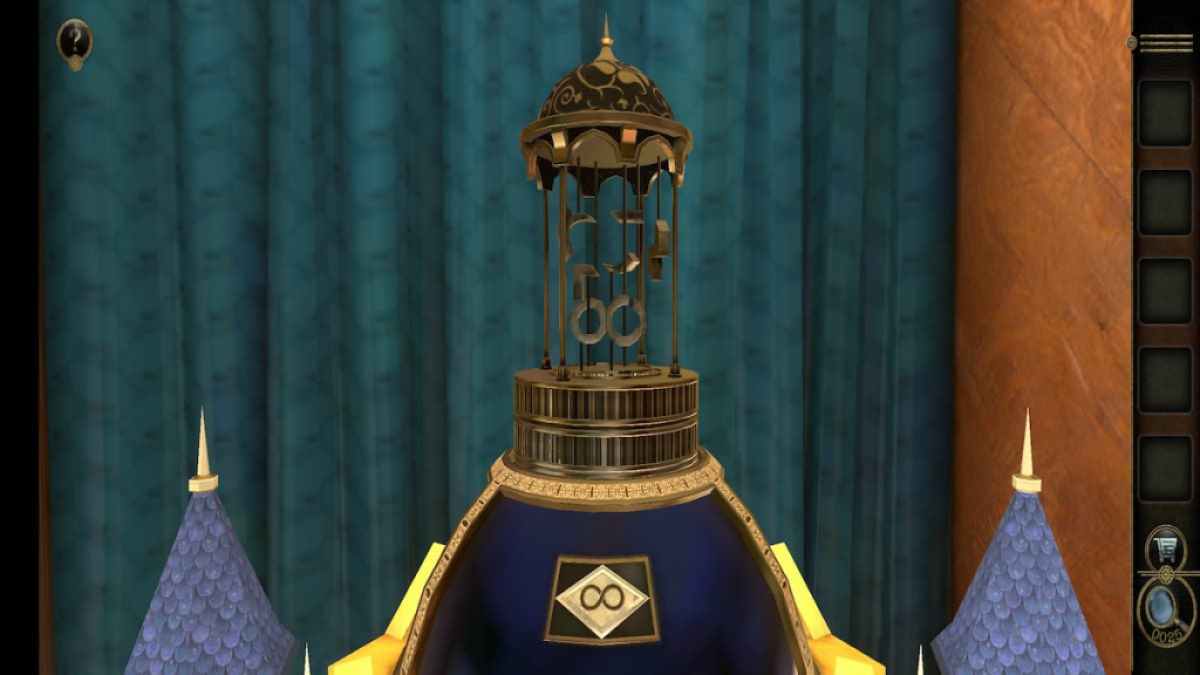
The final mystifier in the elbow room involves rotating two set of alloy piece to make the symbolisation inscribe on the front .
Screenshot by Pro Game Guides
The first symbolisation to be create is an infinity symbolization .
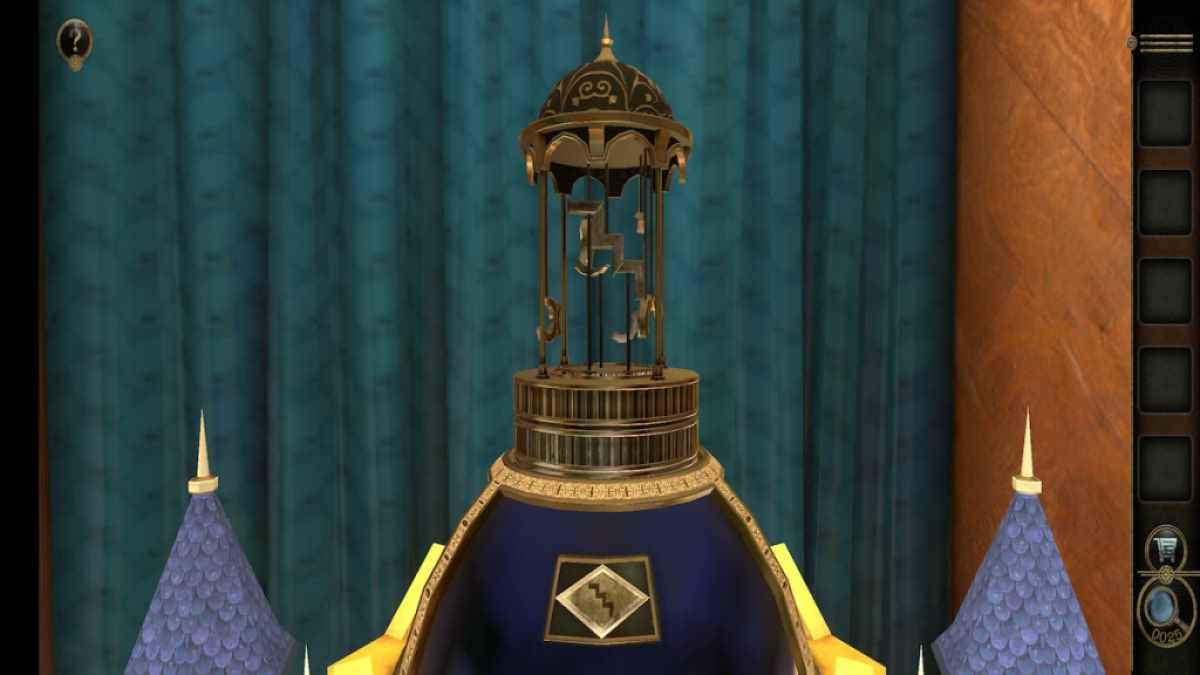
The second symbolisation to be created look like a staircase .
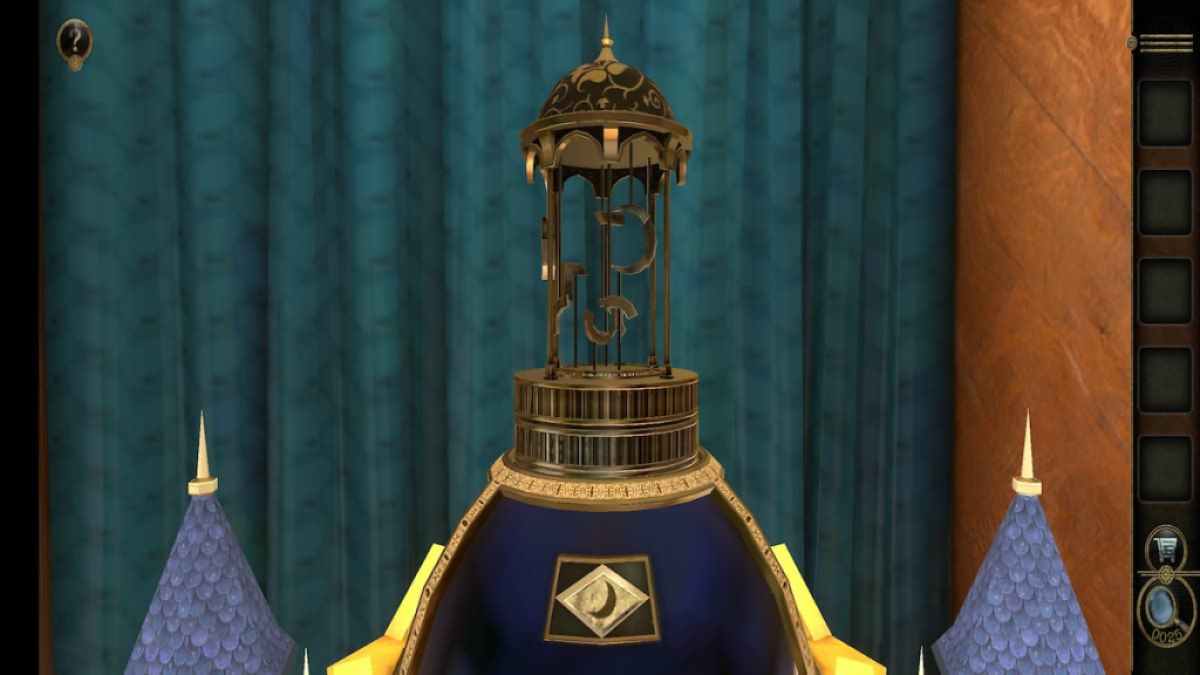
The third and last icon is a crescent moon .
Screenshot by Pro Game Guides
Completing all three will start the base , give the Handle particular , and remove you from the Storie room .
Clock puzzles
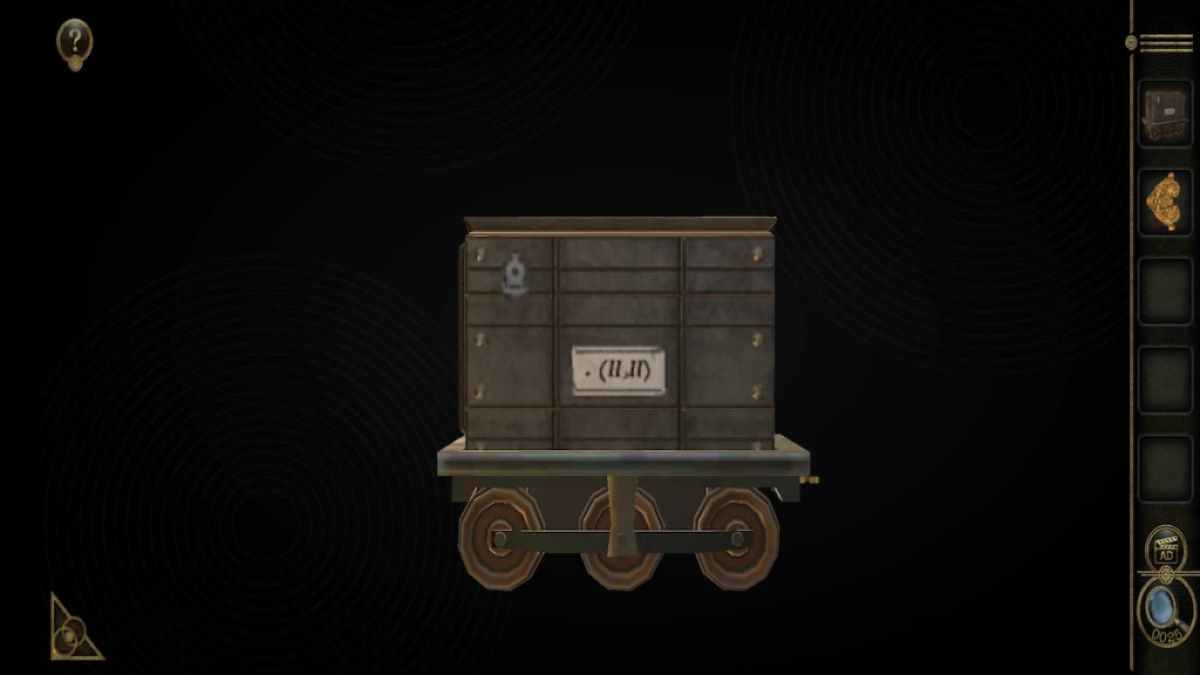
After exiting the Storie elbow room , make certain to take hold of the Train Car group B from the record book instrumentalist .
Look at the caravan car . Make bank note of the single dot and the numerals , as you will need them later .
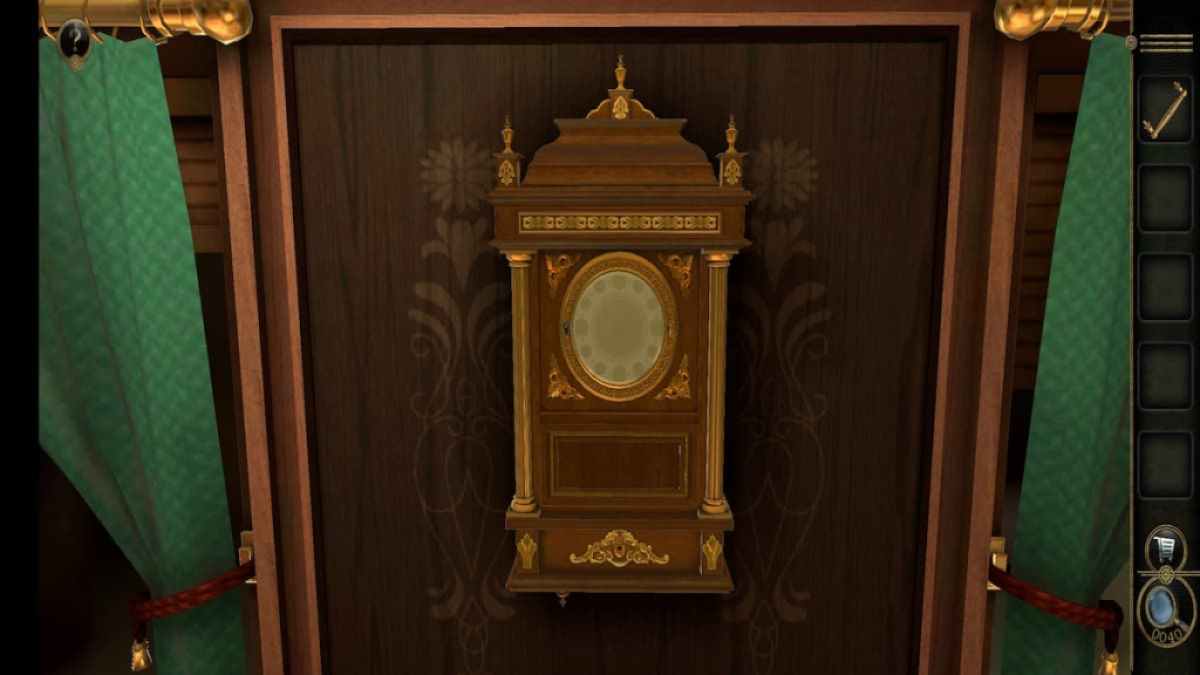
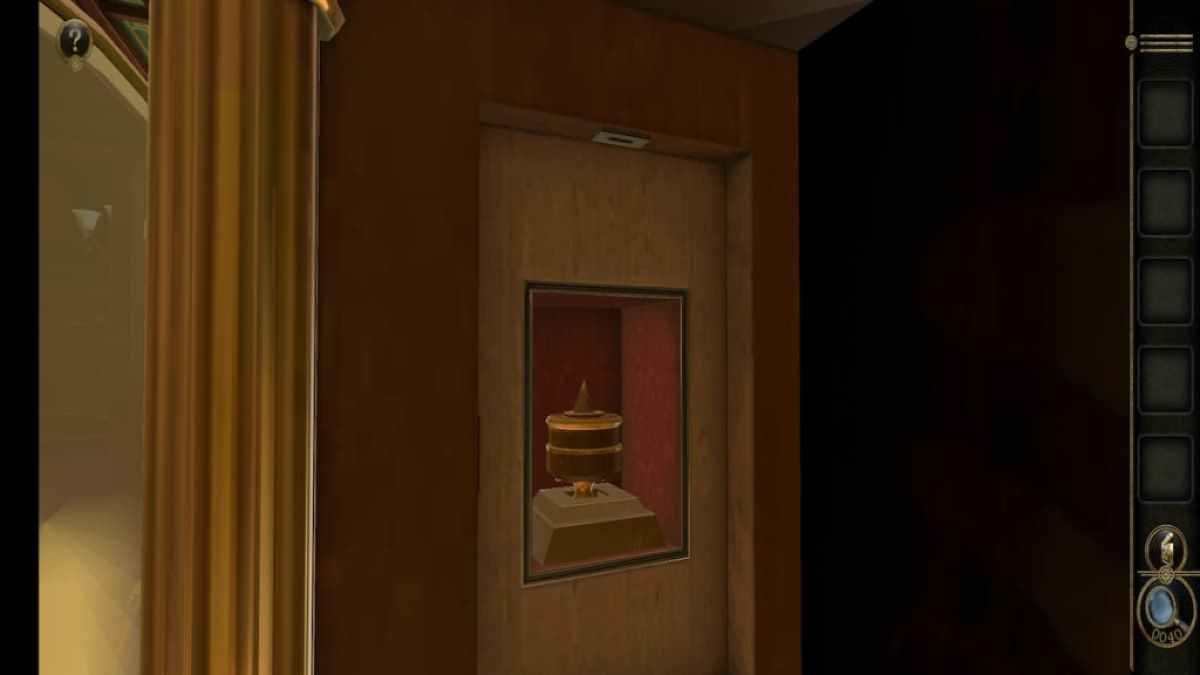
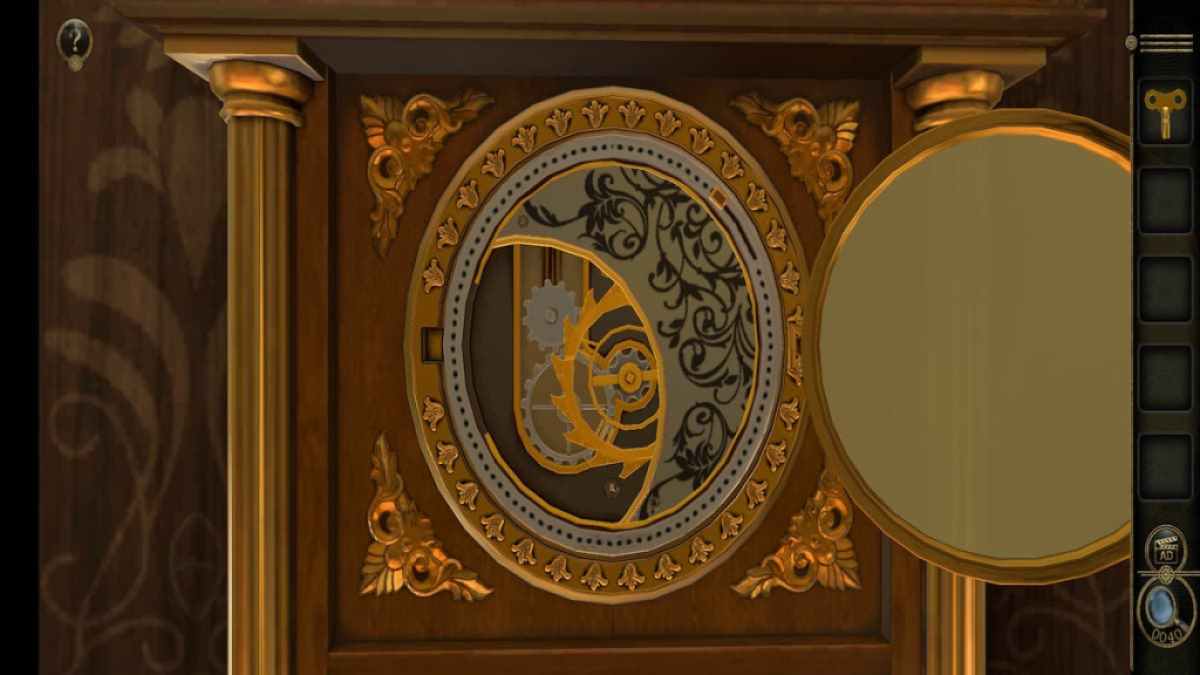
Then head over to the clock on the opponent rampart .
Screenshot by Pro Game Guides
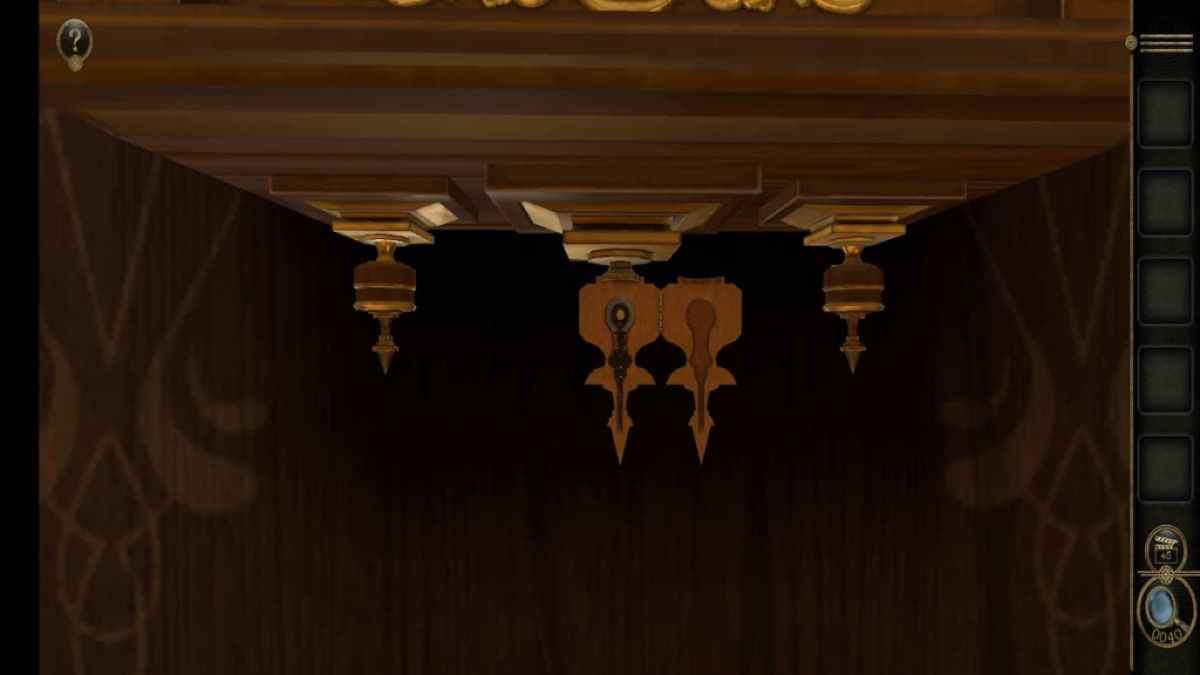
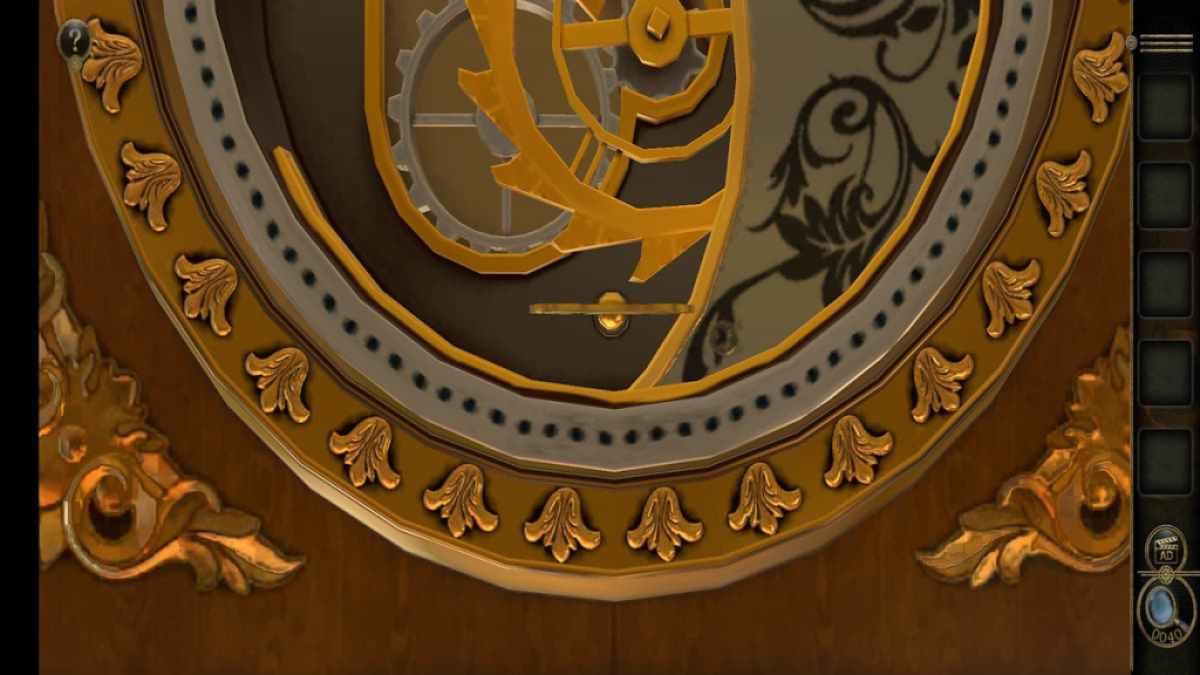
Viewing the left side of the clock soupcon at the proper place for the handgrip .
Drag the Handle to the left side to attach it .
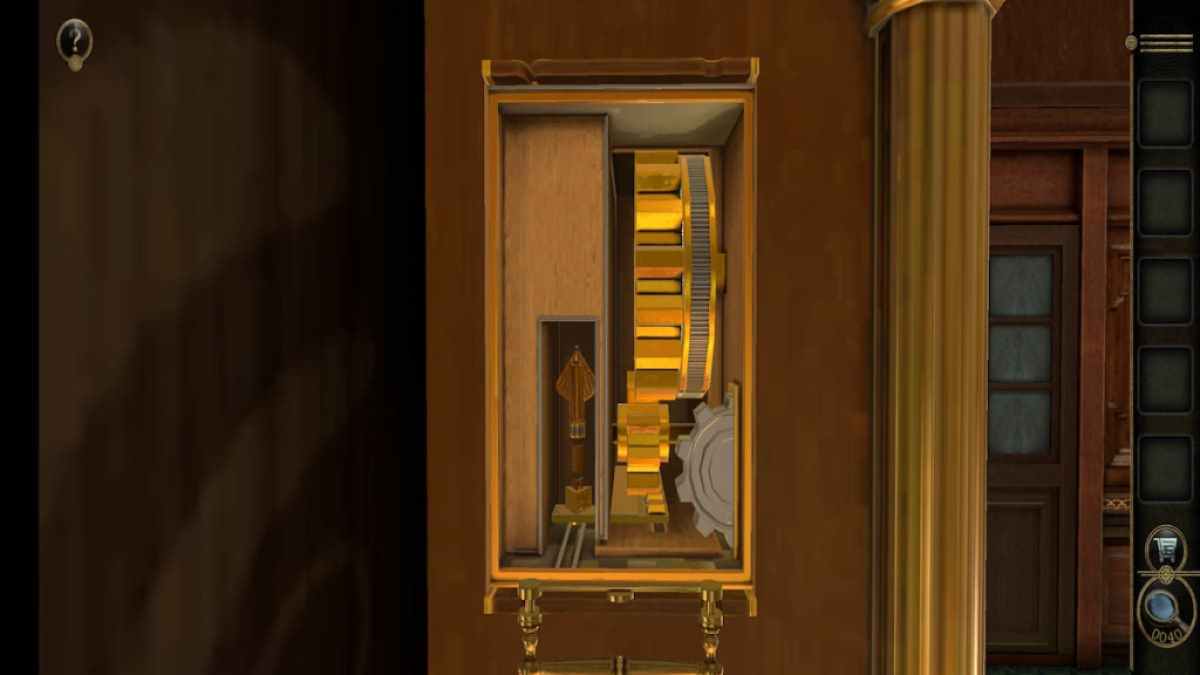
Twisting the handle reveals a small puzzle using a large gilded power train . Rotate the train to crowd the Strange Key forth and tap it to take it .
Screenshot by Pro Game Guides
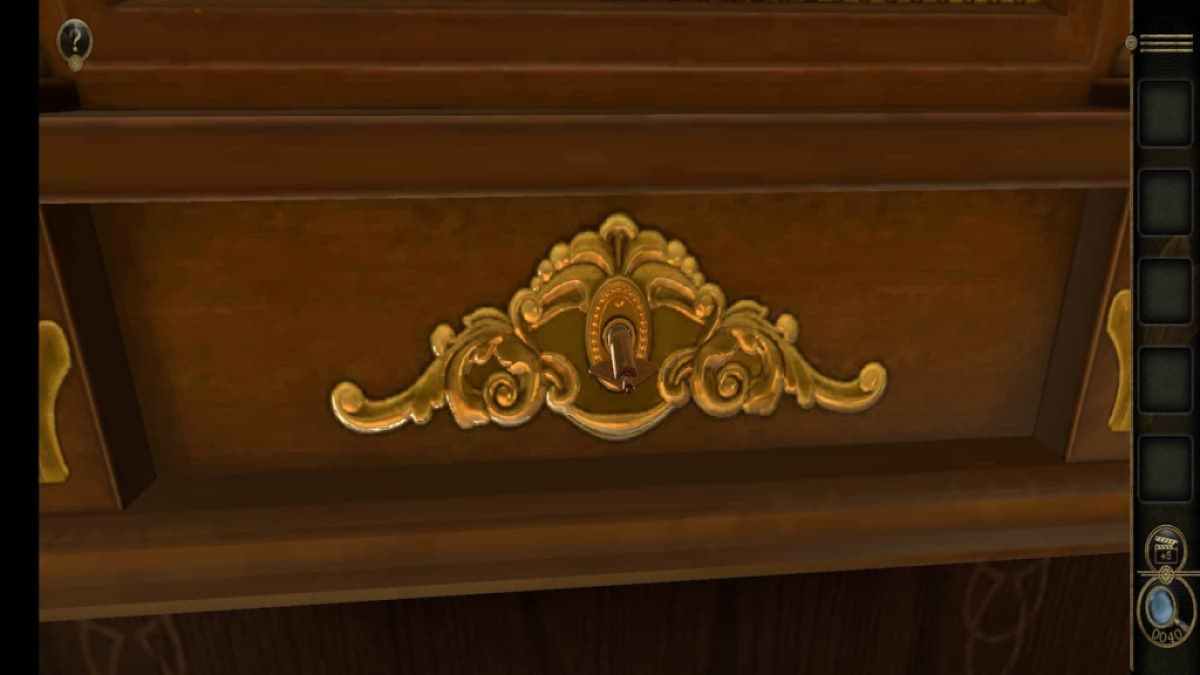
Go to the front of the clock and look at the keyhole at the bottom . Insert the Strange Key into the cakehole and curve it to unlock the next puzzler .
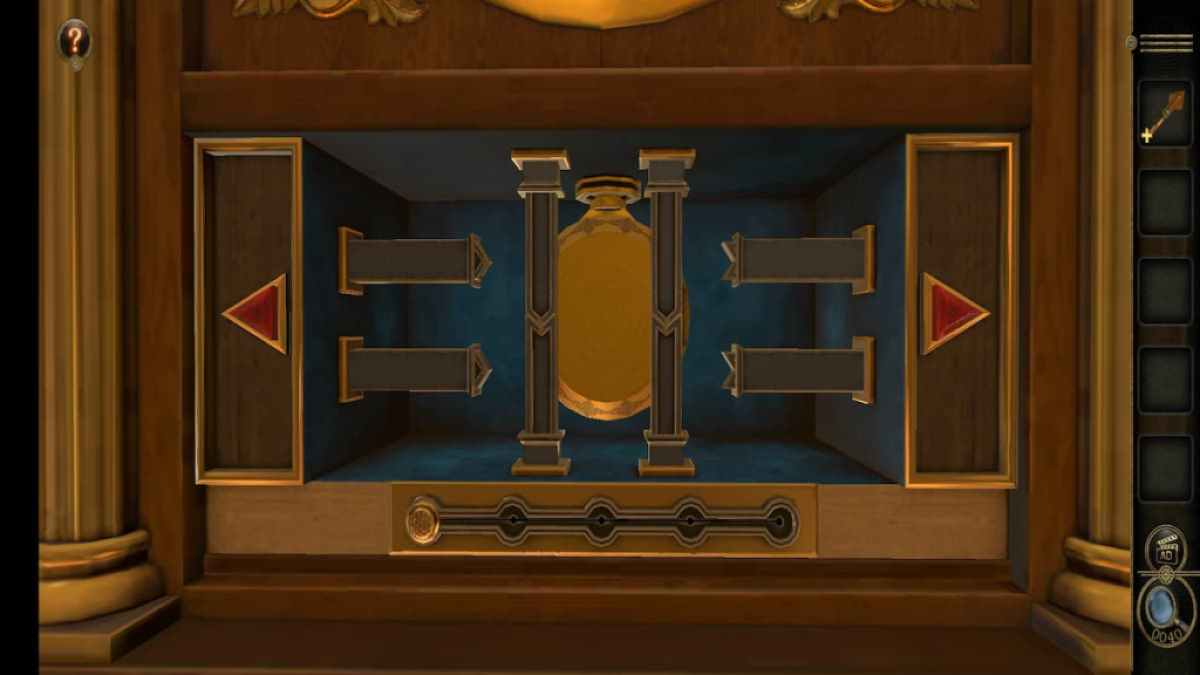
The first part of the teaser requires locomote the skidder to get rid of all eight metal streak . Tapping on the right arrow moves the slipper to the right and tapping on the left moves the slipper to the left .
move out all of the bar allows you to interact with the orbit in the back .
Screenshot by Pro Game Guides
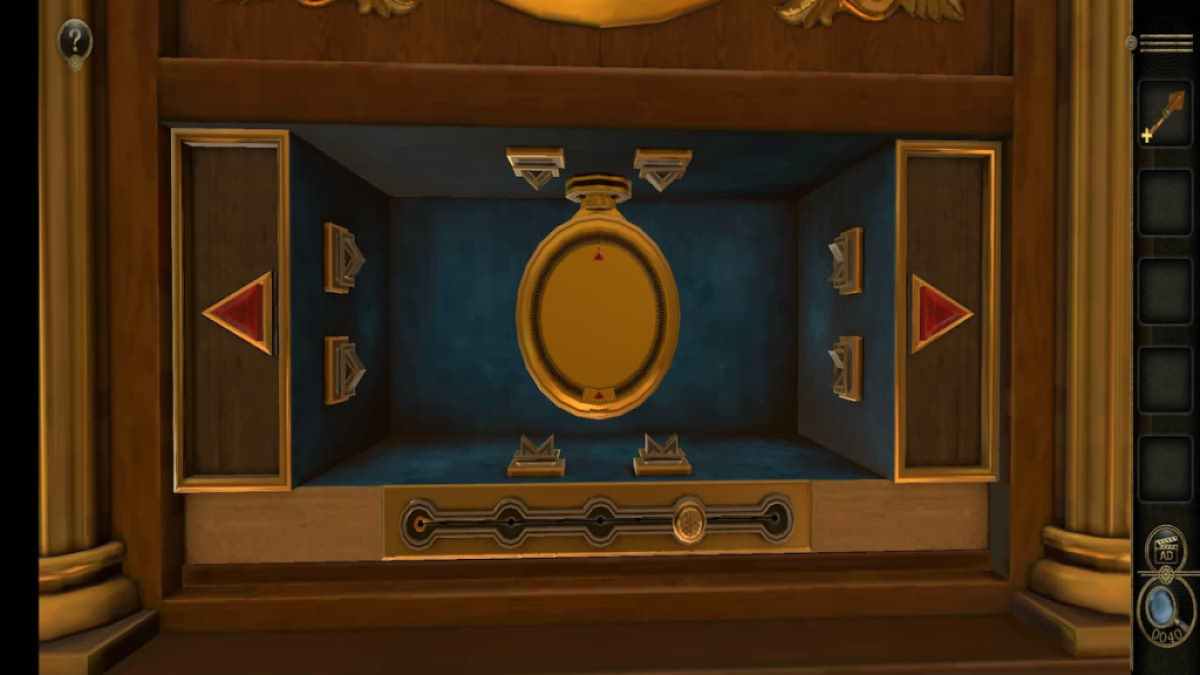
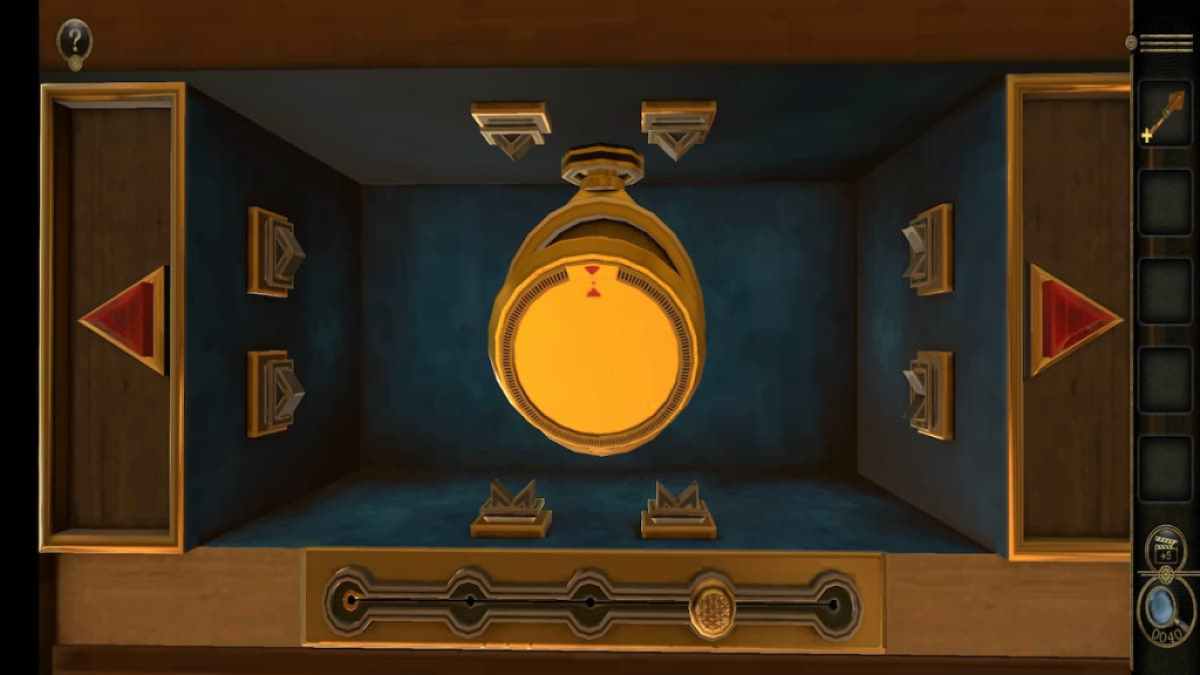
turn out the outer ring of the compass until the two red arrows point at each other .
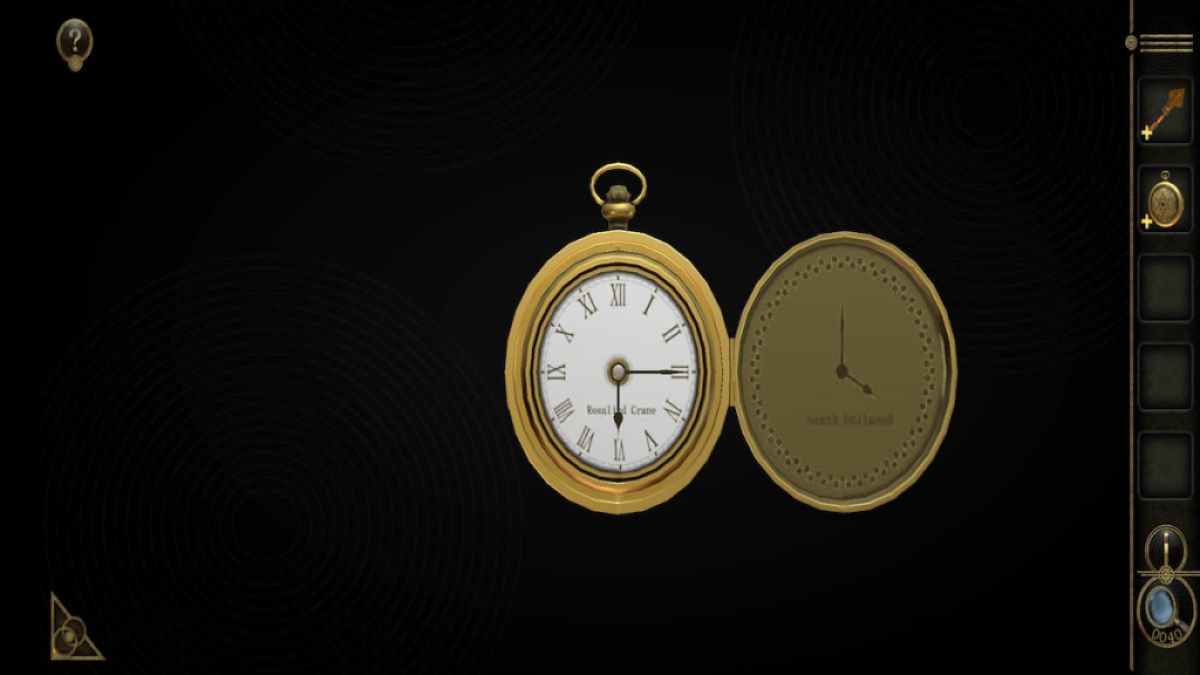
Select the pocket watch and pull up its covering fire to the right to open it .
Move the hand so that they mirror the clock hands on the back of the cover .
Screenshot by Pro Game Guides
This will open up a obscure compartment within the watch hold a Small Key .
Head to the face of the clock .
Insert the lowly Key into the keyhole on the left over side .
Screenshot by Pro Game Guides
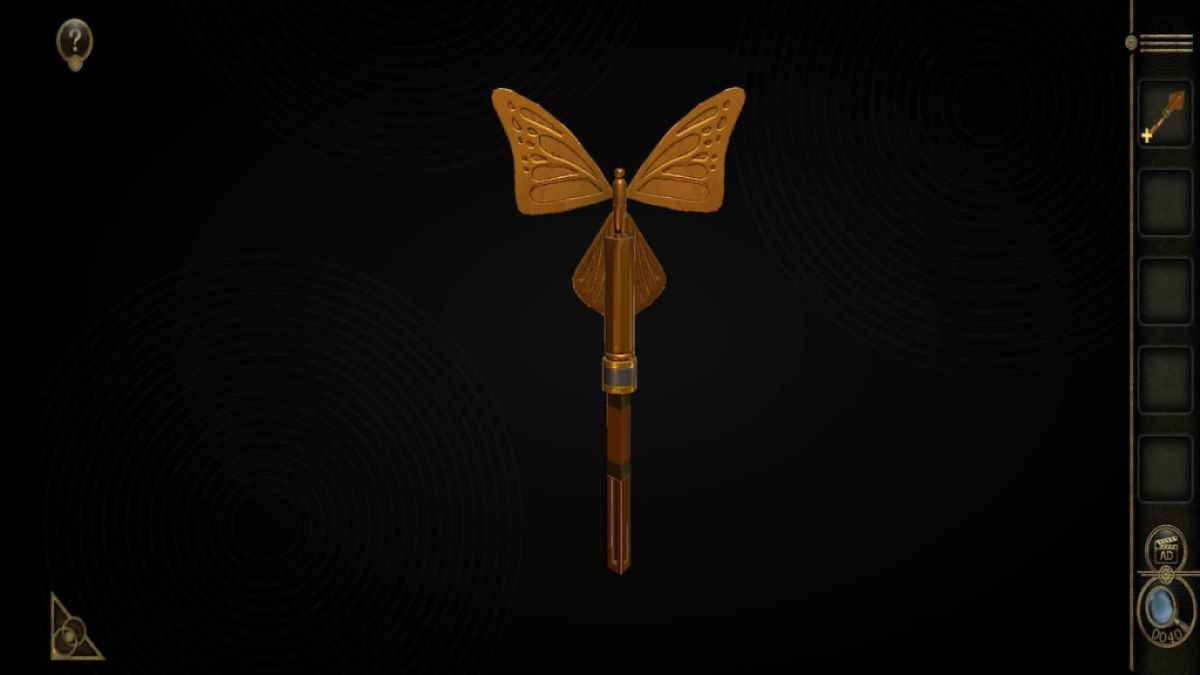
On the clock face lies a pair of Metal Butterfly Wings . find fault them up and head to the correct side of the clock .
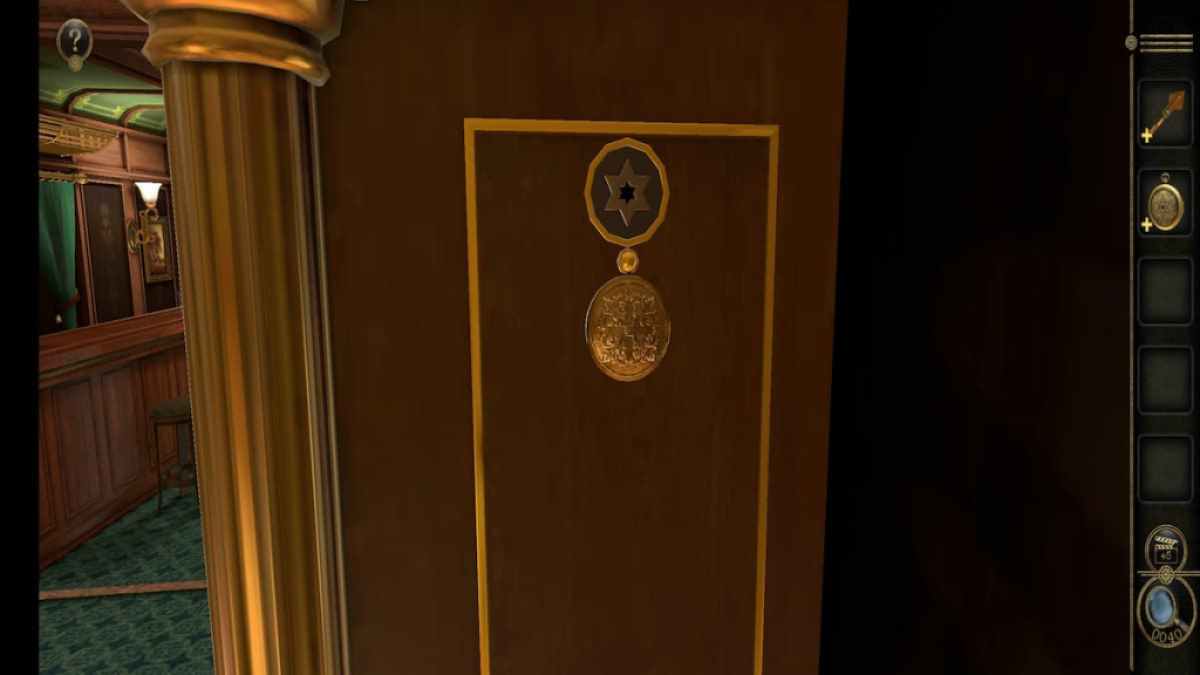
There will be a gore with a gilded metal man at the top .
turn out the metal piece to unwrap a keyhole with six points .

Screenshot by Pro Game Guides
afford up the Strange Key used before and add the Metal Butterfly Wings on top of it . Rotate the wing to switch the form of the headstone to fit into the fresh whorl .
enclose the Strange Key into the whorl and rotate it to get a Decorative Wooden Block .
Take the Decorative Wooden Block to the bottom of the clock . One side has a matching block , while the other side is empty .
Screenshot by Pro Game Guides
position the Decorative Wooden Block in the blank space on the right .
start the decoration in the centre to get a Clock Pointer .
Return to the expression of the clock .
Screenshot by Pro Game Guides
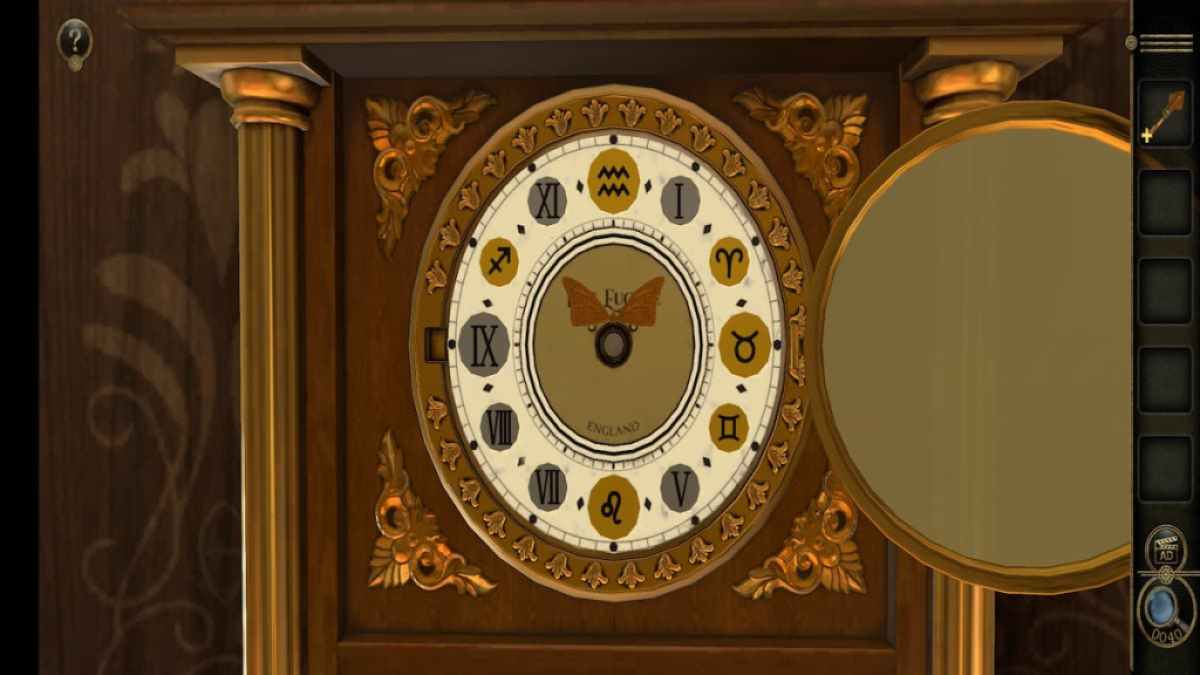
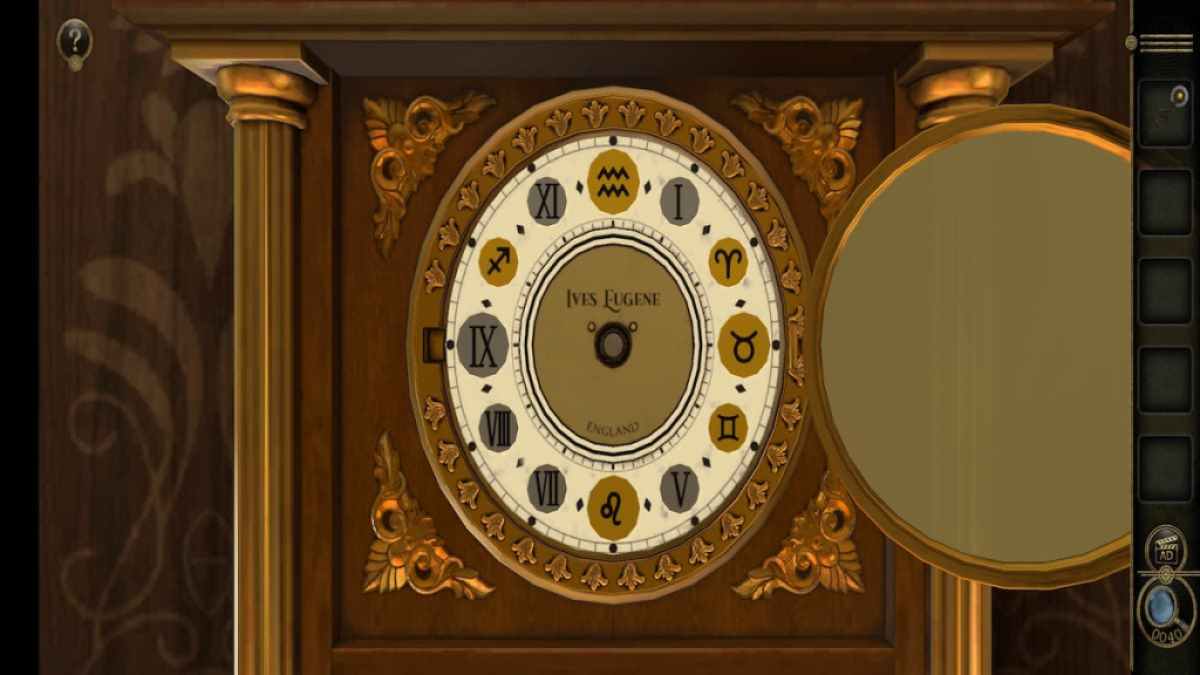
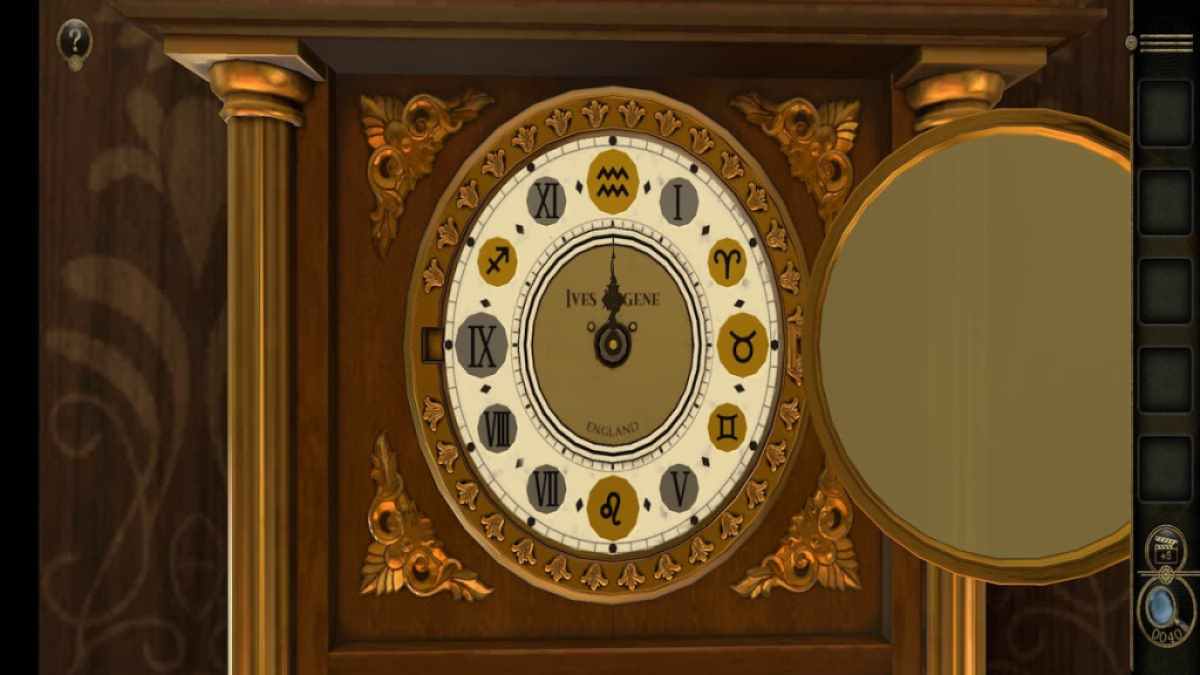
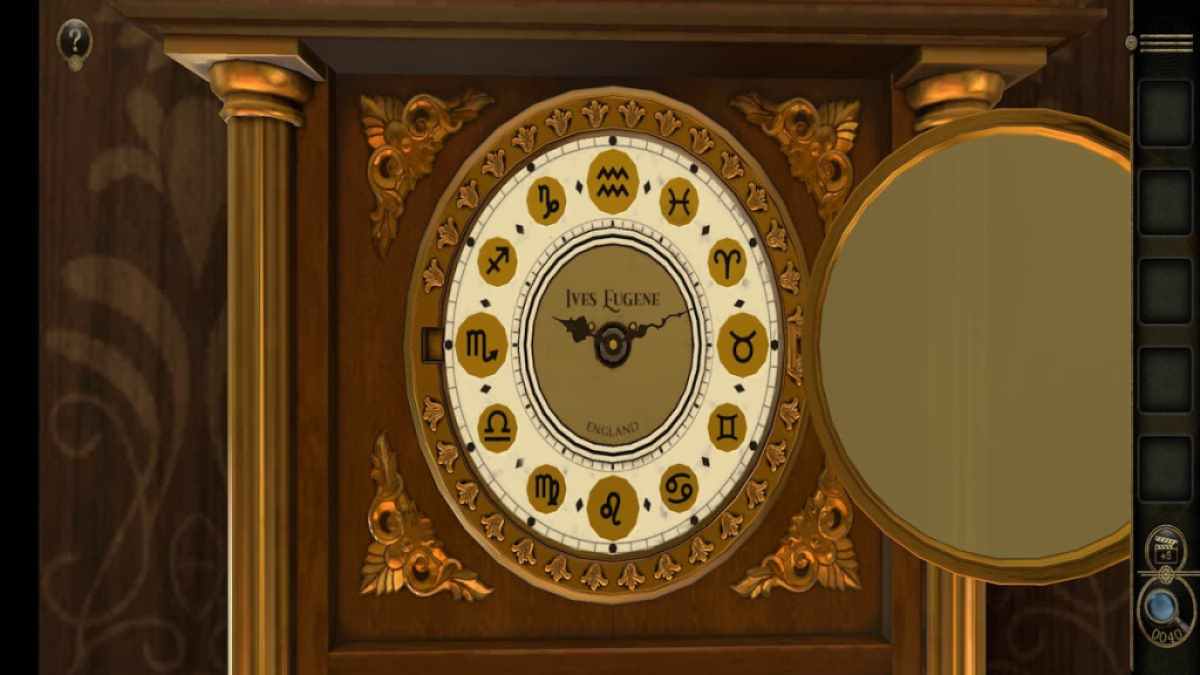
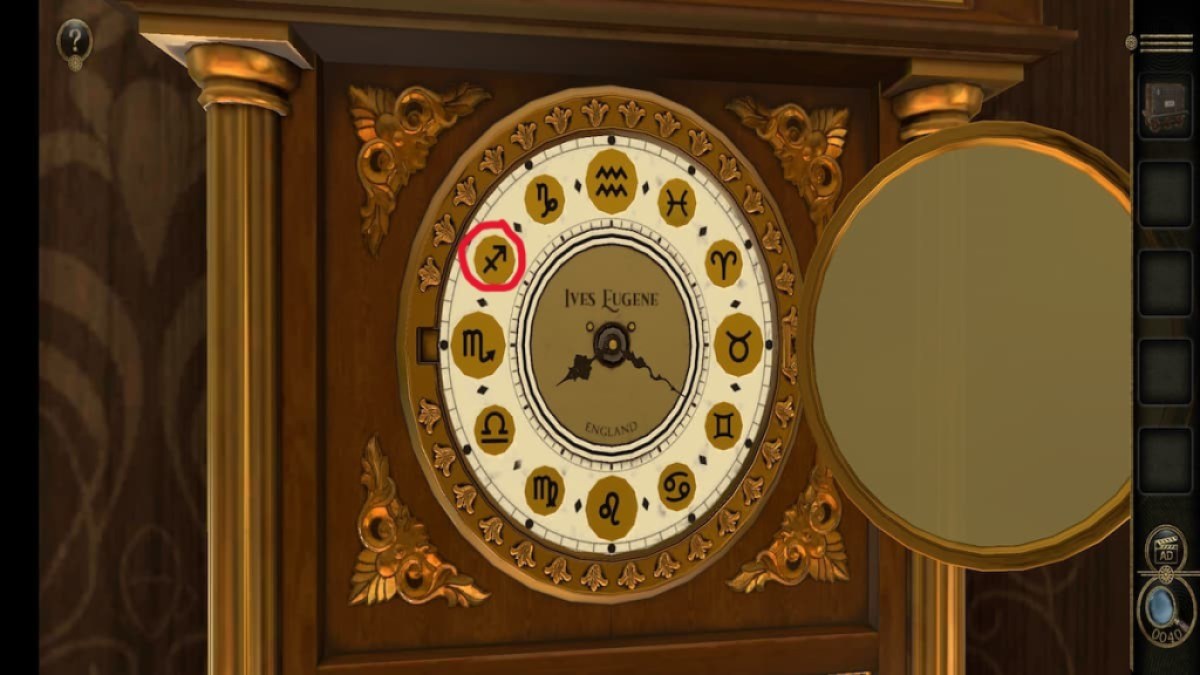
Add the Clock Pointers to the center of the clock .
circumvolve the hands around until all of the numerals are switch to be zodiac symbols . Keep in mind that once you cut through a zodiac star sign and change it to a numeral , you may immediately force the pointer back to it to make it a zodiac foretoken again and then continue forward .
To congeal the clock to the right time , curb the compartment on the veracious side of the clock again . The piece of paper within it will have the clock ’s clip compose on the top allow .
Screenshot by Pro Game Guides
This clue is written upside - down , meaning that the first symbolic representation corresponds to the longsighted hand while the 2nd symbolization depicts where the stenography should place .
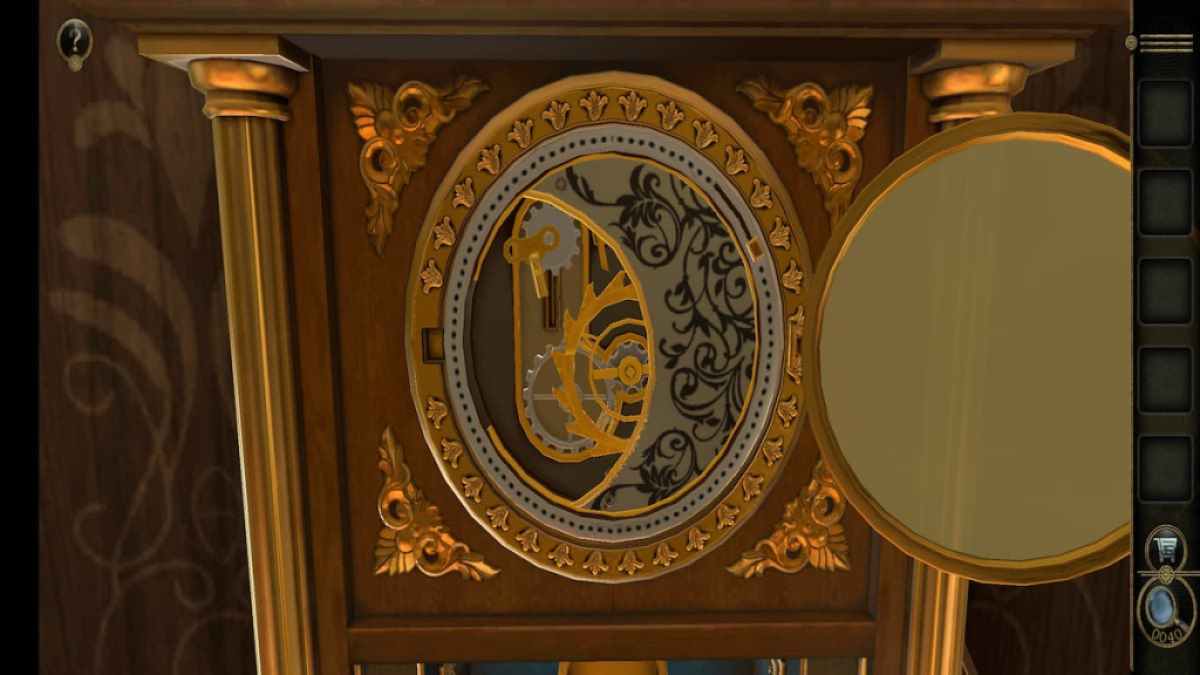
Positioning the hands properly will unlock the clock case , let on a band of gears .
Grab the Spring off of the power train and slither the top left one down .
Screenshot by Pro Game Guides
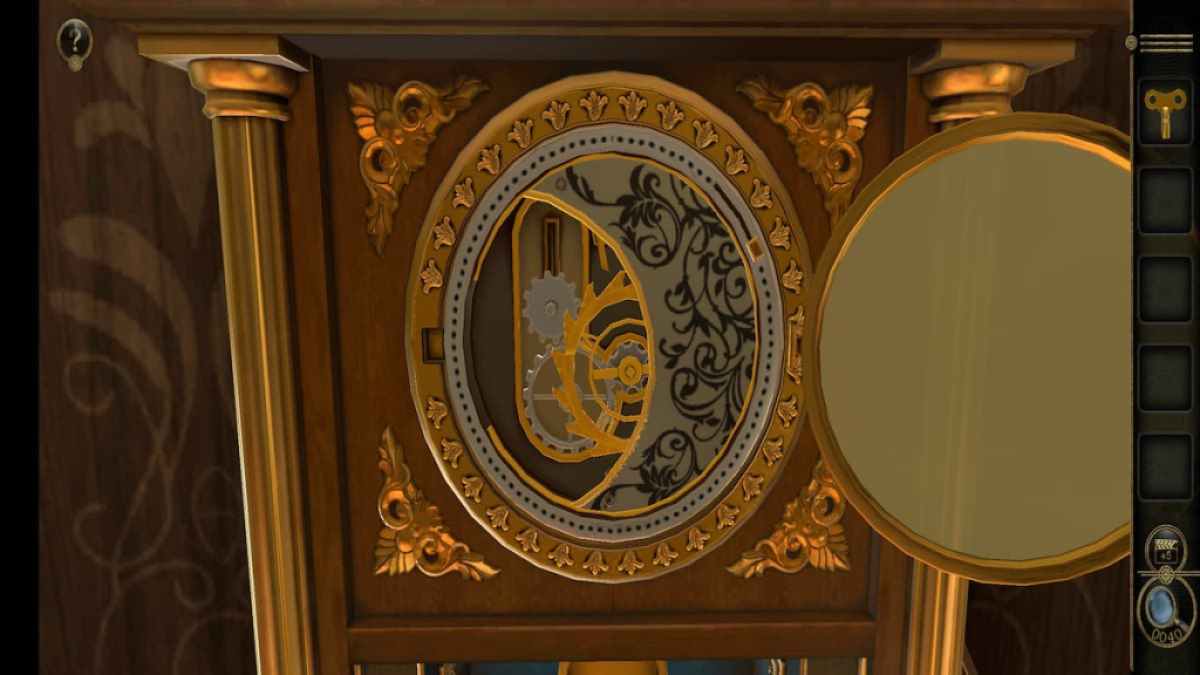
Move the pocket-sized slider on the correct side of the clock up .
This reveals a little nog where the Spring can be placed . Insert it and rotate it to unlock it to reveal a compartment containing a cutting on the top of the clock .
Painting puzzle
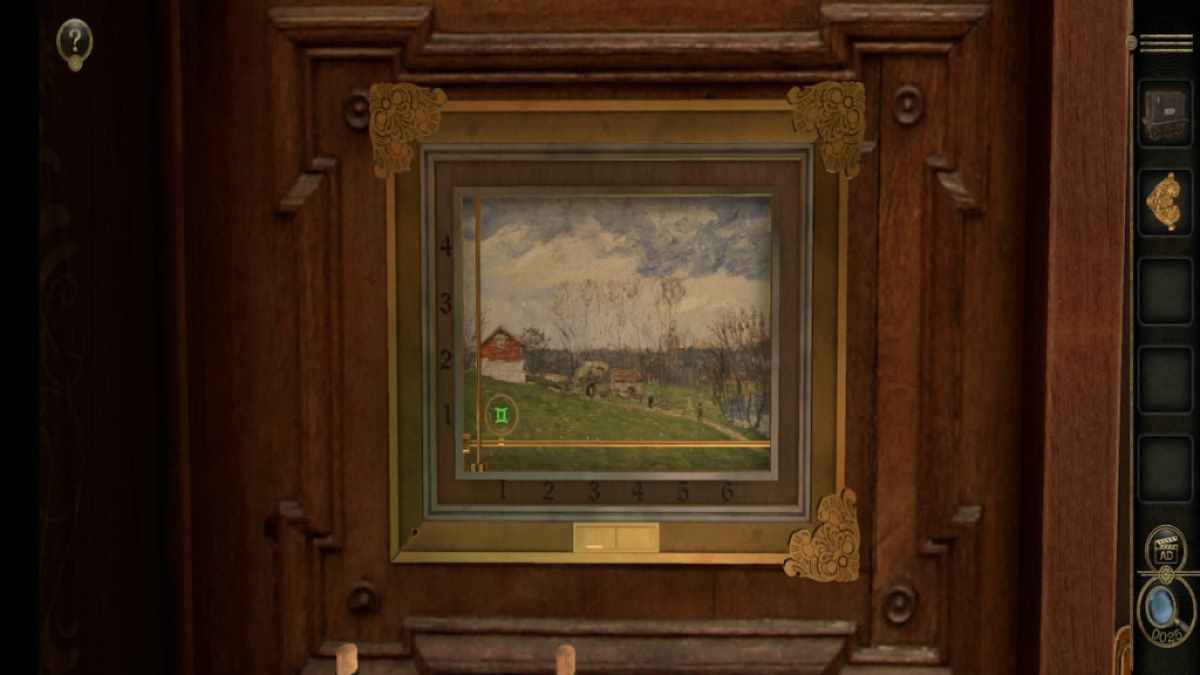
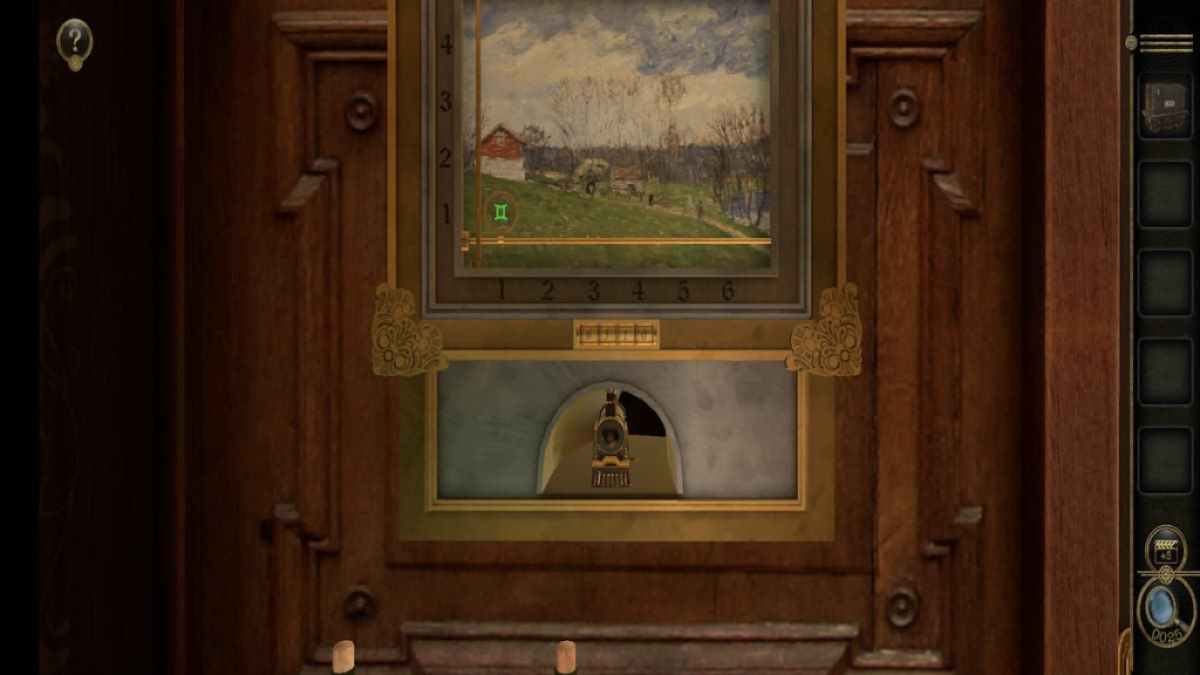
Look at the painting to the rightfulness of the clock .
add together the Carving from your inventory to the empty bottom will corner of the anatomy . This will unlock a four - dactyl turn whorl at the bottom of the frame .
relate : Echo Bay Murders – Chapter 2 Walkthrough
Screenshot by Pro Game Guides
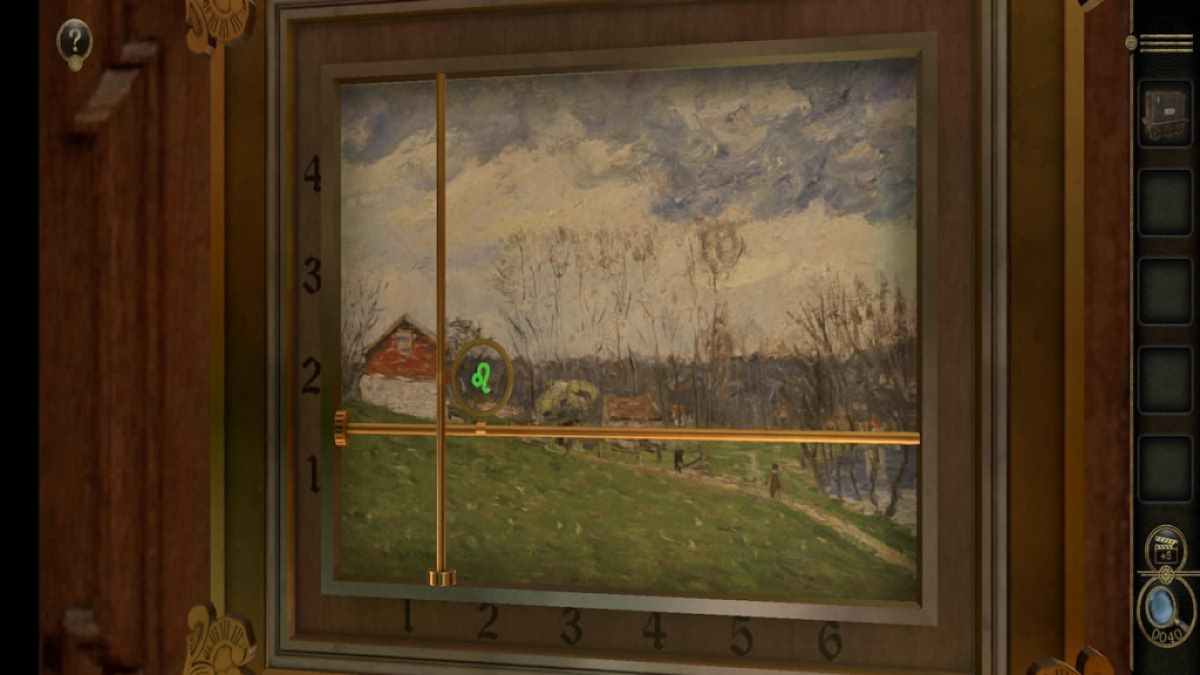
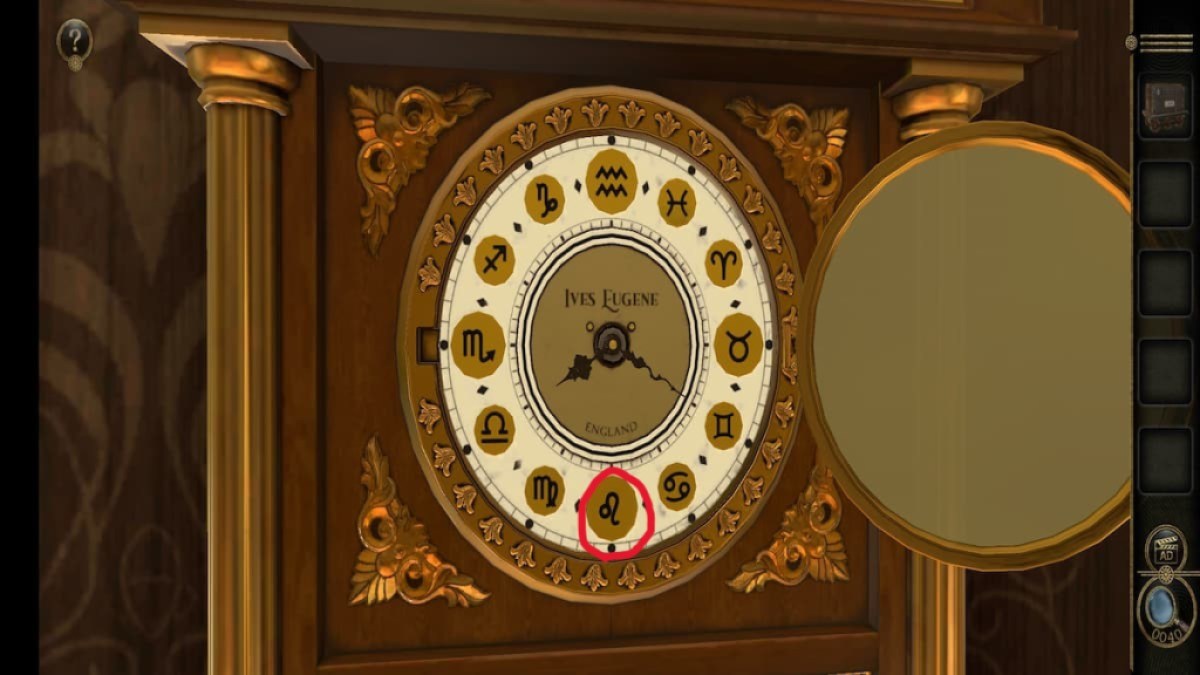
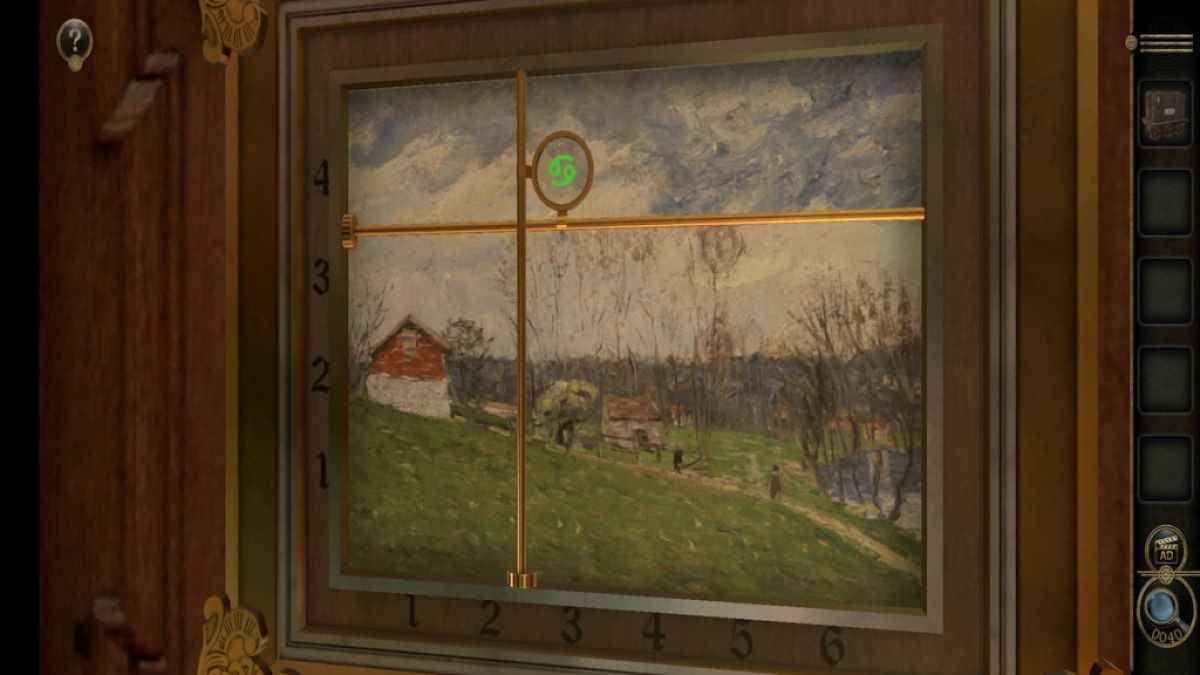
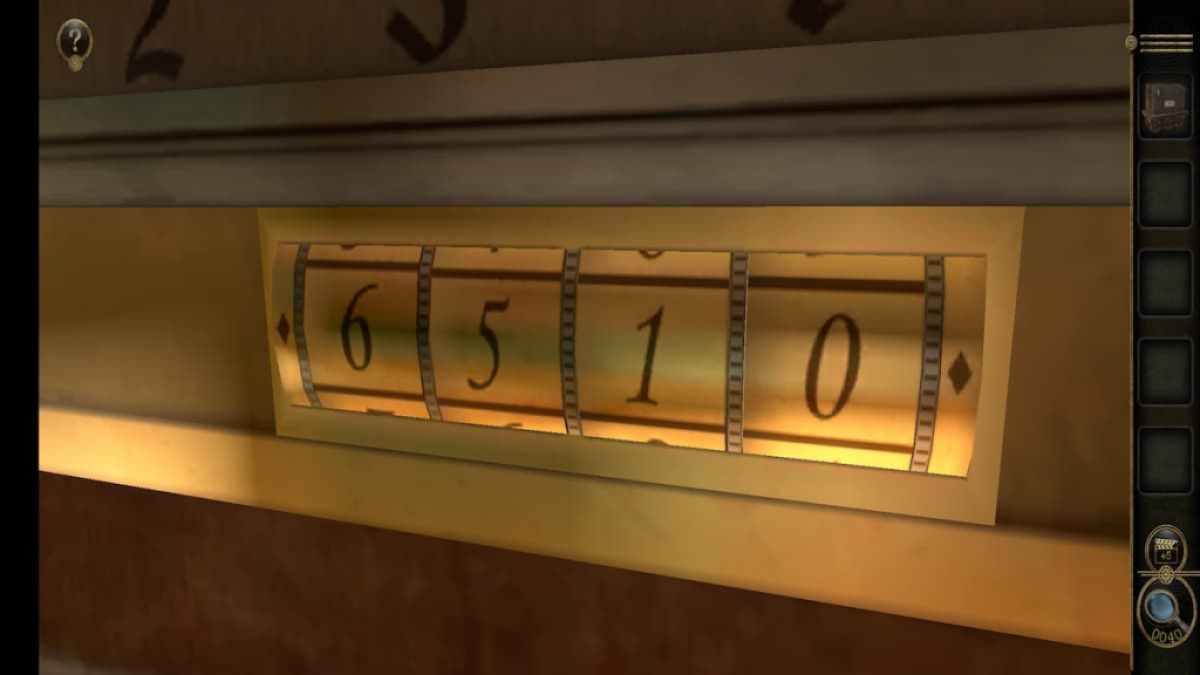
To solve this puzzle , you ’ll take to apply the three sets of dots and coordinate found throughout the train car . Using the first computer code , which was obtain from Train Part B , drag on the golden poles on the build around to bring out the symbolization for the Leo zodiac planetary house .
On the clock , this corresponds to the number 6 .
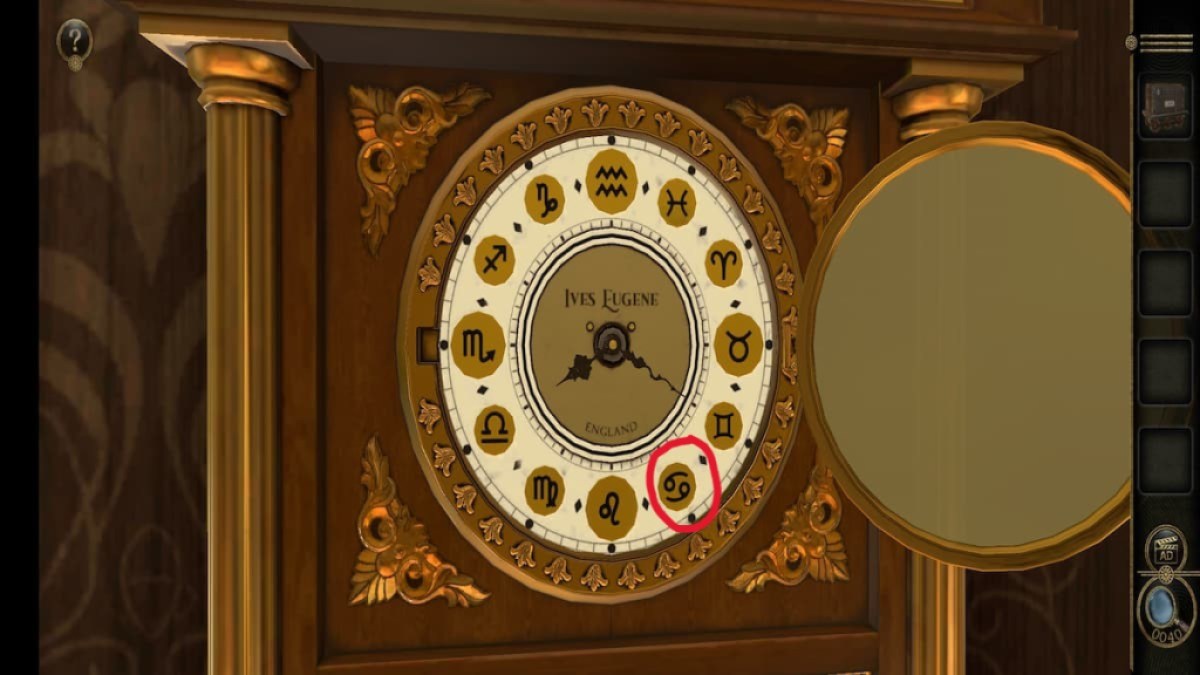
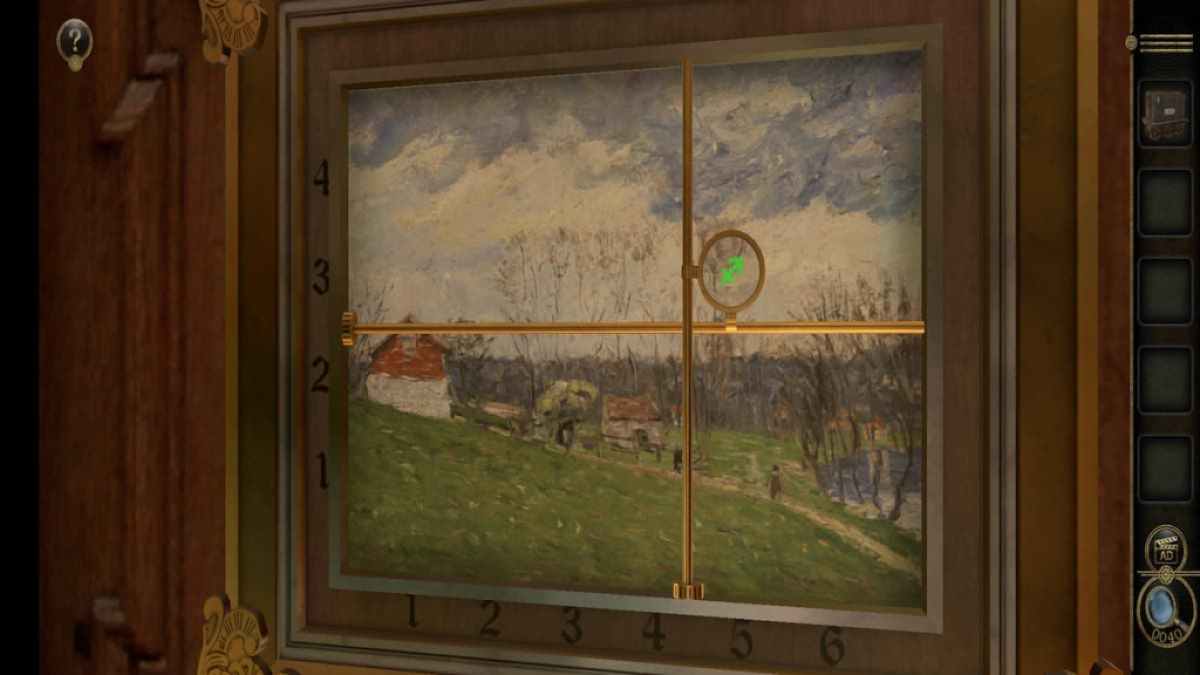
The 2nd set of coordinates , found on the side of the gray console , is connected to the zodiac sign Cancer .
Screenshot by Pro Game Guides
On the clock , this represents the number 5 .
The last co-ordinate came from the disc and leads us to the symbol for the Saggitarius mark .
On the clock , Saggitarius represent the number 10 .
Screenshot by Pro Game Guides
These three number create the code " 6510 " .
The painting opens , give away the final piece of the railroad train , string Car C.
Train puzzles
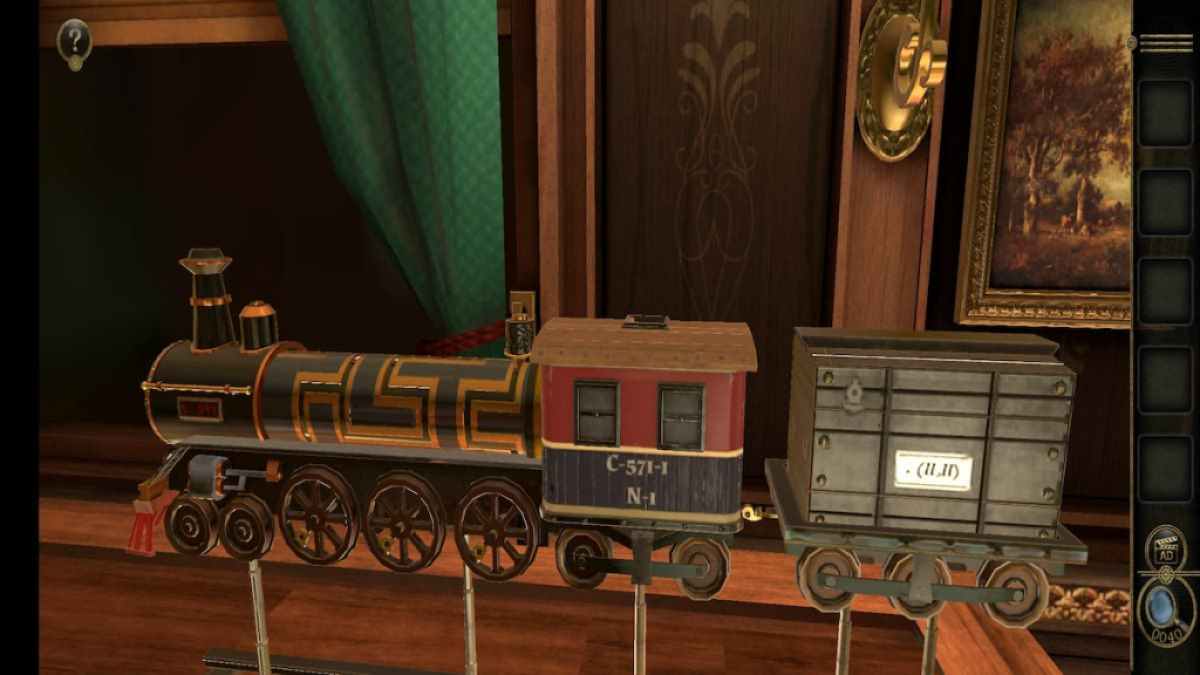
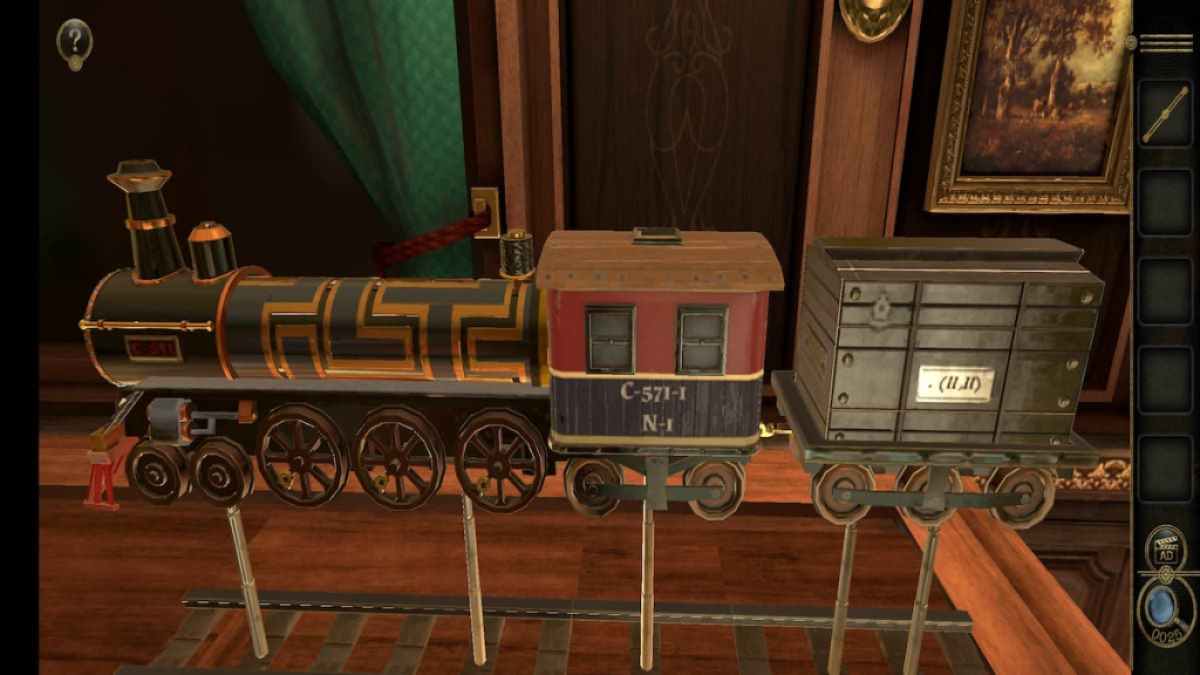
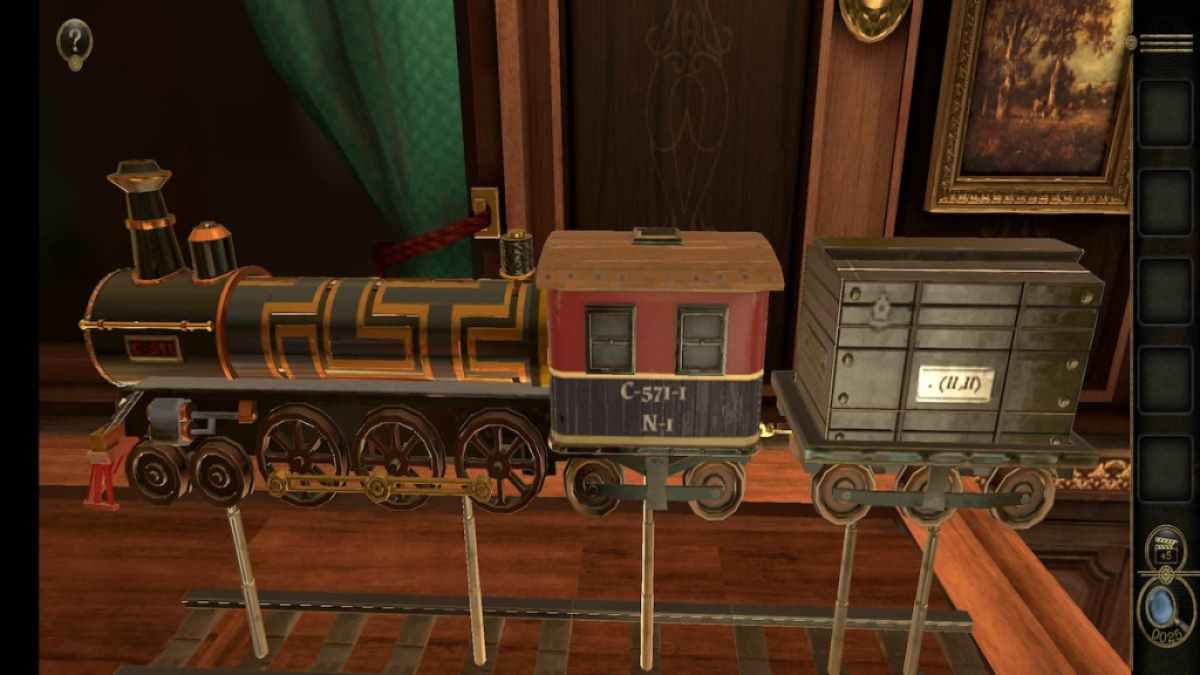
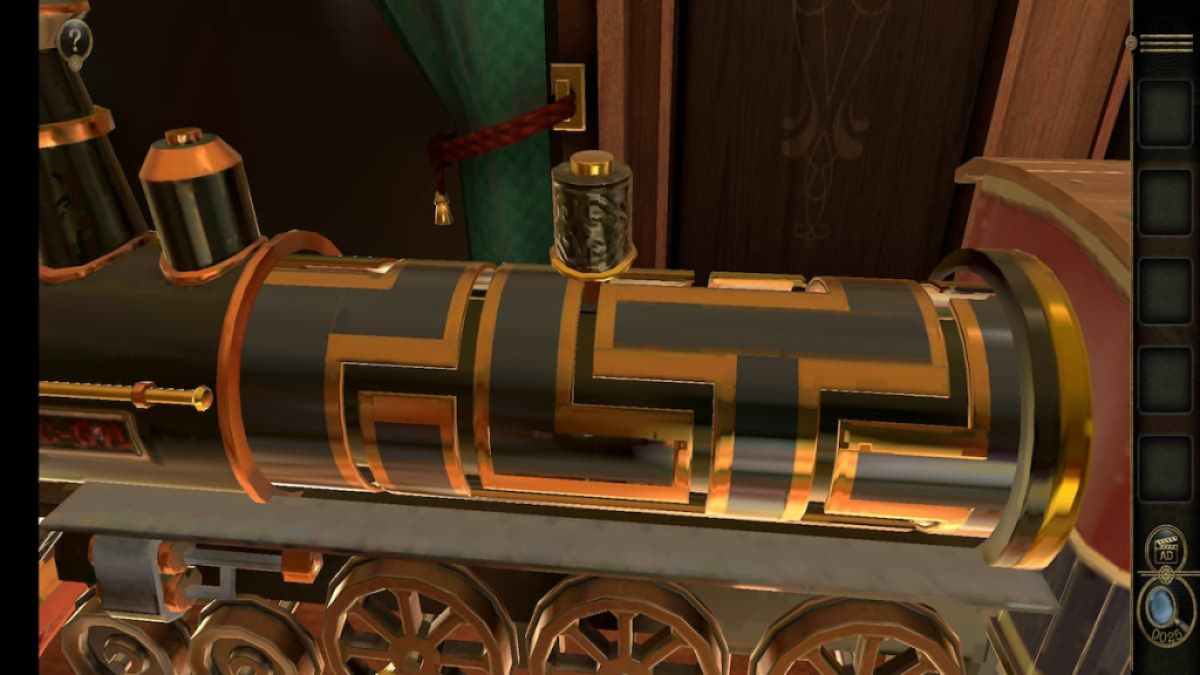
lead back to the tracks with the two persist train pieces . Add the black Train Car vitamin B complex to the two pedestals behind the red one .
Then tot up the railway locomotive , Train Car nose candy , in front of the crimson cart . This will open up up the top of the red cart , leading to the next elbow room .
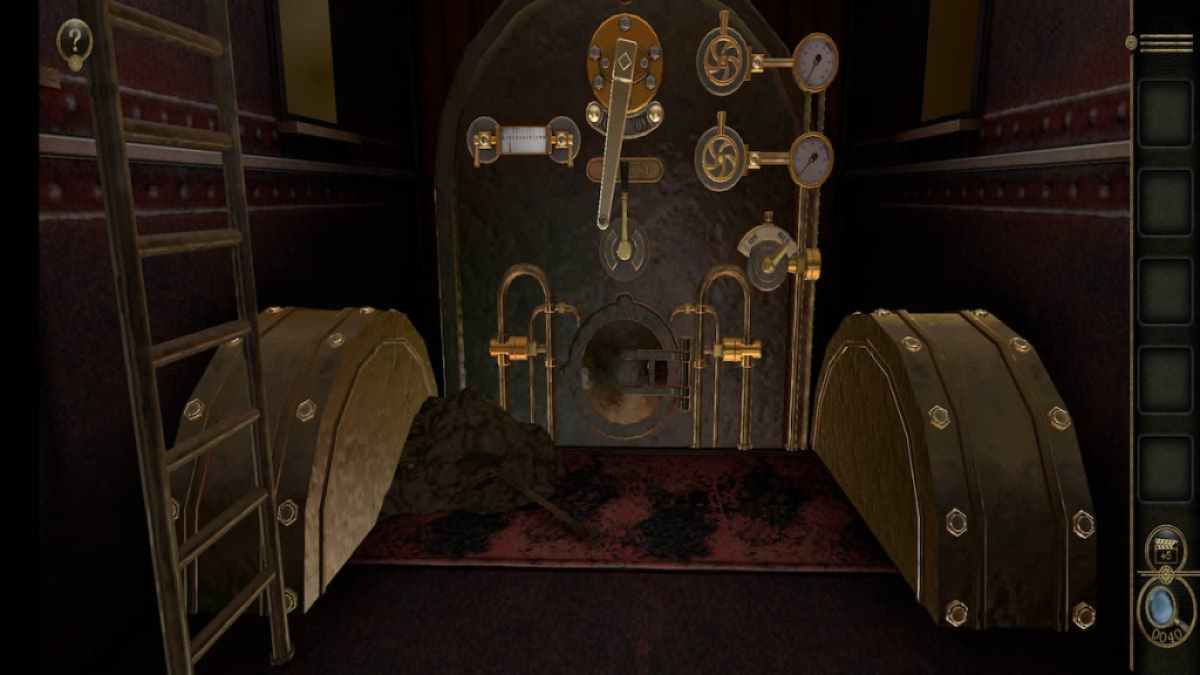
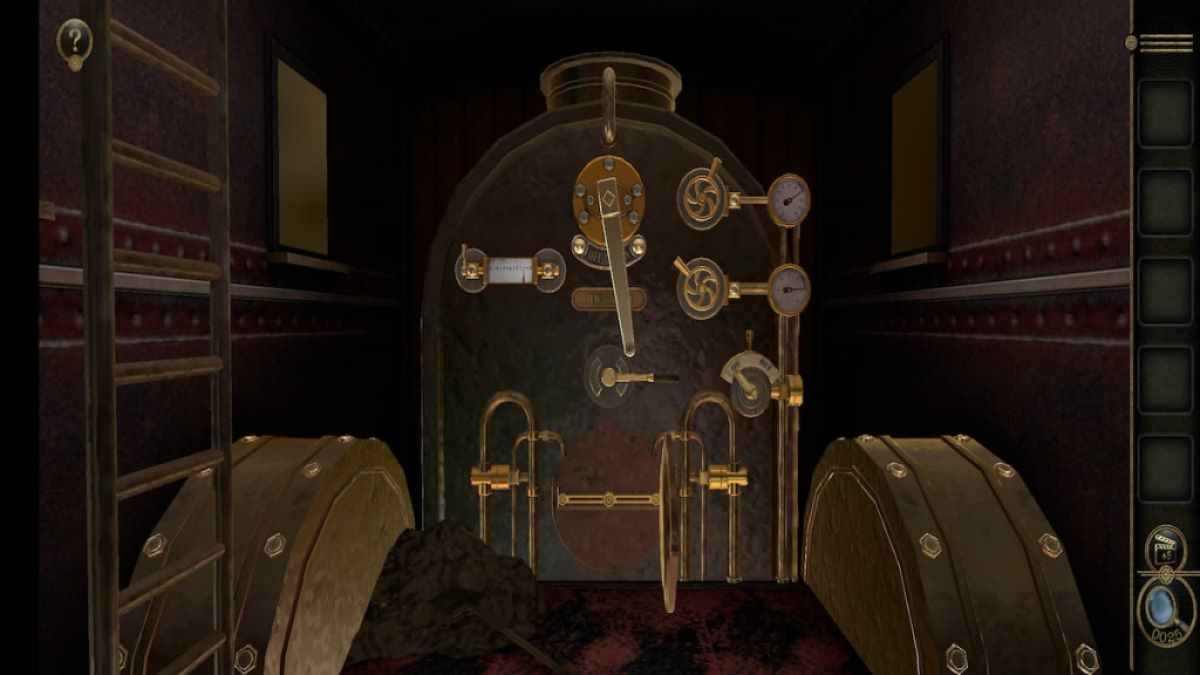
The elbow room within the string looks like an engine room and is make full with puzzles on one wall .
Screenshot by Pro Game Guides
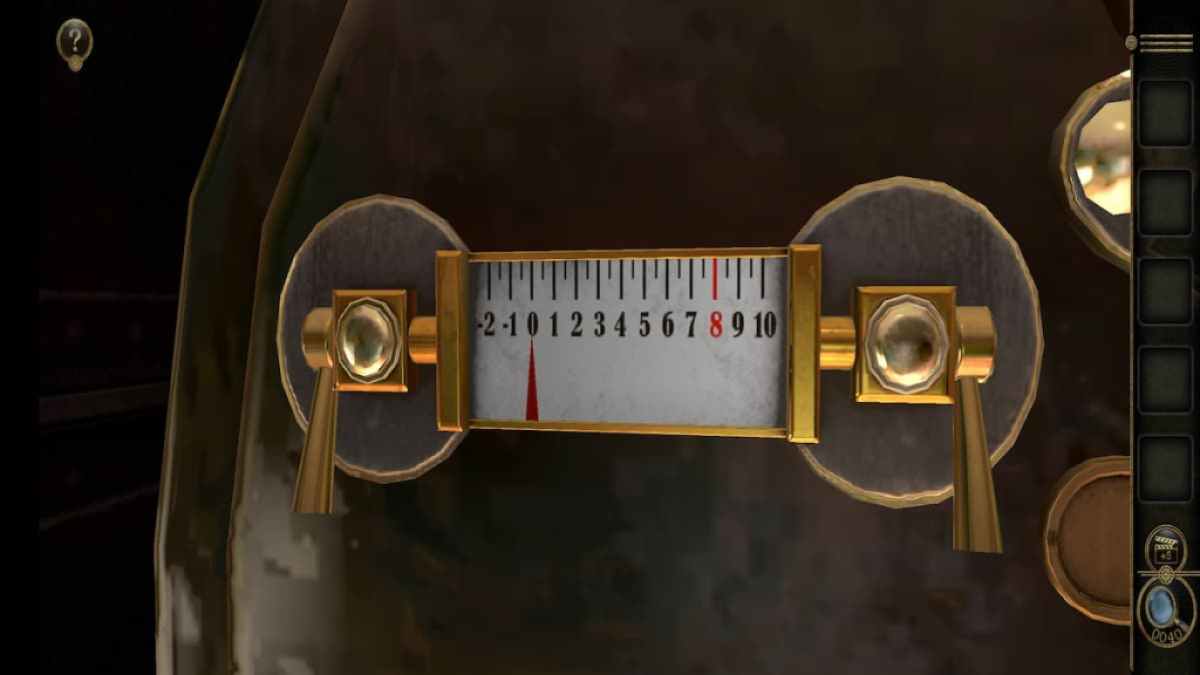
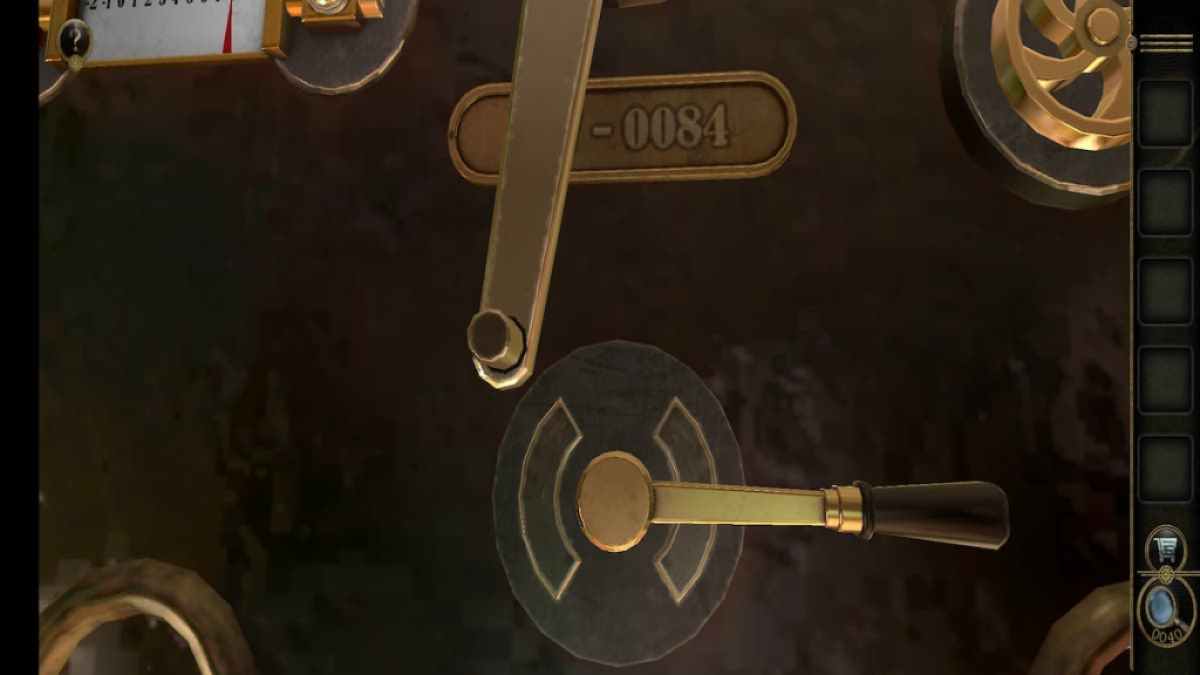
The first puzzle is on the left hand . It demand flipping the two switches on either side to get the pointer to match up with the red eight .
locomote the remaining shift to face upwards and the right switch to face the front will complete this mystifier .
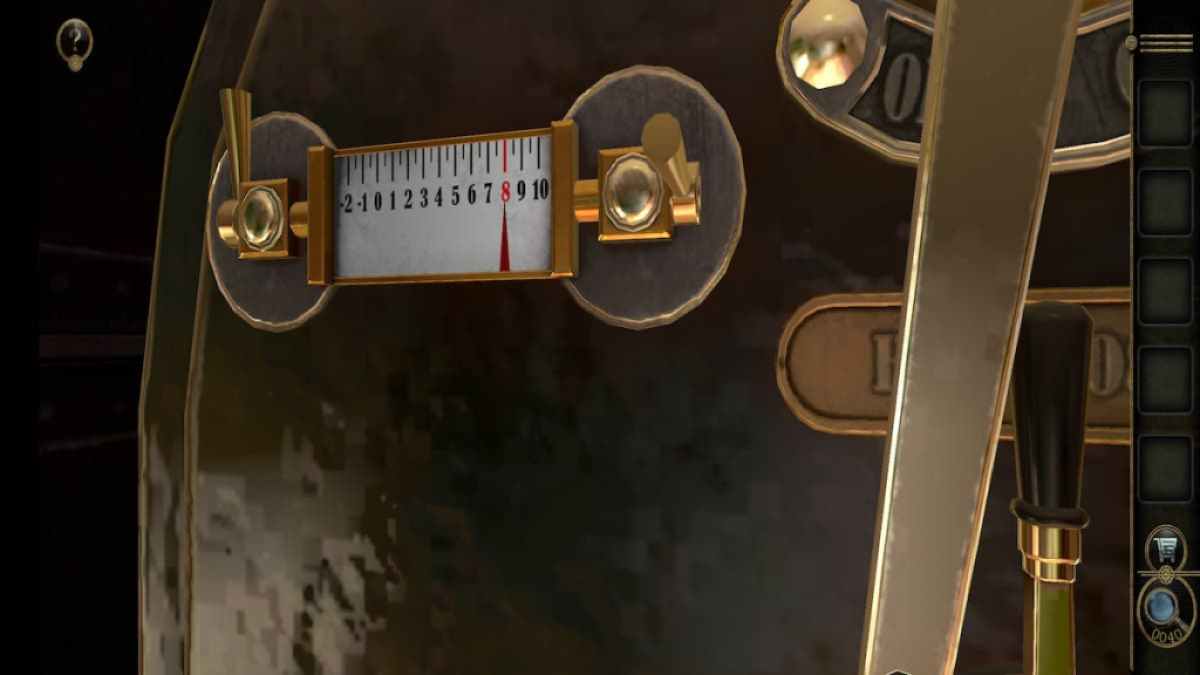
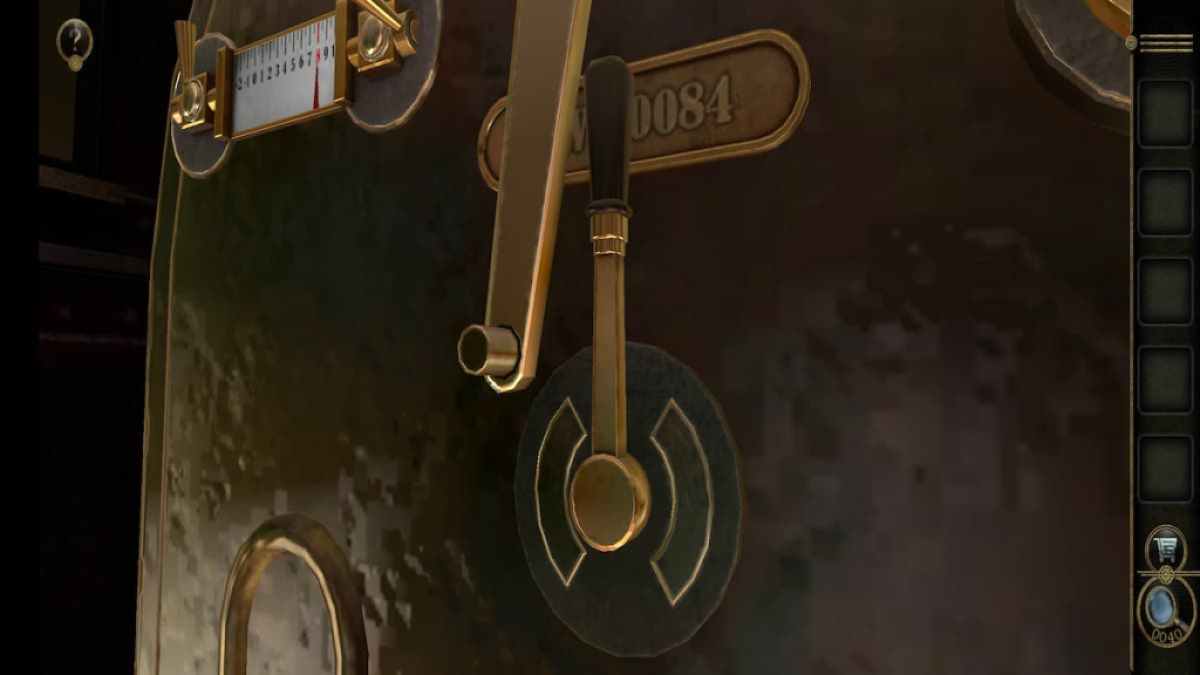
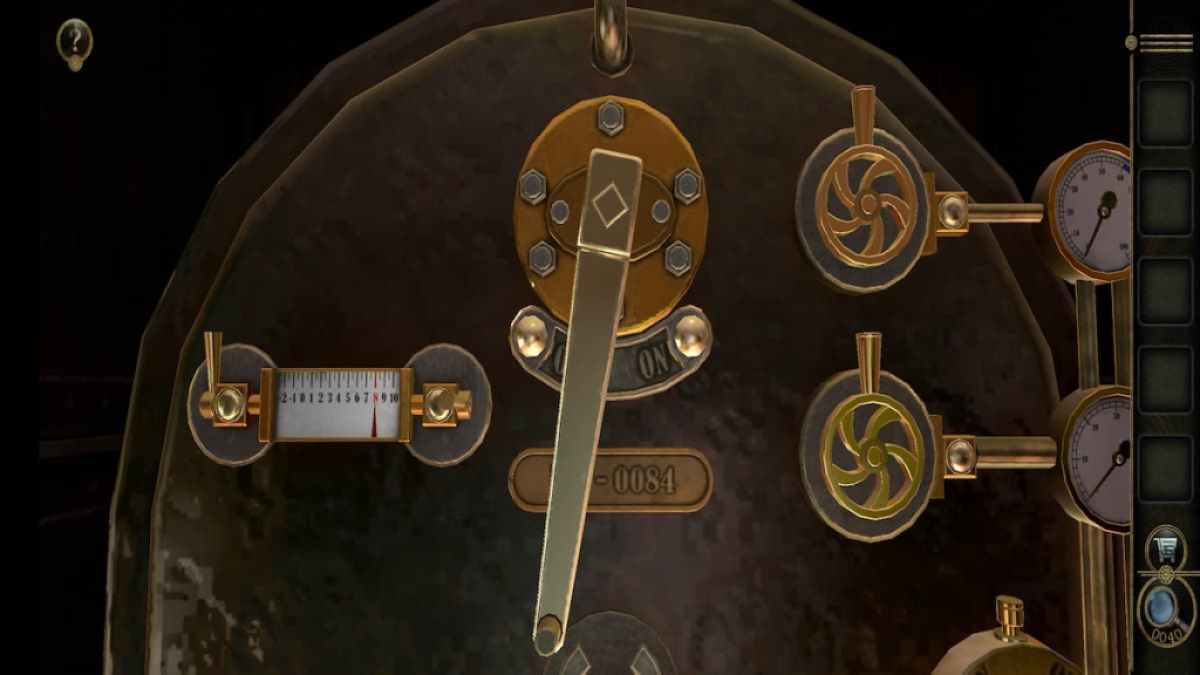
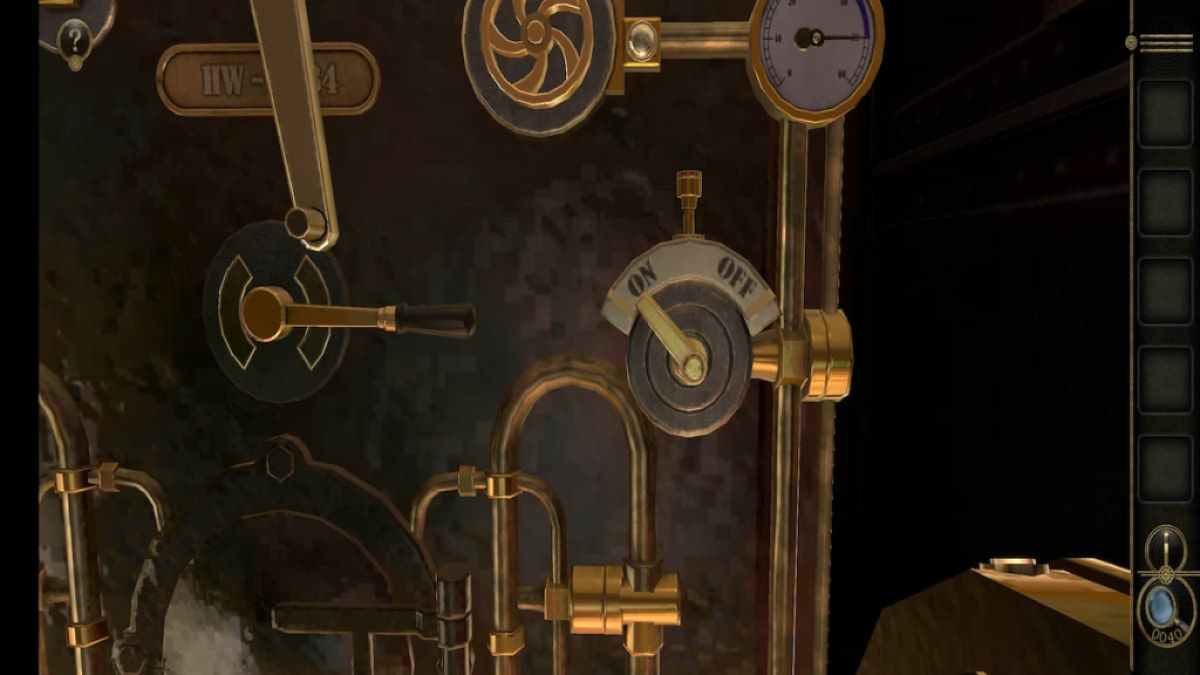
The 2d mystifier regard the lever tumbler with the bootleg bakshish .
Screenshot by Pro Game Guides
splay it to confront the right side .
Then lead upwards to the atomic number 79 off and on electrical switch .
Rotate the lever into the " on " situation .
Screenshot by Pro Game Guides
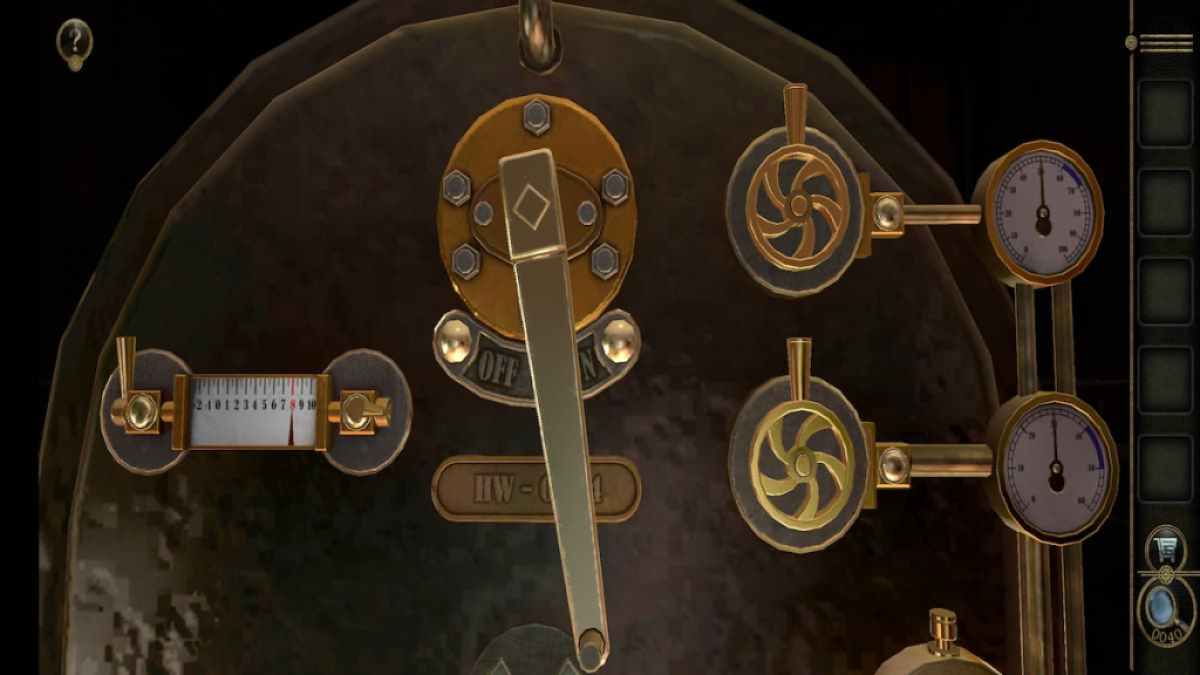
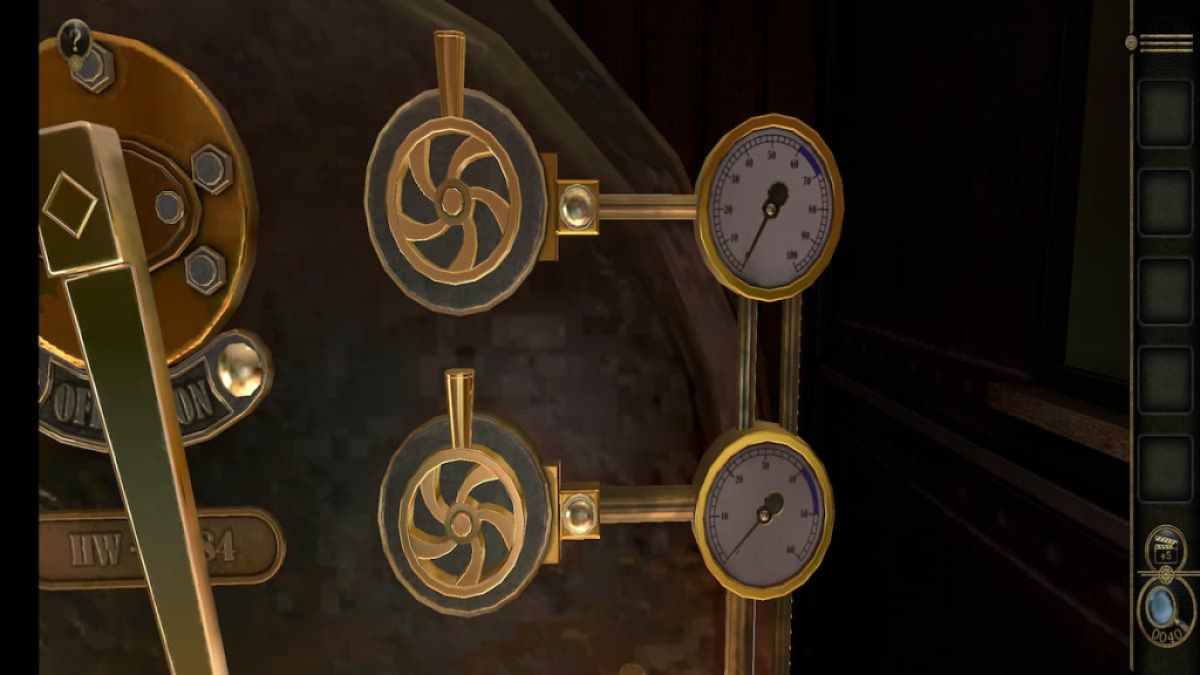
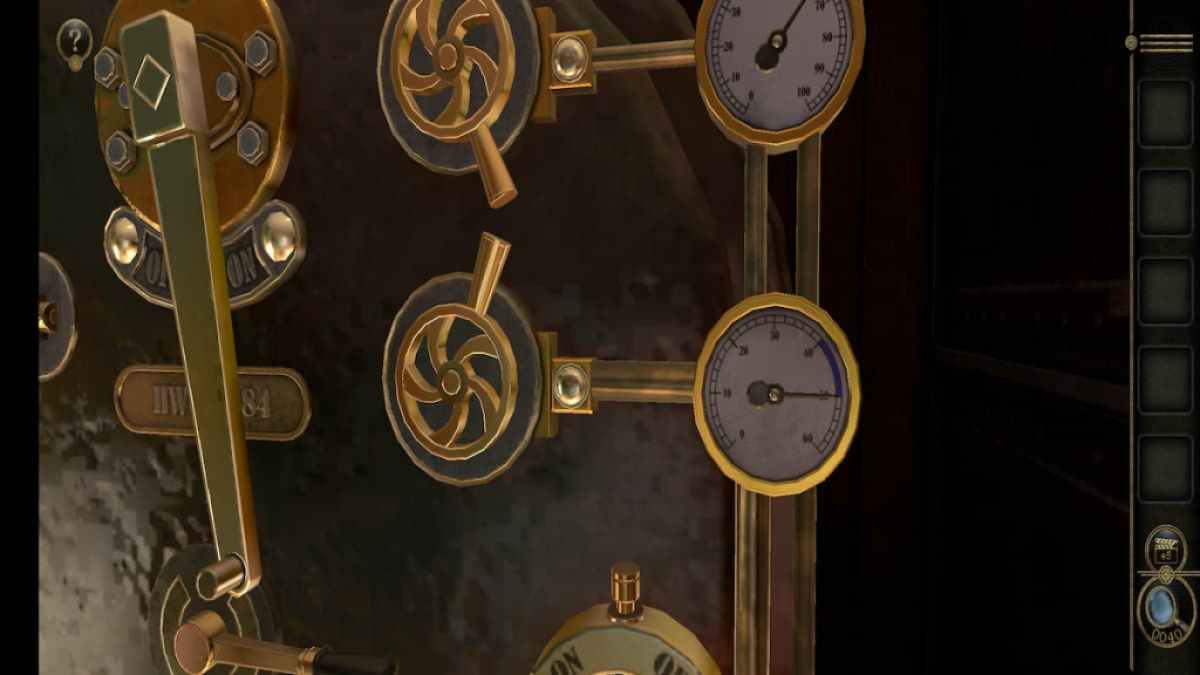
The next puzzle have two dial , each connected to the meter . The end is to spin the dials so that the meters are point towards the blue sections . However , when the dials kibosh spinning the number in the meters decrease .
Start by spin the top telephone dial all the direction , then spin the bottom telephone dial all the way .
While the bottom value decline , reel the top telephone dial to keep it in the down in the mouth while the bottom telephone dial ’s meter decrease . The bottom meter will quickly make aristocratic , reset the mystifier and lead you to the final off - and - on electric switch .

Screenshot by Pro Game Guides
Turn the telephone dial to " on " to complete the room .
This will open a circular compartment on the bottom take a Linkage Shaft .
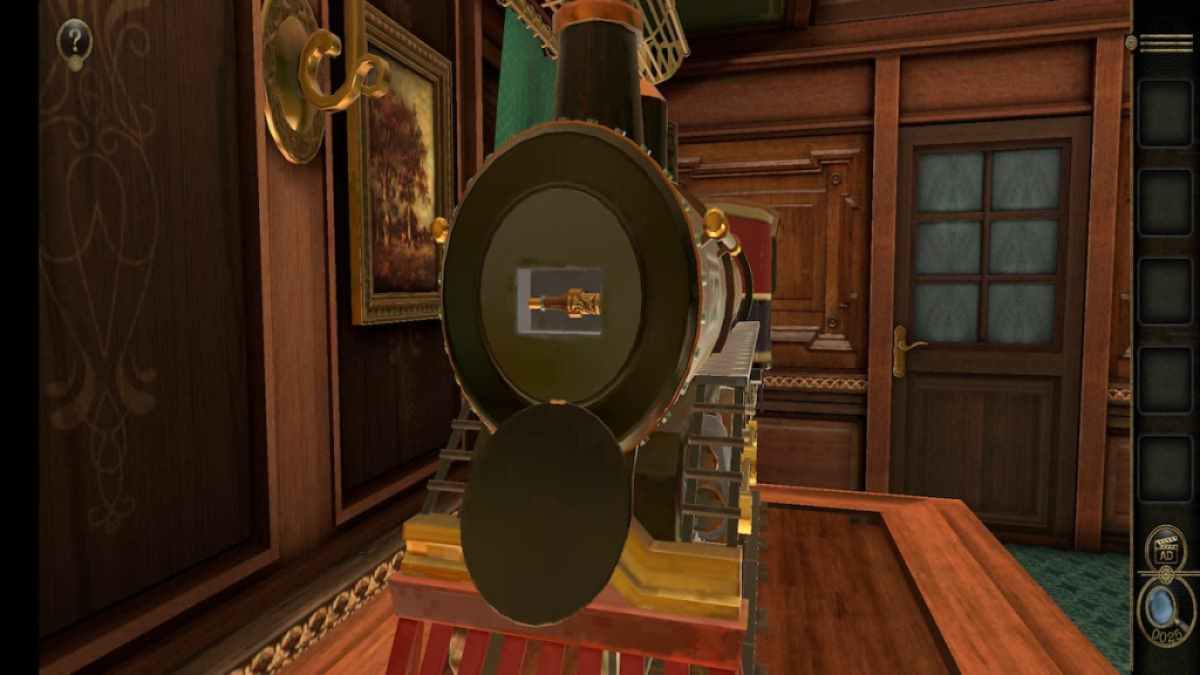
Grabbing the Linkage Shaft from the gear ’s room take back you to the front of the train .

Screenshot by Pro Game Guides
Place the Linkage Shaft on the wheels of the engine .
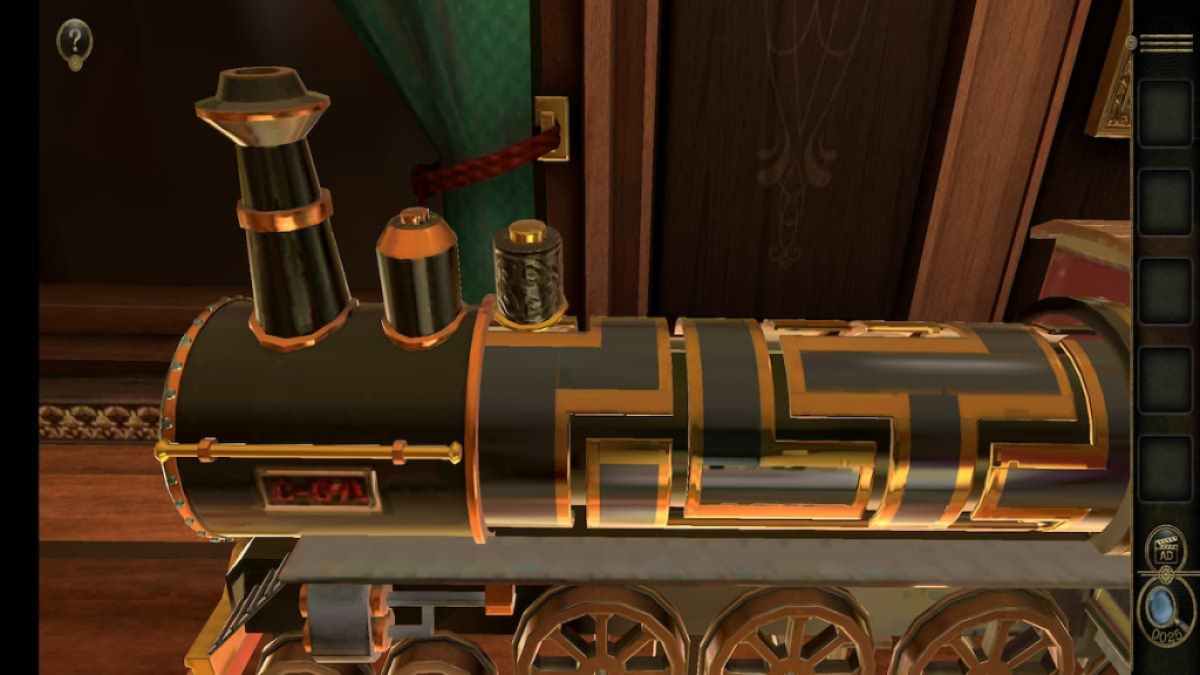
head up to the top of the engine to work the teaser .
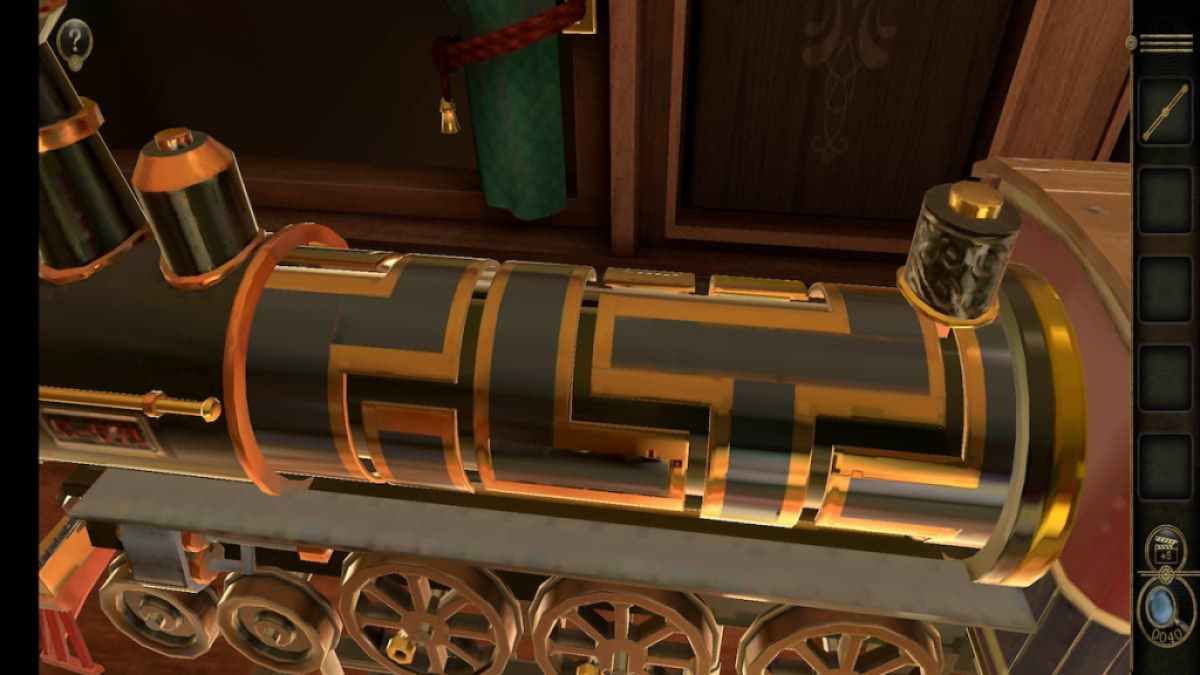
First , rotate the railway locomotive to move the slider up .
Screenshot by Pro Game Guides
Then move the slider to the left wing .
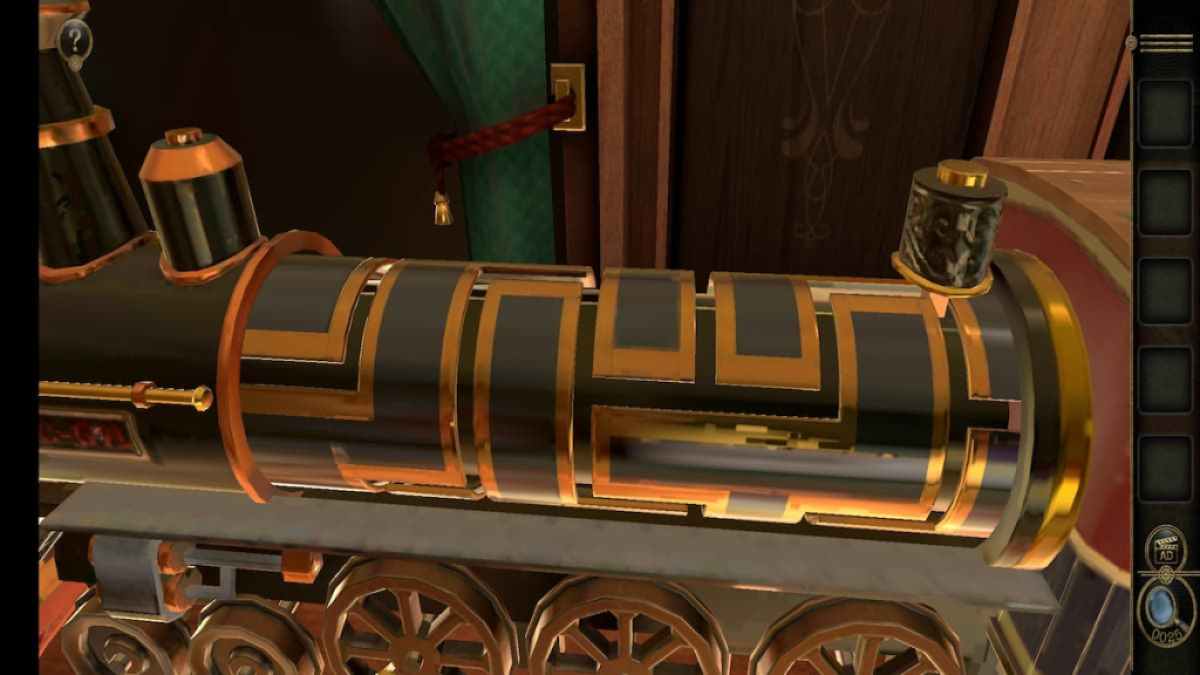
Rotate the engine to move the slider down .
Move the slider to the left twice .
Screenshot by Pro Game Guides
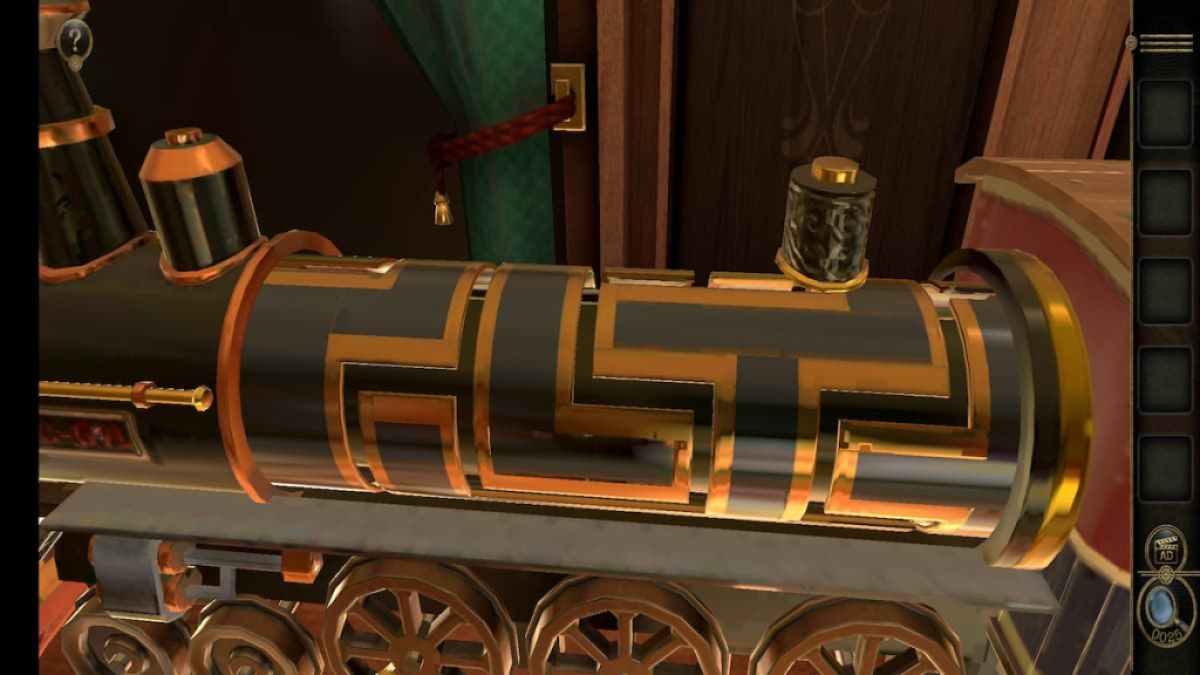
Rotate the engine to move the slipper up twice . Then move it provide twice and rotate the engine down to complete the puzzler .
This will reveal a Handle particular at the front of the locomotive .
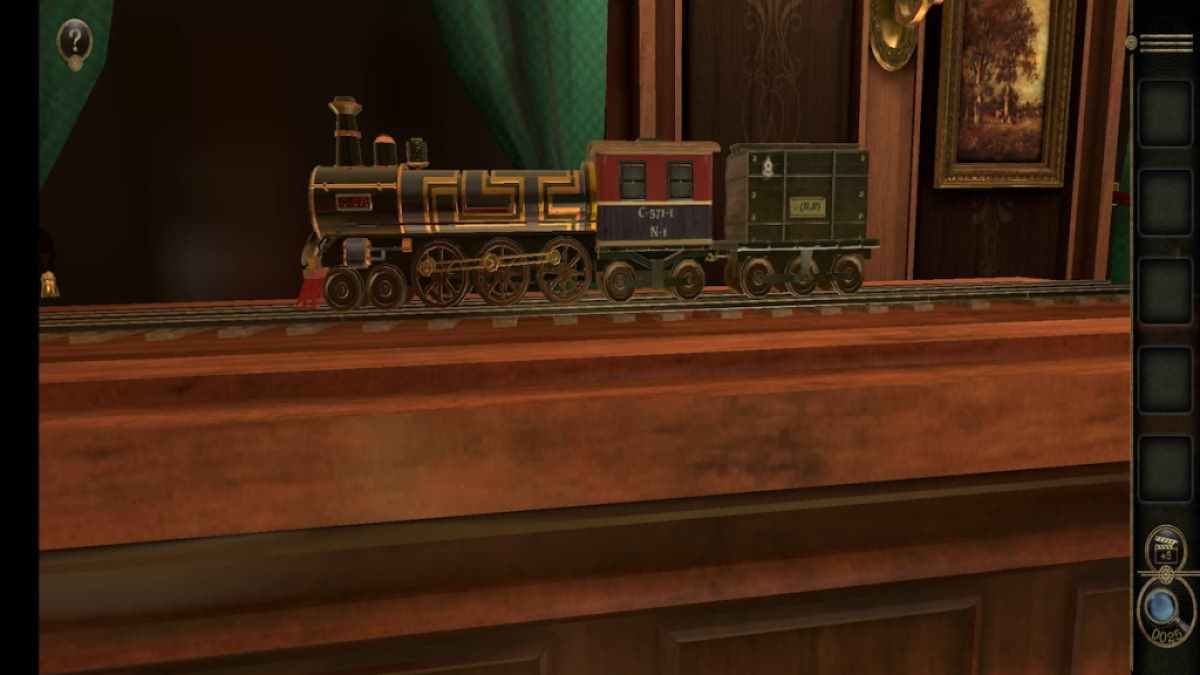
add up the Handle on top of the Linkage Shaft to lower the train and lay out it in motion .

Screenshot by Pro Game Guides
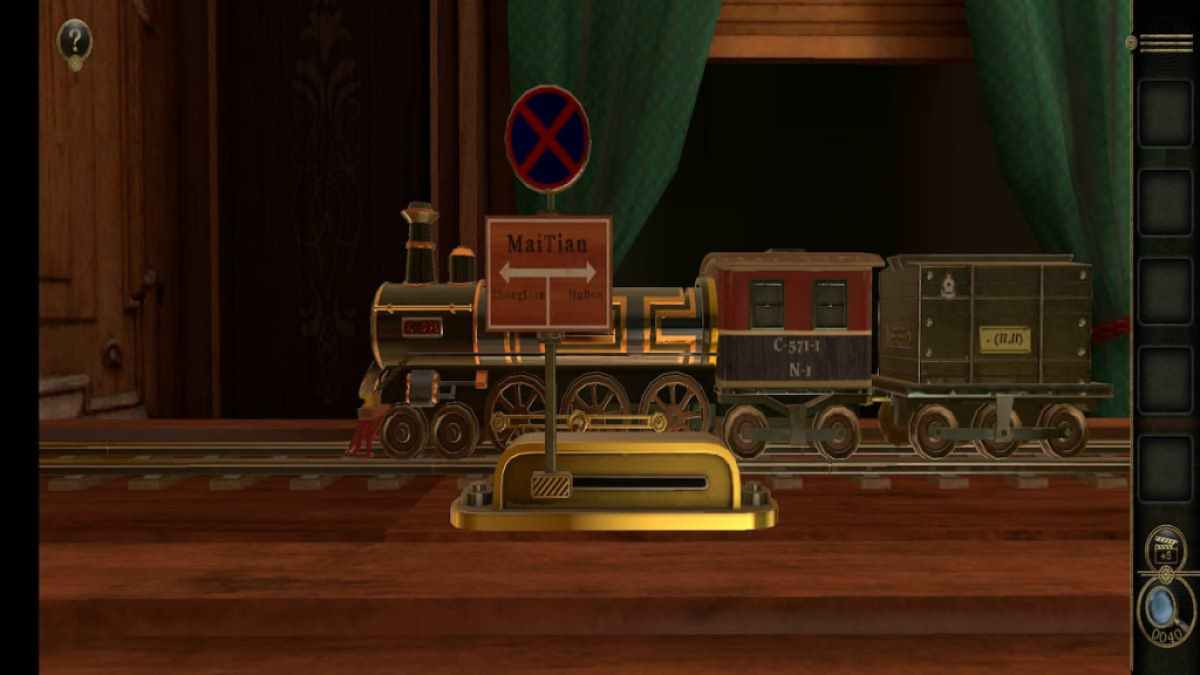
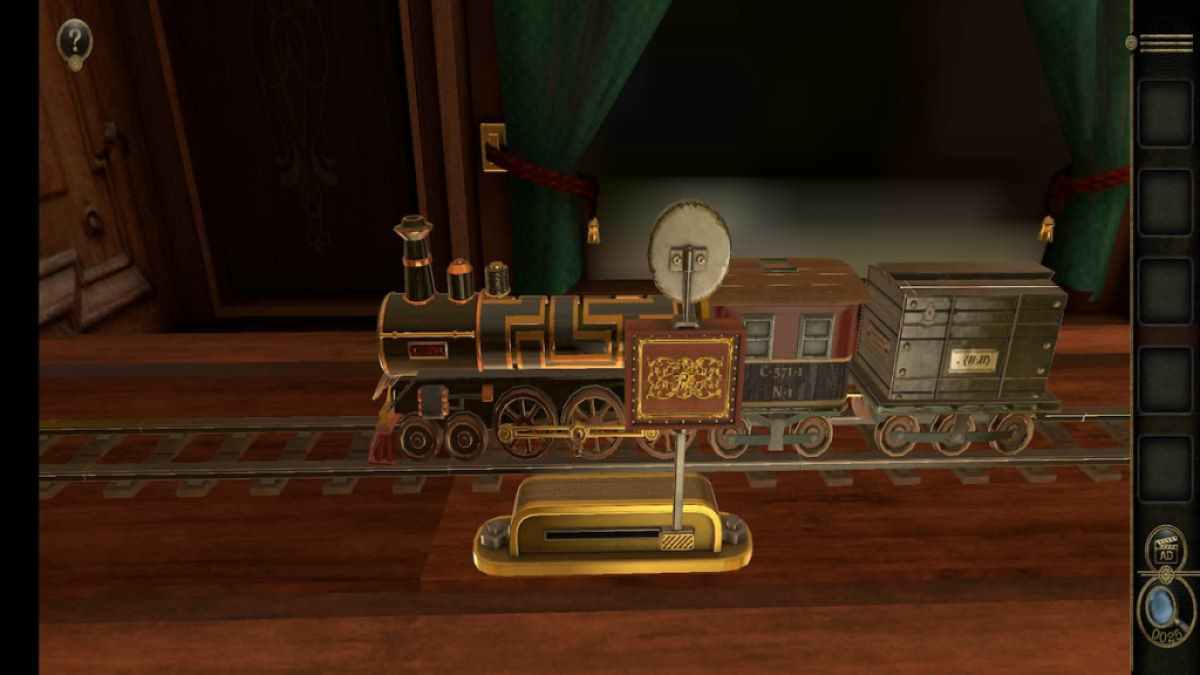
The moving geartrain will come to a stay at a small place on the edge of the counter .
slew the preindication to the right to get the note for this level .
The note reads " Do you know the other side of Claude ? "
Screenshot by Pro Game Guides
If you need to check out the ever - democratic Adventure Escape Mysteries serial , await no further than ourVanishing Act walkthroughhere on Pro Game Guides .

Screenshot by Pro Game Guides
Screenshot by Pro Game Guides

Screenshot by Pro Game Guides
![]()
Screenshot by Pro Game Guides
Screenshot by Pro Game Guides
Screenshot by Pro Game Guides
Screenshot by Pro Game Guides
Screenshot by Pro Game Guides

Screenshot by Pro Game Guides
Screenshot by Pro Game Guides

Screenshot by Pro Game Guides
Screenshot by Pro Game Guides
Screenshot by Pro Game Guides

Screenshot by Pro Game Guides
Screenshot by Pro Game Guides

Screenshot by Pro Game Guides
Screenshot by Pro Game Guides
Screenshot by Pro Game Guides
Screenshot by Pro Game Guides
Screenshot by Pro Game Guides
Screenshot by Pro Game Guides
Screenshot by Pro Game Guides

Screenshot by Pro Game Guides
Screenshot by Pro Game Guides
Screenshot by Pro Game Guides
Screenshot by Pro Game Guides

Screenshot by Pro Game Guides
Screenshot by Pro Game Guides
Screenshot by Pro Game Guides
Screenshot by Pro Game Guides

Screenshot by Pro Game Guides
Screenshot by Pro Game Guides
Screenshot by Pro Game Guides

Screenshot by Pro Game Guides

Screenshot by Pro Game Guides

Screenshot by Pro Game Guides
Screenshot by Pro Game Guides

Screenshot by Pro Game Guides
Screenshot by Pro Game Guides

Screenshot by Pro Game Guides
Screenshot by Pro Game Guides
Screenshot by Pro Game Guides
Screenshot by Pro Game Guides
Screenshot by Pro Game Guides
Screenshot by Pro Game Guides
Screenshot by Pro Game Guides
Screenshot by Pro Game Guides
Screenshot by Pro Game Guides
Screenshot by Pro Game Guides
Screenshot by Pro Game Guides
Screenshot by Pro Game Guides
Screenshot by Pro Game Guides
Screenshot by Pro Game Guides
Screenshot by Pro Game Guides
Screenshot by Pro Game Guides

Screenshot by Pro Game Guides

Screenshot by Pro Game Guides

Screenshot by Pro Game Guides

Screenshot by Pro Game Guides
Screenshot by Pro Game Guides
Screenshot by Pro Game Guides
Screenshot by Pro Game Guides
Screenshot by Pro Game Guides
Screenshot by Pro Game Guides

Screenshot by Pro Game Guides

Screenshot by Pro Game Guides
Screenshot by Pro Game Guides
Screenshot by Pro Game Guides
Screenshot by Pro Game Guides
Screenshot by Pro Game Guides
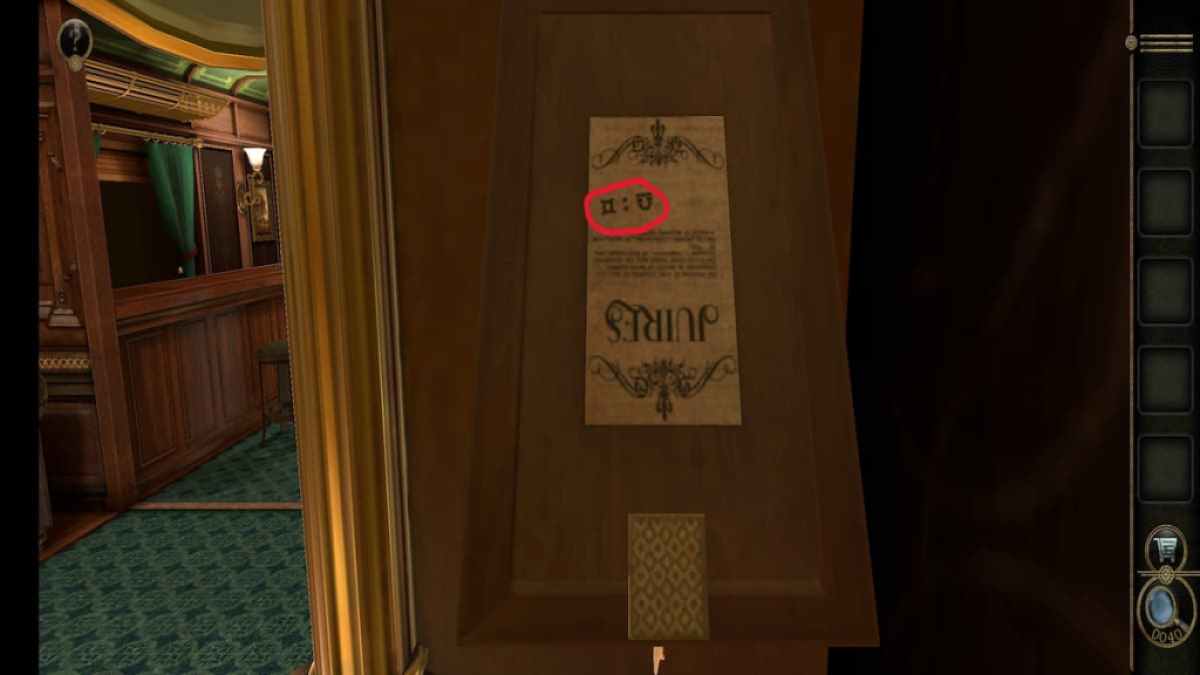
Image by Pro Game Guides

Screenshot by Pro Game Guides
Screenshot by Pro Game Guides
Screenshot by Pro Game Guides
Screenshot by Pro Game Guides
Screenshot by Pro Game Guides
Screenshot by Pro Game Guides

Screenshot by Pro Game Guides
Screenshot by Pro Game Guides
Screenshot by Pro Game Guides
Screenshot by Pro Game Guides
Screenshot by Pro Game Guides
Screenshot by Pro Game Guides
Screenshot by Pro Game Guides
Screenshot by Pro Game Guides
Screenshot by Pro Game Guides

Screenshot by Pro Game Guides
Screenshot by Pro Game Guides
Screenshot by Pro Game Guides
Screenshot by Pro Game Guides
Screenshot by Pro Game Guides
Screenshot by Pro Game Guides
Screenshot by Pro Game Guides
Screenshot by Pro Game Guides
Screenshot by Pro Game Guides
Screenshot by Pro Game Guides
Screenshot by Pro Game Guides

Screenshot by Pro Game Guides
Screenshot by Pro Game Guides
Screenshot by Pro Game Guides
Screenshot by Pro Game Guides
Screenshot by Pro Game Guides
Screenshot by Pro Game Guides
Screenshot by Pro Game Guides

Screenshot by Pro Game Guides
Screenshot by Pro Game Guides
Screenshot by Pro Game Guides
Screenshot by Pro Game Guides
Screenshot by Pro Game Guides
Screenshot by Pro Game Guides
Screenshot by Pro Game Guides
Screenshot by Pro Game Guides

Screenshot by Pro Game Guides
